
Relevant scenarios and APIs
To test the following APIs, you need to set up your development environment as described in this article:Context
In retail scenarios, a game must have a license to be played. A license request checks for an installed disc or sends a request to Microsoft services. A license is granted if the account is entitled to the product through a direct or satisfying purchase (for example, from a subscription or bundle). Licenses can also be granted in sharing scenarios. For more information about sharing, see Product sharing model for games. Development scenarios don’t follow this behavior by default. These scenarios include:- Loose builds (Visual Studio F5 deploy, xbapp/wdapp register/deploy)
- Local package builds (makepkg, xbapp/wdapp install)
XStore APIs still work, but unexpected results can occur when licensing games or Durables.
To configure a build to behave as licensable, apply the correct identity values to the MicrosoftGameConfig (described in Enabling XStore development and testing).
Then the following steps must be taken:
- Note content ID specific to the game or DLC
- Apply content ID to build, as appropriate to the build type
- Console only: Note and apply EKBID to build
Get ContentID
You can find the ContentID on the Packages page after you select Show details: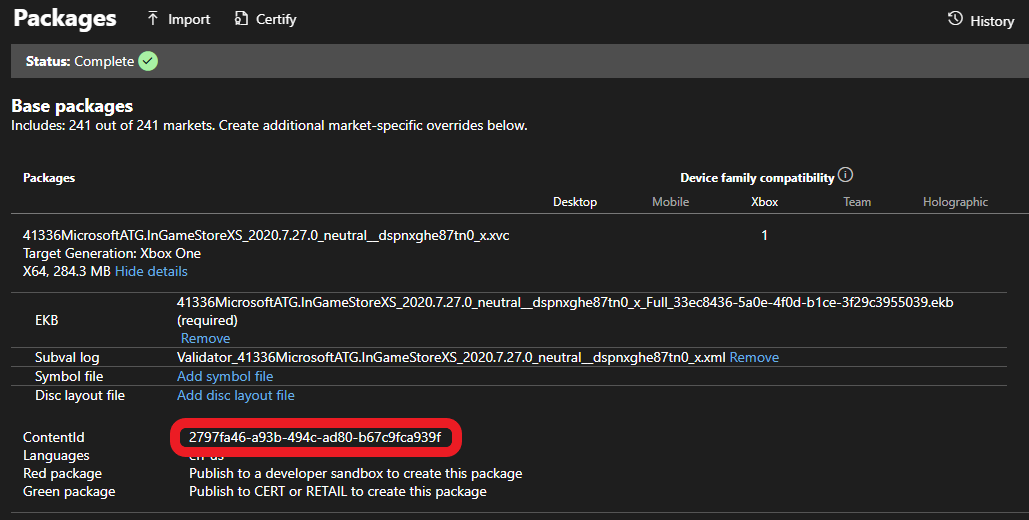
The content ID for sandbox and retail versions can be different. If you install a retail version of the game, the product associates with a different content ID than the one you need for sandbox. Content ID also differs if regional packages are involved.
Console
Find the content ID for an installed package by runningxbapp list /d (or xbapp listdlc /d for DLC) in the Gaming Command Prompt.
PC
Find the content ID for an installed package by runningwdapp list /d (or wdapp listdlc /d for DLC) in the Gaming Command Prompt. For packages you install from the store, use the /includeStore flag.
Apply content ID to build
For loose builds, add the following section in MicrosoftGameConfig:makepkg. For example:
/contentid parameter, the installation process applies any available ContentIdOverride in the MicrosoftGameConfig when you install from a local source.
Builds installed from the Store (sandbox or retail) always have the proper content ID (as seen in Partner Center).
Apply EKBID to build (only applicable to console)
Set the EKBID (Escrow Key Blob ID) to make the build licensable on console. For most scenarios, it simply needs to be overridden from the default test value of all zeroes or 33EC8436-5A0E-4F0D-B1CE-3F29C3955039. Override the EKBID with the following command:wdapp setekbid command).
Trials and EKBID
For trials, the actual EKBID must be applied. To find the EKBID that the game uses, runxbapp list /d for a build installed from the Store. For more information, see Implementing trials for your game.
Ensure test account is entitled to product in the sandbox
For products published to both sandbox and retail, you can use the DevEntitlementTool to query and acquire entitlements for a test account. The best way to get an entitlement is to go directly to the product’s Store page through protocol activation, because products published only to sandbox might not be searchable. The development console or PC must be set to the sandbox where the game is published. For more information, see the XBOX services Sandboxes overview documentation and for PC, see Switching sandboxes properly for store operations. Once signed in properly, use the store protocol link to reach the Store page: On console: Use Gaming Command prompt:xbapp launch ms-windows-store://pdp/?productid=<storeID>
On PC:
In Run box (⊞Win +R) or in a web browser
msxbox://game/?productId=<storeID> (to show product in XBOX App)
Or
ms-windows-store://pdp/?productid=<storeID> (to show product in Microsoft Store)
Once on the Store page, select Buy or Get to acquire a license for the product for your test account. Download and installation of games and DLC should start automatically. If you’re planning to iterate with local builds, you can cancel the operation.
You must acquire an entitlement for every account that runs the build and expects license-related XStore APIs to work.
DLC
In order for local DLC to be licensable, the content ID must be applied tomakepkg and xbapp setekbid set to something other than the default values. Only the DLC needs to be configured for licensing, not the base game.
License overrides are relevant to the following APIs when called with a packaged Durable:
- XStoreAcquireLicenseForDurablesAsync
- XStoreAcquireLicenseForPackageAsync
- XStoreCanAcquireLicenseForPackageAsync
- XStoreCanAcquireLicenseForStoreIdAsync
- XStoreRegisterPackageLicenseLost
Reference API documentation
- XStore (API contents)
- Functions
- XStoreQueryGameLicenseAsync
- XStoreQueryLicenseTokenAsync
- XStoreQueryAddOnLicensesAsync
- XStoreRegisterGameLicenseChanged
- XStoreAcquireLicenseForDurablesAsync
- XStoreAcquireLicenseForPackageAsync
- XStoreCanAcquireLicenseForPackageAsync
- XStoreCanAcquireLicenseForStoreIdAsync
- XStoreRegisterPackageLicenseLost
- Functions
See also
Commerce OverviewEnabling XStore development and testing
Switching sandboxes properly for Store operations
XStore API reference