
- User Store IDs and Microsoft Entra ID: Ties authentication and results to the user account signed in to the Microsoft Store app.
- Delegated Authentication X-tokens: Ties authentication and results to the XBOX services account of the user who’s currently playing the game.
Authenticating with Microsoft Entra ID and User Store IDs
All Microsoft Store service APIs support authentication through Microsoft Entra ID and User Store IDs. To use this authentication, you (or your organization) must have a Microsoft Entra ID tenant and register an application ID under it. To register an application, your account needs the Global administrator role under your tenant. If you already use Microsoft Office 365 or other business services from Microsoft, you already have a Microsoft Entra ID tenant that you can manage in your Azure portal. For guidance about getting the needed User Store IDs for this authentication type, see Requesting a User Store ID for service-to-service authentication.On PC, entitlements are associated with the user who signed in to the Microsoft Store app, instead of the user who’s currently playing a title. Because the accounts can be different, PC titles are encouraged to review the information in Handling mismatched store account scenarios on PC.
Authorization header of your request as follows.
Developer-managed consumable limitation: While User Store ID and Entra ID authentication works for most Microsoft Store API calls in sandbox environments, the Consume API doesn’t support this authentication method for developer-managed consumables in development sandboxes. For consuming developer-managed consumables in sandboxes, use delegated authentication XSTS tokens instead.
Example:
- Microsoft.StoreServices (GitHub): Library and source for authenticating and calling Microsoft Store services from your back-end.
- Microsoft.StoreServices Sample (GitHub): Service sample that demonstrates authentication, commerce integration, and refund reconciliation patterns.
- Requesting a User Store ID for service-to-service authentication
- Renewing a User Store ID key
- Manage product entitlements from a service
Diagram of calling a Microsoft Store API
The following diagram describes the process of calling a Microsoft Store API by using the User Store ID from your service.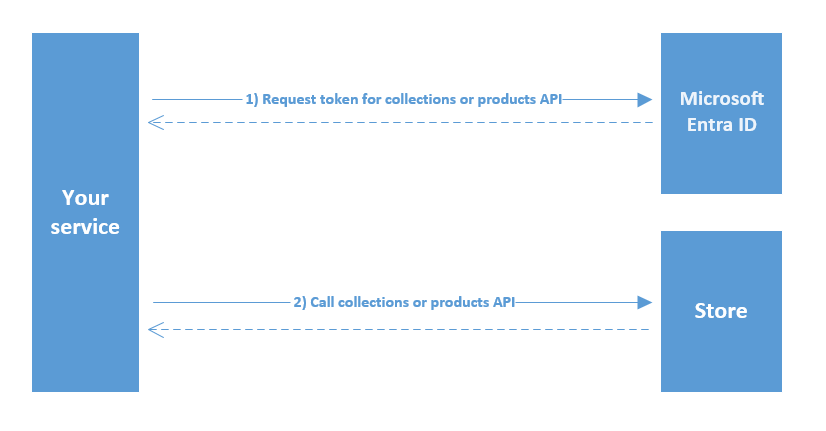
Extra configuration required to view and manage products with a User Store ID and Microsoft Entra ID Auth
To use Microsoft Entra ID and User Store IDs, add your Microsoft Entra application’s Client ID to your game’s Product collections and purchases settings in Partner Center. You can configure up to two Client IDs to access the product and its add-ons through the Collections and Purchase services. The most common symptom for when your products aren’t properly linked to your Microsoft Entra application client ID is that the calls to Collections succeed, but there are no items in the results.Configure your products to be visible to your service through Microsoft Entra ID and User Store IDs
- From the Partner Center page of your game, select Product collections and purchases from the left panel.
- Enter the Microsoft Entra application’s client ID that you’re using to authenticate your service.
- Select the Save button.
- Republish the game product and all add-ons under the product to the Microsoft Store in your sandbox or developer environment.
Authenticating with delegated authentication X-tokens
Use a delegated authentication X-token to authenticate service-to-service calls by adding theAuthorization header to the request in the following format.
- Game Service Sample: A comprehensive web service sample that demonstrates validation and handling of X-tokens from the client, server-to-server authentication, commerce services, and more. Download the latest version from the GDK download site. Download the latest release of All Samples. Game Service Samples is under samples\Live\GameService in the downloaded .zip file.
- Xfest 2019 - XSTS Auth and Server to Server made Easy: Overview and explanation of X-tokens and how the Game Service Sample can help begin your own effort for service-to-service authentication. To download the presentation information, select GDK Track Downloads on the archive site.
- XBOX services authentication and service-to-service calls: More detailed documentation on authentication, X-tokens, and the required steps and calls to make service-to-service calls to XBOX services.
Extra configuration required to view and manage products with delegated authentication X-tokens
X-tokens are tied to a Business Partner ID within Partner Center, so you must link products to that same Business Partner ID. In practice, the products must be under a Product Group whose Dev Studio ID matches the Business Partner ID used by your Relying Party. The most common symptom for when your products aren’t properly linked to the correct Business Partner ID is that calls to Collections succeed but return no items in the results. For more information, see the forum post B2B call to Collections LicensePreview service returns empty results (Partner Center configured game).To configure your products and web services in Partner Center
- Create a Business Partner Certificate by using the Generate Certificate link of the web service. (Select Developer Settings > XBOX Live > Web Services.) Choose the link in the row of the web service that your relying party is tied to.
- Go to the Business Partner management UI (Select Developer Settings > XBOX Live > Business Partner) and copy the Business Partner ID that matches the one from the web service you used in step 1. (Example Business Partner ID: 12345678-9012-3456-7890-123456789012)
- From the Partner Center Overview page of your products, select Create a new and then select Product group.
- Assign this product group to a Dev Studio, or select Create a new developer studio if you don’t have one yet.
- Ensure the selected Dev Studio’s ID matches the Business Partner ID from step 2. Copy the Business Partner ID into Dev Studio ID (optional) if it’s blank. If this field already has a value in use, create a new Dev Studio instead of overwriting it to avoid breaking existing service-to-service product mappings.
- After the Dev Studio is configured with the matching ID of the Business Partner, return to your created Product Group. Add your game and all the products into the Included in this product group list.
- Select Save to finish creating the product group.
- Go to your game’s XBOX Settings UI and ensure the linked Business Partner is the same one used from step 2.
- Republish all the items in the product group to Microsoft Store in your sandbox or developer environment.