
Add GSDK to Project
This article describes how to upgrade an existing project so it can be hosted on PlayFab Multiplayer Servers (MPS). The process involves adding and configuring PlayFab GSDK into an Unreal project. The instructions here are written using the Unreal ThirdPersonMP template project. Note, your Unreal project must have the following capabilities:- Networking
- Multiplayer
- Dedicated Game-Server
Goals
We will add and configure the PlayFab Unreal GSDK to your project, and test it locally to verify it is expected to work on PlayFab Multiplayer Services.Requirements
- Download Visual Studio. The community version is free.
- Required workloads: .NET desktop development and Desktop development with C++
- Download Unreal Engine Source Code. For instructions, see Downloading Unreal Engine Source code (external).
- A completed ThirdPersonMP Example Project, or a project with similar capabilities
- PlayFab Unreal GSDK plugin
- [Optional] PlayFab Marketplace plugin or the source version on GitHub. This plugin is not required for GSDK but is required for many PlayFab services, including login.
C++ Implementation
Add the plugin to the project
Follow these steps to add the Unreal GSDK to your project:- Go to your Unreal project
- Open File Explorer and create a Plugins folder in your games’ root directory. In the Plugins folder, create a folder called PlayFabGSDK.
- Go to {depot}\GSDK\gsdk\UnrealPlugin. Drag all the files from the UnrealPlugin folder into the Plugins/PlayFabGSDK folder.
- Lastly, open the
{ProjectName}.uprojectfile in a text editor of your choice. In the plugins array, add the “PlayFabGSDK” plugin.
Include the plugin in your modules
- Update {ProjectName}.Build.cs file to add “PlayFabGSDK” into the PublicDependencyModuleNames.AddRange(); list as follows:
- Right-click on the
{ProjectName}.uprojectfile and select the option to Switch Unreal Engine version, which is how you can quickly check which Unreal Engine version you are currently using. The popup seen below should appear. If you already see that the Unreal Engine version is source build, you don’t need to change anything, so click Cancel. If the Unreal version is not currently the source build, select it from the dropdown list and then click OK.
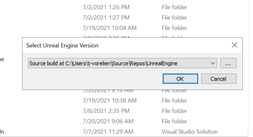
-
Right-click on the
{ProjectName}.uprojectfile again and select “Generate Visual Studio Project Files”. - Finally, build the project in Visual Studio and start the Editor by selecting the Development Editor configuration.
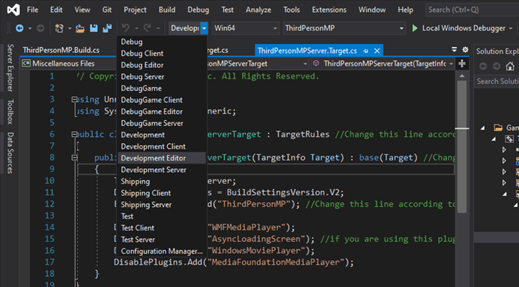
Project set up
Once your project has enabled server mode, you will have a {ProjectName}Server.Target.cs file. Result should look similar to:Create/Update the GameInstance Class
Create a GameInstance Class
If you are in the process of creating a project from scratch and do not yet have a GameInstance class, then first follow these example instructions to create a GameInstance class. If you are using a project, which already has a GameInstance class (for example, ShooterGame from Unreal’s sample library), then move on to the section titled Modify the GameInstance class.In the Unreal Editor:
- Select Files
- Select Create a new C++ class
- Select Show all classes
- Type
GameInstanceinto the search field- By selecting it directly as described, everything should be generated correctly and then you can add the functions we detail below
- Close Unreal and Generate project files in source build mode again
- Using Visual Studio, open those newly created files and follow instructions to modify the GameInstance class.
Modify the GameInstance class
Depending on the setup of your project, you can modify the GameInstance class using C++ or Blueprints. Both ways are presented below, you should select the one that fits your needs.C++ implementation
Locate your GameInstance class, which is most likely called something similar to {ProjectName}GameInstance or MyGameInstance. From now on, your GameInstance class will be denoted with [YourGameInstanceClassName].Modify the GameInstance header file
First, check the include statements and ensure that the following are included in the header file for your GameInstance class ([YourGameInstanceClassName].h):Modify the GameInstance CPP file
Then, locate the [YourGameInstanceClassName].cpp file. Make sure that the following are included:Create Init() function
If you already had an Init() function, go to check in
[YourGameInstanceClassName].cpp file to see if you have a variable that indicates whether the instance is for a dedicated server. If you can find this variable, then add the following to the end of your Init() function:
Modify existing Init() function
Lastly, add these method implementations to the bottom of
[YourGameInstanceClassName].cpp file:
Blueprint implementation
This part is only needed if you have decided to proceed with the Blueprint implementation and not with the pure C++ implementation.- Observe the Content Browser window in the Unreal Editor
- Pick or create a folder to contain new Blueprints
- Right-Click and create a Blueprint class
- In the All classes dropdown menu, find your GameInstance class
- In this example, the blueprint is named “MyGameInstance”
- Double-click the blueprint
- On the left side, hover over the function field and select the Override dropdown
- Select the Init function
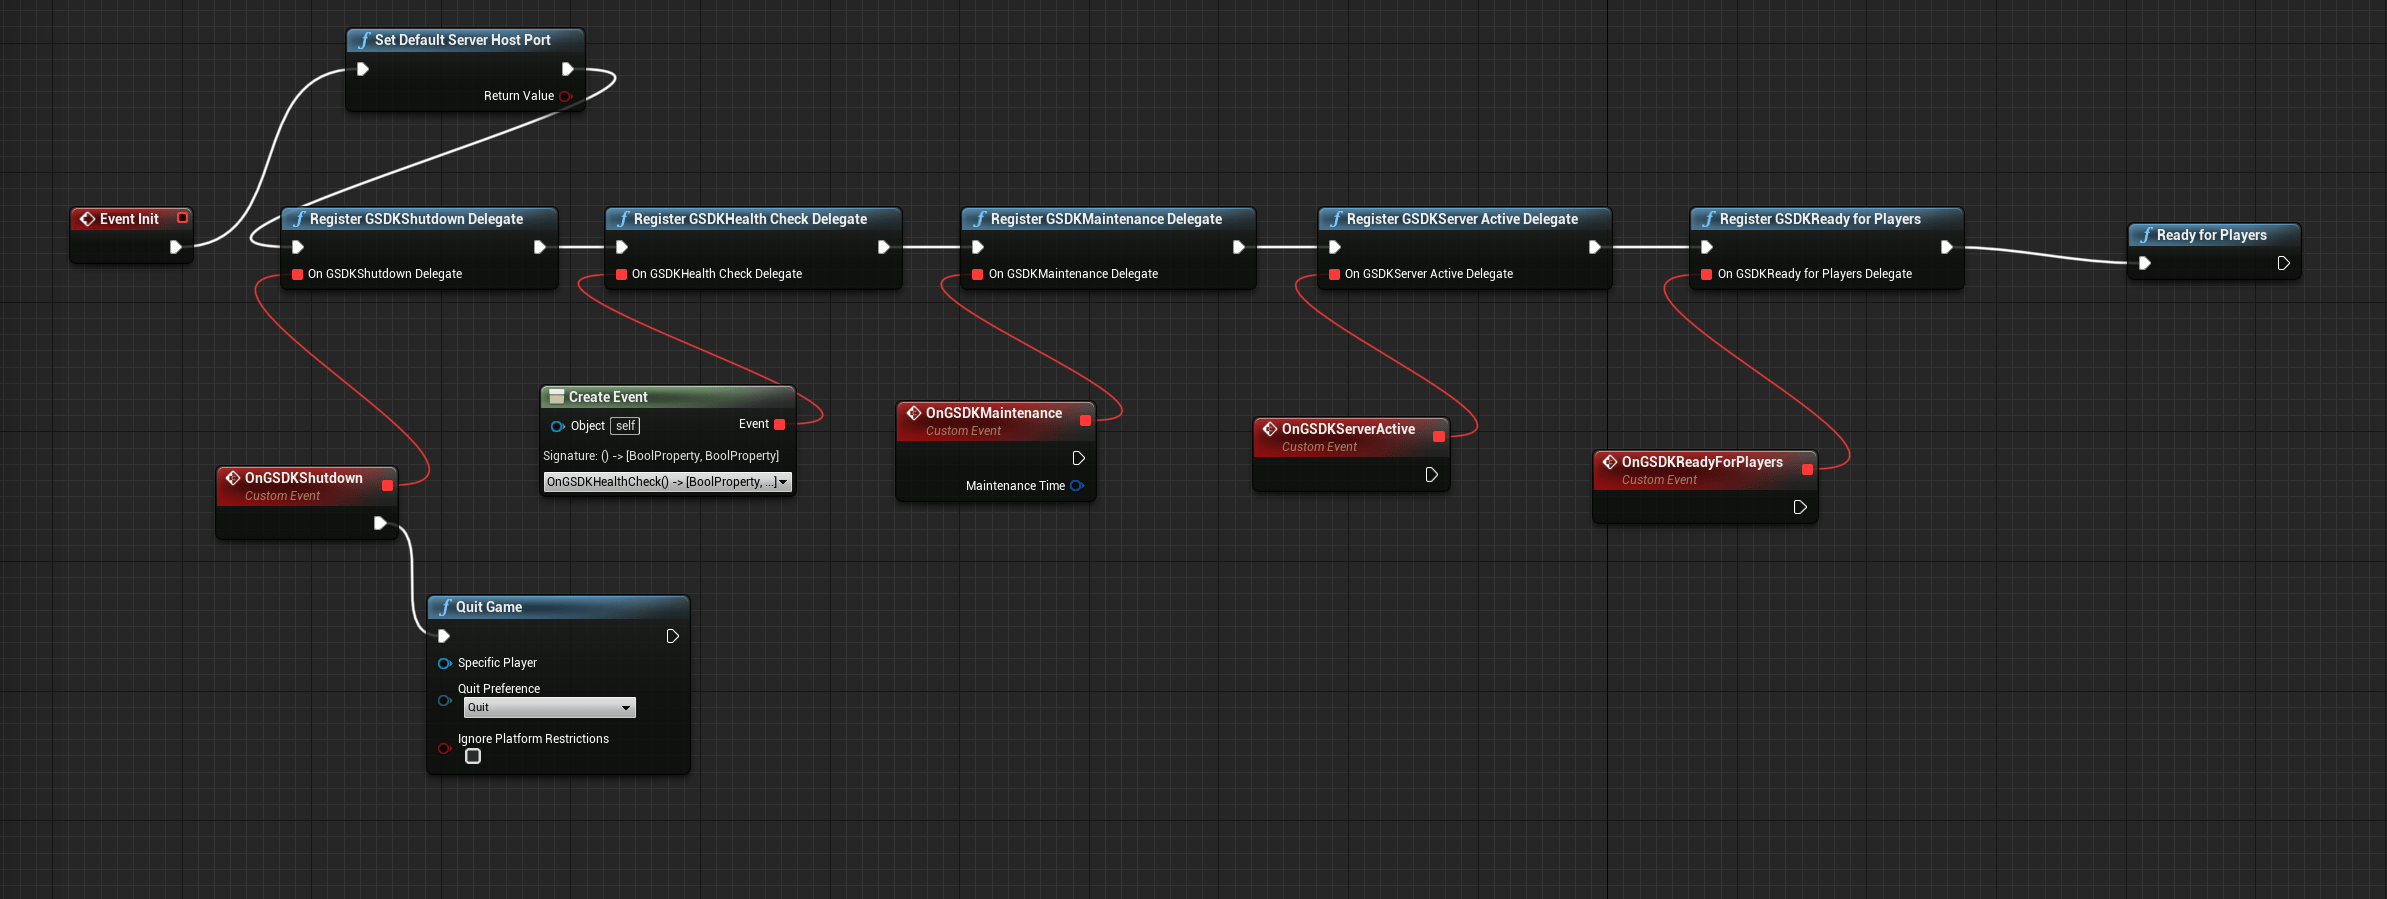
- Right-click in the graph and add in all register GSDK function
- For GSDK Shutdown and Maintenance Delegate drag out a line from the red square, and select “Add Custom Event”
- For “Register GSDK Health Check Delegate”, select the “Create Event” in the “Event Dispatchers”.
-
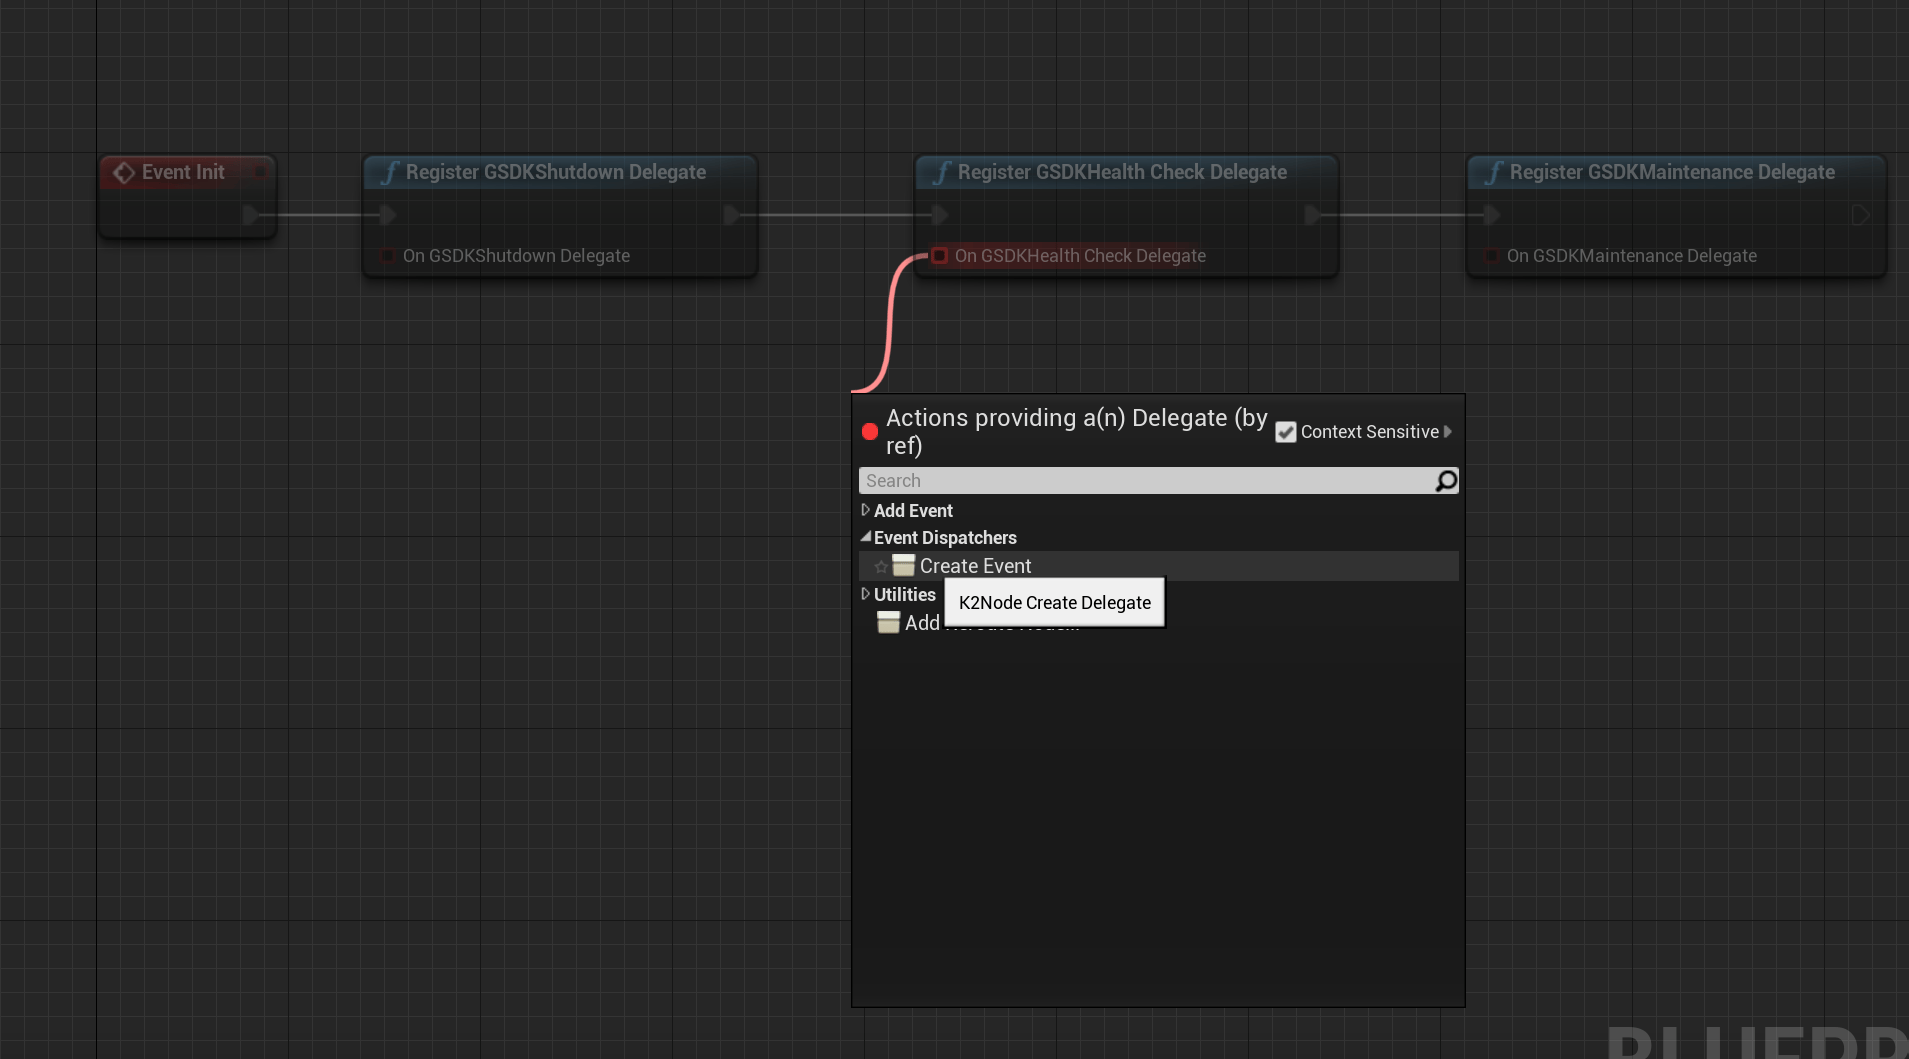
- In the dropdown of the new node “Create matching function”. This is important, as the GSDK Health Check Delegate has a return value.
-
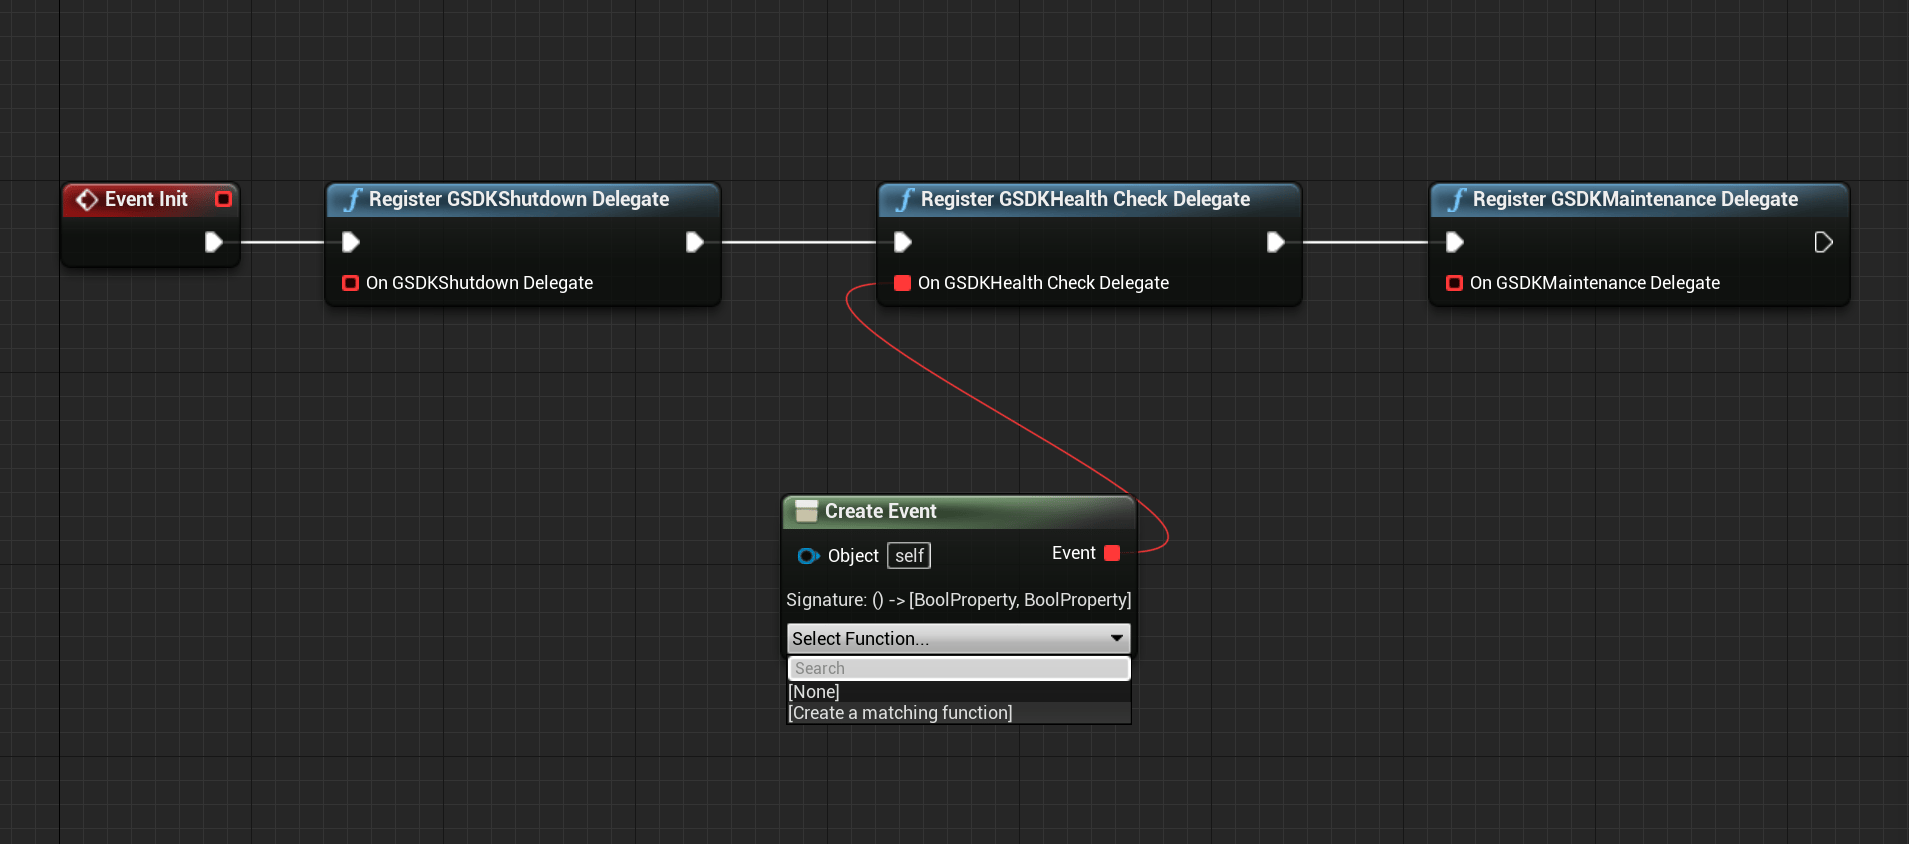
- In the function, make sure the return boolean value is checked.
-
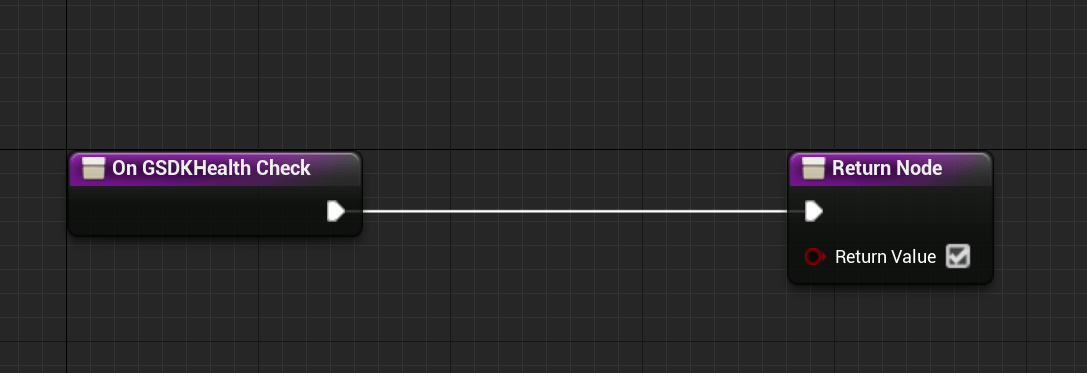
- Don’t forget to connect all the nodes to the Event Init node.
- In the end add the “ReadyforPlayers” node to be able to react to the ready signal of PlayFab.
- Also, don’t forget to add the “SetDefaultServerHostPort” node to connect to the port that GSDK expects.
- For every GSDK function / node that you want to add in your Blueprint, you can verify that it exists by typing the first letters of the name of the function in your new node and seeing the expected GSDK function show up in the suggestions.
- In the end, your Blueprint should be similar to the one presented in the image below.
-
Set the GameInstance class
After creating a custom GameInstance class that integrates with the gsdk, you have to configure your project to actually use this newly created GameInstance class. There are two ways to do this - either through the Unreal Engine editor or by editing DefaultEngine.ini directly.In the Unreal Editor
In the editor, the default GameInstance can be set through the UI in the editor. In the editor, go to Edit -> Project Settings. From that opened window, navigate to Maps&Modes on the left side. Scroll to the bottom, and then you can set the optionGameInstanceClass to your new GameInstance class directly (avoid typos, it must be an exact match).