
Tutorial: Get a player profile
In this tutorial you learn how to:[!div class=“checklist”] * Create a user with a display name * Make a player profile call * Get Player Created time and Last Login time * Configure the player profile view constraints for the title * Get the player profile via login operation
Requirements
- A PlayFab developer account.
- An installed copy of the Unity Editor. To install Unity for personal use via Unity Hub, or Unity+ for professional use, see Download Unity.
The PlayFab Unity3D SDK supports Unity Editor version 5.3 (released December 2015) and higher.
- A Unity Project * this can be any of the following:
- A brand new project. For more information, see Starting Unity for the first time.
- A guided tutorial project. For more information, see Getting Started with Unity.
- An existing project.
- The PlayFab Unity3D SDK.
GetPlayerProfile on the player.
It’s also worthwhile to read the Game Manager quickstart if you’re unfamiliar with the Game Manager, as it’s the place where we configure profile constraints.
The C# Samples in this article are written for the Unity SDK. The Unity SDK uses an event driven model to handle non-synchronous tasks. To run the sample code using the C# SDK, you must modify the code to use an async Task model. Methods that must be modified have Async append to the method name in the signature. For example, SetObject in the Unity SDK becomes SetObjectAsync in the C# SDK. For more information, see Asynchronous programming with async and await.
Create a user with a display name
The first step is to create a player and add a display name to the user. This example will create a new user with the display nameUnicornTossMaster.
Make a player profile call
The next step is to make a very basic profile for the player usin The following example uses a basic GetPlayerProfile call.UnicornTossMaster for the player.
Get Player Created time and Last Login time
In the PlayerProfileModel object there’s a fair amount of data about the player. In the previous step, aGetPlayerProfile was issued, and the response that was received only contained display name information.
The next step is to get even more profile data for the player. To do so, call GetPlayerProfile with additional fields in the PlayerProfileViewConstraints request parameter.
The following C# example modifies the GetPlayerProfile method from step 2 and calls GetPlayerProfile to request the Created and LastLogin fields by setting their flags in the ProfileConstraints.
This will be an unsuccessful call at this step!!!
Error Code 1303. RequestViewConstraintParamsNotAllowed, and an error message stating that there are Invalid view constraints with a JSON output of constraints that the title currently has set.
The error occurs because you haven’t yet configured the ability to show Created and LastLogin in your title’s profile constraint settings.
Configure the player profile view constraints for the title
To get more data when you call the GetPlayerProfile API, you need to configure the constraints on the data to be available. These settings are in the title’s settings in Game Manager. By default, the ALLOW CLIENT ACCESS TO PROFILE PROPERTIES: had only Display name enabled, which allowed you to retrieve Display Name value. To configure additional constraints for the title:- In Game Manager, select your title.
- Select the gear icon in the upper left-hand corner, then select Title settings.
- Select the Client Profile Options tab.
- To enable both Created and LastLogin in the ProfileConstraints, check Creation date and Last login time, then select SAVE CLIENT PROFILE OPTIONS.
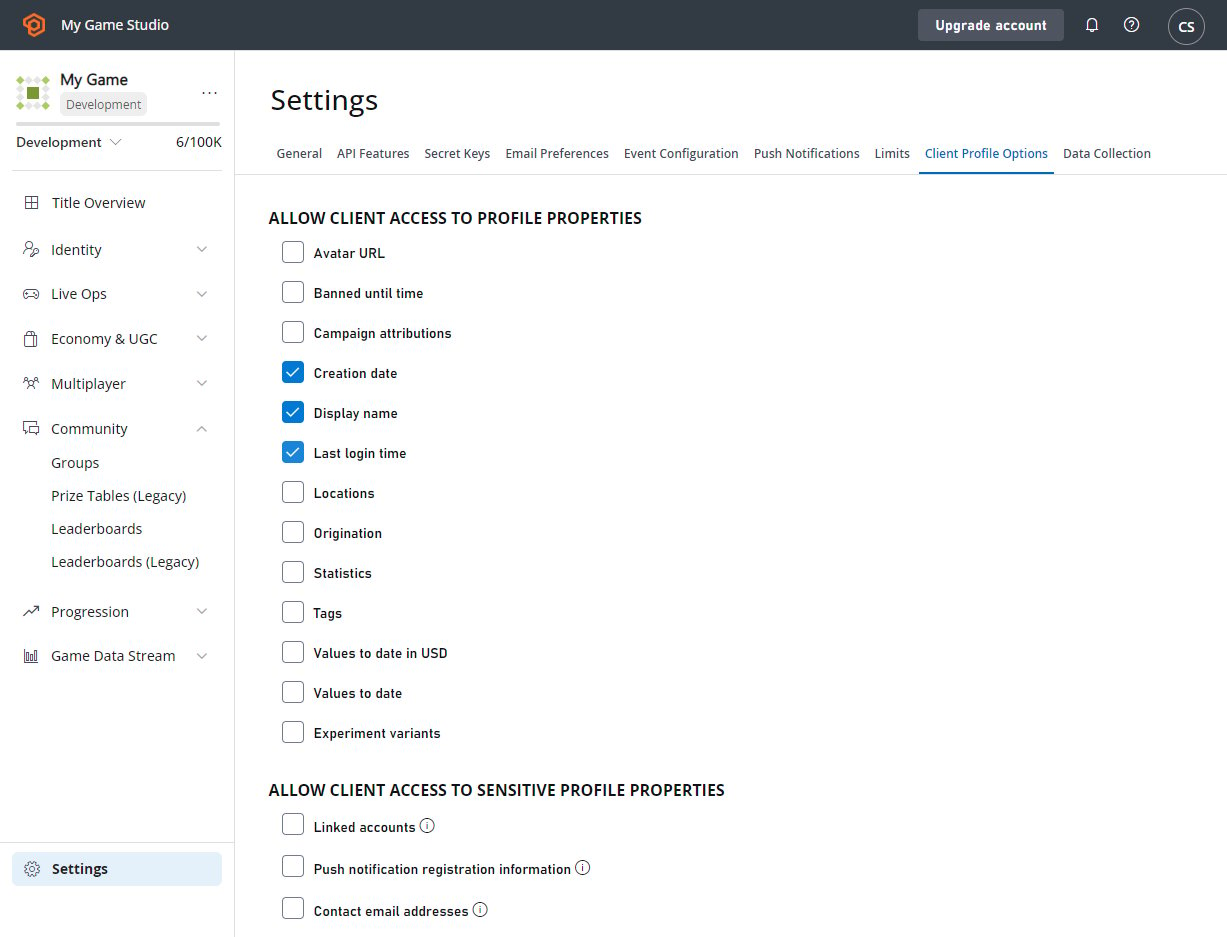
CreatePlayerAndUpdateDisplayName it returns the PlayerProfileModel object with data on the user’s creation time, last login, and the display name of UnicornTossMaster.
Get the player profile via login operation
In most cases you want to retrieve player profile data as soon as a player logs in. The PlayFab API allows you to combine the log in call and the call to retrieve the player profile into a single call. The following example shows how to gain profile information through a login request, and usesLoginWithCustomId as an example.
This works with every login mechanism.