
快速入門:適用於 Unreal Engine 的 PlayFab 用戶端程式庫
開始使用適用於 Unreal Engine 的 PlayFab 外掛程式。請依照本快速入門安裝 PlayFab Unreal Engine 外掛程式,並建立使用 C++ 用戶端程式庫和藍圖介面的範例應用程式。 您可以使用適用於 Unreal Engine 的 PlayFab 外掛程式來管理遊戲的 LiveOps,並執行管理、用戶端和伺服器作業,例如:- 玩家驗證。
- 管理虛擬物品和貨幣。
- 建立社交功能,例如好友清單。 API 參考文件 | 程式庫原始程式碼 | Unreal Marketplace
必要條件
- PlayFab 開發人員帳戶。
- 已針對 Unreal Engine 設定的 Visual Studio 安裝。如需設定 Visual Studio 的相關資訊,請參閱為 Unreal Engine 設定 Visual Studio。
- 已安裝 Unreal Engine。如需安裝 Unreal Engine 的相關資訊,請參閱 Unreal Engine 安裝指南。
- 已安裝 PlayFab Unreal 外掛程式。您可以從 Unreal Engine Marketplace 安裝 Unreal 外掛程式。
建立 Unreal 專案
在 Unreal Engine 中,建立新的 Unreal 專案。如需詳細指示,請依照建立新專案指南操作。- 在 Project Category 中,選取 Games。
- 在 Select Template 中,選取 Blank。
- 在 Project Settings 中,選取 C++ 或 Blueprint。
- 選擇 No Starter Content。
- 為您的專案選擇名稱,例如 MyProject。
在您的 Unreal 專案中啟用 PlayFab 外掛程式
若要啟用 PlayFab 外掛程式:- 從 Settings 功能表的 Game Specific Settings 下,選取 Plugins。
- 啟用 PlayFab 外掛程式,並視需要重新啟動 Unreal Engine。
在 C++ 中將 PlayFab 新增為模組相依性
在 Visual Studio 中,將 PlayFab 新增為您 C++ 專案的模組相依性:- 從 View 功能表開啟 Solution Explorer,其中會顯示您的 C++ 專案檔案。
- 在 Solution Explorer 中,瀏覽至 Solution\Games\YourProjectName\Source,然後開啟 YourProjectName.Build.cs。
-
新增下列這一行:
- 儲存您的變更。
產生必要的 Visual Studio 專案檔案
若要更新並產生使用 PlayFab 外掛程式所需的 Visual Studio 專案檔案:- 開啟檔案總管視窗,並瀏覽至您專案檔案所在的資料夾。
- 在專案的根資料夾中,以滑鼠右鍵按一下 YourProjectName.uproject 檔案。
- 從操作功能表中,選取 Generate Visual Studio project files。
使用 C++ 呼叫 PlayFab
下列步驟會逐步引導您建立使用自訂識別碼登入 PlayFab 的 Tile。如需從藍圖專案登入的相關資訊,請參閱本文稍後的「從 Unreal 藍圖呼叫 PlayFab」。建立新的 Actor
若要建立新的 Actor:- 從 File 功能表中,選取 New C++ Class。
- 在 Parent Class 中,選取 Actor。
- 將您的 Actor 命名為 LoginActor。建立 Actor 之後,Unreal Engine 會自動開啟您的 C++ 開發環境,並載入 LoginActor.cpp 和 LoginActor.h。
基於本快速入門的目的,您必須將 Actor 命名為 LoginActor。如果您為 Actor 指定不同的名稱,就必須更新本快速入門中提供的範例程式碼以符合新名稱。
-
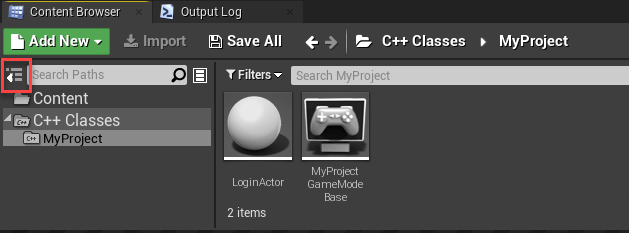
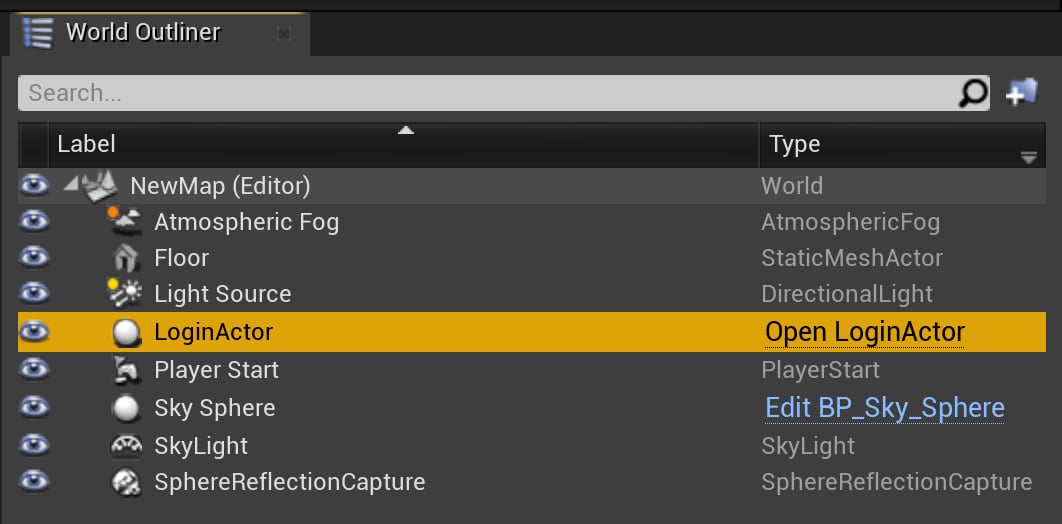
將您的新 Actor LoginActor 從 Content Browser 拖放至 Viewport 面板。它現在會出現在 “World Outliner” 窗格中。
如果您沒有看到 LoginActor,請選取 Show or hide the source panel 圖示。然後在 C++ 類別下選取您的專案名稱。
將 PlayFab API 呼叫新增至您的 C++ LoginActor
在本快速入門中,您會使用 LoginWithCustomID 來執行登入。雖然LoginWithCustomId 易於使用、方便入門,但建議您在發行遊戲時改用更安全的玩家驗證方法。如需實作穩固登入功能的相關資訊,請參閱登入基本概念和最佳做法。
LoginWithCustomID 呼叫是在您的 LoginActor 中進行的。若要將 PlayFab 特定程式碼新增至您的 LoginActor:
- 將 LoginActor.h 的內容取代為所示的程式碼:
- 將 LoginActor.cpp 的內容取代為下列程式碼。
使用 C++ 完成並執行
現在您已準備好以 C++ 測試從 Unreal Engine 對 PlayFab 的呼叫。測試呼叫的結果會顯示在 Unreal Engine 的 Output Log 中。 在 Unreal Engine 中:- 從 Windows 功能表顯示 Output Log,選取 Developer Tools 並啟用 Output Log。
- 在工具列中,選取 Compile 並等待 Unreal Engine 完成編譯。編譯程式碼時,Unreal 會顯示 “Compiling C++ Code”。
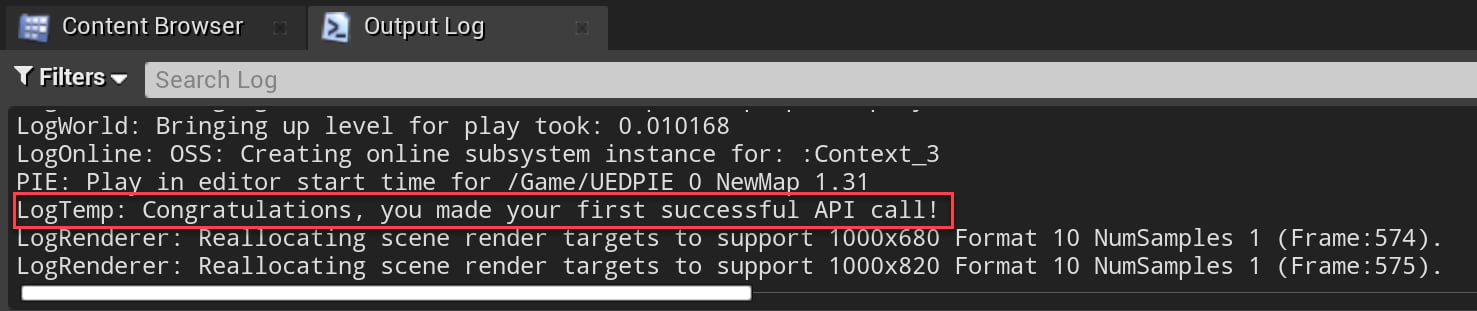
- 選取 Play。程式碼執行時,Unreal 會在 Output Log 視窗中顯示下列內容:
LogTemp: Congratulations, you made your first successful API call!
從 Unreal 藍圖呼叫 PlayFab
本節會引導您建立藍圖結構,該結構會使用 PlayFab API 呼叫 LoginWithCustomID。雖然LoginWithCustomId 易於使用、方便入門,但建議您在發行遊戲時改用更安全的玩家驗證方法。如需實作穩固登入功能的相關資訊,請參閱登入基本概念和最佳做法。
建立藍圖結構
在 Unreal Engine 中,從工具列選取 Open Level Blueprint。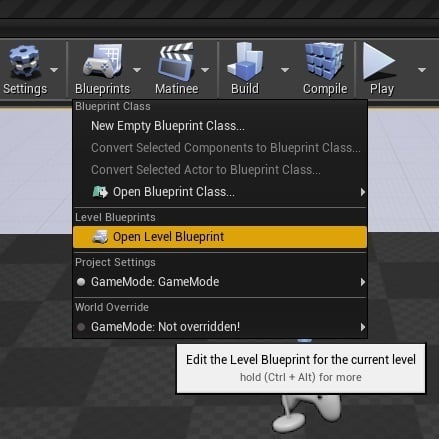
Event BeginPlay 和 Event Tick。
本快速入門中使用的動作:
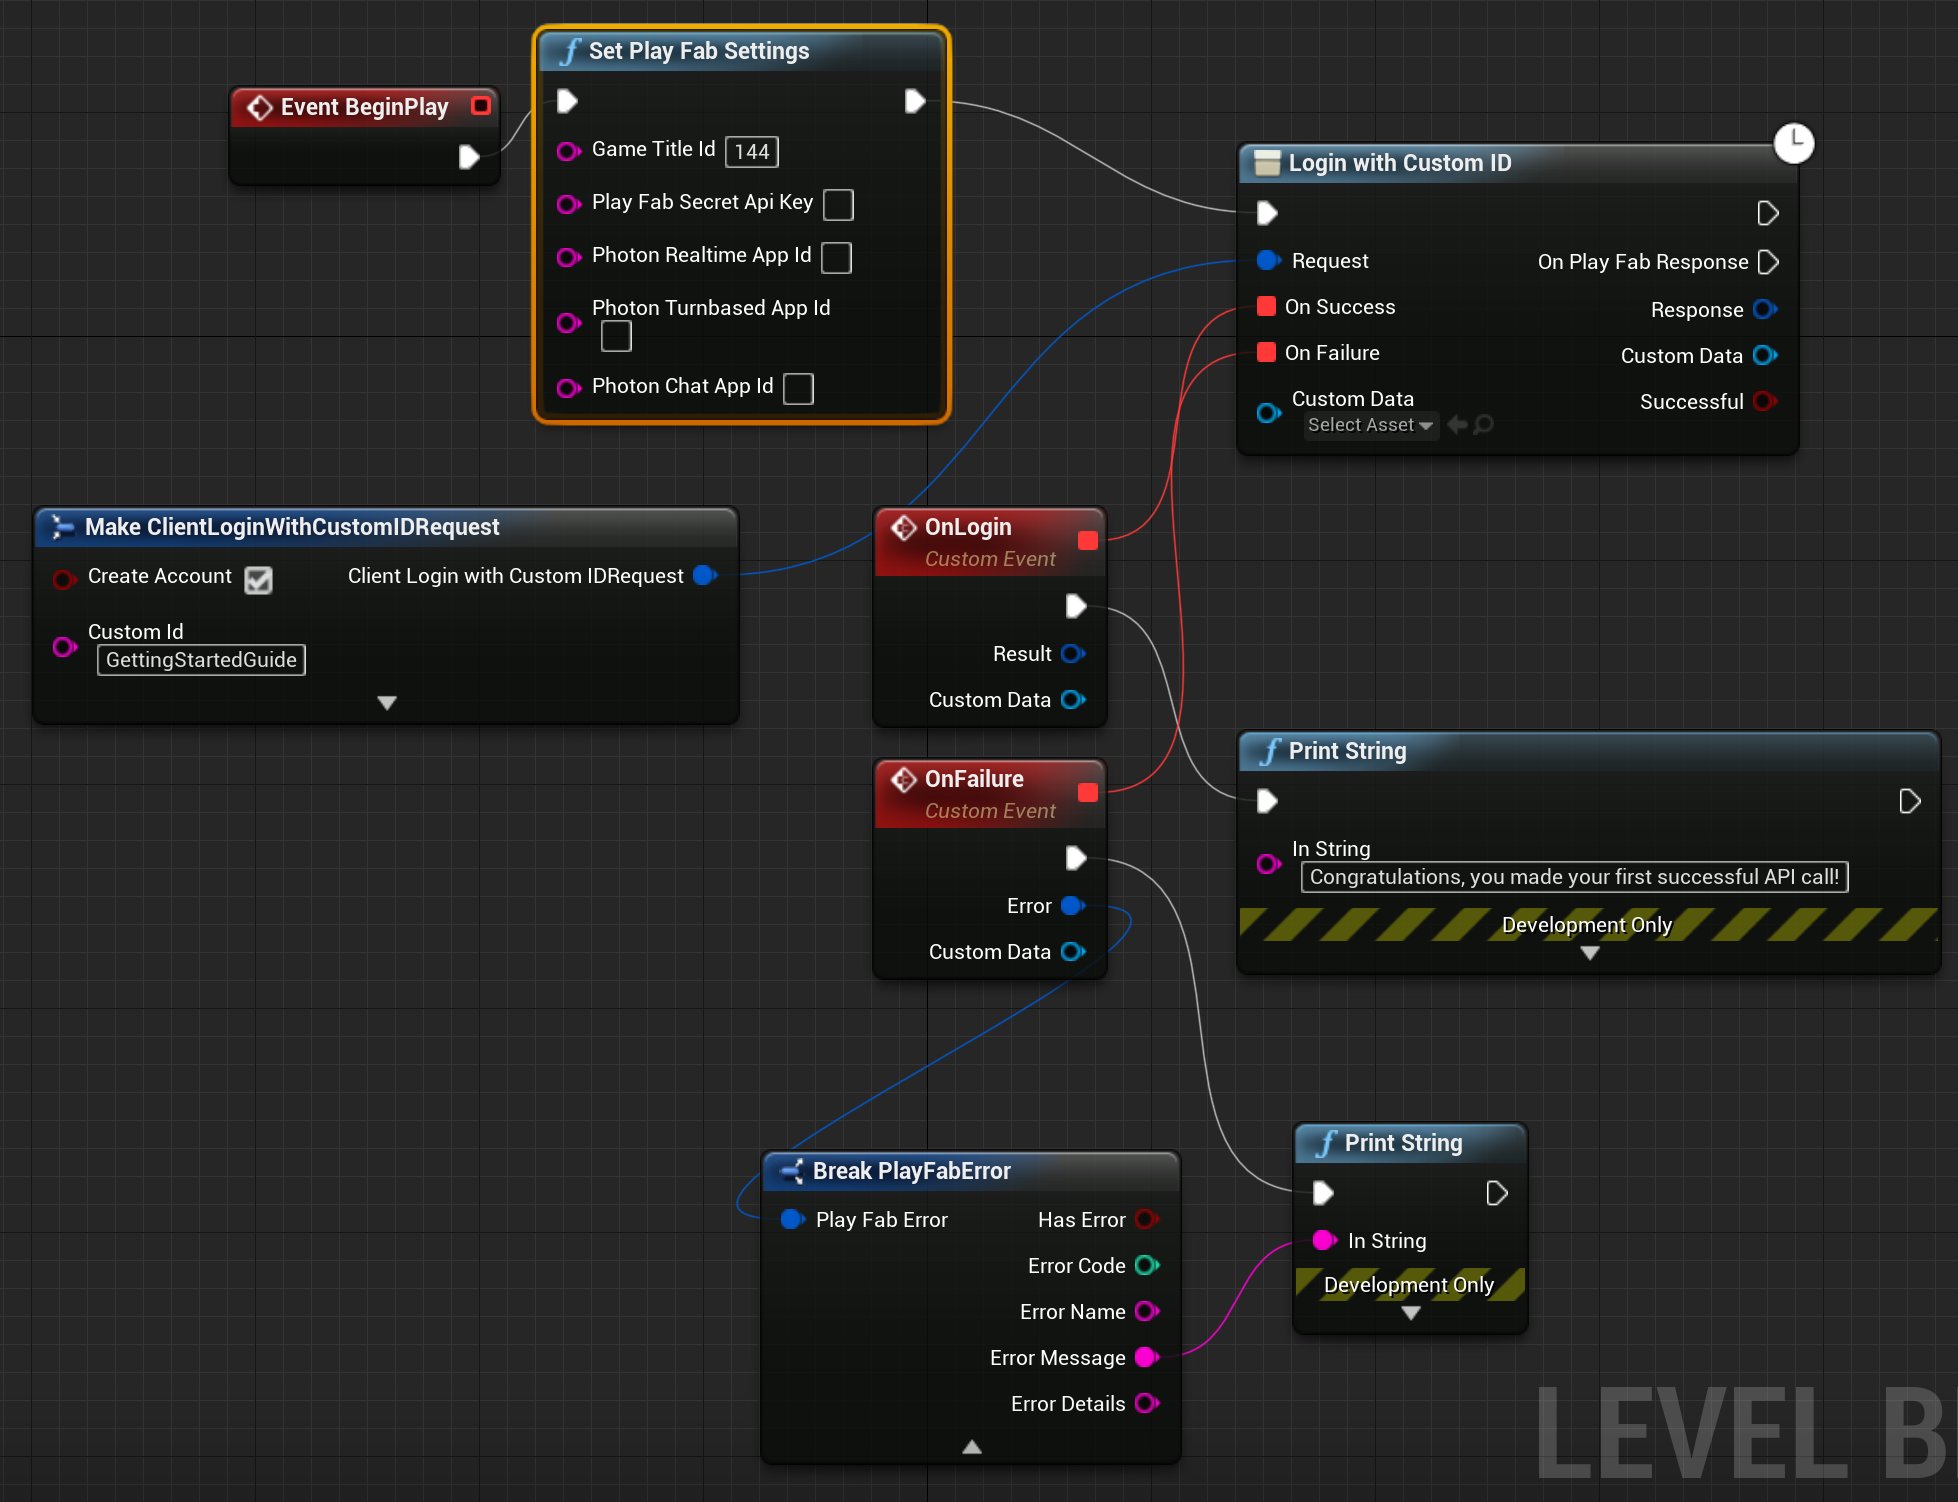
Set Play Fab SettingsLogin with Custom IDMake ClientLoginWithCustomIDRequestAddCustomEventx 2Break PlayFabErrorPrint Stringx 2
-
選取
Event BeginPlay上的輸出接腳,並將其拖曳至 Event Graph 中的空白位置。在 Executable Actions 對話方塊中,搜尋Set Play Fab Settings並選取它,將其新增至您的藍圖。在Set Play Fab Settings中,如果 Game Title id 是空白的,請將其設定為您遊戲的 Title ID。 -
選取
Set Play Fab Settings上的輸出接腳,並將其拖曳至空白位置。在 Executable Actions 對話方塊中,搜尋Login with Custom ID並選取它,將其新增至您的藍圖。 -
選取
Login with Custom ID上的 Request 接腳,並將其拖曳至空白位置。從 Actions providing a(n) Client Login With Custom ID Request Structure 中,選取Make ClientLoginWithCustomIDRequest。 -
在
Make ClientLoginWithCustomIDRequest上:- 選取 Create Account。
- 將 Custom Id 設定為 GettingStartedGuide。
-
在
Login with Custom ID上,選取 On Success 接腳並將其拖曳至空白位置。在 Actions providing a(n) Delegate 中,搜尋Add Custom Event並選取它,將其新增至您的藍圖。- 將其命名為
OnLogin。
- 將其命名為
-
選取 On Failure 接腳並將其拖曳至空白位置。在 Actions providing a(n) Delegate 中,搜尋
Add Custom Event並選取它,將其新增至您的藍圖。- 將其命名為
OnFailure。
- 將其命名為
-
選取
OnLogin上的輸出接腳,並將其拖曳至空白位置。在 Executable Actions 對話方塊中,搜尋Print String並選取它,將其新增至藍圖。- 在
Print String上,將 In String 值設定為 “Congratulations, you made your first successful PlayFab API call using Blueprint!”。
- 在
-
選取
OnFailure的輸出接腳,並將其拖曳至空白位置。在 Executable Actions 對話方塊中,搜尋Print String並選取它,將其新增至藍圖。 -
選取
OnFailure上的 Error 接腳,並將其拖曳至空白位置。在 Actions providing a(n) string 對話方塊中,搜尋 Break PlayFabError 並選取它,將其新增至藍圖。在 Actions taking a(n) PlayFab error structure 對話方塊中,搜尋 Break PlayFabError 並選取它,將其新增至藍圖。 -
將
Break PlayFabError的 Error Message 接腳連接至失敗時Print String動作的 In String 接腳。
使用藍圖執行 PlayFab 呼叫
- 在工具列上,選取 Play 按鈕。
-
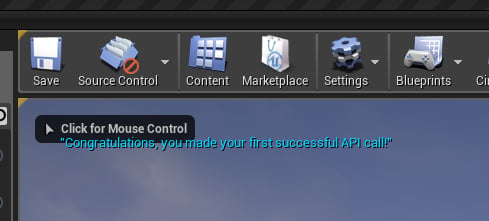
藍圖執行時,Viewport 視窗中會顯示下列輸出。
更多資源
- Unreal Engine 的藍圖視覺化指令碼文件。
- Unreal Engine 文件。