
Cocos2d-x project setup
OS: This guide is written for Windows 10, using Visual Studio 2015. Cocos works on most modern OSs and environments. The installation instructions are similar, but different for each combination. If you’re building for other platforms, the files you need are the same, but you’ll need to do the project setup yourself. Visual Studio 2013 has identical steps, but the screenshots provided here look a bit different from yours.-
Download and install Cocos2d-x
- https://www.cocos2d-x.org/download
- Setting up Cocos2d-x requires some familiarity. Check out their docs site:
- https://docs.cocos2d-x.org/cocos2d-x/en/en/
- Note the Cocos Prerequisites
- Visual Studio 2013 or 2015 are also required.
-
Once you have Cocos2d-x configured, create a project using the Cocos CLI:
- Navigate to a location where you wish to store your Cocos project
-
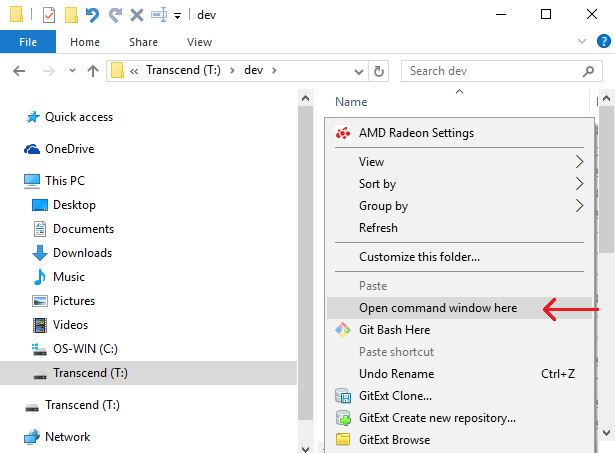
Open a command window in your parent folder (Cocos CLI will create the actual project directory)
-
Hold down your Shift key, and right-click in the empty white space of the Explorer window.
-
Hold down your Shift key, and right-click in the empty white space of the Explorer window.
-
In the new console window enter this command:
cocos new CocosGettingStarted -l cpp- Make sure your target sub-directory (CocosGettingStarted) doesn’t already exist - This command will fail if the folder already exists.
- If you get a message that “‘cocos’ isn’t recognized as an internal or external command”, you haven’t configured the cocos installation correctly (Go back to the Cocos windows installation guide).
- If successful, there will be a new folder CocosGettingStarted. This guide will refer to that directory location as
{CocosGettingStarted}.
- Successful output should appear similar to the example provided below.
-
Download PlayFab Cocos2d-xSdk: Cocos2D-x SDK (C++). Save and extract it to a temporary location {PlayFabCocos}
- Open the following folder in Windows Explorer: {PlayFabCocos}/PlayFabClientSDK
- Open the following folder in a second Windows Explorer: {CocosGettingStarted}/Classes
- Copy paste all files from {PlayFabCocos}/PlayFabClientSDK to {CocosGettingStarted}/Classes
-
In Visual Studio, Load
{CocosGettingStarted}/proj.win32/CocosGettingStarted.sln. - We want to add the PlayFab files to the Cocos project.
- In Visual Studio, Solution Explorer panel, expand to the folder: Solution/CocosGettingStarted/src
-
Open a Windows Explorer window at {CocosGettingStarted}/Classes
- Select all files in {CocosGettingStarted}/Classes, EXCEPT AppDelegate.h, AppDelegate.cpp, HelloWorldScene.h, HelloWorldScene.cpp
- Drag and drop all of those files from Explorer, onto the Visual Studio Solution/CocosGettingStarted/src folder we found above. If you experience problems, you can drag and drop each file one at a time, just be careful and get all of them.
-
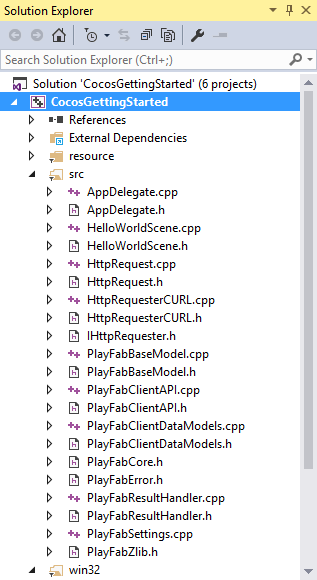
You should see these files in your VS project:
-
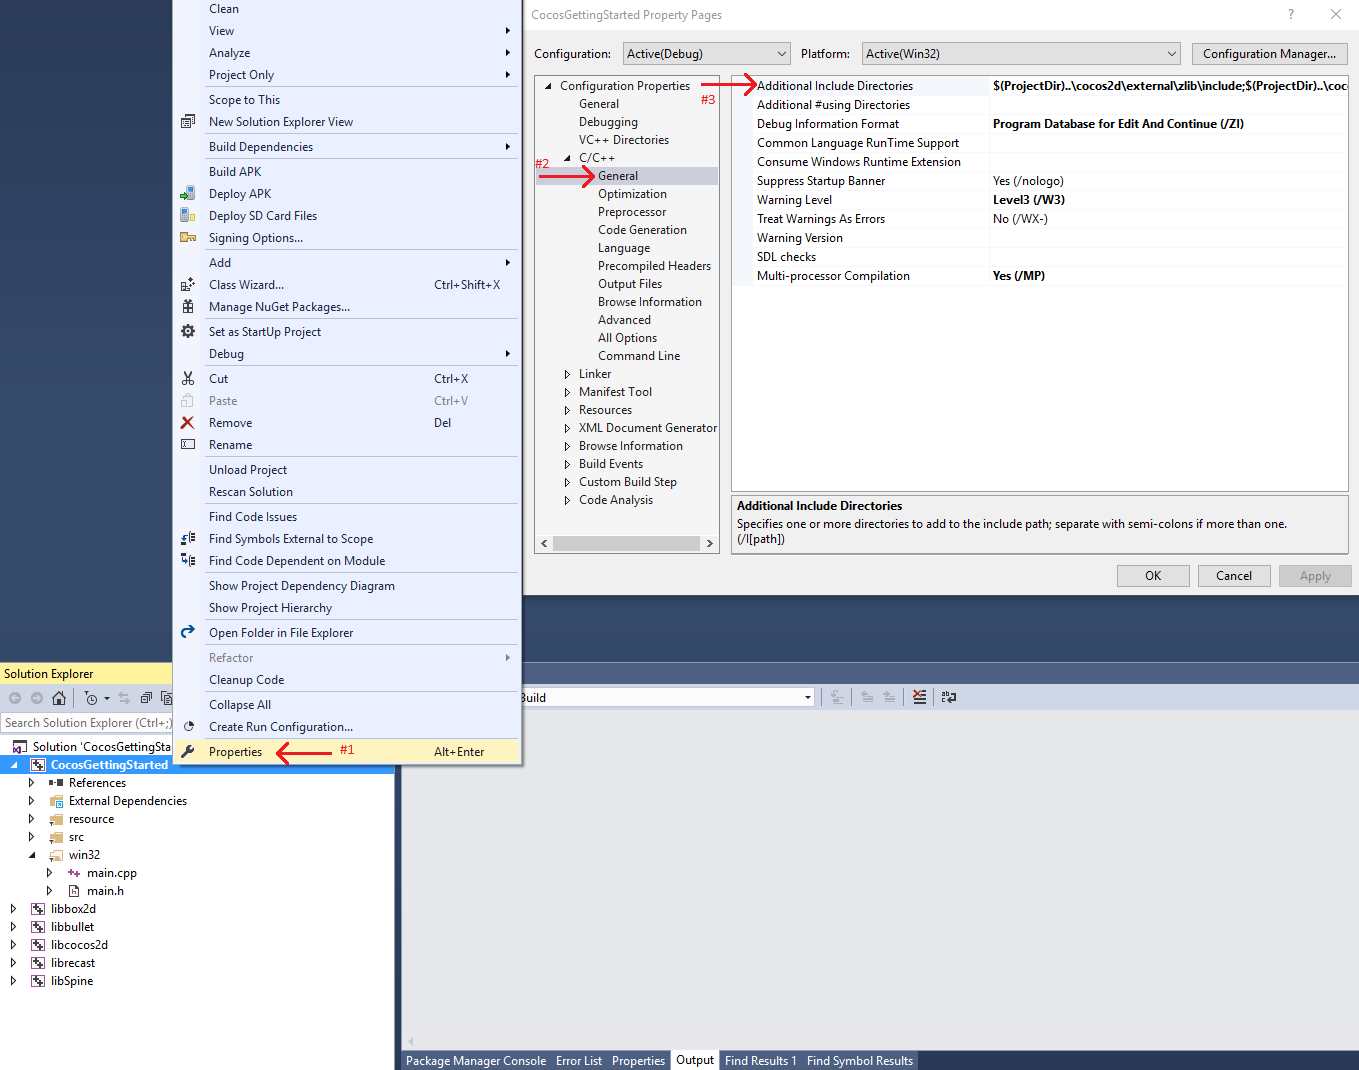
Open the Properties window for your CocosGettingStarted project (as shown below).
-
Replace the Additional Include Directories with this:
$(ProjectDir)..\cocos2d\external\zlib\include;$(ProjectDir)..\cocos2d\external\curl\include\win32;$(EngineRoot)cocos\audio\include;$(EngineRoot)external;$(EngineRoot)external\chipmunk\include\chipmunk;$(EngineRoot)extensions;..\Classes;..;%(AdditionalIncludeDirectories);$(_COCOS_HEADER_WIN32_BEGIN);$(_COCOS_HEADER_WIN32_END);..\cocos2d
We’re adding curl and zlib, which are libraries that come with Cocos, but aren’t enabled by default.
Set up your first API call
This guide provides the minimum steps to make your first PlayFab API call. Confirmation is visible in the app.- In Visual Studio, inside of the Solution/CocosGettingStarted/src folder, Open HelloWorldScene.h and replace the contents with this:
- In Visual Studio, inside of the Solution/CocosGettingStarted/src folder, Open
HelloWorldScene.hand replace the contents with those shown below.
- In Visual Studio, inside of the Solution/CocosGettingStarted/src folder, Open
- Immediately next to that, open
HelloWorldScene.cpp, and replace the contents with this:
Finish and execute
- Build and Execute your Cocos Project: Dropdowns -> Debug -> Start Debugging.
- This will prompt you to build. Select Yes.
- You should see a screen that says: Congratulations, you made your first successful API call!
-
Now, you can start making other API calls, and building your game.
For a list of all available client API calls, see our PlayFab API References documentation.
Deconstruct the code
This optional last section describes each part of source code above, in detail.-
HelloWorldScene.h- This is only trivially modified from the default
HelloWorldScene.hgenerated by Cocos. - Specifically, it defines some Cocos GUI we’re using, and the prototype for
OnLoginSuccessandOnLoginFail. - Everything else is standard Cocos Engine functions.
- This is only trivially modified from the default
-
HelloWorldScene.cpp-
createScene()is a standard Cocos Engine function. -
init()-
Normal Cocos Gui stuff:
closeItemandtestReportLabel. -
PlayFab::PlayFabSettings::titleId = "xxxx";- Every PlayFab developer creates a title in Game Manager. When you publish your game, you must code that titleId into your game. This lets the client know how to access the correct data within PlayFab. For most users, just consider it a mandatory step that makes PlayFab work.
-
PlayFab::ClientModels::LoginWithCustomIDRequest request;- Most PlayFab API methods require input parameters, and those input parameters are packed into a request object.
- Every API method requires a unique request object, with a mix of optional and mandatory parameters.
- For
LoginWithCustomIDRequest, there’s a mandatory parameter ofCustomId, which uniquely identifies a player andCreateAccount, which allows the creation of a new account with this call.
- For
- For login, most developers will want to use a more appropriate login method.
- See the PlayFab Login documentation for a list of all login methods, and input parameters. Common choices are:
LoginWithAndroidDeviceIDLoginWithIOSDeviceIDLoginWithEmailAddress
- See the PlayFab Login documentation for a list of all login methods, and input parameters. Common choices are:
-
PlayFab::PlayFabClientAPI::LoginWithCustomID(request, OnLoginSuccess, OnLoginFail, nullptr);- This begins the async request to
LoginWithCustomID, and will invoke theOnLoginSuccessorOnLoginFailfunction when complete.
- This begins the async request to
-
Normal Cocos Gui stuff:
-
update(float delta)- Simply setting the
statusMsgvariable doesn’t update the on-screen text. - This function sets the GUI text to match the contents of
statusMsgevery tick (not very efficient).
- Simply setting the
-
OnLoginSuccess(result, customData)- When the success callback is called, the result object of many API callbacks will contain the requested information.
LoginResultcontains some basic information about the player, but for most users, login is simply a mandatory step before calling other APIs.
-
OnLoginFail(error, customData)- If the error-function is called, your API call has failed.
- API calls can fail for many reasons, and you should always attempt to handle failure.
- Why API calls fail (In order of likelihood)
PlayFabSettings.TitleIdisn’t set. If you forget to set titleId to your title, then nothing will work.- In Cocos, the curl library will probably just crash your game if you fail to set titleId correctly.
- Request parameters. If you haven’t provided the correct or required information for a particular API call, then it will fail. See
error.errorMessage,error.errorDetails, orerror.GenerateErrorReport()for more info. - Device connectivity issue. Cell phones lose/regain connectivity constantly, and so any API call at any time can fail randomly, and then work immediately after. Going into a tunnel can disconnect you completely.
- PlayFab server issue. As with all software, there can be issues. See our release notes for updates.
- The internet isn’t 100% reliable. Sometimes the message is corrupted or fails to reach the PlayFab server.
- If you’re having difficulty debugging an issue, and the information within the error callback isn’t sufficient, visit us on our forums.
-
customData is a void-pointer, which can be used in any way to establish context.
- In C++, it’s harder to maintain the context of an API call, so we added the
customDataparameter, which can relay any object to the callback, which can be used however you like to establish context. - Thus, if you make API calls to retrieve inventory, you can pass a player, or inventory pointer as
customData, and update the inventory on that object, in the callback.
- In C++, it’s harder to maintain the context of an API call, so we added the
-