
快速入门:Unreal Engine 的 PlayFab 客户端库
开始使用适用于 Unreal Engine 的 PlayFab 插件。按照本快速入门安装 PlayFab Unreal Engine 插件,并创建使用 C++ 客户端库和 Blueprint 接口的示例应用。 您可以使用适用于 Unreal Engine 的 PlayFab 插件来管理 Title 的 LiveOps,并执行管理员、客户端和服务器操作,例如:- 玩家身份验证。
- 管理虚拟物品和货币。
- 创建社交功能,如好友列表。 API 参考文档 | 库源代码 | Unreal Marketplace
先决条件
- PlayFab 开发者帐户。
- 已安装并配置为支持 Unreal Engine 的 Visual Studio。有关配置 Visual Studio 的信息,请参阅 Setting Up Visual Studio for Unreal Engine。
- 已安装 Unreal Engine。有关安装 Unreal Engine 的信息,请参阅 Unreal Engine 安装指南。
- 已安装 PlayFab Unreal 插件。您可以从 Unreal Engine marketplace 安装 Unreal 插件。
创建 Unreal 项目
在 Unreal Engine 中,创建一个新的 Unreal 项目。有关详细说明,请参阅 Create a New Project guide。- 对于 Project Category 选择 Games。
- 在 Select Template 中,选择 Blank。
- 在 Project Settings 中,选择 C++ 或 Blueprint。
- 选择 No Starter Content。
- 为您的项目选择一个名称,例如 MyProject。
在 Unreal 项目中启用 PlayFab 插件
要启用 PlayFab 插件:- 从 Settings 菜单,在 Game Specific Settings 下选择 Plugins。
- 启用 PlayFab 插件并根据需要重新启动 Unreal Engine。
在 C++ 中将 PlayFab 添加为模块依赖项
在 Visual Studio 中,将 PlayFab 添加为 C++ 项目的模块依赖项:- 从 View 菜单打开 Solution Explorer,该窗口显示您的 C++ 项目文件。
- 在 Solution Explorer 中,导航到 Solution\Games\YourProjectName\Source 并打开 YourProjectName.Build.cs。
-
添加以下行:
- 保存您的更改。
生成所需的 Visual Studio 项目文件
要更新并生成使用 PlayFab 插件所需的 Visual Studio 项目文件:- 打开文件资源管理器窗口并导航到项目文件所在的文件夹。
- 在项目的根文件夹中,右键单击 YourProjectName.uproject 文件。
- 从上下文菜单中,选择 Generate Visual Studio project files。
使用 C++ 调用 PlayFab
以下步骤将引导您创建一个使用自定义 ID 登录 PlayFab 的 Tile。有关从 Blueprints 项目登录的信息,请参阅本文后面的 “从 Unreal Blueprints 调用 PlayFab”。创建新的 Actor
要创建新的 Actor:- 从 File 菜单,选择 New C++ Class。
- 对于 Parent Class 选择 Actor。
- 将您的 actor 命名为 LoginActor。创建 Actor 后,Unreal Engine 会自动打开您的 C++ 开发环境并加载 LoginActor.cpp 和 LoginActor.h。
在本快速入门中,您必须将 Actor 命名为 LoginActor。如果您给 Actor 使用不同的名称,则必须更新本快速入门中提供的示例代码以匹配新名称。
-
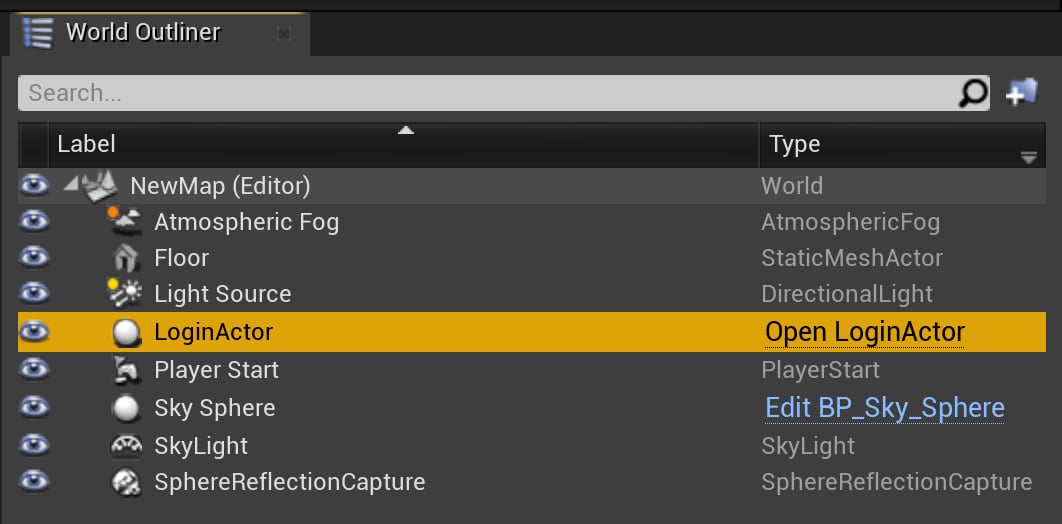
将您新创建的 Actor LoginActor 从 Content Browser 拖放到 Viewport 面板中。现在,它出现在 “World Outliner” 窗格中。
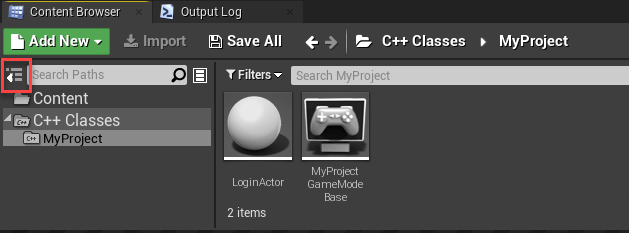
如果您没有看到 LoginActor,请选择 Show or hide the source panel 图标。然后在 C++ 类下选择您的项目名称。
向您的 C++ LoginActor 添加 PlayFab API 调用
在本快速入门中,您使用 LoginWithCustomID 执行登录。虽然LoginWithCustomId 易于开始使用,但我们建议在游戏发布时改用更安全的玩家身份验证方法。有关实现健壮登录功能的信息,请参阅 Login basics and best practices。
LoginWithCustomID 调用是在您的 LoginActor 中进行的。要将 PlayFab 特定代码添加到您的 LoginActor:
- 将 LoginActor.h 的内容替换为所示的代码:
- 将 LoginActor.cpp 的内容替换为以下代码。
使用 C++ 完成并执行
现在,您已准备好在 Unreal Engine 中使用 C++ 测试对 PlayFab 的调用。测试调用的结果显示在 Unreal Engine 的 Output Log 中。 在 Unreal Engine 中:- 从 Windows 菜单显示 Output Log,选择 Developer Tools 并启用 Output Log。
- 在工具栏中,选择 Compile 并等待 Unreal Engine 完成编译。在您的代码编译期间,Unreal 会显示 “Compiling C++ Code.”。
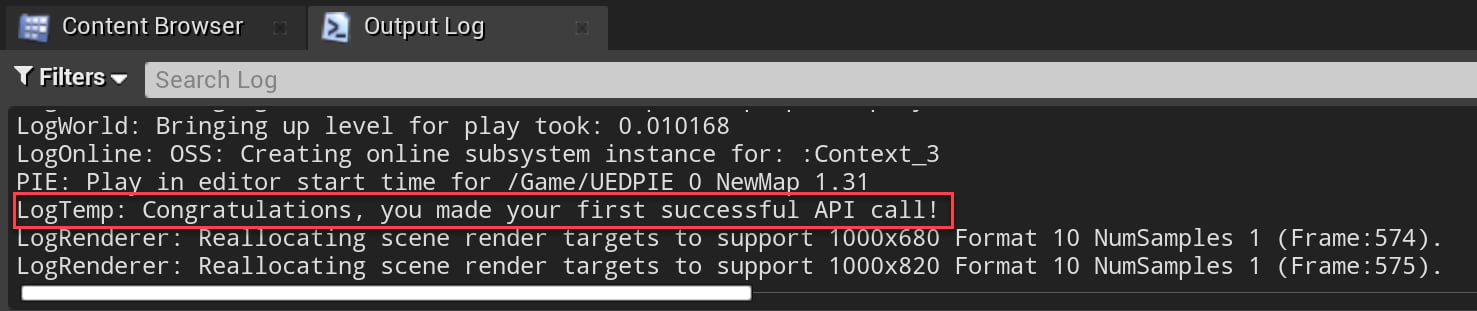
- 选择 Play。代码运行时,Unreal 会在 Output Log 窗口中显示以下内容:
LogTemp: Congratulations, you made your first successful API call!
从 Unreal Blueprints 调用 PlayFab
本节将引导您创建一个 Blueprint 结构,它使用 PlayFab API 调用 LoginWithCustomID。虽然LoginWithCustomId 易于开始使用,但我们建议在游戏发布时改用更安全的玩家身份验证方法。有关实现健壮登录功能的信息,请参阅 Login basics and best practices。
创建 Blueprint 结构
在 Unreal Engine 中,从工具栏中选择 Open Level Blueprint。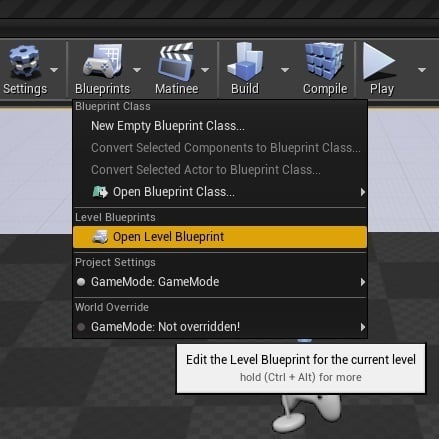
Event BeginPlay 和 Event Tick。
本快速入门中使用的 Actions:
Set Play Fab SettingsLogin with Custom IDMake ClientLoginWithCustomIDRequestAddCustomEventx 2Break PlayFabErrorPrint Stringx 2
-
在
Event BeginPlay上选择输出引脚并将其拖到 Event Graph 中的空白位置。在 Executable Actions 对话框中,搜索Set Play Fab Settings并选择它以将其添加到您的 Blueprint。在Set Play Fab Settings中,如果 Game Title id 为空,请将其设置为您游戏的 Title ID。 -
在
Set Play Fab Settings上选择输出引脚并将其拖到空白位置。在 Executable Actions 对话框中,搜索Login with Custom ID并选择它以将其添加到您的 Blueprint。 -
在
Login with Custom ID上选择 Request 引脚并将其拖到空白位置。从 Actions providing a(n) Client Login With Custom ID Request Structure 中,选择Make ClientLoginWithCustomIDRequest。 -
在
Make ClientLoginWithCustomIDRequest上:- 选择 Create Account。
- 将 Custom Id 设置为 GettingStartedGuide。
-
在
Login with Custom ID上,选择 On Success 引脚并将其拖到空白位置。在 Actions providing a(n) Delegate 中,搜索Add Custom Event并选择它以将其添加到您的 Blueprint。- 将其命名为
OnLogin。
- 将其命名为
-
选择 On Failure 引脚并将其拖到空白位置。在 Actions providing a(n) Delegate 中,搜索
Add Custom Event并选择它以将其添加到您的 Blueprint。- 将其命名为
OnFailure。
- 将其命名为
-
在
OnLogin上选择输出引脚并将其拖到空白位置。在 Executable Actions 对话框中,搜索Print String并选择它以将其添加到 Blueprint。- 在
Print String上,将 In String 值设置为 “Congratulations, you made your first successful PlayFab API call using Blueprint!”。
- 在
-
选择
OnFailure的输出引脚并将其拖到空白位置。在 Executable Actions 对话框中,搜索Print String并选择它以将其添加到 Blueprint。 -
在
OnFailure上选择 Error 引脚并将其拖到空白位置。在 Actions providing a(n) string 对话框中,搜索 Break PlayFabError 并选择它以将其添加到 Blueprint。在 Actions taking a(n) PlayFab error structure 对话框中,搜索 Break PlayFabError 并选择它以将其添加到 Blueprint。 -
将
Break PlayFabError的 Error Message 引脚连接到失败时的Print StringAction 的 In String 引脚。
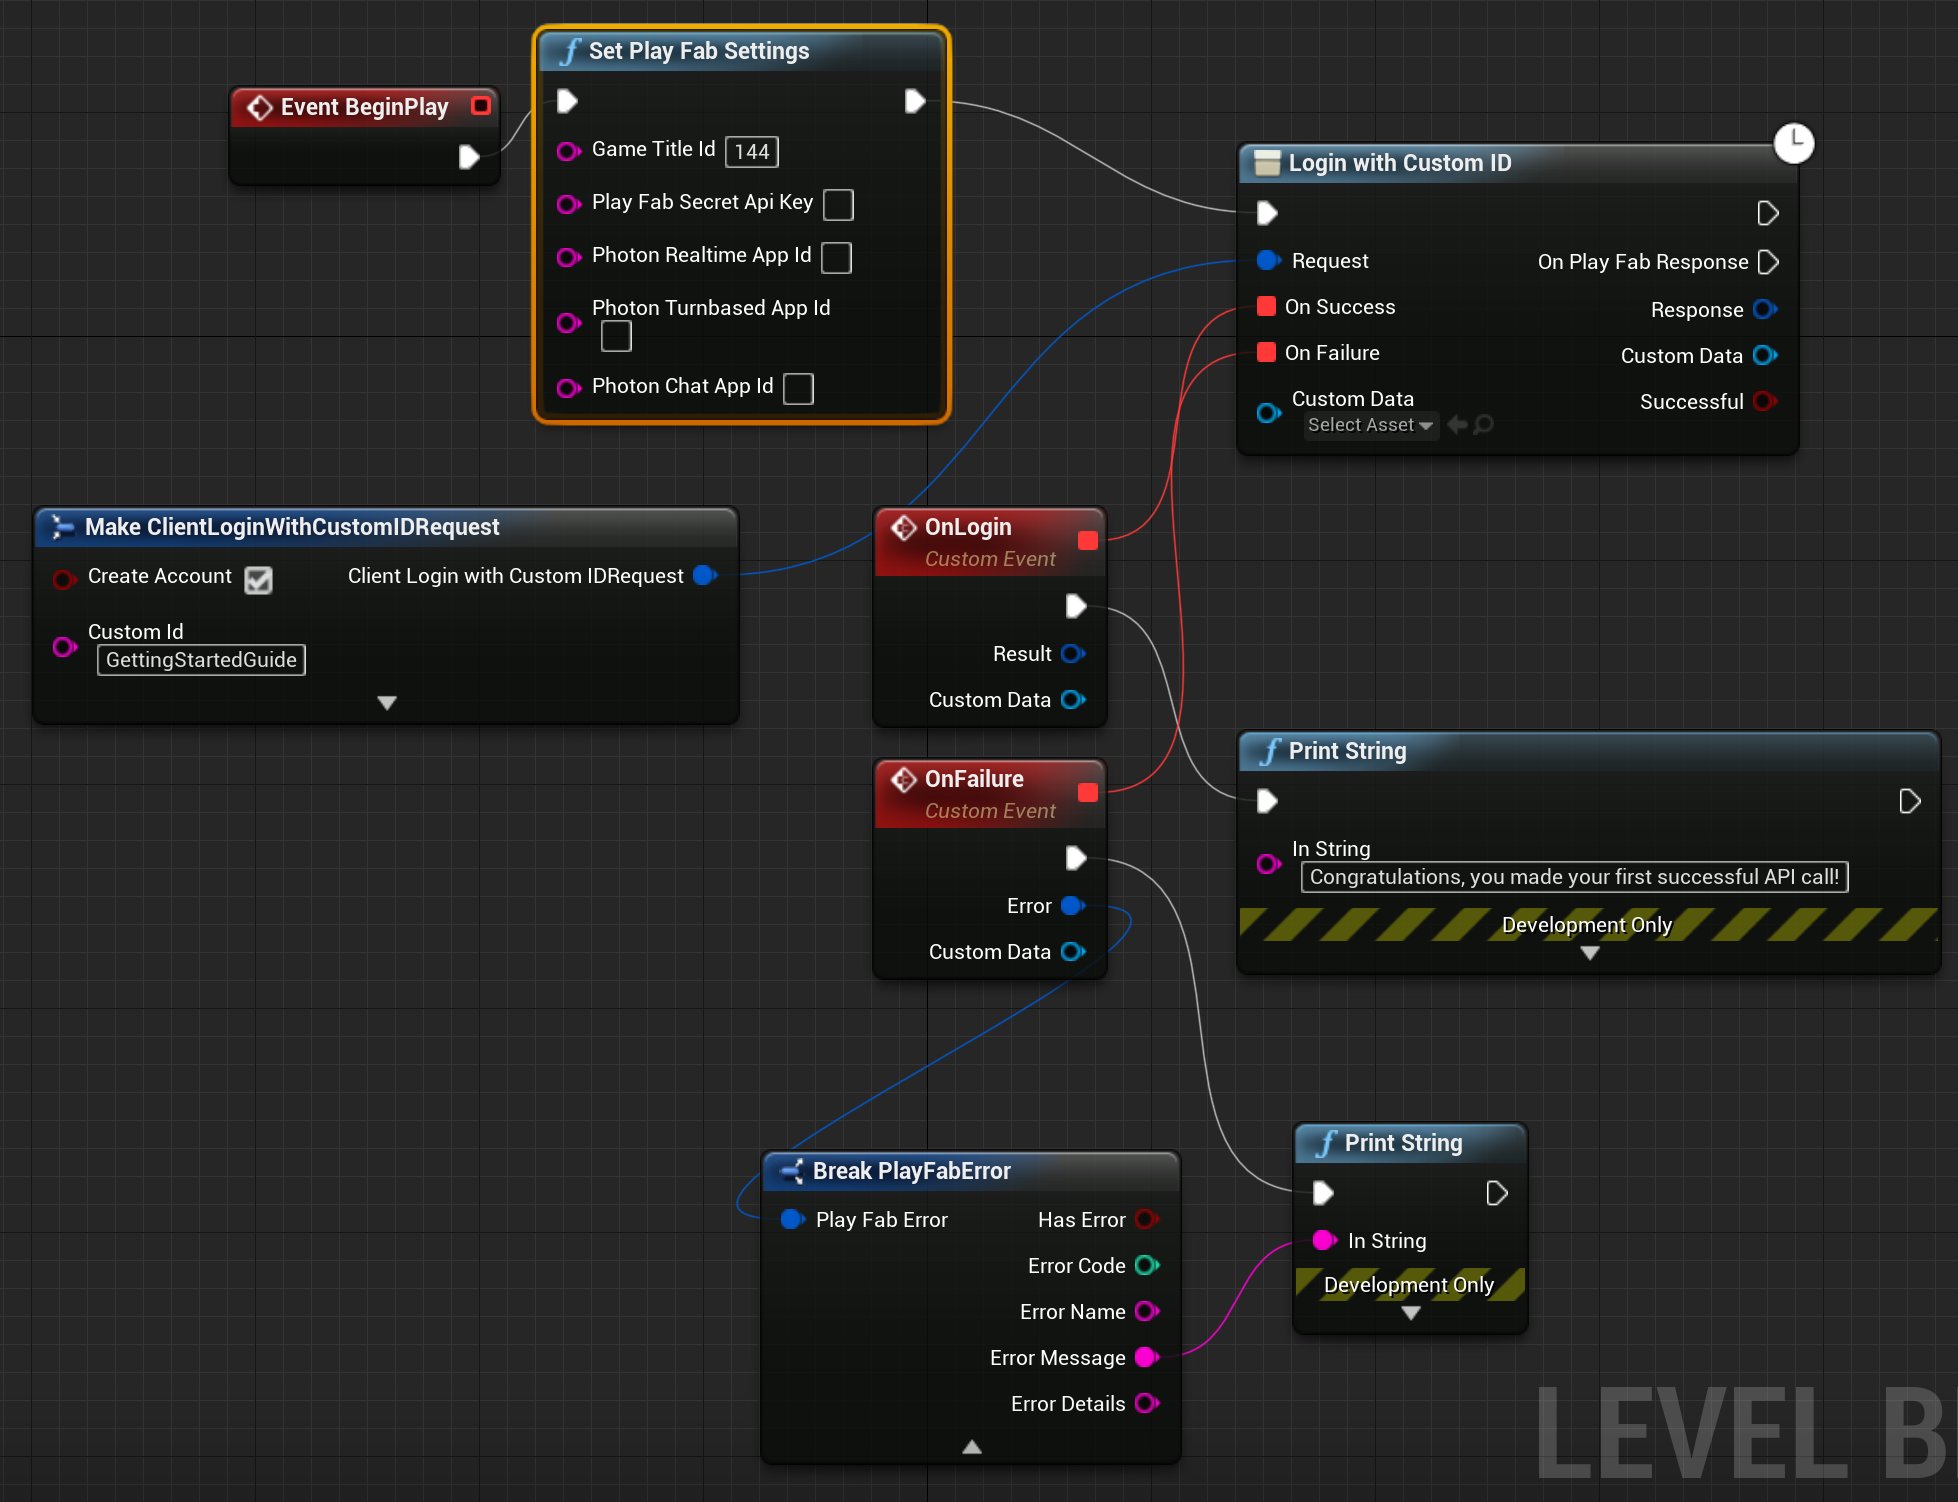
使用 Blueprint 执行 PlayFab 调用
- 在工具栏上,选择 Play 按钮。
-
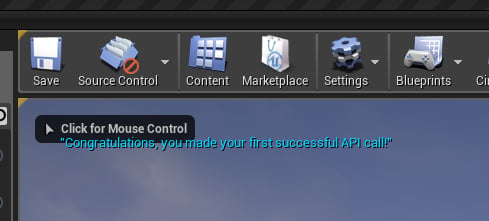
当 Blueprint 运行时,Viewport 窗口中会显示以下输出。
更多资源
- Unreal Engine 关于 Blueprints Visual Scripting 的文档。
- Unreal Engine 文档。