> ## Documentation Index
> Fetch the complete documentation index at: https://devdocs.xbox.com/llms.txt
> Use this file to discover all available pages before exploring further.
# Unreal Engine 快速入門
> 安裝 PlayFab Unreal Marketplace 外掛程式,並使用 C++ 或藍圖從 Unreal Engine 專案進行您的第一次 PlayFab API 呼叫。
# 快速入門:適用於 Unreal Engine 的 PlayFab 用戶端程式庫
開始使用適用於 Unreal Engine 的 PlayFab 外掛程式。請依照本快速入門安裝 PlayFab Unreal Engine 外掛程式,並建立使用 C++ 用戶端程式庫和藍圖介面的範例應用程式。
您可以使用適用於 Unreal Engine 的 PlayFab 外掛程式來管理遊戲的 LiveOps,並執行管理、用戶端和伺服器作業,例如:
* 玩家驗證。
* 管理虛擬物品和貨幣。
* 建立社交功能,例如好友清單。
[API 參考文件](/zh-TW/services/playfab/api-references) | [程式庫原始程式碼](https://github.com/PlayFab/UnrealMarketplacePlugin) | [Unreal Marketplace](https://www.unrealengine.com/marketplace/playfab-sdk)
## 必要條件
* [PlayFab 開發人員帳戶](https://developer.playfab.com)。
* 已針對 Unreal Engine 設定的 [Visual Studio](https://visualstudio.microsoft.com/downloads/) 安裝。如需設定 Visual Studio 的相關資訊,請參閱[為 Unreal Engine 設定 Visual Studio](https://docs.unrealengine.com/en-US/Programming/Development/VisualStudioSetup/index.html)。
* 已安裝 [Unreal Engine](https://www.unrealengine.com/download)。如需安裝 Unreal Engine 的相關資訊,請參閱 [Unreal Engine 安裝指南](https://docs.unrealengine.com/4.27/en-US/Basics/Projects/Browser/)。
* 已安裝 PlayFab Unreal 外掛程式。您可以從 [Unreal Engine Marketplace](https://www.unrealengine.com/marketplace/playfab-sdk) 安裝 Unreal 外掛程式。
## 建立 Unreal 專案
在 Unreal Engine 中,建立新的 Unreal 專案。如需詳細指示,請依照[建立新專案指南](https://docs.unrealengine.com/4.27/en-US/Basics/Projects/Browser/)操作。
1. 在 **Project Category** 中,選取 **Games**。
2. 在 **Select Template** 中,選取 **Blank**。
3. 在 **Project Settings** 中,選取 **C++** 或 **Blueprint**。
4. 選擇 **No Starter Content**。
5. 為您的專案選擇名稱,例如 **MyProject**。
## 在您的 Unreal 專案中啟用 PlayFab 外掛程式
若要啟用 PlayFab 外掛程式:
1. 從 **Settings** 功能表的 **Game Specific Settings** 下,選取 **Plugins**。
2. 啟用 **PlayFab** 外掛程式,並視需要重新啟動 Unreal Engine。
如果 "PlayFab" 沒有出現在 **Plugins** 中,請確認已從 Unreal Marketplace 安裝外掛程式。重新啟動 Unreal 編輯器。然後再次開啟 **Plugins** 並搜尋 "PlayFab"。
### 在 C++ 中將 PlayFab 新增為模組相依性
在 Visual Studio 中,將 PlayFab 新增為您 C++ 專案的模組相依性:
1. 從 **View** 功能表開啟 **Solution Explorer**,其中會顯示您的 C++ 專案檔案。
2. 在 Solution Explorer 中,瀏覽至 **Solution\Games\YourProjectName\Source**,然後開啟 **YourProjectName.Build.cs**。
3. 新增下列這一行:
```cpp theme={null}
PrivateDependencyModuleNames.AddRange(new string[] { "PlayFab", "PlayFabCpp", "PlayFabCommon" });
```
4. 儲存您的變更。
## 產生必要的 Visual Studio 專案檔案
若要更新並產生使用 PlayFab 外掛程式所需的 Visual Studio 專案檔案:
1. 開啟檔案總管視窗,並瀏覽至您專案檔案所在的資料夾。
2. 在專案的根資料夾中,以滑鼠右鍵按一下 YourProjectName.uproject 檔案。
3. 從操作功能表中,選取 **Generate Visual Studio project files**。
## 使用 C++ 呼叫 PlayFab
下列步驟會逐步引導您建立使用自訂識別碼登入 PlayFab 的 Tile。如需從藍圖專案登入的相關資訊,請參閱本文稍後的「從 Unreal 藍圖呼叫 PlayFab」。
### 建立新的 Actor
若要建立新的 Actor:
1. 從 **File** 功能表中,選取 **New C++ Class**。
2. 在 **Parent Class** 中,選取 **Actor**。
3. 將您的 Actor 命名為 **LoginActor**。建立 Actor 之後,Unreal Engine 會自動開啟您的 C++ 開發環境,並載入 LoginActor.cpp 和 LoginActor.h。
基於本快速入門的目的,您必須將 Actor 命名為 **LoginActor**。如果您為 Actor 指定不同的名稱,就必須更新本快速入門中提供的範例程式碼以符合新名稱。
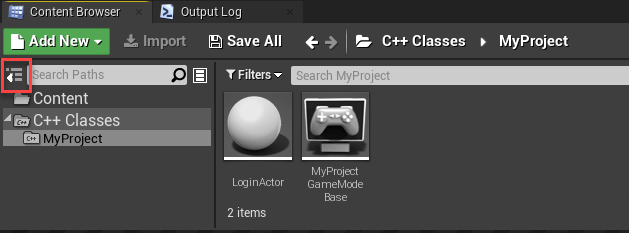
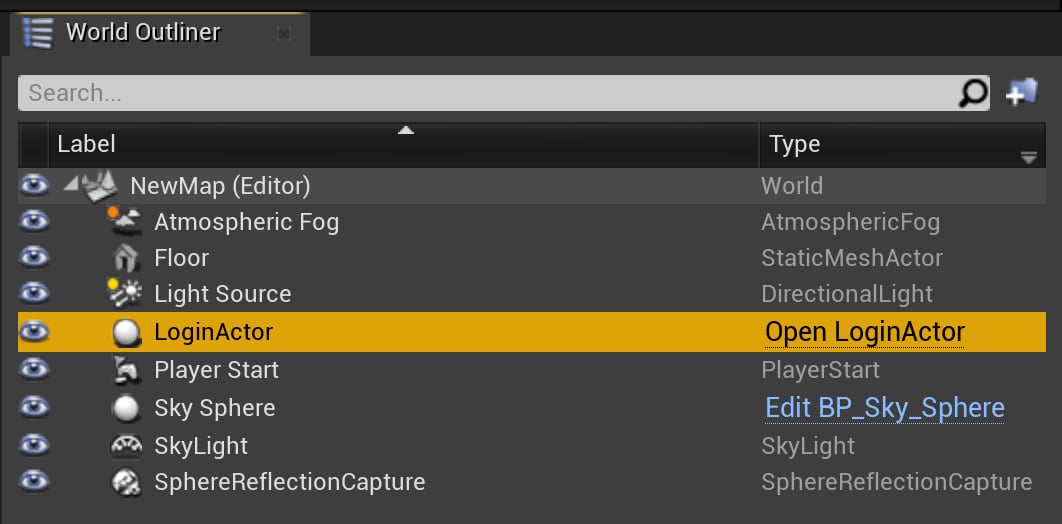
4. 將您的新 Actor **LoginActor** 從 Content Browser 拖放至 Viewport 面板。它現在會出現在 "World Outliner" 窗格中。
如果您沒有看到 **LoginActor**,請選取 **Show or hide the source panel** 圖示。然後在 C++ 類別下選取您的專案名稱。
 ### 將 PlayFab API 呼叫新增至您的 C++ LoginActor
在本快速入門中,您會使用 [LoginWithCustomID](xref:titleid.playfabapi.com.client.authentication.loginwithcustomid) 來執行登入。雖然 `LoginWithCustomId` 易於使用、方便入門,但建議您在發行遊戲時改用更安全的玩家驗證方法。如需實作穩固登入功能的相關資訊,請參閱[登入基本概念和最佳做法](/zh-TW/services/playfab/identity/player-identity/login/login-basics-best-practices)。
`LoginWithCustomID` 呼叫是在您的 **LoginActor** 中進行的。若要將 PlayFab 特定程式碼新增至您的 **LoginActor**:
1. 將 LoginActor.h 的內容取代為所示的程式碼:
```cpp theme={null}
#pragma once
#include "CoreMinimal.h"
#include "GameFramework/Actor.h"
#include "PlayFab.h"
#include "Core/PlayFabError.h"
#include "Core/PlayFabClientDataModels.h"
#include "LoginActor.generated.h"
UCLASS()
class ALoginActor : public AActor
{
GENERATED_BODY()
public:
ALoginActor();
virtual void BeginPlay() override;
void OnSuccess(const PlayFab::ClientModels::FLoginResult& Result) const;
void OnError(const PlayFab::FPlayFabCppError& ErrorResult) const;
virtual void Tick(float DeltaSeconds) override;
private:
PlayFabClientPtr clientAPI = nullptr;
};
```
2. 將 LoginActor.cpp 的內容取代為下列程式碼。
```cpp theme={null}
#include "LoginActor.h"
#include "Core/PlayFabClientAPI.h"
ALoginActor::ALoginActor()
{
PrimaryActorTick.bCanEverTick = true;
}
void ALoginActor::BeginPlay()
{
Super::BeginPlay();
GetMutableDefault()->TitleId = TEXT("144");
clientAPI = IPlayFabModuleInterface::Get().GetClientAPI();
PlayFab::ClientModels::FLoginWithCustomIDRequest request;
request.CustomId = TEXT("GettingStartedGuide");
request.CreateAccount = true;
clientAPI->LoginWithCustomID(request,
PlayFab::UPlayFabClientAPI::FLoginWithCustomIDDelegate::CreateUObject(this, &ALoginActor::OnSuccess),
PlayFab::FPlayFabErrorDelegate::CreateUObject(this, &ALoginActor::OnError)
);
}
void ALoginActor::OnSuccess(const PlayFab::ClientModels::FLoginResult& Result) const
{
UE_LOG(LogTemp, Log, TEXT("Congratulations, you made your first successful API call!"));
}
void ALoginActor::OnError(const PlayFab::FPlayFabCppError& ErrorResult) const
{
UE_LOG(LogTemp, Error, TEXT("Something went wrong with your first API call.\nHere's some debug information:\n%s"), *ErrorResult.GenerateErrorReport());
}
void ALoginActor::Tick(float DeltaTime)
{
Super::Tick(DeltaTime);
}
```
Visual Studio 中的 Intellisense 會指出它找不到 include 檔案和 PlayFab 命名空間。您可以放心地忽略這些警告。當您執行專案時,它會正確地建置和執行。
### 使用 C++ 完成並執行
現在您已準備好以 C++ 測試從 Unreal Engine 對 PlayFab 的呼叫。測試呼叫的結果會顯示在 Unreal Engine 的 **Output Log** 中。
在 Unreal Engine 中:
1. 從 **Windows** 功能表顯示 Output Log,選取 **Developer Tools** 並啟用 **Output Log**。
2. 在工具列中,選取 **Compile** 並等待 Unreal Engine 完成編譯。編譯程式碼時,Unreal 會顯示 "Compiling C++ Code"。
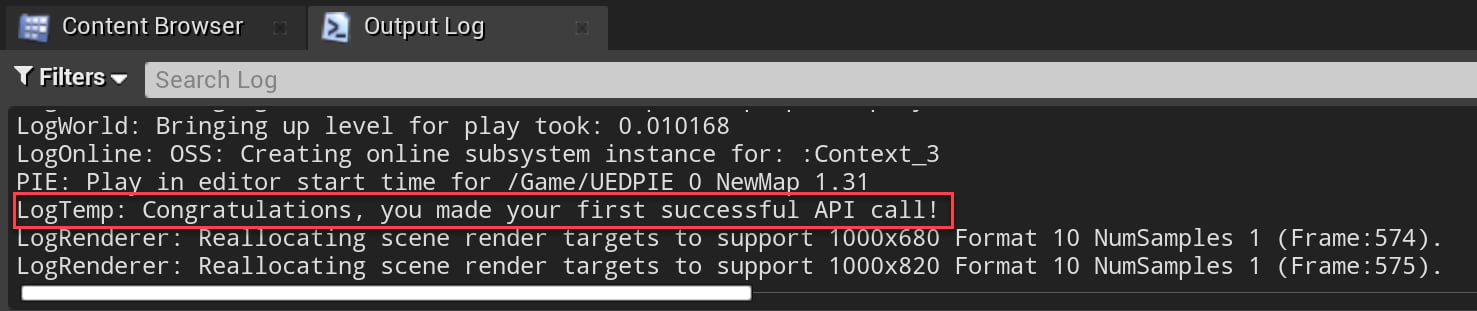
3. 選取 **Play**。程式碼執行時,Unreal 會在 **Output Log** 視窗中顯示下列內容:
`LogTemp: Congratulations, you made your first successful API call!`
### 將 PlayFab API 呼叫新增至您的 C++ LoginActor
在本快速入門中,您會使用 [LoginWithCustomID](xref:titleid.playfabapi.com.client.authentication.loginwithcustomid) 來執行登入。雖然 `LoginWithCustomId` 易於使用、方便入門,但建議您在發行遊戲時改用更安全的玩家驗證方法。如需實作穩固登入功能的相關資訊,請參閱[登入基本概念和最佳做法](/zh-TW/services/playfab/identity/player-identity/login/login-basics-best-practices)。
`LoginWithCustomID` 呼叫是在您的 **LoginActor** 中進行的。若要將 PlayFab 特定程式碼新增至您的 **LoginActor**:
1. 將 LoginActor.h 的內容取代為所示的程式碼:
```cpp theme={null}
#pragma once
#include "CoreMinimal.h"
#include "GameFramework/Actor.h"
#include "PlayFab.h"
#include "Core/PlayFabError.h"
#include "Core/PlayFabClientDataModels.h"
#include "LoginActor.generated.h"
UCLASS()
class ALoginActor : public AActor
{
GENERATED_BODY()
public:
ALoginActor();
virtual void BeginPlay() override;
void OnSuccess(const PlayFab::ClientModels::FLoginResult& Result) const;
void OnError(const PlayFab::FPlayFabCppError& ErrorResult) const;
virtual void Tick(float DeltaSeconds) override;
private:
PlayFabClientPtr clientAPI = nullptr;
};
```
2. 將 LoginActor.cpp 的內容取代為下列程式碼。
```cpp theme={null}
#include "LoginActor.h"
#include "Core/PlayFabClientAPI.h"
ALoginActor::ALoginActor()
{
PrimaryActorTick.bCanEverTick = true;
}
void ALoginActor::BeginPlay()
{
Super::BeginPlay();
GetMutableDefault()->TitleId = TEXT("144");
clientAPI = IPlayFabModuleInterface::Get().GetClientAPI();
PlayFab::ClientModels::FLoginWithCustomIDRequest request;
request.CustomId = TEXT("GettingStartedGuide");
request.CreateAccount = true;
clientAPI->LoginWithCustomID(request,
PlayFab::UPlayFabClientAPI::FLoginWithCustomIDDelegate::CreateUObject(this, &ALoginActor::OnSuccess),
PlayFab::FPlayFabErrorDelegate::CreateUObject(this, &ALoginActor::OnError)
);
}
void ALoginActor::OnSuccess(const PlayFab::ClientModels::FLoginResult& Result) const
{
UE_LOG(LogTemp, Log, TEXT("Congratulations, you made your first successful API call!"));
}
void ALoginActor::OnError(const PlayFab::FPlayFabCppError& ErrorResult) const
{
UE_LOG(LogTemp, Error, TEXT("Something went wrong with your first API call.\nHere's some debug information:\n%s"), *ErrorResult.GenerateErrorReport());
}
void ALoginActor::Tick(float DeltaTime)
{
Super::Tick(DeltaTime);
}
```
Visual Studio 中的 Intellisense 會指出它找不到 include 檔案和 PlayFab 命名空間。您可以放心地忽略這些警告。當您執行專案時,它會正確地建置和執行。
### 使用 C++ 完成並執行
現在您已準備好以 C++ 測試從 Unreal Engine 對 PlayFab 的呼叫。測試呼叫的結果會顯示在 Unreal Engine 的 **Output Log** 中。
在 Unreal Engine 中:
1. 從 **Windows** 功能表顯示 Output Log,選取 **Developer Tools** 並啟用 **Output Log**。
2. 在工具列中,選取 **Compile** 並等待 Unreal Engine 完成編譯。編譯程式碼時,Unreal 會顯示 "Compiling C++ Code"。
3. 選取 **Play**。程式碼執行時,Unreal 會在 **Output Log** 視窗中顯示下列內容:
`LogTemp: Congratulations, you made your first successful API call!`
 ## 從 Unreal 藍圖呼叫 PlayFab
本節會引導您建立藍圖結構,該結構會使用 PlayFab API 呼叫 [LoginWithCustomID](https://learn.microsoft.com/en-us/rest/api/playfab/client/authentication/login-with-custom-id?view=playfab-rest\&preserve-view=true)。雖然 `LoginWithCustomId` 易於使用、方便入門,但建議您在發行遊戲時改用更安全的玩家驗證方法。如需實作穩固登入功能的相關資訊,請參閱[登入基本概念和最佳做法](/zh-TW/services/playfab/identity/player-identity/login/login-basics-best-practices)。
如果您從藍圖專案開始,就必須將其轉換為 C++ 專案,PlayFab 藍圖動作才能運作。
### 建立藍圖結構
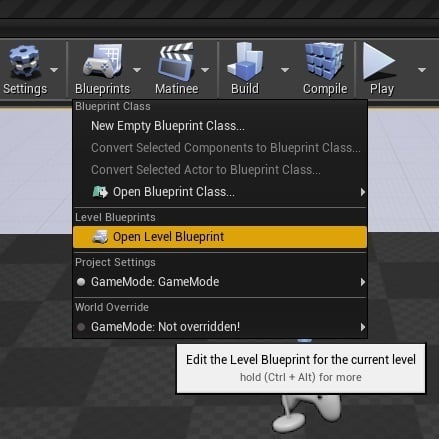
在 Unreal Engine 中,從工具列選取 **Open Level Blueprint**。
## 從 Unreal 藍圖呼叫 PlayFab
本節會引導您建立藍圖結構,該結構會使用 PlayFab API 呼叫 [LoginWithCustomID](https://learn.microsoft.com/en-us/rest/api/playfab/client/authentication/login-with-custom-id?view=playfab-rest\&preserve-view=true)。雖然 `LoginWithCustomId` 易於使用、方便入門,但建議您在發行遊戲時改用更安全的玩家驗證方法。如需實作穩固登入功能的相關資訊,請參閱[登入基本概念和最佳做法](/zh-TW/services/playfab/identity/player-identity/login/login-basics-best-practices)。
如果您從藍圖專案開始,就必須將其轉換為 C++ 專案,PlayFab 藍圖動作才能運作。
### 建立藍圖結構
在 Unreal Engine 中,從工具列選取 **Open Level Blueprint**。
 EventGraph 隨即開啟,並預先填入兩個動作:`Event BeginPlay` 和 `Event Tick`。
本快速入門中使用的動作:
* `Set Play Fab Settings`
* `Login with Custom ID`
* `Make ClientLoginWithCustomIDRequest`
* `AddCustomEvent` x 2
* `Break PlayFabError`
* `Print String` x 2
依下列方式建立您的藍圖:
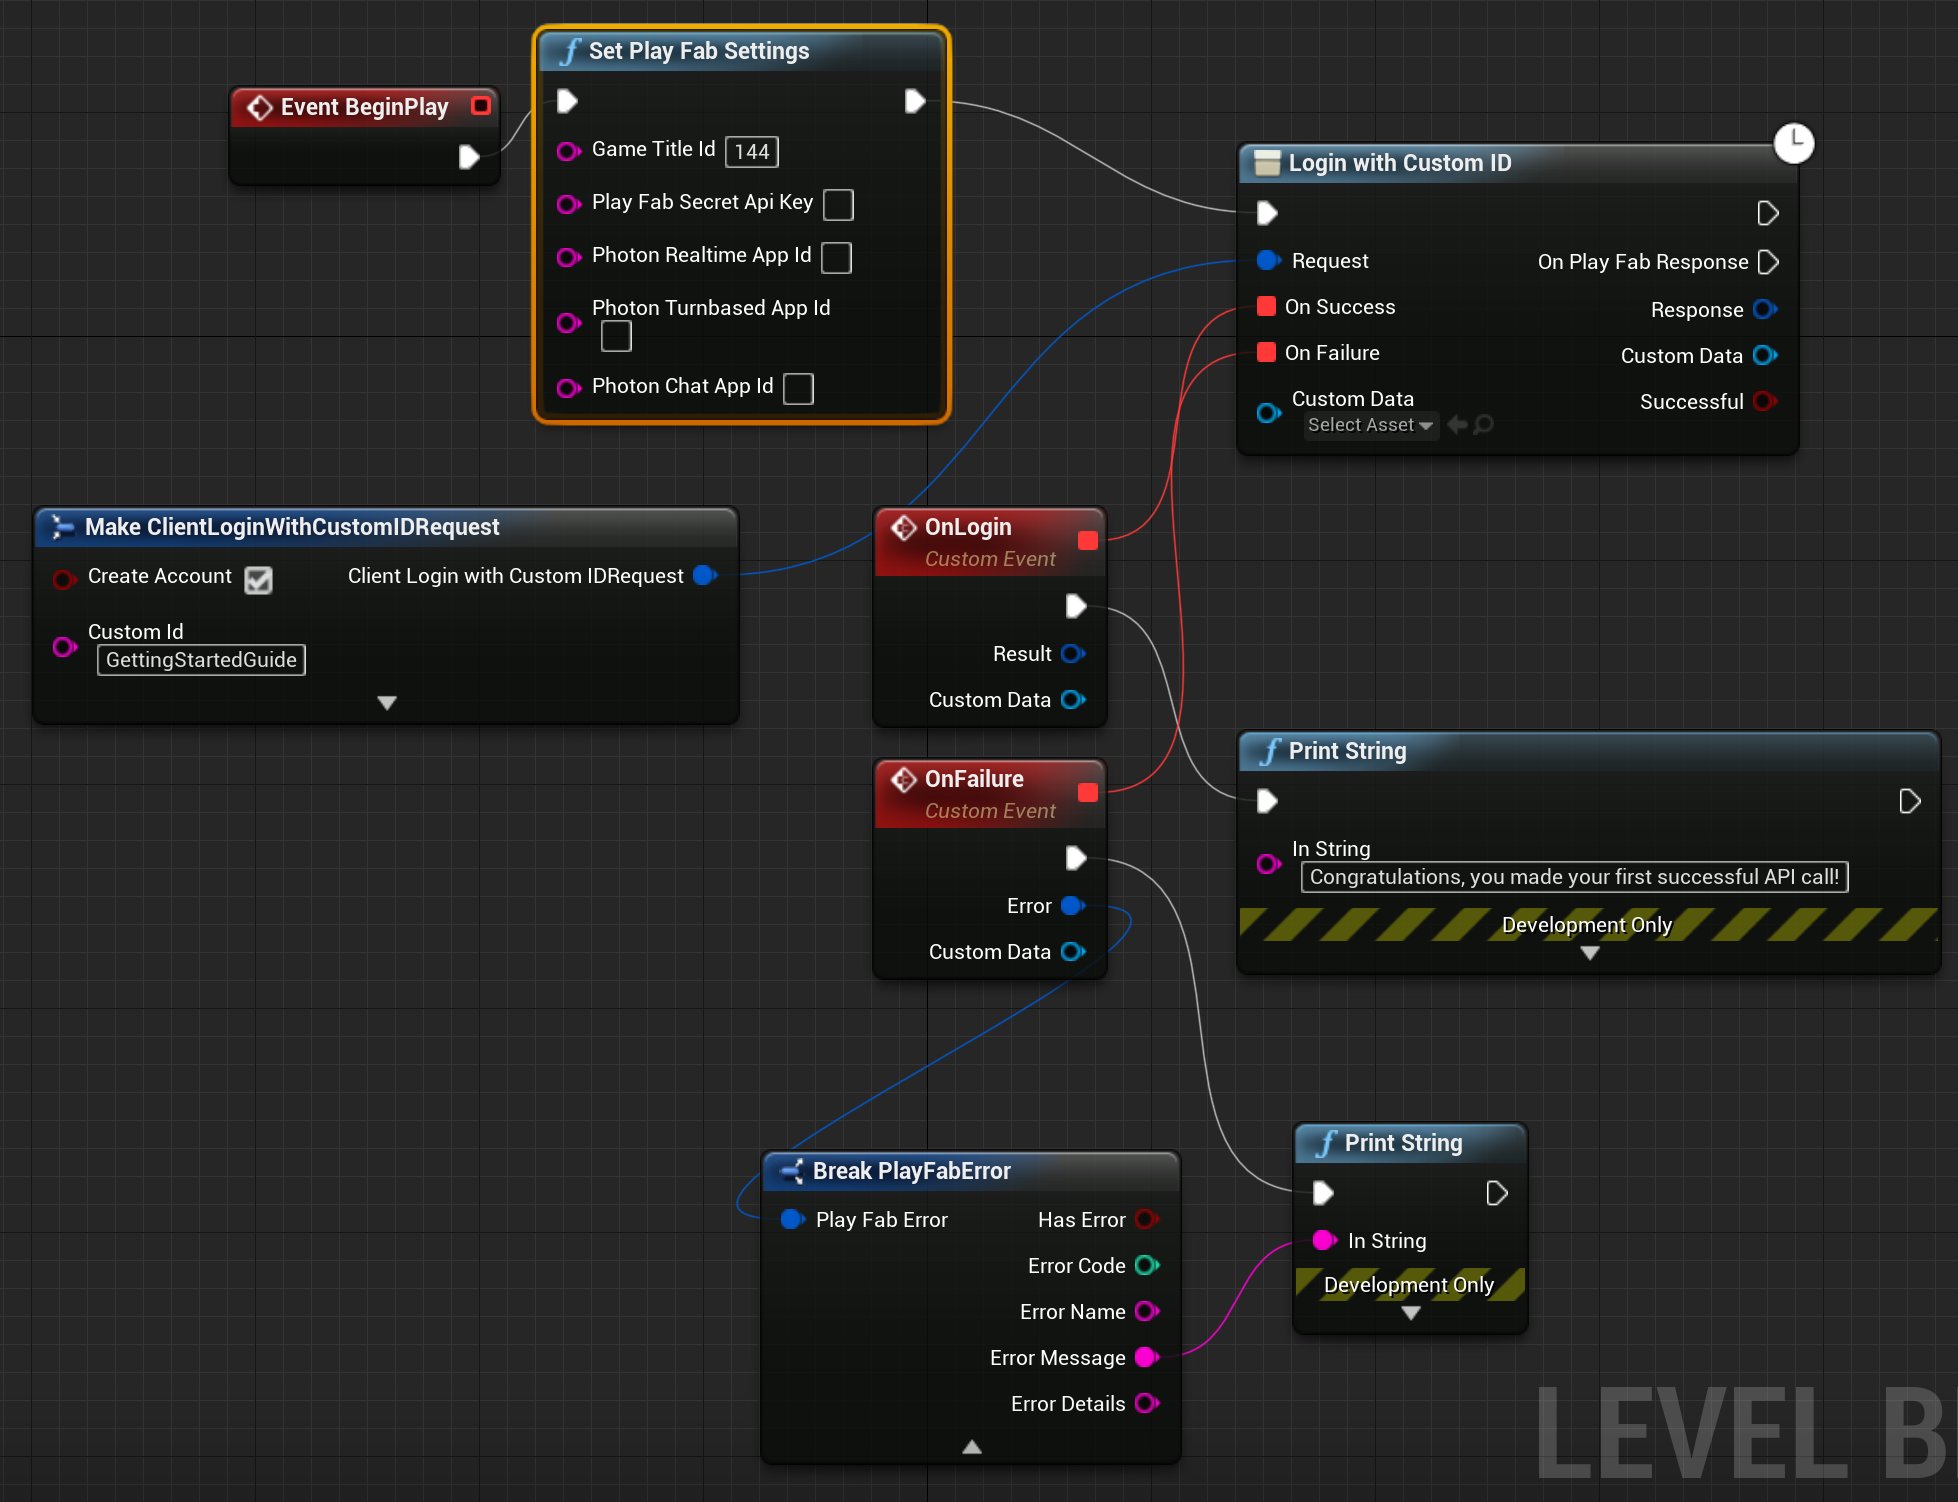
* 選取 `Event BeginPlay` 上的輸出接腳,並將其拖曳至 **Event Graph** 中的空白位置。在 **Executable Actions** 對話方塊中,搜尋 `Set Play Fab Settings` 並選取它,將其新增至您的藍圖。在 `Set Play Fab Settings` 中,如果 **Game Title id** 是空白的,請將其設定為您遊戲的 **Title ID**。
* 選取 `Set Play Fab Settings` 上的輸出接腳,並將其拖曳至空白位置。在 **Executable Actions** 對話方塊中,搜尋 `Login with Custom ID` 並選取它,將其新增至您的藍圖。
* 選取 `Login with Custom ID` 上的 **Request** 接腳,並將其拖曳至空白位置。從 **Actions providing a(n) Client Login With Custom ID Request Structure** 中,選取 `Make ClientLoginWithCustomIDRequest`。
* 在 `Make ClientLoginWithCustomIDRequest` 上:
* 選取 **Create Account**。
* 將 **Custom Id** 設定為 GettingStartedGuide。
* 在 `Login with Custom ID` 上,選取 **On Success** 接腳並將其拖曳至空白位置。在 **Actions providing a(n) Delegate** 中,搜尋 `Add Custom Event` 並選取它,將其新增至您的藍圖。
* 將其命名為 `OnLogin`。
* 選取 **On Failure** 接腳並將其拖曳至空白位置。在 **Actions providing a(n) Delegate** 中,搜尋 `Add Custom Event` 並選取它,將其新增至您的藍圖。
* 將其命名為 `OnFailure`。
* 選取 `OnLogin` 上的輸出接腳,並將其拖曳至空白位置。在 **Executable Actions** 對話方塊中,搜尋 `Print String` 並選取它,將其新增至藍圖。
* 在 `Print String` 上,將 **In String** 值設定為 "Congratulations, you made your first successful PlayFab API call using Blueprint!"。
* 選取 `OnFailure` 的輸出接腳,並將其拖曳至空白位置。在 **Executable Actions** 對話方塊中,搜尋 `Print String` 並選取它,將其新增至藍圖。
* 選取 `OnFailure` 上的 **Error** 接腳,並將其拖曳至空白位置。在 **Actions providing a(n) string** 對話方塊中,搜尋 **Break PlayFabError** 並選取它,將其新增至藍圖。在 **Actions taking a(n) PlayFab error structure** 對話方塊中,搜尋 **Break PlayFabError** 並選取它,將其新增至藍圖。
* 將 `Break PlayFabError` 的 **Error Message** 接腳連接至失敗時 `Print String` 動作的 **In String** 接腳。
完成時,您的藍圖應該會類似於此設計:
EventGraph 隨即開啟,並預先填入兩個動作:`Event BeginPlay` 和 `Event Tick`。
本快速入門中使用的動作:
* `Set Play Fab Settings`
* `Login with Custom ID`
* `Make ClientLoginWithCustomIDRequest`
* `AddCustomEvent` x 2
* `Break PlayFabError`
* `Print String` x 2
依下列方式建立您的藍圖:
* 選取 `Event BeginPlay` 上的輸出接腳,並將其拖曳至 **Event Graph** 中的空白位置。在 **Executable Actions** 對話方塊中,搜尋 `Set Play Fab Settings` 並選取它,將其新增至您的藍圖。在 `Set Play Fab Settings` 中,如果 **Game Title id** 是空白的,請將其設定為您遊戲的 **Title ID**。
* 選取 `Set Play Fab Settings` 上的輸出接腳,並將其拖曳至空白位置。在 **Executable Actions** 對話方塊中,搜尋 `Login with Custom ID` 並選取它,將其新增至您的藍圖。
* 選取 `Login with Custom ID` 上的 **Request** 接腳,並將其拖曳至空白位置。從 **Actions providing a(n) Client Login With Custom ID Request Structure** 中,選取 `Make ClientLoginWithCustomIDRequest`。
* 在 `Make ClientLoginWithCustomIDRequest` 上:
* 選取 **Create Account**。
* 將 **Custom Id** 設定為 GettingStartedGuide。
* 在 `Login with Custom ID` 上,選取 **On Success** 接腳並將其拖曳至空白位置。在 **Actions providing a(n) Delegate** 中,搜尋 `Add Custom Event` 並選取它,將其新增至您的藍圖。
* 將其命名為 `OnLogin`。
* 選取 **On Failure** 接腳並將其拖曳至空白位置。在 **Actions providing a(n) Delegate** 中,搜尋 `Add Custom Event` 並選取它,將其新增至您的藍圖。
* 將其命名為 `OnFailure`。
* 選取 `OnLogin` 上的輸出接腳,並將其拖曳至空白位置。在 **Executable Actions** 對話方塊中,搜尋 `Print String` 並選取它,將其新增至藍圖。
* 在 `Print String` 上,將 **In String** 值設定為 "Congratulations, you made your first successful PlayFab API call using Blueprint!"。
* 選取 `OnFailure` 的輸出接腳,並將其拖曳至空白位置。在 **Executable Actions** 對話方塊中,搜尋 `Print String` 並選取它,將其新增至藍圖。
* 選取 `OnFailure` 上的 **Error** 接腳,並將其拖曳至空白位置。在 **Actions providing a(n) string** 對話方塊中,搜尋 **Break PlayFabError** 並選取它,將其新增至藍圖。在 **Actions taking a(n) PlayFab error structure** 對話方塊中,搜尋 **Break PlayFabError** 並選取它,將其新增至藍圖。
* 將 `Break PlayFabError` 的 **Error Message** 接腳連接至失敗時 `Print String` 動作的 **In String** 接腳。
完成時,您的藍圖應該會類似於此設計:
 **儲存**藍圖,然後關閉藍圖編輯器視窗。
### 使用藍圖執行 PlayFab 呼叫
1. 在工具列上,選取 **Play** 按鈕。
2. 藍圖執行時,Viewport 視窗中會顯示下列輸出。
**儲存**藍圖,然後關閉藍圖編輯器視窗。
### 使用藍圖執行 PlayFab 呼叫
1. 在工具列上,選取 **Play** 按鈕。
2. 藍圖執行時,Viewport 視窗中會顯示下列輸出。
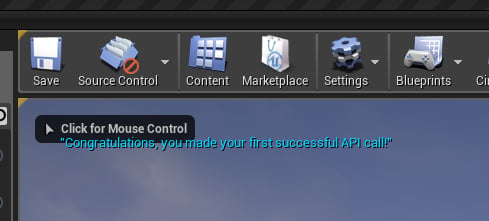 恭喜,您已使用藍圖成功進行第一次 PlayFab API 呼叫!
## 更多資源
* Unreal Engine 的[藍圖視覺化指令碼](https://docs.unrealengine.com/en-US/Engine/Blueprints/index.html)文件。
* [Unreal Engine 文件](https://docs.unrealengine.com/)。
## Related topics
- [搭配 Unreal Engine 使用 GDK](/zh-TW/build/gdk-and-engines/unreal/unreal.md)
- [PlayFab 支援的遊戲引擎](/zh-TW/services/playfab/sdks/game-engines/index.md)
- [PlayFab 2018 版本資訊](/zh-TW/services/playfab/release-notes/2018.md)
- [Party 快速入門](/zh-TW/services/playfab/multiplayer/networking/quickstart.md)
- [PlayFab Online Subsystem (OSS) 快速入門](/zh-TW/services/playfab/multiplayer/networking/party-unreal-engine-oss-quickstart.md)
恭喜,您已使用藍圖成功進行第一次 PlayFab API 呼叫!
## 更多資源
* Unreal Engine 的[藍圖視覺化指令碼](https://docs.unrealengine.com/en-US/Engine/Blueprints/index.html)文件。
* [Unreal Engine 文件](https://docs.unrealengine.com/)。
## Related topics
- [搭配 Unreal Engine 使用 GDK](/zh-TW/build/gdk-and-engines/unreal/unreal.md)
- [PlayFab 支援的遊戲引擎](/zh-TW/services/playfab/sdks/game-engines/index.md)
- [PlayFab 2018 版本資訊](/zh-TW/services/playfab/release-notes/2018.md)
- [Party 快速入門](/zh-TW/services/playfab/multiplayer/networking/quickstart.md)
- [PlayFab Online Subsystem (OSS) 快速入門](/zh-TW/services/playfab/multiplayer/networking/party-unreal-engine-oss-quickstart.md)