> ## Documentation Index
> Fetch the complete documentation index at: https://devdocs.xbox.com/llms.txt
> Use this file to discover all available pages before exploring further.
# Cocos2D-x 快速入門
> 在 Windows 上的 Visual Studio 中設定 Cocos2d-x 專案,並使用 PlayFab Cocos2d-x 用戶端程式庫進行您的第一次 PlayFab API 呼叫。
本快速入門可協助您在 Cocos2d-x 引擎中進行第一次 PlayFab API 呼叫。
您必須先擁有 [PlayFab 開發人員帳戶](https://developer.playfab.com),才能呼叫任何 PlayFab API。
## Cocos2d-x 專案設定
作業系統:本指南是針對使用 Visual Studio 2015 的 Windows 10 撰寫的。Cocos 可在大多數現代作業系統和環境中運作。安裝指示大致相似,但每種組合各有不同。
如果您要針對其他平台建置,所需的檔案相同,但您必須自行完成專案設定。Visual Studio 2013 的步驟完全相同,但此處提供的螢幕擷取畫面看起來會與您的畫面稍有不同。
1. 下載並安裝 Cocos2d-x
* [https://www.cocos2d-x.org/download](https://www.cocos2d-x.org/download)
* 設定 Cocos2d-x 需要一定的熟悉度。請參閱他們的文件網站:
* [https://docs.cocos2d-x.org/cocos2d-x/en/en/](https://docs.cocos2d-x.org/cocos2d-x/v3/en/)
* 請留意 [Cocos 必要條件](https://docs.cocos2d-x.org/cocos2d-x/v3/en/installation/prerequisites.html)
* 此外也需要 Visual Studio 2013 或 2015。
2. 設定好 Cocos2d-x 之後,使用 Cocos CLI 建立專案:
* 瀏覽至您要存放 Cocos 專案的位置
* 在父資料夾中開啟命令視窗 (Cocos CLI 會建立實際的專案目錄)
* 按住 **Shift** 鍵,然後在檔案總管視窗的空白處按一下滑鼠右鍵。
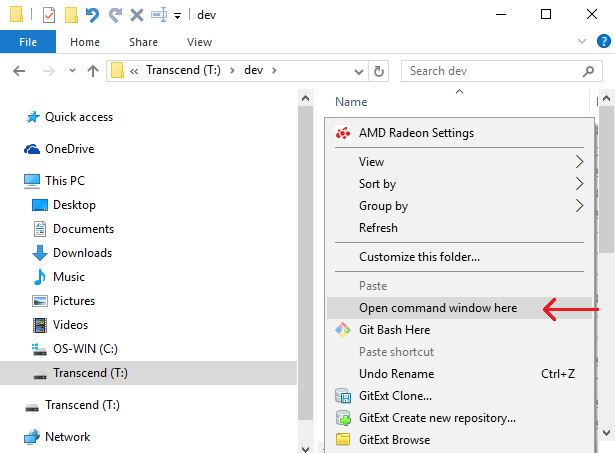 * 在新的主控台視窗中輸入下列命令:
* `cocos new CocosGettingStarted -l cpp`
* 請確定您的目標子目錄 (**CocosGettingStarted**) 尚不存在;如果資料夾已存在,此命令將會失敗。
* 如果您收到「'cocos' isn't recognized as an internal or external command」訊息,表示您尚未正確設定 cocos 安裝 (請回到 Cocos Windows 安裝指南)。
* 如果成功,將會出現新資料夾 **CocosGettingStarted**。本指南會將該目錄位置稱為 `{CocosGettingStarted}`。
* 成功的輸出應該類似下方提供的範例。
```output theme={null}
> Copy template into C:\dev\CocosGettingStarted
> Copying Cocos2d-x files...
> Rename project name from 'HelloCpp' to 'CocosGettingStarted'
> Replace the project name from 'HelloCpp' to 'CocosGettingStarted'
> Replace the project package name from 'org.cocos2dx.hellocpp' to 'org.cocos2dx.CocosGettingStarted'
> Replace the Mac bundle id from 'org.cocos2dx.hellocpp' to 'org.cocos2dx.CocosGettingStarted'
> Replace the iOS bundle id from 'org.cocos2dx.hellocpp' to 'org.cocos2dx.CocosGettingStarted'
```
3. 下載 PlayFab Cocos2d-xSdk:[Cocos2D-x SDK (C++)](https://aka.ms/playfabCsharpsdkdownload)。將其儲存並解壓縮至暫存位置 \{PlayFabCocos}
* 在 Windows 檔案總管中開啟下列資料夾:\{PlayFabCocos}/PlayFabClientSDK
* 在第二個 Windows 檔案總管中開啟下列資料夾:\{CocosGettingStarted}/Classes
4. 將 \{PlayFabCocos}/PlayFabClientSDK 中的所有檔案複製並貼上至 \{CocosGettingStarted}/Classes
5. 在 Visual Studio 中,載入 `{CocosGettingStarted}/proj.win32/CocosGettingStarted.sln`。
6. 我們要將 PlayFab 檔案新增至 Cocos 專案。
7. 在 Visual Studio 的方案總管面板中,展開至資料夾:Solution/CocosGettingStarted/src
8. 在 \{CocosGettingStarted}/Classes 開啟 Windows 檔案總管視窗
* 選取 \{CocosGettingStarted}/Classes 中的所有檔案,但 AppDelegate.h、AppDelegate.cpp、HelloWorldScene.h、HelloWorldScene.cpp **除外**
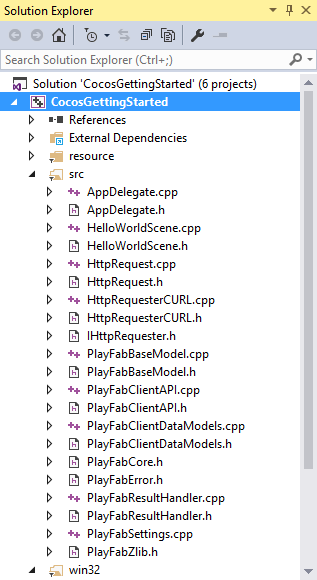
* 將這些檔案全部從檔案總管拖放到我們在上方找到的 Visual Studio Solution/CocosGettingStarted/src 資料夾。如果遇到問題,您可以一次拖放一個檔案,*只是請小心,務必全部都拖放進去*。
* 您應該會在 VS 專案中看到這些檔案:
* 在新的主控台視窗中輸入下列命令:
* `cocos new CocosGettingStarted -l cpp`
* 請確定您的目標子目錄 (**CocosGettingStarted**) 尚不存在;如果資料夾已存在,此命令將會失敗。
* 如果您收到「'cocos' isn't recognized as an internal or external command」訊息,表示您尚未正確設定 cocos 安裝 (請回到 Cocos Windows 安裝指南)。
* 如果成功,將會出現新資料夾 **CocosGettingStarted**。本指南會將該目錄位置稱為 `{CocosGettingStarted}`。
* 成功的輸出應該類似下方提供的範例。
```output theme={null}
> Copy template into C:\dev\CocosGettingStarted
> Copying Cocos2d-x files...
> Rename project name from 'HelloCpp' to 'CocosGettingStarted'
> Replace the project name from 'HelloCpp' to 'CocosGettingStarted'
> Replace the project package name from 'org.cocos2dx.hellocpp' to 'org.cocos2dx.CocosGettingStarted'
> Replace the Mac bundle id from 'org.cocos2dx.hellocpp' to 'org.cocos2dx.CocosGettingStarted'
> Replace the iOS bundle id from 'org.cocos2dx.hellocpp' to 'org.cocos2dx.CocosGettingStarted'
```
3. 下載 PlayFab Cocos2d-xSdk:[Cocos2D-x SDK (C++)](https://aka.ms/playfabCsharpsdkdownload)。將其儲存並解壓縮至暫存位置 \{PlayFabCocos}
* 在 Windows 檔案總管中開啟下列資料夾:\{PlayFabCocos}/PlayFabClientSDK
* 在第二個 Windows 檔案總管中開啟下列資料夾:\{CocosGettingStarted}/Classes
4. 將 \{PlayFabCocos}/PlayFabClientSDK 中的所有檔案複製並貼上至 \{CocosGettingStarted}/Classes
5. 在 Visual Studio 中,載入 `{CocosGettingStarted}/proj.win32/CocosGettingStarted.sln`。
6. 我們要將 PlayFab 檔案新增至 Cocos 專案。
7. 在 Visual Studio 的方案總管面板中,展開至資料夾:Solution/CocosGettingStarted/src
8. 在 \{CocosGettingStarted}/Classes 開啟 Windows 檔案總管視窗
* 選取 \{CocosGettingStarted}/Classes 中的所有檔案,但 AppDelegate.h、AppDelegate.cpp、HelloWorldScene.h、HelloWorldScene.cpp **除外**
* 將這些檔案全部從檔案總管拖放到我們在上方找到的 Visual Studio Solution/CocosGettingStarted/src 資料夾。如果遇到問題,您可以一次拖放一個檔案,*只是請小心,務必全部都拖放進去*。
* 您應該會在 VS 專案中看到這些檔案:
 PlayFab 使用了數個必須手動新增至相依性清單的 Cocos 程式庫。
* 開啟 CocosGettingStarted 專案的 **Properties** 視窗 (如下所示)。
PlayFab 使用了數個必須手動新增至相依性清單的 Cocos 程式庫。
* 開啟 CocosGettingStarted 專案的 **Properties** 視窗 (如下所示)。
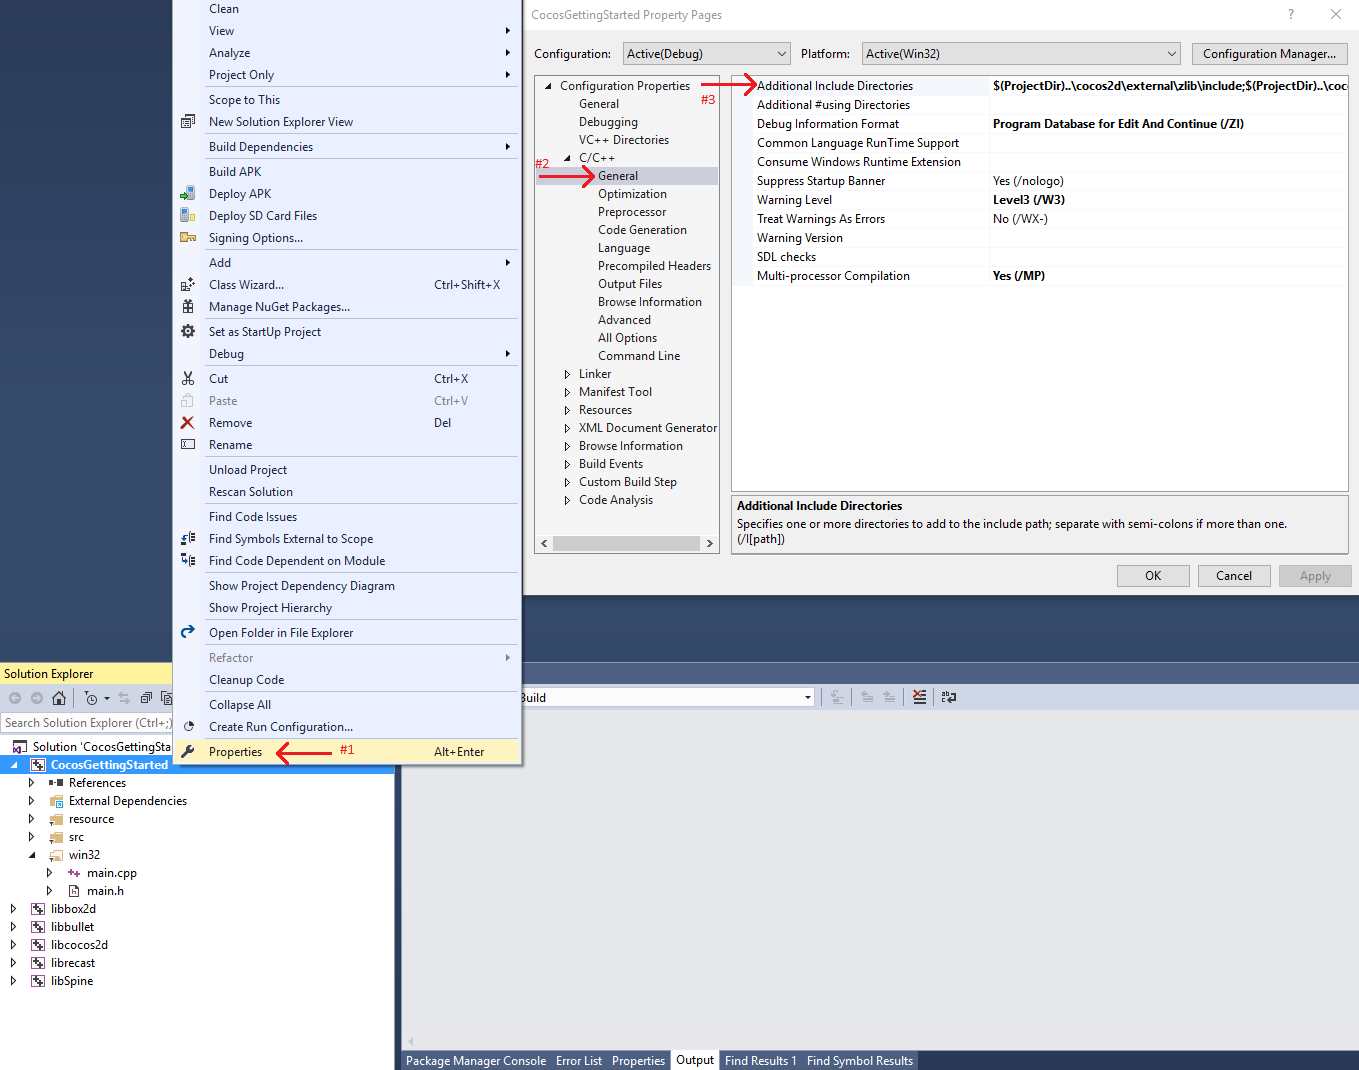 * 將 Additional Include Directories 取代為下列內容:
`$(ProjectDir)..\cocos2d\external\zlib\include;$(ProjectDir)..\cocos2d\external\curl\include\win32;$(EngineRoot)cocos\audio\include;$(EngineRoot)external;$(EngineRoot)external\chipmunk\include\chipmunk;$(EngineRoot)extensions;..\Classes;..;%(AdditionalIncludeDirectories);$(_COCOS_HEADER_WIN32_BEGIN);$(_COCOS_HEADER_WIN32_END);..\cocos2d`
我們要新增 curl 和 zlib,這些是 Cocos 隨附但預設未啟用的程式庫。
您的 CocosGettingStarted 專案現在應該可以編譯 (甚至可以執行),但我們還沒有進行任何 PlayFab API 呼叫。
安裝完成!
## 設定您的第一次 API 呼叫
本指南提供進行第一次 PlayFab API 呼叫所需的最少步驟。您可以在應用程式中看到確認訊息。
1. 在 Visual Studio 中,於 Solution/CocosGettingStarted/src 資料夾內開啟 HelloWorldScene.h,並將內容取代為下列內容:
* 在 Visual Studio 中,於 **Solution/CocosGettingStarted/src** 資料夾內開啟 `HelloWorldScene.h`,並將內容取代為下方所示的內容。
```cpp theme={null}
#ifndef __HELLOWORLD_SCENE_H__
#define __HELLOWORLD_SCENE_H__
#include "cocos2d.h"
#include "PlayFabClientDataModels.h"
#include "PlayFabError.h"
class HelloWorld : public cocos2d::Layer
{
public:
static std::string statusMsg;
static cocos2d::Scene* createScene();
static cocos2d::Label* testReportLabel;
virtual bool init();
void update(float) override;
void menuCloseCallback(cocos2d::Ref* pSender);
CREATE_FUNC(HelloWorld);
static void HelloWorld::OnLoginSuccess(const PlayFab::ClientModels::LoginResult& result, void* customData);
static void HelloWorld::OnLoginFail(const PlayFab::PlayFabError& error, void* customData);
};
#endif // __HELLOWORLD_SCENE_H__
```
2. 緊接著開啟 `HelloWorldScene.cpp`,並將內容取代為下列內容:
```cpp theme={null}
#include "HelloWorldScene.h"
#include "PlayFabClientAPI.h"
#include
USING_NS_CC;
std::string HelloWorld::statusMsg;
cocos2d::Label* HelloWorld::testReportLabel;
Scene* HelloWorld::createScene()
{
auto scene = Scene::create(); // 'scene' is an autorelease object
auto layer = HelloWorld::create(); // 'layer' is an autorelease object
scene->addChild(layer); // add layer as a child to scene
return scene; // return the scene
}
bool HelloWorld::init()
{
if (!Layer::init())
return false;
Size visibleSize = Director::getInstance()->getVisibleSize();
Vec2 origin = Director::getInstance()->getVisibleOrigin();
auto closeItem = MenuItemImage::create("CloseNormal.png", "CloseSelected.png", CC_CALLBACK_1(HelloWorld::menuCloseCallback, this));
closeItem->setPosition(Vec2(origin.x + visibleSize.width - closeItem->getContentSize().width / 2, origin.y + closeItem->getContentSize().height / 2));
auto menu = Menu::create(closeItem, NULL);
menu->setPosition(Vec2::ZERO);
this->addChild(menu, 1);
this->scheduleUpdate();
testReportLabel = Label::createWithTTF("", "fonts/Marker Felt.ttf", 14);
this->addChild(testReportLabel, 1);
statusMsg = "Login pending...";
PlayFab::PlayFabSettings::titleId = "144";
PlayFab::ClientModels::LoginWithCustomIDRequest request;
request.CustomId = "GettingStartedGuide";
request.CreateAccount = true;
PlayFab::PlayFabClientAPI::LoginWithCustomID(request, OnLoginSuccess, OnLoginFail, nullptr);
return true;
}
void HelloWorld::menuCloseCallback(Ref* pSender)
{
Director::getInstance()->end();
#if (CC_TARGET_PLATFORM == CC_PLATFORM_IOS)
exit(0);
#endif
}
void HelloWorld::update(float delta)
{
Size visibleSize = Director::getInstance()->getVisibleSize();
Vec2 origin = Director::getInstance()->getVisibleOrigin();
testReportLabel->setPosition(Vec2(origin.x + visibleSize.width / 2, origin.y + visibleSize.height / 2));
testReportLabel->setString(statusMsg);
}
void HelloWorld::OnLoginSuccess(const PlayFab::ClientModels::LoginResult& result, void* customData)
{
statusMsg = "Congratulations, you made your first successful API call!";
}
void HelloWorld::OnLoginFail(const PlayFab::PlayFabError& error, void* customData)
{
statusMsg = "Something went wrong with your first API call.\n";
statusMsg += "Here's some debug information:\n";
statusMsg += error.GenerateErrorReport();
}
```
這些檔案會採用新 Cocos 專案範本中既有的 HelloWorldScene,並加以修改以納入您的第一次 PlayFab API 呼叫。
## 完成並執行
1. 建置並執行您的 Cocos 專案:下拉式清單 -> Debug -> Start Debugging。
2. 系統會提示您進行建置。選取 **Yes**。
3. 您應該會看到顯示下列內容的畫面:
**Congratulations, you made your first successful API call!**
4. 現在,您可以開始進行其他 API 呼叫並建置您的遊戲。\
如需所有可用用戶端 API 呼叫的清單,請參閱我們的 [PlayFab API 參考](/zh-TW/services/playfab/api-references)文件。
祝您程式撰寫愉快!
## 解構程式碼
這個選擇性的最後一節會詳細說明上述原始程式碼的每個部分。
* `HelloWorldScene.h`
* 這只是對 Cocos 產生的預設 `HelloWorldScene.h` 做了少許修改。
* 具體而言,它定義了我們所使用的一些 Cocos GUI,以及 `OnLoginSuccess` 和 `OnLoginFail` 的原型。
* 其他部分都是標準的 Cocos Engine 函式。
* `HelloWorldScene.cpp`
* `createScene()` 是標準的 Cocos Engine 函式。
* `init()`
* 一般的 Cocos GUI 項目:`closeItem` 和 `testReportLabel`。
* `PlayFab::PlayFabSettings::titleId = "xxxx";`
* 每位 PlayFab 開發人員都會在 Game Manager 中建立遊戲。當您發佈遊戲時,必須將該 titleId 寫入遊戲程式碼中。這可讓用戶端知道如何存取 PlayFab 中正確的資料。對大多數使用者而言,只要將其視為讓 PlayFab 運作的必要步驟即可。
* `PlayFab::ClientModels::LoginWithCustomIDRequest request;`
* 大多數 PlayFab API 方法都需要輸入參數,而這些輸入參數會封裝在要求物件中。
* 每個 API 方法都需要唯一的要求物件,其中包含選擇性和必要參數的組合。
* 對於 `LoginWithCustomIDRequest`,有一個必要參數 `CustomId` 可唯一識別玩家,還有 `CreateAccount` 允許透過此呼叫建立新帳戶。
* 對於登入,大多數開發人員會想要使用更合適的登入方法。
* 如需所有登入方法和輸入參數的清單,請參閱 PlayFab 登入文件。常見的選擇包括:
* `LoginWithAndroidDeviceID`
* `LoginWithIOSDeviceID`
* `LoginWithEmailAddress`
* `PlayFab::PlayFabClientAPI::LoginWithCustomID(request, OnLoginSuccess, OnLoginFail, nullptr);`
* 這會開始對 `LoginWithCustomID` 的非同步要求,並在完成時叫用 `OnLoginSuccess` 或 `OnLoginFail` 函式。
* `update(float delta)`
* 單純設定 `statusMsg` 變數並不會更新螢幕上的文字。
* 此函式會在每個 tick 將 GUI 文字設定為與 `statusMsg` 的內容相符 (效率不高)。
* `OnLoginSuccess(result, customData)`
* 呼叫成功回呼時,許多 API 回呼的 result 物件會包含所要求的資訊。
* `LoginResult` 包含玩家的一些基本資訊,但對大多數使用者而言,登入只是呼叫其他 API 之前的必要步驟。
* `OnLoginFail(error, customData)`
* 如果呼叫了錯誤函式,表示您的 API 呼叫已失敗。
* API 呼叫可能因許多原因而失敗,您應該一律嘗試處理失敗情況。
* API 呼叫失敗的原因 (依可能性排序)
* 未設定 `PlayFabSettings.TitleId`。如果您忘記將 titleId 設定為您的遊戲,則一切都無法運作。
* 在 Cocos 中,如果您未正確設定 titleId,curl 程式庫可能會直接讓您的遊戲當機。
* 要求參數。如果您沒有為特定 API 呼叫提供正確或必要的資訊,呼叫就會失敗。如需詳細資訊,請參閱 `error.errorMessage`、`error.errorDetails` 或 `error.GenerateErrorReport()`。
* 裝置連線問題。行動電話會不斷失去/恢復連線,因此任何 API 呼叫都可能隨時隨機失敗,然後又立即恢復正常。進入隧道可能會讓您完全中斷連線。
* PlayFab 伺服器問題。就像所有軟體一樣,可能會發生問題。如需更新資訊,請參閱我們的版本資訊。
* 網際網路並非 100% 可靠。有時訊息會損毀或無法送達 PlayFab 伺服器。
* 如果您在偵錯問題時遇到困難,而錯誤回呼中的資訊又不足夠,請造訪我們的論壇。
* customData 是 void 指標,可以任何方式用來建立內容。
* 在 C++ 中,要維護 API 呼叫的內容比較困難,因此我們新增了 `customData` 參數,它可以將任何物件轉送至回呼,讓您以任何喜歡的方式用來建立內容。
* 因此,如果您進行 API 呼叫以擷取庫存,可以將玩家或庫存指標作為 `customData` 傳遞,並在回呼中更新該物件上的庫存。
## Related topics
- [PlayFab 支援的遊戲引擎](/zh-TW/services/playfab/sdks/game-engines/index.md)
- [Cocos2D-x (C++) SDK](/zh-TW/services/playfab/sdks/cocos2d-x/index.md)
- [Cocos2d-x SDK 授權](/zh-TW/services/playfab/sdks/cocos2d-x/license.md)
- [快速入門](/zh-TW/services/playfab/economy-monetization/economy-v2/quickstart.md)
- [Party 快速入門](/zh-TW/services/playfab/multiplayer/networking/quickstart.md)
* 將 Additional Include Directories 取代為下列內容:
`$(ProjectDir)..\cocos2d\external\zlib\include;$(ProjectDir)..\cocos2d\external\curl\include\win32;$(EngineRoot)cocos\audio\include;$(EngineRoot)external;$(EngineRoot)external\chipmunk\include\chipmunk;$(EngineRoot)extensions;..\Classes;..;%(AdditionalIncludeDirectories);$(_COCOS_HEADER_WIN32_BEGIN);$(_COCOS_HEADER_WIN32_END);..\cocos2d`
我們要新增 curl 和 zlib,這些是 Cocos 隨附但預設未啟用的程式庫。
您的 CocosGettingStarted 專案現在應該可以編譯 (甚至可以執行),但我們還沒有進行任何 PlayFab API 呼叫。
安裝完成!
## 設定您的第一次 API 呼叫
本指南提供進行第一次 PlayFab API 呼叫所需的最少步驟。您可以在應用程式中看到確認訊息。
1. 在 Visual Studio 中,於 Solution/CocosGettingStarted/src 資料夾內開啟 HelloWorldScene.h,並將內容取代為下列內容:
* 在 Visual Studio 中,於 **Solution/CocosGettingStarted/src** 資料夾內開啟 `HelloWorldScene.h`,並將內容取代為下方所示的內容。
```cpp theme={null}
#ifndef __HELLOWORLD_SCENE_H__
#define __HELLOWORLD_SCENE_H__
#include "cocos2d.h"
#include "PlayFabClientDataModels.h"
#include "PlayFabError.h"
class HelloWorld : public cocos2d::Layer
{
public:
static std::string statusMsg;
static cocos2d::Scene* createScene();
static cocos2d::Label* testReportLabel;
virtual bool init();
void update(float) override;
void menuCloseCallback(cocos2d::Ref* pSender);
CREATE_FUNC(HelloWorld);
static void HelloWorld::OnLoginSuccess(const PlayFab::ClientModels::LoginResult& result, void* customData);
static void HelloWorld::OnLoginFail(const PlayFab::PlayFabError& error, void* customData);
};
#endif // __HELLOWORLD_SCENE_H__
```
2. 緊接著開啟 `HelloWorldScene.cpp`,並將內容取代為下列內容:
```cpp theme={null}
#include "HelloWorldScene.h"
#include "PlayFabClientAPI.h"
#include
USING_NS_CC;
std::string HelloWorld::statusMsg;
cocos2d::Label* HelloWorld::testReportLabel;
Scene* HelloWorld::createScene()
{
auto scene = Scene::create(); // 'scene' is an autorelease object
auto layer = HelloWorld::create(); // 'layer' is an autorelease object
scene->addChild(layer); // add layer as a child to scene
return scene; // return the scene
}
bool HelloWorld::init()
{
if (!Layer::init())
return false;
Size visibleSize = Director::getInstance()->getVisibleSize();
Vec2 origin = Director::getInstance()->getVisibleOrigin();
auto closeItem = MenuItemImage::create("CloseNormal.png", "CloseSelected.png", CC_CALLBACK_1(HelloWorld::menuCloseCallback, this));
closeItem->setPosition(Vec2(origin.x + visibleSize.width - closeItem->getContentSize().width / 2, origin.y + closeItem->getContentSize().height / 2));
auto menu = Menu::create(closeItem, NULL);
menu->setPosition(Vec2::ZERO);
this->addChild(menu, 1);
this->scheduleUpdate();
testReportLabel = Label::createWithTTF("", "fonts/Marker Felt.ttf", 14);
this->addChild(testReportLabel, 1);
statusMsg = "Login pending...";
PlayFab::PlayFabSettings::titleId = "144";
PlayFab::ClientModels::LoginWithCustomIDRequest request;
request.CustomId = "GettingStartedGuide";
request.CreateAccount = true;
PlayFab::PlayFabClientAPI::LoginWithCustomID(request, OnLoginSuccess, OnLoginFail, nullptr);
return true;
}
void HelloWorld::menuCloseCallback(Ref* pSender)
{
Director::getInstance()->end();
#if (CC_TARGET_PLATFORM == CC_PLATFORM_IOS)
exit(0);
#endif
}
void HelloWorld::update(float delta)
{
Size visibleSize = Director::getInstance()->getVisibleSize();
Vec2 origin = Director::getInstance()->getVisibleOrigin();
testReportLabel->setPosition(Vec2(origin.x + visibleSize.width / 2, origin.y + visibleSize.height / 2));
testReportLabel->setString(statusMsg);
}
void HelloWorld::OnLoginSuccess(const PlayFab::ClientModels::LoginResult& result, void* customData)
{
statusMsg = "Congratulations, you made your first successful API call!";
}
void HelloWorld::OnLoginFail(const PlayFab::PlayFabError& error, void* customData)
{
statusMsg = "Something went wrong with your first API call.\n";
statusMsg += "Here's some debug information:\n";
statusMsg += error.GenerateErrorReport();
}
```
這些檔案會採用新 Cocos 專案範本中既有的 HelloWorldScene,並加以修改以納入您的第一次 PlayFab API 呼叫。
## 完成並執行
1. 建置並執行您的 Cocos 專案:下拉式清單 -> Debug -> Start Debugging。
2. 系統會提示您進行建置。選取 **Yes**。
3. 您應該會看到顯示下列內容的畫面:
**Congratulations, you made your first successful API call!**
4. 現在,您可以開始進行其他 API 呼叫並建置您的遊戲。\
如需所有可用用戶端 API 呼叫的清單,請參閱我們的 [PlayFab API 參考](/zh-TW/services/playfab/api-references)文件。
祝您程式撰寫愉快!
## 解構程式碼
這個選擇性的最後一節會詳細說明上述原始程式碼的每個部分。
* `HelloWorldScene.h`
* 這只是對 Cocos 產生的預設 `HelloWorldScene.h` 做了少許修改。
* 具體而言,它定義了我們所使用的一些 Cocos GUI,以及 `OnLoginSuccess` 和 `OnLoginFail` 的原型。
* 其他部分都是標準的 Cocos Engine 函式。
* `HelloWorldScene.cpp`
* `createScene()` 是標準的 Cocos Engine 函式。
* `init()`
* 一般的 Cocos GUI 項目:`closeItem` 和 `testReportLabel`。
* `PlayFab::PlayFabSettings::titleId = "xxxx";`
* 每位 PlayFab 開發人員都會在 Game Manager 中建立遊戲。當您發佈遊戲時,必須將該 titleId 寫入遊戲程式碼中。這可讓用戶端知道如何存取 PlayFab 中正確的資料。對大多數使用者而言,只要將其視為讓 PlayFab 運作的必要步驟即可。
* `PlayFab::ClientModels::LoginWithCustomIDRequest request;`
* 大多數 PlayFab API 方法都需要輸入參數,而這些輸入參數會封裝在要求物件中。
* 每個 API 方法都需要唯一的要求物件,其中包含選擇性和必要參數的組合。
* 對於 `LoginWithCustomIDRequest`,有一個必要參數 `CustomId` 可唯一識別玩家,還有 `CreateAccount` 允許透過此呼叫建立新帳戶。
* 對於登入,大多數開發人員會想要使用更合適的登入方法。
* 如需所有登入方法和輸入參數的清單,請參閱 PlayFab 登入文件。常見的選擇包括:
* `LoginWithAndroidDeviceID`
* `LoginWithIOSDeviceID`
* `LoginWithEmailAddress`
* `PlayFab::PlayFabClientAPI::LoginWithCustomID(request, OnLoginSuccess, OnLoginFail, nullptr);`
* 這會開始對 `LoginWithCustomID` 的非同步要求,並在完成時叫用 `OnLoginSuccess` 或 `OnLoginFail` 函式。
* `update(float delta)`
* 單純設定 `statusMsg` 變數並不會更新螢幕上的文字。
* 此函式會在每個 tick 將 GUI 文字設定為與 `statusMsg` 的內容相符 (效率不高)。
* `OnLoginSuccess(result, customData)`
* 呼叫成功回呼時,許多 API 回呼的 result 物件會包含所要求的資訊。
* `LoginResult` 包含玩家的一些基本資訊,但對大多數使用者而言,登入只是呼叫其他 API 之前的必要步驟。
* `OnLoginFail(error, customData)`
* 如果呼叫了錯誤函式,表示您的 API 呼叫已失敗。
* API 呼叫可能因許多原因而失敗,您應該一律嘗試處理失敗情況。
* API 呼叫失敗的原因 (依可能性排序)
* 未設定 `PlayFabSettings.TitleId`。如果您忘記將 titleId 設定為您的遊戲,則一切都無法運作。
* 在 Cocos 中,如果您未正確設定 titleId,curl 程式庫可能會直接讓您的遊戲當機。
* 要求參數。如果您沒有為特定 API 呼叫提供正確或必要的資訊,呼叫就會失敗。如需詳細資訊,請參閱 `error.errorMessage`、`error.errorDetails` 或 `error.GenerateErrorReport()`。
* 裝置連線問題。行動電話會不斷失去/恢復連線,因此任何 API 呼叫都可能隨時隨機失敗,然後又立即恢復正常。進入隧道可能會讓您完全中斷連線。
* PlayFab 伺服器問題。就像所有軟體一樣,可能會發生問題。如需更新資訊,請參閱我們的版本資訊。
* 網際網路並非 100% 可靠。有時訊息會損毀或無法送達 PlayFab 伺服器。
* 如果您在偵錯問題時遇到困難,而錯誤回呼中的資訊又不足夠,請造訪我們的論壇。
* customData 是 void 指標,可以任何方式用來建立內容。
* 在 C++ 中,要維護 API 呼叫的內容比較困難,因此我們新增了 `customData` 參數,它可以將任何物件轉送至回呼,讓您以任何喜歡的方式用來建立內容。
* 因此,如果您進行 API 呼叫以擷取庫存,可以將玩家或庫存指標作為 `customData` 傳遞,並在回呼中更新該物件上的庫存。
## Related topics
- [PlayFab 支援的遊戲引擎](/zh-TW/services/playfab/sdks/game-engines/index.md)
- [Cocos2D-x (C++) SDK](/zh-TW/services/playfab/sdks/cocos2d-x/index.md)
- [Cocos2d-x SDK 授權](/zh-TW/services/playfab/sdks/cocos2d-x/license.md)
- [快速入門](/zh-TW/services/playfab/economy-monetization/economy-v2/quickstart.md)
- [Party 快速入門](/zh-TW/services/playfab/multiplayer/networking/quickstart.md)