> ## Documentation Index
> Fetch the complete documentation index at: https://devdocs.xbox.com/llms.txt
> Use this file to discover all available pages before exploring further.
# Photon 快速入門
> 在 Unity 專案中將 Photon Realtime 和 PUN 多人遊戲與 PlayFab 連接,以驗證玩家並透過 CloudScript 回呼接收房間事件。
本節提供將 PlayFab 與 Photon 多人遊戲服務 (例如 Photon RealTime 和 Photon Unity Networking (PUN)) 搭配使用的資訊。
目前,我們提供下列 Photon 整合:
* 使用 PlayFab 驗證 Photon 玩家。
* 使用 PlayFab CloudScript 回呼接聽房間事件。
## Photon 快速入門
本快速入門說明如何設定 Photon Multiplayer 以搭配 PlayFab 運作。目前,PlayFab 提供下列 Photon 整合:
* 使用 PlayFab 驗證 Photon 玩家。
* 使用 PlayFab CloudScript 回呼接聽房間事件。
在本快速入門中,我們使用最新的 [Photon Unity 範例專案](https://assetstore.unity.com/packages/tools/network/photon-unity-networking-classic-free-1786)說明這兩項功能的運作方式。
如需在 Unity 上獲得完整支援的 PlayFab 多人遊戲和聊天體驗,請參閱 [PlayFab Party Unity 外掛程式](/zh-TW/services/playfab/multiplayer/networking/party-unity-overview)以取得詳細資訊。
## 必要條件
1. 已匯入 PlayFab SDK 並已設定遊戲的 [Unity](/zh-TW/services/playfab/sdks/unity3d/quickstart) 專案。
2. 已註冊的 PlayFab 遊戲。
本指南省略了聊天應用程式設定。若要整合您的聊天應用程式,請建立新的 Photon Chat 應用程式,並在 Unity 和 PlayFab Game Manager 的 Photon 附加元件頁面中對應的方塊中輸入 App ID。
## 設定 Photon 應用程式
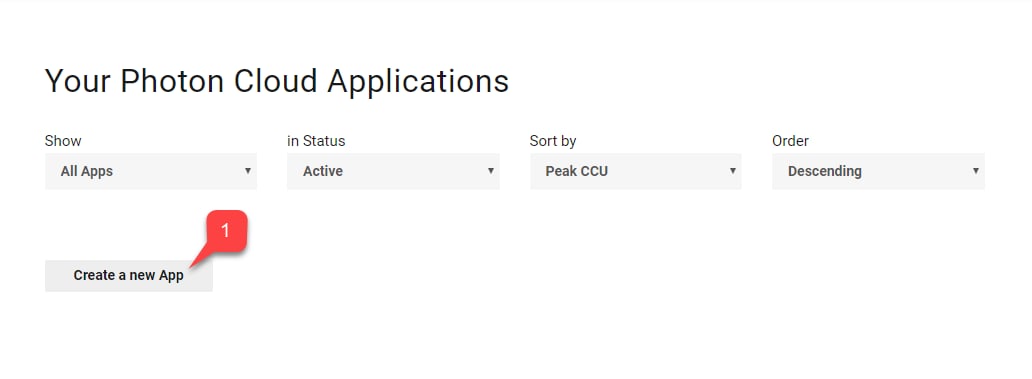
1. 註冊並登入 Photon 儀表板後,選取 **Create a new App**。
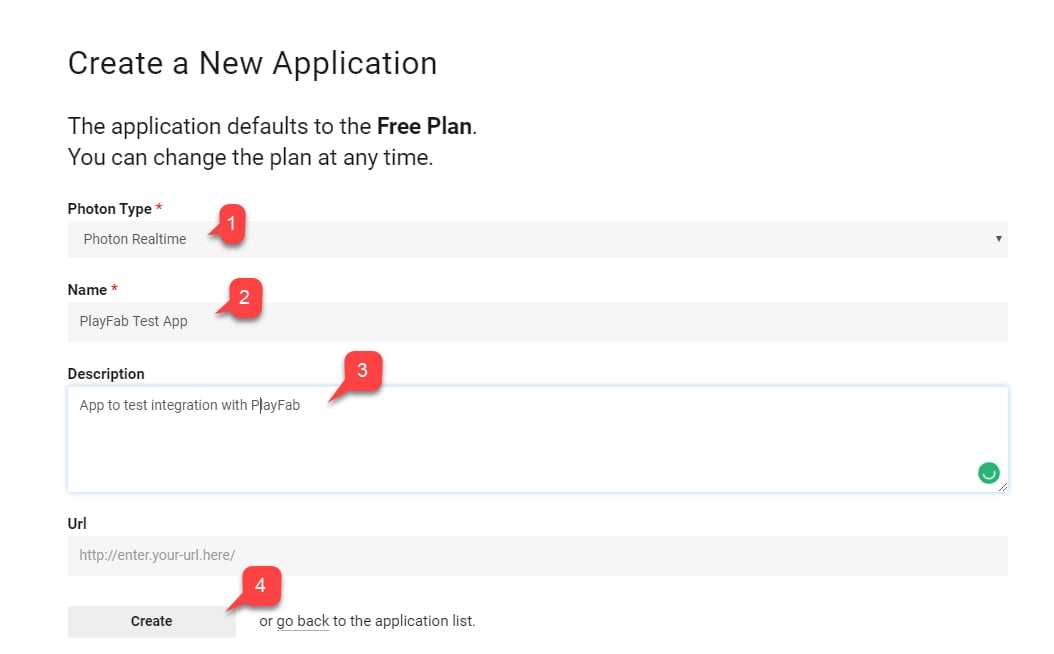
 2. 選取 **Photon Type**。
3. 選擇 **Name**。
4. 建立 **Description**。
5. 選取 **Create** 以提交。
2. 選取 **Photon Type**。
3. 選擇 **Name**。
4. 建立 **Description**。
5. 選取 **Create** 以提交。
 ## 設定驗證
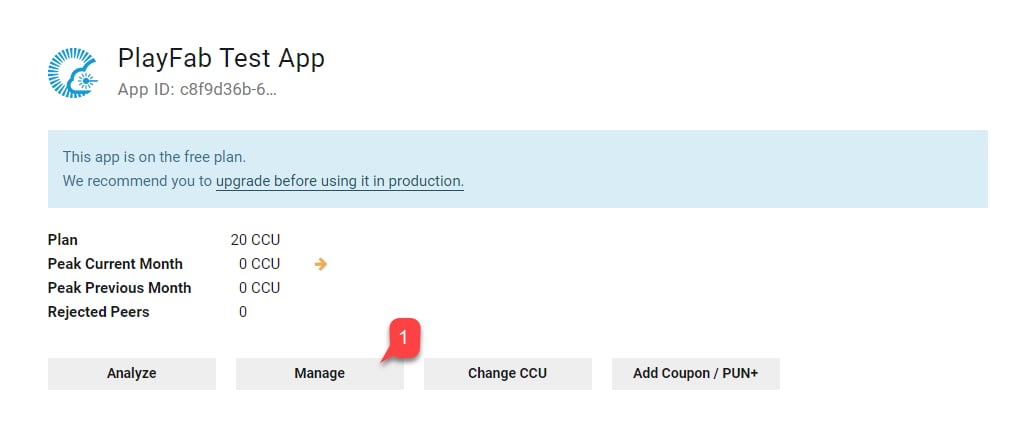
1. 在清單中找到新建立的應用程式,然後選取 **Manage**。
## 設定驗證
1. 在清單中找到新建立的應用程式,然後選取 **Manage**。
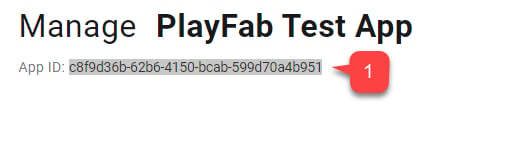
 2. 在**應用程式**儀表板中,找到並儲存位於頁面 **Title** 下方的 **App ID**。
 3. 找到 **Authentication** 區段。
4. 選取 **Custom Server**。
3. 找到 **Authentication** 區段。
4. 選取 **Custom Server**。
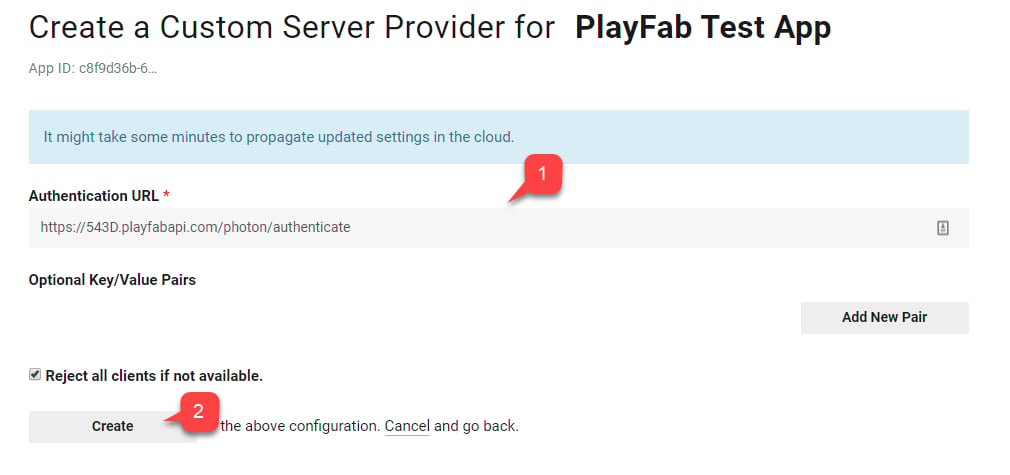
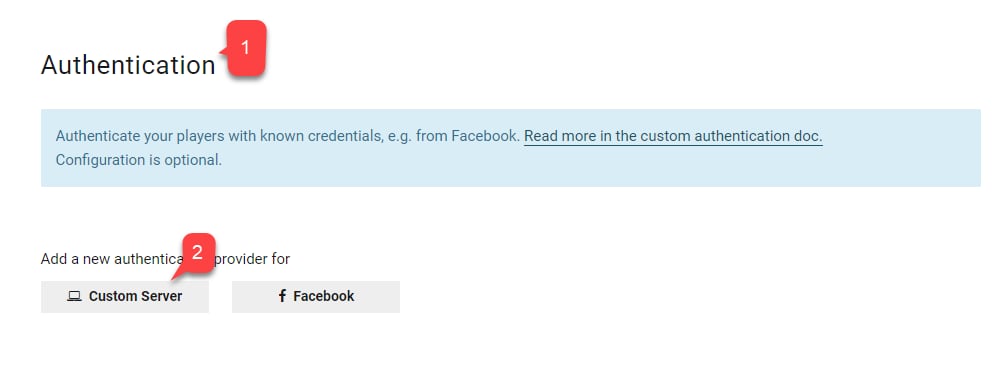 下一個頁面可讓您設定 Photon 的驗證 URL。
```html theme={null}
https://{PlayFabTitleId}.playfabapi.com/photon/authenticate
```
將 `PlayFabTitleId` 預留位置取代為您自己的遊戲識別碼。
```html theme={null}
{PlayFabTitleId}
```
5. 輸入 **URL**。
6. 選取 **Create** 按鈕以提交。
下一個頁面可讓您設定 Photon 的驗證 URL。
```html theme={null}
https://{PlayFabTitleId}.playfabapi.com/photon/authenticate
```
將 `PlayFabTitleId` 預留位置取代為您自己的遊戲識別碼。
```html theme={null}
{PlayFabTitleId}
```
5. 輸入 **URL**。
6. 選取 **Create** 按鈕以提交。
 ## 為 Photon 設定 PlayFab 遊戲
瀏覽至您遊戲的 **Game Manager** 頁面,然後:
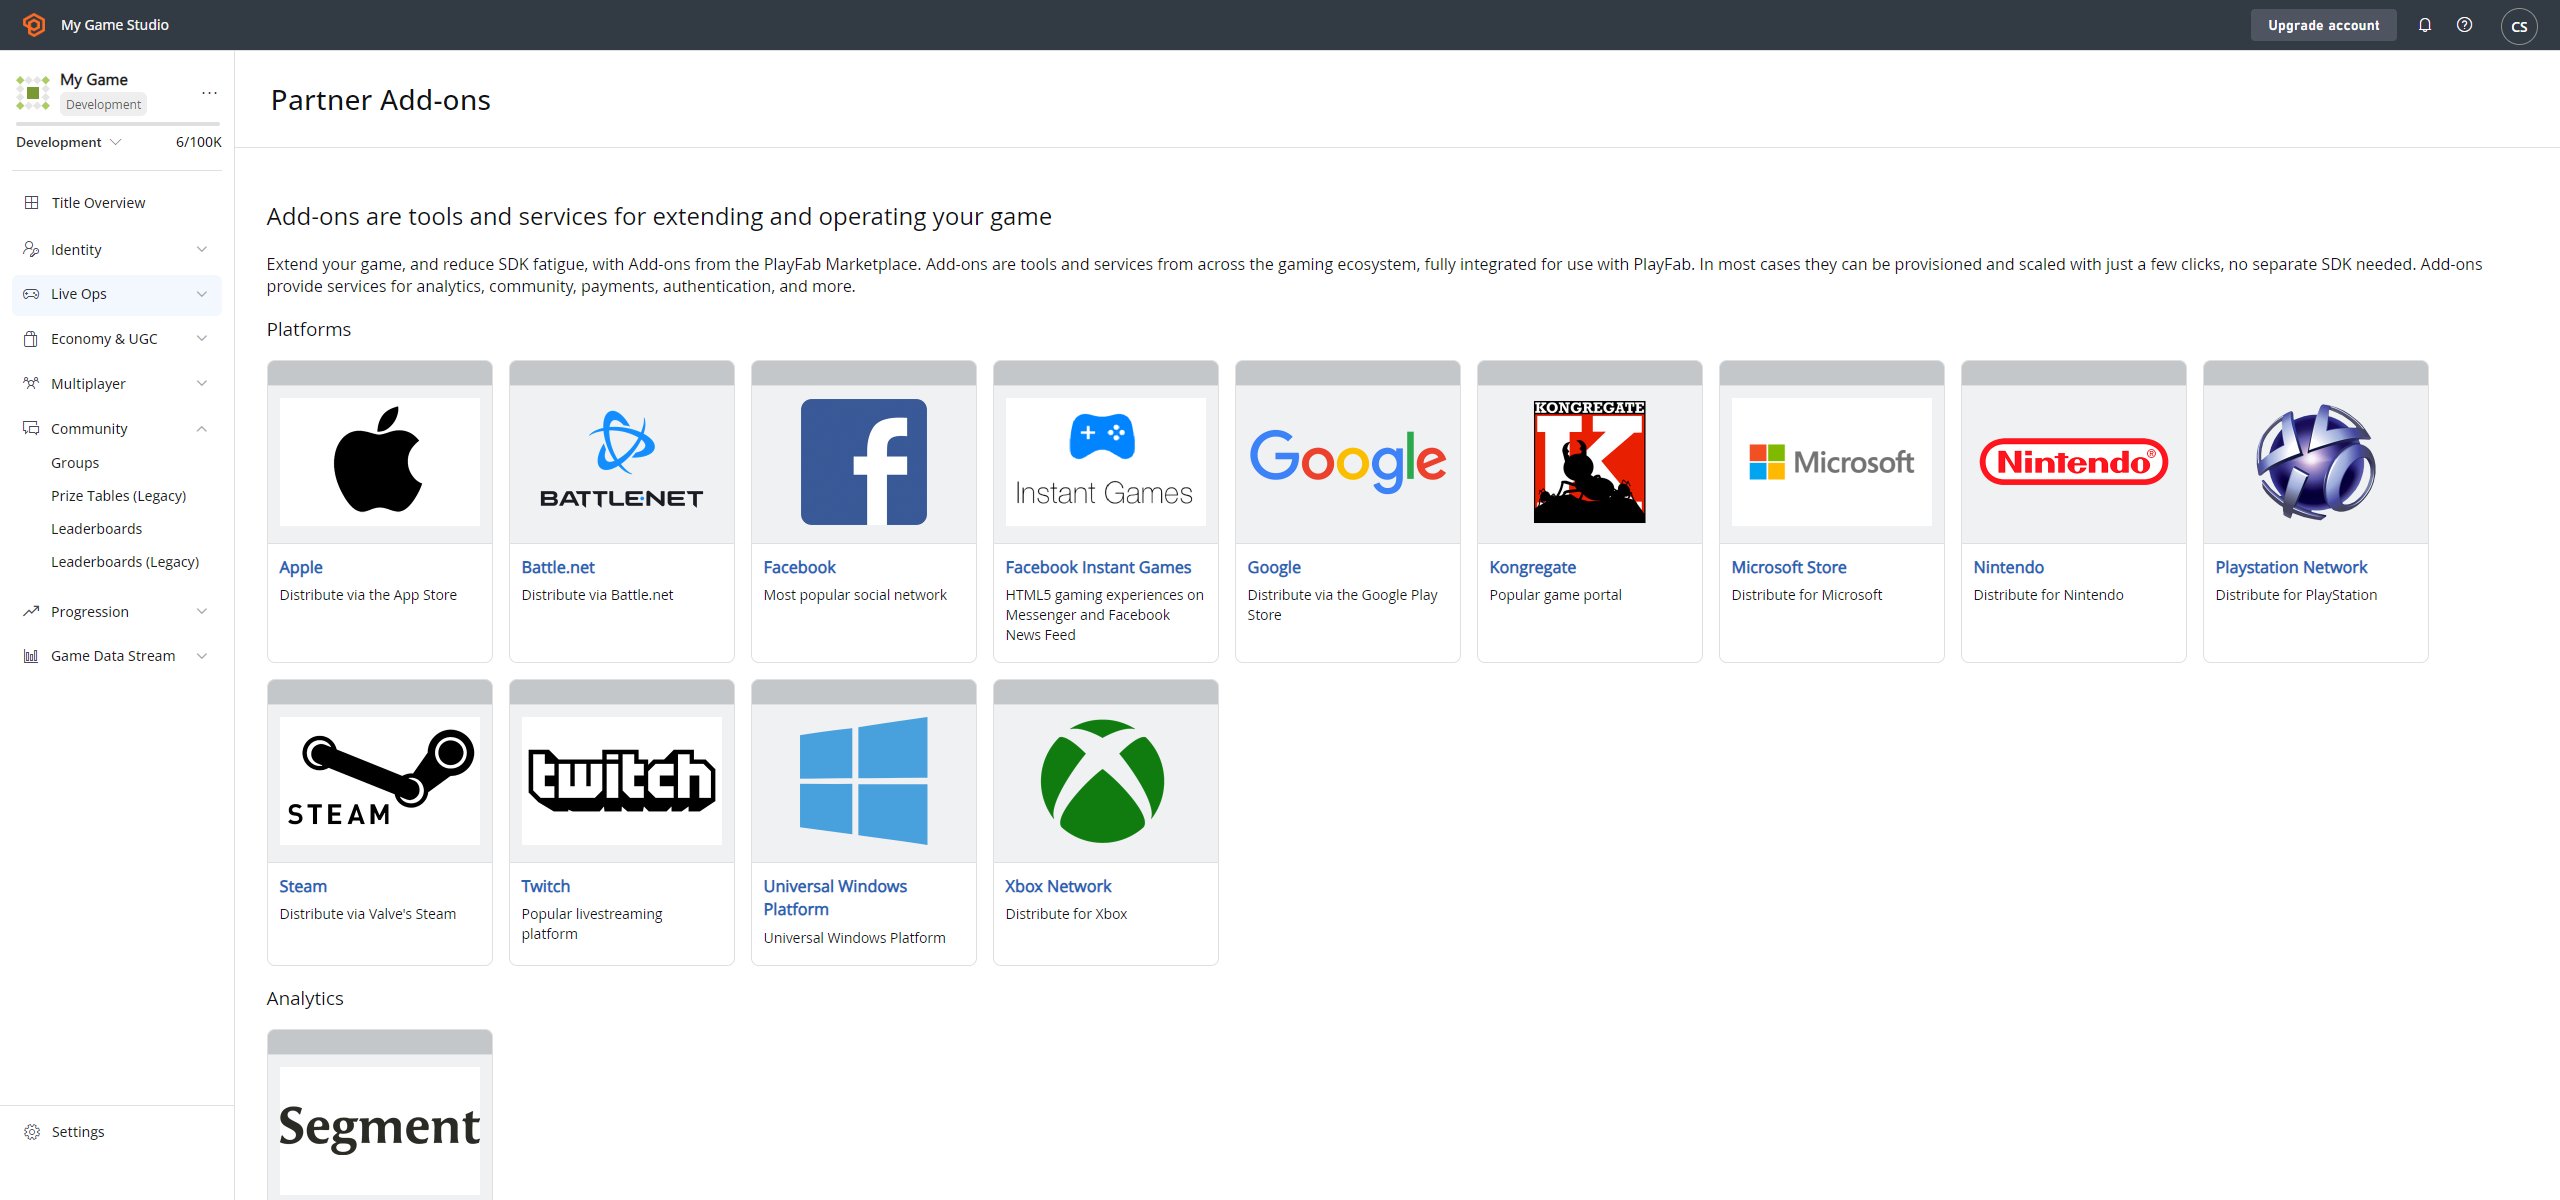
1. 瀏覽至 **Add-ons** 索引標籤。
2. 在 **Add-ons** 清單中,找到並選取 **Photon**。
## 為 Photon 設定 PlayFab 遊戲
瀏覽至您遊戲的 **Game Manager** 頁面,然後:
1. 瀏覽至 **Add-ons** 索引標籤。
2. 在 **Add-ons** 清單中,找到並選取 **Photon**。
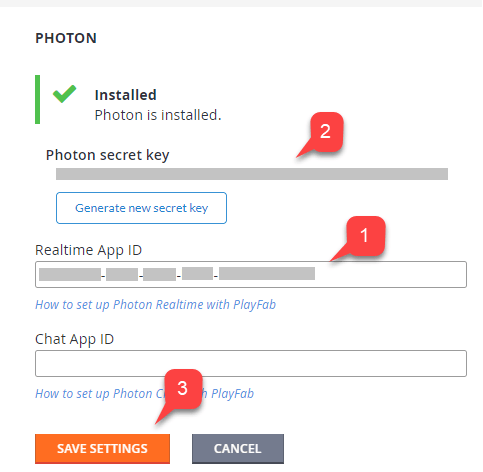
 3. **Photon Add-on** 頁面可讓您指定 **Photon Realtime Application ID** 來安裝 Photon。
* 您可以選擇性地指定 **Chat App ID**。
* 安裝 **Add-on (3)** 後,會產生 **Photon secret Key** **(2)**。
* 請將其儲存,以便日後設定 Webhook 時使用。
請記得將您的 Photon 秘密金鑰儲存在安全且容易存取的位置。設定 Webhook 時會派上用場。
3. **Photon Add-on** 頁面可讓您指定 **Photon Realtime Application ID** 來安裝 Photon。
* 您可以選擇性地指定 **Chat App ID**。
* 安裝 **Add-on (3)** 後,會產生 **Photon secret Key** **(2)**。
* 請將其儲存,以便日後設定 Webhook 時使用。
請記得將您的 Photon 秘密金鑰儲存在安全且容易存取的位置。設定 Webhook 時會派上用場。
 ## 設定 Photon Webhook
作為選用的整合,Photon 可以將特定事件傳送至您的 PlayFab CloudScript。這是透過 Webhook 完成的:
* 您指定基底 URL。
* 然後為每個可用的事件指定路徑。
* 路徑實際上就是在您的 CloudScript 中實作的處理常式名稱。
基底 URL 的格式如下:
```html theme={null}
https://{PlayFabTitleId}.playfablogic.com/webhook/1/prod/{PhotonSecretKey}
```
請務必將 `Title Id` 預留位置取代為您自己的遊戲識別碼。
```html theme={null}
{PlayFabTitleId}
```
請務必將 `PhotonSecretKey` 權杖取代為您在 **Photon Add-on** 頁面上產生的秘密金鑰。
```html theme={null}
{PhotonSecretKey}
```
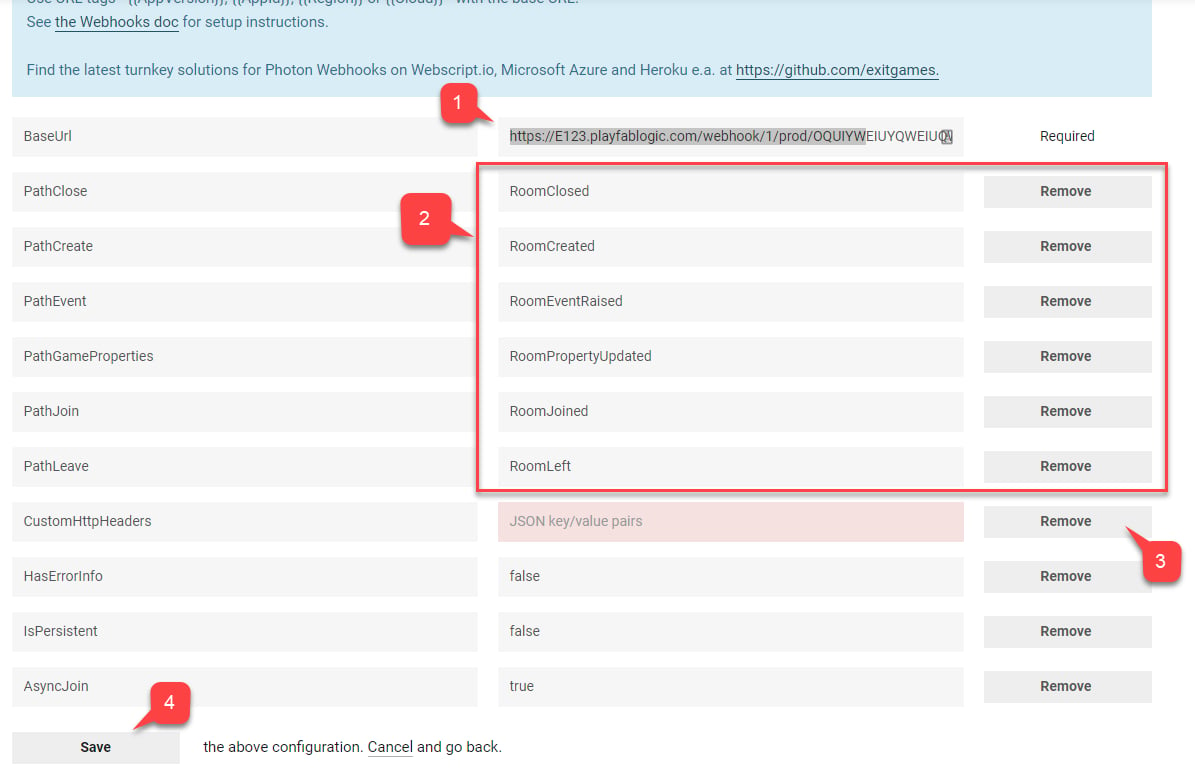
1. 填寫 **Base URL**。
2. 為每個可用的 **Events** 指派 **CloudScript** 處理常式 **Name**。
3. 移除任何 **CustomHttpHeaders**。
4. 選取 **Save** 按鈕以提交。
## 設定 Photon Webhook
作為選用的整合,Photon 可以將特定事件傳送至您的 PlayFab CloudScript。這是透過 Webhook 完成的:
* 您指定基底 URL。
* 然後為每個可用的事件指定路徑。
* 路徑實際上就是在您的 CloudScript 中實作的處理常式名稱。
基底 URL 的格式如下:
```html theme={null}
https://{PlayFabTitleId}.playfablogic.com/webhook/1/prod/{PhotonSecretKey}
```
請務必將 `Title Id` 預留位置取代為您自己的遊戲識別碼。
```html theme={null}
{PlayFabTitleId}
```
請務必將 `PhotonSecretKey` 權杖取代為您在 **Photon Add-on** 頁面上產生的秘密金鑰。
```html theme={null}
{PhotonSecretKey}
```
1. 填寫 **Base URL**。
2. 為每個可用的 **Events** 指派 **CloudScript** 處理常式 **Name**。
3. 移除任何 **CustomHttpHeaders**。
4. 選取 **Save** 按鈕以提交。
 ## 設定 Unity 專案
本指南假設您已匯入並設定 PlayFab SDK,且已設定遊戲設定。
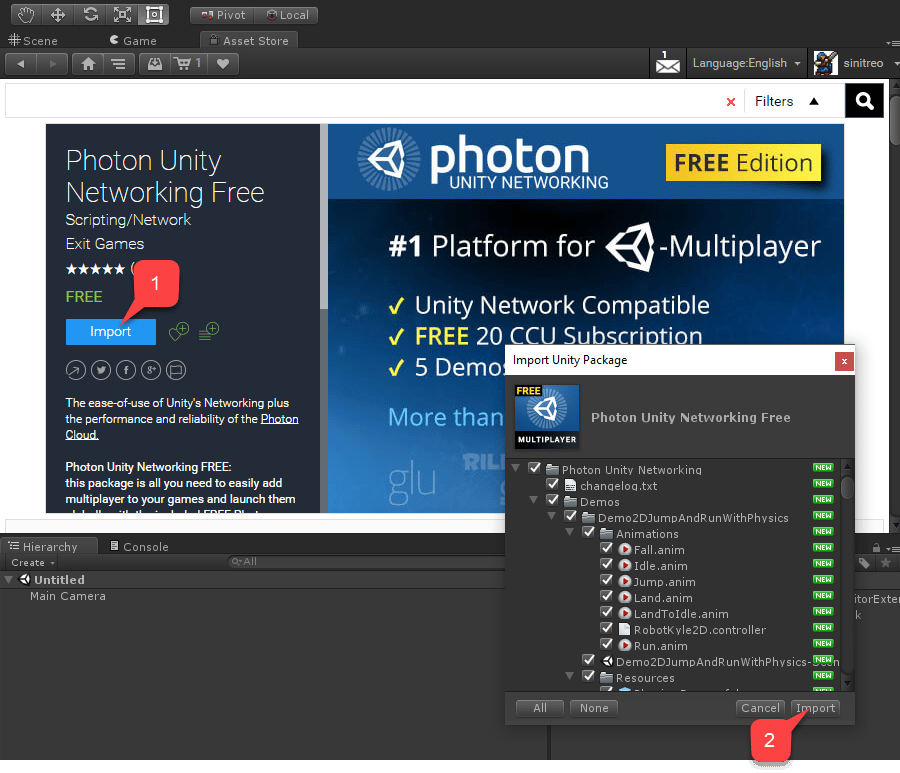
* 首先,瀏覽至 **Asset Store**。
* 找到 [Photon Unity Networking Free 套件](https://assetstore.unity.com/packages/tools/network/photon-unity-networking-classic-free-1786)。
* 選取 **Import (1)**。
* 您可以檢查匯入的檔案。
* 然後選取 **Import (2)**。
## 設定 Unity 專案
本指南假設您已匯入並設定 PlayFab SDK,且已設定遊戲設定。
* 首先,瀏覽至 **Asset Store**。
* 找到 [Photon Unity Networking Free 套件](https://assetstore.unity.com/packages/tools/network/photon-unity-networking-classic-free-1786)。
* 選取 **Import (1)**。
* 您可以檢查匯入的檔案。
* 然後選取 **Import (2)**。
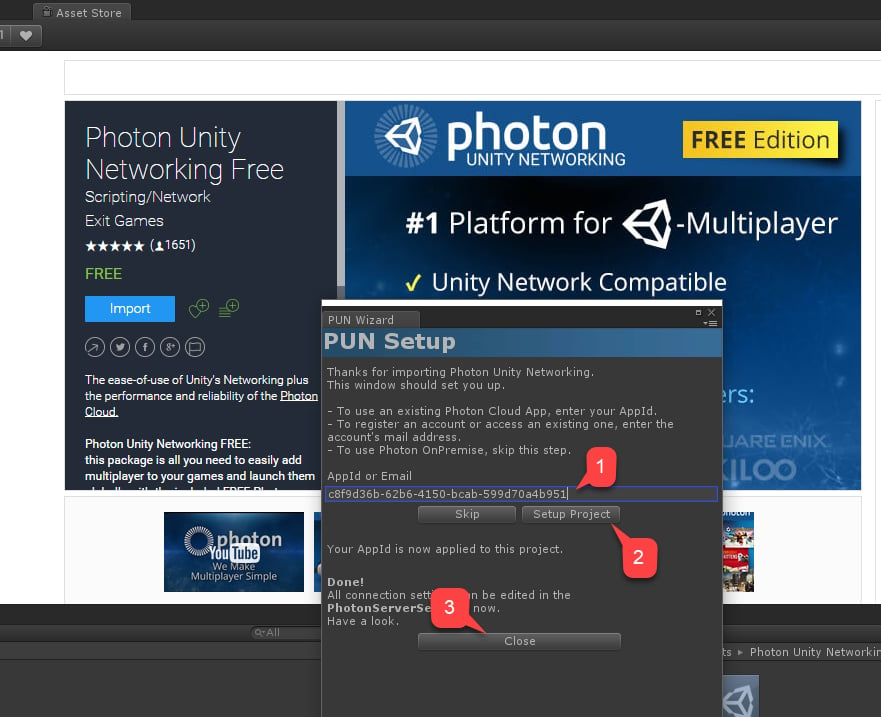
 匯入程序完成後,**PUN Setup** 視窗會立即開啟。
* 輸入您在 **Photon Application Dashboard** 中為所建立之 **Photon App** 找到的 **Realtime Application ID (1)**。
* 選取 **Setup Project (2)**。
* 設定完成後,選取 **Close (3)**。
匯入程序完成後,**PUN Setup** 視窗會立即開啟。
* 輸入您在 **Photon Application Dashboard** 中為所建立之 **Photon App** 找到的 **Realtime Application ID (1)**。
* 選取 **Setup Project (2)**。
* 設定完成後,選取 **Close (3)**。
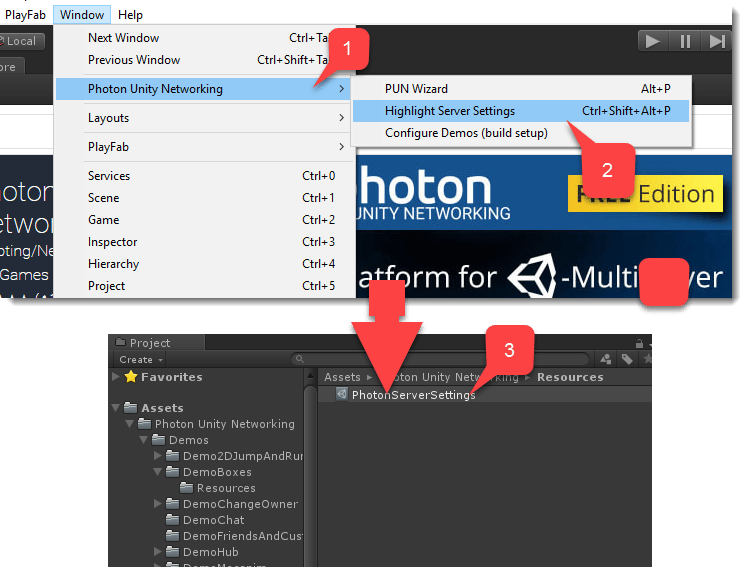
 如果 **AppId** 被接受,**Photon Server Settings** 物件會被選取,並可在 **Unity Inspector** 視窗中檢視。若要手動存取 **Server Settings** 物件:
* 瀏覽至頂端視窗面板。
* 選取 **Window**。
* 然後選取 **Photon Unity Networking (1)**。
* 最後選取 **Highlight Server Settings (2)**。
* **Standard Unity** 專案視窗會顯示 **PhotonServerSettings (3)** 物件。
* 選取該物件,以在 **Unity Inspector** 視窗中顯示其設定。
如果 **AppId** 被接受,**Photon Server Settings** 物件會被選取,並可在 **Unity Inspector** 視窗中檢視。若要手動存取 **Server Settings** 物件:
* 瀏覽至頂端視窗面板。
* 選取 **Window**。
* 然後選取 **Photon Unity Networking (1)**。
* 最後選取 **Highlight Server Settings (2)**。
* **Standard Unity** 專案視窗會顯示 **PhotonServerSettings (3)** 物件。
* 選取該物件,以在 **Unity Inspector** 視窗中顯示其設定。
 作為 **PhotonServerSettings** 的一部分,您可以選擇指派 **Chat Application ID**。
此時,專案已設定完成。
## 實作 PlayFab 至 Photon 的驗證
當您在 PlayFab Game Manager 中為遊戲啟用 **Photon Add-on**,並在 **Photon Application** 儀表板上設定驗證時,PlayFab 可讓您在 Photon 環境內驗證現有的 PlayFab 玩家。
這表示您可以完全避免為 Photon 實作任何使用者管理。
1. 瀏覽至 **Photon Unity Networking Free** 套件 **Classic** 版本中的 **DemoHub-Scene-V2** 場景。
* 此場景是套件中所有範例的中樞。
* 由於它是*第一個*載入的場景,讓我們新增一個小型指令碼來啟用 PlayFab 與 Photon 的驗證。
2. 建立一個名為 **PlayFabAuthenticator** 的空 **GameObject**。
3. 然後在 **Unity Inspector** 視窗中,將同名的元件新增至此 **GameObject**。
作為 **PhotonServerSettings** 的一部分,您可以選擇指派 **Chat Application ID**。
此時,專案已設定完成。
## 實作 PlayFab 至 Photon 的驗證
當您在 PlayFab Game Manager 中為遊戲啟用 **Photon Add-on**,並在 **Photon Application** 儀表板上設定驗證時,PlayFab 可讓您在 Photon 環境內驗證現有的 PlayFab 玩家。
這表示您可以完全避免為 Photon 實作任何使用者管理。
1. 瀏覽至 **Photon Unity Networking Free** 套件 **Classic** 版本中的 **DemoHub-Scene-V2** 場景。
* 此場景是套件中所有範例的中樞。
* 由於它是*第一個*載入的場景,讓我們新增一個小型指令碼來啟用 PlayFab 與 Photon 的驗證。
2. 建立一個名為 **PlayFabAuthenticator** 的空 **GameObject**。
3. 然後在 **Unity Inspector** 視窗中,將同名的元件新增至此 **GameObject**。
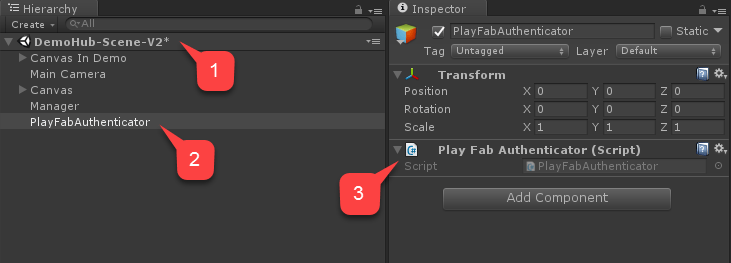 選取齒輪圖示,然後從下拉式功能表中選擇編輯指令碼。複製並貼上 `PlayFabAuthenticator` 元件的程式碼,然後儲存並關閉檔案。
```csharp theme={null}
using PlayFab;
using PlayFab.ClientModels;
using UnityEngine;
public class PlayFabAuthenticator : MonoBehaviour {
private string _playFabPlayerIdCache;
//Run the entire thing on awake
public void Awake() {
AuthenticateWithPlayFab();
}
/*
* Step 1
* We authenticate a current PlayFab user normally.
* In this case we use the LoginWithCustomID API call for simplicity.
* You can absolutely use any Login method you want.
* We use PlayFabSettings.DeviceUniqueIdentifier as our custom ID.
* We pass RequestPhotonToken as a callback to be our next step, if
* authentication was successful.
*/
private void AuthenticateWithPlayFab(){
LogMessage("PlayFab authenticating using Custom ID...");
PlayFabClientAPI.LoginWithCustomID(new LoginWithCustomIDRequest()
{
CreateAccount = true,
CustomId = PlayFabSettings.DeviceUniqueIdentifier
}, RequestPhotonToken, OnPlayFabError);
}
/*
* Step 2
* We request a Photon authentication token from PlayFab.
* This is a crucial step, because Photon uses different authentication tokens
* than PlayFab. Thus, you cannot directly use PlayFab SessionTicket and
* you need to explicitly request a token. This API call requires you to
* pass a Photon App ID. The App ID may be hard coded, but in this example,
* we are accessing it using convenient static field on PhotonNetwork class.
* We pass in AuthenticateWithPhoton as a callback to be our next step, if
* we have acquired the token successfully.
*/
private void RequestPhotonToken(LoginResult obj) {
LogMessage("PlayFab authenticated. Requesting photon token...");
//We can player PlayFabId. This will come in handy during next step
_playFabPlayerIdCache = obj.PlayFabId;
PlayFabClientAPI.GetPhotonAuthenticationToken(new GetPhotonAuthenticationTokenRequest()
{
PhotonApplicationId = PhotonNetwork.PhotonServerSettings.AppSettings.AppIdRealtime
}, AuthenticateWithPhoton, OnPlayFabError);
}
/*
* Step 3
* This is the final and the simplest step. We create a new AuthenticationValues instance.
* This class describes how to authenticate a player inside the Photon environment.
*/
private void AuthenticateWithPhoton(GetPhotonAuthenticationTokenResult obj) {
LogMessage("Photon token acquired: " + obj.PhotonCustomAuthenticationToken + " Authentication complete.");
//We set AuthType to custom, meaning we bring our own, PlayFab authentication procedure.
var customAuth = new Photon.Realtime.AuthenticationValues { AuthType = CustomAuthenticationType.Custom };
//We add "username" parameter. Do not let it confuse you: PlayFab is expecting this parameter to contain player PlayFab ID (!) and not username.
customAuth.AddAuthParameter("username", _playFabPlayerIdCache); // expected by PlayFab custom auth service
//We add "token" parameter. PlayFab expects it to contain Photon Authentication Token issues to your during previous step.
customAuth.AddAuthParameter("token", obj.PhotonCustomAuthenticationToken);
//We finally tell Photon to use this authentication parameters throughout the entire application.
PhotonNetwork.AuthValues = customAuth;
}
private void OnPlayFabError(PlayFabError obj) {
LogMessage(obj.GenerateErrorReport());
}
public void LogMessage(string message) {
Debug.Log("PlayFab + Photon Example: " + message);
}
}
```
## 測試 PlayFab 至 Photon 的驗證
1. 啟動場景。
2. 檢查主控台訊息的流程。
確認:
3. 對 PlayFab 本身的驗證已成功。
4. 已取得 Photon 權杖。
下圖說明了正確的流程。
選取齒輪圖示,然後從下拉式功能表中選擇編輯指令碼。複製並貼上 `PlayFabAuthenticator` 元件的程式碼,然後儲存並關閉檔案。
```csharp theme={null}
using PlayFab;
using PlayFab.ClientModels;
using UnityEngine;
public class PlayFabAuthenticator : MonoBehaviour {
private string _playFabPlayerIdCache;
//Run the entire thing on awake
public void Awake() {
AuthenticateWithPlayFab();
}
/*
* Step 1
* We authenticate a current PlayFab user normally.
* In this case we use the LoginWithCustomID API call for simplicity.
* You can absolutely use any Login method you want.
* We use PlayFabSettings.DeviceUniqueIdentifier as our custom ID.
* We pass RequestPhotonToken as a callback to be our next step, if
* authentication was successful.
*/
private void AuthenticateWithPlayFab(){
LogMessage("PlayFab authenticating using Custom ID...");
PlayFabClientAPI.LoginWithCustomID(new LoginWithCustomIDRequest()
{
CreateAccount = true,
CustomId = PlayFabSettings.DeviceUniqueIdentifier
}, RequestPhotonToken, OnPlayFabError);
}
/*
* Step 2
* We request a Photon authentication token from PlayFab.
* This is a crucial step, because Photon uses different authentication tokens
* than PlayFab. Thus, you cannot directly use PlayFab SessionTicket and
* you need to explicitly request a token. This API call requires you to
* pass a Photon App ID. The App ID may be hard coded, but in this example,
* we are accessing it using convenient static field on PhotonNetwork class.
* We pass in AuthenticateWithPhoton as a callback to be our next step, if
* we have acquired the token successfully.
*/
private void RequestPhotonToken(LoginResult obj) {
LogMessage("PlayFab authenticated. Requesting photon token...");
//We can player PlayFabId. This will come in handy during next step
_playFabPlayerIdCache = obj.PlayFabId;
PlayFabClientAPI.GetPhotonAuthenticationToken(new GetPhotonAuthenticationTokenRequest()
{
PhotonApplicationId = PhotonNetwork.PhotonServerSettings.AppSettings.AppIdRealtime
}, AuthenticateWithPhoton, OnPlayFabError);
}
/*
* Step 3
* This is the final and the simplest step. We create a new AuthenticationValues instance.
* This class describes how to authenticate a player inside the Photon environment.
*/
private void AuthenticateWithPhoton(GetPhotonAuthenticationTokenResult obj) {
LogMessage("Photon token acquired: " + obj.PhotonCustomAuthenticationToken + " Authentication complete.");
//We set AuthType to custom, meaning we bring our own, PlayFab authentication procedure.
var customAuth = new Photon.Realtime.AuthenticationValues { AuthType = CustomAuthenticationType.Custom };
//We add "username" parameter. Do not let it confuse you: PlayFab is expecting this parameter to contain player PlayFab ID (!) and not username.
customAuth.AddAuthParameter("username", _playFabPlayerIdCache); // expected by PlayFab custom auth service
//We add "token" parameter. PlayFab expects it to contain Photon Authentication Token issues to your during previous step.
customAuth.AddAuthParameter("token", obj.PhotonCustomAuthenticationToken);
//We finally tell Photon to use this authentication parameters throughout the entire application.
PhotonNetwork.AuthValues = customAuth;
}
private void OnPlayFabError(PlayFabError obj) {
LogMessage(obj.GenerateErrorReport());
}
public void LogMessage(string message) {
Debug.Log("PlayFab + Photon Example: " + message);
}
}
```
## 測試 PlayFab 至 Photon 的驗證
1. 啟動場景。
2. 檢查主控台訊息的流程。
確認:
3. 對 PlayFab 本身的驗證已成功。
4. 已取得 Photon 權杖。
下圖說明了正確的流程。
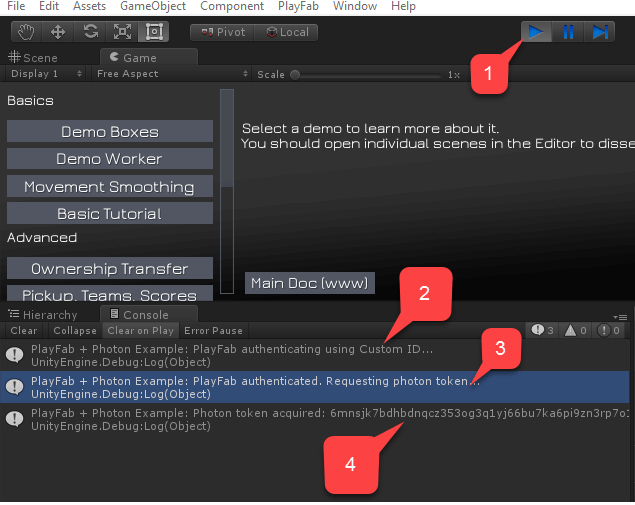 取得 Photon 權杖且驗證完成後,我們就可以查看 Photon 示範了。
例如,啟動名為 **Demo Boxes** 的示範。
5. 為了確保 PlayFab 驗證已完成,請選取 **Demo Boxes**。
6. 然後選取 **Load Demo**,如下圖所示。
取得 Photon 權杖且驗證完成後,我們就可以查看 Photon 示範了。
例如,啟動名為 **Demo Boxes** 的示範。
5. 為了確保 PlayFab 驗證已完成,請選取 **Demo Boxes**。
6. 然後選取 **Load Demo**,如下圖所示。
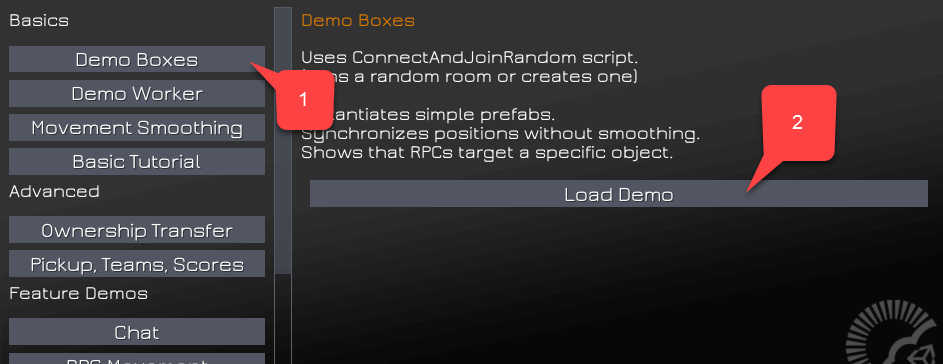 Photon 會開始輸出偵錯訊息。透過監視主控台,您可以輕鬆發現是否有任何驗證問題。
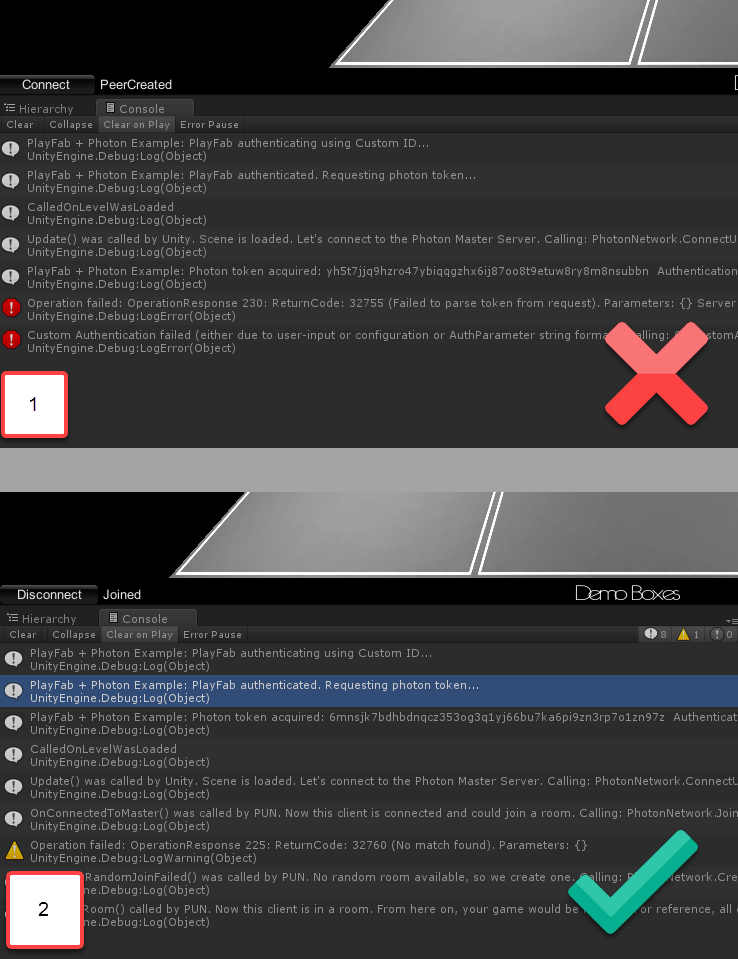 確保主控台中沒有出現 **Authentication Denied** 錯誤。此時,您已設定好最基本的 PlayFab 和 Photon 整合。
## Photon 房間事件 + CloudScript
Photon 配對系統具有*房間*的概念。如果您不熟悉此概念,請參閱 [Photon 配對指南](https://doc.photonengine.com/realtime/current/lobby-and-matchmaking/matchmaking-and-lobby)。
PlayFab 可讓您攔截各種房間事件。下列房間事件只需要 CloudScript 即可攔截:
* `RoomCreated`
* `RoomJoined`
* `RoomLeft`
* `RoomClosed`
下列事件需要對 Unity 程式碼進行額外控制才能攔截 (詳細資料將在本文件稍後提供):
* `RoomPropertyUpdated`
* `RoomEventRaised`
一旦您為房間事件引進處理常式,它就會成為事件處理流程的重要部分。因此,執行 CloudScript 時產生的錯誤可能會對*整個*系統造成問題。例如,如果 `RoomCreated` 處理常式擲回錯誤,您的用戶端也會擲回錯誤,且無法正常連線。
讓我們透過個別定義每種事件類型的處理常式來建構 PlayFab CloudScript。
### Room Created 處理常式
每次建立 Photon 房間時,都會叫用 `RoomCreated` 處理常式。下列 CloudScript 處理常式會攔截此類事件。
```javascript theme={null}
// Triggered automatically when a Photon room is first created
handlers.RoomCreated = function (args) {
return { ResultCode : 0, Message: 'Success' };
};
```
您可以使用 "args" 引數取得有關事件的更多資料。
```json theme={null}
{
"ActorNr": 1,
"AppVersion": "1.2_1.85",
"AppId": "bfd5f98b-c6a4-4763-80d9-824d20db842b",
// Options with which the room was created.
"CreateOptions": {
"MaxPlayers": 4,
"LobbyId": null,
"LobbyType": 0,
"CustomProperties": {
},
"EmptyRoomTTL": 0,
"PlayerTTL": 0,
"CheckUserOnJoin": false,
"DeleteCacheOnLeave": true,
"SuppressRoomEvents": false,
"PublishUserId": false,
"ExpectedUsers": null
},
// Unique game identifier
"GameId": "8b8322de-096d-4481-a2b2-8db8bb45cfef",
"Region": "EU",
"Type": "Create",
// User that caused the room to be created
"UserId": "834D5AA5BAB1DFB6",
"Username": ""
}
```
### Room Joined 處理常式
每次玩家加入房間時,都會叫用 `RoomJoined` 處理常式。下列 CloudScript 處理常式會攔截此類事件。
```javascript theme={null}
// Triggered automatically when a player joins a Photon room
handlers.RoomJoined = function (args) {
return { ResultCode : 0, Message: 'Success' };
};
```
第一位進入房間的使用者不會叫用此回呼。請使用 `RoomCreated` 攔截第一位加入的玩家。您可以使用 "args" 引數取得有關事件的更多資料。
```json theme={null}
{
"ActorNr": 2,
"AppVersion": "1.2_1.85",
"AppId": "bfd5f98b-c6a4-4763-80d9-824d20db842b",
// Unique Game Identifier
"GameId": "b0f55a2e-431d-402a-9809-b0240443267e",
"Region": "EU",
"Type": "Join",
// Id of the player that has joined
"UserId": "AAC7634BF46289DF",
"Username": ""
}
```
### Room left
每次玩家離開房間時,都會叫用 `RoomLeft` 處理常式。下列 CloudScript 處理常式會攔截此類事件。
```javascript theme={null}
// Triggered automatically when a player leaves a Photon room
handlers.RoomLeft = function (args) {
return { ResultCode : 0, Message: 'Success' };
};
```
您可以使用 "args" 引數取得有關事件的更多資料。
```json theme={null}
{
"ActorNr": 2,
"AppVersion": "1.2_1.85",
"AppId": "bfd5f98b-c6a4-4763-80d9-824d20db842b",
// Unique Game Identifier
"GameId": "b0f55a2e-431d-402a-9809-b0240443267e",
"IsInactive": false,
"Reason": "0",
"Region": "EU",
"Type": "ClientDisconnect",
// Id of the user that has left the room
"UserId": "AAC7634BF46289DF",
"Username": ""
}
```
### Room Closed 處理常式
每次最後一位玩家離開房間且房間中已沒有玩家時,都會叫用 `RoomClosed` 處理常式。下列 CloudScript 處理常式會攔截此類事件。
```javascript theme={null}
// Triggered automatically when a Photon room closes
// Note: currentPlayerId is undefined in this function
handlers.RoomClosed = function (args) {
return { ResultCode : 0, Message: 'Success' };
};
```
您可以使用 "args" 引數取得有關事件的更多資料。
```json theme={null}
"ActorCount": 0,
"ActorNr": 1,
"AppVersion": "1.2_1.85",
"AppId": "bfd5f98b-c6a4-4763-80d9-824d20db842b",
// Unique game identifier
"GameId": "b0f55a2e-431d-402a-9809-b0240443267e",
"Region": "EU",
"State2": {
"ActorList": [
]
},
"Type": "Close"
}
```
### Room Property Updated
每次變更房間屬性時,都會叫用 `RoomPropertyUpdated` 處理常式。下列 CloudScript 處理常式會攔截此類事件。
```javascript theme={null}
// Triggered automatically when a Photon room game property is updated.
// Note: currentPlayerId is undefined in this function
handlers.RoomPropertyUpdated = function (args) {
return { ResultCode : 0, Message: 'Success' };
};
```
在此處理常式中,`currentPlayerId` 未定義。如果房間屬性是從用戶端變更的,您可以使用 "args" 引數,並參考 UserId 以取得負責的玩家。
您可以使用 "args" 引數取得有關事件的更多資料。
```json theme={null}
{
"ActorNr": 1,
"AppVersion": "1.2_1.85",
"AppId": "bfd5f98b-c6a4-4763-80d9-824d20db842b",
// Custom Room Properties
"Properties": {
"CustomProperty": "It's Value"
},
"GameId": "8b8322de-096d-4481-a2b2-8db8bb45cfef",
"Region": "EU",
"State": {
"ActorCounter": 1,
"ActorList": [
{
"ActorNr": 1,
"UserId": "834D5AA5BAB1DFB6",
"Username": "",
"IsActive": true,
"Binary": "RGIAAAEBRAAAAAFi\/3MAAA==",
"DEBUG_BINARY": {
"1": {
"255": ""
}
}
}
],
"Binary": {
"18": "RAAAAANi+nkAAHNzAA1QbGF5ZXJJbmRleGVzRGlpAAEAAAABAAAAAHMADkN1c3RvbVByb3BlcnR5cwAKSXQncyBWYWx1ZQ=="
},
"CheckUserOnJoin": false,
"CustomProperties": {
},
"DeleteCacheOnLeave": true,
"EmptyRoomTTL": 0,
"IsOpen": true,
"IsVisible": true,
"LobbyType": 0,
"LobbyProperties": [
],
"MaxPlayers": 4,
"PlayerTTL": 0,
"SuppressRoomEvents": false,
"Slice": 0,
"DebugInfo": {
"DEBUG_PROPERTIES_18": {
"250": [
],
"PlayerIndexes": {
"1": 0
},
"CustomProperty": "It's Value"
}
},
"ExcludedActors": [
],
"PublishUserId": false,
"ExpectedUsers": [
]
},
"Type": "Game",
"UserId": "834D5AA5BAB1DFB6",
"Username": ""
}
```
使用 Unity Photon 用戶端變更自訂房間屬性時,*務必標記該呼叫*,以便將事件傳遞給 Webhook (在此案例中為 PlayFab)。
```csharp theme={null}
// Properties updates ( this hashtable contains the properties to be changed. Properties not mentioned here will stay as is
var properties = new ExitGames.Client.Photon.Hashtable() { { "CustomProperty" , "It's Value" } };
// Control set. Empty in this case, because our property has not existed before.
// Otherwise you would include previous value of the property.
var expectedProperties = new ExitGames.Client.Photon.Hashtable();
// Set Custom Properties call. Notice the last argument set to "true"
// This tells Photon to forward event to the webhook.
PhotonNetwork.room.SetCustomProperties(properties, expectedProperties, true);
```
### Room Event Raised
每次引發自訂房間事件時,都會呼叫 **Room Event Raised**。下列 **CloudScript** 處理常式會攔截此類事件。
```javascript theme={null}
// Triggered by calling "OpRaiseEvent" on the Photon client. The "args.Data" property is
// set to the value of the "customEventContent" HashTable parameter, so you can use
// it to pass in arbitrary data.
handlers.RoomEventRaised= function (args) {
return { ResultCode : 0, Message: 'Success' };
};
```
您可以使用 "args" 引數取得有關事件的更多資料。
```json theme={null}
{
"ActorNr": 1,
"AppVersion": "1.2_1.85",
"AppId": "bfd5f98b-c6a4-4763-80d9-824d20db842b",
// Custom event data
"Data": {
"Hello": "World"
},
"GameId": "8b8322de-096d-4481-a2b2-8db8bb45cfef",
"Region": "EU",
"State": {
"ActorCounter": 1,
"ActorList": [
{
"ActorNr": 1,
"UserId": "834D5AA5BAB1DFB6",
"Username": "",
"IsActive": true,
"Binary": "RGIAAAEBRAAAAAFi\/3MAAA==",
"DEBUG_BINARY": {
"1": {
"255": ""
}
}
}
],
"Binary": {
"18": "RAAAAAJi+nkAAHNzAA1QbGF5ZXJJbmRleGVzRGlpAAEAAAABAAAAAA=="
},
"CheckUserOnJoin": false,
"CustomProperties": {
},
"DeleteCacheOnLeave": true,
"EmptyRoomTTL": 0,
"IsOpen": true,
"IsVisible": true,
"LobbyType": 0,
"LobbyProperties": [
],
"MaxPlayers": 4,
"PlayerTTL": 0,
"SuppressRoomEvents": false,
"Slice": 0,
"DebugInfo": {
"DEBUG_PROPERTIES_18": {
"250": [
],
"PlayerIndexes": {
"1": 0
}
}
},
"ExcludedActors": [
],
"PublishUserId": false,
"ExpectedUsers": [
]
},
"Type": "Event",
// PlayFab User Id if he/she was the source of the event
"UserId": "834D5AA5BAB1DFB6",
"Username": "",
// Event code
"EvCode": 15
}
```
使用 Unity Photon 用戶端引發自訂房間事件時,務必標記該呼叫,以便將事件傳遞給 Webhook (在此案例中為 PlayFab)。
```csharp theme={null}
var data = new Dictionary() {
{ "Hello" , "World" }
};
// Raise custom room event
// Replace 15 with any custom event code of your choice [0..299]
PhotonNetwork.RaiseEvent(15, data, true, new RaiseEventOptions() {
ForwardToWebhook = true, // Mark call to pass event to Webhook (PlayFab in this case)
});
```
## 測試房間事件處理常式
此範例擴充了先前的範例 (PlayFab + Photon 驗證)。
為您的遊戲上傳下列 CloudScript。
```javascript theme={null}
handlers.RoomCreated = function (args) {
server.WriteTitleEvent({
EventName : "room_created"
});
return { ResultCode : 0, Message: 'Success' };
};
handlers.RoomJoined = function (args) {
server.WriteTitleEvent({
EventName : "room_joined"
});
return { ResultCode : 0, Message: 'Success' };
};
handlers.RoomLeft = function (args) {
server.WriteTitleEvent({
EventName : "room_left"
});
return { ResultCode : 0, Message: 'Success' };
};
handlers.RoomClosed = function (args) {
server.WriteTitleEvent({
EventName : "room_closed"
});
return { ResultCode : 0, Message: 'Success' };
};
handlers.RoomPropertyUpdated = function (args) {
server.WriteTitleEvent({
EventName : "room_property_changed"
});
return { ResultCode : 0, Message: 'Success' };
};
handlers.RoomEventRaised = function (args) {
server.WriteTitleEvent({
EventName : "room_event_raised"
});
return { ResultCode : 0, Message: 'Success' };
};
```
此程式碼只會在每次叫用 Photon 回呼時張貼新的遊戲事件。雖然在生產環境中沒有用處,但此範例可讓我們清楚看到回呼的叫用方式。
擴充 `PlayFabAuthenticator` 指令碼,加入引發自訂事件並設定自訂房間屬性的新範例程式碼。擴充版本也使用 `Awake` 方法,以免在場景載入之間終結物件。
```csharp theme={null}
using System.Collections.Generic;
using PlayFab;
using PlayFab.ClientModels;
using UnityEngine;
public class PlayFabAuthenticator : MonoBehaviour {
private string _playFabPlayerIdCache;
//Run the entire thing on awake
public void Awake() {
AuthenticateWithPlayFab();
DontDestroyOnLoad(gameObject);
}
/*
* Step 1
* We authenticate a current PlayFab user normally.
* In this case we use the LoginWithCustomID API call for simplicity.
* You can absolutely use any Login method you want.
* We use PlayFabSettings.DeviceUniqueIdentifier as our custom ID.
* We pass RequestPhotonToken as a callback to be our next step, if
* authentication was successful.
*/
private void AuthenticateWithPlayFab() {
LogMessage("PlayFab authenticating using Custom ID...");
PlayFabClientAPI.LoginWithCustomID(new LoginWithCustomIDRequest()
{
CreateAccount = true,
CustomId = PlayFabSettings.DeviceUniqueIdentifier+"EDITOR"
}, RequestPhotonToken, OnPlayFabError);
}
/*
* Step 2
* We request a Photon authentication token from PlayFab.
* This is a crucial step, because Photon uses different authentication tokens
* than PlayFab. Thus, you cannot directly use PlayFab SessionTicket and
* you need to explicitly request a token. This API call requires you to
* pass a Photon App ID. The App ID may be hard coded, but in this example,
* we are accessing it using convenient static field on PhotonNetwork class.
* We pass in AuthenticateWithPhoton as a callback to be our next step, if
* we have acquired the token successfully.
*/
private void RequestPhotonToken(LoginResult obj) {
LogMessage("PlayFab authenticated. Requesting photon token...");
//We can player PlayFabId. This will come in handy during next step
_playFabPlayerIdCache = obj.PlayFabId;
PlayFabClientAPI.GetPhotonAuthenticationToken(new GetPhotonAuthenticationTokenRequest()
{
PhotonApplicationId = PhotonNetwork.PhotonServerSettings.AppSettings.AppIdRealtime
}, AuthenticateWithPhoton, OnPlayFabError);
}
/*
* Step 3
* This is the final and the simplest step. We create a new AuthenticationValues instance.
* This class describes how to authenticate a player inside the Photon environment.
*/
private void AuthenticateWithPhoton(GetPhotonAuthenticationTokenResult obj) {
LogMessage("Photon token acquired: " + obj.PhotonCustomAuthenticationToken + " Authentication complete.");
//We set AuthType to custom, meaning we bring our own, PlayFab authentication procedure.
var customAuth = new Photon.Realtime.AuthenticationValues { AuthType = CustomAuthenticationType.Custom };
//We add "username" parameter. Do not let it confuse you: PlayFab is expecting this parameter to contain player PlayFab ID (!) and not username.
customAuth.AddAuthParameter("username", _playFabPlayerIdCache); // expected by PlayFab custom auth service
//We add "token" parameter. PlayFab expects it to contain Photon Authentication Token issues to your during previous step.
customAuth.AddAuthParameter("token", obj.PhotonCustomAuthenticationToken);
//We finally tell Photon to use this authentication parameters throughout the entire application.
PhotonNetwork.AuthValues = customAuth;
}
private void OnPlayFabError(PlayFabError obj) {
LogMessage(obj.ErrorMessage);
}
public void LogMessage(string message) {
Debug.Log("PlayFab + Photon Example: " + message);
}
// Add small button to launch our example code
public void OnGUI() {
if (GUILayout.Button("Execute Example ")) ExecuteExample();
}
// Example code which raises custom room event, then sets custom room property
private void ExecuteExample() {
// Raise custom room event
var data = new Dictionary() { {"Hello","World"} };
var result = PhotonNetwork.RaiseEvent(15, data, true, new RaiseEventOptions()
{
ForwardToWebhook = true,
});
LogMessage("New Room Event Post: "+result);
// Set custom room property
var properties = new ExitGames.Client.Photon.Hashtable() { { "CustomProperty", "It's Value" } };
var expectedProperties = new ExitGames.Client.Photon.Hashtable();
PhotonNetwork.room.SetCustomProperties(properties, expectedProperties, true);
LogMessage("New Room Properties Set");
}
}
```
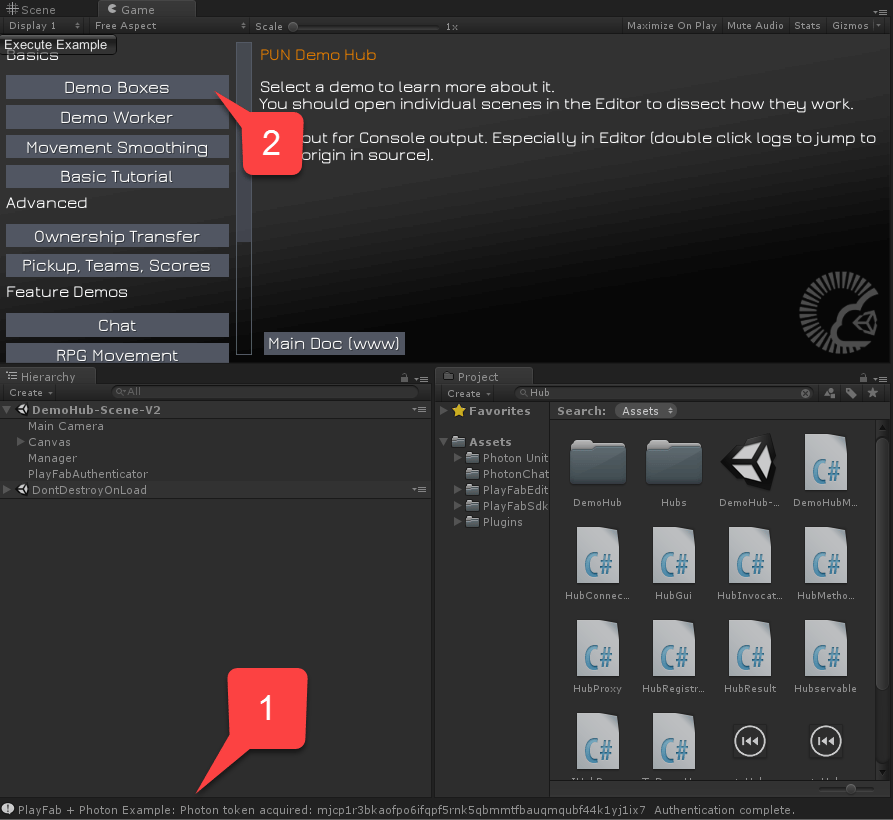
* 執行中樞場景,並等候 PlayFab 驗證完成 **(1)**。
* 然後載入 **Boxes Demo** 場景 **(2)**。
確保主控台中沒有出現 **Authentication Denied** 錯誤。此時,您已設定好最基本的 PlayFab 和 Photon 整合。
## Photon 房間事件 + CloudScript
Photon 配對系統具有*房間*的概念。如果您不熟悉此概念,請參閱 [Photon 配對指南](https://doc.photonengine.com/realtime/current/lobby-and-matchmaking/matchmaking-and-lobby)。
PlayFab 可讓您攔截各種房間事件。下列房間事件只需要 CloudScript 即可攔截:
* `RoomCreated`
* `RoomJoined`
* `RoomLeft`
* `RoomClosed`
下列事件需要對 Unity 程式碼進行額外控制才能攔截 (詳細資料將在本文件稍後提供):
* `RoomPropertyUpdated`
* `RoomEventRaised`
一旦您為房間事件引進處理常式,它就會成為事件處理流程的重要部分。因此,執行 CloudScript 時產生的錯誤可能會對*整個*系統造成問題。例如,如果 `RoomCreated` 處理常式擲回錯誤,您的用戶端也會擲回錯誤,且無法正常連線。
讓我們透過個別定義每種事件類型的處理常式來建構 PlayFab CloudScript。
### Room Created 處理常式
每次建立 Photon 房間時,都會叫用 `RoomCreated` 處理常式。下列 CloudScript 處理常式會攔截此類事件。
```javascript theme={null}
// Triggered automatically when a Photon room is first created
handlers.RoomCreated = function (args) {
return { ResultCode : 0, Message: 'Success' };
};
```
您可以使用 "args" 引數取得有關事件的更多資料。
```json theme={null}
{
"ActorNr": 1,
"AppVersion": "1.2_1.85",
"AppId": "bfd5f98b-c6a4-4763-80d9-824d20db842b",
// Options with which the room was created.
"CreateOptions": {
"MaxPlayers": 4,
"LobbyId": null,
"LobbyType": 0,
"CustomProperties": {
},
"EmptyRoomTTL": 0,
"PlayerTTL": 0,
"CheckUserOnJoin": false,
"DeleteCacheOnLeave": true,
"SuppressRoomEvents": false,
"PublishUserId": false,
"ExpectedUsers": null
},
// Unique game identifier
"GameId": "8b8322de-096d-4481-a2b2-8db8bb45cfef",
"Region": "EU",
"Type": "Create",
// User that caused the room to be created
"UserId": "834D5AA5BAB1DFB6",
"Username": ""
}
```
### Room Joined 處理常式
每次玩家加入房間時,都會叫用 `RoomJoined` 處理常式。下列 CloudScript 處理常式會攔截此類事件。
```javascript theme={null}
// Triggered automatically when a player joins a Photon room
handlers.RoomJoined = function (args) {
return { ResultCode : 0, Message: 'Success' };
};
```
第一位進入房間的使用者不會叫用此回呼。請使用 `RoomCreated` 攔截第一位加入的玩家。您可以使用 "args" 引數取得有關事件的更多資料。
```json theme={null}
{
"ActorNr": 2,
"AppVersion": "1.2_1.85",
"AppId": "bfd5f98b-c6a4-4763-80d9-824d20db842b",
// Unique Game Identifier
"GameId": "b0f55a2e-431d-402a-9809-b0240443267e",
"Region": "EU",
"Type": "Join",
// Id of the player that has joined
"UserId": "AAC7634BF46289DF",
"Username": ""
}
```
### Room left
每次玩家離開房間時,都會叫用 `RoomLeft` 處理常式。下列 CloudScript 處理常式會攔截此類事件。
```javascript theme={null}
// Triggered automatically when a player leaves a Photon room
handlers.RoomLeft = function (args) {
return { ResultCode : 0, Message: 'Success' };
};
```
您可以使用 "args" 引數取得有關事件的更多資料。
```json theme={null}
{
"ActorNr": 2,
"AppVersion": "1.2_1.85",
"AppId": "bfd5f98b-c6a4-4763-80d9-824d20db842b",
// Unique Game Identifier
"GameId": "b0f55a2e-431d-402a-9809-b0240443267e",
"IsInactive": false,
"Reason": "0",
"Region": "EU",
"Type": "ClientDisconnect",
// Id of the user that has left the room
"UserId": "AAC7634BF46289DF",
"Username": ""
}
```
### Room Closed 處理常式
每次最後一位玩家離開房間且房間中已沒有玩家時,都會叫用 `RoomClosed` 處理常式。下列 CloudScript 處理常式會攔截此類事件。
```javascript theme={null}
// Triggered automatically when a Photon room closes
// Note: currentPlayerId is undefined in this function
handlers.RoomClosed = function (args) {
return { ResultCode : 0, Message: 'Success' };
};
```
您可以使用 "args" 引數取得有關事件的更多資料。
```json theme={null}
"ActorCount": 0,
"ActorNr": 1,
"AppVersion": "1.2_1.85",
"AppId": "bfd5f98b-c6a4-4763-80d9-824d20db842b",
// Unique game identifier
"GameId": "b0f55a2e-431d-402a-9809-b0240443267e",
"Region": "EU",
"State2": {
"ActorList": [
]
},
"Type": "Close"
}
```
### Room Property Updated
每次變更房間屬性時,都會叫用 `RoomPropertyUpdated` 處理常式。下列 CloudScript 處理常式會攔截此類事件。
```javascript theme={null}
// Triggered automatically when a Photon room game property is updated.
// Note: currentPlayerId is undefined in this function
handlers.RoomPropertyUpdated = function (args) {
return { ResultCode : 0, Message: 'Success' };
};
```
在此處理常式中,`currentPlayerId` 未定義。如果房間屬性是從用戶端變更的,您可以使用 "args" 引數,並參考 UserId 以取得負責的玩家。
您可以使用 "args" 引數取得有關事件的更多資料。
```json theme={null}
{
"ActorNr": 1,
"AppVersion": "1.2_1.85",
"AppId": "bfd5f98b-c6a4-4763-80d9-824d20db842b",
// Custom Room Properties
"Properties": {
"CustomProperty": "It's Value"
},
"GameId": "8b8322de-096d-4481-a2b2-8db8bb45cfef",
"Region": "EU",
"State": {
"ActorCounter": 1,
"ActorList": [
{
"ActorNr": 1,
"UserId": "834D5AA5BAB1DFB6",
"Username": "",
"IsActive": true,
"Binary": "RGIAAAEBRAAAAAFi\/3MAAA==",
"DEBUG_BINARY": {
"1": {
"255": ""
}
}
}
],
"Binary": {
"18": "RAAAAANi+nkAAHNzAA1QbGF5ZXJJbmRleGVzRGlpAAEAAAABAAAAAHMADkN1c3RvbVByb3BlcnR5cwAKSXQncyBWYWx1ZQ=="
},
"CheckUserOnJoin": false,
"CustomProperties": {
},
"DeleteCacheOnLeave": true,
"EmptyRoomTTL": 0,
"IsOpen": true,
"IsVisible": true,
"LobbyType": 0,
"LobbyProperties": [
],
"MaxPlayers": 4,
"PlayerTTL": 0,
"SuppressRoomEvents": false,
"Slice": 0,
"DebugInfo": {
"DEBUG_PROPERTIES_18": {
"250": [
],
"PlayerIndexes": {
"1": 0
},
"CustomProperty": "It's Value"
}
},
"ExcludedActors": [
],
"PublishUserId": false,
"ExpectedUsers": [
]
},
"Type": "Game",
"UserId": "834D5AA5BAB1DFB6",
"Username": ""
}
```
使用 Unity Photon 用戶端變更自訂房間屬性時,*務必標記該呼叫*,以便將事件傳遞給 Webhook (在此案例中為 PlayFab)。
```csharp theme={null}
// Properties updates ( this hashtable contains the properties to be changed. Properties not mentioned here will stay as is
var properties = new ExitGames.Client.Photon.Hashtable() { { "CustomProperty" , "It's Value" } };
// Control set. Empty in this case, because our property has not existed before.
// Otherwise you would include previous value of the property.
var expectedProperties = new ExitGames.Client.Photon.Hashtable();
// Set Custom Properties call. Notice the last argument set to "true"
// This tells Photon to forward event to the webhook.
PhotonNetwork.room.SetCustomProperties(properties, expectedProperties, true);
```
### Room Event Raised
每次引發自訂房間事件時,都會呼叫 **Room Event Raised**。下列 **CloudScript** 處理常式會攔截此類事件。
```javascript theme={null}
// Triggered by calling "OpRaiseEvent" on the Photon client. The "args.Data" property is
// set to the value of the "customEventContent" HashTable parameter, so you can use
// it to pass in arbitrary data.
handlers.RoomEventRaised= function (args) {
return { ResultCode : 0, Message: 'Success' };
};
```
您可以使用 "args" 引數取得有關事件的更多資料。
```json theme={null}
{
"ActorNr": 1,
"AppVersion": "1.2_1.85",
"AppId": "bfd5f98b-c6a4-4763-80d9-824d20db842b",
// Custom event data
"Data": {
"Hello": "World"
},
"GameId": "8b8322de-096d-4481-a2b2-8db8bb45cfef",
"Region": "EU",
"State": {
"ActorCounter": 1,
"ActorList": [
{
"ActorNr": 1,
"UserId": "834D5AA5BAB1DFB6",
"Username": "",
"IsActive": true,
"Binary": "RGIAAAEBRAAAAAFi\/3MAAA==",
"DEBUG_BINARY": {
"1": {
"255": ""
}
}
}
],
"Binary": {
"18": "RAAAAAJi+nkAAHNzAA1QbGF5ZXJJbmRleGVzRGlpAAEAAAABAAAAAA=="
},
"CheckUserOnJoin": false,
"CustomProperties": {
},
"DeleteCacheOnLeave": true,
"EmptyRoomTTL": 0,
"IsOpen": true,
"IsVisible": true,
"LobbyType": 0,
"LobbyProperties": [
],
"MaxPlayers": 4,
"PlayerTTL": 0,
"SuppressRoomEvents": false,
"Slice": 0,
"DebugInfo": {
"DEBUG_PROPERTIES_18": {
"250": [
],
"PlayerIndexes": {
"1": 0
}
}
},
"ExcludedActors": [
],
"PublishUserId": false,
"ExpectedUsers": [
]
},
"Type": "Event",
// PlayFab User Id if he/she was the source of the event
"UserId": "834D5AA5BAB1DFB6",
"Username": "",
// Event code
"EvCode": 15
}
```
使用 Unity Photon 用戶端引發自訂房間事件時,務必標記該呼叫,以便將事件傳遞給 Webhook (在此案例中為 PlayFab)。
```csharp theme={null}
var data = new Dictionary() {
{ "Hello" , "World" }
};
// Raise custom room event
// Replace 15 with any custom event code of your choice [0..299]
PhotonNetwork.RaiseEvent(15, data, true, new RaiseEventOptions() {
ForwardToWebhook = true, // Mark call to pass event to Webhook (PlayFab in this case)
});
```
## 測試房間事件處理常式
此範例擴充了先前的範例 (PlayFab + Photon 驗證)。
為您的遊戲上傳下列 CloudScript。
```javascript theme={null}
handlers.RoomCreated = function (args) {
server.WriteTitleEvent({
EventName : "room_created"
});
return { ResultCode : 0, Message: 'Success' };
};
handlers.RoomJoined = function (args) {
server.WriteTitleEvent({
EventName : "room_joined"
});
return { ResultCode : 0, Message: 'Success' };
};
handlers.RoomLeft = function (args) {
server.WriteTitleEvent({
EventName : "room_left"
});
return { ResultCode : 0, Message: 'Success' };
};
handlers.RoomClosed = function (args) {
server.WriteTitleEvent({
EventName : "room_closed"
});
return { ResultCode : 0, Message: 'Success' };
};
handlers.RoomPropertyUpdated = function (args) {
server.WriteTitleEvent({
EventName : "room_property_changed"
});
return { ResultCode : 0, Message: 'Success' };
};
handlers.RoomEventRaised = function (args) {
server.WriteTitleEvent({
EventName : "room_event_raised"
});
return { ResultCode : 0, Message: 'Success' };
};
```
此程式碼只會在每次叫用 Photon 回呼時張貼新的遊戲事件。雖然在生產環境中沒有用處,但此範例可讓我們清楚看到回呼的叫用方式。
擴充 `PlayFabAuthenticator` 指令碼,加入引發自訂事件並設定自訂房間屬性的新範例程式碼。擴充版本也使用 `Awake` 方法,以免在場景載入之間終結物件。
```csharp theme={null}
using System.Collections.Generic;
using PlayFab;
using PlayFab.ClientModels;
using UnityEngine;
public class PlayFabAuthenticator : MonoBehaviour {
private string _playFabPlayerIdCache;
//Run the entire thing on awake
public void Awake() {
AuthenticateWithPlayFab();
DontDestroyOnLoad(gameObject);
}
/*
* Step 1
* We authenticate a current PlayFab user normally.
* In this case we use the LoginWithCustomID API call for simplicity.
* You can absolutely use any Login method you want.
* We use PlayFabSettings.DeviceUniqueIdentifier as our custom ID.
* We pass RequestPhotonToken as a callback to be our next step, if
* authentication was successful.
*/
private void AuthenticateWithPlayFab() {
LogMessage("PlayFab authenticating using Custom ID...");
PlayFabClientAPI.LoginWithCustomID(new LoginWithCustomIDRequest()
{
CreateAccount = true,
CustomId = PlayFabSettings.DeviceUniqueIdentifier+"EDITOR"
}, RequestPhotonToken, OnPlayFabError);
}
/*
* Step 2
* We request a Photon authentication token from PlayFab.
* This is a crucial step, because Photon uses different authentication tokens
* than PlayFab. Thus, you cannot directly use PlayFab SessionTicket and
* you need to explicitly request a token. This API call requires you to
* pass a Photon App ID. The App ID may be hard coded, but in this example,
* we are accessing it using convenient static field on PhotonNetwork class.
* We pass in AuthenticateWithPhoton as a callback to be our next step, if
* we have acquired the token successfully.
*/
private void RequestPhotonToken(LoginResult obj) {
LogMessage("PlayFab authenticated. Requesting photon token...");
//We can player PlayFabId. This will come in handy during next step
_playFabPlayerIdCache = obj.PlayFabId;
PlayFabClientAPI.GetPhotonAuthenticationToken(new GetPhotonAuthenticationTokenRequest()
{
PhotonApplicationId = PhotonNetwork.PhotonServerSettings.AppSettings.AppIdRealtime
}, AuthenticateWithPhoton, OnPlayFabError);
}
/*
* Step 3
* This is the final and the simplest step. We create a new AuthenticationValues instance.
* This class describes how to authenticate a player inside the Photon environment.
*/
private void AuthenticateWithPhoton(GetPhotonAuthenticationTokenResult obj) {
LogMessage("Photon token acquired: " + obj.PhotonCustomAuthenticationToken + " Authentication complete.");
//We set AuthType to custom, meaning we bring our own, PlayFab authentication procedure.
var customAuth = new Photon.Realtime.AuthenticationValues { AuthType = CustomAuthenticationType.Custom };
//We add "username" parameter. Do not let it confuse you: PlayFab is expecting this parameter to contain player PlayFab ID (!) and not username.
customAuth.AddAuthParameter("username", _playFabPlayerIdCache); // expected by PlayFab custom auth service
//We add "token" parameter. PlayFab expects it to contain Photon Authentication Token issues to your during previous step.
customAuth.AddAuthParameter("token", obj.PhotonCustomAuthenticationToken);
//We finally tell Photon to use this authentication parameters throughout the entire application.
PhotonNetwork.AuthValues = customAuth;
}
private void OnPlayFabError(PlayFabError obj) {
LogMessage(obj.ErrorMessage);
}
public void LogMessage(string message) {
Debug.Log("PlayFab + Photon Example: " + message);
}
// Add small button to launch our example code
public void OnGUI() {
if (GUILayout.Button("Execute Example ")) ExecuteExample();
}
// Example code which raises custom room event, then sets custom room property
private void ExecuteExample() {
// Raise custom room event
var data = new Dictionary() { {"Hello","World"} };
var result = PhotonNetwork.RaiseEvent(15, data, true, new RaiseEventOptions()
{
ForwardToWebhook = true,
});
LogMessage("New Room Event Post: "+result);
// Set custom room property
var properties = new ExitGames.Client.Photon.Hashtable() { { "CustomProperty", "It's Value" } };
var expectedProperties = new ExitGames.Client.Photon.Hashtable();
PhotonNetwork.room.SetCustomProperties(properties, expectedProperties, true);
LogMessage("New Room Properties Set");
}
}
```
* 執行中樞場景,並等候 PlayFab 驗證完成 **(1)**。
* 然後載入 **Boxes Demo** 場景 **(2)**。
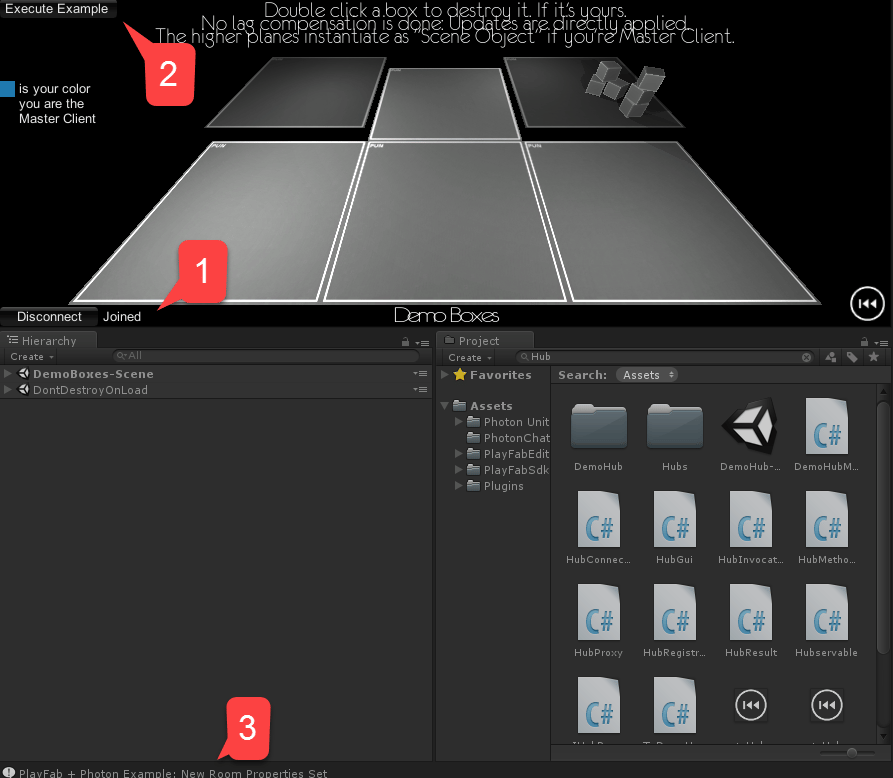
 * 場景載入後,等候對等連線至新建立的房間 **(1)**。
* 然後選取左上角的 **Execute Example** **(2)**。
* 觀察主控台輸出 **(3)**。
* 確認沒有發生任何錯誤。
* 場景載入後,等候對等連線至新建立的房間 **(1)**。
* 然後選取左上角的 **Execute Example** **(2)**。
* 觀察主控台輸出 **(3)**。
* 確認沒有發生任何錯誤。
 別忘了停止 Unity 播放。這是為了確保我們也能收到 **RoomLeft** 和 **RoomClosed** 事件。
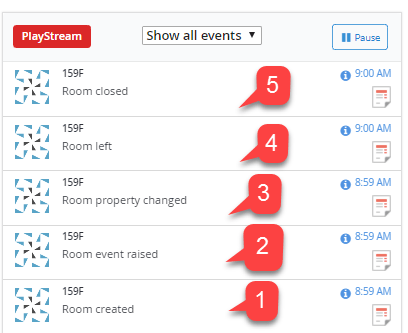
瀏覽至遊戲的 Game Manager 頁面,並觀察 **PlayStream** 面板。您應該可以看到我們的 CloudScript 程式碼處理 Photon 事件所產生的事件。
1. 一開始,我們的 Photon 執行個體沒有開啟的房間。當我們啟動範例時,Photon 為 Boxes Demo 建立了房間。
2. 第一位加入的玩家是要求房間的玩家。因此未記錄任何 **RoomJoined Event**。接著我們執行了範例程式碼:
* 首先,我們引發了自訂的**房間事件**。
* 然後,我們設定了自訂的**房間屬性**。
* 然後我們停止了 Unity 播放模式。這導致我們的用戶端離開房間。
3. 由於我們中斷連線的用戶端是最後一個,因此已沒有其他用戶端,Photon 便關閉了房間。
所有事件都應記錄到 PlayStream 事件流程中,如下圖所示。
別忘了停止 Unity 播放。這是為了確保我們也能收到 **RoomLeft** 和 **RoomClosed** 事件。
瀏覽至遊戲的 Game Manager 頁面,並觀察 **PlayStream** 面板。您應該可以看到我們的 CloudScript 程式碼處理 Photon 事件所產生的事件。
1. 一開始,我們的 Photon 執行個體沒有開啟的房間。當我們啟動範例時,Photon 為 Boxes Demo 建立了房間。
2. 第一位加入的玩家是要求房間的玩家。因此未記錄任何 **RoomJoined Event**。接著我們執行了範例程式碼:
* 首先,我們引發了自訂的**房間事件**。
* 然後,我們設定了自訂的**房間屬性**。
* 然後我們停止了 Unity 播放模式。這導致我們的用戶端離開房間。
3. 由於我們中斷連線的用戶端是最後一個,因此已沒有其他用戶端,Photon 便關閉了房間。
所有事件都應記錄到 PlayStream 事件流程中,如下圖所示。
 此時,您已將 Photon 事件支援完全整合至您的 PlayFab 遊戲。
## Related topics
- [快速入門](/zh-TW/services/playfab/economy-monetization/economy-v2/quickstart.md)
- [Party 快速入門](/zh-TW/services/playfab/multiplayer/networking/quickstart.md)
- [Android 快速入門](/zh-TW/services/playfab/sdks/c/quickstart-android.md)
- [GDK 快速入門](/zh-TW/services/playfab/sdks/c/quickstart-gdk.md)
- [iOS 快速入門](/zh-TW/services/playfab/sdks/c/quickstart-ios.md)
此時,您已將 Photon 事件支援完全整合至您的 PlayFab 遊戲。
## Related topics
- [快速入門](/zh-TW/services/playfab/economy-monetization/economy-v2/quickstart.md)
- [Party 快速入門](/zh-TW/services/playfab/multiplayer/networking/quickstart.md)
- [Android 快速入門](/zh-TW/services/playfab/sdks/c/quickstart-android.md)
- [GDK 快速入門](/zh-TW/services/playfab/sdks/c/quickstart-gdk.md)
- [iOS 快速入門](/zh-TW/services/playfab/sdks/c/quickstart-ios.md)