> ## Documentation Index
> Fetch the complete documentation index at: https://devdocs.xbox.com/llms.txt
> Use this file to discover all available pages before exploring further.
# 開始使用 Android Studio 和推播通知
> 連接 Android Studio、Google Play 服務、Firebase 雲端通訊和 PlayFab,以將推播通知傳送至您的 Android 用戶端應用程式。
## 概觀
本教學課程旨在協助您快速開始使用具有推播通知的 Android PlayFab 整合。
推播通知需要在多個系統中進行設定。開始之前,讓我們先討論基礎結構的運作方式。此程序中有 4 個實體參與:
1. **Google Play 服務**
2. **Firebase 雲端通訊服務** (**FCM**,建置在舊版 **Google 雲端通訊**之上。)
3. **PlayFab 服務**
4. **用戶端應用程式**
### 1. Google Play 服務
Google Play 服務會使用套件名稱來識別您在 Play 商店上的頁面。
例如:**com.bob.games.matchthree**。
在 Google Play 中註冊後,套件名稱會成為唯一的應用程式識別碼,並有多種用途,從透過 Play 商店安裝到防止冒用都包括在內。
### 2. Firebase 雲端通訊 (FCM)
Firebase 雲端通訊服務為您提供一個以雲端為基礎的系統,用於傳送、導向和遞送推播通知。
它也允許其他服務 (例如 PlayFab) 使用 FCM 伺服器金鑰代表您傳送推播通知。
### 3. PlayFab 服務
PlayFab 服務接著會使用 FCM 伺服器金鑰將推播通知傳送給您的用戶端。
### 4. 用戶端服務
最後,您的用戶端應用程式可以接收通知,並視需要進行處理。
### 四方分工
因此,我們需要設定 *4 個不同的系統*。為此,我們的教學課程分為 4 章,分別涵蓋每個部分的設定。
設定系統的*順序*很重要。
## 必要條件
* 您必須擁有 Google 帳戶。
* 您必須擁有 PlayFab 帳戶。
* 使用 Android Asset Studio [Notification icon generator](https://romannurik.github.io/AndroidAssetStudio/icons-notification.html) 產生的通知圖示。
## 情境
在本教學課程的這一節中,我們將組建一個名為 Foo PlayFab App 的應用程式。這是一個具有下列功能的 Android 應用程式:
* 它使用 Android 裝置識別碼登入 PlayFab。
* 它接收來自 PlayFab 的推播通知。
我們的套件名稱將是 com.foo.playfab.app。
依照本教學課程操作時,請務必使用您自己的套件名稱和遊戲。
### 第 1 章:設定 Firebase
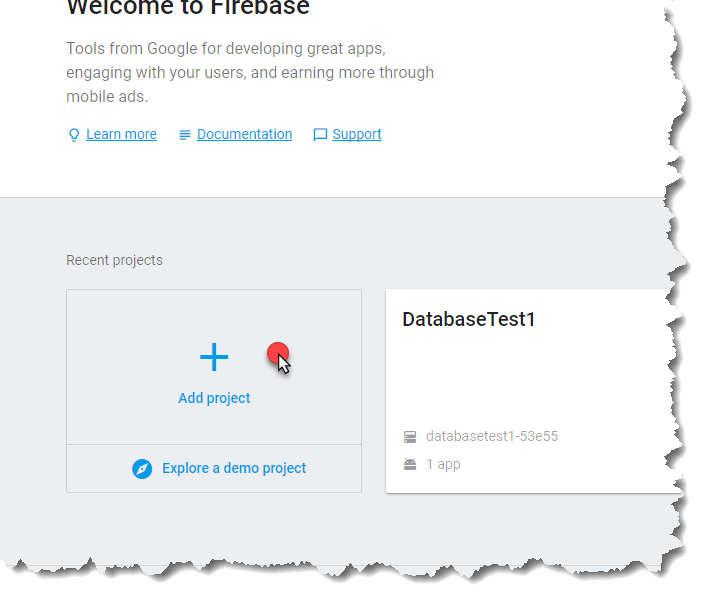
您可以使用 Firebase 的[官方主控台頁面](https://console.firebase.google.com/)開始設定 Firebase。您會看到一個可以新增專案的頁面。
* 若要執行此操作,請選取 **Add project** 區域,如下圖所示。
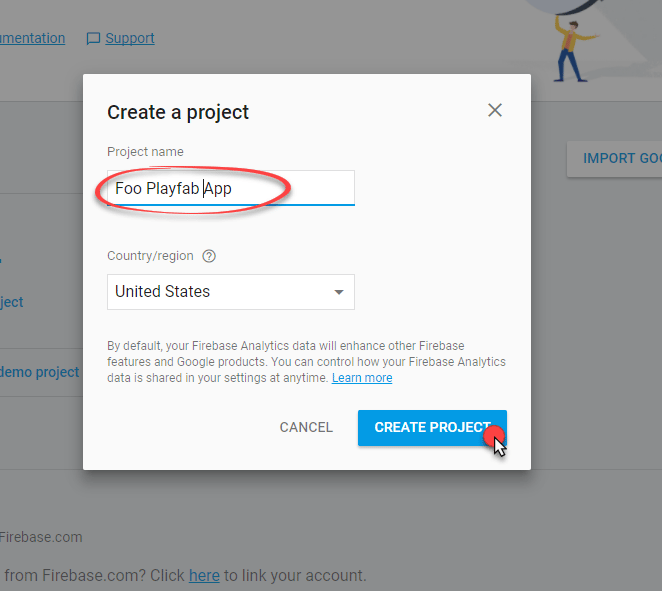
 * 系統會要求您提供 **Project Name** (在本教學課程中,我們使用 **Foo PlayFab App**,但依照本教學課程操作時,*請務必*想出您*自己*的名稱)。
* 選取 **Create Project** 按鈕以前往下一個步驟。
* 系統會要求您提供 **Project Name** (在本教學課程中,我們使用 **Foo PlayFab App**,但依照本教學課程操作時,*請務必*想出您*自己*的名稱)。
* 選取 **Create Project** 按鈕以前往下一個步驟。
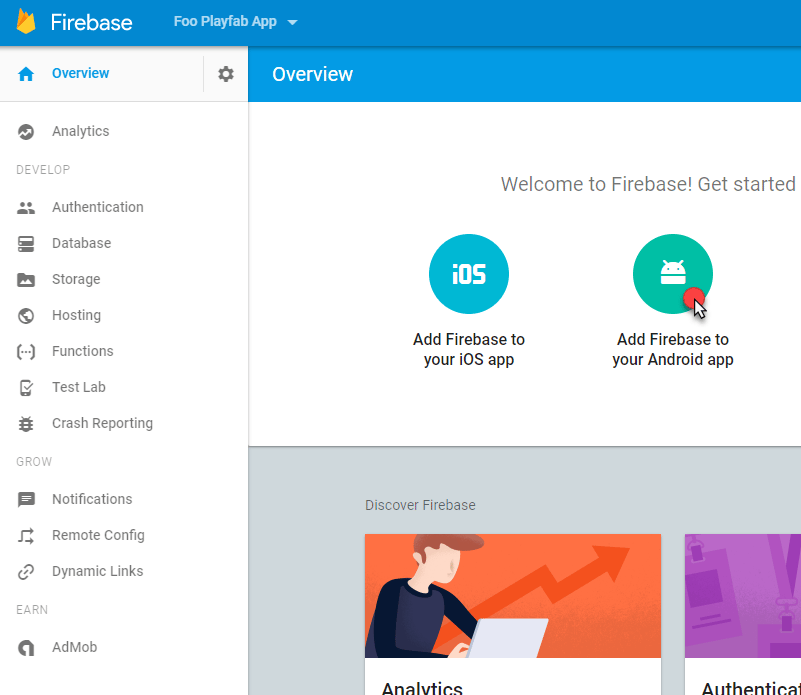
 您會被重新導向至 **New Project Dashboard**。
* 選取如下圖所示的區域,將新的 **Android 應用程式**新增至專案。
您會被重新導向至 **New Project Dashboard**。
* 選取如下圖所示的區域,將新的 **Android 應用程式**新增至專案。
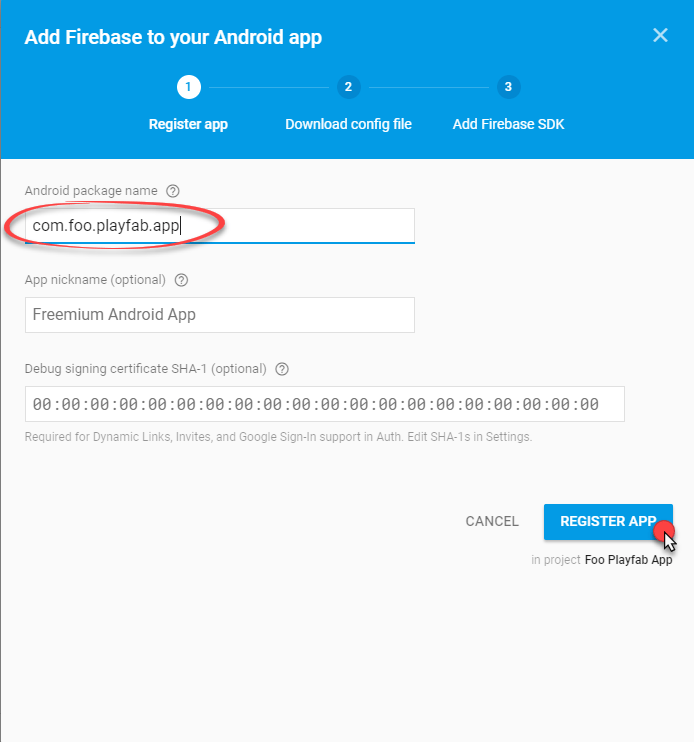
 新增**應用程式**需要 3 個步驟。
1. 首先,您必須提供 **Android Package Name**。我們使用 **com.foo.playfab.app**,但依照本教學課程操作時,請務必想出您*自己*的**套件名稱**。
2. 選取 **Register App** 按鈕以前往下一個步驟。
新增**應用程式**需要 3 個步驟。
1. 首先,您必須提供 **Android Package Name**。我們使用 **com.foo.playfab.app**,但依照本教學課程操作時,請務必想出您*自己*的**套件名稱**。
2. 選取 **Register App** 按鈕以前往下一個步驟。
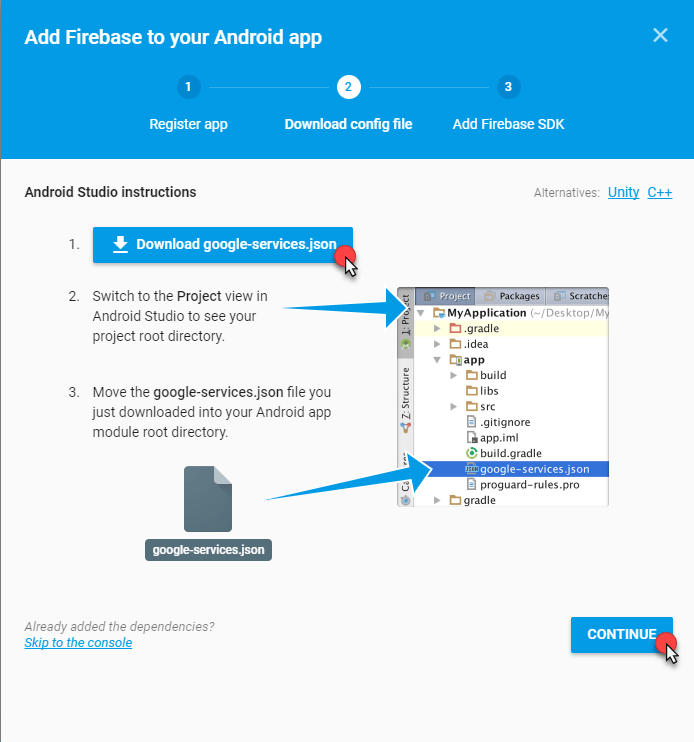
 步驟 2 可讓您下載名為 **google-services.json** 的設定檔案。稍後會在**應用程式**中使用它來自動設定 **Google** 服務。
* 下載後,選取 **Continue** 按鈕以前往下一個步驟。
步驟 2 可讓您下載名為 **google-services.json** 的設定檔案。稍後會在**應用程式**中使用它來自動設定 **Google** 服務。
* 下載後,選取 **Continue** 按鈕以前往下一個步驟。
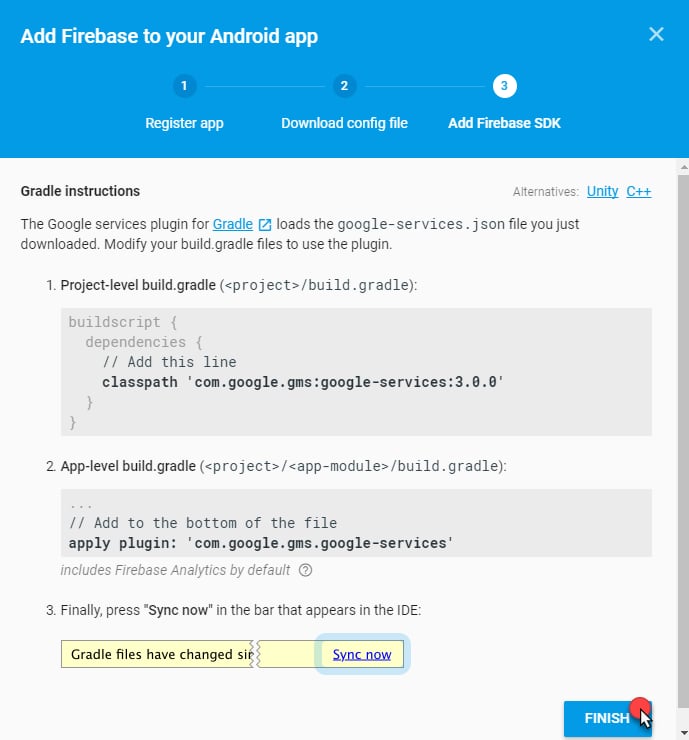
 3. 最後一個步驟提供如何設定建置程序以連接 Firebase 和 Google Play SDK 的資訊。
您可以忽略此資訊,因為我們將使用 Android Studio 內建的自動化工具,它會自動執行此設定。
* 選取 **Finish** 按鈕以繼續。
3. 最後一個步驟提供如何設定建置程序以連接 Firebase 和 Google Play SDK 的資訊。
您可以忽略此資訊,因為我們將使用 Android Studio 內建的自動化工具,它會自動執行此設定。
* 選取 **Finish** 按鈕以繼續。
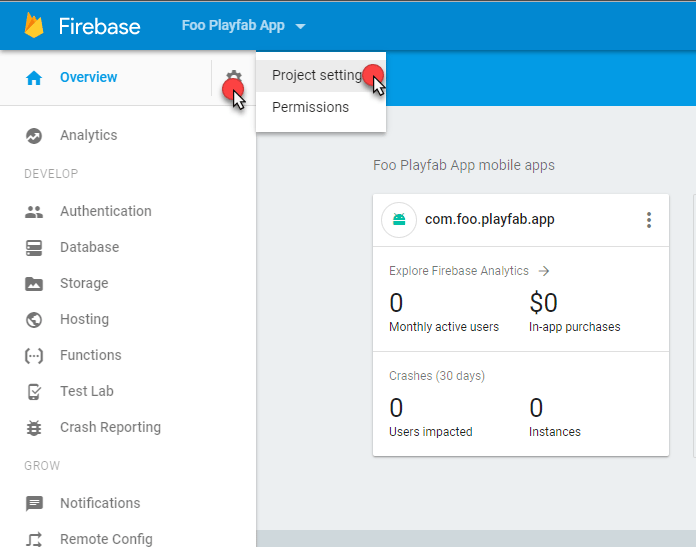
 * 新增**應用程式**後,它會出現在儀表板上。
* 此時,設定已完成,我們需要擷取 FCM 伺服器金鑰 (我們將使用它來連接 PlayFab 推播通知)。
* 前往 **Project settings**,如下圖所示。
* 新增**應用程式**後,它會出現在儀表板上。
* 此時,設定已完成,我們需要擷取 FCM 伺服器金鑰 (我們將使用它來連接 PlayFab 推播通知)。
* 前往 **Project settings**,如下圖所示。
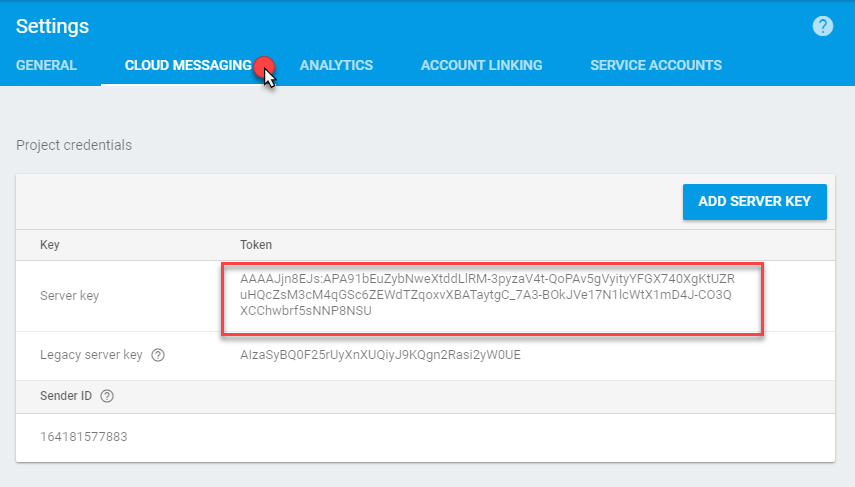
 * 在 **Project settings** 中,瀏覽至 **Cloud Messaging** 索引標籤。
* 找到 **Server Key** 區域 (下圖中的紅色區域)。
* 複製此**金鑰**並將其儲存在安全且容易存取的位置。
* 在 **Project settings** 中,瀏覽至 **Cloud Messaging** 索引標籤。
* 找到 **Server Key** 區域 (下圖中的紅色區域)。
* 複製此**金鑰**並將其儲存在安全且容易存取的位置。
 此時,我們已在 Firebase 中完成啟用推播通知所需的一切。
### 第 2 章:設定 Google Play 主控台
當您的應用程式準備就緒時,您很可能會建立 Google 主控台專案來維護產品的 Play 商店頁面。讓我們逐步完成建立 Google Play 專案並將其連結至 Firebase 專案的程序。
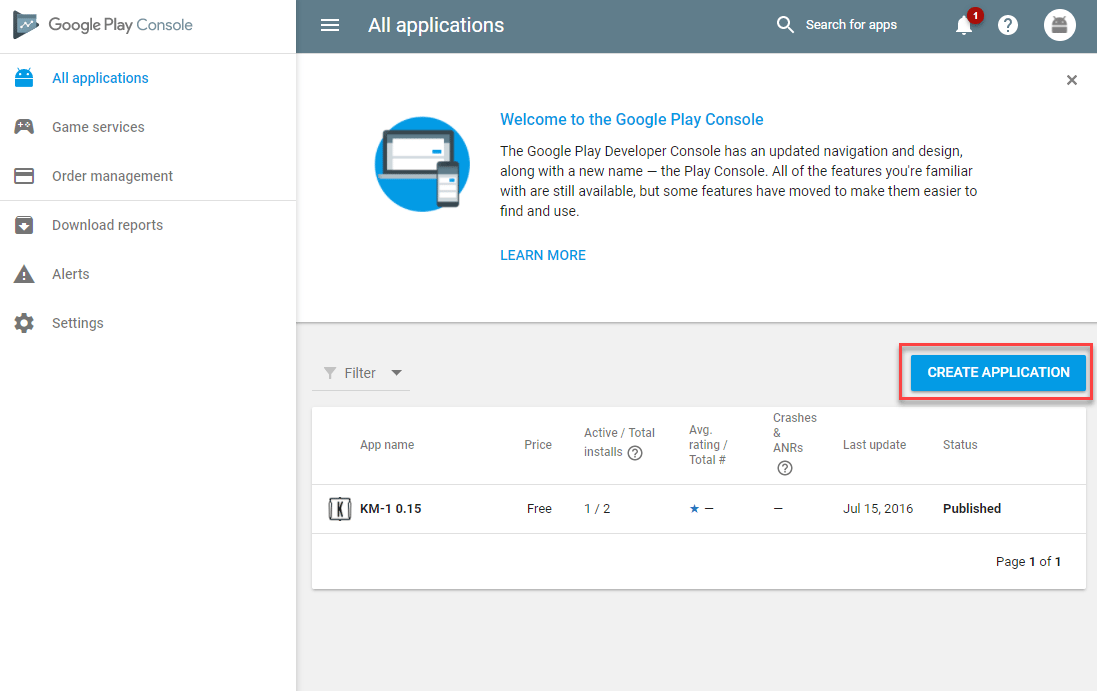
首先,造訪 [Google Play 主控台頁面](https://play.google.com/apps/publish)並建立新專案,如下圖所示。
此時,我們已在 Firebase 中完成啟用推播通知所需的一切。
### 第 2 章:設定 Google Play 主控台
當您的應用程式準備就緒時,您很可能會建立 Google 主控台專案來維護產品的 Play 商店頁面。讓我們逐步完成建立 Google Play 專案並將其連結至 Firebase 專案的程序。
首先,造訪 [Google Play 主控台頁面](https://play.google.com/apps/publish)並建立新專案,如下圖所示。
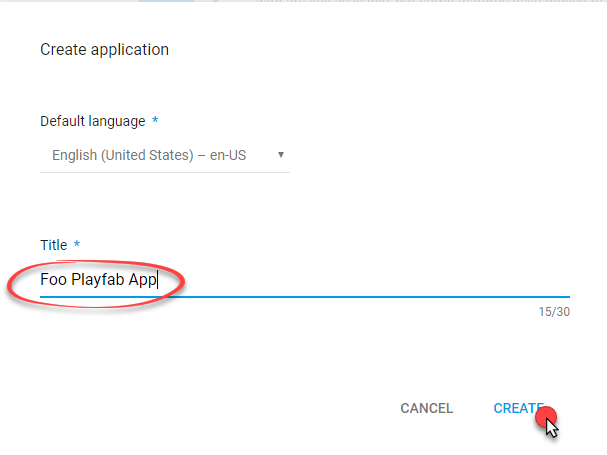
 * 指派 **Title**。
在此範例中,我們使用 **Foo PlayFab App**。依照本教學課程操作時,請務必想出您*自己*的標題和套件名稱。
* 選取 **Create** 按鈕以繼續。
* 指派 **Title**。
在此範例中,我們使用 **Foo PlayFab App**。依照本教學課程操作時,請務必想出您*自己*的標題和套件名稱。
* 選取 **Create** 按鈕以繼續。
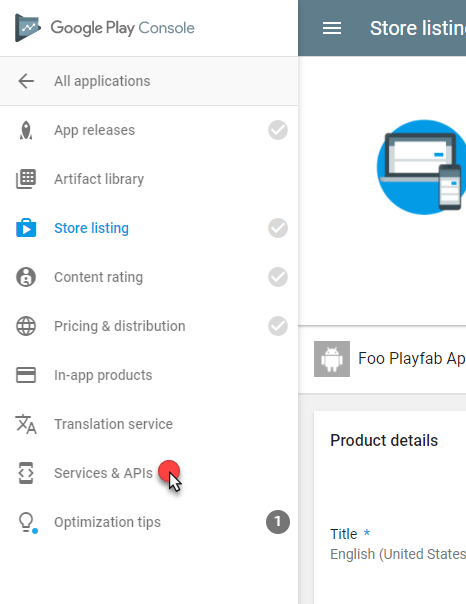
 * **Google Play 主控台專案**頁面隨即開啟。
* 在側邊功能表上選取 **Services & APIs**。
* **Google Play 主控台專案**頁面隨即開啟。
* 在側邊功能表上選取 **Services & APIs**。
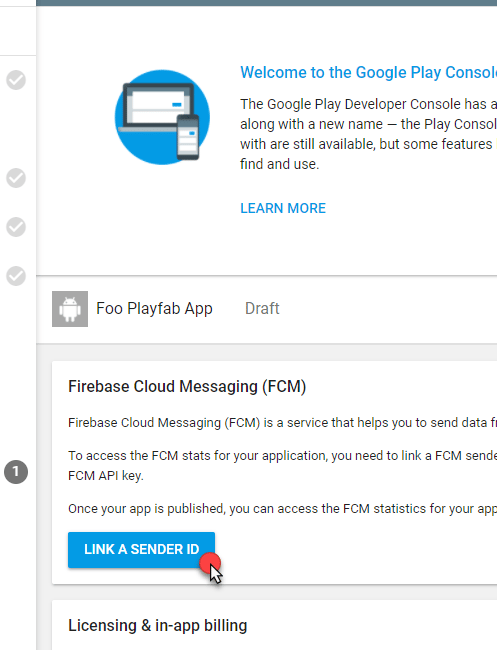
 * **Services configuration** 頁面隨即開啟。
* 找到 **Firebase Cloud Messaging** 面板。
* 選取 **Link a Sender ID** 按鈕,如下圖所示。
* **Services configuration** 頁面隨即開啟。
* 找到 **Firebase Cloud Messaging** 面板。
* 選取 **Link a Sender ID** 按鈕,如下圖所示。
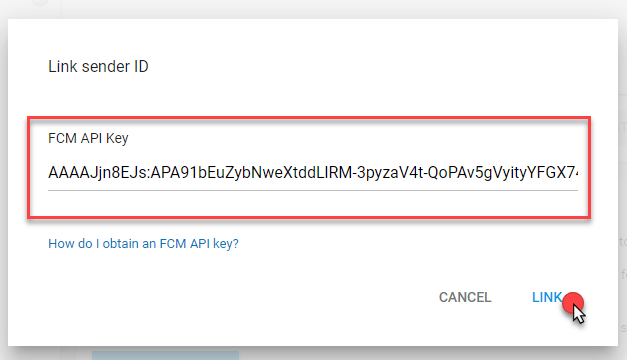
 若要連結 **Sender ID**:
* 使用您在上一章中使用 Firebase 主控台時收到 (並儲存) 的 FCM 伺服器金鑰。
* 完成後,選取 **Link** 按鈕,如我們的範例所示。
若要連結 **Sender ID**:
* 使用您在上一章中使用 Firebase 主控台時收到 (並儲存) 的 FCM 伺服器金鑰。
* 完成後,選取 **Link** 按鈕,如我們的範例所示。
 * 請花點時間確認 **Google Play 主控台**中顯示的 **Sender ID** 與 **Firebase 主控台**中的相符,如下列範例所示。
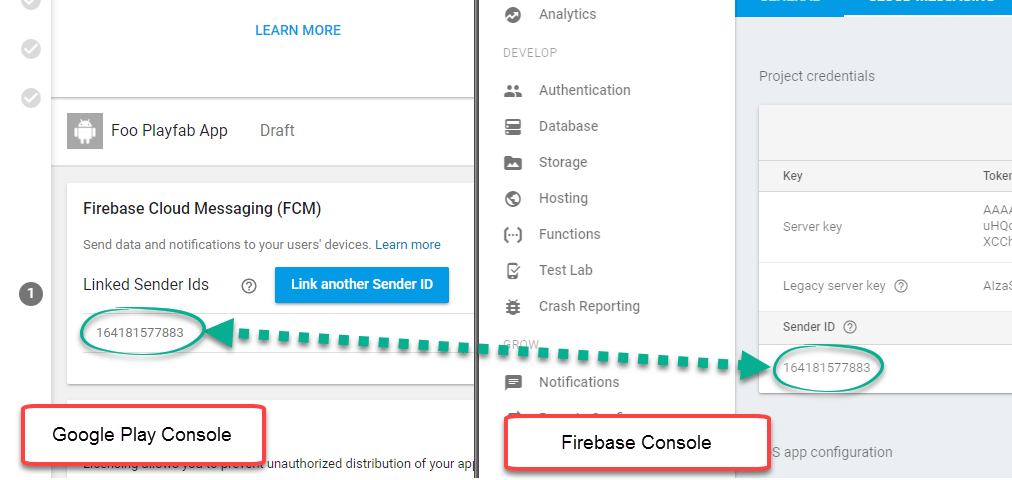 此時,**Google Play 主控台專案**已成功連結至 **Firebase 專案**。
### 第 3 章:設定 PlayFab 遊戲
本章的目的是向您展示如何設定 PlayFab 服務,讓它可以代表您將推播通知傳送給玩家。
* 首先,您必須前往遊戲 Settings 功能表中的 **Title settings**。
* 選取 **Push Notifications** 索引標籤。
* 針對 Android 選項,選取 **Settings** 圖示。
此時,**Google Play 主控台專案**已成功連結至 **Firebase 專案**。
### 第 3 章:設定 PlayFab 遊戲
本章的目的是向您展示如何設定 PlayFab 服務,讓它可以代表您將推播通知傳送給玩家。
* 首先,您必須前往遊戲 Settings 功能表中的 **Title settings**。
* 選取 **Push Notifications** 索引標籤。
* 針對 Android 選項,選取 **Settings** 圖示。
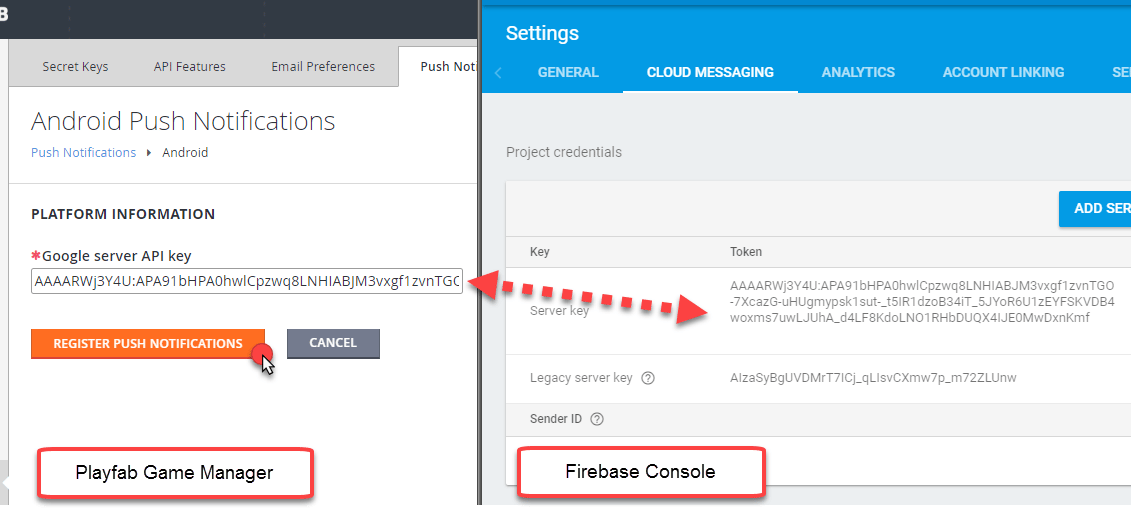
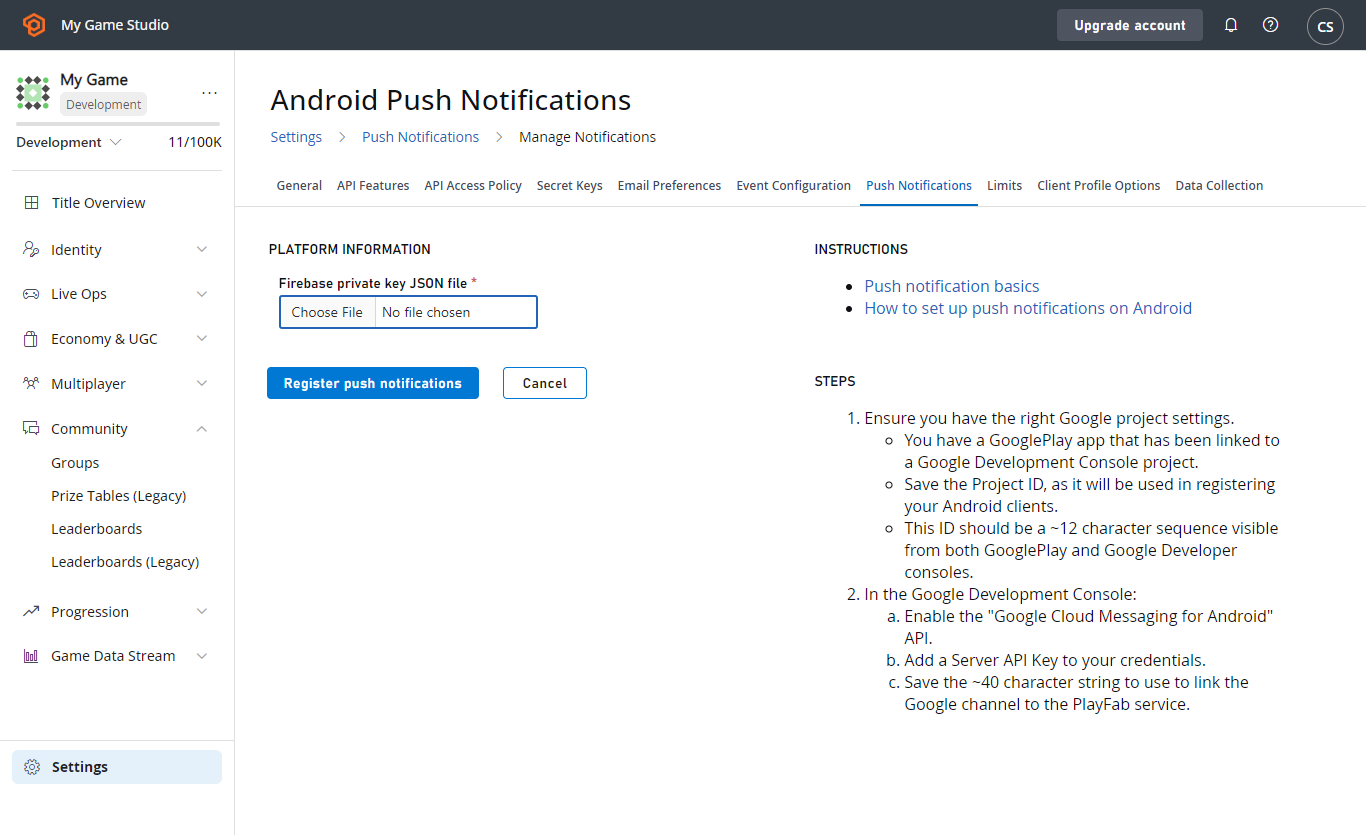 * 系統會要求您提供 **Google server API key**。
* 複製您透過 Firebase 主控台收到的金鑰,如下列範例所示。
* 系統會要求您提供 **Google server API key**。
* 複製您透過 Firebase 主控台收到的金鑰,如下列範例所示。
 * 如果一切正確,您會看到一個頁面,顯示 **Push Notifications** 為 **Active**。
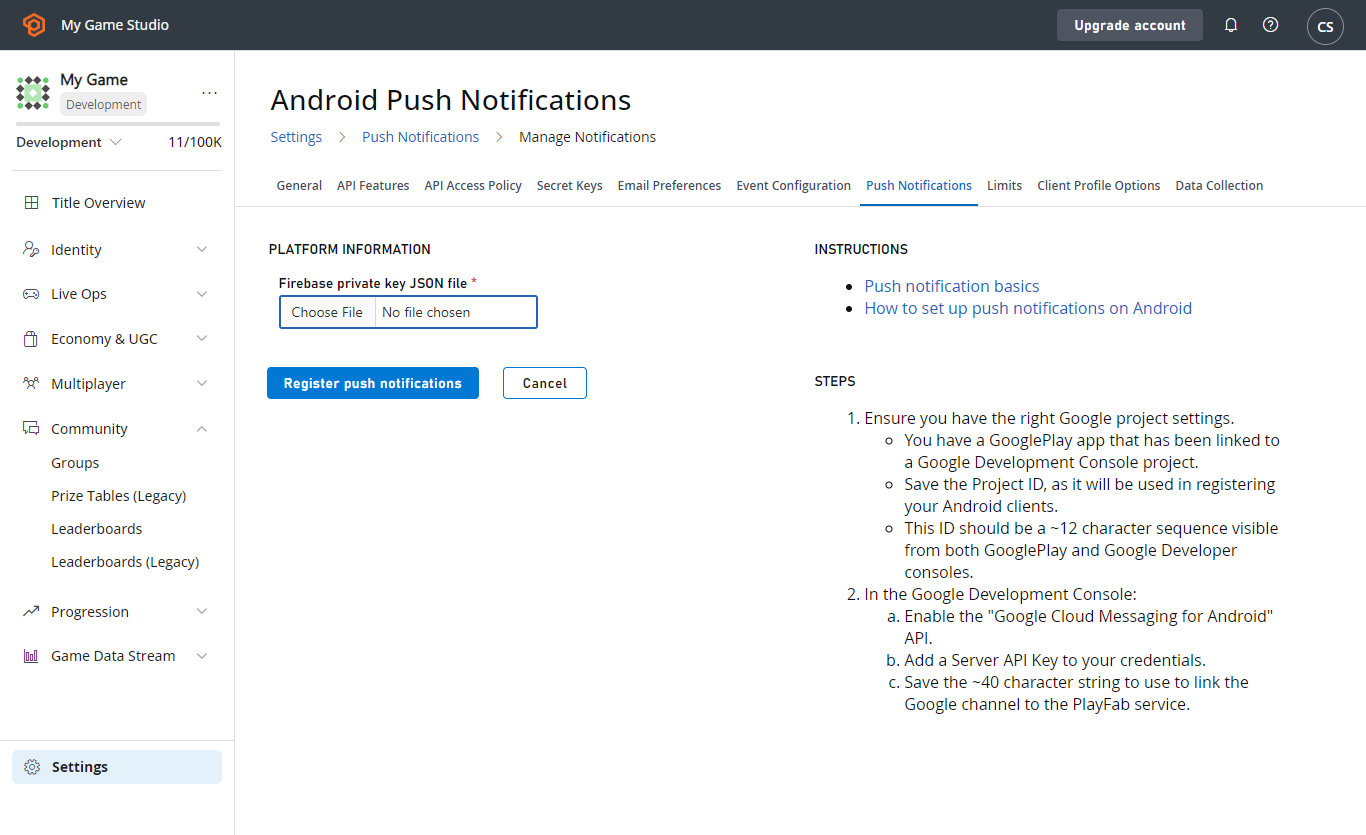 PlayFab 遊戲的設定到此完成。
### 第 4 章:設定 Android Studio 專案
若要使用 PlayFab JavaSDK,您需要 PlayFab Client JavaSDK 及其相依性 Google GSON。
* 在此處下載 PlayFab 用戶端 JavaSDK JAR 程式庫。
* 尋找 `client-sdk-*.jar`,如有需要,也可尋找對應的 Java Doc。
* 下載最新的 Google GSON。
* 尋找 `gson-*.jar`。
* 將先前提到的 .jar 檔案放在手邊。
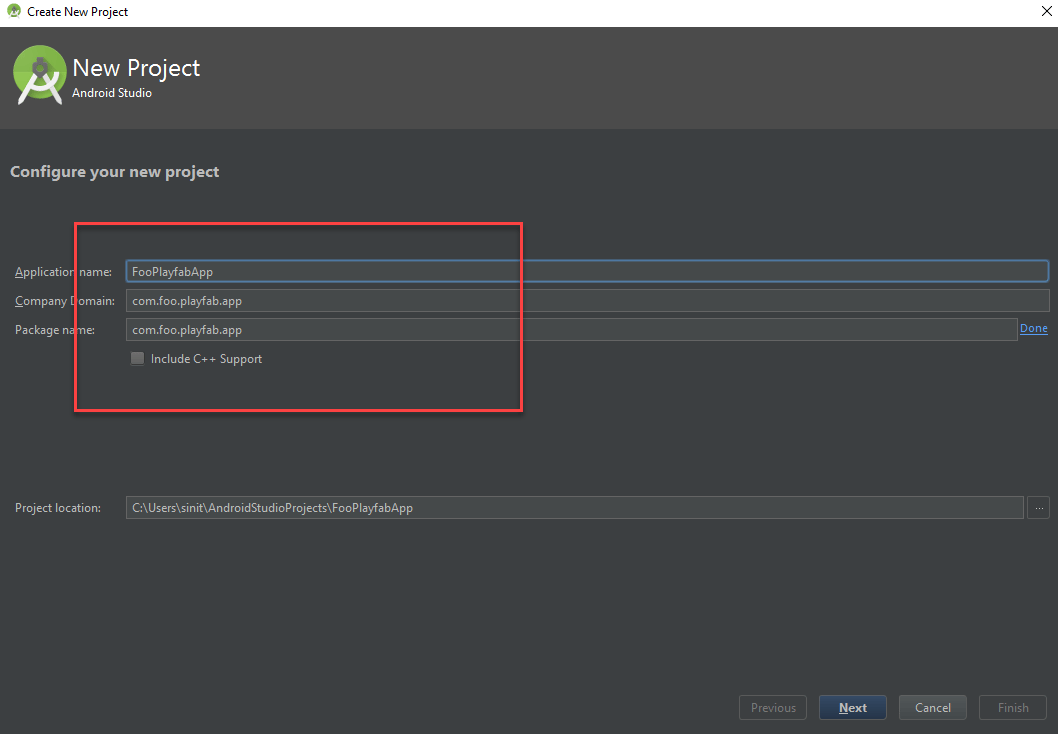
首先,建立一個一般的 Android Studio 專案。
* 確認 **Package name** 與您在整個教學課程中使用的名稱相符 (例如在 Firebase 中)。
在*此*範例中,我們使用 **com.foo.playfab.app**,但依照本教學課程操作時,請記得想出您自己的套件名稱和標題。
PlayFab 遊戲的設定到此完成。
### 第 4 章:設定 Android Studio 專案
若要使用 PlayFab JavaSDK,您需要 PlayFab Client JavaSDK 及其相依性 Google GSON。
* 在此處下載 PlayFab 用戶端 JavaSDK JAR 程式庫。
* 尋找 `client-sdk-*.jar`,如有需要,也可尋找對應的 Java Doc。
* 下載最新的 Google GSON。
* 尋找 `gson-*.jar`。
* 將先前提到的 .jar 檔案放在手邊。
首先,建立一個一般的 Android Studio 專案。
* 確認 **Package name** 與您在整個教學課程中使用的名稱相符 (例如在 Firebase 中)。
在*此*範例中,我們使用 **com.foo.playfab.app**,但依照本教學課程操作時,請記得想出您自己的套件名稱和標題。
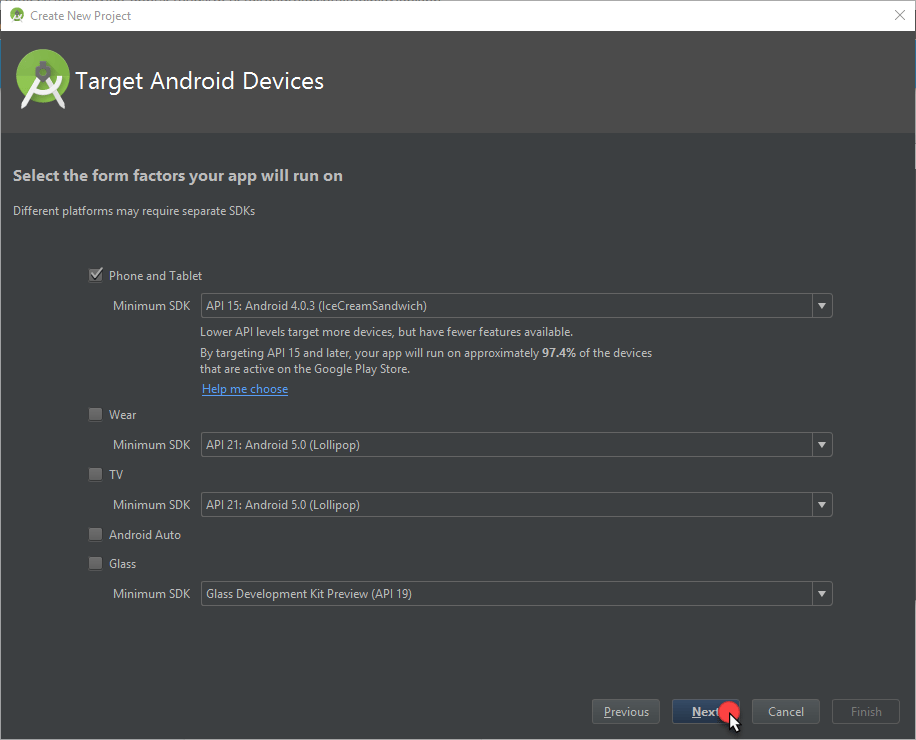
 * 選取您所選的 **Minimum SDK**。
* 然後選取 **Next** 按鈕。
* 選取您所選的 **Minimum SDK**。
* 然後選取 **Next** 按鈕。
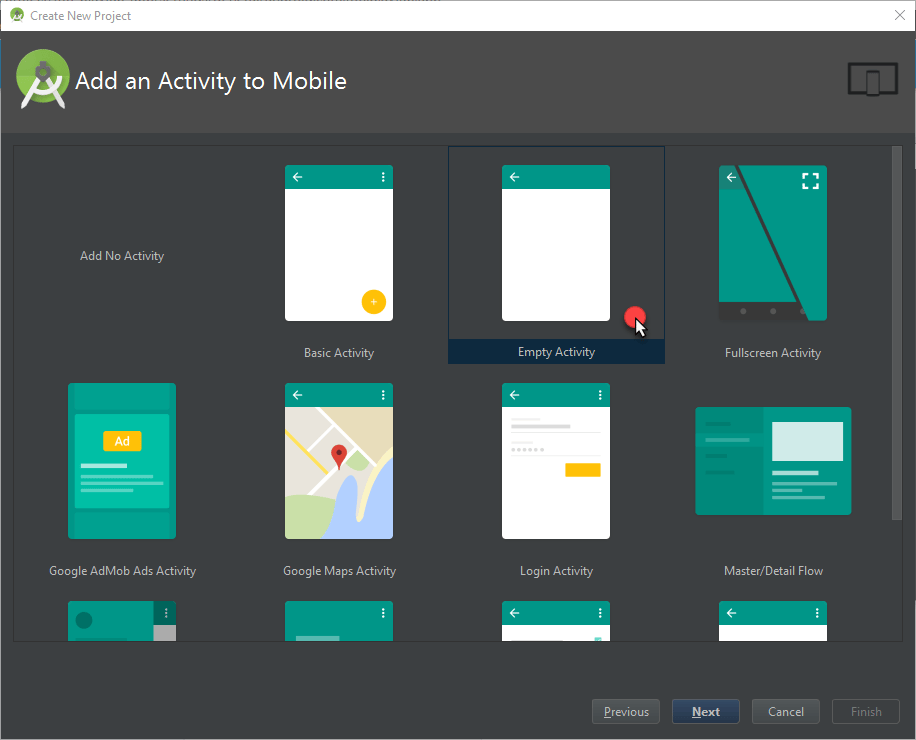
 在本教學課程中,我們建議一開始使用 **Empty Activity** 範本。
* 選取您要使用的範本。
* 然後選取 **Next** 按鈕。
在本教學課程中,我們建議一開始使用 **Empty Activity** 範本。
* 選取您要使用的範本。
* 然後選取 **Next** 按鈕。
 * 依您的需求設定範本。
* 選取 **Finish** 按鈕。
* 依您的需求設定範本。
* 選取 **Finish** 按鈕。
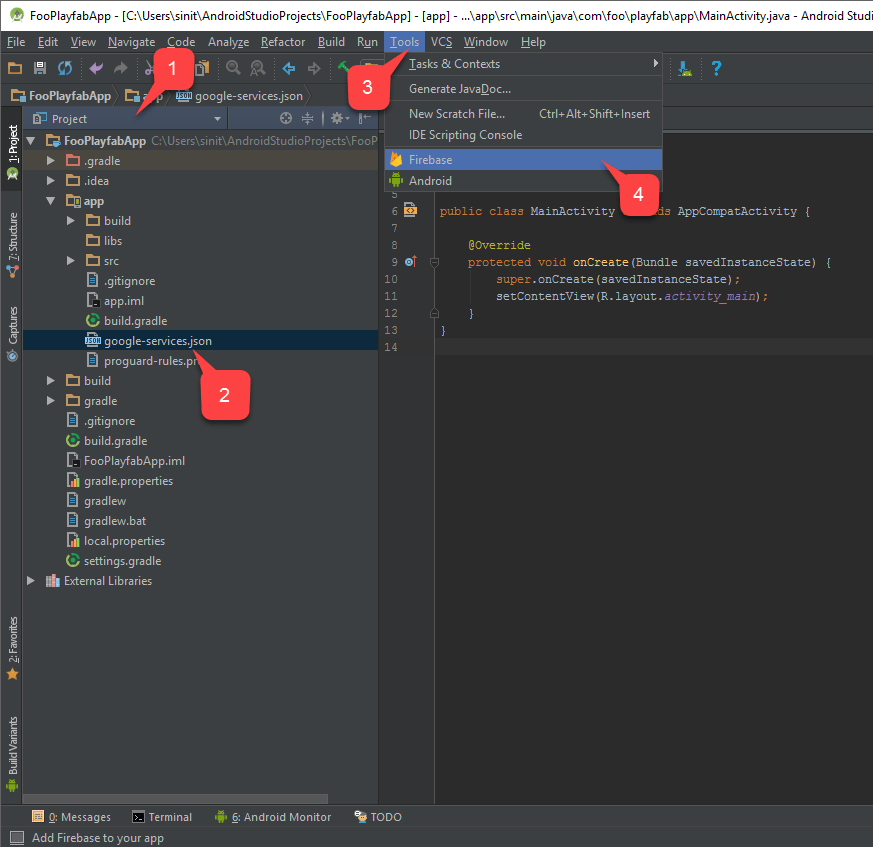
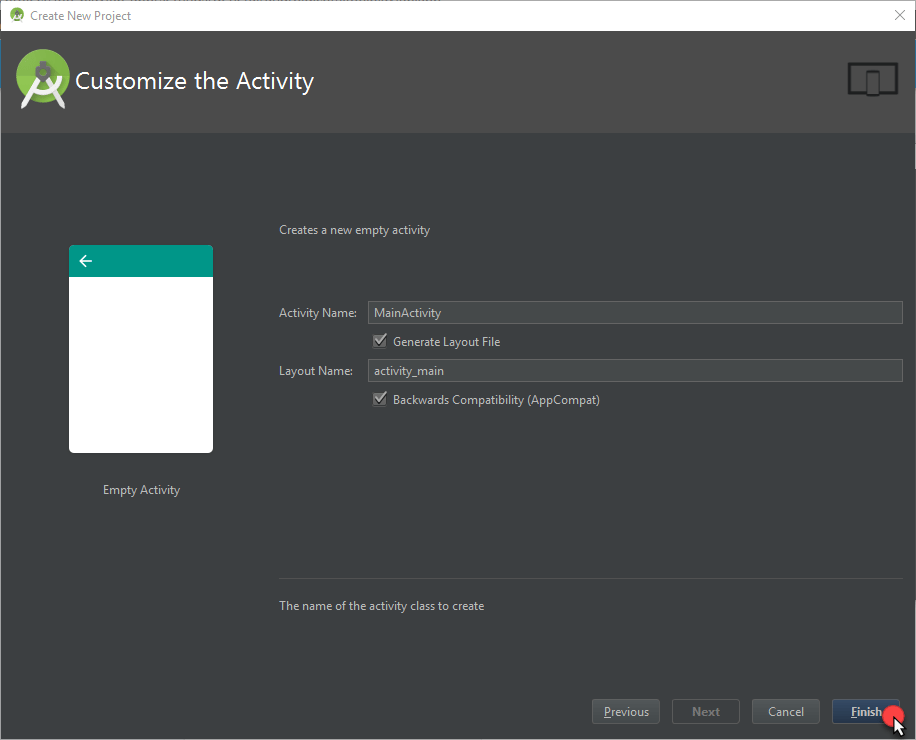 開啟新建立的專案後:
* 切換至 **Project** 索引標籤 **(1)**。
在上一章中,您從 Firebase 主控台下載了 `google-services.json` 設定檔案。請在下一個步驟中使用它。
* 確認此檔案位於 **App** 資料夾 **(2)** 下。
* 然後,瀏覽至 **Tools (3)**。
* 選取 **Firebase (4)**,如下列範例所示。
開啟新建立的專案後:
* 切換至 **Project** 索引標籤 **(1)**。
在上一章中,您從 Firebase 主控台下載了 `google-services.json` 設定檔案。請在下一個步驟中使用它。
* 確認此檔案位於 **App** 資料夾 **(2)** 下。
* 然後,瀏覽至 **Tools (3)**。
* 選取 **Firebase (4)**,如下列範例所示。
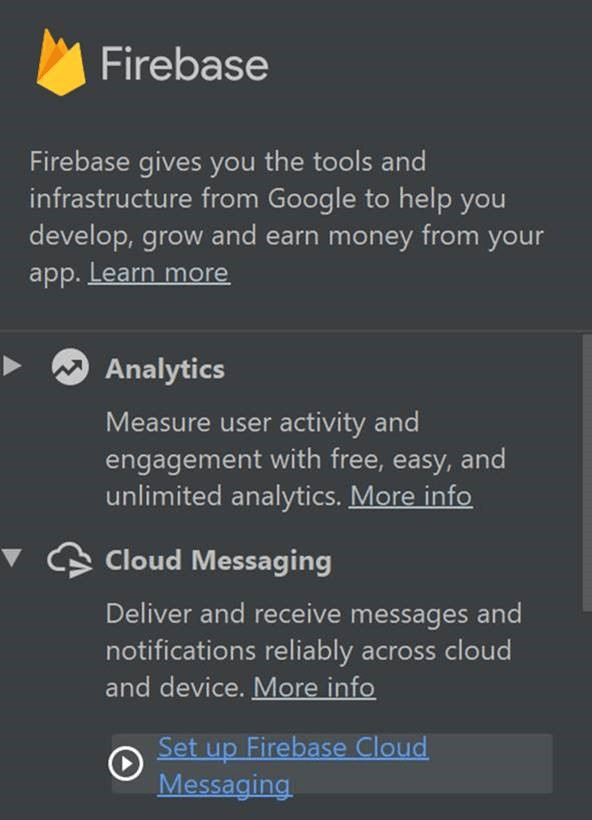
 **Firebase Assistant** 會在視窗右側開啟。
* 找到 **Cloud Messaging** 資料夾,然後選取 **Set up Firebase Cloud Messaging**,如下所示。
**Firebase Assistant** 會在視窗右側開啟。
* 找到 **Cloud Messaging** 資料夾,然後選取 **Set up Firebase Cloud Messaging**,如下所示。
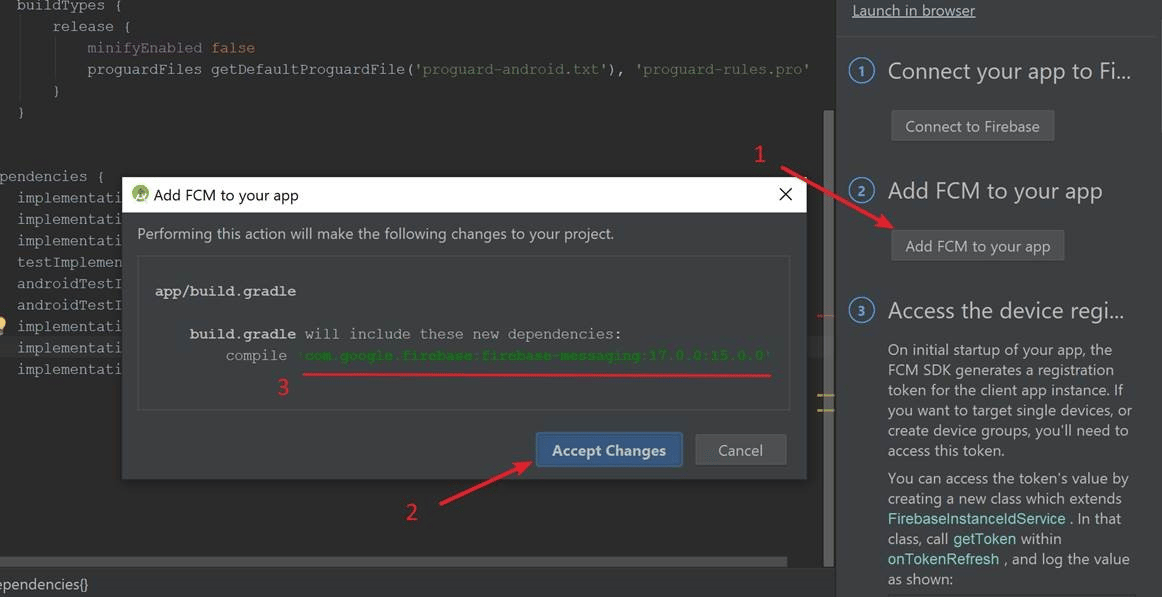
 * 在 **Firebase Notifications Assistant** 中,選取 **Add FCM to your app (1)** 按鈕,如下圖所示。
* 隨即開啟一個對話方塊,指出將透過 **Gradle** 新增新的相依性。
* 選取 **Accept Changes (2)** 以授與變更。
遺憾的是,**Gradle** 同步程序 (**3**) 自動新增的相依性不正確,並會回報失敗!
* 若要正確設定相依性,請將自動新增的語句取代為下列內容:
`implementation 'com.google.firebase:firebase-core:16.0.3`\
`implementation 'com.google.firebase:firebase-messaging:17.0.0`
* 在 **Firebase Notifications Assistant** 中,選取 **Add FCM to your app (1)** 按鈕,如下圖所示。
* 隨即開啟一個對話方塊,指出將透過 **Gradle** 新增新的相依性。
* 選取 **Accept Changes (2)** 以授與變更。
遺憾的是,**Gradle** 同步程序 (**3**) 自動新增的相依性不正確,並會回報失敗!
* 若要正確設定相依性,請將自動新增的語句取代為下列內容:
`implementation 'com.google.firebase:firebase-core:16.0.3`\
`implementation 'com.google.firebase:firebase-messaging:17.0.0`
 該程序完成後:
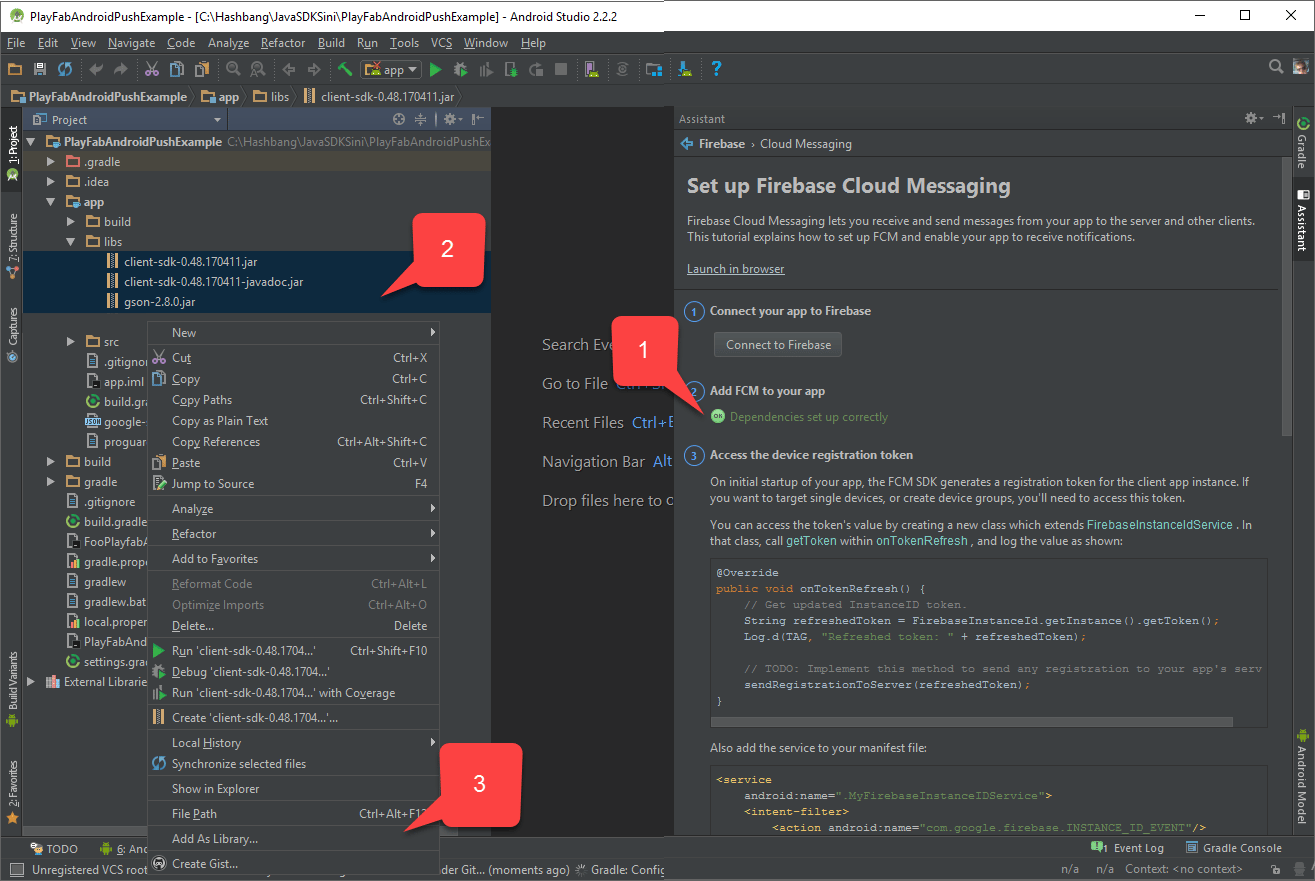
* 確認 **Firebase Notifications Assistant** 指出相依性現在已正確設定 **(1)**。
在本章開頭,我們取得了必要的 JAR 檔案。通常,建置檔案會自動擷取這些檔案。
* 若要確保這些 JAR 檔案列在 **app/libs** 資料夾 **(2)** 下,請選取所有檔案並以滑鼠右鍵按一下。
* 然後選擇 **Add as library... (3)**,如下列範例所示。
該程序完成後:
* 確認 **Firebase Notifications Assistant** 指出相依性現在已正確設定 **(1)**。
在本章開頭,我們取得了必要的 JAR 檔案。通常,建置檔案會自動擷取這些檔案。
* 若要確保這些 JAR 檔案列在 **app/libs** 資料夾 **(2)** 下,請選取所有檔案並以滑鼠右鍵按一下。
* 然後選擇 **Add as library... (3)**,如下列範例所示。
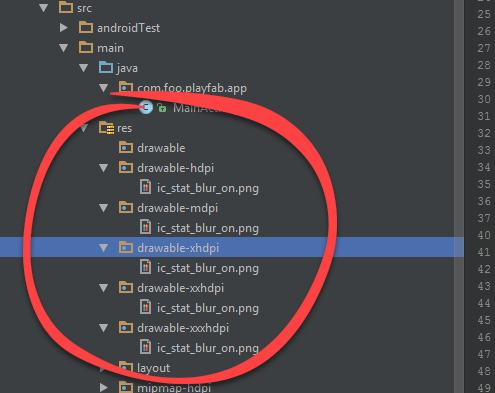
 * 使用 Android Asset Studio [Notification icon generator](https://romannurik.github.io/AndroidAssetStudio/icons-notification.html) 準備圖示,並將其放在 **app/src/main/res** 內。
* 在下列範例中,圖示名為 **ic\_stat\_blur\_on**。
* 使用 Android Asset Studio [Notification icon generator](https://romannurik.github.io/AndroidAssetStudio/icons-notification.html) 準備圖示,並將其放在 **app/src/main/res** 內。
* 在下列範例中,圖示名為 **ic\_stat\_blur\_on**。
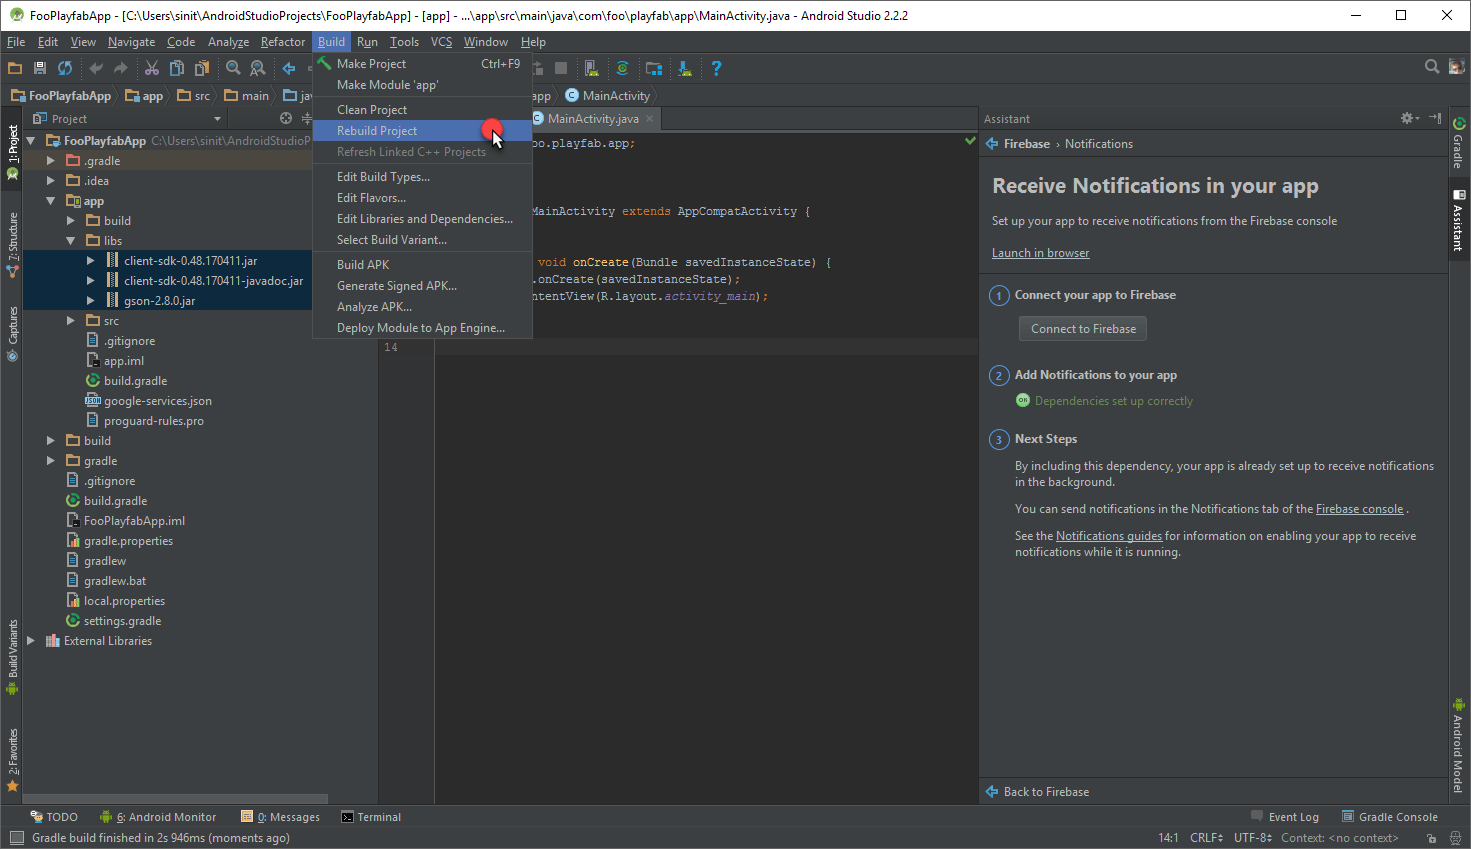
 * 最後,選取 **Rebuild Project**。
 現在我們可以開始實作接收和處理通知的程式碼。我們將修改 (並視需要建立) 4 個檔案:
1. **app/src/main/AndroidManifest.xml**
2. **app/src/main/java/..packagePath../MainActivity.java**
3. **app/src/main/java/..packagePath../FooAppFirebaseInstanceIdService.java**
4. **app/src/main/java/..packagePath../FooAppFirebaseMessagingService.java**
目前的實作盡可能精簡,只是為了快速測試通知。如需高品質的最佳做法和更複雜的實作範例,請參考 [FCM 指南](https://firebase.google.com/docs/cloud-messaging/concept-options)。
#### AndroidManifest.xml
在下列程式碼中,將任何 `MY_PACKAGE_IDENTIFIER` 預留位置取代為您*自己*的套件識別碼。
```xml theme={null}
```
#### MainActivity.java
程式碼中的下列預留位置應根據您的情境進行取代。
* `PLAYFAB_TITLE_ID`
* 使用您在 PlayFab Game Manager 中取得的遊戲識別碼。
* `PACKAGE_IDENTIFIER`
* 使用與您的設定相符的 Java 套件識別碼。
```java theme={null}
package PACKAGE_IDENTIFIER;
import android.os.AsyncTask;
import android.support.v7.app.AppCompatActivity;
import android.os.Bundle;
import android.util.Log;
import com.playfab.PlayFabClientAPI;
import com.playfab.PlayFabClientModels.*;
import com.playfab.PlayFabErrors;
import com.playfab.PlayFabSettings;
import java.util.List;
import java.util.Map;
public class MainActivity extends AppCompatActivity {
// Invoked when activity is started
@Override
protected void onCreate(Bundle savedInstanceState) {
super.onCreate(savedInstanceState);
setContentView(R.layout.activity_main);
// Set PlayFab title
PlayFabSettings.TitleId = "PLAYFAB_TITLE_ID";
// Start login operation
AsyncTask.execute(new Runnable() {
@Override
public void run() {
if(login()) FooAppFirebaseInstanceIdService.setAllowRegisterForPush(true); // Ready to register for push notifications
}
});
}
public boolean login(){
LoginWithAndroidDeviceIDRequest request = new LoginWithAndroidDeviceIDRequest();
request.CreateAccount = true;
// There are several approaches on getting unique android device id.
// https://stackoverflow.com/questions/2785485/is-there-a-unique-android-device-id
request.AndroidDeviceId = "qwerty";
PlayFabErrors.PlayFabResult response = PlayFabClientAPI.LoginWithAndroidDeviceID(request);
if(response.Error != null){
Log.d("Foo PlayFab App",CompileErrorsFromResult(response.Error));
return false;
}
return true;
}
// Utility method to compose an error message out of PlayFab result.
private static String CompileErrorsFromResult(PlayFabErrors.PlayFabError error) {
if (error == null)
return null;
String errorMessage = "";
if (error.errorMessage != null)
errorMessage += error.errorMessage;
if (error.errorDetails != null)
for (Map.Entry> pair : error.errorDetails.entrySet())
for (String msg : pair.getValue())
errorMessage += "\n" + pair.getKey() + ": " + msg;
return errorMessage;
}
}
```
#### FooAppFirebaseInstanceIdService.java
下列程式碼中的預留位置應根據您的情境進行取代。
* `PACKAGE_IDENTIFIER`
* 與您的設定相符的 Java 套件識別碼。
```java theme={null}
package PACKAGE_IDENTIFIER;
import android.text.TextUtils;
import android.util.Log;
import com.google.firebase.iid.FirebaseInstanceId;
import com.google.firebase.iid.FirebaseInstanceIdService;
import com.playfab.PlayFabClientAPI;
import com.playfab.PlayFabClientModels;
import com.playfab.PlayFabErrors;
import java.util.List;
import java.util.Map;
public class FooAppFirebaseInstanceIdService extends FirebaseInstanceIdService {
private static String _token;
private static boolean _allowRegistration;
// This is invoked from activity that performs authentication.
// Once login is complete this method is invoked.
// If we have a pending token, we use it to register for push notifications
public static void setAllowRegisterForPush(boolean isAllowed) {
_allowRegistration = isAllowed;
if (_allowRegistration && !TextUtils.isEmpty(_token)) {
registerForPush(_token);
}
}
// Invoked when firebase has fetched a token
// If we already have logged in, we use new token to register for push
@Override
public void onTokenRefresh() {
_token = FirebaseInstanceId.getInstance().getToken();
if (_allowRegistration && !TextUtils.isEmpty(_token)) {
registerForPush(_token);
}
}
private static void registerForPush(String token) {
PlayFabClientModels.AndroidDevicePushNotificationRegistrationRequest request = new PlayFabClientModels.AndroidDevicePushNotificationRegistrationRequest();
request.DeviceToken = token;
PlayFabErrors.PlayFabResult response = PlayFabClientAPI.AndroidDevicePushNotificationRegistration(request);
if (response.Error != null) {
Log.d("Foo PlayFab App", CompileErrorsFromResult(response.Error));
}
}
// Utility method to compose an error message out of PlayFab result.
private static String CompileErrorsFromResult(PlayFabErrors.PlayFabError error) {
if (error == null)
return null;
String errorMessage = "";
if (error.errorMessage != null)
errorMessage += error.errorMessage;
if (error.errorDetails != null)
for (Map.Entry> pair : error.errorDetails.entrySet())
for (String msg : pair.getValue())
errorMessage += "\n" + pair.getKey() + ": " + msg;
return errorMessage;
}
}
```
#### FooAppFirebaseMessagingService.java
下列程式碼中的預留位置應根據您的情境進行取代。
* `PACKAGE_IDENTIFIER`
* 與您的設定相符的 Java 套件識別碼。
```java theme={null}
package com.foo.playfab.app;
import android.util.Log;
import com.google.firebase.messaging.FirebaseMessagingService;
import com.google.firebase.messaging.RemoteMessage;
public class FooAppFirebaseMessagingService extends FirebaseMessagingService {
@Override
public void onMessageReceived(RemoteMessage message) {
// Intercept the message here
Log.d("Foo PlayFab App","Message received: "+message.getNotification().getBody());
}
}
```
## 測試
此時,您應該可以將應用程式部署到裝置。
* 啟動應用程式後,它會自動登入並註冊推播通知。
* 選取裝置上的 **Home** 按鈕以將應用程式最小化。*這很重要*,因為這樣我們才能測試送達系統匣的通知。
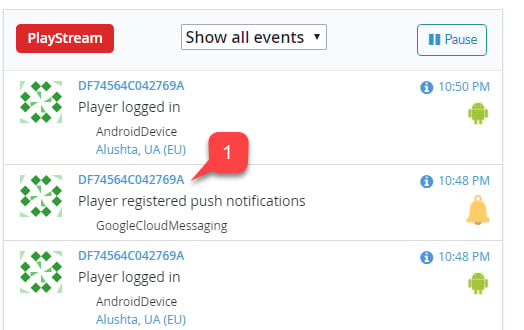
* 接著,前往您的 PlayFab 遊戲 Game Manager 頁面,並使用儀表板找出最新的 **Push Registration**。
* 選取 **Player ID (1)**。
現在我們可以開始實作接收和處理通知的程式碼。我們將修改 (並視需要建立) 4 個檔案:
1. **app/src/main/AndroidManifest.xml**
2. **app/src/main/java/..packagePath../MainActivity.java**
3. **app/src/main/java/..packagePath../FooAppFirebaseInstanceIdService.java**
4. **app/src/main/java/..packagePath../FooAppFirebaseMessagingService.java**
目前的實作盡可能精簡,只是為了快速測試通知。如需高品質的最佳做法和更複雜的實作範例,請參考 [FCM 指南](https://firebase.google.com/docs/cloud-messaging/concept-options)。
#### AndroidManifest.xml
在下列程式碼中,將任何 `MY_PACKAGE_IDENTIFIER` 預留位置取代為您*自己*的套件識別碼。
```xml theme={null}
```
#### MainActivity.java
程式碼中的下列預留位置應根據您的情境進行取代。
* `PLAYFAB_TITLE_ID`
* 使用您在 PlayFab Game Manager 中取得的遊戲識別碼。
* `PACKAGE_IDENTIFIER`
* 使用與您的設定相符的 Java 套件識別碼。
```java theme={null}
package PACKAGE_IDENTIFIER;
import android.os.AsyncTask;
import android.support.v7.app.AppCompatActivity;
import android.os.Bundle;
import android.util.Log;
import com.playfab.PlayFabClientAPI;
import com.playfab.PlayFabClientModels.*;
import com.playfab.PlayFabErrors;
import com.playfab.PlayFabSettings;
import java.util.List;
import java.util.Map;
public class MainActivity extends AppCompatActivity {
// Invoked when activity is started
@Override
protected void onCreate(Bundle savedInstanceState) {
super.onCreate(savedInstanceState);
setContentView(R.layout.activity_main);
// Set PlayFab title
PlayFabSettings.TitleId = "PLAYFAB_TITLE_ID";
// Start login operation
AsyncTask.execute(new Runnable() {
@Override
public void run() {
if(login()) FooAppFirebaseInstanceIdService.setAllowRegisterForPush(true); // Ready to register for push notifications
}
});
}
public boolean login(){
LoginWithAndroidDeviceIDRequest request = new LoginWithAndroidDeviceIDRequest();
request.CreateAccount = true;
// There are several approaches on getting unique android device id.
// https://stackoverflow.com/questions/2785485/is-there-a-unique-android-device-id
request.AndroidDeviceId = "qwerty";
PlayFabErrors.PlayFabResult response = PlayFabClientAPI.LoginWithAndroidDeviceID(request);
if(response.Error != null){
Log.d("Foo PlayFab App",CompileErrorsFromResult(response.Error));
return false;
}
return true;
}
// Utility method to compose an error message out of PlayFab result.
private static String CompileErrorsFromResult(PlayFabErrors.PlayFabError error) {
if (error == null)
return null;
String errorMessage = "";
if (error.errorMessage != null)
errorMessage += error.errorMessage;
if (error.errorDetails != null)
for (Map.Entry> pair : error.errorDetails.entrySet())
for (String msg : pair.getValue())
errorMessage += "\n" + pair.getKey() + ": " + msg;
return errorMessage;
}
}
```
#### FooAppFirebaseInstanceIdService.java
下列程式碼中的預留位置應根據您的情境進行取代。
* `PACKAGE_IDENTIFIER`
* 與您的設定相符的 Java 套件識別碼。
```java theme={null}
package PACKAGE_IDENTIFIER;
import android.text.TextUtils;
import android.util.Log;
import com.google.firebase.iid.FirebaseInstanceId;
import com.google.firebase.iid.FirebaseInstanceIdService;
import com.playfab.PlayFabClientAPI;
import com.playfab.PlayFabClientModels;
import com.playfab.PlayFabErrors;
import java.util.List;
import java.util.Map;
public class FooAppFirebaseInstanceIdService extends FirebaseInstanceIdService {
private static String _token;
private static boolean _allowRegistration;
// This is invoked from activity that performs authentication.
// Once login is complete this method is invoked.
// If we have a pending token, we use it to register for push notifications
public static void setAllowRegisterForPush(boolean isAllowed) {
_allowRegistration = isAllowed;
if (_allowRegistration && !TextUtils.isEmpty(_token)) {
registerForPush(_token);
}
}
// Invoked when firebase has fetched a token
// If we already have logged in, we use new token to register for push
@Override
public void onTokenRefresh() {
_token = FirebaseInstanceId.getInstance().getToken();
if (_allowRegistration && !TextUtils.isEmpty(_token)) {
registerForPush(_token);
}
}
private static void registerForPush(String token) {
PlayFabClientModels.AndroidDevicePushNotificationRegistrationRequest request = new PlayFabClientModels.AndroidDevicePushNotificationRegistrationRequest();
request.DeviceToken = token;
PlayFabErrors.PlayFabResult response = PlayFabClientAPI.AndroidDevicePushNotificationRegistration(request);
if (response.Error != null) {
Log.d("Foo PlayFab App", CompileErrorsFromResult(response.Error));
}
}
// Utility method to compose an error message out of PlayFab result.
private static String CompileErrorsFromResult(PlayFabErrors.PlayFabError error) {
if (error == null)
return null;
String errorMessage = "";
if (error.errorMessage != null)
errorMessage += error.errorMessage;
if (error.errorDetails != null)
for (Map.Entry> pair : error.errorDetails.entrySet())
for (String msg : pair.getValue())
errorMessage += "\n" + pair.getKey() + ": " + msg;
return errorMessage;
}
}
```
#### FooAppFirebaseMessagingService.java
下列程式碼中的預留位置應根據您的情境進行取代。
* `PACKAGE_IDENTIFIER`
* 與您的設定相符的 Java 套件識別碼。
```java theme={null}
package com.foo.playfab.app;
import android.util.Log;
import com.google.firebase.messaging.FirebaseMessagingService;
import com.google.firebase.messaging.RemoteMessage;
public class FooAppFirebaseMessagingService extends FirebaseMessagingService {
@Override
public void onMessageReceived(RemoteMessage message) {
// Intercept the message here
Log.d("Foo PlayFab App","Message received: "+message.getNotification().getBody());
}
}
```
## 測試
此時,您應該可以將應用程式部署到裝置。
* 啟動應用程式後,它會自動登入並註冊推播通知。
* 選取裝置上的 **Home** 按鈕以將應用程式最小化。*這很重要*,因為這樣我們才能測試送達系統匣的通知。
* 接著,前往您的 PlayFab 遊戲 Game Manager 頁面,並使用儀表板找出最新的 **Push Registration**。
* 選取 **Player ID (1)**。
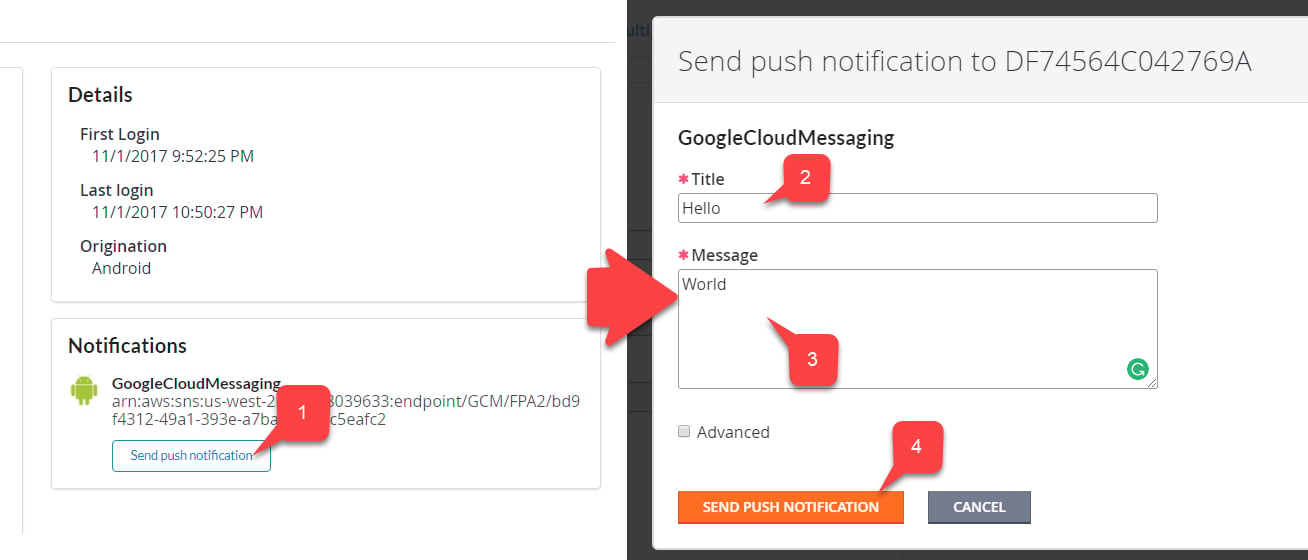
 這會開啟該玩家的 **Send Push Notification** 頁面。
* 選取 **Send Push Notification** 按鈕 **(1)**。
* 輸入 **Title (2)**。
* 輸入訊息本文 **(3)**。
* 選取 **Send Push Notification** 按鈕 **(4)** 以認可您的變更。
這會開啟該玩家的 **Send Push Notification** 頁面。
* 選取 **Send Push Notification** 按鈕 **(1)**。
* 輸入 **Title (2)**。
* 輸入訊息本文 **(3)**。
* 選取 **Send Push Notification** 按鈕 **(4)** 以認可您的變更。
 * 確認訊息已送達您的裝置。
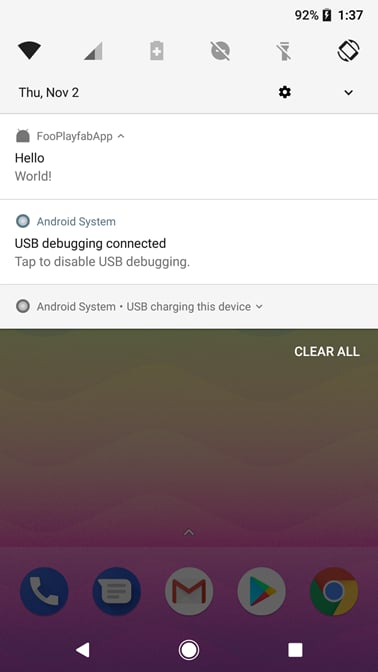 如果您的訊息已送達,表示訊息已成功遞送至您的應用程式。
此時,您已成功完成整合。您可以在應用程式實際執行時,使用 **FooAppFirebaseMessagingService** 處理傳入的訊息。
## Related topics
- [Android 推播通知](/zh-TW/services/playfab/live-service-management/game-configuration/title-communications/push-notifications/push-notifications-for-android.md)
- [推播通知](/zh-TW/services/playfab/live-service-management/game-configuration/title-communications/push-notifications/index.md)
- [推播通知快速入門](/zh-TW/services/playfab/live-service-management/game-configuration/title-communications/push-notifications/quickstart.md)
- [PlayFab 參與概觀](/zh-TW/services/playfab/live-service-management/game-configuration/title-communications/overview.md)
- [iOS 推播通知](/zh-TW/services/playfab/live-service-management/game-configuration/title-communications/push-notifications/push-notifications-for-ios.md)
如果您的訊息已送達,表示訊息已成功遞送至您的應用程式。
此時,您已成功完成整合。您可以在應用程式實際執行時,使用 **FooAppFirebaseMessagingService** 處理傳入的訊息。
## Related topics
- [Android 推播通知](/zh-TW/services/playfab/live-service-management/game-configuration/title-communications/push-notifications/push-notifications-for-android.md)
- [推播通知](/zh-TW/services/playfab/live-service-management/game-configuration/title-communications/push-notifications/index.md)
- [推播通知快速入門](/zh-TW/services/playfab/live-service-management/game-configuration/title-communications/push-notifications/quickstart.md)
- [PlayFab 參與概觀](/zh-TW/services/playfab/live-service-management/game-configuration/title-communications/overview.md)
- [iOS 推播通知](/zh-TW/services/playfab/live-service-management/game-configuration/title-communications/push-notifications/push-notifications-for-ios.md)