> ## Documentation Index
> Fetch the complete documentation index at: https://devdocs.xbox.com/llms.txt
> Use this file to discover all available pages before exploring further.
# 使用 UWP 應用程式設定 PlayFab 驗證
> 逐步教學課程,說明如何使用 Windows Hello 進行帳戶建立和玩家登入,將 PlayFab 驗證新增至通用 Windows 平台應用程式。
本教學課程將引導您完成使用通用 Windows 平台 (UWP) 進行 PlayFab 驗證的程序。
此程序是基本入門,說明如何取得所有實體,並透過 Windows Hello 和 PlayFab 進行驗證。如需更完整的 Windows Hello 和 PlayFab 驗證範例,請參考我們的 `[UWPExample project](https://github.com/PlayFab/UWPExample)`。
## 需求
* 依照 [MSDN「Get Set Up」指南](https://learn.microsoft.com/en-us/windows/apps/windows-app-sdk/set-up-your-development-environment)準備 Windows 和 Visual Studio 以進行 UWP 開發。
* 擁有已註冊的 [PlayFab](https://developer.playfab.com/) 遊戲。
* 熟悉[登入基本概念和最佳做法](/zh-TW/services/playfab/identity/player-identity/login/login-basics-best-practices)。
*非常*重要的是,您必須使用 Windows 10 作業系統、以已驗證的 Microsoft 帳戶登入,並已設定 PIN 等存取介面。如果*未*符合這些需求,應用程式將會失敗,且不會提供任何有用的原因說明。
## 準備 Visual Studio 專案
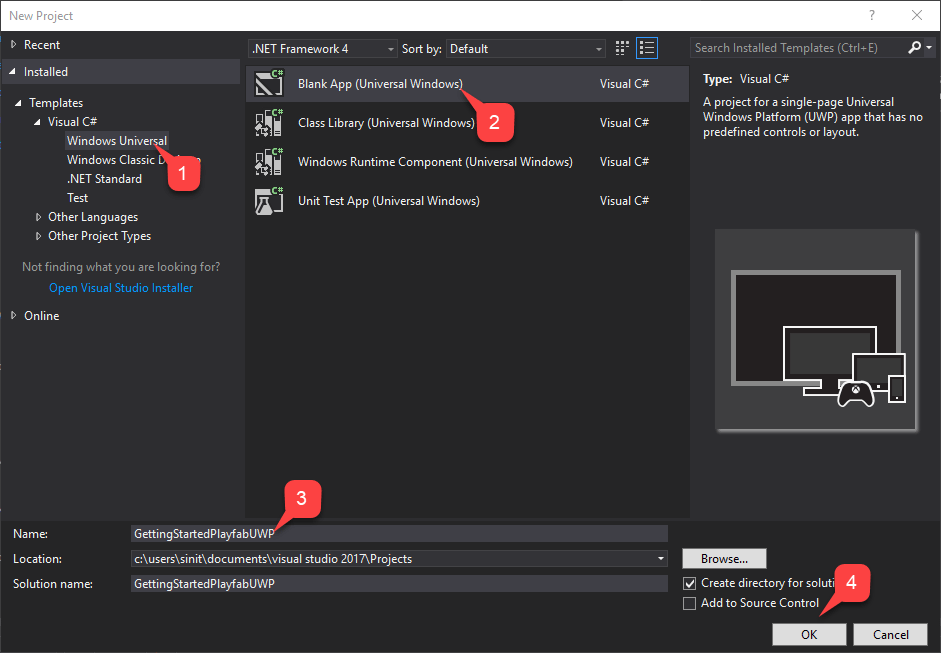
啟動 Visual Studio 並建立新專案。
1. 在 **Templates** 下,選取 **Windows Universal**。
2. 然後選取 **Blank App (Universal Windows)** 類型。
3. 將其命名為 **GettingStartedPlayfabUWP**。
4. 選取 **OK** 按鈕以提交。
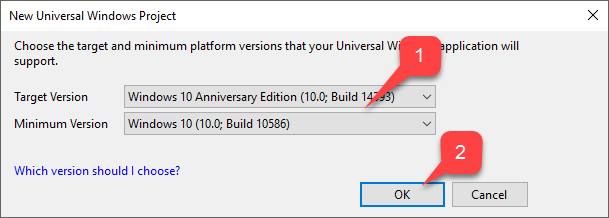
1. 選取與您的**專案**相符的 **Target Version** 和 **Minimum Version**。
2. 選取 **OK** 按鈕。
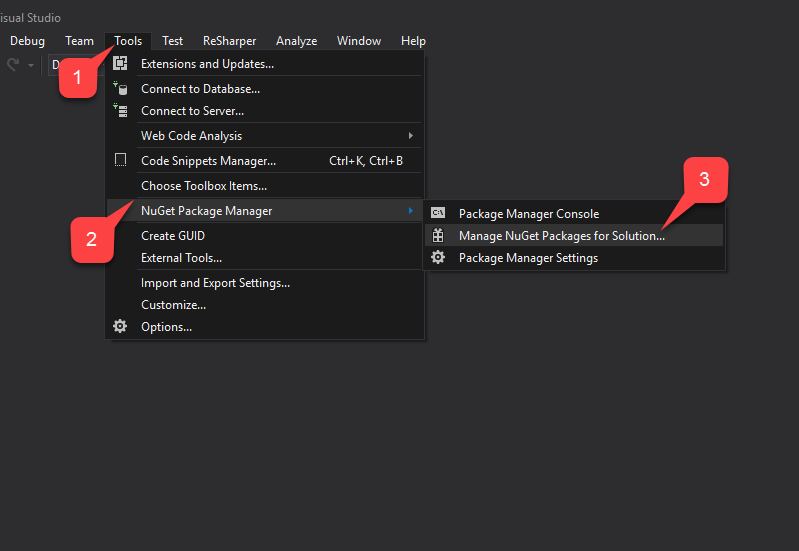
建立**專案**之後,使用 **NuGet 套件管理員**新增 **PlayFab SDK**。
1. 首先,選取 **Tools** 索引標籤。
2. 在下拉式功能表中,選取 **NuGet Package Manager**。
3. 然後選取 **Manage NuGet Packages for Solution**。
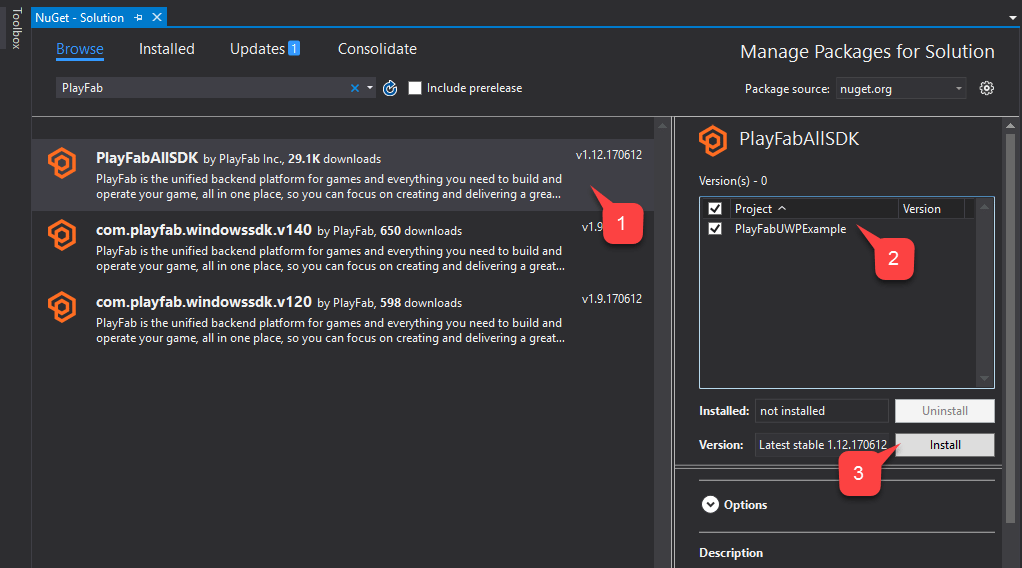
在 **NuGet Manager** 視窗中:
1. 選取 **Browse** 並搜尋 **PlayFabAllSDK** 套件。
2. 選取您的目標**專案**。
3. 然後選取 **Install** 按鈕。
完成後,您的基本專案設定就完成了。在下一節中,我們將修改兩個應該在建立專案時自動產生的類別:
1. **App**
2. **MainPage**
## 實作
### App.xaml.cs
此類別只會透過設定正確的遊戲識別碼來設定我們的 PlayFab SDK。別忘了將遊戲識別碼取代為您自己的識別碼。
```csharp theme={null}
using System;
using Windows.ApplicationModel;
using Windows.ApplicationModel.Activation;
using Windows.UI.Xaml;
using Windows.UI.Xaml.Controls;
using Windows.UI.Xaml.Navigation;
namespace GettingStartedPlayfabUWP
{
// This class is generated upon project creation.
// While template on it's own contains a lot of xml comments, we are only interested in lines 17 and 27
sealed partial class App : Application
{
// Replace PLAYFAB_TITLE_ID with your own
public const string PlayfabTitleId = "PLAYFAB_TITLE_ID";
///
/// Initializes the singleton application object. This is the first line of authored code
/// executed, and as such is the logical equivalent of main() or WinMain().
///
public App()
{
// This is the only line of functional code we need to add to this class.
PlayFab.PlayFabSettings.TitleId = PlayfabTitleId;
this.InitializeComponent();
this.Suspending += OnSuspending;
}
///
/// Invoked when the application is launched normally by the end user. Other entry points
/// will be used such as when the application is launched to open a specific file.
///
/// Details about the launch request and process.
protected override void OnLaunched(LaunchActivatedEventArgs e)
{
Frame rootFrame = Window.Current.Content as Frame;
// Do not repeat app initialization when the Window already has content,
// just ensure that the window is active
if (rootFrame == null)
{
// Create a Frame to act as the navigation context and navigate to the first page
rootFrame = new Frame();
rootFrame.NavigationFailed += OnNavigationFailed;
if (e.PreviousExecutionState == ApplicationExecutionState.Terminated)
{
//TODO: Load state from previously suspended application
}
// Place the frame in the current Window
Window.Current.Content = rootFrame;
}
if (e.PrelaunchActivated == false)
{
if (rootFrame.Content == null)
{
// When the navigation stack isn't restored navigate to the first page,
// configuring the new page by passing required information as a navigation
// parameter
rootFrame.Navigate(typeof(MainPage), e.Arguments);
}
// Ensure the current window is active
Window.Current.Activate();
}
}
///
/// Invoked when Navigation to a certain page fails
///
/// The Frame which failed navigation
/// Details about the navigation failure
void OnNavigationFailed(object sender, NavigationFailedEventArgs e)
{
throw new Exception("Failed to load Page " + e.SourcePageType.FullName);
}
///
/// Invoked when application execution is being suspended. Application state is saved
/// without knowing whether the application will be terminated or resumed with the contents
/// of memory still intact.
///
/// The source of the suspend request.
/// Details about the suspend request.
private void OnSuspending(object sender, SuspendingEventArgs e)
{
var deferral = e.SuspendingOperation.GetDeferral();
//TODO: Save application state and stop any background activity
deferral.Complete();
}
}
}
```
### MainPage.xaml
此檔案包含主頁面的版面配置。這是一個*非常簡單*的版面配置,在垂直方向的格線中組合了兩個按鈕和一個文字輸入。
按鈕繫結至特定方法,而文字方塊可透過其名稱 `UsernameInput` 存取。
```xaml theme={null}
```
### MainPage.xaml.cs
這是主頁面的功能類別,也是此範例的核心。請參閱程式碼註解,並檢閱用來引導您完成 PlayFab+Hello 註冊和登入的各個方法。
開始學習程式碼最簡單的方式,是檢閱由對應按鈕觸發的方法:
* **RegisterRequest**
* **LogInRequest**。
```csharp theme={null}
using System;
using System.Linq;
using System.Threading.Tasks;
using Windows.Foundation;
using Windows.Networking.Connectivity;
using Windows.Security.Credentials;
using Windows.Security.Cryptography;
using Windows.Security.Cryptography.Core;
using Windows.Storage.Streams;
using Windows.UI.Popups;
using Windows.UI.Xaml;
using Windows.UI.Xaml.Controls;
using PlayFab;
using PlayFab.ClientModels;
namespace GettingStartedPlayfabUWP
{
public sealed partial class MainPage : Page
{
// Shortcut to get current value of UsernameInput
public string Username => UsernameInput.Text;
public MainPage()
{
this.InitializeComponent();
}
///
/// This method is invoked when you select the Register button
/// This method illustrates the flow for Registration process.
/// We operate on 2 entities:
/// - User Credentials of type KeyCredential
/// - Public Key of type String
/// We first check if user with this id already has Credentials. If so, we redirect to login procedure.
/// Then we create new User Credentials. Check CreateKeyCredential for implementation details
/// Then we get Base64 encoded Public Key using the new User Credentials. Check GetPublicKeyBase64 for implementation details
/// Then we execute RegisterWithHello api call call. Check CallPlayFabRegisterWithHello for implementation details
///
private async void RegisterRequest(object sender, RoutedEventArgs e)
{
// Check if the user already exists and if so log them in.
KeyCredentialRetrievalResult retrieveResult = await KeyCredentialManager.OpenAsync(Username);
if (retrieveResult.Status == KeyCredentialStatus.Success)
{
// Redirect to login procedure
LogInRequest(sender, e);
return;
}
// Create a new KeyCredential for the user on the device.
var credential = await CreateKeyCredential(Username);
if (credential == null) return;
var publicKey = await GetPublicKeyBase64(credential);
if (string.IsNullOrEmpty(publicKey)) return;
// Include the name of the current device for the benefit of the user.
// The server could support a Web interface that shows the user all the devices they
// have signed in from and revoke access from devices they have lost.
var registerResponse = await CallPlayFabRegisterWithHello(publicKey, Username);
await ShowMessage("Registered and signed in with Session Ticket " + registerResponse.Result.SessionTicket);
}
//
///
/// This method is invoked when you select the Log In button
/// This method shows entities flow during the sign in process.
/// We have 4 different entities:
/// - User Credentials of type KeyCredential
/// - Public Key Hint of type String
/// - Challenge of type String
/// - SignedChallenge of type String
///
/// We first acquire the User Credentials. We do it based on Username. Check GetUserCredentials method for implementation details
/// Next, we get Public Key Hint based on those credentials. Check GetPublicKeyHint for implementation details.
/// Next we request a Challenge from PlayFab. Check GetPlayFabHelloChallenge for implementation details
/// Next we sign the Challenge using User Credentials, so we obtain Signed Challenge. Check GetPlayFabHelloChallenge for implementation details
/// Finally we use Signed Challenge and Public Key Hint to log into PlayFab. Check CallPlayFabLoginWithHello for implementation details
///
private async void LogInRequest(object sender, RoutedEventArgs e)
{
// Get credentials based on current Username.
var credentials = await GetUserCredentials(Username);
if (credentials == null) return;
// Credentials will give us Public Key. We use it to construct Public Key Hint, which is first important entity for PlayFab+UWP authentication.
var publicKeyHint = GetPublicKeyHintBase64(credentials);
if (string.IsNullOrEmpty(publicKeyHint)) return;
// Get PlayFab Challenge to sign for Windows Hello.
var challenge = await GetPlayFabHelloChallenge(publicKeyHint);
if (string.IsNullOrEmpty(challenge)) return;
// Request user to sign the challenge.
var signedChallenge = await RequestUserSignChallenge(credentials, challenge);
if (string.IsNullOrEmpty(signedChallenge)) return;
// Send the signature back to the server to confirm our identity.
// The publicKeyHint tells the server which public key to use to verify the signature.
var result = await CallPlayFabLoginWithHello(publicKeyHint, signedChallenge);
if (result == null) return;
// Report the result.
await ShowMessage("Signed in with Session Ticket " + result.Result.SessionTicket);
}
public async Task GetPublicKeyBase64(KeyCredential userCredential)
{
IBuffer publicKey = userCredential.RetrievePublicKey();
if (publicKey == null)
{
await ShowMessage("Failed to get public key for credential");
return null;
}
return CryptographicBuffer.EncodeToBase64String(publicKey);
}
public string GetPublicKeyHintBase64(KeyCredential userCredential)
{
HashAlgorithmProvider hashProvider = HashAlgorithmProvider.OpenAlgorithm(HashAlgorithmNames.Sha256);
var publicKey = userCredential.RetrievePublicKey();
IBuffer publicKeyHash = hashProvider.HashData(publicKey);
return CryptographicBuffer.EncodeToBase64String(publicKeyHash);
}
public async Task GetUserCredentials(string userId)
{
// Open credential based on our Username and make sure it is successful
KeyCredentialRetrievalResult retrieveResult = await KeyCredentialManager.OpenAsync(userId);
if (retrieveResult.Status != KeyCredentialStatus.Success)
{
await ShowMessage("Error: Unable to open credentials! " + retrieveResult.Status);
return null;
}
return retrieveResult.Credential;
}
public async Task GetPlayFabHelloChallenge(string publicKeyHint)
{
// Request challenge from PlayFab and make sure response has no errors
var challengeResponse = await PlayFab.PlayFabClientAPI.GetWindowsHelloChallengeAsync(new GetWindowsHelloChallengeRequest
{
PublicKeyHint = publicKeyHint,
TitleId = PlayFab.PlayFabSettings.TitleId
});
if (challengeResponse.Error != null)
{
await ShowMessage($"Error during getting challenge: {challengeResponse.Error.Error}");
return null;
}
return challengeResponse.Result.Challenge;
}
public async Task RequestUserSignChallenge(KeyCredential credentials, string challenge)
{
IBuffer challengeBuffer = CryptographicBuffer.DecodeFromBase64String(challenge);
KeyCredentialOperationResult opResult = await credentials.RequestSignAsync(challengeBuffer);
if (opResult.Status != KeyCredentialStatus.Success)
{
await ShowMessage("Failed sign the challenge string: " + opResult.Status);
return null;
}
return CryptographicBuffer.EncodeToBase64String(opResult.Result);
}
public async Task> CallPlayFabLoginWithHello(string publicKeyHint, string signedChallenge)
{
var loginResponse = await PlayFab.PlayFabClientAPI.LoginWithWindowsHelloAsync(new LoginWithWindowsHelloRequest
{
ChallengeSignature = signedChallenge,
PublicKeyHint = publicKeyHint
});
if (loginResponse.Error != null)
{
await ShowMessage($"Failed to log in: {loginResponse.Error.Error}");
return null;
}
return loginResponse;
}
public IAsyncOperation ShowMessage(string messageString)
{
MessageDialog message = new MessageDialog($"{messageString}");
return message.ShowAsync();
}
public async Task> CallPlayFabRegisterWithHello(string publicKey, string username)
{
var hostNames = NetworkInformation.GetHostNames();
var localName = hostNames.FirstOrDefault(name => name.DisplayName.Contains(".local"));
string computerName = localName.DisplayName.Replace(".local", "");
var registerResult = await PlayFab.PlayFabClientAPI.RegisterWithWindowsHelloAsync(new RegisterWithWindowsHelloRequest
{
DeviceName = computerName,
PublicKey = publicKey,
UserName = username
});
if (registerResult.Error != null)
{
await ShowMessage(registerResult.Error.GenerateErrorReport());
return null;
}
return registerResult;
}
public async Task CreateKeyCredential(string username)
{
KeyCredentialRetrievalResult keyCreationResult = await KeyCredentialManager.RequestCreateAsync(username, KeyCredentialCreationOption.ReplaceExisting);
if (keyCreationResult.Status != KeyCredentialStatus.Success)
{
// User has authenticated with Windows Hello and the key credential is created.
await ShowMessage("Failed to create key credential: " + keyCreationResult.Status);
return null;
}
return keyCreationResult.Credential;
}
}
}
```
## 測試
若要執行應用程式:
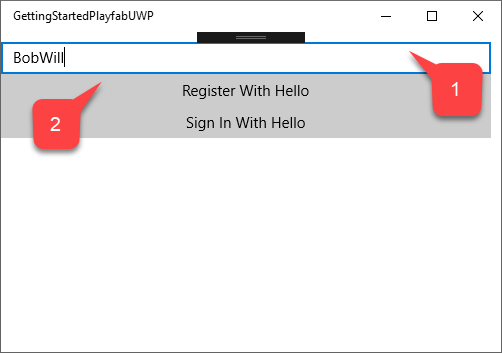
1. 輸入您的使用者名稱。
2. 選取 **Register With Hello** 按鈕。
依照 **Windows** 提供的驗證指示操作。
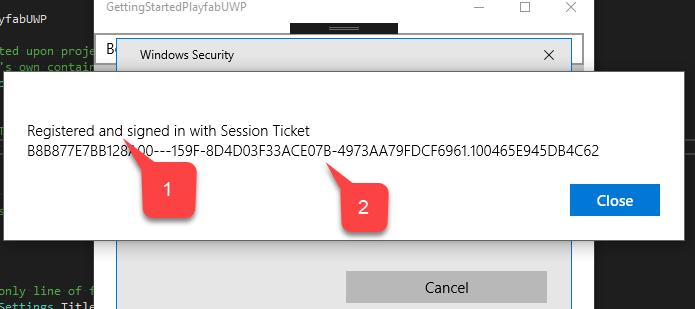
1. 確認您的身分後,您會看到確認訊息,指出帳戶已 **Registered and signed in**。
2. 並附有**工作階段票證**。
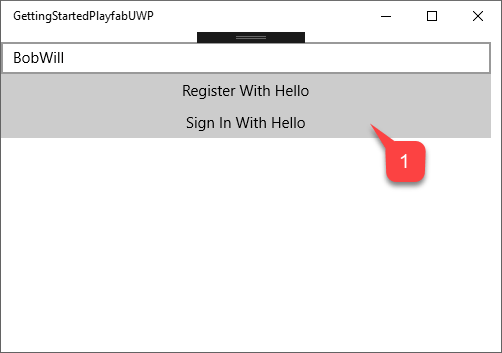
1. 選取 **Sign in With Hello** 按鈕。
依照 Windows 提供的驗證指示操作。
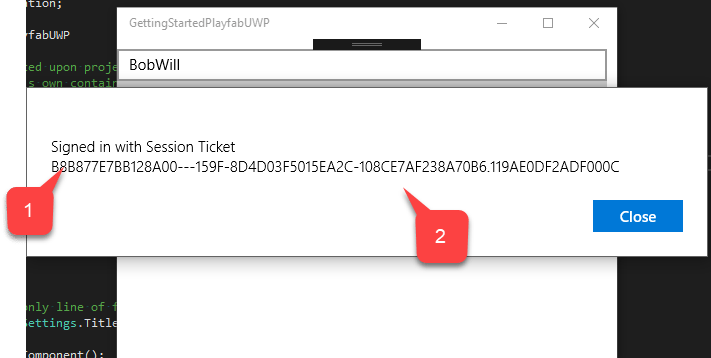
1. 確認您的身分後,您會看到確認訊息,指出帳戶已 **Signed in**。
2. 並附有**工作階段票證**。
此時,您已成功將 PlayFab 整合至您的 UWP 應用程式。
## Related topics
- [使用 Facebook 和 Unity 設定 PlayFab 驗證](/zh-TW/services/playfab/identity/player-identity/platform-specific-authentication/facebook-unity.md)
- [使用 Kongregate 和 Unity 設定 PlayFab 驗證](/zh-TW/services/playfab/identity/player-identity/platform-specific-authentication/kongregate-unity.md)
- [使用 Kongregate 和 HTML5 設定 PlayFab 驗證](/zh-TW/services/playfab/identity/player-identity/platform-specific-authentication/kongregate-html5.md)
- [使用 Twitch 和 HTML5 設定 PlayFab 驗證](/zh-TW/services/playfab/identity/player-identity/platform-specific-authentication/twitch-html5.md)
- [使用 Facebook 和 HTML5 設定 PlayFab 驗證](/zh-TW/services/playfab/identity/player-identity/platform-specific-authentication/facebook-html5.md)
 1. 選取與您的**專案**相符的 **Target Version** 和 **Minimum Version**。
2. 選取 **OK** 按鈕。
1. 選取與您的**專案**相符的 **Target Version** 和 **Minimum Version**。
2. 選取 **OK** 按鈕。
 建立**專案**之後,使用 **NuGet 套件管理員**新增 **PlayFab SDK**。
1. 首先,選取 **Tools** 索引標籤。
2. 在下拉式功能表中,選取 **NuGet Package Manager**。
3. 然後選取 **Manage NuGet Packages for Solution**。
建立**專案**之後,使用 **NuGet 套件管理員**新增 **PlayFab SDK**。
1. 首先,選取 **Tools** 索引標籤。
2. 在下拉式功能表中,選取 **NuGet Package Manager**。
3. 然後選取 **Manage NuGet Packages for Solution**。
 在 **NuGet Manager** 視窗中:
1. 選取 **Browse** 並搜尋 **PlayFabAllSDK** 套件。
2. 選取您的目標**專案**。
3. 然後選取 **Install** 按鈕。
在 **NuGet Manager** 視窗中:
1. 選取 **Browse** 並搜尋 **PlayFabAllSDK** 套件。
2. 選取您的目標**專案**。
3. 然後選取 **Install** 按鈕。
 完成後,您的基本專案設定就完成了。在下一節中,我們將修改兩個應該在建立專案時自動產生的類別:
1. **App**
2. **MainPage**
## 實作
### App.xaml.cs
此類別只會透過設定正確的遊戲識別碼來設定我們的 PlayFab SDK。別忘了將遊戲識別碼取代為您自己的識別碼。
```csharp theme={null}
using System;
using Windows.ApplicationModel;
using Windows.ApplicationModel.Activation;
using Windows.UI.Xaml;
using Windows.UI.Xaml.Controls;
using Windows.UI.Xaml.Navigation;
namespace GettingStartedPlayfabUWP
{
// This class is generated upon project creation.
// While template on it's own contains a lot of xml comments, we are only interested in lines 17 and 27
sealed partial class App : Application
{
// Replace PLAYFAB_TITLE_ID with your own
public const string PlayfabTitleId = "PLAYFAB_TITLE_ID";
///
完成後,您的基本專案設定就完成了。在下一節中,我們將修改兩個應該在建立專案時自動產生的類別:
1. **App**
2. **MainPage**
## 實作
### App.xaml.cs
此類別只會透過設定正確的遊戲識別碼來設定我們的 PlayFab SDK。別忘了將遊戲識別碼取代為您自己的識別碼。
```csharp theme={null}
using System;
using Windows.ApplicationModel;
using Windows.ApplicationModel.Activation;
using Windows.UI.Xaml;
using Windows.UI.Xaml.Controls;
using Windows.UI.Xaml.Navigation;
namespace GettingStartedPlayfabUWP
{
// This class is generated upon project creation.
// While template on it's own contains a lot of xml comments, we are only interested in lines 17 and 27
sealed partial class App : Application
{
// Replace PLAYFAB_TITLE_ID with your own
public const string PlayfabTitleId = "PLAYFAB_TITLE_ID";
///  依照 **Windows** 提供的驗證指示操作。
1. 確認您的身分後,您會看到確認訊息,指出帳戶已 **Registered and signed in**。
2. 並附有**工作階段票證**。
依照 **Windows** 提供的驗證指示操作。
1. 確認您的身分後,您會看到確認訊息,指出帳戶已 **Registered and signed in**。
2. 並附有**工作階段票證**。
 1. 選取 **Sign in With Hello** 按鈕。
 依照 Windows 提供的驗證指示操作。
1. 確認您的身分後,您會看到確認訊息,指出帳戶已 **Signed in**。
2. 並附有**工作階段票證**。
依照 Windows 提供的驗證指示操作。
1. 確認您的身分後,您會看到確認訊息,指出帳戶已 **Signed in**。
2. 並附有**工作階段票證**。
 此時,您已成功將 PlayFab 整合至您的 UWP 應用程式。
## Related topics
- [使用 Facebook 和 Unity 設定 PlayFab 驗證](/zh-TW/services/playfab/identity/player-identity/platform-specific-authentication/facebook-unity.md)
- [使用 Kongregate 和 Unity 設定 PlayFab 驗證](/zh-TW/services/playfab/identity/player-identity/platform-specific-authentication/kongregate-unity.md)
- [使用 Kongregate 和 HTML5 設定 PlayFab 驗證](/zh-TW/services/playfab/identity/player-identity/platform-specific-authentication/kongregate-html5.md)
- [使用 Twitch 和 HTML5 設定 PlayFab 驗證](/zh-TW/services/playfab/identity/player-identity/platform-specific-authentication/twitch-html5.md)
- [使用 Facebook 和 HTML5 設定 PlayFab 驗證](/zh-TW/services/playfab/identity/player-identity/platform-specific-authentication/facebook-html5.md)
此時,您已成功將 PlayFab 整合至您的 UWP 應用程式。
## Related topics
- [使用 Facebook 和 Unity 設定 PlayFab 驗證](/zh-TW/services/playfab/identity/player-identity/platform-specific-authentication/facebook-unity.md)
- [使用 Kongregate 和 Unity 設定 PlayFab 驗證](/zh-TW/services/playfab/identity/player-identity/platform-specific-authentication/kongregate-unity.md)
- [使用 Kongregate 和 HTML5 設定 PlayFab 驗證](/zh-TW/services/playfab/identity/player-identity/platform-specific-authentication/kongregate-html5.md)
- [使用 Twitch 和 HTML5 設定 PlayFab 驗證](/zh-TW/services/playfab/identity/player-identity/platform-specific-authentication/twitch-html5.md)
- [使用 Facebook 和 HTML5 設定 PlayFab 驗證](/zh-TW/services/playfab/identity/player-identity/platform-specific-authentication/facebook-html5.md)