> ## Documentation Index
> Fetch the complete documentation index at: https://devdocs.xbox.com/llms.txt
> Use this file to discover all available pages before exploring further.

# 使用 Twitch 和 HTML5 設定 PlayFab 驗證

> 逐步教學課程，說明如何使用 HTML5 和 JavaScript 將 Twitch 登入新增至 PlayFab 遊戲，涵蓋 Twitch 應用程式註冊和 OAuth 玩家驗證。

本教學課程旨在引導您完成使用 Twitch 和 HTML5/JavaScript 進行 PlayFab 驗證的程序。

## 需求

開始之前，您應該具備：

* 用於測試的 [Twitch 帳戶](https://www.twitch.tv/)。
* 已註冊的 [PlayFab](https://developer.playfab.com/) 遊戲。
* 熟悉[登入基本概念和最佳做法](/zh-TW/services/playfab/identity/player-identity/login/login-basics-best-practices)。
* 至少需要一部具有有效網域名稱的伺服器，以提供靜態 HTML 檔案。

<Note>
  如需如何設定具有有效網域名稱之伺服器的相關資訊，請參閱[執行 HTTP 伺服器進行測試](/zh-TW/services/playfab/identity/player-identity/platform-specific-authentication/running-an-http-server-for-testing)教學課程。
</Note>

## 伺服器和網域

本教學課程需要 Web 伺服器才能依照指示操作。如果您還沒有已註冊的遠端 Web 伺服器，請依照我們的[執行 HTTP 伺服器進行測試](/zh-TW/services/playfab/identity/player-identity/platform-specific-authentication/running-an-http-server-for-testing)教學課程，了解如何執行本機 Web 伺服器。

<Note>
  在本教學課程中，我們假設您的網域是 `[http://localhost/](http://localhost/)`。
</Note>

## 註冊 Twitch 應用程式

首先，瀏覽至 [Twitch 網站](https://www.twitch.tv/)，並確認您已登入。

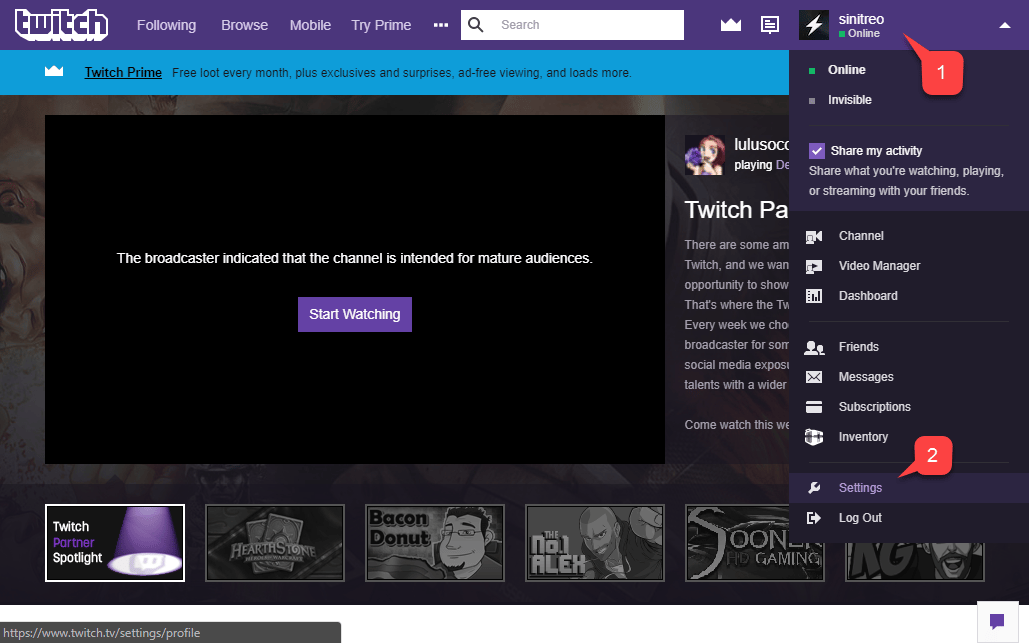
1. 瀏覽至 **Account** 下拉式清單。
2. 從提供的功能表中選取 **Settings**。

<img src="https://mintcdn.com/microsoft-4404708b/mLCHf0iQv3VidfBe/images/playfab/identity/player-identity/platform-specific-authentication/tutorials/twitch-html5/twitch-account-settings.png?fit=max&auto=format&n=mLCHf0iQv3VidfBe&q=85&s=16b0349a480883b4517f021b9f43b337" alt="Twitch 帳戶設定" width="1029" height="643" data-path="images/playfab/identity/player-identity/platform-specific-authentication/tutorials/twitch-html5/twitch-account-settings.png" />

在 **Settings** 頁面上，選取 **Connections (1)**，如下所示。

<img src="https://mintcdn.com/microsoft-4404708b/3hg2JQs0m7qmDqay/images/playfab/identity/player-identity/platform-specific-authentication/tutorials/twitch-html5/twitch-settings-connections.png?fit=max&auto=format&n=3hg2JQs0m7qmDqay&q=85&s=4f6e6dc81498ffe1a7007c0ae060eab4" alt="Twitch 設定連線" width="1016" height="198" data-path="images/playfab/identity/player-identity/platform-specific-authentication/tutorials/twitch-html5/twitch-settings-connections.png" />

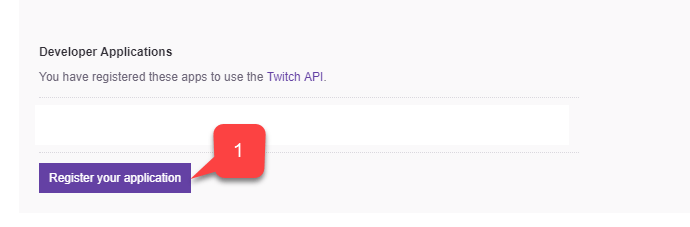
在頁面底部，選取 **Register your application (1)** 按鈕，如下所示。

<img src="https://mintcdn.com/microsoft-4404708b/3hg2JQs0m7qmDqay/images/playfab/identity/player-identity/platform-specific-authentication/tutorials/twitch-html5/twitch-open-application-registration.png?fit=max&auto=format&n=3hg2JQs0m7qmDqay&q=85&s=d9b6a12d357e2364a422502ce3e943bd" alt="Twitch 開啟應用程式註冊頁面" width="690" height="227" data-path="images/playfab/identity/player-identity/platform-specific-authentication/tutorials/twitch-html5/twitch-open-application-registration.png" />

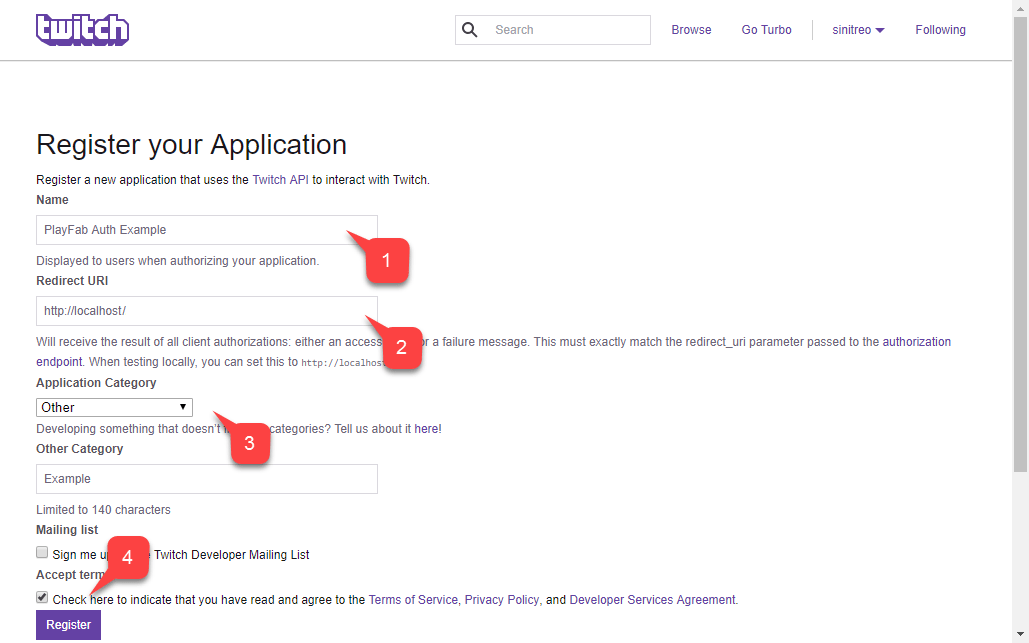
隨即開啟可讓您設定新應用程式的頁面。

1. 填寫**應用程式**的 **Name**。
2. 輸入 **Redirect URL**。
3. 輸入 **Application Category**。
4. 然後同意 **Twitch** 條款，並選取 **Register** 按鈕。

<img src="https://mintcdn.com/microsoft-4404708b/3hg2JQs0m7qmDqay/images/playfab/identity/player-identity/platform-specific-authentication/tutorials/twitch-html5/twitch-register-your-application.png?fit=max&auto=format&n=3hg2JQs0m7qmDqay&q=85&s=2f039af883eeeea4f5141f2b5f560cae" alt="Twitch 註冊您的應用程式" width="1029" height="643" data-path="images/playfab/identity/player-identity/platform-specific-authentication/tutorials/twitch-html5/twitch-register-your-application.png" />

<Info>
  使用本機 Web 伺服器進行測試時，Twitch 允許您使用 `**<http://localhost>**` 作為重新導向 URL。請務必包含前置斜線 **/**。若沒有前置斜線，Twitch 將無法辨識 localhost URL。
</Info>

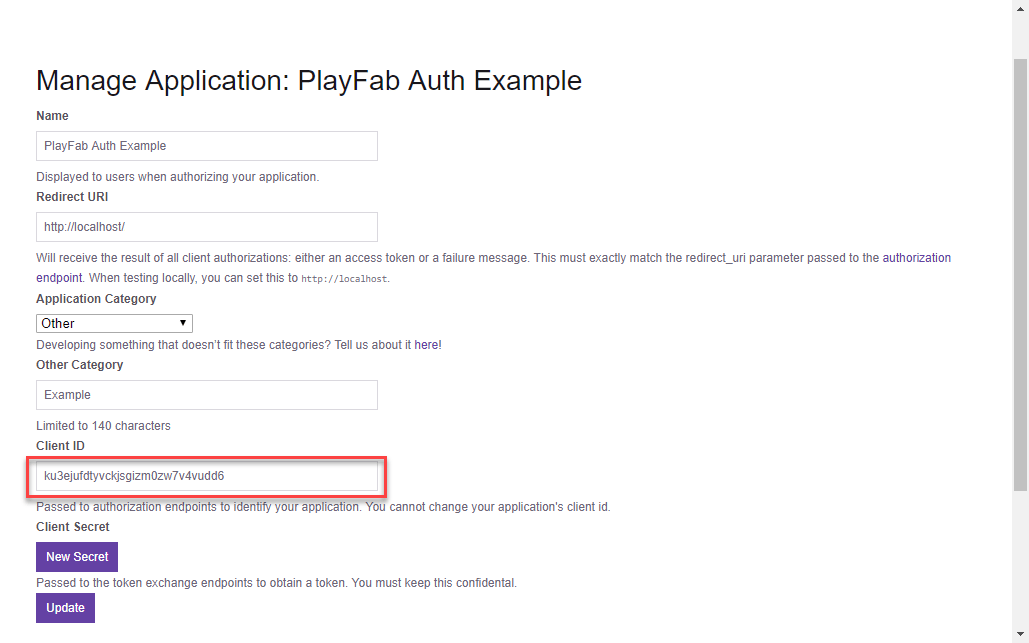
應用程式註冊完成後，頁面會更新並顯示您應用程式的用戶端識別碼 (Client ID)。

<Note>
  請將此 Client ID 保存在安全且容易存取的位置，因為您稍後會用它來設定您的 PlayFab 遊戲。
</Note>

<img src="https://mintcdn.com/microsoft-4404708b/mLCHf0iQv3VidfBe/images/playfab/identity/player-identity/platform-specific-authentication/tutorials/twitch-html5/twitch-manage-application.png?fit=max&auto=format&n=mLCHf0iQv3VidfBe&q=85&s=a540ab15379f0a9890594bb1f0b8b57a" alt="Twitch 管理應用程式" width="1029" height="643" data-path="images/playfab/identity/player-identity/platform-specific-authentication/tutorials/twitch-html5/twitch-manage-application.png" />

## 設定 PlayFab 遊戲

取得 Twitch Client ID 之後，您就可以為 PlayFab 遊戲啟用並設定 Twitch 附加元件。

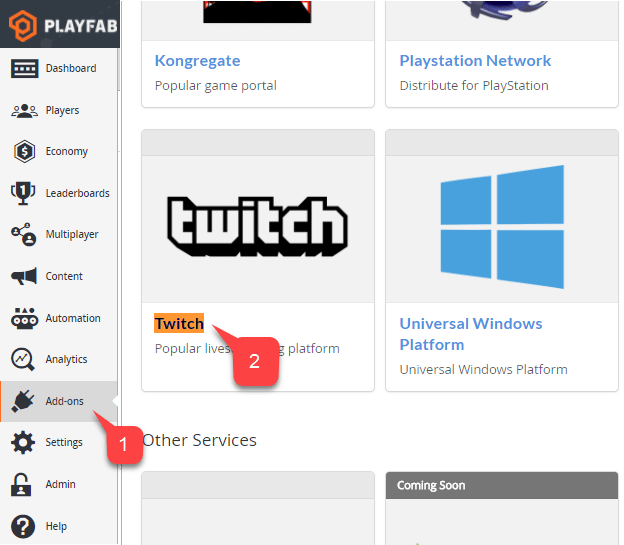
1. 在您的 **PlayFab Title** 畫面上，前往功能表並選取 **Add-ons** 項目。
2. 然後選取 **Twitch** 圖示連結。
<img src="https://mintcdn.com/microsoft-4404708b/mLCHf0iQv3VidfBe/images/playfab/identity/player-identity/platform-specific-authentication/tutorials/twitch-html5/game-manager-addons-tab-twitch.png?fit=max&auto=format&n=mLCHf0iQv3VidfBe&q=85&s=50176ba6202f1f26b095ed278ce8c1ed" alt="Game Manager Add-ons 索引標籤" width="624" height="545" data-path="images/playfab/identity/player-identity/platform-specific-authentication/tutorials/twitch-html5/game-manager-addons-tab-twitch.png" />

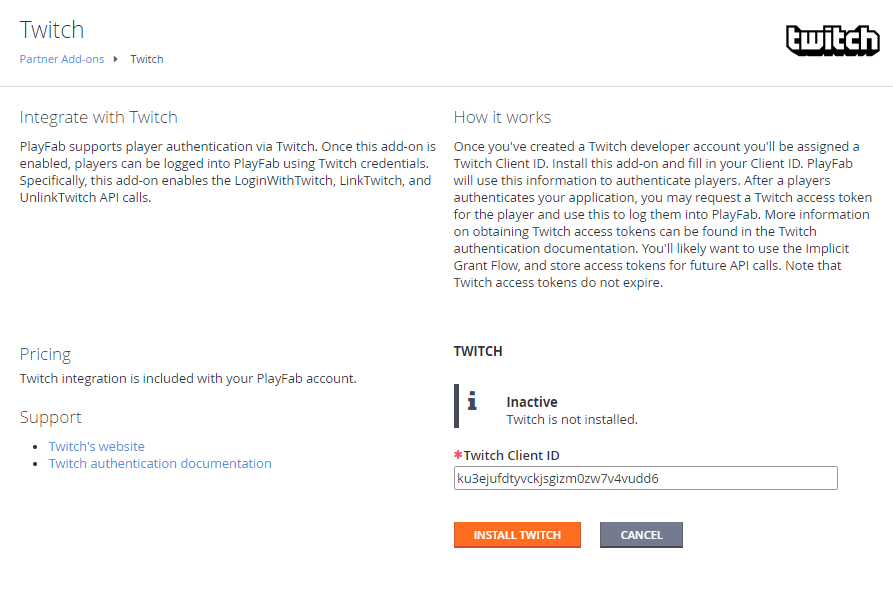
在 **Twitch** 頁面上：

* 隨即開啟 **Twitch Add-on** 的 **Settings** 頁面。
* 輸入您的 **Twitch Client ID**。
* 選取 **Install Twitch** 按鈕。
<img src="https://mintcdn.com/microsoft-4404708b/mLCHf0iQv3VidfBe/images/playfab/identity/player-identity/platform-specific-authentication/tutorials/twitch-html5/game-manager-twitch-addon-settings.png?fit=max&auto=format&n=mLCHf0iQv3VidfBe&q=85&s=ade8d576e742ccb6492da588c5f12cbc" alt="Game Manager Twitch 附加元件設定和安裝" width="893" height="599" data-path="images/playfab/identity/player-identity/platform-specific-authentication/tutorials/twitch-html5/game-manager-twitch-addon-settings.png" />

請花點時間確認附加元件已安裝，且未發生任何錯誤。PlayFab 遊戲的設定到此完成。

## 測試

使用下列 HTML 檔案測試使用 Twitch 的 PlayFab 驗證。

請務必將 `TWITCH_CLIENT_ID_GOES_HERE` 和 `PLAYFAB_TITLE_ID_GOES_HERE` 取代為您自己的值。

```html theme={null}
<!DOCTYPE html>
<html>
<head>
    <!-- Include JQuery - dependency of Twitch JS SDK -->
    <script src="//code.jquery.com/jquery.min.js"></script>
    <!-- Include Twitch SDK -->
    <script src="https://ttv-api.s3.amazonaws.com/twitch.min.js"></script>
    <!-- Include PlayFab SDK -->
    <script src="https://download.playfab.com/PlayFabClientApi.js"></script>
</head>
<body>
    <p>Twitch Auth Example</p>
    <button onclick="login()">Login With Twitch</button>
    <script>
        // Establish Twitch Auth Callback (invoked when logged in with Twitch)
        Twitch.events.addListener('auth.login', function() {
            logLine("Logged in with Twitch!");
            // Invoke login with PlayFab code and pass the token
            loginWithPlayFab(Twitch.getToken());
        });

        // Run Twitch SDK initialization
        Twitch.init({clientId: 'TWITCH_CLIENT_ID_GOES_HERE'}, function(error, status) {
            logLine("Twitch SDK Initialized");
        });

        // This method is invoked when you press the button

        function login() {
            logLine("Logging in via Twitch...");
            Twitch.login({
                scope: ['user_read', 'channel_read']
            });
        }

        function loginWithPlayFab(accessToken){
            logLine("Logging in via PlayFab...");

            // When given accessToken, make call to LoginWithTwitch API Call
            // Make sure to use your own PlayFab Title ID
            PlayFabClientSDK.LoginWithTwitch({
                AccessToken: accessToken,
                TitleId: "PLAYFAB_TITLE_ID_GOES_HERE",
                CreateAccount: true
            }, onPlayFabResponse);
        }

        // Handles response from playfab.
        function onPlayFabResponse(response, error) {
            if (response)
                logLine("Response: " + JSON.stringify(response));
            if (error)
                logLine("Error: " + JSON.stringify(error));
        }

        function logLine(message) {
        console.log(message);
            var textnode = document.createTextNode(message);
            document.body.appendChild(textnode);
            var br = document.createElement("br");
            document.body.appendChild(br);
        }
    </script>
</body>
</html>
```

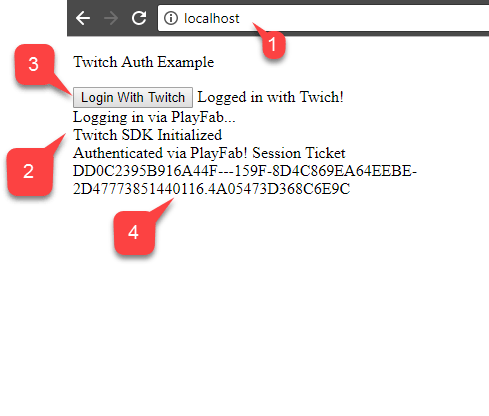
1. 使用您在 Twitch 應用程式設定期間設定的網域 (在我們的範例中為 `<http://localhost>`)，從您的伺服器要求下列檔案。

2. 頁面開啟後，等候指出 **Twitch SDK** 已初始化的訊息。

3. 然後選取 **Login with Twitch** 按鈕。

4. 依照快顯視窗中的任何 **Twitch** 指示操作，並觀察輸出。

<Info>
  如果您在到達頁面時*已經有*進行中的 Twitch 驗證工作階段，回呼可能會以不同、非預期的順序觸發。下方的螢幕擷取畫面顯示了這種情況。不過，您應該確保在 **Logged in with Twitch** 之後只接著 **Logging in via PlayFab**。這表示權杖已接收或已從本機儲存體還原，我們不必等候 Twitch SDK 啟動即可登入 PlayFab。
</Info>

<img src="https://mintcdn.com/microsoft-4404708b/mLCHf0iQv3VidfBe/images/playfab/identity/player-identity/platform-specific-authentication/tutorials/twitch-html5/twitch-auth-example.png?fit=max&auto=format&n=mLCHf0iQv3VidfBe&q=85&s=8e4934020a31d60a0c4eb5ee8c017558" alt="Twitch 驗證範例" width="489" height="416" data-path="images/playfab/identity/player-identity/platform-specific-authentication/tutorials/twitch-html5/twitch-auth-example.png" />

如果 PlayFab 成功取得 `SessionTicket`，表示您已成功將 Twitch 驗證與您的 PlayFab 應用程式整合。


## Related topics

- [平台特定驗證](/zh-TW/services/playfab/identity/player-identity/platform-specific-authentication/index.md)
- [使用 Google 和 HTML5 設定 PlayFab 驗證](/zh-TW/services/playfab/identity/player-identity/platform-specific-authentication/google-html5.md)
- [使用 Kongregate 和 HTML5 設定 PlayFab 驗證](/zh-TW/services/playfab/identity/player-identity/platform-specific-authentication/kongregate-html5.md)
- [使用 Facebook 和 HTML5 設定 PlayFab 驗證](/zh-TW/services/playfab/identity/player-identity/platform-specific-authentication/facebook-html5.md)
- [為 PlayFab 設定使用 Battle.net 登入](/zh-TW/services/playfab/identity/player-identity/platform-specific-authentication/battlenet-login.md)