> ## Documentation Index
> Fetch the complete documentation index at: https://devdocs.xbox.com/llms.txt
> Use this file to discover all available pages before exploring further.
# 開始使用 Economy v2、Unity IAP 和 Android
> 將 Unity IAP 和 Android Billing API 連接到 PlayFab Economy v2 組合,讓玩家能夠購買真實貨幣項目並將其兌換至庫存。
# 開始使用 Economy v2、Unity 和 Android
Economy v2 現已正式推出。如需支援與意見反應,請前往 [PlayFab 論壇](https://community.playfab.com)。
本教學課程說明如何使用 PlayFab、Unity + IAP 服務和 Android Billing API 來設定應用程式內購買 (IAP)。
## 開始之前
Android Billing API 與 PlayFab 會共同運作,為您的用戶端提供 IAP 體驗:
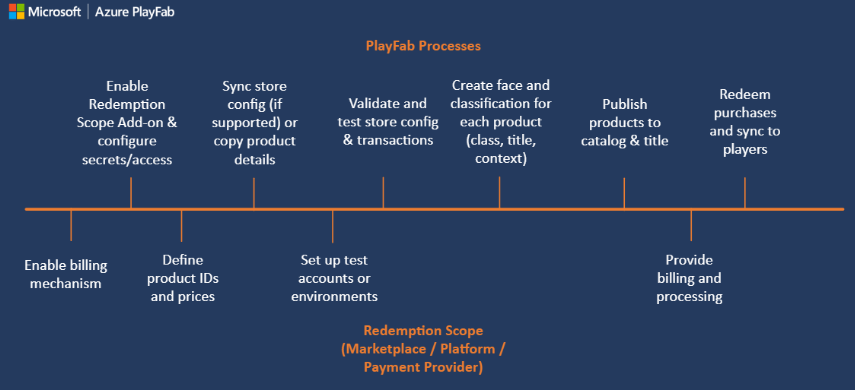 首先,透過 PlayMarket 設定您的**產品識別碼**和**價格**。一開始,所有產品都是\_無面貌\_的,也就是玩家能夠購買的數位實體,但對 PlayFab 玩家而言沒有任何意義。
為了讓這些實體發揮作用,我們需要在 PlayFab 項目目錄中鏡像它們。PlayFab 會將無面貌的實體轉換為組合、容器和個別項目。
每個項目都有自己獨特的面貌,包括:
* **標題**
* **描述**
* **標籤**
* **類型**
* **影像**
* **行為**
所有項目都透過共用識別碼與市集產品連結。
存取可供購買之真實貨幣項目的最佳方式,是使用 [GetItems](https://learn.microsoft.com/en-us/rest/api/playfab/economy/catalog/get-items)。
項目的識別碼是 PlayFab 與任何外部 IAP 系統之間的連結。因此,我們會將項目識別碼傳遞給 IAP 服務。
此時,購買流程便會開始。玩家與 IAP 介面互動,如果購買成功,您就會取得收據。
PlayFab 會驗證收據並登錄購買,將玩家剛購買的項目授與該 PlayFab 玩家。
## 設定用戶端應用程式
本節說明如何設定應用程式,以使用 PlayFab、UnityIAP 和 Android Billing API 測試 IAP。
必要條件:
* Unity 專案。
* 已匯入並設定為搭配您遊戲使用的 [PlayFab Unity SDK](/zh-TW/services/playfab/sdks/unity3d)。
* 已安裝並設定為搭配您 Unity 專案使用的編輯器,例如 [Visual Studio](https://learn.microsoft.com/en-us/visualstudio/gamedev/unity/get-started/getting-started-with-visual-studio-tools-for-unity)。
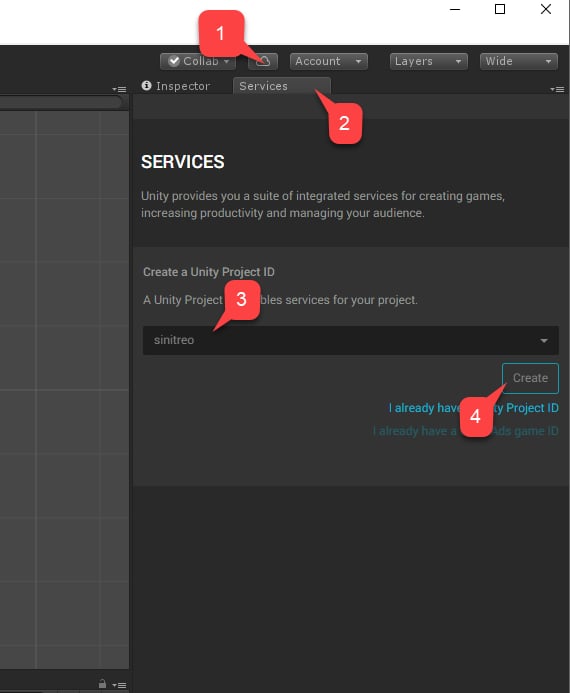
我們的第一個步驟是設定 UnityIAP:
1. 瀏覽至 **Services**。
2. 確定已選取 **Services** 索引標籤。
3. 選取您的 **Unity Services** 設定檔或組織。
4. 選取 **Create** 按鈕。
首先,透過 PlayMarket 設定您的**產品識別碼**和**價格**。一開始,所有產品都是\_無面貌\_的,也就是玩家能夠購買的數位實體,但對 PlayFab 玩家而言沒有任何意義。
為了讓這些實體發揮作用,我們需要在 PlayFab 項目目錄中鏡像它們。PlayFab 會將無面貌的實體轉換為組合、容器和個別項目。
每個項目都有自己獨特的面貌,包括:
* **標題**
* **描述**
* **標籤**
* **類型**
* **影像**
* **行為**
所有項目都透過共用識別碼與市集產品連結。
存取可供購買之真實貨幣項目的最佳方式,是使用 [GetItems](https://learn.microsoft.com/en-us/rest/api/playfab/economy/catalog/get-items)。
項目的識別碼是 PlayFab 與任何外部 IAP 系統之間的連結。因此,我們會將項目識別碼傳遞給 IAP 服務。
此時,購買流程便會開始。玩家與 IAP 介面互動,如果購買成功,您就會取得收據。
PlayFab 會驗證收據並登錄購買,將玩家剛購買的項目授與該 PlayFab 玩家。
## 設定用戶端應用程式
本節說明如何設定應用程式,以使用 PlayFab、UnityIAP 和 Android Billing API 測試 IAP。
必要條件:
* Unity 專案。
* 已匯入並設定為搭配您遊戲使用的 [PlayFab Unity SDK](/zh-TW/services/playfab/sdks/unity3d)。
* 已安裝並設定為搭配您 Unity 專案使用的編輯器,例如 [Visual Studio](https://learn.microsoft.com/en-us/visualstudio/gamedev/unity/get-started/getting-started-with-visual-studio-tools-for-unity)。
我們的第一個步驟是設定 UnityIAP:
1. 瀏覽至 **Services**。
2. 確定已選取 **Services** 索引標籤。
3. 選取您的 **Unity Services** 設定檔或組織。
4. 選取 **Create** 按鈕。
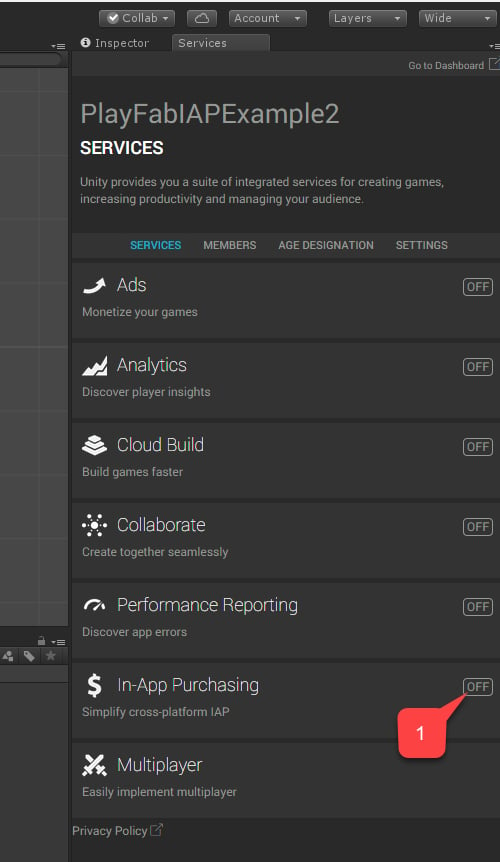
 1. 接著,瀏覽至 **In-App Purchasing (IAP)** 服務。
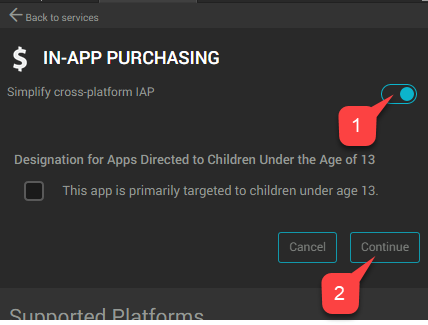
 1. 請務必設定 **Simplify cross-platform IAP** 切換開關,以啟用 **Service**。
2. 然後選取 **Continue** 按鈕。
1. 請務必設定 **Simplify cross-platform IAP** 切換開關,以啟用 **Service**。
2. 然後選取 **Continue** 按鈕。
 隨即出現含有外掛程式清單的頁面。
1. 選取 **Import** 按鈕。
隨即出現含有外掛程式清單的頁面。
1. 選取 **Import** 按鈕。
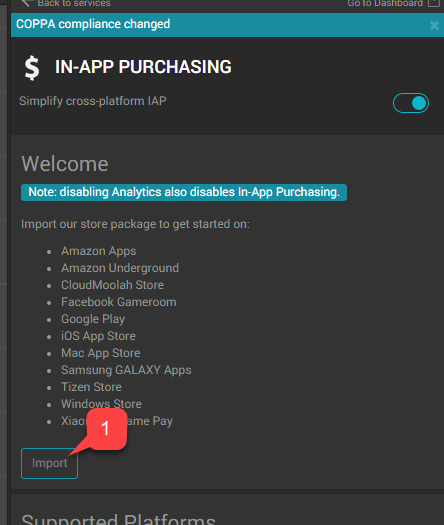 繼續進行 Unity 安裝和匯入程序,直到所有外掛程式都已匯入為止。
1. 確認外掛程式已就緒。
2. 然後建立名為 **AndroidIAPExample.cs** 的新指令碼。
繼續進行 Unity 安裝和匯入程序,直到所有外掛程式都已匯入為止。
1. 確認外掛程式已就緒。
2. 然後建立名為 **AndroidIAPExample.cs** 的新指令碼。
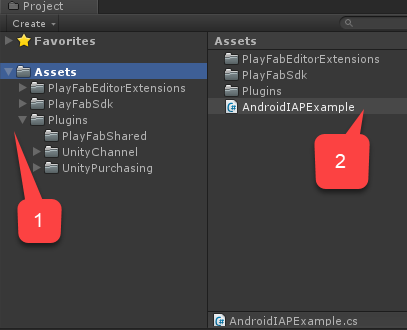 `AndroidIAPExample.cs` 包含下列程式碼 (如需進一步說明,請參閱程式碼註解)。
```csharp theme={null}
using System;
using System.Collections.Generic;
using System.Linq;
using System.Threading.Tasks;
using UnityEngine;
using UnityEngine.Purchasing;
using UnityEngine.Purchasing.Extension;
using PlayFab;
using PlayFab.ClientModels;
using PlayFab.EconomyModels;
///
/// Unity behavior that implements the Unity IAP Store interface.
/// Attach as an asset to your Scene.
///
public class AndroidIAPExample : MonoBehaviour, IDetailedStoreListener
{
// Bundles for sale on the Google Play Store.
private Dictionary _googlePlayCatalog;
// In-game items for sale at the example vendor.
private Dictionary _storefrontCatalog;
private string _purchaseIdempotencyId = null;
private PlayFabEconomyAPIAsyncResult _lastAPICallResult = null;
private static readonly PlayFabEconomyAPIAsync s_economyAPI = new();
private static IStoreController s_storeController;
// TODO: This callback is for illustrations purposes, you should create one that fits your needs
public delegate void PlayFabProcessPurchaseCallback(PurchaseProcessingResult result);
///
/// Event that is triggered when a purchase is processed.
///
///
/// TODO: Subscribe to this event in your game code to handle purchase results.
///
public event PlayFabProcessPurchaseCallback PlayFabProcessPurchaseEvent;
///
/// True if the Store Controller, extensions, and Catalog are set.
///
public bool IsInitialized => s_storeController != null
&& _googlePlayCatalog != null
&& _storefrontCatalog != null;
// Start is called before the first frame update.
public void Start()
{
Login();
}
///
/// Attempts to log the player in via the Android Device ID.
///
private void Login()
{
// TODO: it is better to use LoginWithGooglePlayGamesService or a similar platform-specific login method for final game code.
// SystemInfo.deviceUniqueIdentifier will prompt for permissions on newer devices.
// Using a non-device specific GUID and saving to a local file
// is a better approach. PlayFab does allow you to link multiple
// Android device IDs to a single PlayFab account.
PlayFabClientAPI.LoginWithCustomID(new LoginWithCustomIDRequest()
{
CreateAccount = true,
CustomId = SystemInfo.deviceUniqueIdentifier
}, result => RefreshIAPItems(), PlayFabSampleUtil.OnPlayFabError);
}
///
/// Queries the PlayFab Economy Catalog V2 for updated listings
/// and then fills the local catalog objects.
///
private async void RefreshIAPItems()
{
_googlePlayCatalog = new Dictionary();
SearchItemsRequest googlePlayCatalogRequest = new()
{
Count = 50,
Filter = "AlternateIds/any(t: t/type eq 'GooglePlay')"
};
SearchItemsResponse googlePlayCatalogResponse;
do
{
googlePlayCatalogResponse = await s_economyAPI.SearchItemsAsync(googlePlayCatalogRequest);
Debug.Log("Search response: " + JsonUtility.ToJson(googlePlayCatalogResponse));
foreach (PlayFab.EconomyModels.CatalogItem item in googlePlayCatalogResponse.Items)
{
_googlePlayCatalog.Add(item.Id, item);
}
} while (!string.IsNullOrEmpty(googlePlayCatalogResponse.ContinuationToken));
Debug.Log($"Completed pulling from PlayFab Economy v2 googleplay Catalog: {_googlePlayCatalog.Count()} items retrieved");
_storefrontCatalog = new Dictionary();
GetItemRequest storeCatalogRequest = new()
{
AlternateId = new CatalogAlternateId()
{
Type = "FriendlyId",
Value = "villagerstore"
}
};
GetItemResponse storeCatalogResponse;
storeCatalogResponse = await s_economyAPI.GetItemAsync(storeCatalogRequest);
List itemIds = new();
foreach (CatalogItemReference item in storeCatalogResponse.Item.ItemReferences)
{
itemIds.Add(item.Id);
}
GetItemsRequest itemsCatalogRequest = new()
{
Ids = itemIds
};
GetItemsResponse itemsCatalogResponse = await s_economyAPI.GetItemsAsync(itemsCatalogRequest);
foreach (PlayFab.EconomyModels.CatalogItem item in itemsCatalogResponse.Items)
{
_storefrontCatalog.Add(item.Id, item);
}
Debug.Log($"Completed pulling from PlayFab Economy v2 villagerstore store: {_storefrontCatalog.Count()} items retrieved");
InitializePurchasing();
}
///
/// Initializes the Unity IAP system for the Google Play Store.
///
private void InitializePurchasing()
{
if (IsInitialized) return;
var builder = ConfigurationBuilder.Instance(StandardPurchasingModule.Instance(AppStore.GooglePlay));
foreach (PlayFab.EconomyModels.CatalogItem item in _googlePlayCatalog.Values)
{
string googlePlayItemId = item.AlternateIds.FirstOrDefault(item => item.Type == "GooglePlay")?.Value;
if (!string.IsNullOrWhiteSpace(googlePlayItemId))
{
builder.AddProduct(googlePlayItemId, ProductType.Consumable);
}
}
UnityPurchasing.Initialize(this, builder);
}
///
/// Draw a debug IMGUI for testing examples.
/// Use UI Toolkit for your production game runtime UI instead.
///
public void OnGUI()
{
// Support high-res devices.
GUI.matrix = Matrix4x4.TRS(new Vector3(0, 0, 0), Quaternion.identity, new Vector3(3, 3, 3));
if (!IsInitialized)
{
GUILayout.Label("Initializing IAP and logging in...");
return;
}
if (!string.IsNullOrEmpty(_purchaseIdempotencyId) && (!string.IsNullOrEmpty(_lastAPICallResult?.Message)
|| !string.IsNullOrEmpty(_lastAPICallResult?.Error)))
{
GUILayout.Label(_lastAPICallResult?.Message + _lastAPICallResult?.Error);
}
GUILayout.Label("Shop for game currency bundles.");
// Draw a purchase menu for each catalog item.
foreach (PlayFab.EconomyModels.CatalogItem item in _googlePlayCatalog.Values)
{
// Use a dictionary to select the proper language.
if (GUILayout.Button("Get " + (item.Title.ContainsKey("en-US") ? item.Title["en-US"] : item.Title["NEUTRAL"])))
{
BuyProductById(item.AlternateIds.FirstOrDefault(item => item.Type == "GooglePlay").Value);
}
}
GUILayout.Label("Hmmm. (Translation: Welcome to my humble Villager store.)");
// Draw a purchase menu for each catalog item.
foreach (PlayFab.EconomyModels.CatalogItem item in _storefrontCatalog.Values)
{
// Use a dictionary to select the proper language.
if (GUILayout.Button("Buy "
+ (item.Title.ContainsKey("en-US") ? item.Title["en-US"] : item.Title["NEUTRAL"]
+ ": "
+ item.PriceOptions.Prices.FirstOrDefault().Amounts.FirstOrDefault().Amount.ToString()
+ " Diamonds"
)))
{
Task.Run(() => PlayFabPurchaseItemById(item.Id));
}
}
}
///
/// Integrates game purchasing with the Unity IAP API.
///
public void BuyProductById(string productId)
{
if (!IsInitialized)
{
Debug.LogError("IAP Service is not initialized!");
return;
}
s_storeController.InitiatePurchase(productId);
}
///
/// Purchases a PlayFab inventory item by ID.
/// See the class for details on error handling
/// and calling patterns.
///
async public Task PlayFabPurchaseItemById(string itemId)
{
if (!IsInitialized)
{
Debug.LogError("IAP Service is not initialized!");
return false;
}
_lastAPICallResult = new();
Debug.Log("Player buying product " + itemId);
if (string.IsNullOrEmpty(_purchaseIdempotencyId))
{
_purchaseIdempotencyId = Guid.NewGuid().ToString();
}
GetItemRequest getVillagerStoreRequest = new()
{
AlternateId = new CatalogAlternateId()
{
Type = "FriendlyId",
Value = "villagerstore"
}
};
GetItemResponse getStoreResponse = await s_economyAPI.GetItemAsync(getVillagerStoreRequest);
if (getStoreResponse == null || string.IsNullOrEmpty(getStoreResponse?.Item?.Id))
{
_lastAPICallResult.Error = "Unable to contact the store. Check your internet connection and try again in a few minutes.";
return false;
}
CatalogPriceAmount price = _storefrontCatalog.FirstOrDefault(item => item.Key == itemId).Value.PriceOptions.Prices.FirstOrDefault().Amounts.FirstOrDefault();
PurchaseInventoryItemsRequest purchaseInventoryItemsRequest = new()
{
Amount = 1,
Item = new InventoryItemReference()
{
Id = itemId
},
PriceAmounts = new List
{
new()
{
Amount = price.Amount,
ItemId = price.ItemId
}
},
IdempotencyId = _purchaseIdempotencyId,
StoreId = getStoreResponse.Item.Id
};
PurchaseInventoryItemsResponse purchaseInventoryItemsResponse = await s_economyAPI.PurchaseInventoryItemsAsync(purchaseInventoryItemsRequest);
if (purchaseInventoryItemsResponse == null || purchaseInventoryItemsResponse?.TransactionIds.Count < 1)
{
_lastAPICallResult.Error = "Unable to purchase. Try again in a few minutes.";
return false;
}
_purchaseIdempotencyId = "";
_lastAPICallResult.Message = "Purchasing!";
return true;
}
private void OnRegistration(LoginResult result)
{
PlayFabSettings.staticPlayer.ClientSessionTicket = result.SessionTicket;
}
public void OnInitialized(IStoreController controller, IExtensionProvider extensions)
{
s_storeController = controller;
extensions.GetExtension().RestoreTransactions((result, error) => {
if (result)
{
Debug.LogWarning("Restore transactions succeeded.");
}
else
{
Debug.LogWarning("Restore transactions failed.");
}
});
}
public void OnInitializeFailed(InitializationFailureReason error)
{
Debug.Log("OnInitializeFailed InitializationFailureReason:" + error);
}
public void OnInitializeFailed(InitializationFailureReason error, string message)
{
Debug.Log("OnInitializeFailed InitializationFailureReason:" + error + message);
}
public void OnPurchaseFailed(UnityEngine.Purchasing.Product product, PurchaseFailureReason failureReason)
{
Debug.Log($"OnPurchaseFailed: FAIL. Product: '{product.definition.storeSpecificId}', PurchaseFailureReason: {failureReason}");
}
public void OnPurchaseFailed(UnityEngine.Purchasing.Product product, PurchaseFailureDescription failureDescription)
{
Debug.Log($"OnPurchaseFailed: FAIL. Product: '{product.definition.storeSpecificId}', PurchaseFailureReason: {failureDescription}");
}
///
/// Callback for Store purchases. Subscribe to PlayFabProcessPurchaseEvent to handle the final PurchaseProcessingResult.
///
///
///
/// This code does not account for purchases that were pending and are
/// delivered on application start. Production code should account for these cases.
///
/// Complete immediately upon error. Pending if PlayFab Economy is handling final processing and will trigger PlayFabProcessPurchaseEvent with the final result.
public PurchaseProcessingResult ProcessPurchase(PurchaseEventArgs purchaseEvent)
{
if (!IsInitialized)
{
Debug.LogWarning("Not initialized. Ignoring.");
return PurchaseProcessingResult.Complete;
}
if (purchaseEvent.purchasedProduct == null)
{
Debug.LogWarning("Attempted to process purchase with unknown product. Ignoring.");
return PurchaseProcessingResult.Complete;
}
if (string.IsNullOrEmpty(purchaseEvent.purchasedProduct.receipt))
{
Debug.LogWarning("Attempted to process purchase with no receipt. Ignoring.");
return PurchaseProcessingResult.Complete;
}
Debug.Log("Attempting purchase with receipt " + purchaseEvent.purchasedProduct.receipt);
GooglePurchase purchasePayload = GooglePurchase.FromJson(purchaseEvent.purchasedProduct.receipt);
RedeemGooglePlayInventoryItemsRequest request = new()
{
Purchases = new List
{
new()
{
ProductId = purchasePayload.PayloadData?.JsonData?.productId,
Token = purchasePayload.PayloadData?.JsonData?.purchaseToken
}
}
};
PlayFabEconomyAPI.RedeemGooglePlayInventoryItems(request, result =>
{
Debug.Log("Processed receipt validation.");
if (result?.Failed.Count > 0)
{
Debug.Log($"Validation failed for {result.Failed.Count} receipts.");
Debug.Log(JsonUtility.ToJson(result.Failed));
PlayFabProcessPurchaseEvent?.Invoke(PurchaseProcessingResult.Pending);
}
else
{
Debug.Log("Validation succeeded!");
PlayFabProcessPurchaseEvent?.Invoke(PurchaseProcessingResult.Complete);
s_storeController.ConfirmPendingPurchase(purchaseEvent.purchasedProduct);
Debug.Log("Confirmed purchase with Google Marketplace.");
}
},
PlayFabSampleUtil.OnPlayFabError);
return PurchaseProcessingResult.Pending;
}
}
///
/// Utility classes for the sample.
///
public class PlayFabEconomyAPIAsyncResult
{
public string Error { get; set; } = null;
public string Message { get; set; } = null;
}
public static class PlayFabSampleUtil
{
public static void OnPlayFabError(PlayFabError error)
{
Debug.LogError(error.GenerateErrorReport());
}
}
///
/// Example Async wrapper for PlayFab API's.
///
/// This is just a quick sample for example purposes.
///
/// Write your own customer Logger implementation to log and handle errors
/// for user-facing scenarios. Use tags and map which PlayFab errors require your
/// game to handle GUI or gameplay updates vs which should be logged to crash and
/// error reporting services.
///
public class PlayFabEconomyAPIAsync
{
///
///
///
public Task GetItemAsync(GetItemRequest request)
{
TaskCompletionSource getItemAsyncTaskSource = new();
PlayFabEconomyAPI.GetItem(request, (response) => getItemAsyncTaskSource.SetResult(response), error =>
{
PlayFabSampleUtil.OnPlayFabError(error);
getItemAsyncTaskSource.SetResult(default);
});
return getItemAsyncTaskSource.Task;
}
///
///
///
public Task GetItemsAsync(GetItemsRequest request)
{
TaskCompletionSource getItemsAsyncTaskSource = new();
PlayFabEconomyAPI.GetItems(request, (response) => getItemsAsyncTaskSource.SetResult(response), error =>
{
PlayFabSampleUtil.OnPlayFabError(error);
getItemsAsyncTaskSource.SetResult(default);
});
return getItemsAsyncTaskSource.Task;
}
///
///
///
public Task PurchaseInventoryItemsAsync(PurchaseInventoryItemsRequest request)
{
TaskCompletionSource purchaseInventoryItemsAsyncTaskSource = new();
PlayFabEconomyAPI.PurchaseInventoryItems(request, (response) => purchaseInventoryItemsAsyncTaskSource.SetResult(response), error =>
{
PlayFabSampleUtil.OnPlayFabError(error);
purchaseInventoryItemsAsyncTaskSource.SetResult(default);
});
return purchaseInventoryItemsAsyncTaskSource.Task;
}
///
///
///
public Task SearchItemsAsync(SearchItemsRequest request)
{
TaskCompletionSource searchItemsAsyncTaskSource = new();
PlayFabEconomyAPI.SearchItems(request, (response) => searchItemsAsyncTaskSource.SetResult(response), error =>
{
PlayFabSampleUtil.OnPlayFabError(error);
searchItemsAsyncTaskSource.SetResult(default);
});
return searchItemsAsyncTaskSource.Task;
}
}
[Serializable]
public class PurchaseJsonData
{
public string orderId;
public string packageName;
public string productId;
public string purchaseToken;
public long purchaseTime;
public int purchaseState;
}
[Serializable]
public class PurchasePayloadData
{
public PurchaseJsonData JsonData;
public string signature;
public string json;
public static PurchasePayloadData FromJson(string json)
{
var payload = JsonUtility.FromJson(json);
payload.JsonData = JsonUtility.FromJson(payload.json);
return payload;
}
}
[Serializable]
public class GooglePurchase
{
public PurchasePayloadData PayloadData;
public string Store;
public string TransactionID;
public string Payload;
public static GooglePurchase FromJson(string json)
{
var purchase = JsonUtility.FromJson(json);
// Only fake receipts are returned in Editor play.
if (Application.isEditor)
{
return purchase;
}
purchase.PayloadData = PurchasePayloadData.FromJson(purchase.Payload);
return purchase;
}
}
```
1. 建立名為 **Code** 的新 **GameObject**。
2. 將 `AndroidIAPExample` 元件新增至其中 (按一下並拖曳,或)。
3. 請務必**儲存**場景。
`AndroidIAPExample.cs` 包含下列程式碼 (如需進一步說明,請參閱程式碼註解)。
```csharp theme={null}
using System;
using System.Collections.Generic;
using System.Linq;
using System.Threading.Tasks;
using UnityEngine;
using UnityEngine.Purchasing;
using UnityEngine.Purchasing.Extension;
using PlayFab;
using PlayFab.ClientModels;
using PlayFab.EconomyModels;
///
/// Unity behavior that implements the Unity IAP Store interface.
/// Attach as an asset to your Scene.
///
public class AndroidIAPExample : MonoBehaviour, IDetailedStoreListener
{
// Bundles for sale on the Google Play Store.
private Dictionary _googlePlayCatalog;
// In-game items for sale at the example vendor.
private Dictionary _storefrontCatalog;
private string _purchaseIdempotencyId = null;
private PlayFabEconomyAPIAsyncResult _lastAPICallResult = null;
private static readonly PlayFabEconomyAPIAsync s_economyAPI = new();
private static IStoreController s_storeController;
// TODO: This callback is for illustrations purposes, you should create one that fits your needs
public delegate void PlayFabProcessPurchaseCallback(PurchaseProcessingResult result);
///
/// Event that is triggered when a purchase is processed.
///
///
/// TODO: Subscribe to this event in your game code to handle purchase results.
///
public event PlayFabProcessPurchaseCallback PlayFabProcessPurchaseEvent;
///
/// True if the Store Controller, extensions, and Catalog are set.
///
public bool IsInitialized => s_storeController != null
&& _googlePlayCatalog != null
&& _storefrontCatalog != null;
// Start is called before the first frame update.
public void Start()
{
Login();
}
///
/// Attempts to log the player in via the Android Device ID.
///
private void Login()
{
// TODO: it is better to use LoginWithGooglePlayGamesService or a similar platform-specific login method for final game code.
// SystemInfo.deviceUniqueIdentifier will prompt for permissions on newer devices.
// Using a non-device specific GUID and saving to a local file
// is a better approach. PlayFab does allow you to link multiple
// Android device IDs to a single PlayFab account.
PlayFabClientAPI.LoginWithCustomID(new LoginWithCustomIDRequest()
{
CreateAccount = true,
CustomId = SystemInfo.deviceUniqueIdentifier
}, result => RefreshIAPItems(), PlayFabSampleUtil.OnPlayFabError);
}
///
/// Queries the PlayFab Economy Catalog V2 for updated listings
/// and then fills the local catalog objects.
///
private async void RefreshIAPItems()
{
_googlePlayCatalog = new Dictionary();
SearchItemsRequest googlePlayCatalogRequest = new()
{
Count = 50,
Filter = "AlternateIds/any(t: t/type eq 'GooglePlay')"
};
SearchItemsResponse googlePlayCatalogResponse;
do
{
googlePlayCatalogResponse = await s_economyAPI.SearchItemsAsync(googlePlayCatalogRequest);
Debug.Log("Search response: " + JsonUtility.ToJson(googlePlayCatalogResponse));
foreach (PlayFab.EconomyModels.CatalogItem item in googlePlayCatalogResponse.Items)
{
_googlePlayCatalog.Add(item.Id, item);
}
} while (!string.IsNullOrEmpty(googlePlayCatalogResponse.ContinuationToken));
Debug.Log($"Completed pulling from PlayFab Economy v2 googleplay Catalog: {_googlePlayCatalog.Count()} items retrieved");
_storefrontCatalog = new Dictionary();
GetItemRequest storeCatalogRequest = new()
{
AlternateId = new CatalogAlternateId()
{
Type = "FriendlyId",
Value = "villagerstore"
}
};
GetItemResponse storeCatalogResponse;
storeCatalogResponse = await s_economyAPI.GetItemAsync(storeCatalogRequest);
List itemIds = new();
foreach (CatalogItemReference item in storeCatalogResponse.Item.ItemReferences)
{
itemIds.Add(item.Id);
}
GetItemsRequest itemsCatalogRequest = new()
{
Ids = itemIds
};
GetItemsResponse itemsCatalogResponse = await s_economyAPI.GetItemsAsync(itemsCatalogRequest);
foreach (PlayFab.EconomyModels.CatalogItem item in itemsCatalogResponse.Items)
{
_storefrontCatalog.Add(item.Id, item);
}
Debug.Log($"Completed pulling from PlayFab Economy v2 villagerstore store: {_storefrontCatalog.Count()} items retrieved");
InitializePurchasing();
}
///
/// Initializes the Unity IAP system for the Google Play Store.
///
private void InitializePurchasing()
{
if (IsInitialized) return;
var builder = ConfigurationBuilder.Instance(StandardPurchasingModule.Instance(AppStore.GooglePlay));
foreach (PlayFab.EconomyModels.CatalogItem item in _googlePlayCatalog.Values)
{
string googlePlayItemId = item.AlternateIds.FirstOrDefault(item => item.Type == "GooglePlay")?.Value;
if (!string.IsNullOrWhiteSpace(googlePlayItemId))
{
builder.AddProduct(googlePlayItemId, ProductType.Consumable);
}
}
UnityPurchasing.Initialize(this, builder);
}
///
/// Draw a debug IMGUI for testing examples.
/// Use UI Toolkit for your production game runtime UI instead.
///
public void OnGUI()
{
// Support high-res devices.
GUI.matrix = Matrix4x4.TRS(new Vector3(0, 0, 0), Quaternion.identity, new Vector3(3, 3, 3));
if (!IsInitialized)
{
GUILayout.Label("Initializing IAP and logging in...");
return;
}
if (!string.IsNullOrEmpty(_purchaseIdempotencyId) && (!string.IsNullOrEmpty(_lastAPICallResult?.Message)
|| !string.IsNullOrEmpty(_lastAPICallResult?.Error)))
{
GUILayout.Label(_lastAPICallResult?.Message + _lastAPICallResult?.Error);
}
GUILayout.Label("Shop for game currency bundles.");
// Draw a purchase menu for each catalog item.
foreach (PlayFab.EconomyModels.CatalogItem item in _googlePlayCatalog.Values)
{
// Use a dictionary to select the proper language.
if (GUILayout.Button("Get " + (item.Title.ContainsKey("en-US") ? item.Title["en-US"] : item.Title["NEUTRAL"])))
{
BuyProductById(item.AlternateIds.FirstOrDefault(item => item.Type == "GooglePlay").Value);
}
}
GUILayout.Label("Hmmm. (Translation: Welcome to my humble Villager store.)");
// Draw a purchase menu for each catalog item.
foreach (PlayFab.EconomyModels.CatalogItem item in _storefrontCatalog.Values)
{
// Use a dictionary to select the proper language.
if (GUILayout.Button("Buy "
+ (item.Title.ContainsKey("en-US") ? item.Title["en-US"] : item.Title["NEUTRAL"]
+ ": "
+ item.PriceOptions.Prices.FirstOrDefault().Amounts.FirstOrDefault().Amount.ToString()
+ " Diamonds"
)))
{
Task.Run(() => PlayFabPurchaseItemById(item.Id));
}
}
}
///
/// Integrates game purchasing with the Unity IAP API.
///
public void BuyProductById(string productId)
{
if (!IsInitialized)
{
Debug.LogError("IAP Service is not initialized!");
return;
}
s_storeController.InitiatePurchase(productId);
}
///
/// Purchases a PlayFab inventory item by ID.
/// See the class for details on error handling
/// and calling patterns.
///
async public Task PlayFabPurchaseItemById(string itemId)
{
if (!IsInitialized)
{
Debug.LogError("IAP Service is not initialized!");
return false;
}
_lastAPICallResult = new();
Debug.Log("Player buying product " + itemId);
if (string.IsNullOrEmpty(_purchaseIdempotencyId))
{
_purchaseIdempotencyId = Guid.NewGuid().ToString();
}
GetItemRequest getVillagerStoreRequest = new()
{
AlternateId = new CatalogAlternateId()
{
Type = "FriendlyId",
Value = "villagerstore"
}
};
GetItemResponse getStoreResponse = await s_economyAPI.GetItemAsync(getVillagerStoreRequest);
if (getStoreResponse == null || string.IsNullOrEmpty(getStoreResponse?.Item?.Id))
{
_lastAPICallResult.Error = "Unable to contact the store. Check your internet connection and try again in a few minutes.";
return false;
}
CatalogPriceAmount price = _storefrontCatalog.FirstOrDefault(item => item.Key == itemId).Value.PriceOptions.Prices.FirstOrDefault().Amounts.FirstOrDefault();
PurchaseInventoryItemsRequest purchaseInventoryItemsRequest = new()
{
Amount = 1,
Item = new InventoryItemReference()
{
Id = itemId
},
PriceAmounts = new List
{
new()
{
Amount = price.Amount,
ItemId = price.ItemId
}
},
IdempotencyId = _purchaseIdempotencyId,
StoreId = getStoreResponse.Item.Id
};
PurchaseInventoryItemsResponse purchaseInventoryItemsResponse = await s_economyAPI.PurchaseInventoryItemsAsync(purchaseInventoryItemsRequest);
if (purchaseInventoryItemsResponse == null || purchaseInventoryItemsResponse?.TransactionIds.Count < 1)
{
_lastAPICallResult.Error = "Unable to purchase. Try again in a few minutes.";
return false;
}
_purchaseIdempotencyId = "";
_lastAPICallResult.Message = "Purchasing!";
return true;
}
private void OnRegistration(LoginResult result)
{
PlayFabSettings.staticPlayer.ClientSessionTicket = result.SessionTicket;
}
public void OnInitialized(IStoreController controller, IExtensionProvider extensions)
{
s_storeController = controller;
extensions.GetExtension().RestoreTransactions((result, error) => {
if (result)
{
Debug.LogWarning("Restore transactions succeeded.");
}
else
{
Debug.LogWarning("Restore transactions failed.");
}
});
}
public void OnInitializeFailed(InitializationFailureReason error)
{
Debug.Log("OnInitializeFailed InitializationFailureReason:" + error);
}
public void OnInitializeFailed(InitializationFailureReason error, string message)
{
Debug.Log("OnInitializeFailed InitializationFailureReason:" + error + message);
}
public void OnPurchaseFailed(UnityEngine.Purchasing.Product product, PurchaseFailureReason failureReason)
{
Debug.Log($"OnPurchaseFailed: FAIL. Product: '{product.definition.storeSpecificId}', PurchaseFailureReason: {failureReason}");
}
public void OnPurchaseFailed(UnityEngine.Purchasing.Product product, PurchaseFailureDescription failureDescription)
{
Debug.Log($"OnPurchaseFailed: FAIL. Product: '{product.definition.storeSpecificId}', PurchaseFailureReason: {failureDescription}");
}
///
/// Callback for Store purchases. Subscribe to PlayFabProcessPurchaseEvent to handle the final PurchaseProcessingResult.
///
///
///
/// This code does not account for purchases that were pending and are
/// delivered on application start. Production code should account for these cases.
///
/// Complete immediately upon error. Pending if PlayFab Economy is handling final processing and will trigger PlayFabProcessPurchaseEvent with the final result.
public PurchaseProcessingResult ProcessPurchase(PurchaseEventArgs purchaseEvent)
{
if (!IsInitialized)
{
Debug.LogWarning("Not initialized. Ignoring.");
return PurchaseProcessingResult.Complete;
}
if (purchaseEvent.purchasedProduct == null)
{
Debug.LogWarning("Attempted to process purchase with unknown product. Ignoring.");
return PurchaseProcessingResult.Complete;
}
if (string.IsNullOrEmpty(purchaseEvent.purchasedProduct.receipt))
{
Debug.LogWarning("Attempted to process purchase with no receipt. Ignoring.");
return PurchaseProcessingResult.Complete;
}
Debug.Log("Attempting purchase with receipt " + purchaseEvent.purchasedProduct.receipt);
GooglePurchase purchasePayload = GooglePurchase.FromJson(purchaseEvent.purchasedProduct.receipt);
RedeemGooglePlayInventoryItemsRequest request = new()
{
Purchases = new List
{
new()
{
ProductId = purchasePayload.PayloadData?.JsonData?.productId,
Token = purchasePayload.PayloadData?.JsonData?.purchaseToken
}
}
};
PlayFabEconomyAPI.RedeemGooglePlayInventoryItems(request, result =>
{
Debug.Log("Processed receipt validation.");
if (result?.Failed.Count > 0)
{
Debug.Log($"Validation failed for {result.Failed.Count} receipts.");
Debug.Log(JsonUtility.ToJson(result.Failed));
PlayFabProcessPurchaseEvent?.Invoke(PurchaseProcessingResult.Pending);
}
else
{
Debug.Log("Validation succeeded!");
PlayFabProcessPurchaseEvent?.Invoke(PurchaseProcessingResult.Complete);
s_storeController.ConfirmPendingPurchase(purchaseEvent.purchasedProduct);
Debug.Log("Confirmed purchase with Google Marketplace.");
}
},
PlayFabSampleUtil.OnPlayFabError);
return PurchaseProcessingResult.Pending;
}
}
///
/// Utility classes for the sample.
///
public class PlayFabEconomyAPIAsyncResult
{
public string Error { get; set; } = null;
public string Message { get; set; } = null;
}
public static class PlayFabSampleUtil
{
public static void OnPlayFabError(PlayFabError error)
{
Debug.LogError(error.GenerateErrorReport());
}
}
///
/// Example Async wrapper for PlayFab API's.
///
/// This is just a quick sample for example purposes.
///
/// Write your own customer Logger implementation to log and handle errors
/// for user-facing scenarios. Use tags and map which PlayFab errors require your
/// game to handle GUI or gameplay updates vs which should be logged to crash and
/// error reporting services.
///
public class PlayFabEconomyAPIAsync
{
///
///
///
public Task GetItemAsync(GetItemRequest request)
{
TaskCompletionSource getItemAsyncTaskSource = new();
PlayFabEconomyAPI.GetItem(request, (response) => getItemAsyncTaskSource.SetResult(response), error =>
{
PlayFabSampleUtil.OnPlayFabError(error);
getItemAsyncTaskSource.SetResult(default);
});
return getItemAsyncTaskSource.Task;
}
///
///
///
public Task GetItemsAsync(GetItemsRequest request)
{
TaskCompletionSource getItemsAsyncTaskSource = new();
PlayFabEconomyAPI.GetItems(request, (response) => getItemsAsyncTaskSource.SetResult(response), error =>
{
PlayFabSampleUtil.OnPlayFabError(error);
getItemsAsyncTaskSource.SetResult(default);
});
return getItemsAsyncTaskSource.Task;
}
///
///
///
public Task PurchaseInventoryItemsAsync(PurchaseInventoryItemsRequest request)
{
TaskCompletionSource purchaseInventoryItemsAsyncTaskSource = new();
PlayFabEconomyAPI.PurchaseInventoryItems(request, (response) => purchaseInventoryItemsAsyncTaskSource.SetResult(response), error =>
{
PlayFabSampleUtil.OnPlayFabError(error);
purchaseInventoryItemsAsyncTaskSource.SetResult(default);
});
return purchaseInventoryItemsAsyncTaskSource.Task;
}
///
///
///
public Task SearchItemsAsync(SearchItemsRequest request)
{
TaskCompletionSource searchItemsAsyncTaskSource = new();
PlayFabEconomyAPI.SearchItems(request, (response) => searchItemsAsyncTaskSource.SetResult(response), error =>
{
PlayFabSampleUtil.OnPlayFabError(error);
searchItemsAsyncTaskSource.SetResult(default);
});
return searchItemsAsyncTaskSource.Task;
}
}
[Serializable]
public class PurchaseJsonData
{
public string orderId;
public string packageName;
public string productId;
public string purchaseToken;
public long purchaseTime;
public int purchaseState;
}
[Serializable]
public class PurchasePayloadData
{
public PurchaseJsonData JsonData;
public string signature;
public string json;
public static PurchasePayloadData FromJson(string json)
{
var payload = JsonUtility.FromJson(json);
payload.JsonData = JsonUtility.FromJson(payload.json);
return payload;
}
}
[Serializable]
public class GooglePurchase
{
public PurchasePayloadData PayloadData;
public string Store;
public string TransactionID;
public string Payload;
public static GooglePurchase FromJson(string json)
{
var purchase = JsonUtility.FromJson(json);
// Only fake receipts are returned in Editor play.
if (Application.isEditor)
{
return purchase;
}
purchase.PayloadData = PurchasePayloadData.FromJson(purchase.Payload);
return purchase;
}
}
```
1. 建立名為 **Code** 的新 **GameObject**。
2. 將 `AndroidIAPExample` 元件新增至其中 (按一下並拖曳,或)。
3. 請務必**儲存**場景。
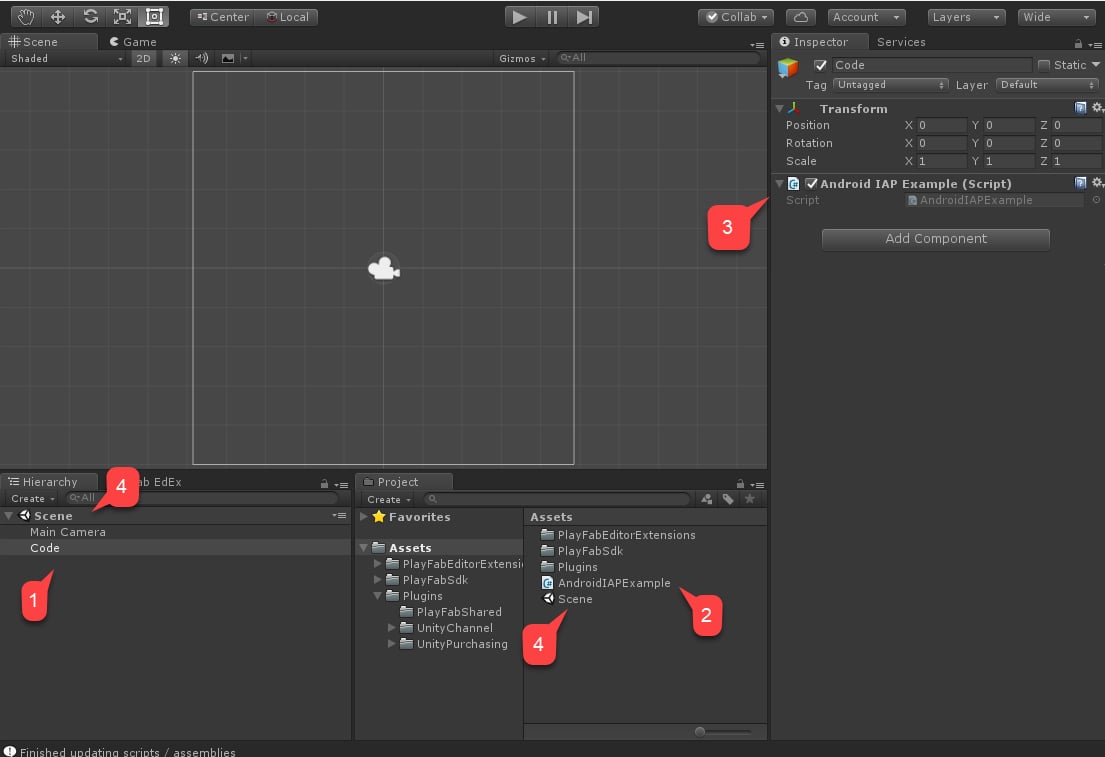 最後,瀏覽至 **Build Settings**。
1. 確認您的場景已新增至 **Scenes In Build** 區域。
2. 確定已選取 **Android** 平台。
3. 移至 **Player Settings** 區域。
4. 指派您的 **Package Name**。
請務必自行想出\_您自己的\_套件名稱,以避免任何 **PlayMarket** 衝突。
最後,瀏覽至 **Build Settings**。
1. 確認您的場景已新增至 **Scenes In Build** 區域。
2. 確定已選取 **Android** 平台。
3. 移至 **Player Settings** 區域。
4. 指派您的 **Package Name**。
請務必自行想出\_您自己的\_套件名稱,以避免任何 **PlayMarket** 衝突。
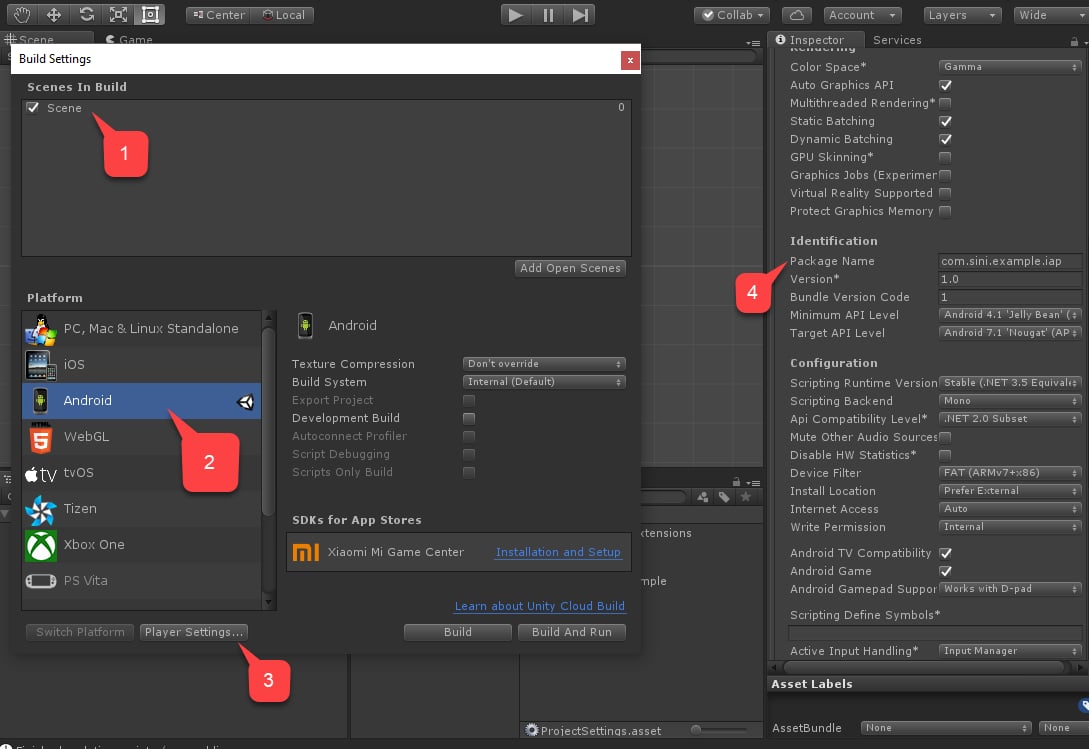 最後,照常建置應用程式,並確定已產生 APK。
為了進行測試,我們需要設定 PlayMarket 和 PlayFab。
## 為 IAP 設定 PlayMarket 應用程式
本節說明如何為您的 PlayMarket 應用程式啟用 IAP 的詳細資訊。
設定應用程式本身不在本教學課程的範圍內。我們假設您\_已經有\_應用程式,且該應用程式已設定為至少可發佈 Alpha 版本。
最後,照常建置應用程式,並確定已產生 APK。
為了進行測試,我們需要設定 PlayMarket 和 PlayFab。
## 為 IAP 設定 PlayMarket 應用程式
本節說明如何為您的 PlayMarket 應用程式啟用 IAP 的詳細資訊。
設定應用程式本身不在本教學課程的範圍內。我們假設您\_已經有\_應用程式,且該應用程式已設定為至少可發佈 Alpha 版本。
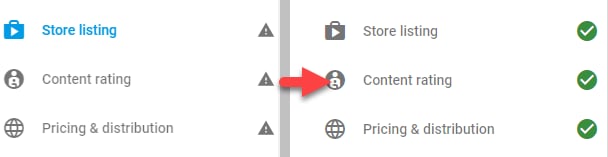 實用注意事項:
* 若要進行到這一步,您必須已上傳 APK。請使用我們在上一節中建構的 APK。
* 將 APK 上傳為 *Alpha* 或 *Beta* 應用程式,以啟用 IAP 沙箱。
* 設定**內容分級**時,會包含有關應用程式中如何啟用 IAP 的問題。
* PlayMarket *不\_允許發行者使用或測試 IAP。請挑選\_另一個* Google 帳戶用於測試,並將其新增為 Alpha/Beta 組建的測試人員。
1. 發佈應用程式組建。
2. 從功能表中選取 **In-app products**。
* 如果系統要求您提供 **Merchant Account**,請連結或建立一個。
3. 選取 **Add New Product** 按鈕。
實用注意事項:
* 若要進行到這一步,您必須已上傳 APK。請使用我們在上一節中建構的 APK。
* 將 APK 上傳為 *Alpha* 或 *Beta* 應用程式,以啟用 IAP 沙箱。
* 設定**內容分級**時,會包含有關應用程式中如何啟用 IAP 的問題。
* PlayMarket *不\_允許發行者使用或測試 IAP。請挑選\_另一個* Google 帳戶用於測試,並將其新增為 Alpha/Beta 組建的測試人員。
1. 發佈應用程式組建。
2. 從功能表中選取 **In-app products**。
* 如果系統要求您提供 **Merchant Account**,請連結或建立一個。
3. 選取 **Add New Product** 按鈕。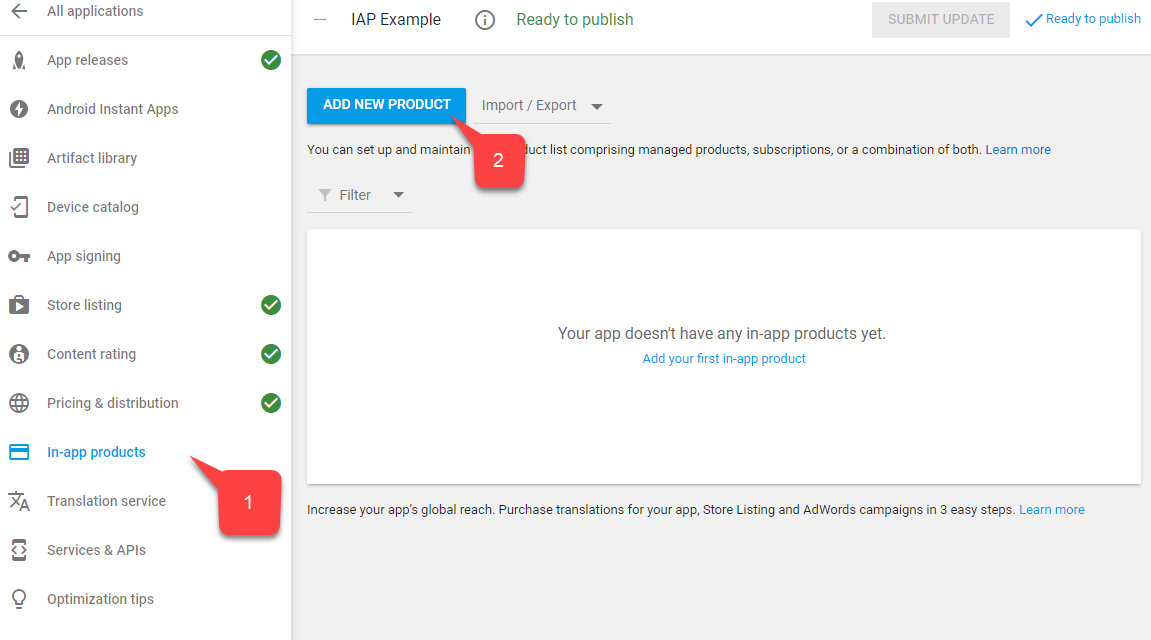 4. 在新產品畫面上,選取 **Managed Product**。
5. 為其指定描述性的\_產品識別碼\_,例如 `100diamonds`。
6. 選取 **Continue**。
4. 在新產品畫面上,選取 **Managed Product**。
5. 為其指定描述性的\_產品識別碼\_,例如 `100diamonds`。
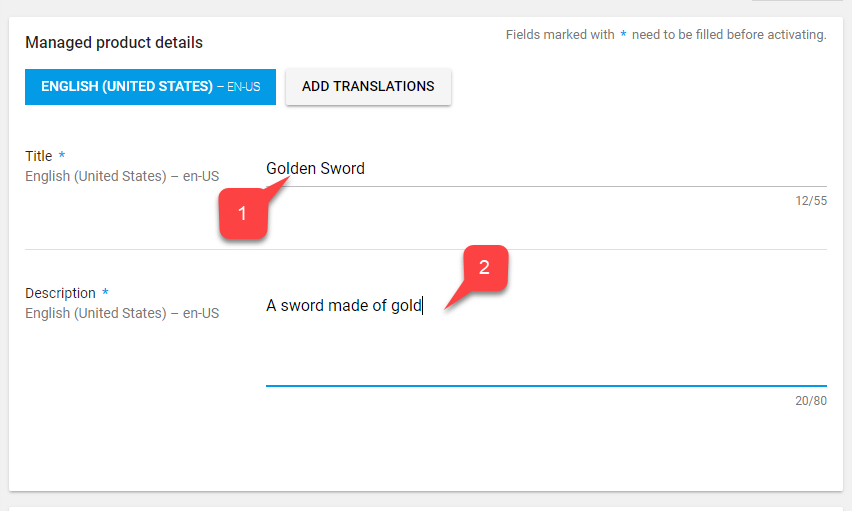
6. 選取 **Continue**。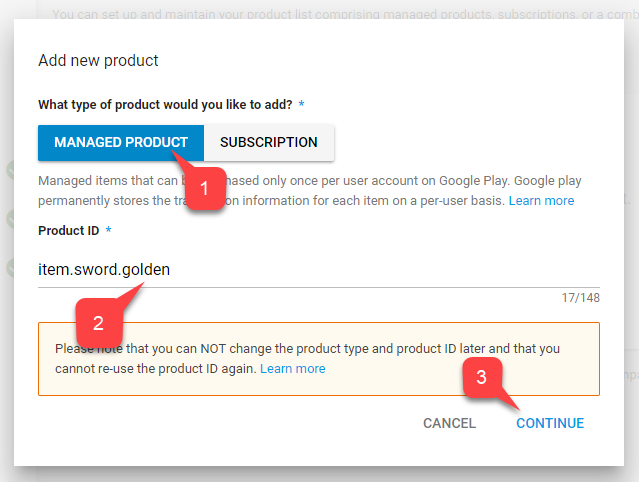 7. PlayMarket 要求您填寫 **Title (1)** 和 **Description (2)**,例如 `100 Diamonds` 和 `A pack of 100 diamonds to spend in-game`。**Data Item** 資料完全來自 PlayFab 服務,只需要識別碼相符即可。
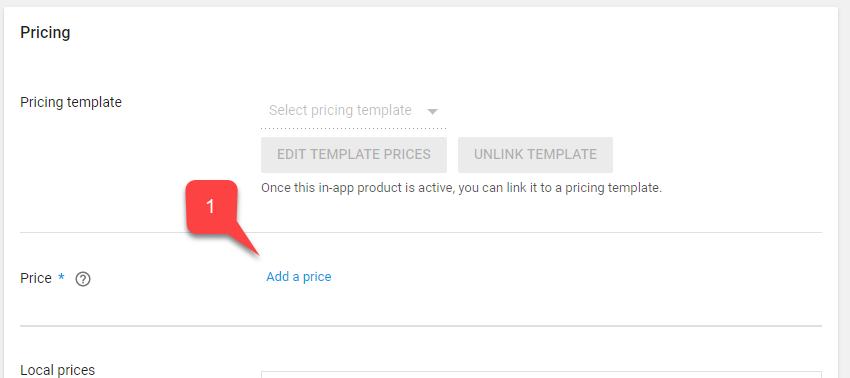
 8. 繼續向下捲動並選取 **Add a price** 按鈕。
 9. 輸入有效的價格,例如 "\$0.99" (請注意價格會針對每個國家/地區分別轉換)。
10. 選取 **Apply** 按鈕。
9. 輸入有效的價格,例如 "\$0.99" (請注意價格會針對每個國家/地區分別轉換)。
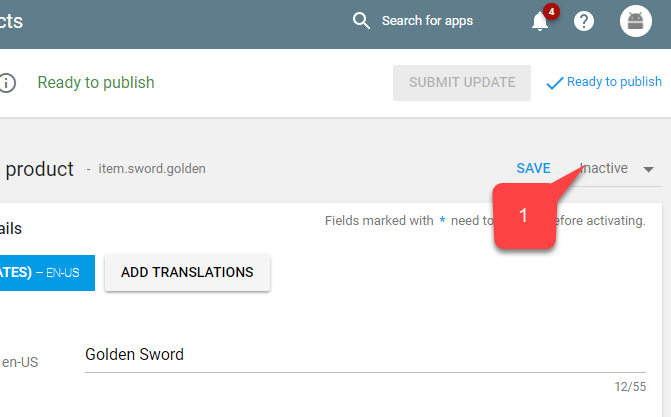
10. 選取 **Apply** 按鈕。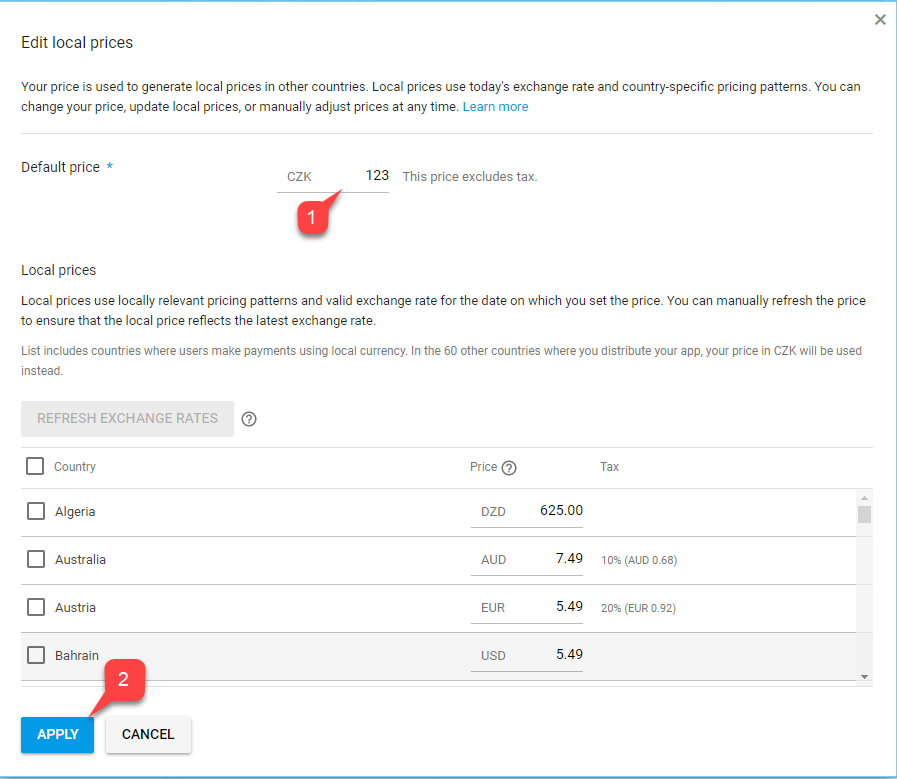 11. 最後,捲動回畫面頂端,並將項目的狀態變更為 **Active**。
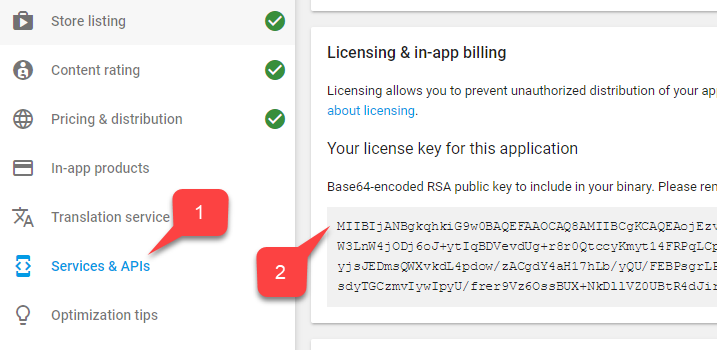
 12. 儲存 **Licensing Key** 以連結 PlayFab 與 PlayMarket。
13. 瀏覽至功能表中的 **Services & APIs**。
14. 然後找到並儲存 **Key** 的 **Base64** 版本。
12. 儲存 **Licensing Key** 以連結 PlayFab 與 PlayMarket。
13. 瀏覽至功能表中的 **Services & APIs**。
14. 然後找到並儲存 **Key** 的 **Base64** 版本。
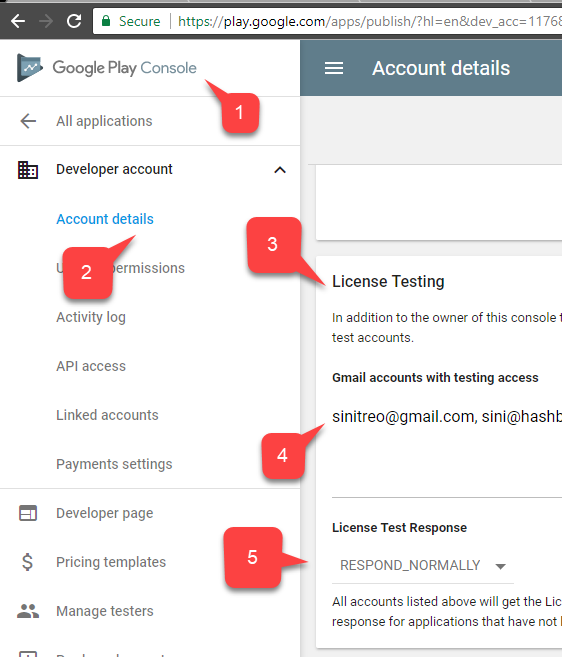
 下一個步驟是啟用 IAP 測試。雖然 Alpha 和 Beta 組建會自動啟用沙箱,但我們需要設定獲授權測試應用程式的帳戶:
1. 瀏覽至 **Home**。
2. 在左側功能表中找到並選取 **Account details**。
3. 找到 **License Testing** 區域。
4. 確認您的 **Test Accounts** 在清單中。
5. 確定 **License Test Response** 設定為 **RESPOND\_NORMALLY**。
別忘了套用設定!
下一個步驟是啟用 IAP 測試。雖然 Alpha 和 Beta 組建會自動啟用沙箱,但我們需要設定獲授權測試應用程式的帳戶:
1. 瀏覽至 **Home**。
2. 在左側功能表中找到並選取 **Account details**。
3. 找到 **License Testing** 區域。
4. 確認您的 **Test Accounts** 在清單中。
5. 確定 **License Test Response** 設定為 **RESPOND\_NORMALLY**。
別忘了套用設定!
 此時應已完成整合的 Play Market 端設定。
## 設定 PlayFab 遊戲
我們的最後一個步驟是設定 PlayFab 遊戲以反映我們的產品,並與 Google Billing API 整合。
1. 選取 **Add-ons**。
2. 然後選取 **Google** 附加元件。
此時應已完成整合的 Play Market 端設定。
## 設定 PlayFab 遊戲
我們的最後一個步驟是設定 PlayFab 遊戲以反映我們的產品,並與 Google Billing API 整合。
1. 選取 **Add-ons**。
2. 然後選取 **Google** 附加元件。
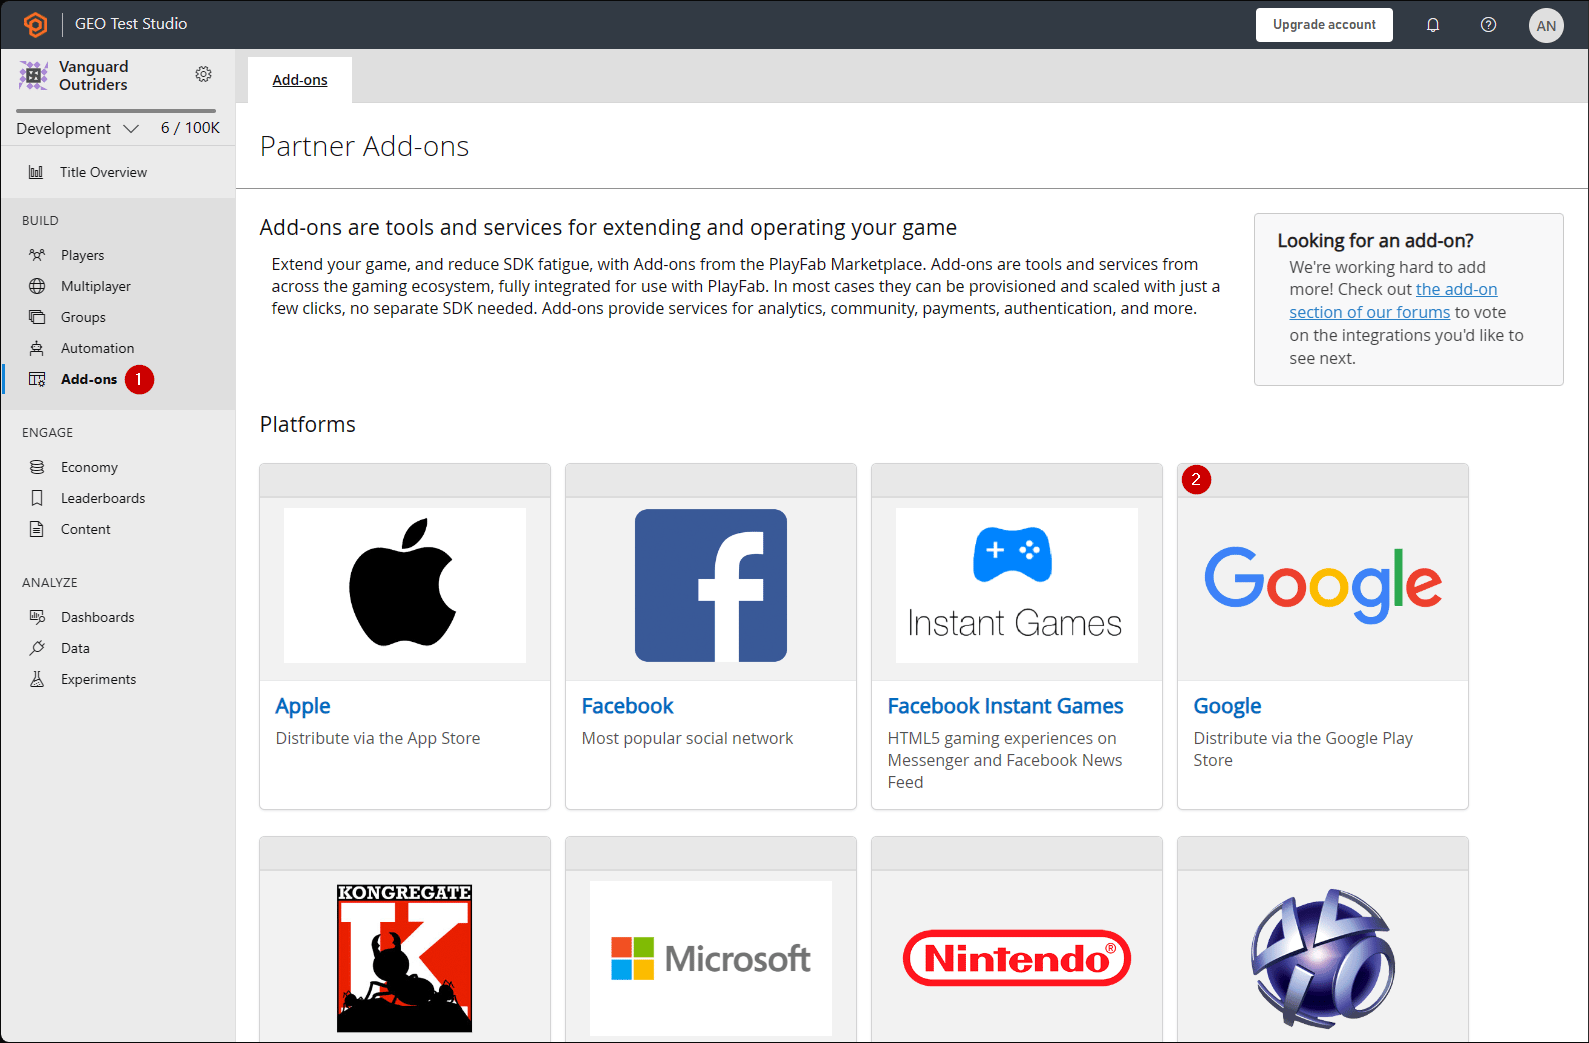 1. 填寫您的 **Package ID**。
2. 填寫您在上一節中取得的 **Google App License Key**。
3. 選取 **Install Google** 按鈕以認可您的變更。
我們的下一個步驟是在 PlayFab 中反映我們的 100 Diamonds 組合:
### Game Manager
1. 建立新的 Economy Catalog (V2) 貨幣。
2. 編輯 **Title** 並新增 **Description**,例如 `Diamonds`、`Our in-game currency of choice.`。
3. 新增 **Friendly ID** 以便更容易找到您的貨幣,例如 `diamonds`。
4. 選取 **Save and publish** 以完成變更。
5. 在 **Currency** 清單中查看您的貨幣。
6. 接著,建立新的 Economy Catalog (V2) 組合。
7. 編輯 **Title** 並新增 **Description**,例如 `100 Diamonds Bundle`、`A pack of 100 diamonds to spend in-game.`。
```JSON theme={null}
{
"NEUTRAL": "100 Diamonds Bundle",
"en-US": "100 Diamonds Bundle",
"en-GB": "100 Diamonds Bundle",
"de-DE": "100 Diamantenbüschel"
}
```
請記住,此資料與 **Play Market Item Title** 和 **Description** *毫無關係*,兩者是獨立的。
1. 您可以使用內容類型來組織您的組合,例如 `appstorebundles`。內容類型是在 ⚙️ > Title Settings > Economy (V2) 中管理。
2. 將當地語系化的價格新增至 Display properties,以追蹤真實世界的價格。
```json theme={null}
{
"prices": [
"en-us": 0.99,
"en-gb": 0.85,
"de-de": 0.45
]
}
```
3. 將新項目新增至組合。在篩選條件中選取 Currencies,然後選擇您在上一個步驟中建立的貨幣。將 Quantity 設定為您想要在此組合中販售的貨幣數量。
4. 為 "GooglePlay" 市集新增平台。如果您還沒有 GooglePlay 市集,可以在 Economy Settings 頁面中建立。將 **Marketplace ID** 設定為與您在上一節中建立的 Google Play Console 產品識別碼相符。
5. 選取 **Save and publish** 以完成變更。
6. 在 **Bundles** 清單中查看您的組合。
### REST API
***
接著,我們可以透過代表遊戲內 NPC 商人的 PlayFab 商店,設定讓玩家花費貨幣的遊戲內購買:
### Game Manager
1. 建立新的 Economy Catalog (V2) 項目。
2. 編輯 **Title** 並新增 **Description**,例如 "Golden Sword"、"A sword made of gold."。
3. 您可以新增當地語系化的關鍵字,協助玩家在商店中找到您的項目。新增標籤和內容類型,以協助您組織項目,以便日後透過 API 擷取。使用 Display Properties 來儲存遊戲資料,例如護甲值、美術資產的相對路徑,或您的遊戲需要儲存的任何其他資料。
4. 新增價格,並選取您在上一個步驟中建立的貨幣。將 Amount 設定為您想要的預設價格。您之後可以在您建立的任何商店中覆寫價格。
5. 選取 **Save and publish** 以完成變更。
6. 在 **Items** 清單中查看您的項目。
7. 最後,建立新的 Economy Catalog (V2) 商店。
8. 編輯 **Title** 並新增 **Description**,例如 `Villager Store`、`A humble store run by a humble villager.`。
9. 為其指定 **Friendly ID** 以便於擷取,例如 `villagerstore`。
10. 將您在上一個步驟中建立的項目新增至商店。您可以將多個項目新增至商店,並視需要覆寫任何預設價格。
11. 選取 **Save and publish** 以完成變更。
12. 在 **Stores** 清單中查看您的商店。
### REST API
***
我們已完成 PlayFab 遊戲的設定。
## 測試
為了進行測試,請使用 Alpha/Beta 版本下載應用程式。
* 請務必使用測試帳戶和實體 Android 裝置。
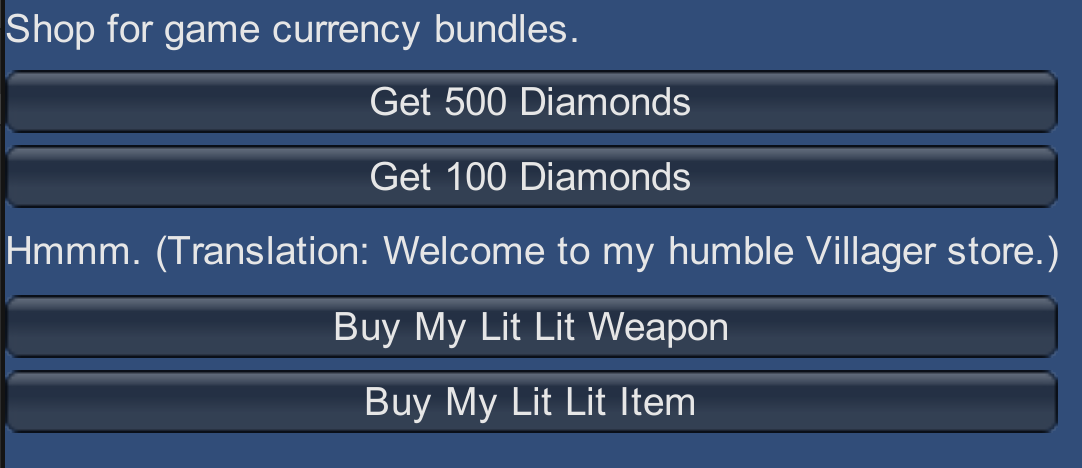
* 啟動應用程式後,您應該會看到 IAP 已初始化,以及代表您項目的\_一個按鈕\_。
* 選取該按鈕。
1. 填寫您的 **Package ID**。
2. 填寫您在上一節中取得的 **Google App License Key**。
3. 選取 **Install Google** 按鈕以認可您的變更。
我們的下一個步驟是在 PlayFab 中反映我們的 100 Diamonds 組合:
### Game Manager
1. 建立新的 Economy Catalog (V2) 貨幣。
2. 編輯 **Title** 並新增 **Description**,例如 `Diamonds`、`Our in-game currency of choice.`。
3. 新增 **Friendly ID** 以便更容易找到您的貨幣,例如 `diamonds`。
4. 選取 **Save and publish** 以完成變更。
5. 在 **Currency** 清單中查看您的貨幣。
6. 接著,建立新的 Economy Catalog (V2) 組合。
7. 編輯 **Title** 並新增 **Description**,例如 `100 Diamonds Bundle`、`A pack of 100 diamonds to spend in-game.`。
```JSON theme={null}
{
"NEUTRAL": "100 Diamonds Bundle",
"en-US": "100 Diamonds Bundle",
"en-GB": "100 Diamonds Bundle",
"de-DE": "100 Diamantenbüschel"
}
```
請記住,此資料與 **Play Market Item Title** 和 **Description** *毫無關係*,兩者是獨立的。
1. 您可以使用內容類型來組織您的組合,例如 `appstorebundles`。內容類型是在 ⚙️ > Title Settings > Economy (V2) 中管理。
2. 將當地語系化的價格新增至 Display properties,以追蹤真實世界的價格。
```json theme={null}
{
"prices": [
"en-us": 0.99,
"en-gb": 0.85,
"de-de": 0.45
]
}
```
3. 將新項目新增至組合。在篩選條件中選取 Currencies,然後選擇您在上一個步驟中建立的貨幣。將 Quantity 設定為您想要在此組合中販售的貨幣數量。
4. 為 "GooglePlay" 市集新增平台。如果您還沒有 GooglePlay 市集,可以在 Economy Settings 頁面中建立。將 **Marketplace ID** 設定為與您在上一節中建立的 Google Play Console 產品識別碼相符。
5. 選取 **Save and publish** 以完成變更。
6. 在 **Bundles** 清單中查看您的組合。
### REST API
***
接著,我們可以透過代表遊戲內 NPC 商人的 PlayFab 商店,設定讓玩家花費貨幣的遊戲內購買:
### Game Manager
1. 建立新的 Economy Catalog (V2) 項目。
2. 編輯 **Title** 並新增 **Description**,例如 "Golden Sword"、"A sword made of gold."。
3. 您可以新增當地語系化的關鍵字,協助玩家在商店中找到您的項目。新增標籤和內容類型,以協助您組織項目,以便日後透過 API 擷取。使用 Display Properties 來儲存遊戲資料,例如護甲值、美術資產的相對路徑,或您的遊戲需要儲存的任何其他資料。
4. 新增價格,並選取您在上一個步驟中建立的貨幣。將 Amount 設定為您想要的預設價格。您之後可以在您建立的任何商店中覆寫價格。
5. 選取 **Save and publish** 以完成變更。
6. 在 **Items** 清單中查看您的項目。
7. 最後,建立新的 Economy Catalog (V2) 商店。
8. 編輯 **Title** 並新增 **Description**,例如 `Villager Store`、`A humble store run by a humble villager.`。
9. 為其指定 **Friendly ID** 以便於擷取,例如 `villagerstore`。
10. 將您在上一個步驟中建立的項目新增至商店。您可以將多個項目新增至商店,並視需要覆寫任何預設價格。
11. 選取 **Save and publish** 以完成變更。
12. 在 **Stores** 清單中查看您的商店。
### REST API
***
我們已完成 PlayFab 遊戲的設定。
## 測試
為了進行測試,請使用 Alpha/Beta 版本下載應用程式。
* 請務必使用測試帳戶和實體 Android 裝置。
* 啟動應用程式後,您應該會看到 IAP 已初始化,以及代表您項目的\_一個按鈕\_。
* 選取該按鈕。
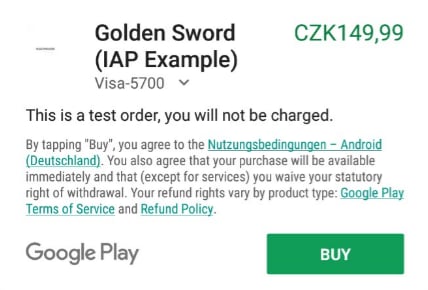
 IAP 購買隨即開始。依照 Google Play 的指示操作,直到購買成功為止。
 最後,在 PlayFab **Game Manager** 儀表板中瀏覽至您的遊戲,並找到 **New Events**。
確認購買已提供、驗證並傳送至 PlayFab 生態系統。
您已成功將 UnityIAP 和 Android Billing API 整合至您的 PlayFab 應用程式!
## 後續步驟
1. 建置用於購買的 Unity UI Toolkit 介面,以取代示範用的 IMGUI 顯示。
2. 建立自訂 Unity Logger 來處理 PlayFab 錯誤,並向使用者顯示這些錯誤。
3. 將圖示影像新增至您的 PlayFab 項目 Images 欄位,以在 Unity UI 中顯示。
## Related topics
- [開始使用 PlayFab Economy 舊版、Unity IAP、Android](/zh-TW/services/playfab/economy-monetization/economy/tutorials/getting-started-with-unity-iap-android.md)
- [Android 推播通知](/zh-TW/services/playfab/live-service-management/game-configuration/title-communications/push-notifications/push-notifications-for-android.md)
- [使用 Google 市集兌換](/zh-TW/services/playfab/economy-monetization/economy-v2/marketplace/marketplace-redemption/google.md)
- [PlayFab UGC 文件](/zh-TW/services/playfab/economy-monetization/economy-v2/ugc/index.md)
- [PlayFab for Unity (v2 Unified)](/zh-TW/services/playfab/sdks/unified-unity/overview.md)
最後,在 PlayFab **Game Manager** 儀表板中瀏覽至您的遊戲,並找到 **New Events**。
確認購買已提供、驗證並傳送至 PlayFab 生態系統。
您已成功將 UnityIAP 和 Android Billing API 整合至您的 PlayFab 應用程式!
## 後續步驟
1. 建置用於購買的 Unity UI Toolkit 介面,以取代示範用的 IMGUI 顯示。
2. 建立自訂 Unity Logger 來處理 PlayFab 錯誤,並向使用者顯示這些錯誤。
3. 將圖示影像新增至您的 PlayFab 項目 Images 欄位,以在 Unity UI 中顯示。
## Related topics
- [開始使用 PlayFab Economy 舊版、Unity IAP、Android](/zh-TW/services/playfab/economy-monetization/economy/tutorials/getting-started-with-unity-iap-android.md)
- [Android 推播通知](/zh-TW/services/playfab/live-service-management/game-configuration/title-communications/push-notifications/push-notifications-for-android.md)
- [使用 Google 市集兌換](/zh-TW/services/playfab/economy-monetization/economy-v2/marketplace/marketplace-redemption/google.md)
- [PlayFab UGC 文件](/zh-TW/services/playfab/economy-monetization/economy-v2/ugc/index.md)
- [PlayFab for Unity (v2 Unified)](/zh-TW/services/playfab/sdks/unified-unity/overview.md)