> ## Documentation Index
> Fetch the complete documentation index at: https://devdocs.xbox.com/llms.txt
> Use this file to discover all available pages before exploring further.
# 市集整合 - Google
> 在 Game Manager 中使用 Google Cloud 服務帳戶和 Google Play Android Developer API,將 Google Play 應用程式連結至您的 PlayFab 遊戲。
# 市集整合:Google
本教學課程說明如何將 Google Play 應用程式成功整合至 Game Manager 中的遊戲。
## 必要條件
1. Google 帳戶。
2. 已建立並可在 [Google Play](https://play.google.com/console/developers) 中使用的應用程式。
1. 請確定您的應用程式已啟用 [Google Play Android Developer API](https://console.cloud.google.com/apis/library/androidpublisher.googleapis.com)。
3. [Google Cloud](https://cloud.google.com/) 的存取權。
4. 現有的 Google Cloud 專案。
## 步驟 1:建立服務帳戶
您需要完成的第一個步驟是建立服務帳戶。這是透過 [Google Cloud Platform](https://cloud.google.com/) (GCP) 完成。
1. 從頂端導覽列,選取左上角的功能表按鈕。
2. 選取 **IAM & Admin**,然後選取 **Service Accounts**。
3. 從頁面頂端,選取 **Create Service Account**。
 4. 填寫服務帳戶詳細資料,然後選取 **Create and Continue**。
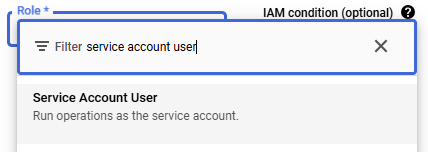
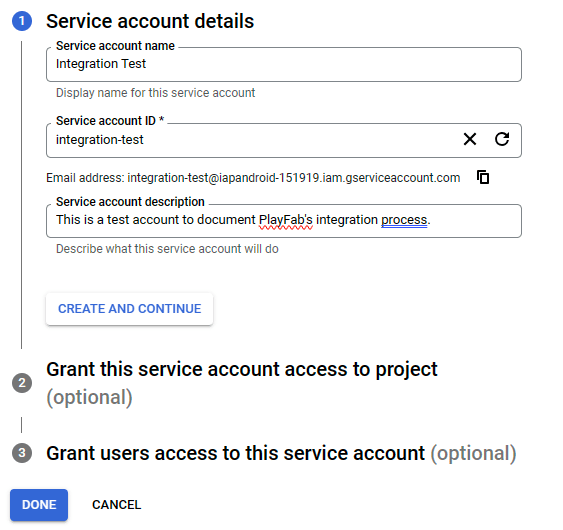 5. 在 **Select a role** 下拉式選項中尋找 **Service Account User**,以授與新服務帳戶存取權。
 6. 按下 **Done** (您可以略過 **Grant users access to this service account** 步驟)。
建立服務帳戶後,系統會將您導回 **Service Accounts** 頁面,其中會顯示指定專案下所有服務帳戶的清單。
### 將權限新增至現有的服務帳戶
此子步驟旨在說明如何將專案權限新增至現有的服務帳戶,或在建立帳戶時遺漏新增權限的情況下使用。
1. 從左上方的導覽列功能表,前往 GCP 中的 **IAM & Admin** 區段。
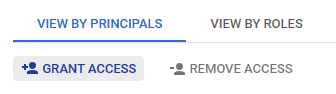
2. 從服務帳戶清單的開頭選取 **Grant Access**。
6. 按下 **Done** (您可以略過 **Grant users access to this service account** 步驟)。
建立服務帳戶後,系統會將您導回 **Service Accounts** 頁面,其中會顯示指定專案下所有服務帳戶的清單。
### 將權限新增至現有的服務帳戶
此子步驟旨在說明如何將專案權限新增至現有的服務帳戶,或在建立帳戶時遺漏新增權限的情況下使用。
1. 從左上方的導覽列功能表,前往 GCP 中的 **IAM & Admin** 區段。
2. 從服務帳戶清單的開頭選取 **Grant Access**。
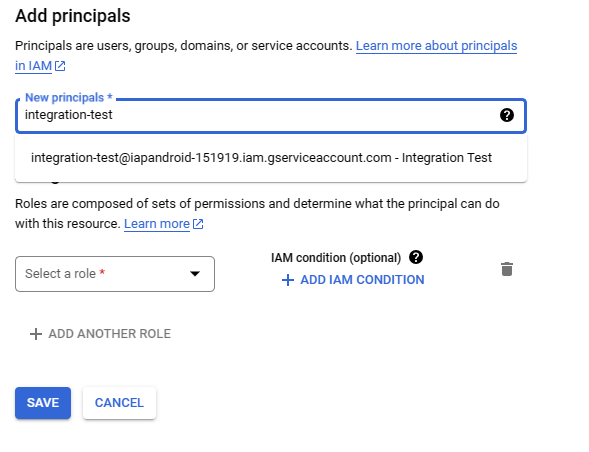
 3. 在 **New principals** 方塊中選取所需的服務帳戶。它會在專案中所有現有的服務帳戶中搜尋您的服務帳戶名稱,並提示您選取對應至所需服務帳戶的特定選項。
 4. 在 **Select a role** 下拉式清單中搜尋 **Service Account User** 角色並指派。
5. 按下 **Save**。
## 步驟 2:取得帳戶認證
建立並備妥**服務帳戶**後,下一步是取得包含**私密金鑰** (認證) 的 JSON 檔案,該金鑰將新增至 **Game Manager** 中的**遊戲**。若要執行此動作,請依照下列步驟進行:
1. 從 [GCP](https://cloud.google.com/) 開啟左側導覽列功能表,然後在 **IAM & Admin** 底下選擇 **Service Accounts**。
2. 這會載入目前專案下所有服務帳戶的清單。尋找您要取得認證的帳戶並選取它。(在此案例中,我們的服務帳戶名為 **Integration Test**,因此會顯示為 "integration-test\@.....")。
4. 在 **Select a role** 下拉式清單中搜尋 **Service Account User** 角色並指派。
5. 按下 **Save**。
## 步驟 2:取得帳戶認證
建立並備妥**服務帳戶**後,下一步是取得包含**私密金鑰** (認證) 的 JSON 檔案,該金鑰將新增至 **Game Manager** 中的**遊戲**。若要執行此動作,請依照下列步驟進行:
1. 從 [GCP](https://cloud.google.com/) 開啟左側導覽列功能表,然後在 **IAM & Admin** 底下選擇 **Service Accounts**。
2. 這會載入目前專案下所有服務帳戶的清單。尋找您要取得認證的帳戶並選取它。(在此案例中,我們的服務帳戶名為 **Integration Test**,因此會顯示為 "integration-test\@.....")。
 3. 畫面會顯示您的服務帳戶詳細資料,畫面上方有多個索引標籤,請選取 **Keys** 索引標籤。
4. 選取 **Add Key** > **Create new key**。
5. 選取 **JSON** 作為 **Key type**,然後按下 **Create**。
6. 這會將 .json 檔案下載到您的電腦。開啟該檔案,並確定其中包含**私密金鑰**。
3. 畫面會顯示您的服務帳戶詳細資料,畫面上方有多個索引標籤,請選取 **Keys** 索引標籤。
4. 選取 **Add Key** > **Create new key**。
5. 選取 **JSON** 作為 **Key type**,然後按下 **Create**。
6. 這會將 .json 檔案下載到您的電腦。開啟該檔案,並確定其中包含**私密金鑰**。
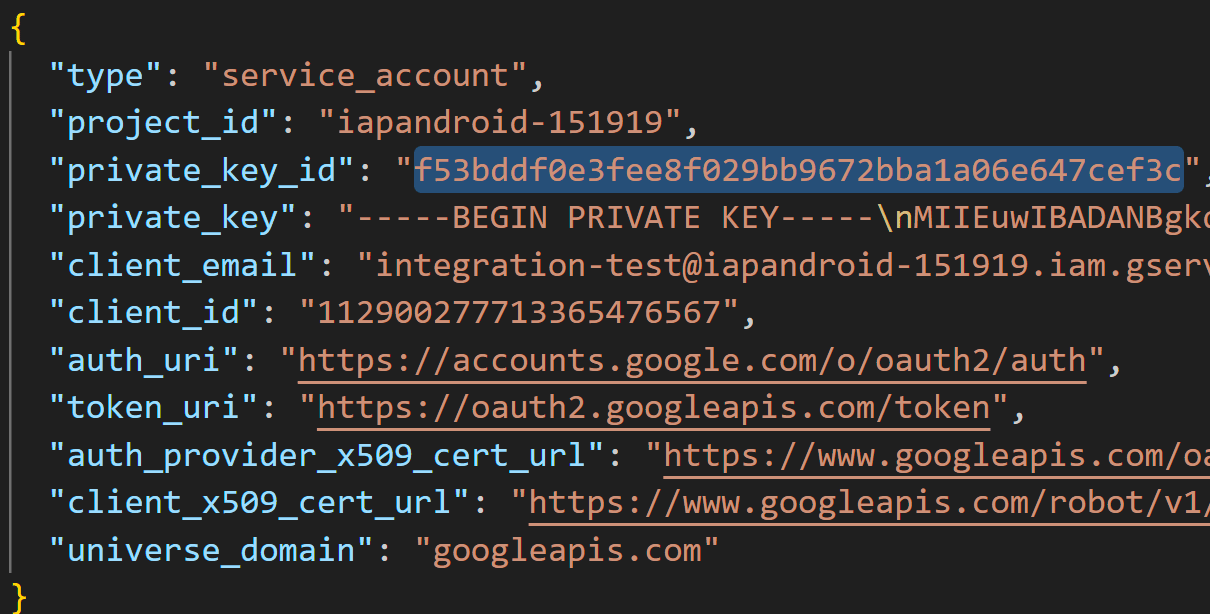 請確定您以適當且安全的方式儲存該 JSON 檔案以保護您的資料,稍後在本教學課程中將需要使用它。
## 步驟 3:連結至 Google Play Console
接下來前往 [Google Play Console](https://play.google.com/console/developers),將新建立的認證與您的遊戲連結。
此步驟假設您已完成必要條件,在 Google Play Console 中已建立並備妥應用程式。如果您還沒有應用程式,現在就是建立的時候。
1. 開啟 [Google Play Console](https://play.google.com/console/developers)。
2. 從左側導覽功能表,選取 **Users and permissions**。
3. 在畫面右側,選取 **Invite new users**。
請確定您以適當且安全的方式儲存該 JSON 檔案以保護您的資料,稍後在本教學課程中將需要使用它。
## 步驟 3:連結至 Google Play Console
接下來前往 [Google Play Console](https://play.google.com/console/developers),將新建立的認證與您的遊戲連結。
此步驟假設您已完成必要條件,在 Google Play Console 中已建立並備妥應用程式。如果您還沒有應用程式,現在就是建立的時候。
1. 開啟 [Google Play Console](https://play.google.com/console/developers)。
2. 從左側導覽功能表,選取 **Users and permissions**。
3. 在畫面右側,選取 **Invite new users**。
 4. 在電子郵件地址欄位中,新增 GCP 中服務帳戶的電子郵件地址。它看起來應該類似這樣:`integration-test@iapandroid-151919.iam.gserviceaccount.com`。
5. 您會在 **Permissions** 區段中看到幾個索引標籤,預設應會選取 **App permissions**。選取 **Add app** 選項。
4. 在電子郵件地址欄位中,新增 GCP 中服務帳戶的電子郵件地址。它看起來應該類似這樣:`integration-test@iapandroid-151919.iam.gserviceaccount.com`。
5. 您會在 **Permissions** 區段中看到幾個索引標籤,預設應會選取 **App permissions**。選取 **Add app** 選項。
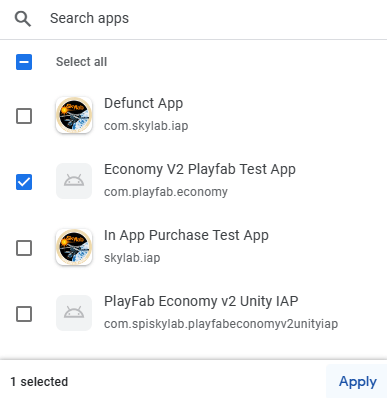
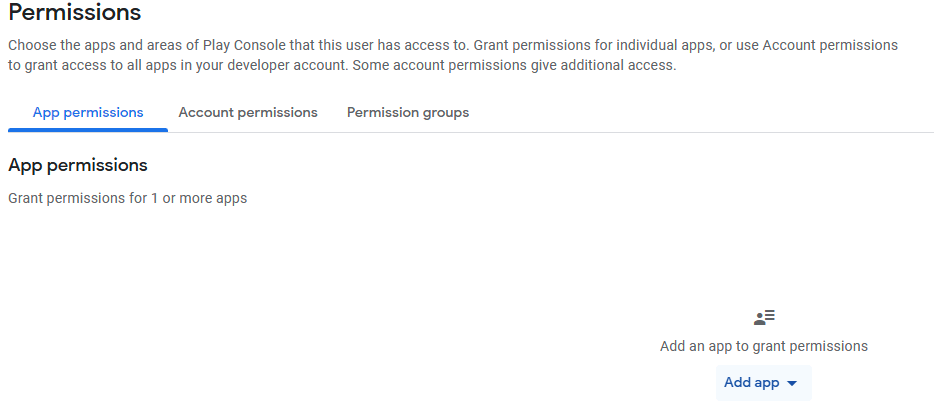 6. 從應用程式清單中,選擇您要連結帳戶的應用程式。在此案例中,它是 **Economy V2 PlayFab Test App**。選取後,按下 **Apply**。
 7. 會彈出一個視窗,要求您指定要在應用程式中授與該帳戶的權限類型。在 **Financial data** 底下選擇 **Manage orders and subscriptions** 和 **View financial data**,然後按下 **Apply**。
8. 系統會再次將您重新導向至 **Invite user** 畫面 (您在此新增帳戶的電子郵件地址並設定應用程式權限)。但這次,您應按下畫面右下角的 **Invite user**。然後按下 **Send invite** 確認訊息。
7. 會彈出一個視窗,要求您指定要在應用程式中授與該帳戶的權限類型。在 **Financial data** 底下選擇 **Manage orders and subscriptions** 和 **View financial data**,然後按下 **Apply**。
8. 系統會再次將您重新導向至 **Invite user** 畫面 (您在此新增帳戶的電子郵件地址並設定應用程式權限)。但這次,您應按下畫面右下角的 **Invite user**。然後按下 **Send invite** 確認訊息。
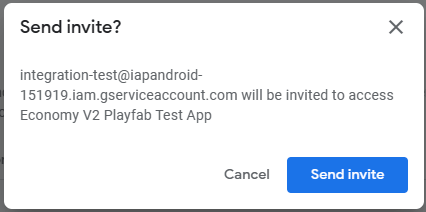 傳送邀請後,您就可以在 **Users and permissions** 畫面的 **Users** 清單下看到您的服務帳戶。
## 步驟 4:透過 Game Manager 連結至 PlayFab
現在您的服務帳戶已在 **Google Cloud Platform** 中建立,並成功連結至 **Google Play Console** 中的應用程式。接下來要將其連結至 PlayFab **Game Manager** 中的工作室和遊戲。
1. 開啟 [Game Manager](https://developer.playfab.com/) 並選取您的**遊戲**。
2. 進入遊戲畫面後,從左側導覽功能表選取 **Add-ons** 選項。
3. 搜尋並選取 **Google** 選項。
4. 在畫面右側,選取 **Install Google**,這會顯示完成整合前必須填入的一組資訊。
5. 在 **Google App package ID** 中,您應使用 **Google Play Console** 中的 ID,在我們的案例中是:`com.playfab.economy`,此範例的其餘欄位皆為選用。唯一的其他必要欄位是 **Service Account Key** 欄位,您應在其中貼上從 **Google Cloud Platform** 取得的 JSON 檔案內容。
傳送邀請後,您就可以在 **Users and permissions** 畫面的 **Users** 清單下看到您的服務帳戶。
## 步驟 4:透過 Game Manager 連結至 PlayFab
現在您的服務帳戶已在 **Google Cloud Platform** 中建立,並成功連結至 **Google Play Console** 中的應用程式。接下來要將其連結至 PlayFab **Game Manager** 中的工作室和遊戲。
1. 開啟 [Game Manager](https://developer.playfab.com/) 並選取您的**遊戲**。
2. 進入遊戲畫面後,從左側導覽功能表選取 **Add-ons** 選項。
3. 搜尋並選取 **Google** 選項。
4. 在畫面右側,選取 **Install Google**,這會顯示完成整合前必須填入的一組資訊。
5. 在 **Google App package ID** 中,您應使用 **Google Play Console** 中的 ID,在我們的案例中是:`com.playfab.economy`,此範例的其餘欄位皆為選用。唯一的其他必要欄位是 **Service Account Key** 欄位,您應在其中貼上從 **Google Cloud Platform** 取得的 JSON 檔案內容。
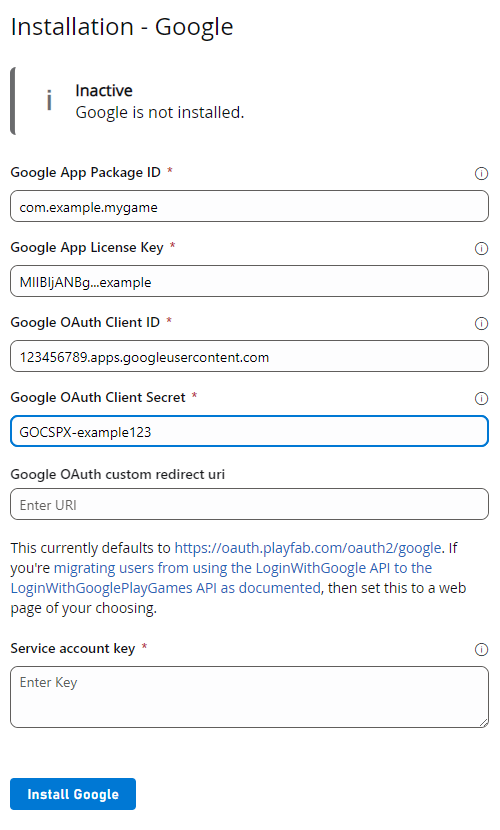 6. 按下 **Install Google**。這會驗證您在上一個步驟中輸入的資料,您會發現服務帳戶金鑰已簡化,只會顯示 **Private Key Id**。
## 後續步驟
* [設定可從 Google Play 商店購買的 PlayFab 組合包](/zh-TW/services/playfab/economy-monetization/economy-v2/marketplace/marketplace-redemption/google)
## Related topics
- [市集整合 - 概觀](/zh-TW/services/playfab/economy-monetization/economy-v2/marketplace/marketplace-integrations/overview.md)
- [市集整合 - Steam](/zh-TW/services/playfab/economy-monetization/economy-v2/marketplace/marketplace-integrations/steam.md)
- [市集整合 - Microsoft Store](/zh-TW/services/playfab/economy-monetization/economy-v2/marketplace/marketplace-integrations/microsoft.md)
- [市集整合 - Apple](/zh-TW/services/playfab/economy-monetization/economy-v2/marketplace/marketplace-integrations/apple.md)
- [詐騙防範快速入門](/zh-TW/services/playfab/economy-monetization/economy-v2/fraud-prevention/quickstart.md)
6. 按下 **Install Google**。這會驗證您在上一個步驟中輸入的資料,您會發現服務帳戶金鑰已簡化,只會顯示 **Private Key Id**。
## 後續步驟
* [設定可從 Google Play 商店購買的 PlayFab 組合包](/zh-TW/services/playfab/economy-monetization/economy-v2/marketplace/marketplace-redemption/google)
## Related topics
- [市集整合 - 概觀](/zh-TW/services/playfab/economy-monetization/economy-v2/marketplace/marketplace-integrations/overview.md)
- [市集整合 - Steam](/zh-TW/services/playfab/economy-monetization/economy-v2/marketplace/marketplace-integrations/steam.md)
- [市集整合 - Microsoft Store](/zh-TW/services/playfab/economy-monetization/economy-v2/marketplace/marketplace-integrations/microsoft.md)
- [市集整合 - Apple](/zh-TW/services/playfab/economy-monetization/economy-v2/marketplace/marketplace-integrations/apple.md)
- [詐騙防範快速入門](/zh-TW/services/playfab/economy-monetization/economy-v2/fraud-prevention/quickstart.md)