> ## Documentation Index
> Fetch the complete documentation index at: https://devdocs.xbox.com/llms.txt
> Use this file to discover all available pages before exploring further.
# 在 Unity 中使用 Google Play Games 登录进行 PlayFab 身份验证
> 使用 PlayFab SDK 将 Google Play Games 登录添加到 Unity 项目的分步教程,涵盖 Play Console 设置和玩家身份验证。
# 在 Unity 中使用 Google Play Games 登录设置 PlayFab 身份验证
## 先决条件
* 使用 Unity 游戏引擎构建的项目。
* Google 开发者账户。
* 有权访问 PlayFab 中的游戏 title 的 PlayFab 开发者账户。
* [PlayFab Unity Editor Extensions & Unity SDK](/services/playfab/sdks/unity3d/quickstart)。
* [Google Play Games SDK](https://github.com/playgameservices/play-games-plugin-for-unity)。
* 熟悉[登录基础和最佳实践](/services/playfab/identity/player-identity/login/login-basics-best-practices)。
## 入门
首先,我们从在 Google Play 中设置一些基本内容开始。有一些关于如何完成其中一些任务的很好的指南,因此我们不会重新发明轮子。
1. 创建**应用程序** - 如果你还没有创建应用程序,则需要在 [Google Play Developer Console](https://play.google.com/apps/publish) 中执行此操作。
2. 构建你的游戏 AAB,并将其上传用于内部测试。你可以按照[此](https://support.google.com/googleplay/android-developer/answer/9859348?visit_id=638373214207471441-2235763004\&rd=1)指南将你的应用发布到 **Internal testing** 轨道。在签名过程中,请考虑你必须为此目的使用自己的 keystore 用于你的应用捆绑包。有关如何创建 keystore,请参阅[此](https://docs.unity3d.com/Manual/android-keystore-create.html)文档。
3. 按照此页面上的说明设置 Google Play Games services:[设置 Google Play Games Services](https://developers.google.com/games/services/console/enabling)。
4. 下载 [Google Play Games SDK](https://github.com/playgameservices/play-games-plugin-for-unity) 并安装它。
5. 安装 PlayFab Unity SDK(如果你不知道如何执行此任务,请按照 [Unity3D 快速入门指南](/services/playfab/sdks/unity3d/quickstart)操作)。
## 配置 Google Play Games
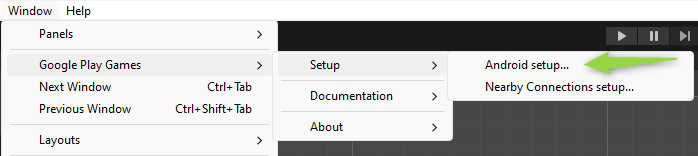
你可以从与 Google Play Games SDK 一起安装的工具集配置 Google Play Games。你可以通过以下方式访问这些工具:
* 转到 **Window** 选项卡。
* 选择 **Google Play Games**。
* 转到 **Setup**。
* 然后访问 **Android Setup**。
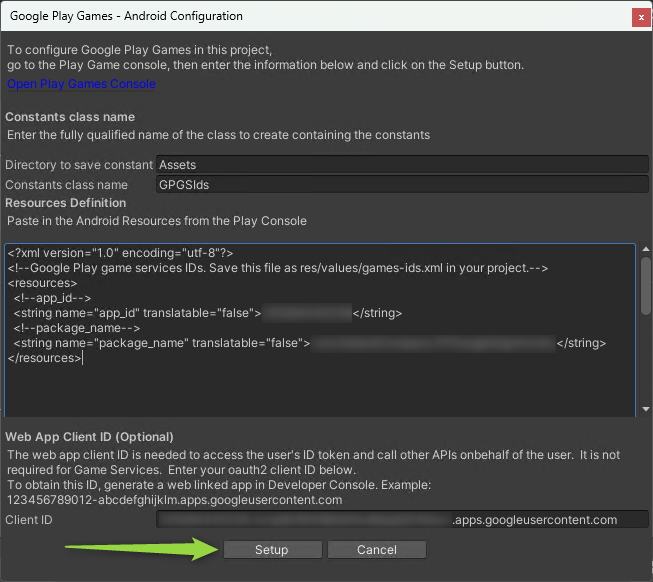
 * Android 配置窗口出现,我们需要在此屏幕上输入 Resources Definition 和 Web App Client ID。
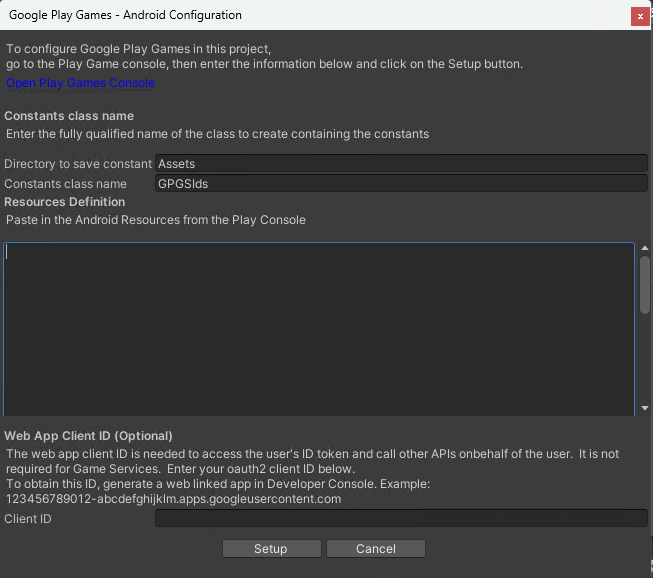 ### 获取 Resources Definition
* 按照[这些](https://developer.android.com/games/pgs/unity/unity-start#get-android-resources)步骤获取你的 Android Resources 定义。
### 获取 Web App Client ID
为了让 Google Sign-In 与 PlayFab 配合工作,你需要使用一个 Web Client ID,你可以通过为“Web application”类型创建 OAuth Client ID 凭据来获取。
在创建 OAuth Client ID 之前,你需要知道你的 PlayFab **API Endpoint**,你可以按照以下步骤找到:
* 登录 [Game Manager](https://developer.playfab.com/)。
* 选择你的 title。
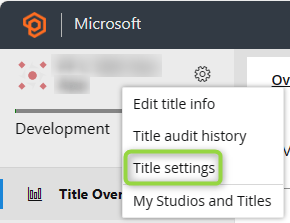
* 通过点击 title 名称旁边的**齿轮图标**并选择 **Title Settings** 来转到你的 title 设置。
### 获取 Resources Definition
* 按照[这些](https://developer.android.com/games/pgs/unity/unity-start#get-android-resources)步骤获取你的 Android Resources 定义。
### 获取 Web App Client ID
为了让 Google Sign-In 与 PlayFab 配合工作,你需要使用一个 Web Client ID,你可以通过为“Web application”类型创建 OAuth Client ID 凭据来获取。
在创建 OAuth Client ID 之前,你需要知道你的 PlayFab **API Endpoint**,你可以按照以下步骤找到:
* 登录 [Game Manager](https://developer.playfab.com/)。
* 选择你的 title。
* 通过点击 title 名称旁边的**齿轮图标**并选择 **Title Settings** 来转到你的 title 设置。
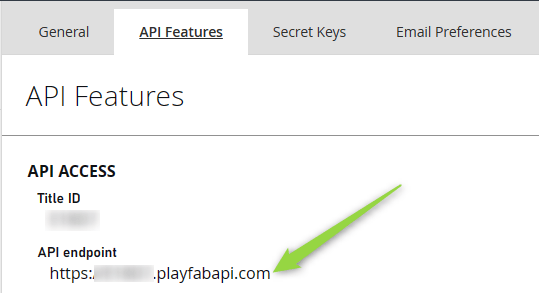
 * 选择 **API Features** 选项卡。
* 复制到 **API endpoint** 字段。
* 选择 **API Features** 选项卡。
* 复制到 **API endpoint** 字段。
 现在你知道了你的 title API Endpoint,按照[此处](https://developers.google.com/workspace/guides/create-credentials#web-application)概述的步骤创建 OAuth Client ID Credential。
* 创建 Client ID 时,你需要将 API endpoint 添加为你的 Client ID 的 **Authorized JavaScript origin**。
现在你知道了你的 title API Endpoint,按照[此处](https://developers.google.com/workspace/guides/create-credentials#web-application)概述的步骤创建 OAuth Client ID Credential。
* 创建 Client ID 时,你需要将 API endpoint 添加为你的 Client ID 的 **Authorized JavaScript origin**。
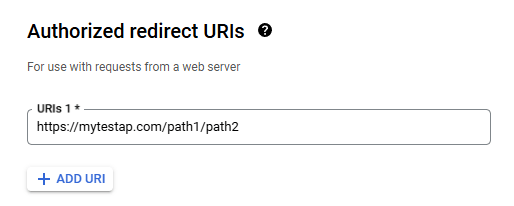
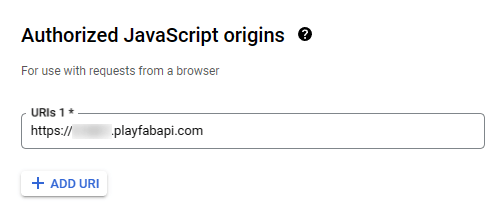 * 此外,请确保将你自己的应用程序重定向 URI 添加为 **Authorized Redirect URI**。如果你不执行此步骤,将收到 **mismatch redirect\_uri** 错误。
 创建 Client ID 后,你将获得类似以下的屏幕,你将获得生成的 Client ID 字符串和 Client Secret。
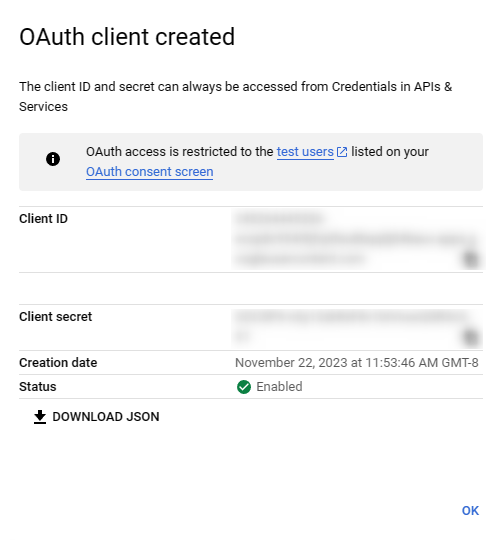 现在,你可以回到 Unity 中的 Android Configuration 窗口,将 client ID 粘贴到 **Client ID** 文本框中:
 现在两个值都已填充,你可以选择 **Setup**:
 ## PlayFab Google 登录设置
PlayFab 有自己的过程来设置 Google 登录。你可以在你的 PlayFab 开发者账户中执行此设置。如果你没有,你可以[注册免费的开发者账户](https://developer.playfab.com)。
要在 PlayFab 中设置 Google:
* 导航到你仪表板中的 **Add-ons** 部分。
* 转到 **Google Add-On**。
* 从那里,选择 **Install Google** 按钮。
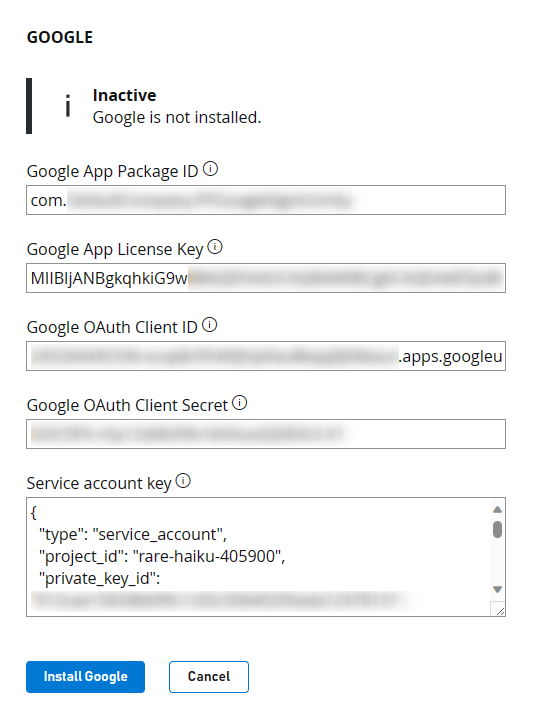
你需要在此表单中输入以下几项:
* **Google App Package ID** - 此字段是你 Android 包的名称。例如,我们的示例使用 `com.playfab.gpgexample`。
* **Google App License Key** - 虽然此字段是必需的,但它与 Google Sign-In 无关。此字段用于使用我们的 **Receipt Validation API** 设置收据验证。
你可以从 [Google Developer Console](https://play.google.com/apps/publish) 获取此 License Key,导航到你的应用,在 **Monetize** 部分下。选择标题为 **Monetization Setup** 的部分。在此处,向下滚动直到看到 **Licensing** 文本框,将 Base64 编码的 RSA 公钥复制并粘贴到此字段中。
* **Google OAuth Client ID** - 你在 Unity 中的 **Google Play Games SDK** 设置中使用的 Web Client ID。
* **Google OAuth Client Secret** - 你在创建 OAuth Client ID 时获得的密钥。
* **Service Account Key** - 此字段期望一个服务账户密钥 JSON 字符串,你需要按照[这些](https://developers.google.com/workspace/guides/create-credentials#create_a_service_account)步骤创建一个服务账户密钥。然后,按照[此处](https://developers.google.com/workspace/guides/create-credentials#create_credentials_for_a_service_account)的步骤为该服务账户创建凭据。获得凭据 JSON 文件后,将整个 JSON 内容粘贴到此字段中。
保存前,附加组件配置应如下所示:
## PlayFab Google 登录设置
PlayFab 有自己的过程来设置 Google 登录。你可以在你的 PlayFab 开发者账户中执行此设置。如果你没有,你可以[注册免费的开发者账户](https://developer.playfab.com)。
要在 PlayFab 中设置 Google:
* 导航到你仪表板中的 **Add-ons** 部分。
* 转到 **Google Add-On**。
* 从那里,选择 **Install Google** 按钮。
你需要在此表单中输入以下几项:
* **Google App Package ID** - 此字段是你 Android 包的名称。例如,我们的示例使用 `com.playfab.gpgexample`。
* **Google App License Key** - 虽然此字段是必需的,但它与 Google Sign-In 无关。此字段用于使用我们的 **Receipt Validation API** 设置收据验证。
你可以从 [Google Developer Console](https://play.google.com/apps/publish) 获取此 License Key,导航到你的应用,在 **Monetize** 部分下。选择标题为 **Monetization Setup** 的部分。在此处,向下滚动直到看到 **Licensing** 文本框,将 Base64 编码的 RSA 公钥复制并粘贴到此字段中。
* **Google OAuth Client ID** - 你在 Unity 中的 **Google Play Games SDK** 设置中使用的 Web Client ID。
* **Google OAuth Client Secret** - 你在创建 OAuth Client ID 时获得的密钥。
* **Service Account Key** - 此字段期望一个服务账户密钥 JSON 字符串,你需要按照[这些](https://developers.google.com/workspace/guides/create-credentials#create_a_service_account)步骤创建一个服务账户密钥。然后,按照[此处](https://developers.google.com/workspace/guides/create-credentials#create_credentials_for_a_service_account)的步骤为该服务账户创建凭据。获得凭据 JSON 文件后,将整个 JSON 内容粘贴到此字段中。
保存前,附加组件配置应如下所示:
 务必 **Save Settings**!
## 将 Google 登录添加到你的 Unity 游戏中
让 Google 登录工作的代码相当简单。有初始化代码,你将其放在你的 Start(或你正在初始化或启动应用的任何位置)中。
此代码可以在不同位置,具体取决于你游戏或应用的架构和框架。在任何情况下,以下代码都会初始化 Google Play Games。
*请确保*你不要忘记 **using** 语句,以便你可以使用 Google Play Games SDK。
```csharp theme={null}
using GooglePlayGames;
using GooglePlayGames.BasicApi;
using PlayFab;
using PlayFab.ClientModels;
using UnityEngine;
public class PFGoogleSignInUnity : MonoBehaviour
{
void Start()
{
PlayGamesPlatform.Instance.Authenticate(ProcessAuthentication);
}
internal void ProcessAuthentication(SignInStatus status)
{
if (status == SignInStatus.Success)
{
PlayGamesPlatform.Instance.RequestServerSideAccess(false, ProcessServerAuthCode);
}
}
private void ProcessServerAuthCode(string serverAuthCode)
{
Debug.Log("Server Auth Code: " + serverAuthCode);
var request = new LoginWithGooglePlayGamesServicesRequest
{
ServerAuthCode = serverAuthCode,
CreateAccount = true,
TitleId = PlayFabSettings.TitleId
};
PlayFabClientAPI.LoginWithGooglePlayGamesServices(request, OnLoginWithGooglePlayGamesServicesSuccess, OnLoginWithGooglePlayGamesServicesFailure);
}
private void OnLoginWithGooglePlayGamesServicesSuccess(LoginResult result)
{
Debug.Log("PF Login Success LoginWithGooglePlayGamesServices");
}
private void OnLoginWithGooglePlayGamesServicesFailure(PlayFabError error)
{
Debug.Log("PF Login Failure LoginWithGooglePlayGamesServices: " + error.GenerateErrorReport());
}
}
```
让我们分解一下究竟发生了什么:
* 首先,我们使用 `PlayGamesPlatform.Instance.Authenticate` 登录 - 此函数接收一个回调函数作为参数,用于处理结果,并根据接收到的 *SignInStatus* 告知我们用户是否能够成功登录。
* 如果你没有将测试账户添加到你的应用,在测试时回调 *SignInStatus* 结果总是 *Canceled*。如果发生此问题,请按照[此](https://developers.google.com/games/services/console/testpub)指南上的步骤将测试者添加到你的 Google 应用程序。
对 `PlayGamesPlatform.Instance.Authenticate` 的调用将触发 **Google Play Games** 登录对话框弹出。
* 接下来,如果我们成功登录,我们对 `PlayGamesPlatform.Instance.RequestServerSideAccess` 进行调用,它接收另一个回调并返回 ServerAuthCode 字符串。
* 然后,我们进行 `PlayFabClientAPI.LoginWithGooglePlayGamesServices` 调用,并将我们刚从 Google 获得的 `AuthCode` 作为 `ServerAuthCode` 参数传入。
* 最后,根据 `LoginWithGooglePlayGamesServices` 调用的结果,会调用 `OnLoginWithGooglePlayGamesServicesSuccess` 或 `OnLoginWithGooglePlayGamesServicesFailure`,这些回调是处理你到 PlayFab 的登录操作结果的回调。此时,你应该在你的仪表板中看到一个成功的登录!
希望本指南对你有所帮助。但如果你有问题,请随时在我们的[社区论坛](https://community.playfab.com/)中提问。
## Related topics
- [使用 Google 和 HTML5 设置 PlayFab 身份验证](/zh-CN/services/playfab/identity/player-identity/platform-specific-authentication/google-html5.md)
- [使用 Kongregate 和 Unity 设置 PlayFab 身份验证](/zh-CN/services/playfab/identity/player-identity/platform-specific-authentication/kongregate-unity.md)
- [使用 Facebook 和 Unity 设置 PlayFab 身份验证](/zh-CN/services/playfab/identity/player-identity/platform-specific-authentication/facebook-unity.md)
- [使用 Steam 和 Unity 设置 PlayFab 身份验证](/zh-CN/services/playfab/identity/player-identity/platform-specific-authentication/steam-unity.md)
- [服务器端匿名登录身份验证](/zh-CN/services/playfab/identity/player-identity/platform-specific-authentication/anonymous-login.md)
务必 **Save Settings**!
## 将 Google 登录添加到你的 Unity 游戏中
让 Google 登录工作的代码相当简单。有初始化代码,你将其放在你的 Start(或你正在初始化或启动应用的任何位置)中。
此代码可以在不同位置,具体取决于你游戏或应用的架构和框架。在任何情况下,以下代码都会初始化 Google Play Games。
*请确保*你不要忘记 **using** 语句,以便你可以使用 Google Play Games SDK。
```csharp theme={null}
using GooglePlayGames;
using GooglePlayGames.BasicApi;
using PlayFab;
using PlayFab.ClientModels;
using UnityEngine;
public class PFGoogleSignInUnity : MonoBehaviour
{
void Start()
{
PlayGamesPlatform.Instance.Authenticate(ProcessAuthentication);
}
internal void ProcessAuthentication(SignInStatus status)
{
if (status == SignInStatus.Success)
{
PlayGamesPlatform.Instance.RequestServerSideAccess(false, ProcessServerAuthCode);
}
}
private void ProcessServerAuthCode(string serverAuthCode)
{
Debug.Log("Server Auth Code: " + serverAuthCode);
var request = new LoginWithGooglePlayGamesServicesRequest
{
ServerAuthCode = serverAuthCode,
CreateAccount = true,
TitleId = PlayFabSettings.TitleId
};
PlayFabClientAPI.LoginWithGooglePlayGamesServices(request, OnLoginWithGooglePlayGamesServicesSuccess, OnLoginWithGooglePlayGamesServicesFailure);
}
private void OnLoginWithGooglePlayGamesServicesSuccess(LoginResult result)
{
Debug.Log("PF Login Success LoginWithGooglePlayGamesServices");
}
private void OnLoginWithGooglePlayGamesServicesFailure(PlayFabError error)
{
Debug.Log("PF Login Failure LoginWithGooglePlayGamesServices: " + error.GenerateErrorReport());
}
}
```
让我们分解一下究竟发生了什么:
* 首先,我们使用 `PlayGamesPlatform.Instance.Authenticate` 登录 - 此函数接收一个回调函数作为参数,用于处理结果,并根据接收到的 *SignInStatus* 告知我们用户是否能够成功登录。
* 如果你没有将测试账户添加到你的应用,在测试时回调 *SignInStatus* 结果总是 *Canceled*。如果发生此问题,请按照[此](https://developers.google.com/games/services/console/testpub)指南上的步骤将测试者添加到你的 Google 应用程序。
对 `PlayGamesPlatform.Instance.Authenticate` 的调用将触发 **Google Play Games** 登录对话框弹出。
* 接下来,如果我们成功登录,我们对 `PlayGamesPlatform.Instance.RequestServerSideAccess` 进行调用,它接收另一个回调并返回 ServerAuthCode 字符串。
* 然后,我们进行 `PlayFabClientAPI.LoginWithGooglePlayGamesServices` 调用,并将我们刚从 Google 获得的 `AuthCode` 作为 `ServerAuthCode` 参数传入。
* 最后,根据 `LoginWithGooglePlayGamesServices` 调用的结果,会调用 `OnLoginWithGooglePlayGamesServicesSuccess` 或 `OnLoginWithGooglePlayGamesServicesFailure`,这些回调是处理你到 PlayFab 的登录操作结果的回调。此时,你应该在你的仪表板中看到一个成功的登录!
希望本指南对你有所帮助。但如果你有问题,请随时在我们的[社区论坛](https://community.playfab.com/)中提问。
## Related topics
- [使用 Google 和 HTML5 设置 PlayFab 身份验证](/zh-CN/services/playfab/identity/player-identity/platform-specific-authentication/google-html5.md)
- [使用 Kongregate 和 Unity 设置 PlayFab 身份验证](/zh-CN/services/playfab/identity/player-identity/platform-specific-authentication/kongregate-unity.md)
- [使用 Facebook 和 Unity 设置 PlayFab 身份验证](/zh-CN/services/playfab/identity/player-identity/platform-specific-authentication/facebook-unity.md)
- [使用 Steam 和 Unity 设置 PlayFab 身份验证](/zh-CN/services/playfab/identity/player-identity/platform-specific-authentication/steam-unity.md)
- [服务器端匿名登录身份验证](/zh-CN/services/playfab/identity/player-identity/platform-specific-authentication/anonymous-login.md)