> ## Documentation Index
> Fetch the complete documentation index at: https://devdocs.xbox.com/llms.txt
> Use this file to discover all available pages before exploring further.

# 使用 Google 和 HTML5 设置 PlayFab 身份验证

> 使用 HTML5 和 JavaScript 向 PlayFab title 添加 Google 登录的分步教程，涵盖 Google API 设置和 OAuth 玩家身份验证。

本教程指导你完成使用 Google 和 HTML5/JavaScript 进行 PlayFab 身份验证的过程。

## 要求

你需要：

* 一个用于测试的 [Google 账户](https://google.com/)。
* 已注册的 `[PlayFab](https://developer.playfab.com/)` title。
* 熟悉[登录基础和最佳实践](/services/playfab/identity/player-identity/login/login-basics-best-practices)。
* 至少一个具有有效域名的服务器以充当静态 HTML 文件。请参阅[为测试运行 HTTP 服务器](/services/playfab/identity/player-identity/platform-specific-authentication/running-an-http-server-for-testing)教程，了解如何设置。

## 服务器和域名

本指南需要具有有效域名的服务器来跟进。如果你还没有注册域名和远程 Web 服务器，请按照我们的[为测试运行 HTTP 服务器](/services/playfab/identity/player-identity/platform-specific-authentication/running-an-http-server-for-testing)教程，了解如何设置一个具有有效域名的本地 Web 服务器。

在本指南中，我们假设你的域名是 `[http://playfab.example](http://playfab.example)`。

## 注册 Google API 项目

首先导航到 [Google API Console](https://console.developers.google.com/)：

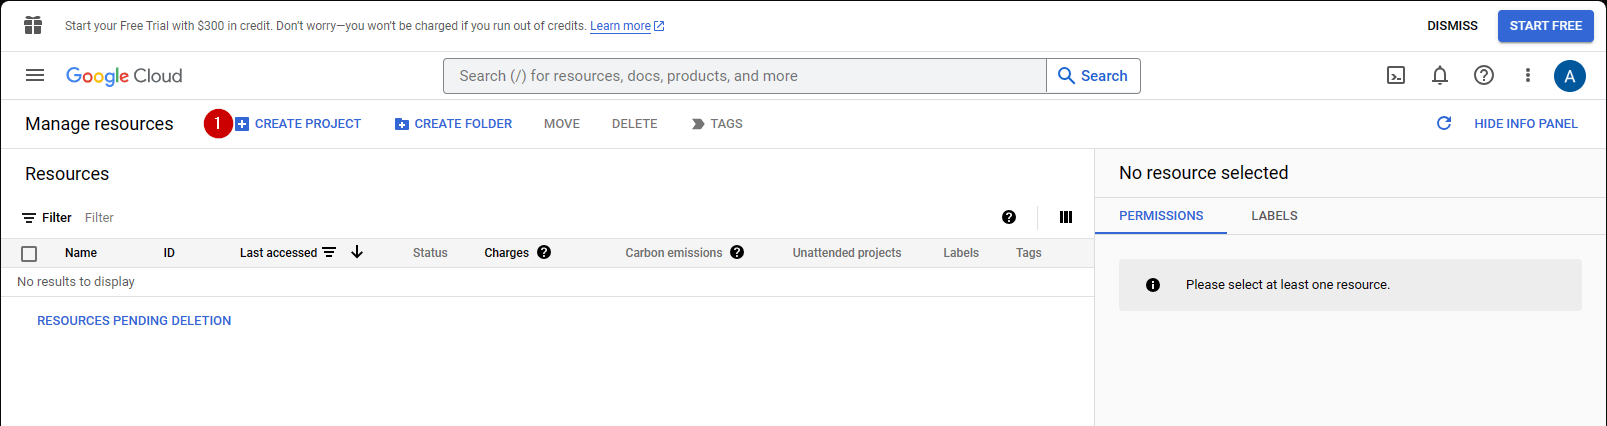
1. 导航到 **CREATE PROJECT** 并选择它。

<img src="https://mintcdn.com/microsoft-4404708b/mLCHf0iQv3VidfBe/images/playfab/identity/player-identity/platform-specific-authentication/tutorials/google-html5/create-project.png?fit=max&auto=format&n=mLCHf0iQv3VidfBe&q=85&s=5b9ba00fd573b49ddbdc0a4b47d173a4" alt="Google API Manager create new credentials" width="1607" height="426" data-path="images/playfab/identity/player-identity/platform-specific-authentication/tutorials/google-html5/create-project.png" />

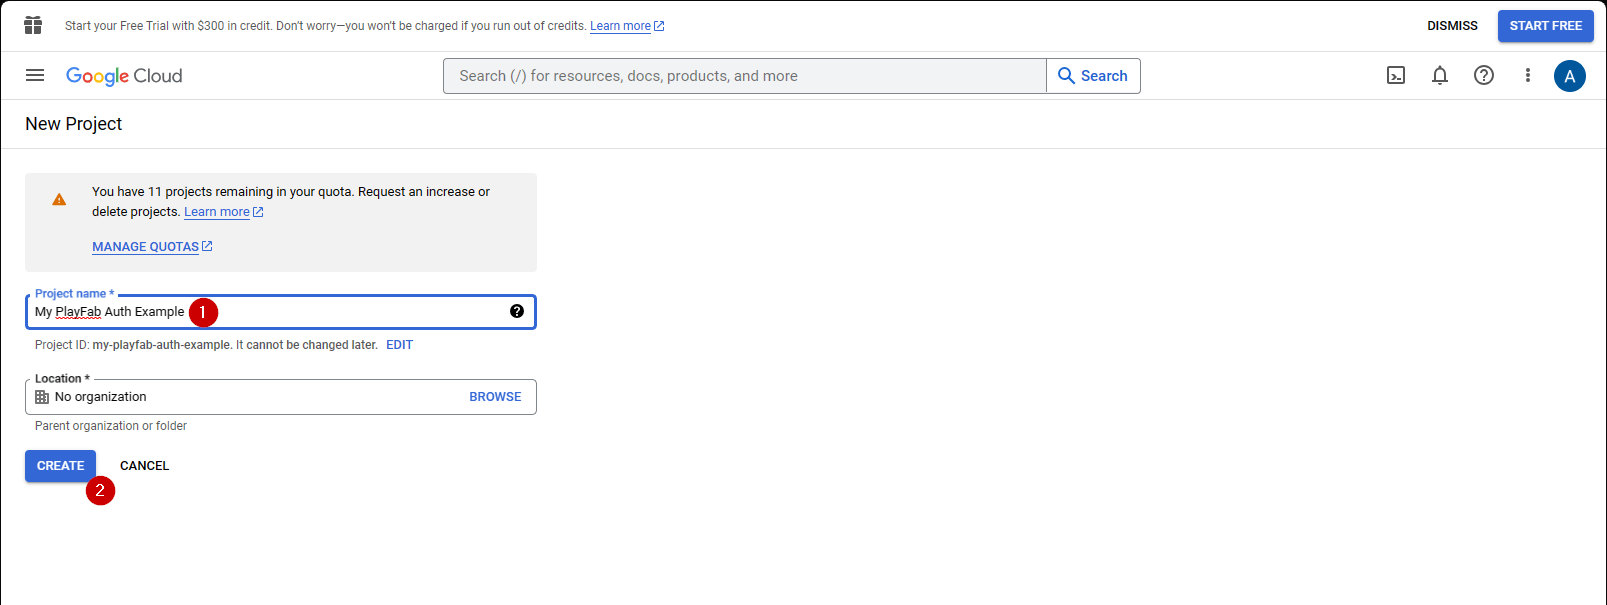
1. 填写 **Project Name** 下的字段。
2. 选择 **Create** 按钮。
<img src="https://mintcdn.com/microsoft-4404708b/mLCHf0iQv3VidfBe/images/playfab/identity/player-identity/platform-specific-authentication/tutorials/google-html5/create-new-project.png?fit=max&auto=format&n=mLCHf0iQv3VidfBe&q=85&s=10b5bb3e56749cdc940cc756f0285d0d" alt="Google API Manager new project" width="1607" height="605" data-path="images/playfab/identity/player-identity/platform-specific-authentication/tutorials/google-html5/create-new-project.png" />

<Note>
  **API Manager** 生成项目需要 10-20 秒是正常的。
</Note>

创建项目后：

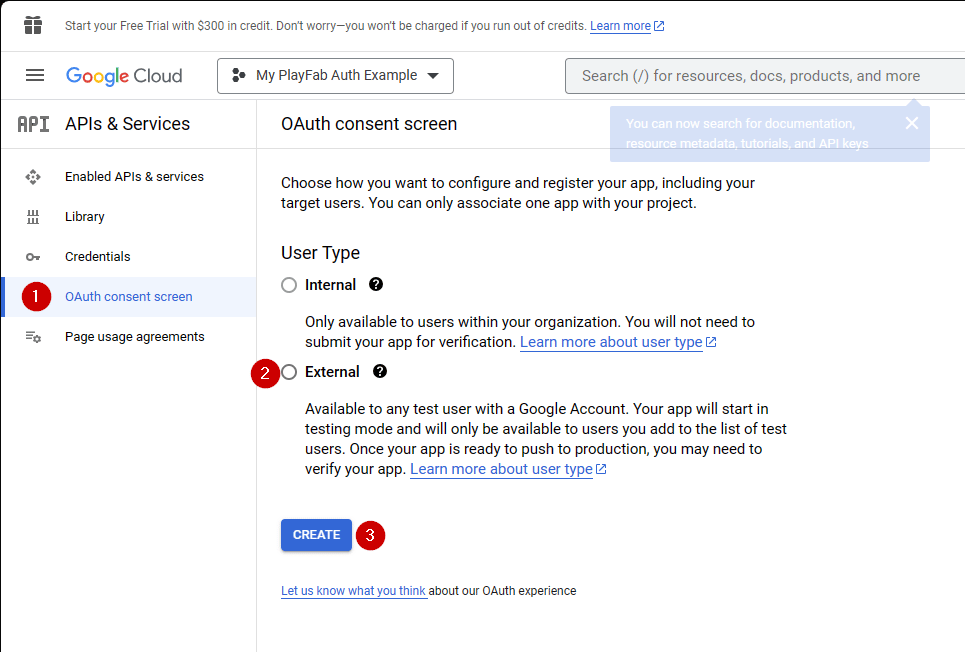
1. 导航到 **OAuth consent screen**。
2. 在 User Type 下选择 **External**
3. 然后选择 **Create**。

<img src="https://mintcdn.com/microsoft-4404708b/mLCHf0iQv3VidfBe/images/playfab/identity/player-identity/platform-specific-authentication/tutorials/google-html5/oauth-consent-screen.png?fit=max&auto=format&n=mLCHf0iQv3VidfBe&q=85&s=f6889444d347b1f9d78f0309c2e75193" alt="Google API Manager OAuth consent screen" width="965" height="652" data-path="images/playfab/identity/player-identity/platform-specific-authentication/tutorials/google-html5/oauth-consent-screen.png" />

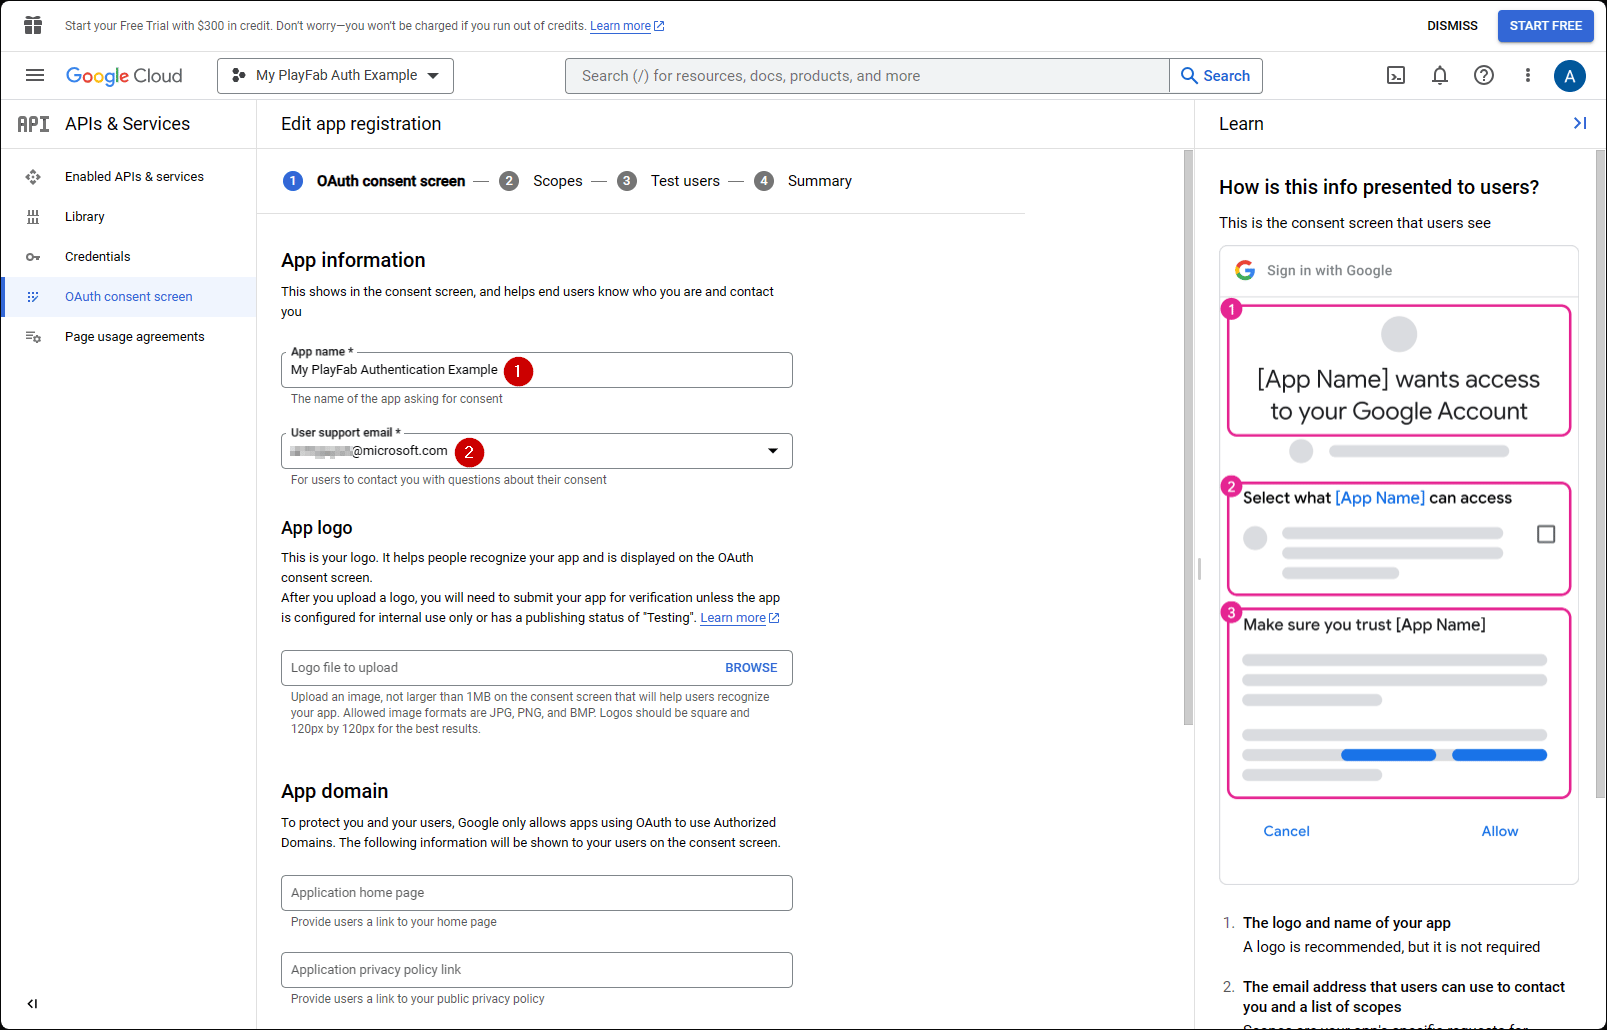
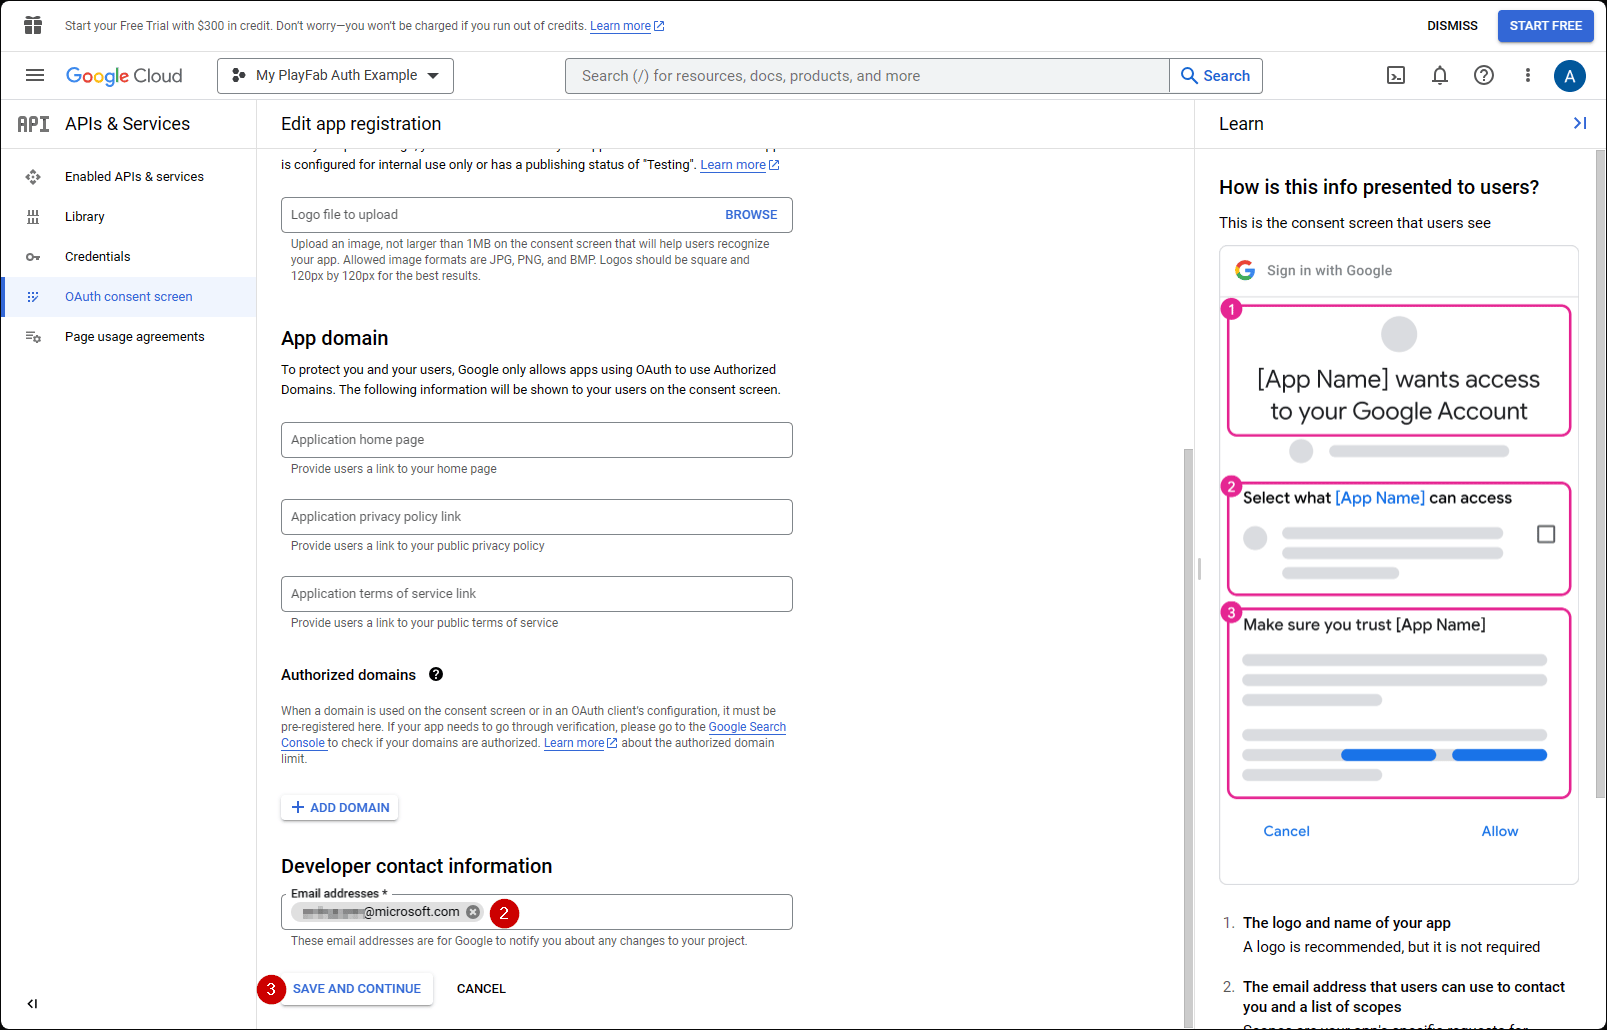
1. 填写 App Name
2. 确保有 **user support email** 和 **Developer Contact Email** 的电子邮件
3. 然后选择 **SAVE AND CONTINUE**
<img src="https://mintcdn.com/microsoft-4404708b/mLCHf0iQv3VidfBe/images/playfab/identity/player-identity/platform-specific-authentication/tutorials/google-html5/create-oauth-consent-screen-1.png?fit=max&auto=format&n=mLCHf0iQv3VidfBe&q=85&s=f3d7855e3f4b8ecd65cf3eb41f8f358c" alt="Google API Manager OAuth Consent Screen configuration" width="1607" height="1030" data-path="images/playfab/identity/player-identity/platform-specific-authentication/tutorials/google-html5/create-oauth-consent-screen-1.png" />

<img src="https://mintcdn.com/microsoft-4404708b/mLCHf0iQv3VidfBe/images/playfab/identity/player-identity/platform-specific-authentication/tutorials/google-html5/create-oauth-consent-screen-2.png?fit=max&auto=format&n=mLCHf0iQv3VidfBe&q=85&s=d6013db1014b105eae236b04f61a92b9" alt="Google API Manager OAuth Consent Screen configuration 2" width="1607" height="1030" data-path="images/playfab/identity/player-identity/platform-specific-authentication/tutorials/google-html5/create-oauth-consent-screen-2.png" />

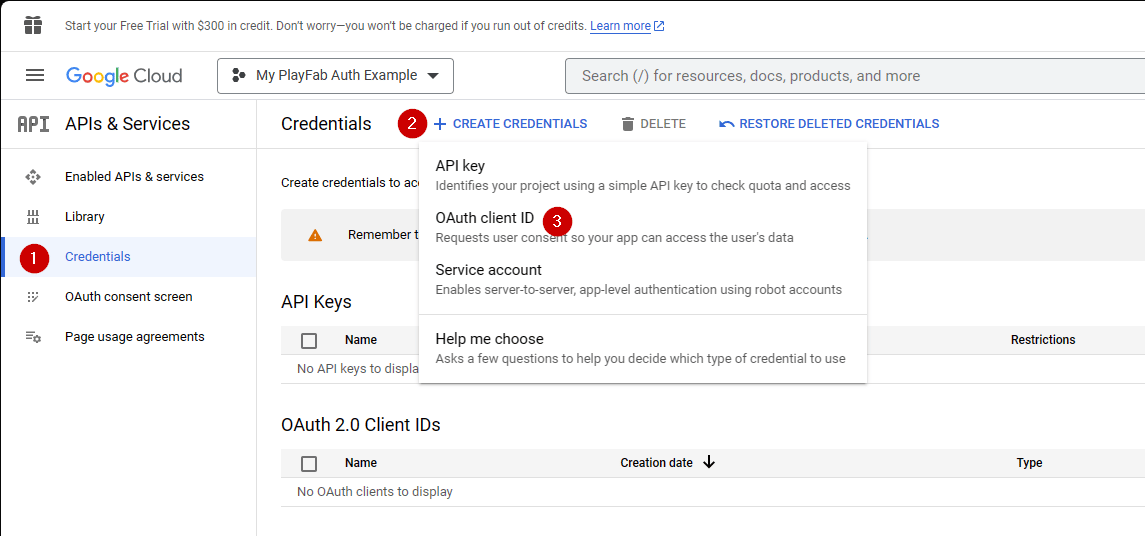
1. 接下来，导航到 **Credentials**。
2. 选择 **Create credentials**。
3. 然后选择 **OAuth client ID**。
<img src="https://mintcdn.com/microsoft-4404708b/mLCHf0iQv3VidfBe/images/playfab/identity/player-identity/platform-specific-authentication/tutorials/google-html5/open-oauth-credentials.png?fit=max&auto=format&n=mLCHf0iQv3VidfBe&q=85&s=6d594083a2d96943f337a0c2489c40eb" alt="Google API Manager open OAuth credentials" width="1145" height="536" data-path="images/playfab/identity/player-identity/platform-specific-authentication/tutorials/google-html5/open-oauth-credentials.png" />

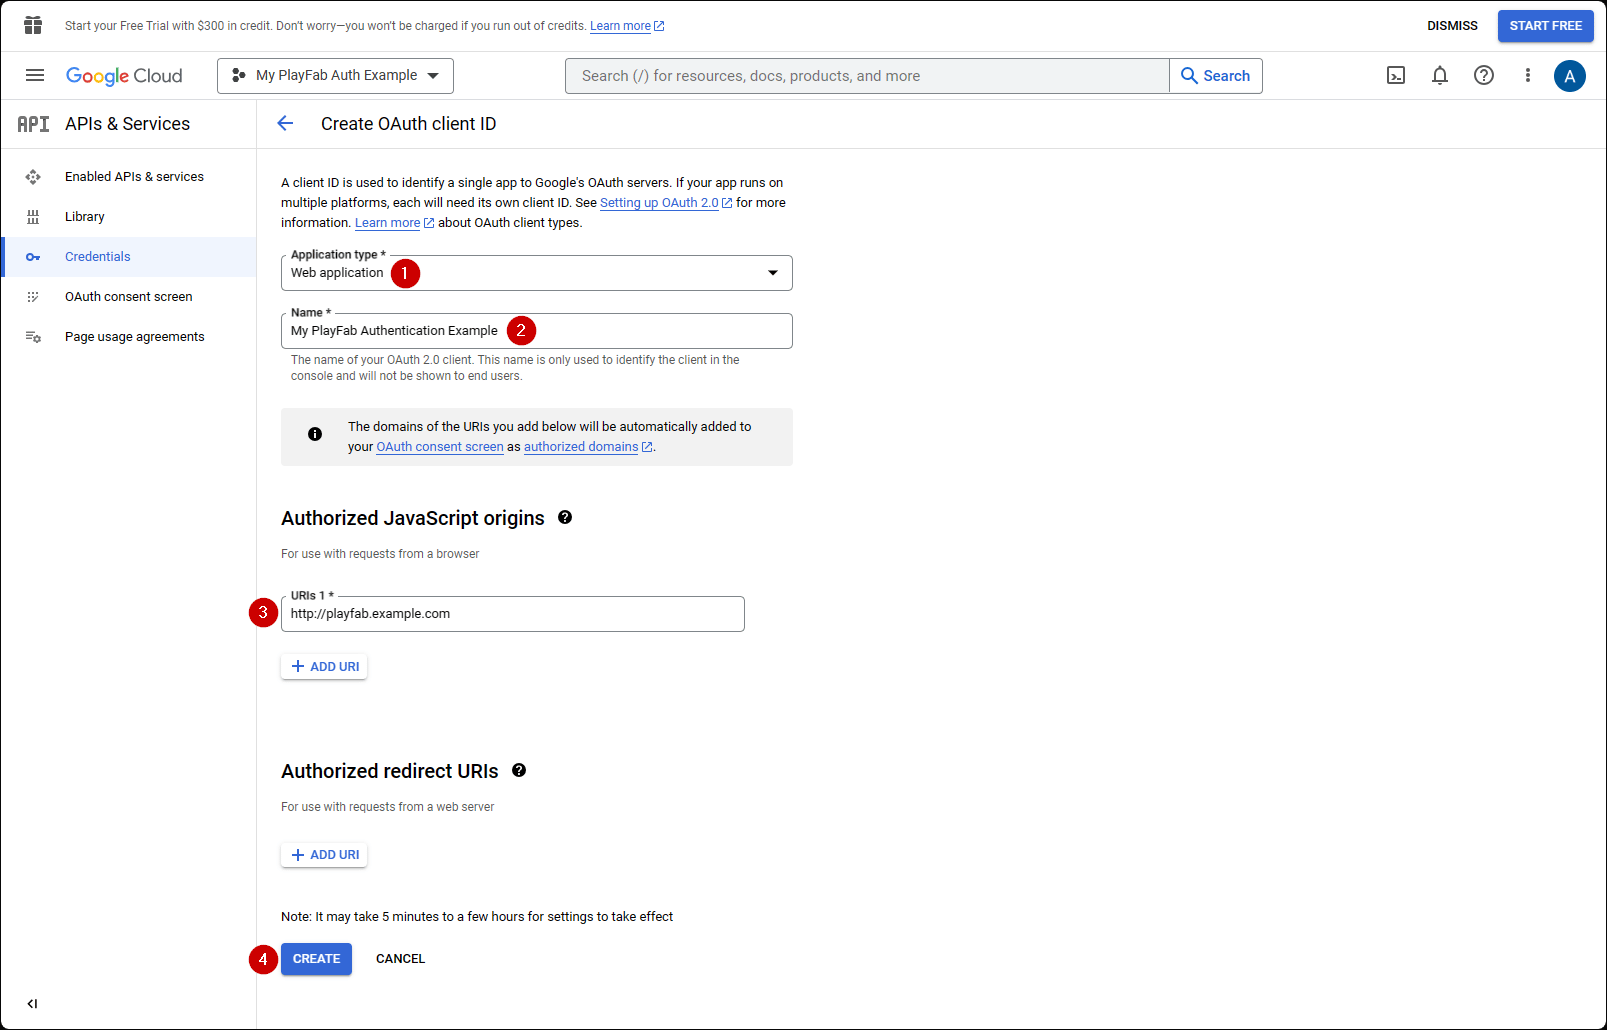
1. 选择 **Web Application** 作为你的 **Application type**。
2. 为你的应用程序命名 **Name**。
3. 将你的域名添加到 **Authorized JavaScript origins** —— 在我们的情况下是 `[PlayFab](http://playfab.example.com)`。
4. 最后，选择 **Create** 按钮提交你的更改。

<img src="https://mintcdn.com/microsoft-4404708b/mLCHf0iQv3VidfBe/images/playfab/identity/player-identity/platform-specific-authentication/tutorials/google-html5/create-oauth-credentials.png?fit=max&auto=format&n=mLCHf0iQv3VidfBe&q=85&s=0cc913b14a6883d7f2286121ce8af563" alt="Google API Manager create OAuth credentials" width="1607" height="1030" data-path="images/playfab/identity/player-identity/platform-specific-authentication/tutorials/google-html5/create-oauth-credentials.png" />

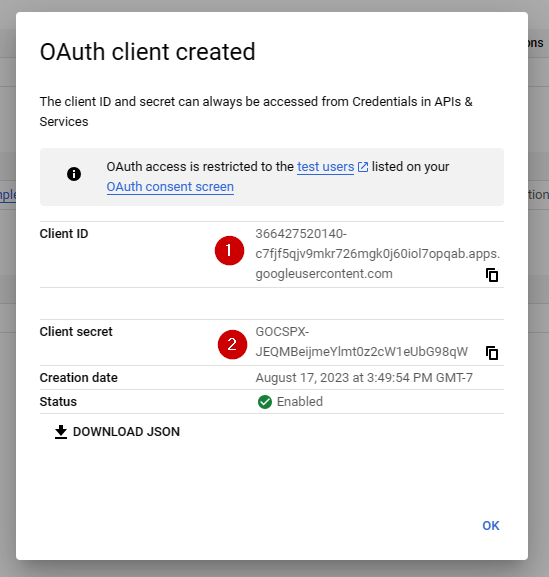
在下面所示的 **OAuth client** 屏幕上，Google API Manager 显示了两个重要信息：

1. **client ID**
2. **client secret**。
<Note>
  请务必将这些值复制并保存在易于访问的安全位置，因为它们将在本教程稍后显示的授权过程中使用。
</Note>

<img src="https://mintcdn.com/microsoft-4404708b/mLCHf0iQv3VidfBe/images/playfab/identity/player-identity/platform-specific-authentication/tutorials/google-html5/oauth-client-credentials.png?fit=max&auto=format&n=mLCHf0iQv3VidfBe&q=85&s=33427703b3ddb679666f2d4c0632e0c8" alt="Google API Manager OAuth client ID and secret" width="549" height="577" data-path="images/playfab/identity/player-identity/platform-specific-authentication/tutorials/google-html5/oauth-client-credentials.png" />

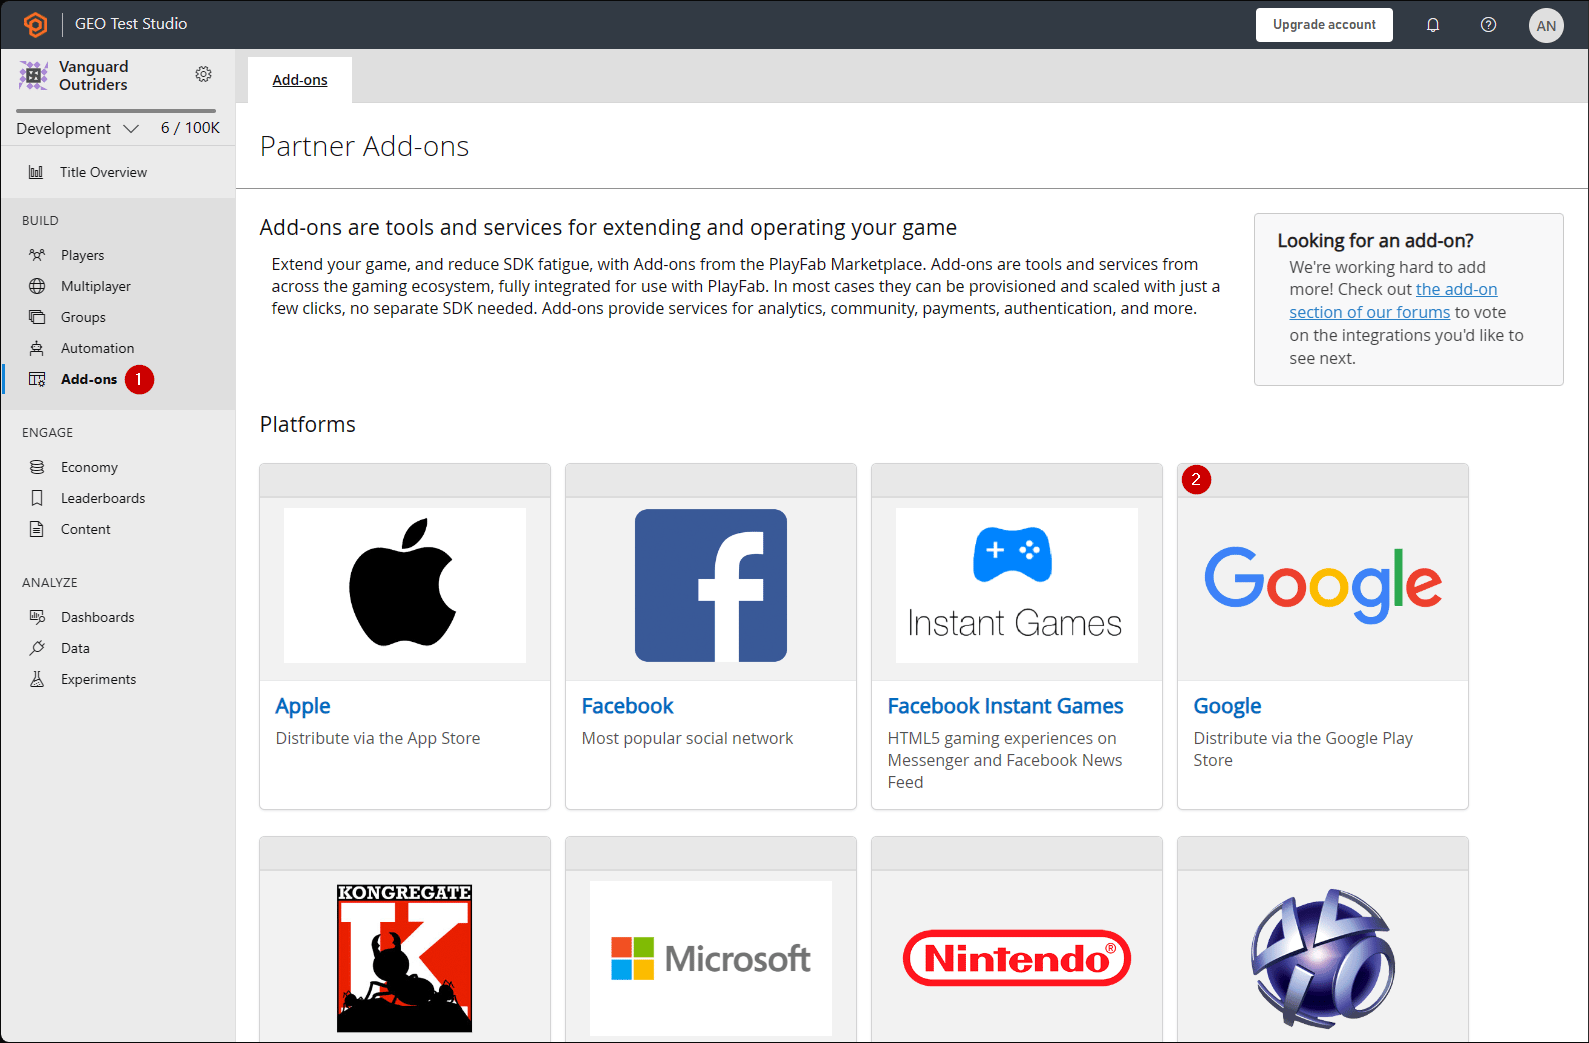
转到你 title 的 PlayFab **Game Manager** 页面。

1. 在菜单中导航到 **Add-ons**。
2. 找到并打开 **Google Add-on** 图标/链接。
<img src="https://mintcdn.com/microsoft-4404708b/mLCHf0iQv3VidfBe/images/playfab/identity/player-identity/platform-specific-authentication/tutorials/google-html5/open-google-add-on.png?fit=max&auto=format&n=mLCHf0iQv3VidfBe&q=85&s=1b0af874b0d7e46cf30337e322f0004a" alt="PlayFab Game Manager Add-on" width="1589" height="1043" data-path="images/playfab/identity/player-identity/platform-specific-authentication/tutorials/google-html5/open-google-add-on.png" />

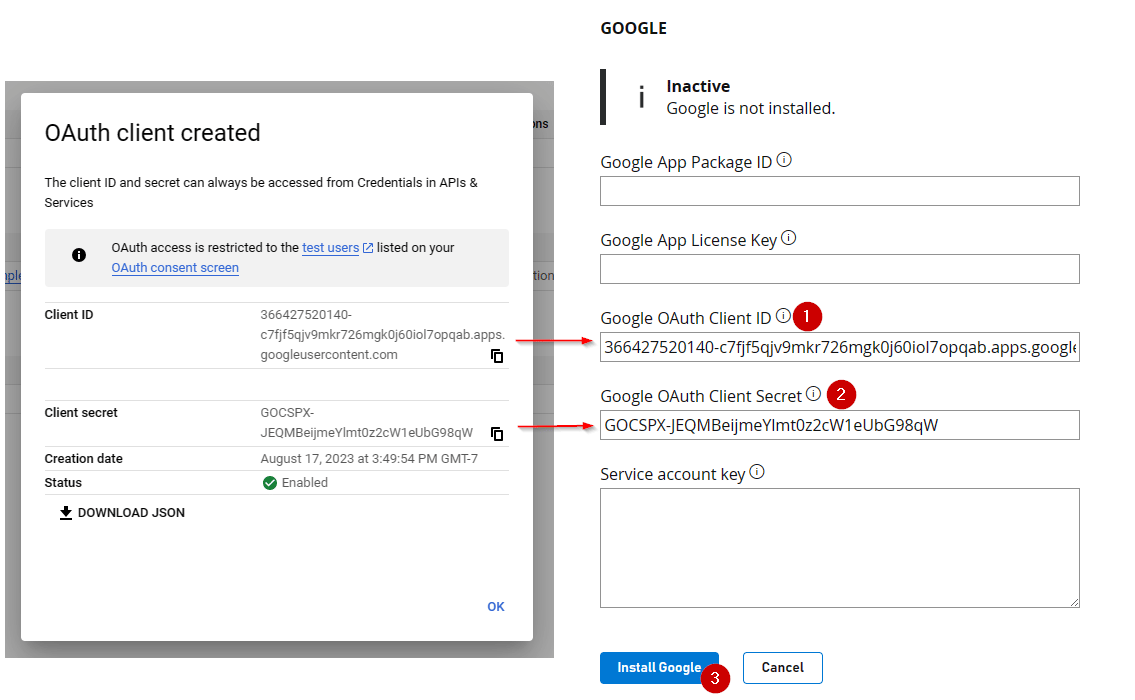
1. 填写 **Client ID**。
2. 填写 **Client secret**。
3. 然后选择 **Install Google** 按钮。
<img src="https://mintcdn.com/microsoft-4404708b/mLCHf0iQv3VidfBe/images/playfab/identity/player-identity/platform-specific-authentication/tutorials/google-html5/install-google-add-on.png?fit=max&auto=format&n=mLCHf0iQv3VidfBe&q=85&s=d84b1601417c536b97d909df1ae1f58c" alt="PlayFab Game Manager Install Google Add-on" width="1135" height="700" data-path="images/playfab/identity/player-identity/platform-specific-authentication/tutorials/google-html5/install-google-add-on.png" />

<Note>
  截至 2017 年 7 月，**Google API Manager** 有*不*正确挂钩 **Allowed JS** 源域的坏习惯。如果你收到以下错误：**"idpiframe\_initialization\_failed", details: "Not a valid origin for the client: somedomain.com..."**，请删除凭据并重新创建它们。*无需删除整个项目——只需删除凭据即可。*
</Note>

## 使用访问令牌进行测试

在此示例中，我们展示如何使用经典访问令牌方法测试 LoginWithGoogleAccount API。使用下面提供的 HTML 代码进行测试。

<Note>
  请务必\*用你自己的值替换 `YOUR_CLIENT_ID` 和 `YOUR_PLAYFAB_TITLE`。
</Note>

<Note>
  在 TypeScript 类型定义文件中，**LoginWithGoogleAccountRequest** 对象中缺少 **AccessToken** 参数。如果你在 Node SDK 中使用 TypeScript，你可以创建一个自定义类型 `interface LoginRequest extends PlayFabClientModels.LoginWithGoogleAccountRequest { AccessToken: string; }`，并在使用 API 时进行类型转换 `PlayFabClient.LoginWithGoogleAccount( { AccessToken: accessToken, CreateAccount: true, } as LoginRequest, onPlayFabResponse);`
</Note>

```html theme={null}
<!DOCTYPE html>
<html>
  <head>
    <script src="https://accounts.google.com/gsi/client" onload="initClient()" async defer></script>
    <script src="https://download.playfab.com/PlayFabClientApi.js"></script>
  </head>
  <body>
    <script>
      var client;
      function initClient() {
          console.log("Initializing Google token client on page load");
          client = google.accounts.oauth2.initTokenClient({
              client_id: "YOUR_CLIENT_ID", // TODO: PUT YOUR GOOGLE CLIENT_ID HERE!
              callback: "onTokenResponse",
              scope: "https://www.googleapis.com/auth/userinfo.profile",
              callback: (tokenResponse) => {
                  access_token = tokenResponse.access_token;
                  onSignIn();
              }
          });
      }

      function getToken() {
        client.requestAccessToken();
      }

      // Invoked after user has signed in with Google
      function onSignIn() {
          // Execute LoginWithGoogleAccount API call using the Google access token. Please replace TitleId.
          logLine("Attempting PlayFab Sign-in using LoginWithGoogleAccount");
          PlayFabClientSDK.LoginWithGoogleAccount({
              AccessToken: access_token, // This access token is generated after a user has signed into Google
              CreateAccount: true,
              TitleId: "YOUR_PLAYFAB_TITLE", // TODO: PUT YOUR TITLE ID HERE!
          }, onPlayFabResponse);
      }

      // Handles response from PlayFab
      function onPlayFabResponse(response, error) {
          if (response)
              logLine("Response: " + JSON.stringify(response));
          if (error)
              logLine("Error: " + JSON.stringify(error));
      }

      function logLine(message) {
          var textnode = document.createTextNode(message);
          document.body.appendChild(textnode);
          var br = document.createElement("br");
          document.body.appendChild(br);
      }
    </script>
    <h1>Google Access Token Auth Example</h1>
    <!-- Clicking this button will prompt the user to sign into Google. Once they have signed into Google, LoginWithGoogleAccount is automatically called. -->
    <button onclick="getToken();">Sign into Google</button><br><br>
  </body>
</html>
```

**使用（已弃用的）Google Sign-in Platform library 进行测试**

<Note>
  下面的示例使用 Google Sign-In platform library。**根据 [Google Identity 公共文档站点](https://developers.google.com/identity/gsi/web/guides/migration)，用于 Web 的 Google Sign-In JavaScript platform library 将于 2023 年 3 月 31 日弃用**。此示例将不再适用于新创建的 Google 客户端 —— 请参考先前的代码示例，它使用较新的 Google Identity Services 库！
</Note>

```html theme={null}
<!DOCTYPE html>
<html>
<head>
    <!-- Special meta tag allows you to pass Google Client ID. Replace the content attribute value with your own Client Id -->
    <meta name="google-signin-client_id" content="YOUR_CLIENT_ID"><!-- // TODO: PUT YOUR GOOGLE CLIENT_ID HERE! -->
    <!-- Load Google platform SDK-->
    <script src="https://apis.google.com/js/platform.js" async defer></script>
    <!-- Load PlayFab Client JavaScript SDK -->
    <script src="https://download.playfab.com/PlayFabClientApi.js"></script>
</head>
<body>
    <p>Google Access Token Auth Example</p>
    <!-- Neat Google button gets styled automatically when Google platform SDK is loaded -->
    <div class="g-signin2" data-onsuccess="onSignIn"></div>
    <script>
        // Invoked when user has signed in with Google
        function onSignIn() {
            // Retrieve access token
            var accessToken = gapi.auth2.getAuthInstance().currentUser.get().getAuthResponse(true).access_token;
            // Execute LoginWithGoogleAccount API call using the access token. Please replace TitleID with your own.
            logLine("Attempting PlayFab Sign-in using LoginWithGoogleAccount");
            PlayFabClientSDK.LoginWithGoogleAccount({
                ServerAuthCode: accessToken,
                CreateAccount : true,
                TitleId: "YOUR_PLAYFAB_TITLE", // TODO: PUT YOUR TITLE ID HERE!
            }, onPlayFabResponse);
        }

        // Handles response from PlayFab
        function onPlayFabResponse(response, error) {
            if (response)
                logLine("Response: " + JSON.stringify(response));
            if (error)
                logLine("Error: " + JSON.stringify(error));
        }

        function logLine(message) {
            var textnode = document.createTextNode(message);
            document.body.appendChild(textnode);
            var br = document.createElement("br");
            document.body.appendChild(br);
        }
    </script>
</body>
</html>
```

记住使用你的 Web 服务器打开此页面，并确保使用你在配置 Google Project 时指定的 URL（在我们的情况下是 `http://playfab.example`）访问此页面。

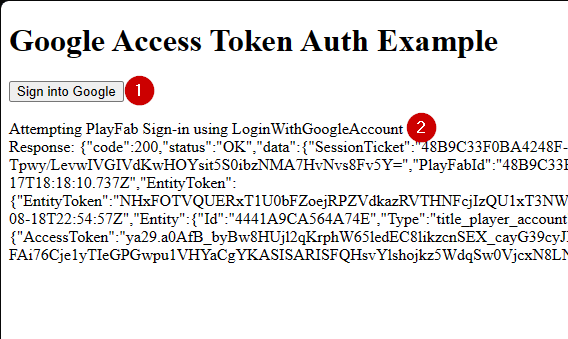
1. 页面打开后，选择 **G Signed In**，并按照通用的 Google 身份验证流程。
2. 完成后，脚本将尝试在 PlayFab 端进行身份验证并输出结果。

<img src="https://mintcdn.com/microsoft-4404708b/mLCHf0iQv3VidfBe/images/playfab/identity/player-identity/platform-specific-authentication/tutorials/google-html5/google-auth-example.png?fit=max&auto=format&n=mLCHf0iQv3VidfBe&q=85&s=b931669ffe5a96cb90404383ab650072" alt="Google Auth Example" width="568" height="339" data-path="images/playfab/identity/player-identity/platform-specific-authentication/tutorials/google-html5/google-auth-example.png" />

<Note>
  如果你*已经有*一个 Google 身份验证会话正在运行，你就不必选择 **G Signed In**。一切都会自动发生。
</Note>


## Related topics

- [特定平台的身份验证](/zh-CN/services/playfab/identity/player-identity/platform-specific-authentication/index.md)
- [使用 Facebook 和 HTML5 设置 PlayFab 身份验证](/zh-CN/services/playfab/identity/player-identity/platform-specific-authentication/facebook-html5.md)
- [使用 Kongregate 和 HTML5 设置 PlayFab 身份验证](/zh-CN/services/playfab/identity/player-identity/platform-specific-authentication/kongregate-html5.md)
- [使用 Twitch 和 HTML5 设置 PlayFab 身份验证](/zh-CN/services/playfab/identity/player-identity/platform-specific-authentication/twitch-html5.md)
- [为 PlayFab 设置 Sign In with Battle.net](/zh-CN/services/playfab/identity/player-identity/platform-specific-authentication/battlenet-login.md)