> ## Documentation Index
> Fetch the complete documentation index at: https://devdocs.xbox.com/llms.txt
> Use this file to discover all available pages before exploring further.
# Quickstart Android
> Set up the PlayFab Services C SDK in Android Studio, add the native libraries, and make your first PlayFab API call from an Android project.
# Quickstart: Android
Get started with the PlayFab Services SDK for Android. Follow these steps to include the libraries in your project and try out the sample code for basic PlayFab functionality.
This quickstart helps you make your first PlayFab API call using the Android SDK. Before continuing, make sure you have completed the steps in [Quickstart: Game Manager](/services/playfab/live-service-management/gamemanager/quickstart), which ensure you have a PlayFab account and are familiar with the PlayFab Game Manager.
## Requirements
* A [PlayFab developer account](https://developer.playfab.com).
* [Android Studio](https://developer.android.com/studio) installed.
## Project setup
Download the PlayFab Android SDK to your project from the [PlayFab SDK Release Page](https://github.com/PlayFab/PlayFabCSdk/releases/latest).
### Integrate PlayFab C SDK into your own project
These next steps are written with the assumption that you have created a new project using Android Studio.
#### Add binaries to your game
There are two parts of the binaries that you'll need to integrate into your project: the shared object files (.so) and the android archive files (.aar). You can build the binaries yourself or you can download them from the releases page.
#### Adding the .so files
These files are integrated into your project using CMake.
1. Unzip the PlayFab SDK for Android release and place its contents in your desired directory.
2. Using **target\_include\_directories** or another equivalent function, add the headers under "Include" from the PlayFab SDK release:
```cmake theme={null}
TARGET_INCLUDE_DIRECTORIES(
${PROJECT_NAME}
"Include"
)
```
3. Using **target\_link\_libraries** or another equivalent function, link the locations of the .so files to your project.
For example:
```cmake theme={null}
set(PLAYFAB_SERVICES_PATH "[LOCATION OF YOUR FILE]/libPlayFabServices.Android.so")
set(PLAYFAB_CORE_PATH "[LOCATION OF YOUR FILE]/libPlayFabCore.Android.so")
set(LIBHTTPCLIENT_PATH "[LOCATION OF YOUR FILE]/libHttpClient.Android.so")
TARGET_LINK_LIBRARIES(
[YOUR PROJECT NAME]
${PLAYFAB_SERVICES_PATH}
${PLAYFAB_CORE_PATH}
${LIBHTTPCLIENT_PATH}
)
```
#### Adding the .aar files
These files are integrated into your project using Gradle.
1. Create a libs folder within app level Android project directory. Here's an example of what your project directory should look like now:
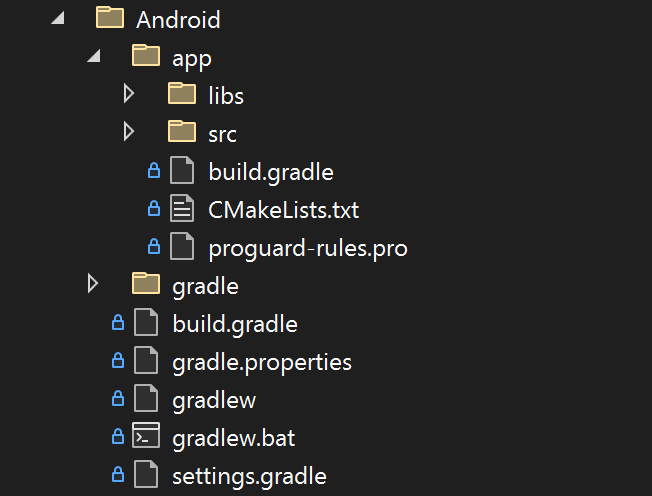 2. Copy the .aar files into the libs folder.
3. In app level build.gradle file, the one in the same directory as the libs folder, add these lines to the dependencies section. The second line is required as a dependency for libHttpClient.
```gradle theme={null}
implementation fileTree(dir: 'libs', include: ['*.aar'])
implementation 'com.squareup.okhttp3:okhttp:4.9.1'
```
## Init and Logging in
Now that your project is fully set up to use the PlayFab Services SDK for Android, follow the next steps to get some sample calls working.
### Initial setup
You'll first need to setup your application to have an instance of an Android [activity](https://developer.android.com/reference/android/app/Activity). You'll also need to setup a small C/C++ application to use the NDK with the JNI (Java Native Interface). Here's a small example for reference: [https://github.com/android/ndk-samples/tree/android-mk/hello-jni](https://github.com/android/ndk-samples/tree/android-mk/hello-jni).
The example contains a native method that returns a jstring:
```cpp theme={null}
jstring Java_com_example_hellojni_HelloJni_stringFromJNI(JNIEnv* env, jobject thiz)
```
Native methods can be used to obtain the Java VM and the application context, two things that are needed to initialize PFServices. You can create a similar method for the purpose of initialization:
```cpp theme={null}
void Java_com_example_hellojni_HelloJni_InitializeApp(JNIEnv* env, jobject appContext)
```
The Java VM can then be retrieved using the JNIEnv variable.
```cpp theme={null}
JavaVM* javaVM = nullptr;
jint res = env->GetJavaVM(&javaVM);
if (res != JNI_OK)
{
// error handling
}
```
Next, the application context can be gotten with the jobject parameter.
```cpp theme={null}
applicationContext = env->NewGlobalRef(appContext);
```
Now that you stored these two variables, we can begin to make calls.
### Headers
Include **PFServices.h** to get access to all included PlayFab functionality:
```cpp theme={null}
#include
```
### Initialization
PlayFab initialization requires two function calls: **PFServicesInitialize** and **PFServiceConfigCreateHandle**. The result of this initialization is a **PFServiceConfigHandle**. You provide this handle to a subsequent login call, directing the call to the correct title in the PlayFab backend.
```cpp theme={null}
HCInitArgs initArgs;
// Use the Java VM and application context from earlier
initArgs.javaVM = javaVm;
initArgs.applicationContext = applicationContext;
HRESULT hr = PFServicesInitialize(nullptr, &initArgs); // Add your own error handling when FAILED(hr) == true
PFServiceConfigHandle serviceConfigHandle{ nullptr };
hr = PFServiceConfigCreateHandle(
"https://ABCDEF.playfabapi.com", // PlayFab API endpoint - obtained in the Game Manager
"ABCDEF", // PlayFab Title id - obtained in the Game Manager
&serviceConfigHandle);
```
### Logging in
Once you have a **PFServiceConfigHandle**, you can use it to make a player login call. In the SDK, use a **PFAuthenticationLoginWith\*Async** method like **PFAuthenticationLoginWithCustomIDAsync**. This function allows you to log in a player to PlayFab using a custom ID.
After making a login call, you can check the status of the call with **XAsyncGetStatus**. The status starts as **E\_PENDING** and changes to **S\_OK** after the call completes successfully. If the call fails for some reason, the status reflects that failure. Error handling on all PlayFab Services calls works this way.
Along with an **S\_OK** result, you get back a **PFEntityHandle**. You use this handle to make subsequent PlayFab calls as the logged in player. It includes any material required to authenticate with the PlayFab service as that player.
```cpp theme={null}
PFAuthenticationLoginWithCustomIDRequest request{};
request.createAccount = true;
request.customId = "player1";
XAsyncBlock async{};
HRESULT hr = PFAuthenticationLoginWithCustomIDAsync(serviceConfigHandle, &request, &async); // Add your own error handling when FAILED(hr) == true
hr = XAsyncGetStatus(&async, true); // This is doing a blocking wait for completion, but you can use the XAsyncBlock to set a callback instead for async style usage
std::vector loginResultBuffer;
PFAuthenticationLoginResult const* loginResult;
size_t bufferSize;
hr = PFAuthenticationLoginWithCustomIDGetResultSize(&async, &bufferSize);
loginResultBuffer.resize(bufferSize);
PFEntityHandle entityHandle{ nullptr };
hr = PFAuthenticationLoginWithCustomIDGetResult(&async, &entityHandle, loginResultBuffer.size(), loginResultBuffer.data(), &loginResult, nullptr);
```
## Service Calls
After logging the player in, you can now make calls to the PlayFab backend. Here's an example of a call to get files stored in PlayFab for the current player.
### Getting the EntityKey
One thing that can be useful for some calls to PlayFab is knowing the **PFEntityKey** of the player. Once you have a **PFEntityToken**, you can retrieve a **PFEntityKey** with **PFEntityGetEntityKey**.
```cpp theme={null}
PFEntityKey const* pEntityKey{};
std::vector entityKeyBuffer;
size_t size{};
HRESULT hr = PFEntityGetEntityKeySize(entityHandle, &size); // Add your own error handling when FAILED(hr) == true
entityKeyBuffer.resize(size);
hr = PFEntityGetEntityKey(entityHandle, entityKeyBuffer.size(), entityKeyBuffer.data(), &pEntityKey, nullptr);
```
### Calling GetFiles
All PlayFab calls follow a similar pattern of preparing the request object, making the call (using the **PFEntityHandle** from login), creating an object to receive the response, and then calling a **GetResult** function to fill the newly created container.
```cpp theme={null}
XAsyncBlock async{};
PFDataGetFilesRequest requestFiles{};
requestFiles.entity = pEntityKey;
HRESULT hr = PFDataGetFilesAsync(entityHandle, &requestFiles, &async); // Add your own error handling when FAILED(hr) == true
hr = XAsyncGetStatus(&async, true); // This is doing a blocking wait for completion, but you can use the XAsyncBlock to set a callback instead for async style usage
size_t resultSize;
hr = PFDataGetFilesGetResultSize(&async, &resultSize);
std::vector getFilesResultBuffer(resultSize);
PFDataGetFilesResponse* getFilesResponseResult{ nullptr };
hr = PFDataGetFilesGetResult(&async, getFilesResultBuffer.size(), getFilesResultBuffer.data(), &getFilesResponseResult, nullptr);
```
## Clean up
When your game is ready to shut down or you need to clean up PlayFab for some other reason, ensure you close all open handles and call **PFServicesUninitializeAsync**.
```cpp theme={null}
PFEntityCloseHandle(entityHandle);
entityHandle = nullptr;
PFServiceConfigCloseHandle(serviceConfigHandle);
serviceConfigHandle = nullptr;
XAsyncBlock async{};
HRESULT hr = PFServicesUninitializeAsync(&async); // Add your own error handling when FAILED(hr) == true
hr = XAsyncGetStatus(&async, true); // This is doing a blocking wait for completion, but you can use the XAsyncBlock to set a callback instead for async style usage
```
## Async API pattern
The PlayFab Services SDK follows the [Asynchronous Programming Model](https://learn.microsoft.com/en-us/gaming/gdk/_content/gc/system/overviews/async-programming-model) implemented in the GDK. This programming model involves the use of Tasks and Task Queues provided by the [XAsync library](/build/core-features/common/async/async-libraries/async-library-xasync). This model is consistent with other GDK functions and extensions (such as the XBOX Services API). While it does introduce some complexity, it also brings a high degree of control over asynchronous operations.
This example shows how to make an asynchronous call to **PFDataGetFilesAsync**.
```cpp theme={null}
auto async = std::make_unique();
async->callback = [](XAsyncBlock* async)
{
std::unique_ptr asyncBlockPtr{ async }; // take ownership of XAsyncBlock
size_t resultSize;
HRESULT hr = PFDataGetFilesGetResultSize(async, &resultSize);
if (SUCCEEDED(hr))
{
std::vector getFilesResultBuffer(resultSize);
PFDataGetFilesResponse* getFilesResponseResult{ nullptr };
PFDataGetFilesGetResult(async, getFilesResultBuffer.size(), getFilesResultBuffer.data(), &getFilesResponseResult, nullptr);
}
};
PFDataGetFilesRequest requestFiles{};
requestFiles.entity = m_pEntityKey;
HRESULT hr = PFDataGetFilesAsync(m_entityHandle, &requestFiles, async.get());
if (SUCCEEDED(hr))
{
async.release(); // at this point, the callback will be called so release the unique ptr
}
```
## Error handling
Completed **XAsync** operations return HTTP status codes. An error status code manifests as a failure **HRESULT** such as **HTTP\_E\_STATUS\_NOT\_FOUND** when calling **XAsyncGetStatus()** or one of the **PF\*Get()** APIs.
To see detailed error messages returned by the service see the next section on debugging. These detailed error messages can be useful during development to better understand how the PlayFab service reacts to requests from the client.
## Debugging
The easiest way to see the results and debug any calls in the PlayFab Services SDK is to enable [Debug Tracing](/services/playfab/sdks/c/tracing). Enabling debug tracing allows you to both see the results in the debugger output window and hook the results into your game's own logs.
## Reference
[API reference documentation](/services/playfab/api-references/c/pfauthentication/pfauthentication_members)
## Related topics
- [PlayFab supported platforms](/services/playfab/sdks/platforms/index.md)
- [PlayFab supported languages](/services/playfab/sdks/languages/index.md)
- [Voice Audio Noise Suppression](/services/playfab/community/voice-communications/concepts-noise-suppression.md)
- [Java quickstart for Native and Android Studio](/services/playfab/sdks/java/quickstart.md)
- [Push Notification for Android](/services/playfab/live-service-management/game-configuration/title-communications/push-notifications/push-notifications-for-android.md)
2. Copy the .aar files into the libs folder.
3. In app level build.gradle file, the one in the same directory as the libs folder, add these lines to the dependencies section. The second line is required as a dependency for libHttpClient.
```gradle theme={null}
implementation fileTree(dir: 'libs', include: ['*.aar'])
implementation 'com.squareup.okhttp3:okhttp:4.9.1'
```
## Init and Logging in
Now that your project is fully set up to use the PlayFab Services SDK for Android, follow the next steps to get some sample calls working.
### Initial setup
You'll first need to setup your application to have an instance of an Android [activity](https://developer.android.com/reference/android/app/Activity). You'll also need to setup a small C/C++ application to use the NDK with the JNI (Java Native Interface). Here's a small example for reference: [https://github.com/android/ndk-samples/tree/android-mk/hello-jni](https://github.com/android/ndk-samples/tree/android-mk/hello-jni).
The example contains a native method that returns a jstring:
```cpp theme={null}
jstring Java_com_example_hellojni_HelloJni_stringFromJNI(JNIEnv* env, jobject thiz)
```
Native methods can be used to obtain the Java VM and the application context, two things that are needed to initialize PFServices. You can create a similar method for the purpose of initialization:
```cpp theme={null}
void Java_com_example_hellojni_HelloJni_InitializeApp(JNIEnv* env, jobject appContext)
```
The Java VM can then be retrieved using the JNIEnv variable.
```cpp theme={null}
JavaVM* javaVM = nullptr;
jint res = env->GetJavaVM(&javaVM);
if (res != JNI_OK)
{
// error handling
}
```
Next, the application context can be gotten with the jobject parameter.
```cpp theme={null}
applicationContext = env->NewGlobalRef(appContext);
```
Now that you stored these two variables, we can begin to make calls.
### Headers
Include **PFServices.h** to get access to all included PlayFab functionality:
```cpp theme={null}
#include
```
### Initialization
PlayFab initialization requires two function calls: **PFServicesInitialize** and **PFServiceConfigCreateHandle**. The result of this initialization is a **PFServiceConfigHandle**. You provide this handle to a subsequent login call, directing the call to the correct title in the PlayFab backend.
```cpp theme={null}
HCInitArgs initArgs;
// Use the Java VM and application context from earlier
initArgs.javaVM = javaVm;
initArgs.applicationContext = applicationContext;
HRESULT hr = PFServicesInitialize(nullptr, &initArgs); // Add your own error handling when FAILED(hr) == true
PFServiceConfigHandle serviceConfigHandle{ nullptr };
hr = PFServiceConfigCreateHandle(
"https://ABCDEF.playfabapi.com", // PlayFab API endpoint - obtained in the Game Manager
"ABCDEF", // PlayFab Title id - obtained in the Game Manager
&serviceConfigHandle);
```
### Logging in
Once you have a **PFServiceConfigHandle**, you can use it to make a player login call. In the SDK, use a **PFAuthenticationLoginWith\*Async** method like **PFAuthenticationLoginWithCustomIDAsync**. This function allows you to log in a player to PlayFab using a custom ID.
After making a login call, you can check the status of the call with **XAsyncGetStatus**. The status starts as **E\_PENDING** and changes to **S\_OK** after the call completes successfully. If the call fails for some reason, the status reflects that failure. Error handling on all PlayFab Services calls works this way.
Along with an **S\_OK** result, you get back a **PFEntityHandle**. You use this handle to make subsequent PlayFab calls as the logged in player. It includes any material required to authenticate with the PlayFab service as that player.
```cpp theme={null}
PFAuthenticationLoginWithCustomIDRequest request{};
request.createAccount = true;
request.customId = "player1";
XAsyncBlock async{};
HRESULT hr = PFAuthenticationLoginWithCustomIDAsync(serviceConfigHandle, &request, &async); // Add your own error handling when FAILED(hr) == true
hr = XAsyncGetStatus(&async, true); // This is doing a blocking wait for completion, but you can use the XAsyncBlock to set a callback instead for async style usage
std::vector loginResultBuffer;
PFAuthenticationLoginResult const* loginResult;
size_t bufferSize;
hr = PFAuthenticationLoginWithCustomIDGetResultSize(&async, &bufferSize);
loginResultBuffer.resize(bufferSize);
PFEntityHandle entityHandle{ nullptr };
hr = PFAuthenticationLoginWithCustomIDGetResult(&async, &entityHandle, loginResultBuffer.size(), loginResultBuffer.data(), &loginResult, nullptr);
```
## Service Calls
After logging the player in, you can now make calls to the PlayFab backend. Here's an example of a call to get files stored in PlayFab for the current player.
### Getting the EntityKey
One thing that can be useful for some calls to PlayFab is knowing the **PFEntityKey** of the player. Once you have a **PFEntityToken**, you can retrieve a **PFEntityKey** with **PFEntityGetEntityKey**.
```cpp theme={null}
PFEntityKey const* pEntityKey{};
std::vector entityKeyBuffer;
size_t size{};
HRESULT hr = PFEntityGetEntityKeySize(entityHandle, &size); // Add your own error handling when FAILED(hr) == true
entityKeyBuffer.resize(size);
hr = PFEntityGetEntityKey(entityHandle, entityKeyBuffer.size(), entityKeyBuffer.data(), &pEntityKey, nullptr);
```
### Calling GetFiles
All PlayFab calls follow a similar pattern of preparing the request object, making the call (using the **PFEntityHandle** from login), creating an object to receive the response, and then calling a **GetResult** function to fill the newly created container.
```cpp theme={null}
XAsyncBlock async{};
PFDataGetFilesRequest requestFiles{};
requestFiles.entity = pEntityKey;
HRESULT hr = PFDataGetFilesAsync(entityHandle, &requestFiles, &async); // Add your own error handling when FAILED(hr) == true
hr = XAsyncGetStatus(&async, true); // This is doing a blocking wait for completion, but you can use the XAsyncBlock to set a callback instead for async style usage
size_t resultSize;
hr = PFDataGetFilesGetResultSize(&async, &resultSize);
std::vector getFilesResultBuffer(resultSize);
PFDataGetFilesResponse* getFilesResponseResult{ nullptr };
hr = PFDataGetFilesGetResult(&async, getFilesResultBuffer.size(), getFilesResultBuffer.data(), &getFilesResponseResult, nullptr);
```
## Clean up
When your game is ready to shut down or you need to clean up PlayFab for some other reason, ensure you close all open handles and call **PFServicesUninitializeAsync**.
```cpp theme={null}
PFEntityCloseHandle(entityHandle);
entityHandle = nullptr;
PFServiceConfigCloseHandle(serviceConfigHandle);
serviceConfigHandle = nullptr;
XAsyncBlock async{};
HRESULT hr = PFServicesUninitializeAsync(&async); // Add your own error handling when FAILED(hr) == true
hr = XAsyncGetStatus(&async, true); // This is doing a blocking wait for completion, but you can use the XAsyncBlock to set a callback instead for async style usage
```
## Async API pattern
The PlayFab Services SDK follows the [Asynchronous Programming Model](https://learn.microsoft.com/en-us/gaming/gdk/_content/gc/system/overviews/async-programming-model) implemented in the GDK. This programming model involves the use of Tasks and Task Queues provided by the [XAsync library](/build/core-features/common/async/async-libraries/async-library-xasync). This model is consistent with other GDK functions and extensions (such as the XBOX Services API). While it does introduce some complexity, it also brings a high degree of control over asynchronous operations.
This example shows how to make an asynchronous call to **PFDataGetFilesAsync**.
```cpp theme={null}
auto async = std::make_unique();
async->callback = [](XAsyncBlock* async)
{
std::unique_ptr asyncBlockPtr{ async }; // take ownership of XAsyncBlock
size_t resultSize;
HRESULT hr = PFDataGetFilesGetResultSize(async, &resultSize);
if (SUCCEEDED(hr))
{
std::vector getFilesResultBuffer(resultSize);
PFDataGetFilesResponse* getFilesResponseResult{ nullptr };
PFDataGetFilesGetResult(async, getFilesResultBuffer.size(), getFilesResultBuffer.data(), &getFilesResponseResult, nullptr);
}
};
PFDataGetFilesRequest requestFiles{};
requestFiles.entity = m_pEntityKey;
HRESULT hr = PFDataGetFilesAsync(m_entityHandle, &requestFiles, async.get());
if (SUCCEEDED(hr))
{
async.release(); // at this point, the callback will be called so release the unique ptr
}
```
## Error handling
Completed **XAsync** operations return HTTP status codes. An error status code manifests as a failure **HRESULT** such as **HTTP\_E\_STATUS\_NOT\_FOUND** when calling **XAsyncGetStatus()** or one of the **PF\*Get()** APIs.
To see detailed error messages returned by the service see the next section on debugging. These detailed error messages can be useful during development to better understand how the PlayFab service reacts to requests from the client.
## Debugging
The easiest way to see the results and debug any calls in the PlayFab Services SDK is to enable [Debug Tracing](/services/playfab/sdks/c/tracing). Enabling debug tracing allows you to both see the results in the debugger output window and hook the results into your game's own logs.
## Reference
[API reference documentation](/services/playfab/api-references/c/pfauthentication/pfauthentication_members)
## Related topics
- [PlayFab supported platforms](/services/playfab/sdks/platforms/index.md)
- [PlayFab supported languages](/services/playfab/sdks/languages/index.md)
- [Voice Audio Noise Suppression](/services/playfab/community/voice-communications/concepts-noise-suppression.md)
- [Java quickstart for Native and Android Studio](/services/playfab/sdks/java/quickstart.md)
- [Push Notification for Android](/services/playfab/live-service-management/game-configuration/title-communications/push-notifications/push-notifications-for-android.md)