> ## Documentation Index
> Fetch the complete documentation index at: https://devdocs.xbox.com/llms.txt
> Use this file to discover all available pages before exploring further.
# Setting up PlayFab authentication using Twitch and HTML5
> Step-by-step tutorial for adding Twitch login to a PlayFab title with HTML5 and JavaScript, covering Twitch app registration and OAuth player authentication.
This tutorial has been designed to guide you through the process of PlayFab authentication, using Twitch and HTML5/JavaScript.
## Requirements
Prior to beginning, you should have:
* A [Twitch Account](https://www.twitch.tv/) for testing.
* A Registered [PlayFab](https://developer.playfab.com/) title.
* Familiarity with [Login basics and Best Practices](/services/playfab/identity/player-identity/login/login-basics-best-practices).
* At the minimum, a server with a valid domain name to serve static HTML files.
Consult the [Running an HTTP server for testing](/services/playfab/identity/player-identity/platform-specific-authentication/running-an-http-server-for-testing) tutorial for information on how to set up a server with a valid domain name.
## Server and domain
This tutorial requires a web server, in order to follow the instructions. If you don't have a registered remote web server yet, follow our [Running an HTTP server for testing](/services/playfab/identity/player-identity/platform-specific-authentication/running-an-http-server-for-testing) tutorial, for information on how to run a local web server.
Throughout this tutorial, we'll assume your domain is `[http://localhost/](http://localhost/)`.
## Registering a Twitch application
Start by navigating to the [Twitch website](https://www.twitch.tv/), and verifying that you're logged in.
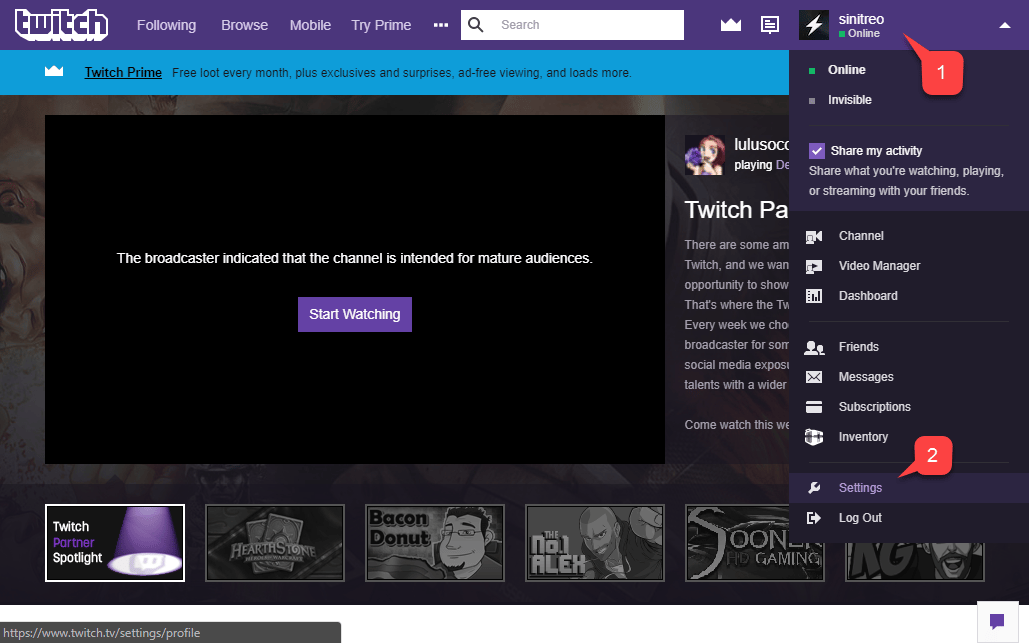
1. Navigate to the **Account** drop-down.
2. Select **Settings** from the menu provided.
On the **Settings** page, select **Connections (1)**, as shown below.
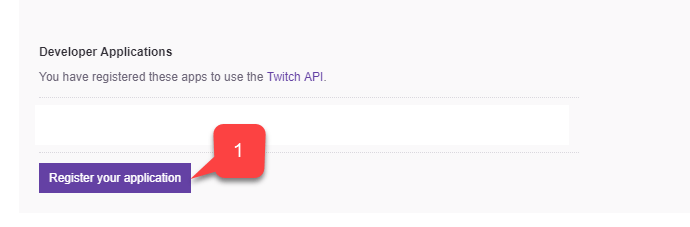
At the bottom of the page, select the **Register your application (1)** button, as shown below.
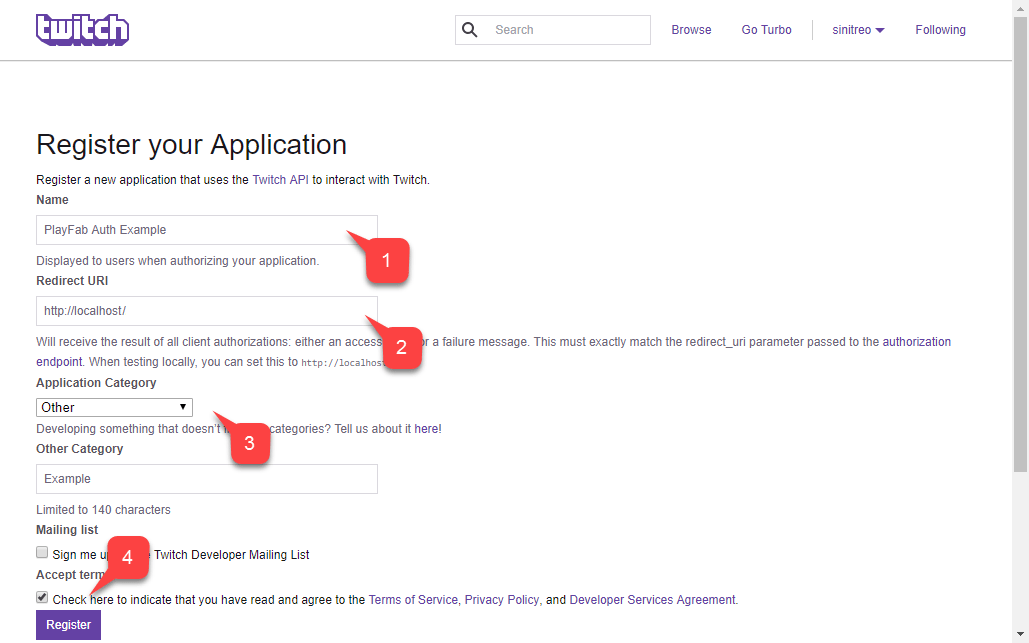
A page will open that lets you configure a new app.
1. Fill in the **Name** of the **Application**.
2. Enter the **Redirect URL**.
3. Enter the **Application Category**.
4. Then agree to the **Twitch** terms, and select the **Register** button.
When testing using a local web server, Twitch allows you to use `****` as a redirect URL. Make sure to include the leading slash **/**. Without a leading slash, Twitch will fail to recognize the localhost URL.
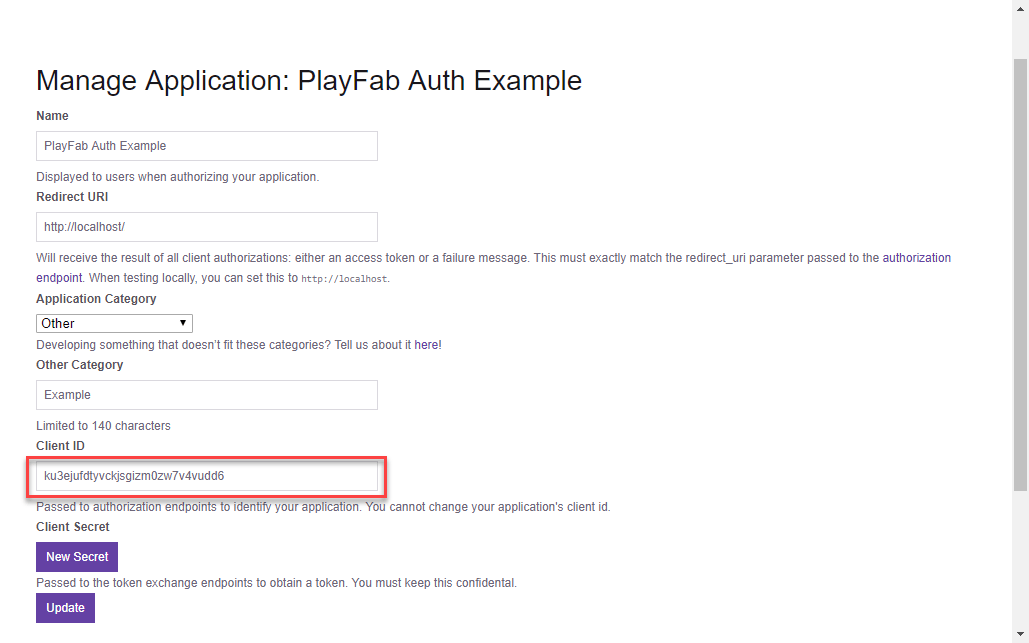
Once the application is registered, the page will be updated and reveal the Client ID for your application.
Keep this Client ID in a safe and easily accessible place, as you'll be using it later to configure your PlayFab title.
## Configuring a PlayFab title
Once you acquire your Twitch Client ID, you can enable and configure a Twitch Add-on for your PlayFab title.
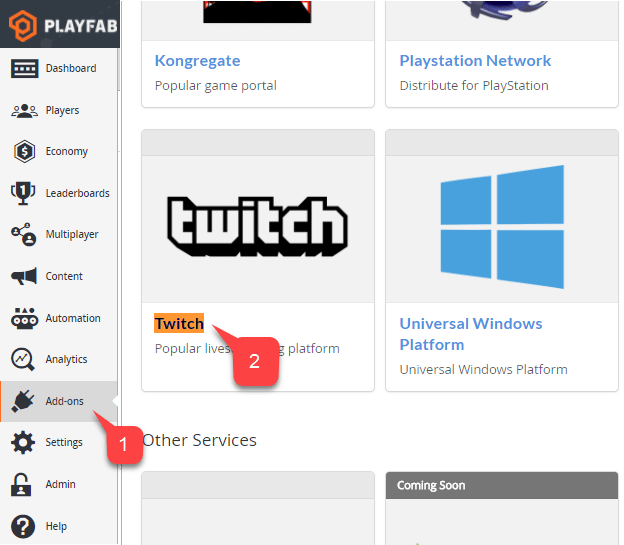
1. On your **PlayFab Title** screen, go to the menu and select the **Add-ons** item.
2. Then select the **Twitch** icon link.
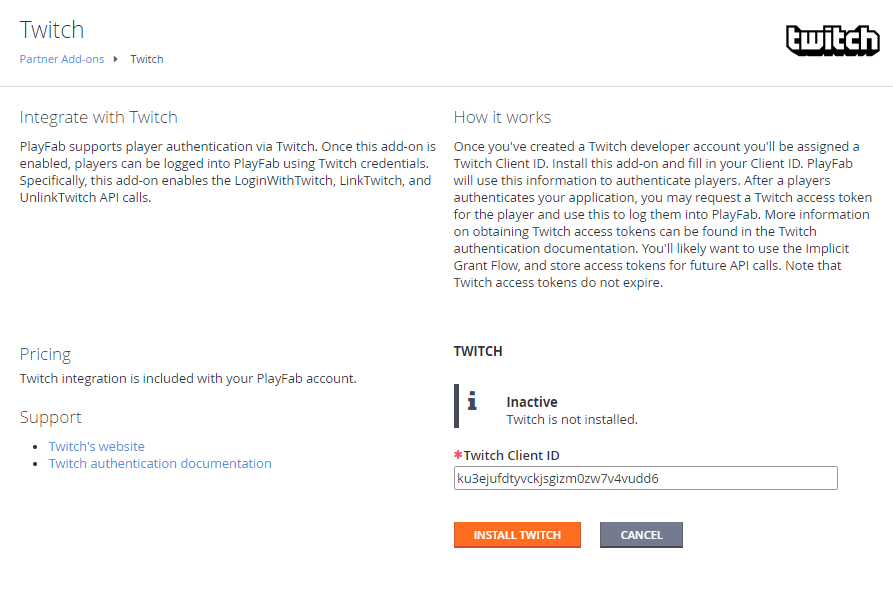
On the **Twitch** page:
* A **Settings** page will open for the **Twitch Add-on**.
* Enter your **Twitch Client ID**.
* Select the **Install Twitch** button.
Take a moment to verify that the add-on was installed, and that no errors have occurred. This concludes configuring the PlayFab title.
## Testing
Use the following HTML file to test PlayFab authentication using Twitch.
Make sure to replace `TWITCH_CLIENT_ID_GOES_HERE` and `PLAYFAB_TITLE_ID_GOES_HERE` with your own values.
```html theme={null}
Twitch Auth Example
```
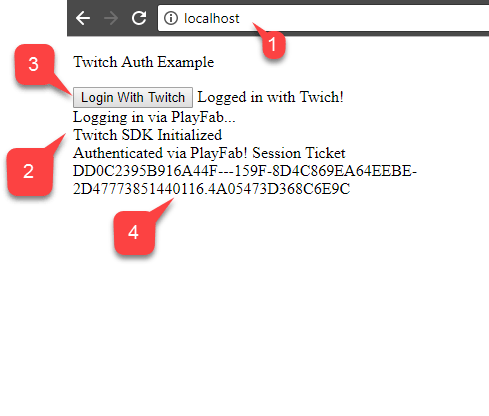
1. Request the following file from your server, using the domain you set up during the Twitch application configuration `` in our case.
2. Once the page opens, wait for the message indicating that the **Twitch SDK** was initialized.
3. Then select the **Login with Twitch** button.
4. Follow any **Twitch** instructions in the pop-up window, and watch the output.
If you *already have* a Twitch auth session going when reaching the page, it's possible for callbacks to fire in a different, unexpected order. This case is shown in the screenshot shown below. However, you should make sure that only **Logging in via PlayFab** follows after **Logged in with Twitch**. This indicates that the token was received or restored from the local storage, and we don't have to wait for the Twitch SDK to start signing in to PlayFab.
If PlayFab manages to acquire a `SessionTicket`, you have successfully integrated Twitch authentication with your PlayFab app.
## Related topics
- [Platform-Specific Authentication](/services/playfab/identity/player-identity/platform-specific-authentication/index.md)
- [Setting up PlayFab authentication using Google and HTML5](/services/playfab/identity/player-identity/platform-specific-authentication/google-html5.md)
- [Setting up PlayFab authentication using Kongregate and HTML5](/services/playfab/identity/player-identity/platform-specific-authentication/kongregate-html5.md)
- [Setting up PlayFab authentication using Facebook and HTML5](/services/playfab/identity/player-identity/platform-specific-authentication/facebook-html5.md)
- [Server Anonymous Login Authentication](/services/playfab/identity/player-identity/platform-specific-authentication/anonymous-login.md)
 On the **Settings** page, select **Connections (1)**, as shown below.
 At the bottom of the page, select the **Register your application (1)** button, as shown below.
 A page will open that lets you configure a new app.
1. Fill in the **Name** of the **Application**.
2. Enter the **Redirect URL**.
3. Enter the **Application Category**.
4. Then agree to the **Twitch** terms, and select the **Register** button.
A page will open that lets you configure a new app.
1. Fill in the **Name** of the **Application**.
2. Enter the **Redirect URL**.
3. Enter the **Application Category**.
4. Then agree to the **Twitch** terms, and select the **Register** button.
 ## Configuring a PlayFab title
Once you acquire your Twitch Client ID, you can enable and configure a Twitch Add-on for your PlayFab title.
1. On your **PlayFab Title** screen, go to the menu and select the **Add-ons** item.
2. Then select the **Twitch** icon link.
## Configuring a PlayFab title
Once you acquire your Twitch Client ID, you can enable and configure a Twitch Add-on for your PlayFab title.
1. On your **PlayFab Title** screen, go to the menu and select the **Add-ons** item.
2. Then select the **Twitch** icon link.
 On the **Twitch** page:
* A **Settings** page will open for the **Twitch Add-on**.
* Enter your **Twitch Client ID**.
* Select the **Install Twitch** button.
On the **Twitch** page:
* A **Settings** page will open for the **Twitch Add-on**.
* Enter your **Twitch Client ID**.
* Select the **Install Twitch** button.
 Take a moment to verify that the add-on was installed, and that no errors have occurred. This concludes configuring the PlayFab title.
## Testing
Use the following HTML file to test PlayFab authentication using Twitch.
Make sure to replace `TWITCH_CLIENT_ID_GOES_HERE` and `PLAYFAB_TITLE_ID_GOES_HERE` with your own values.
```html theme={null}
Take a moment to verify that the add-on was installed, and that no errors have occurred. This concludes configuring the PlayFab title.
## Testing
Use the following HTML file to test PlayFab authentication using Twitch.
Make sure to replace `TWITCH_CLIENT_ID_GOES_HERE` and `PLAYFAB_TITLE_ID_GOES_HERE` with your own values.
```html theme={null}
 If PlayFab manages to acquire a `SessionTicket`, you have successfully integrated Twitch authentication with your PlayFab app.
## Related topics
- [Platform-Specific Authentication](/services/playfab/identity/player-identity/platform-specific-authentication/index.md)
- [Setting up PlayFab authentication using Google and HTML5](/services/playfab/identity/player-identity/platform-specific-authentication/google-html5.md)
- [Setting up PlayFab authentication using Kongregate and HTML5](/services/playfab/identity/player-identity/platform-specific-authentication/kongregate-html5.md)
- [Setting up PlayFab authentication using Facebook and HTML5](/services/playfab/identity/player-identity/platform-specific-authentication/facebook-html5.md)
- [Server Anonymous Login Authentication](/services/playfab/identity/player-identity/platform-specific-authentication/anonymous-login.md)
If PlayFab manages to acquire a `SessionTicket`, you have successfully integrated Twitch authentication with your PlayFab app.
## Related topics
- [Platform-Specific Authentication](/services/playfab/identity/player-identity/platform-specific-authentication/index.md)
- [Setting up PlayFab authentication using Google and HTML5](/services/playfab/identity/player-identity/platform-specific-authentication/google-html5.md)
- [Setting up PlayFab authentication using Kongregate and HTML5](/services/playfab/identity/player-identity/platform-specific-authentication/kongregate-html5.md)
- [Setting up PlayFab authentication using Facebook and HTML5](/services/playfab/identity/player-identity/platform-specific-authentication/facebook-html5.md)
- [Server Anonymous Login Authentication](/services/playfab/identity/player-identity/platform-specific-authentication/anonymous-login.md)