> ## Documentation Index
> Fetch the complete documentation index at: https://devdocs.xbox.com/llms.txt
> Use this file to discover all available pages before exploring further.
# Setting up PlayFab authentication using Google and HTML5
> Step-by-step tutorial for adding Google sign-in to a PlayFab title using HTML5 and JavaScript, covering Google API setup and OAuth player authentication.
This tutorial guides you through the process of PlayFab authentication using Google and HTML5/JavaScript.
## Requirements
You'll need:
* A [Google account](https://google.com/) for testing.
* A Registered `[PlayFab](https://developer.playfab.com/)` title.
* Familiarity with [Login basics and Best Practices](/services/playfab/identity/player-identity/login/login-basics-best-practices).
* At the minimum, a server with a valid domain name to act as a static HTML file. Consult the [Running an HTTP server for testing](/services/playfab/identity/player-identity/platform-specific-authentication/running-an-http-server-for-testing) tutorial for information on how to set one up.
## Server and domain
This guide requires a server with a valid domain to follow. If you don't have a registered domain and remote web server yet, follow our [Running an HTTP server for testing](/services/playfab/identity/player-identity/platform-specific-authentication/running-an-http-server-for-testing) tutorial for information on how to set one to run a local web server with a valid domain name.
Throughout this guide, we'll assume your domain is `[http://playfab.example](http://playfab.example)`.
## Registering a Google API project
Start by navigating to the [Google API Console](https://console.developers.google.com/):
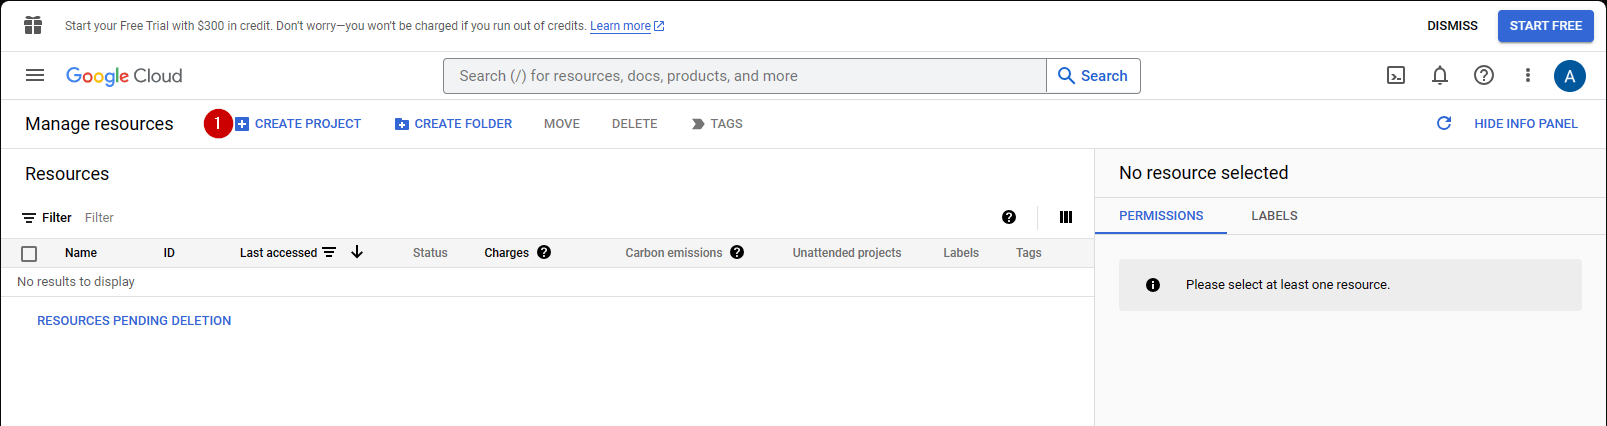
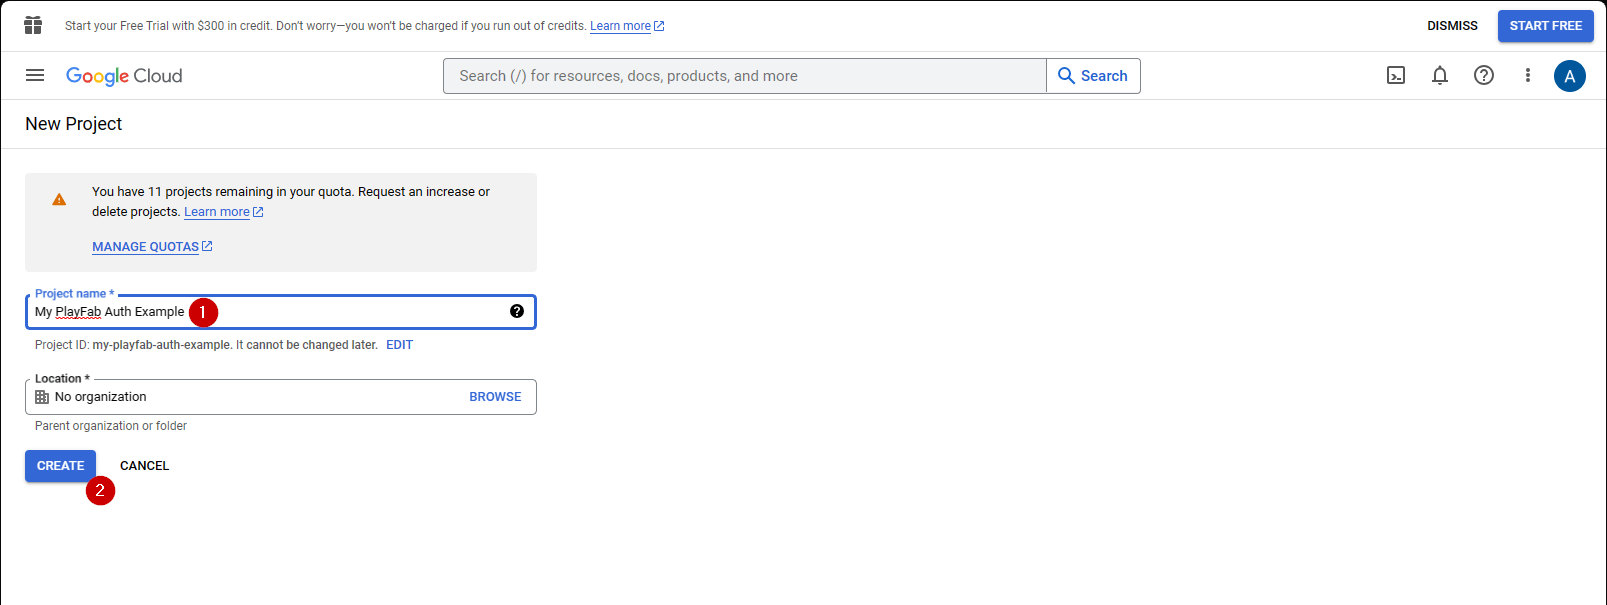
1. Navigate to **CREATE PROJECT** and select it.
1. Fill in the field under **Project Name**.
2. Select the **Create** button.
It's normal for **API Manager** to take 10-20 seconds to generate the project.
Once the Project is created:
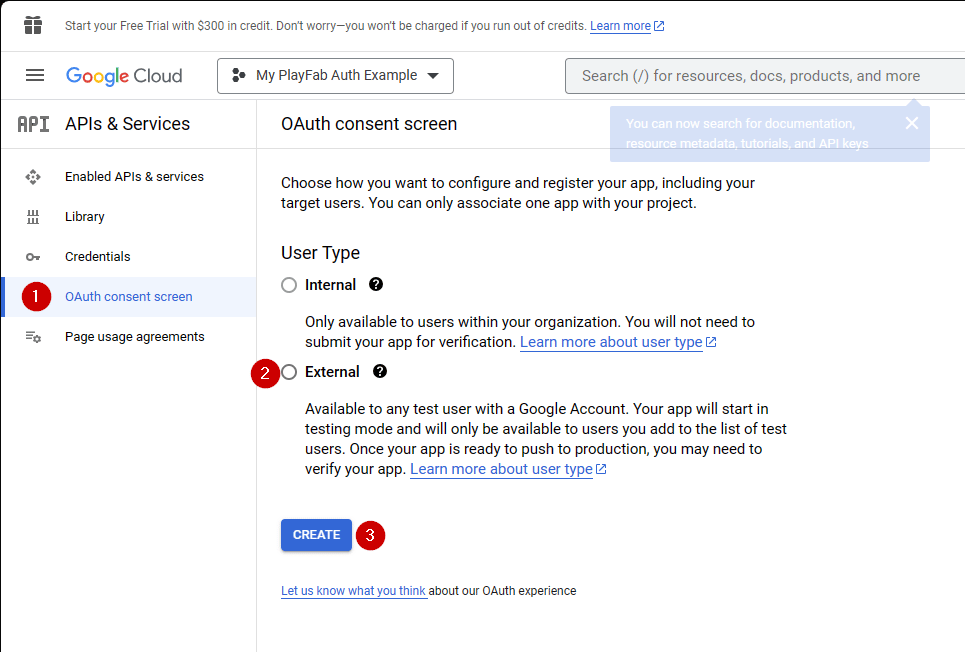
1. Navigate to the **OAuth consent screen**.
2. Select **External** under User Type
3. Then select **Create**.
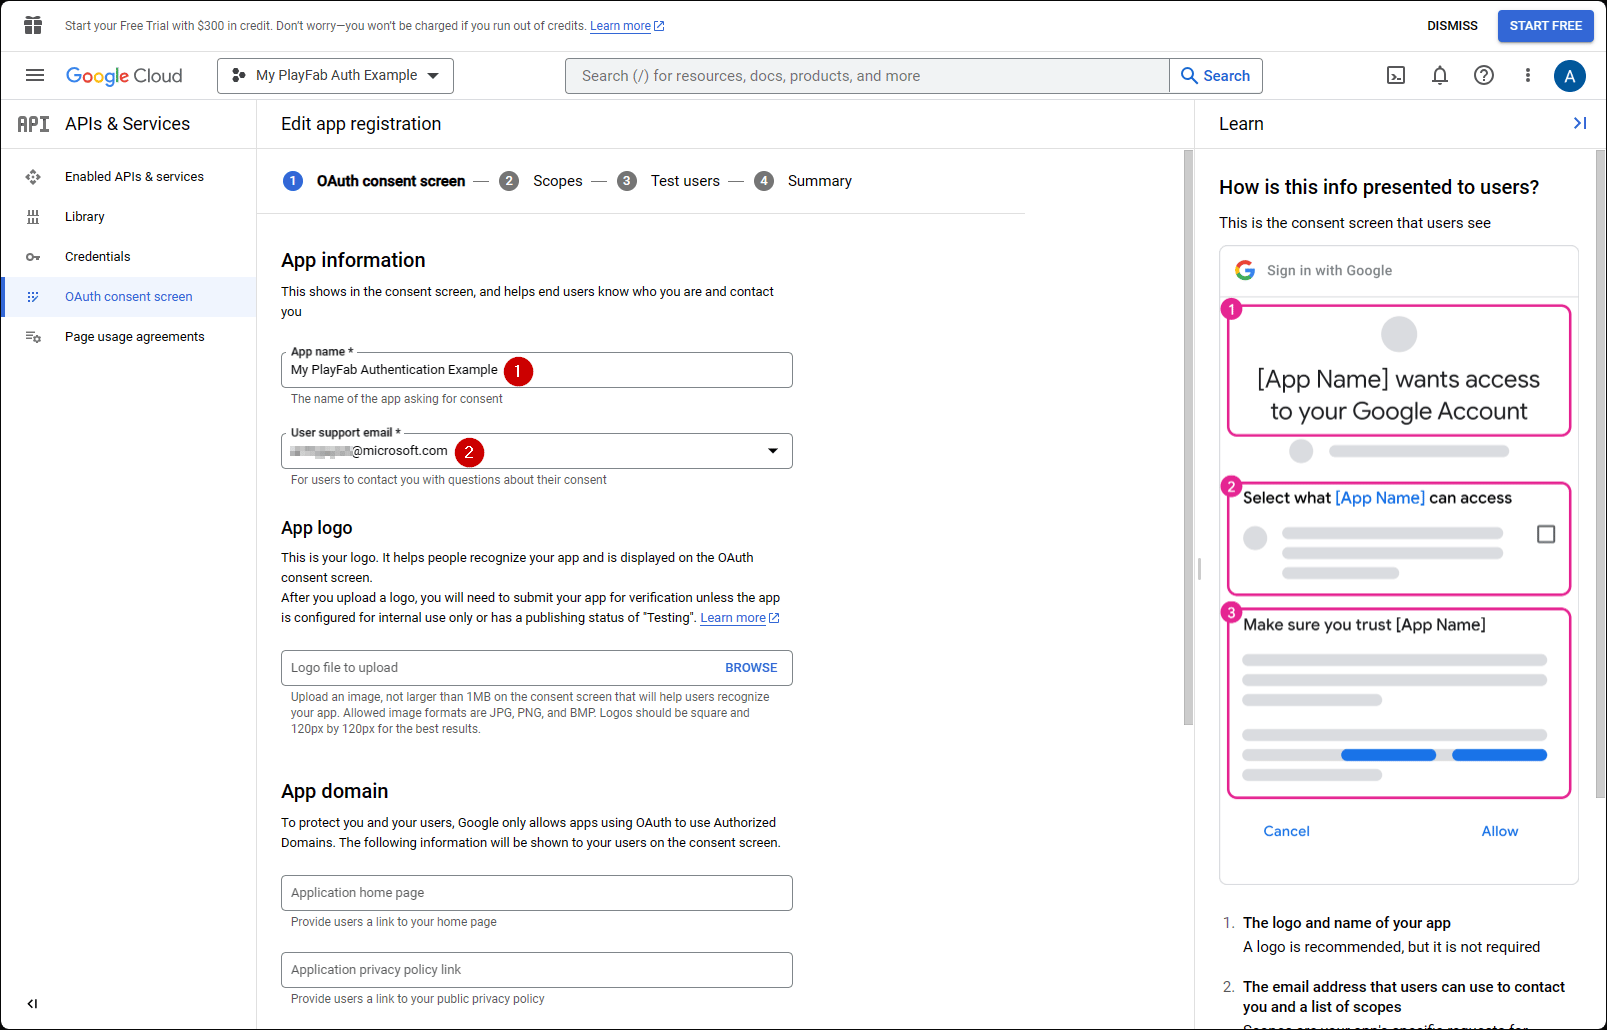
1. Fill out an App Name
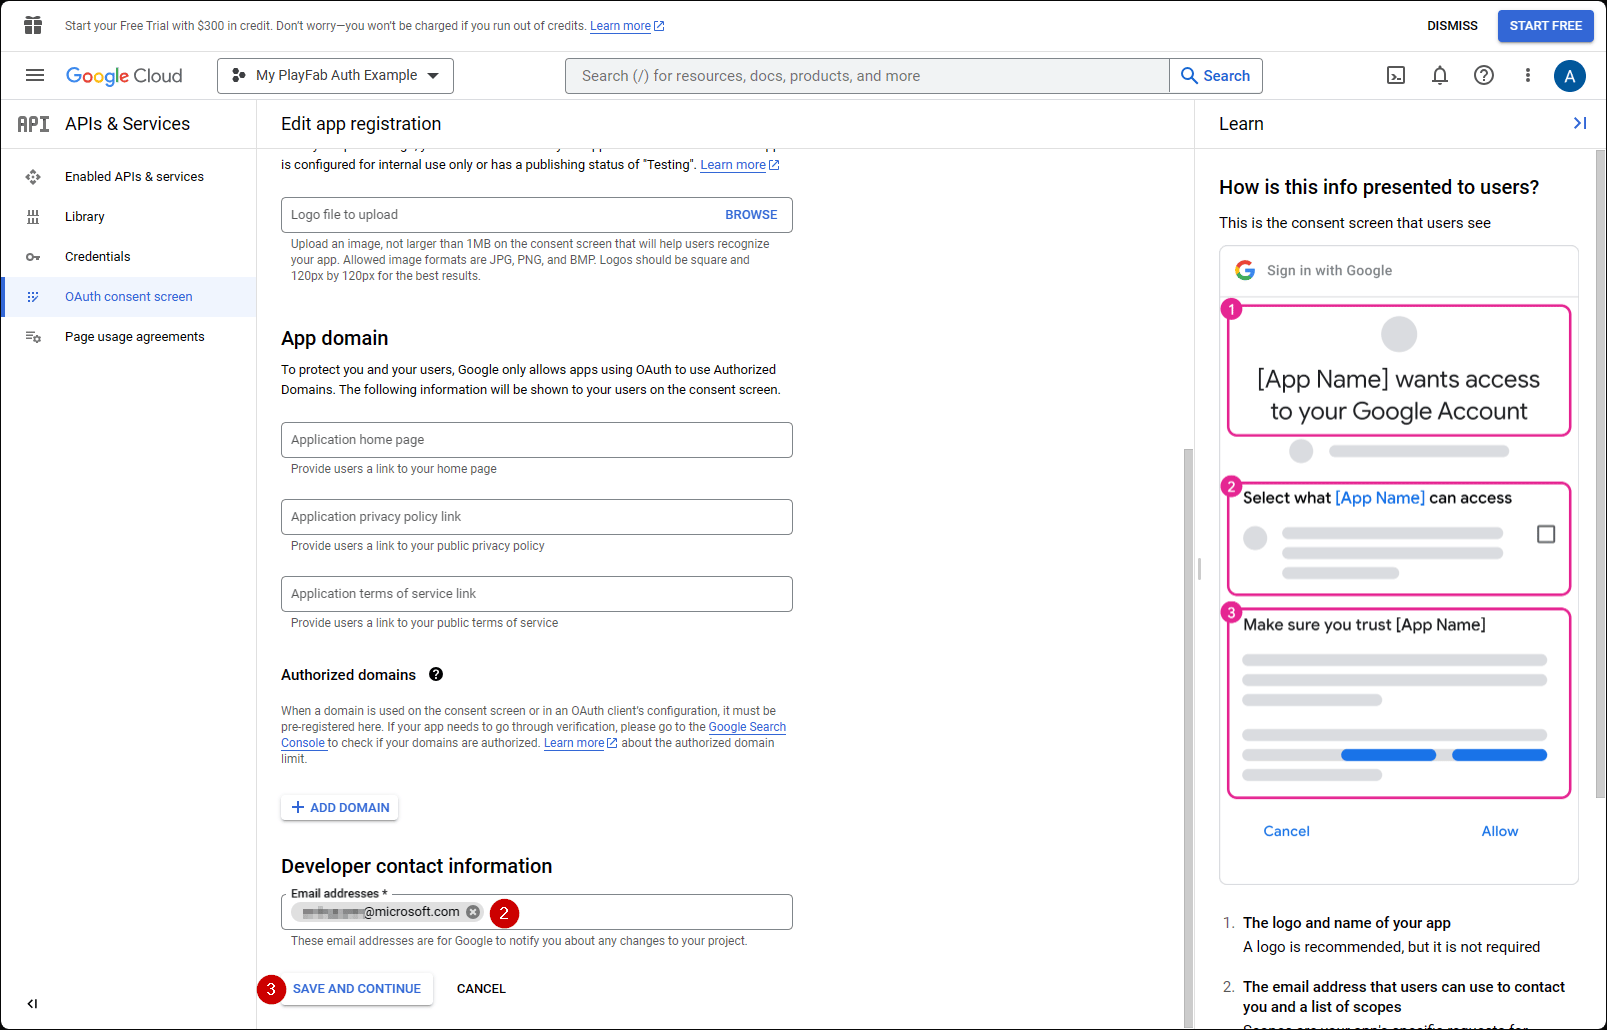
2. Make sure there are emails for **user support email** and **Developer Contact Email**
3. Then select **SAVE AND CONTINUE**
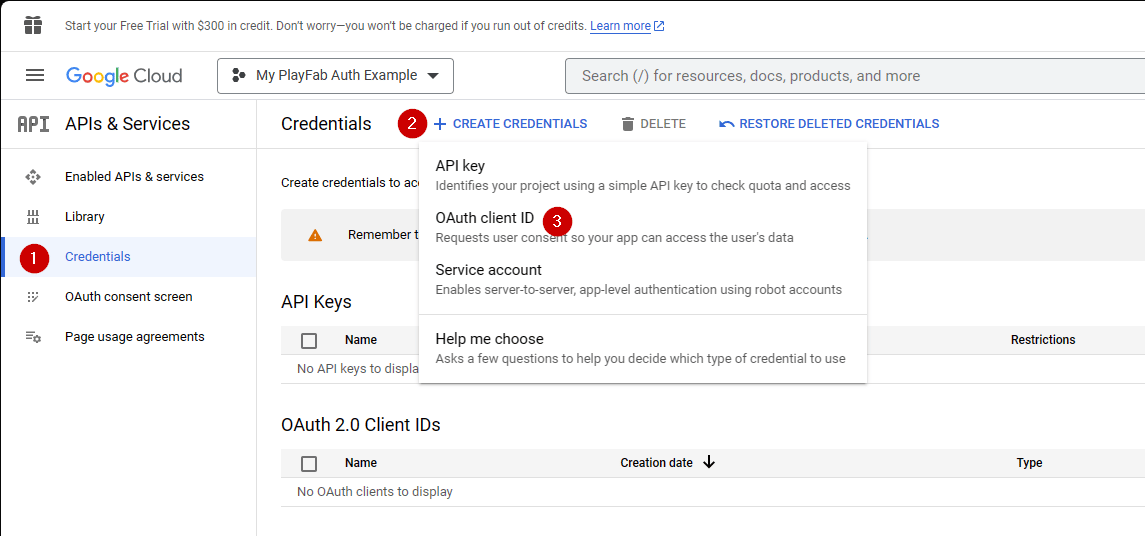
1. Next, navigate to **Credentials**.
2. Select **Create credentials**.
3. Then select **OAuth client ID**.
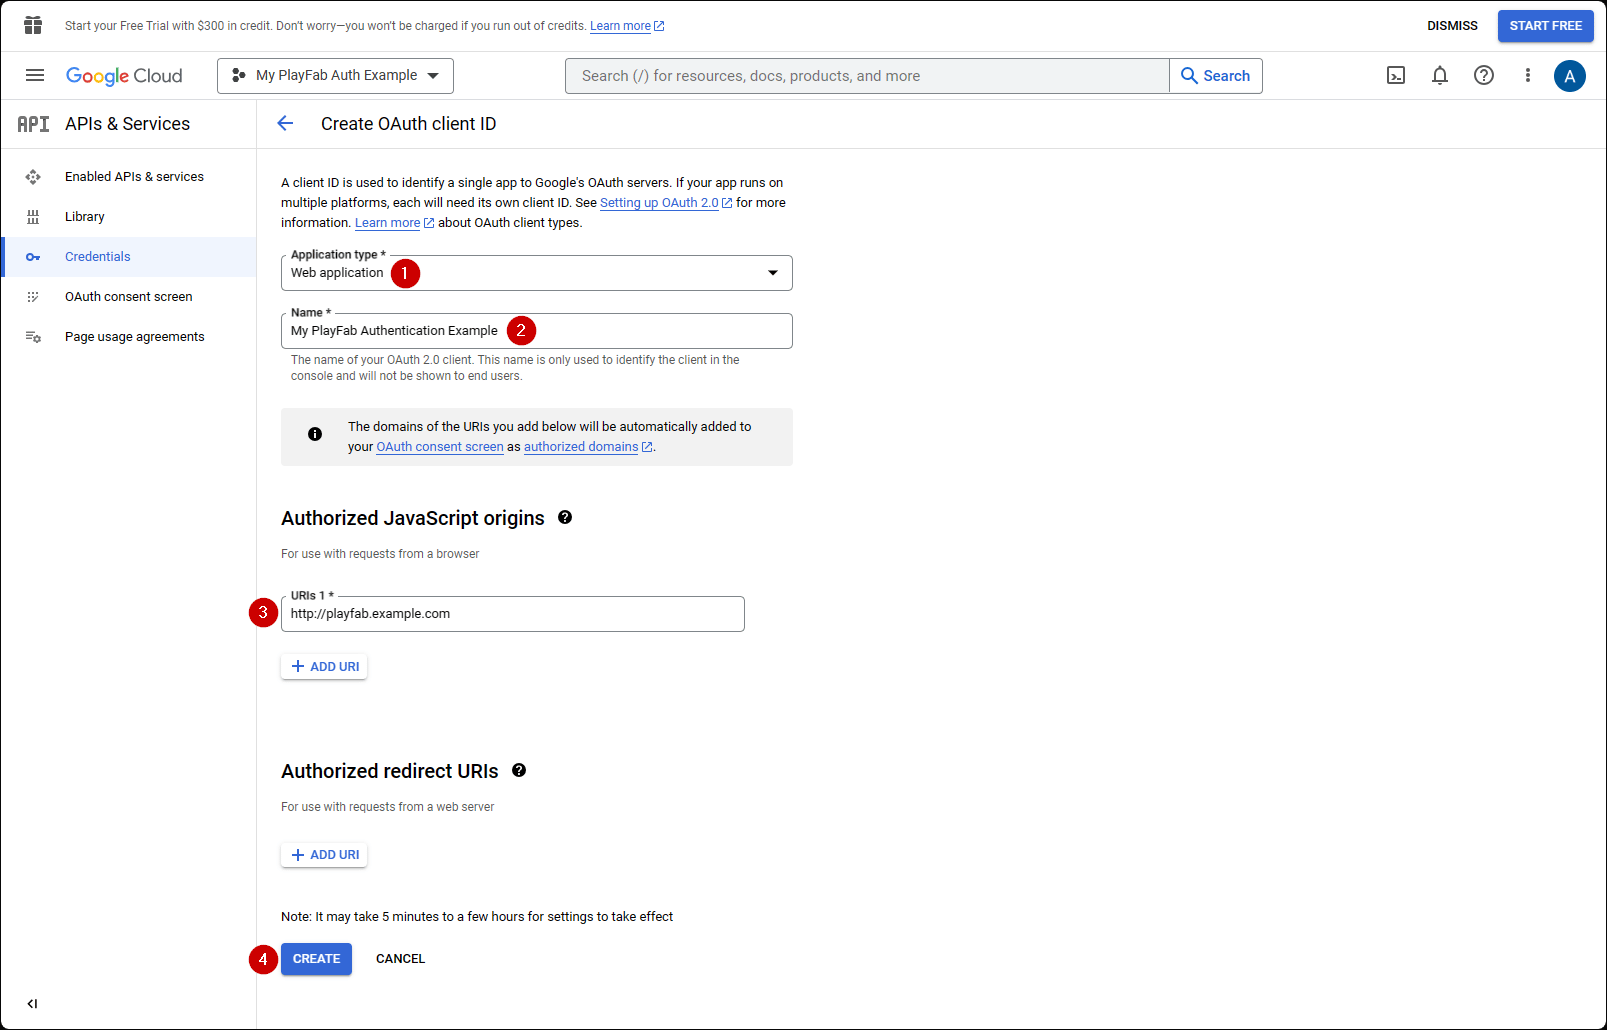
1. Select **Web Application** as your **Application type**.
2. Give your application a **Name**.
3. Add your domain to **Authorized JavaScript origins** - `[PlayFab](http://playfab.example.com)` in our case.
4. Finally, select the **Create** button to commit your changes.
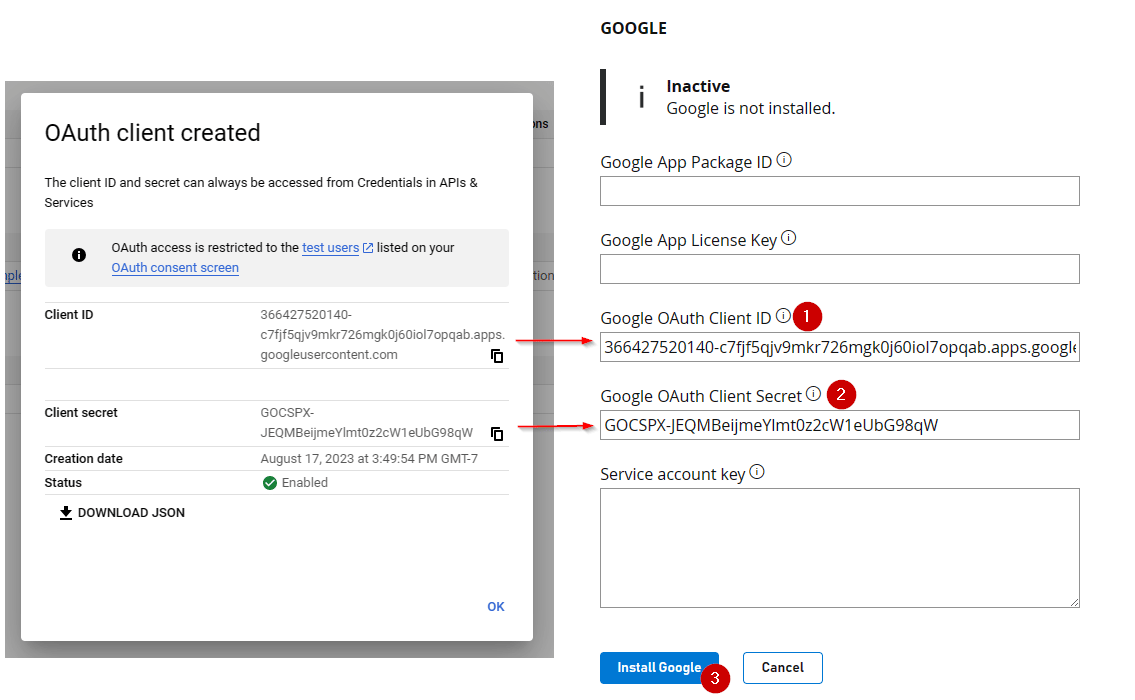
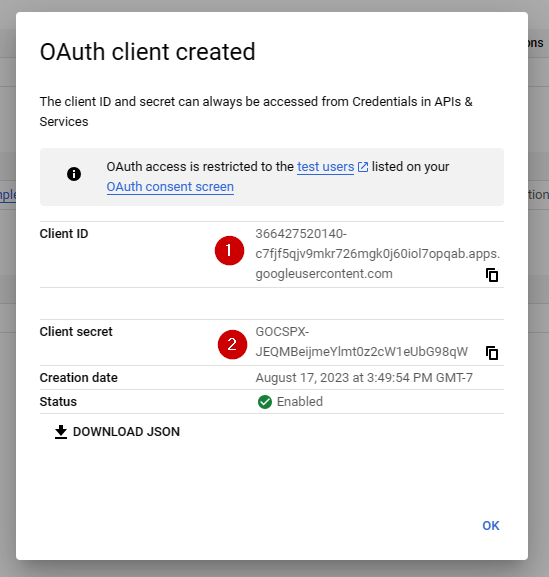
On the **OAuth client** screen shown below, the Google API Manager reveals two important pieces of information:
1. The **client ID**
2. The **client secret**.
Be sure to copy and save these values in a safe place that is easily accessible, as they'll be used in the authorization process shown later in this tutorial.
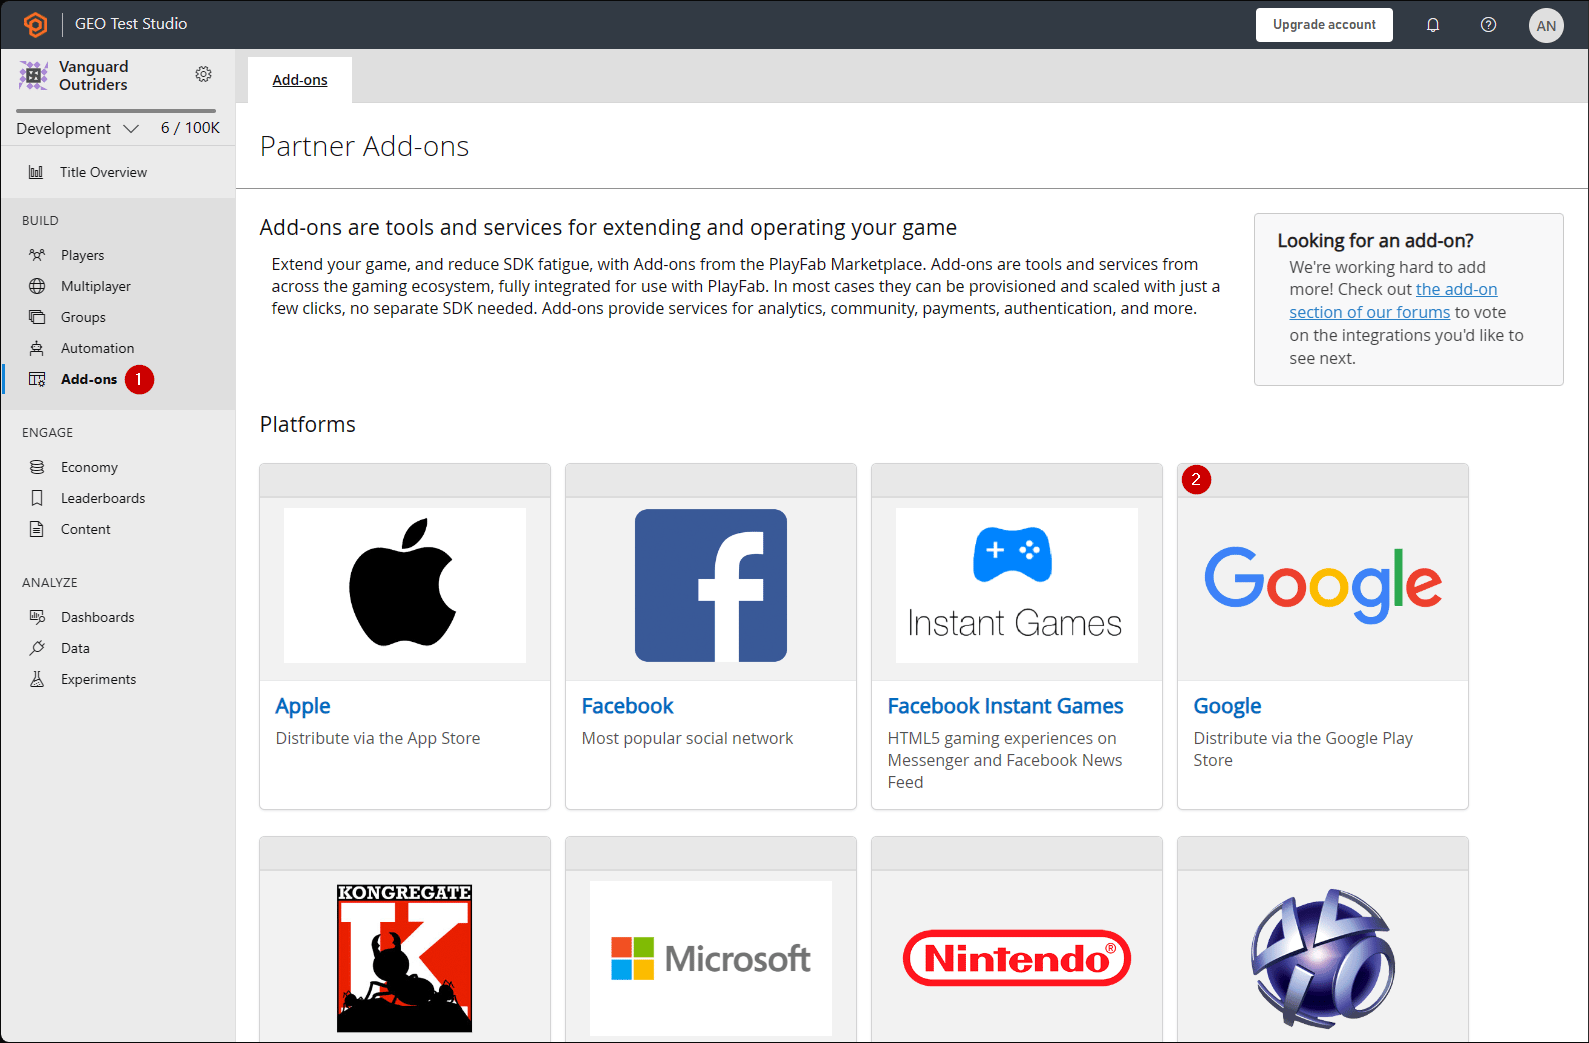
Go to the PlayFab **Game Manager** page for your title.
1. Navigate to **Add-ons** in the menu.
2. Locate and open the **Google Add-on** icon/link.
1. Fill in the **Client ID**.
2. Fill in the **Client secret**.
3. Then select the **Install Google** button.
As of July 2017, **Google API Manager** has a bad habit of *not* hooking the **Allowed JS** origin domain properly. If you receive the following error: **"idpiframe\_initialization\_failed", details: "Not a valid origin for the client: somedomain.com..."** Remove the credentials and recreate them. *There's no need to delete the entire project - just the credentials.*
## Testing using an access token
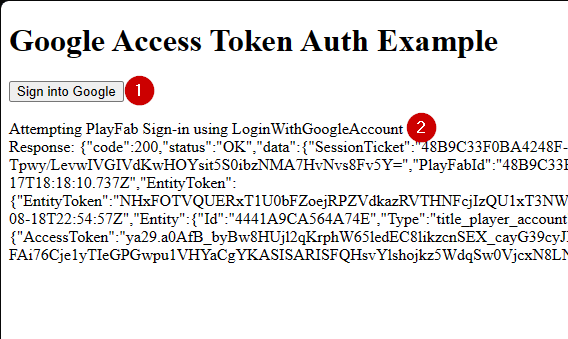
In this example, we show how to test the LoginWithGoogleAccount API using the classic access token approach. Use the HTML code provided below for your testing.
Make sure\* to replace `YOUR_CLIENT_ID` and `YOUR_PLAYFAB_TITLE` with your own values.
the **AccessToken** param is missing in the **LoginWithGoogleAccountRequest** object in the TypeScript typings files. If you are using TypeScript with the Node SDK, you can create a custom type `interface LoginRequest extends PlayFabClientModels.LoginWithGoogleAccountRequest { AccessToken: string; }` and cast the type when using the API `PlayFabClient.LoginWithGoogleAccount( { AccessToken: accessToken, CreateAccount: true, } as LoginRequest, onPlayFabResponse);`
```html theme={null}
Google Access Token Auth Example
```
**Testing using the (deprecated) Google Sign-in Platform library**
The sample below uses the Google Sign-In platform library. **According to the [Google Identity public documentation site](https://developers.google.com/identity/gsi/web/guides/migration), the Google Sign-In JavaScript platform library for Web will be deprecated March 31, 2023**. This sample won't work for newly created Google clients moving forward - refer to the prior code sample, which uses the newer Google Identity Services library!
```html theme={null}
Google Access Token Auth Example
```
Remember to open this page using your web server, and make sure to access this page using the URL you specified, while configuring Google Project, (`http://playfab.example` in our case).
1. Once the page opens, select **G Signed In**, and follow the general Google authentication flow.
2. When this is finished, the script will try to authenticate on the PlayFab side and output the result.
If you *already have* a Google authentication session running, you won't have to select **G Signed In**. Everything will happen automatically.
## Related topics
- [Platform-Specific Authentication](/services/playfab/identity/player-identity/platform-specific-authentication/index.md)
- [Setting up PlayFab authentication using Kongregate and HTML5](/services/playfab/identity/player-identity/platform-specific-authentication/kongregate-html5.md)
- [Setting up PlayFab authentication using Facebook and HTML5](/services/playfab/identity/player-identity/platform-specific-authentication/facebook-html5.md)
- [Setting up PlayFab authentication using Twitch and HTML5](/services/playfab/identity/player-identity/platform-specific-authentication/twitch-html5.md)
- [Server Anonymous Login Authentication](/services/playfab/identity/player-identity/platform-specific-authentication/anonymous-login.md)
 1. Fill in the field under **Project Name**.
2. Select the **Create** button.
1. Fill in the field under **Project Name**.
2. Select the **Create** button.
 1. Fill out an App Name
2. Make sure there are emails for **user support email** and **Developer Contact Email**
3. Then select **SAVE AND CONTINUE**
1. Fill out an App Name
2. Make sure there are emails for **user support email** and **Developer Contact Email**
3. Then select **SAVE AND CONTINUE**
 1. Next, navigate to **Credentials**.
2. Select **Create credentials**.
3. Then select **OAuth client ID**.
1. Next, navigate to **Credentials**.
2. Select **Create credentials**.
3. Then select **OAuth client ID**.
 1. Select **Web Application** as your **Application type**.
2. Give your application a **Name**.
3. Add your domain to **Authorized JavaScript origins** - `[PlayFab](http://playfab.example.com)` in our case.
4. Finally, select the **Create** button to commit your changes.
1. Select **Web Application** as your **Application type**.
2. Give your application a **Name**.
3. Add your domain to **Authorized JavaScript origins** - `[PlayFab](http://playfab.example.com)` in our case.
4. Finally, select the **Create** button to commit your changes.
 On the **OAuth client** screen shown below, the Google API Manager reveals two important pieces of information:
1. The **client ID**
2. The **client secret**.
On the **OAuth client** screen shown below, the Google API Manager reveals two important pieces of information:
1. The **client ID**
2. The **client secret**.
 Go to the PlayFab **Game Manager** page for your title.
1. Navigate to **Add-ons** in the menu.
2. Locate and open the **Google Add-on** icon/link.
Go to the PlayFab **Game Manager** page for your title.
1. Navigate to **Add-ons** in the menu.
2. Locate and open the **Google Add-on** icon/link.
 1. Fill in the **Client ID**.
2. Fill in the **Client secret**.
3. Then select the **Install Google** button.
1. Fill in the **Client ID**.
2. Fill in the **Client secret**.
3. Then select the **Install Google** button.