> ## Documentation Index
> Fetch the complete documentation index at: https://devdocs.xbox.com/llms.txt
> Use this file to discover all available pages before exploring further.
# Início rápido do Photon
> Conecte o multijogador Photon Realtime e PUN ao PlayFab para autenticar jogadores e receber eventos de sala por meio de retornos de chamada do CloudScript em um projeto do Unity.
Esta seção fornece informações sobre o uso do PlayFab em conjunto com os serviços multijogador do Photon, como Photon RealTime e Photon Unity Networking (PUN).
No momento, oferecemos as seguintes integrações com o Photon:
* Autenticar jogadores do Photon com o PlayFab.
* Escutar eventos de sala usando retornos de chamada do CloudScript do PlayFab.
## Início rápido do Photon
Este início rápido mostra como configurar o Photon Multiplayer para funcionar com o PlayFab. No momento, o PlayFab oferece as seguintes integrações com o Photon:
* Autenticar jogadores do Photon com o PlayFab.
* Escutar eventos de sala usando retornos de chamada do CloudScript do PlayFab.
Neste início rápido, ilustramos como os dois recursos funcionam usando o [projeto de exemplo do Photon para Unity](https://assetstore.unity.com/packages/tools/network/photon-unity-networking-classic-free-1786) mais recente.
Para obter uma experiência multijogador e de chat do PlayFab com suporte completo no Unity, consulte o [PlayFab Party Unity Plugin](/pt-BR/services/playfab/multiplayer/networking/party-unity-overview) para obter mais informações.
## Pré-requisitos
1. Um projeto do [Unity](/pt-BR/services/playfab/sdks/unity3d/quickstart) com o SDK do PlayFab importado e um título configurado.
2. O título do PlayFab registrado.
Este guia omite as configurações do aplicativo de chat. Para integrar seu aplicativo de chat, crie um novo Photon Chat Application e insira a App ID nas caixas correspondentes no Unity e na página do complemento Photon no PlayFab Game Manager.
## Configurar um aplicativo do Photon
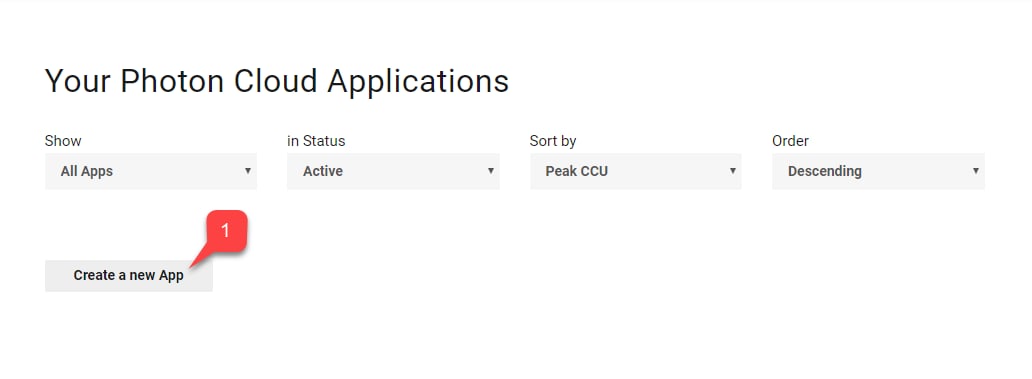
1. Depois de se registrar e entrar no painel do Photon, selecione **Create a new App**.
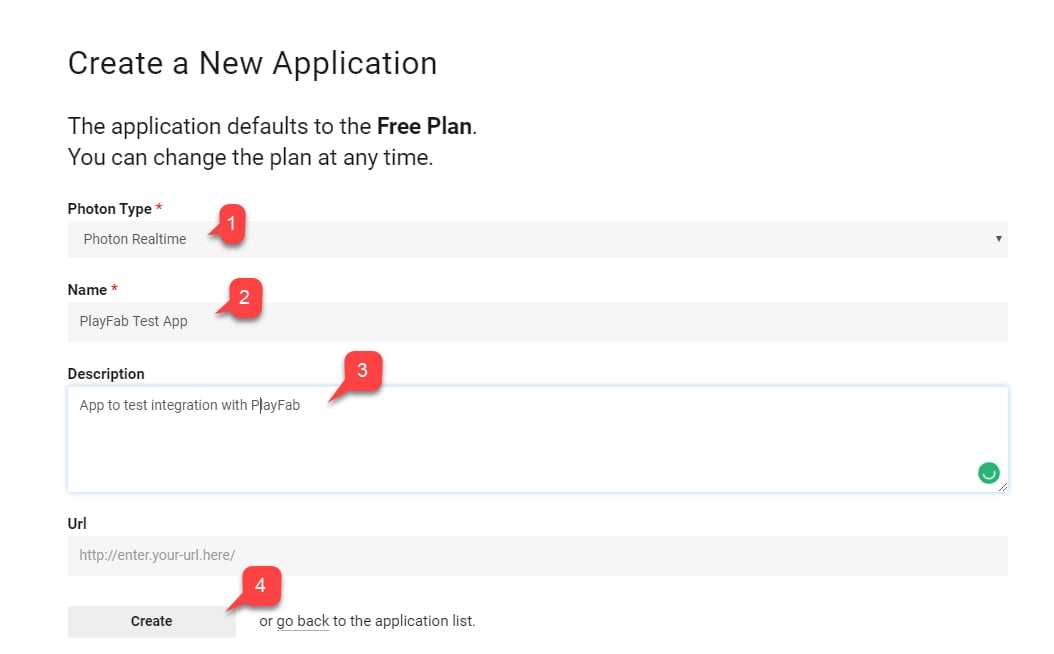
 2. Selecione **Photon Type**.
3. Escolha um **Name**.
4. Crie uma **Description**.
5. Envie selecionando **Create**.
2. Selecione **Photon Type**.
3. Escolha um **Name**.
4. Crie uma **Description**.
5. Envie selecionando **Create**.
 ## Configurar a autenticação
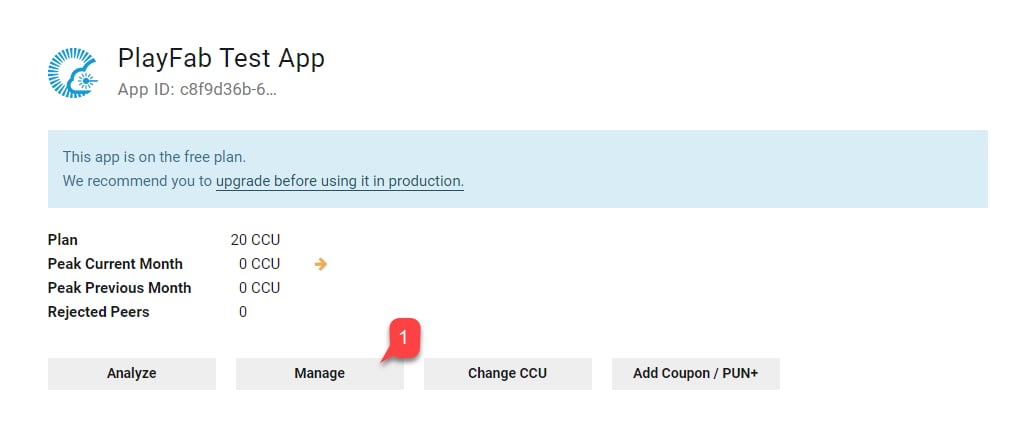
1. Localize o aplicativo recém-criado na lista e selecione **Manage**.
## Configurar a autenticação
1. Localize o aplicativo recém-criado na lista e selecione **Manage**.
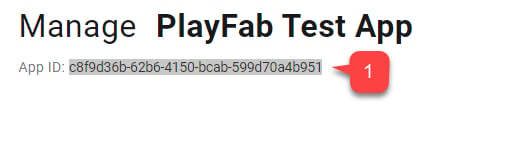
 2. No painel do **Application**, localize e salve a **App ID** que fica abaixo do **Title** da página.
 3. Localize a seção **Authentication**.
4. Selecione **Custom Server**.
3. Localize a seção **Authentication**.
4. Selecione **Custom Server**.
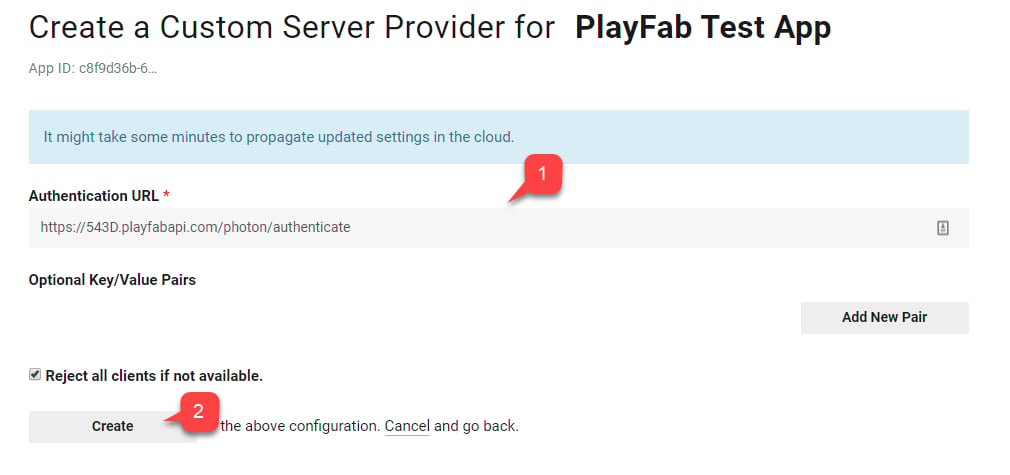
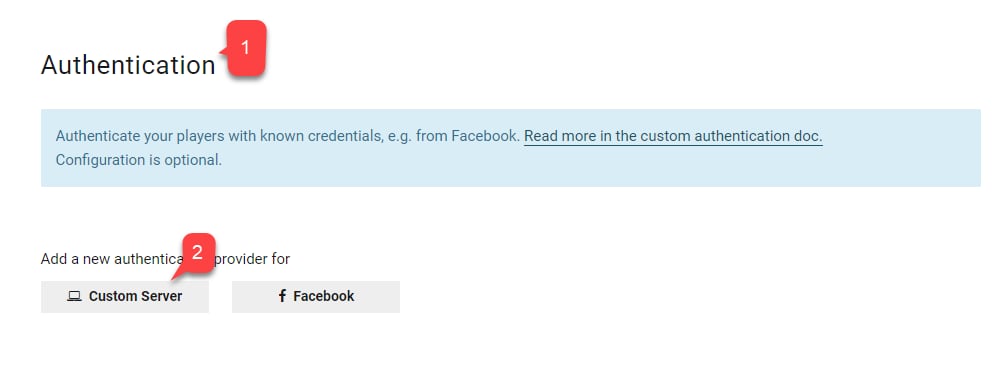 A próxima página permite configurar a URL de autenticação do Photon.
```html theme={null}
https://{PlayFabTitleId}.playfabapi.com/photon/authenticate
```
Substitua o espaço reservado `PlayFabTitleId` pela sua própria Title Id.
```html theme={null}
{PlayFabTitleId}
```
5. Insira a **URL**.
6. Envie selecionando o botão **Create**.
A próxima página permite configurar a URL de autenticação do Photon.
```html theme={null}
https://{PlayFabTitleId}.playfabapi.com/photon/authenticate
```
Substitua o espaço reservado `PlayFabTitleId` pela sua própria Title Id.
```html theme={null}
{PlayFabTitleId}
```
5. Insira a **URL**.
6. Envie selecionando o botão **Create**.
 ## Configurar um título do PlayFab para o Photon
Navegue até a página do **Game Manager** do seu título e, em seguida:
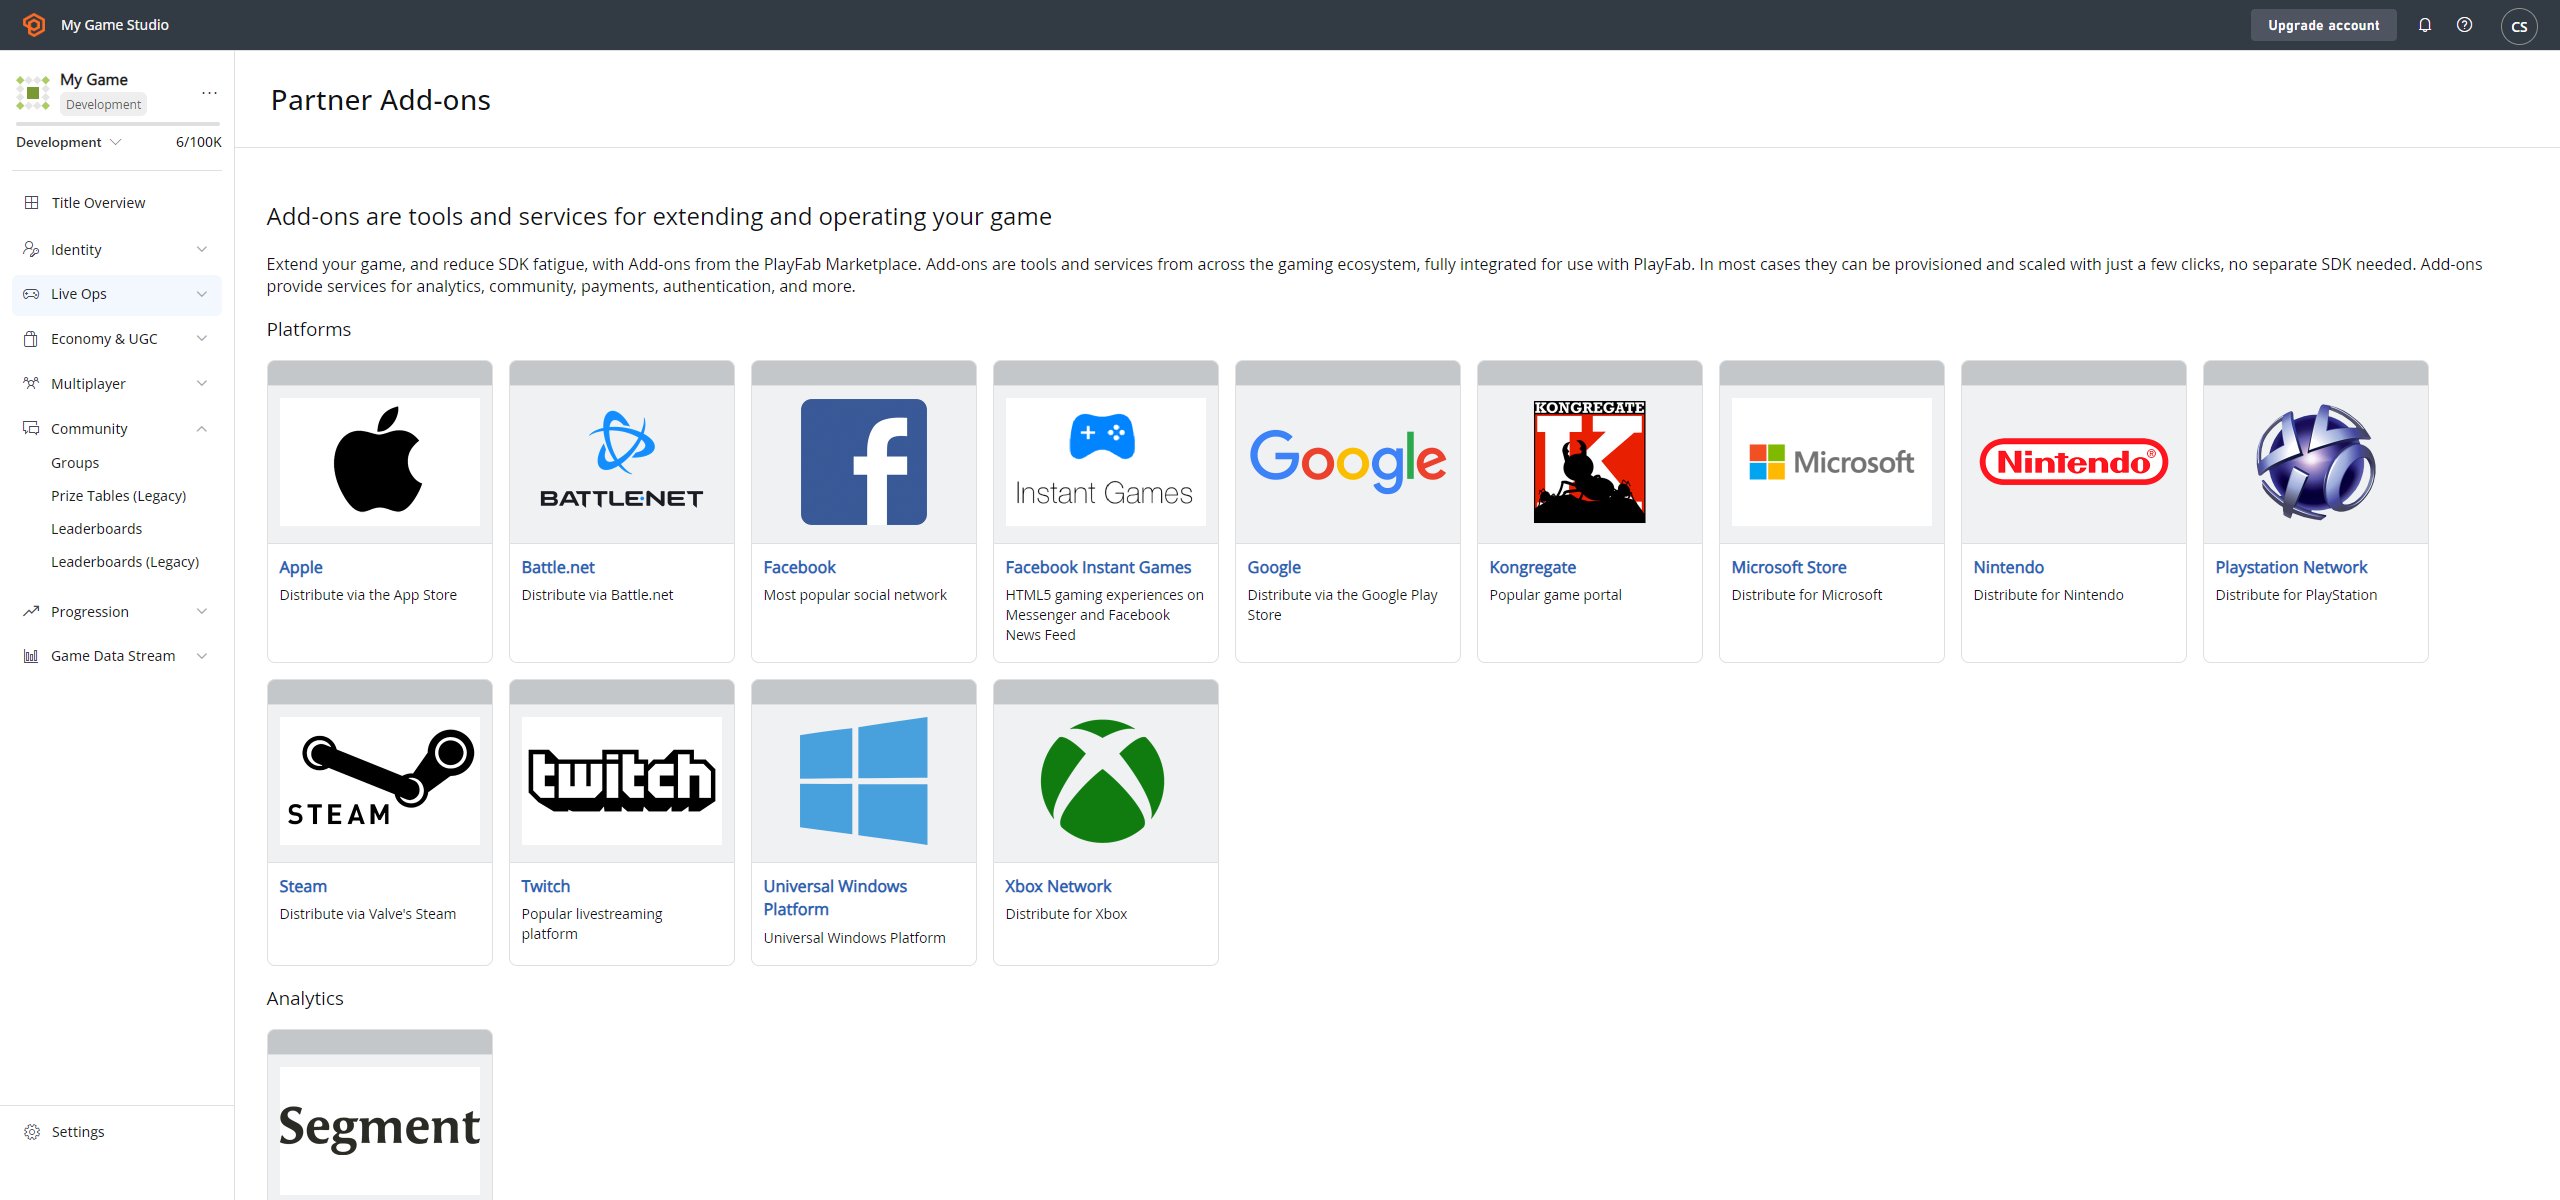
1. Navegue até a guia **Add-ons**.
2. Na lista de **Add-ons**, localize e selecione **Photon**.
## Configurar um título do PlayFab para o Photon
Navegue até a página do **Game Manager** do seu título e, em seguida:
1. Navegue até a guia **Add-ons**.
2. Na lista de **Add-ons**, localize e selecione **Photon**.
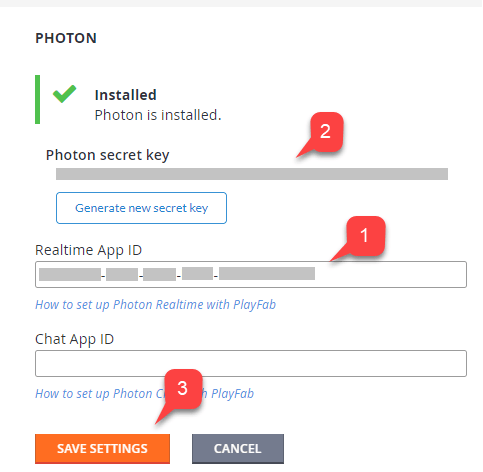
 3. A página **Photon Add-on** permite instalar o Photon especificando sua **Photon Realtime Application ID**.
* Opcionalmente, você pode especificar a **Chat App ID**.
* Depois que você instalar o **Add-on (3)**, uma **Photon secret Key** será gerada **(2)**.
* Salve-a para uso futuro ao configurar webhooks.
Lembre-se de salvar sua chave secreta do Photon em um local seguro e de fácil acesso. Ela será útil ao configurar os webhooks.
3. A página **Photon Add-on** permite instalar o Photon especificando sua **Photon Realtime Application ID**.
* Opcionalmente, você pode especificar a **Chat App ID**.
* Depois que você instalar o **Add-on (3)**, uma **Photon secret Key** será gerada **(2)**.
* Salve-a para uso futuro ao configurar webhooks.
Lembre-se de salvar sua chave secreta do Photon em um local seguro e de fácil acesso. Ela será útil ao configurar os webhooks.
 ## Configurar webhooks do Photon
Como integração opcional, o Photon pode transmitir determinados eventos ao seu CloudScript do PlayFab. Isso é feito com webhooks:
* Você especifica uma URL base.
* Em seguida, especifica um caminho para cada um dos eventos disponíveis.
* Um caminho é, efetivamente, o nome de um manipulador implementado no seu CloudScript.
A URL base tem o seguinte formato:
```html theme={null}
https://{PlayFabTitleId}.playfablogic.com/webhook/1/prod/{PhotonSecretKey}
```
Substitua o espaço reservado `Title Id` pela sua própria Title Id.
```html theme={null}
{PlayFabTitleId}
```
Substitua o token `PhotonSecretKey` pela chave secreta que você gerou na página **Photon Add-on**.
```html theme={null}
{PhotonSecretKey}
```
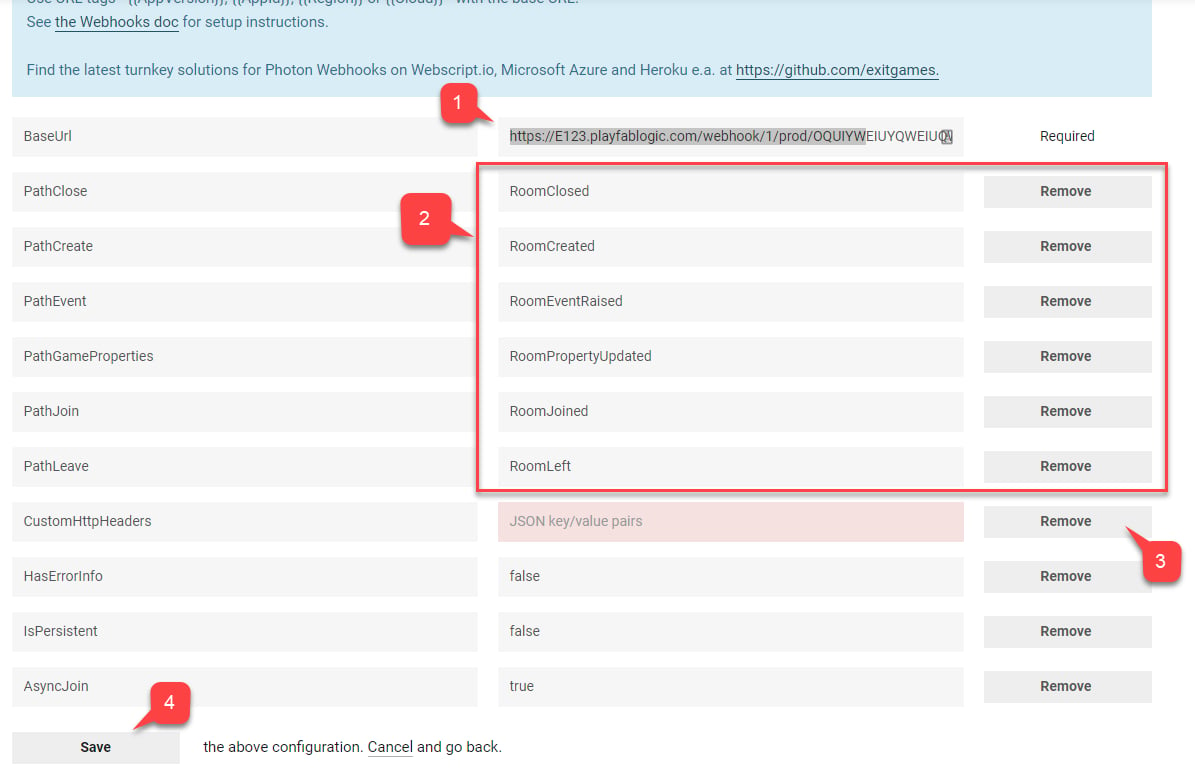
1. Preencha a **Base URL**.
2. Atribua um **Name** de manipulador do **CloudScript** para cada um dos **Events** disponíveis.
3. Remova todos os **CustomHttpHeaders**.
4. Envie selecionando o botão **Save**.
## Configurar webhooks do Photon
Como integração opcional, o Photon pode transmitir determinados eventos ao seu CloudScript do PlayFab. Isso é feito com webhooks:
* Você especifica uma URL base.
* Em seguida, especifica um caminho para cada um dos eventos disponíveis.
* Um caminho é, efetivamente, o nome de um manipulador implementado no seu CloudScript.
A URL base tem o seguinte formato:
```html theme={null}
https://{PlayFabTitleId}.playfablogic.com/webhook/1/prod/{PhotonSecretKey}
```
Substitua o espaço reservado `Title Id` pela sua própria Title Id.
```html theme={null}
{PlayFabTitleId}
```
Substitua o token `PhotonSecretKey` pela chave secreta que você gerou na página **Photon Add-on**.
```html theme={null}
{PhotonSecretKey}
```
1. Preencha a **Base URL**.
2. Atribua um **Name** de manipulador do **CloudScript** para cada um dos **Events** disponíveis.
3. Remova todos os **CustomHttpHeaders**.
4. Envie selecionando o botão **Save**.
 ## Configurar um projeto do Unity
O guia pressupõe que você já tenha o SDK do PlayFab importado e configurado, além das configurações do título definidas.
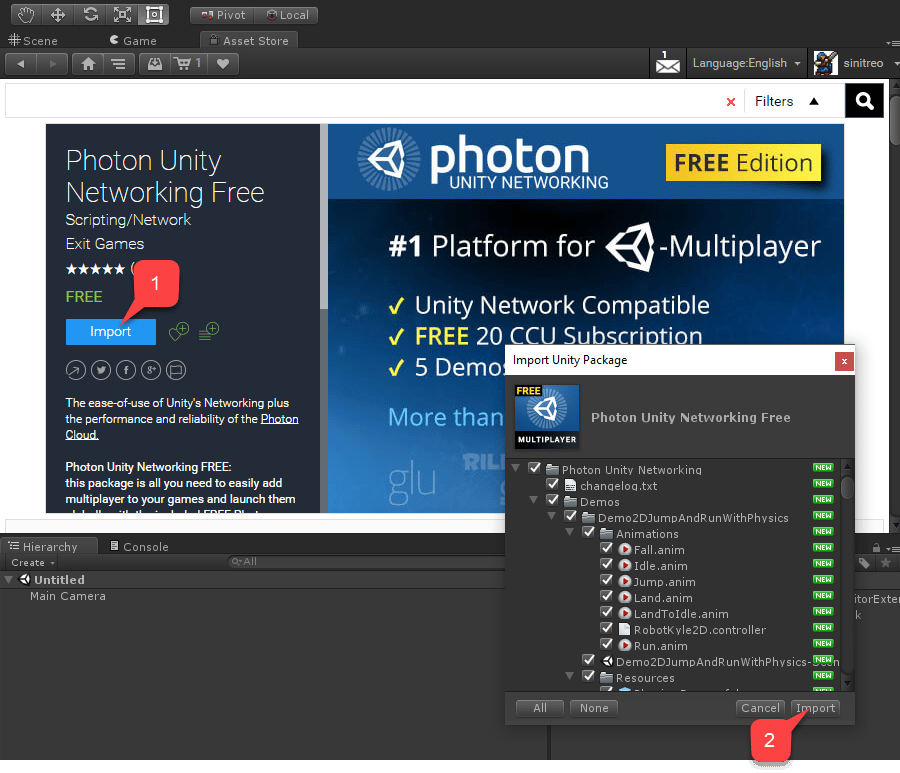
* Comece navegando até a **Asset Store**.
* Localize o [pacote Photon Unity Networking Free](https://assetstore.unity.com/packages/tools/network/photon-unity-networking-classic-free-1786).
* Selecione **Import (1)**.
* Você pode inspecionar os arquivos importados.
* Em seguida, selecione **Import (2)**.
## Configurar um projeto do Unity
O guia pressupõe que você já tenha o SDK do PlayFab importado e configurado, além das configurações do título definidas.
* Comece navegando até a **Asset Store**.
* Localize o [pacote Photon Unity Networking Free](https://assetstore.unity.com/packages/tools/network/photon-unity-networking-classic-free-1786).
* Selecione **Import (1)**.
* Você pode inspecionar os arquivos importados.
* Em seguida, selecione **Import (2)**.
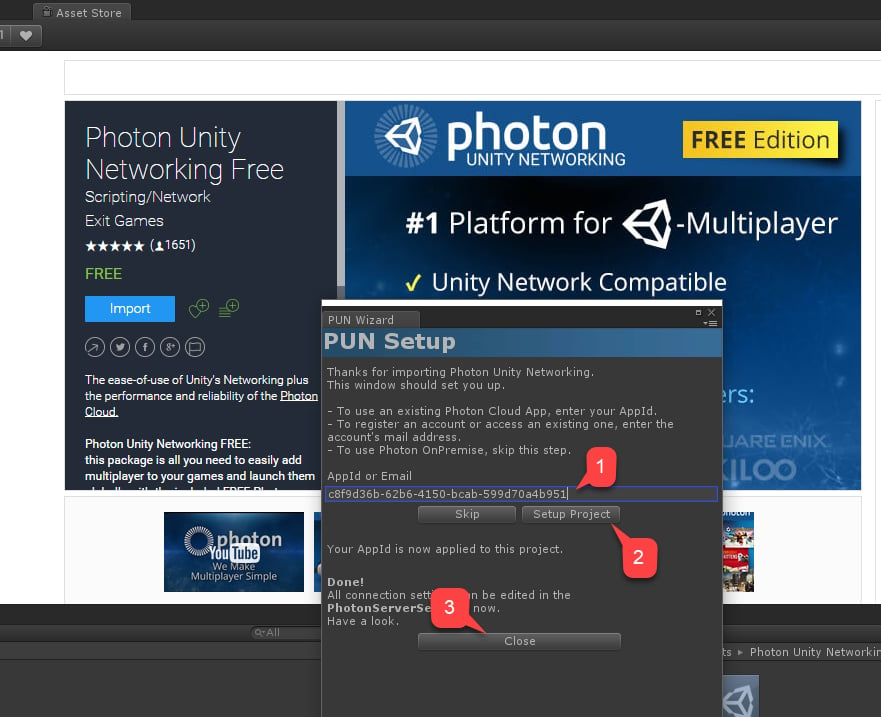
 Logo após o término do processo de importação, a janela **PUN Setup** é aberta.
* Insira sua **Realtime Application ID (1)**, encontrada no **Photon Application Dashboard** do **Photon App** que você criou.
* Selecione **Setup Project (2)**.
* Quando a configuração terminar, selecione **Close (3)**.
Logo após o término do processo de importação, a janela **PUN Setup** é aberta.
* Insira sua **Realtime Application ID (1)**, encontrada no **Photon Application Dashboard** do **Photon App** que você criou.
* Selecione **Setup Project (2)**.
* Quando a configuração terminar, selecione **Close (3)**.
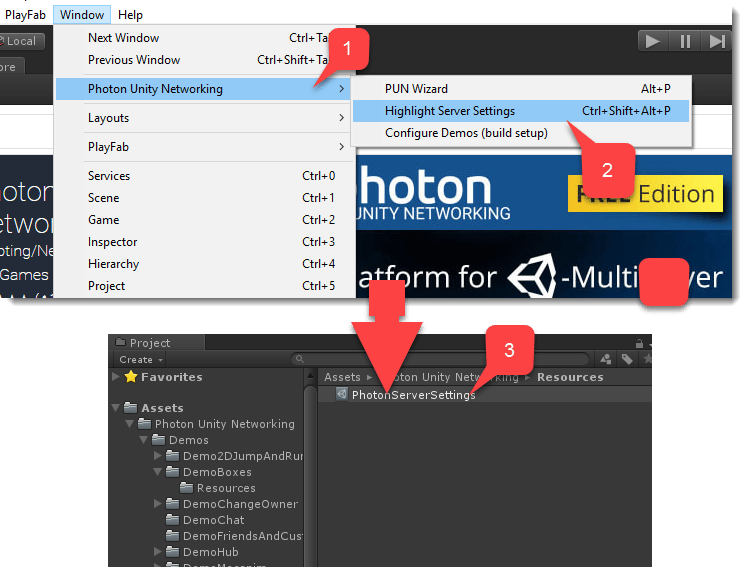
 Se a **AppId** for aceita, o objeto **Photon Server Settings** será selecionado e poderá ser exibido na janela **Unity Inspector**. Para acessar manualmente o objeto **Server Settings**:
* Navegue até o painel superior da janela.
* Selecione **Window**.
* Em seguida, selecione **Photon Unity Networking (1)**.
* Por fim, selecione **Highlight Server Settings (2)**.
* A janela de projeto **Standard Unity** revela o objeto **PhotonServerSettings (3)**.
* Selecione o objeto para revelar suas configurações na janela **Unity Inspector**.
Se a **AppId** for aceita, o objeto **Photon Server Settings** será selecionado e poderá ser exibido na janela **Unity Inspector**. Para acessar manualmente o objeto **Server Settings**:
* Navegue até o painel superior da janela.
* Selecione **Window**.
* Em seguida, selecione **Photon Unity Networking (1)**.
* Por fim, selecione **Highlight Server Settings (2)**.
* A janela de projeto **Standard Unity** revela o objeto **PhotonServerSettings (3)**.
* Selecione o objeto para revelar suas configurações na janela **Unity Inspector**.
 Como parte de **PhotonServerSettings**, você tem a opção de atribuir a **Chat Application ID**.
Nesse ponto, o projeto está configurado.
## Implementar a autenticação do PlayFab no Photon
Quando você habilita o **Photon Add-on** para seu título no PlayFab Game Manager e configura a autenticação no painel do **Photon Application**, o PlayFab permite autenticar jogadores existentes do PlayFab no ambiente do Photon.
Isso significa que você pode evitar completamente a implementação de qualquer gerenciamento de usuários para o Photon.
1. Navegue até a cena **DemoHub-Scene-V2** do pacote **Photon Unity Networking Free**, versão **Classic**.
* Essa cena é um hub para todos os exemplos do pacote.
* Como é a *primeira* cena a ser carregada, vamos adicionar um pequeno script para habilitar a autenticação do PlayFab com o Photon.
2. Crie um **GameObject** vazio chamado **PlayFabAuthenticator**.
3. Em seguida, na janela **Unity Inspector**, adicione um componente com o mesmo nome a esse **GameObject**.
Como parte de **PhotonServerSettings**, você tem a opção de atribuir a **Chat Application ID**.
Nesse ponto, o projeto está configurado.
## Implementar a autenticação do PlayFab no Photon
Quando você habilita o **Photon Add-on** para seu título no PlayFab Game Manager e configura a autenticação no painel do **Photon Application**, o PlayFab permite autenticar jogadores existentes do PlayFab no ambiente do Photon.
Isso significa que você pode evitar completamente a implementação de qualquer gerenciamento de usuários para o Photon.
1. Navegue até a cena **DemoHub-Scene-V2** do pacote **Photon Unity Networking Free**, versão **Classic**.
* Essa cena é um hub para todos os exemplos do pacote.
* Como é a *primeira* cena a ser carregada, vamos adicionar um pequeno script para habilitar a autenticação do PlayFab com o Photon.
2. Crie um **GameObject** vazio chamado **PlayFabAuthenticator**.
3. Em seguida, na janela **Unity Inspector**, adicione um componente com o mesmo nome a esse **GameObject**.
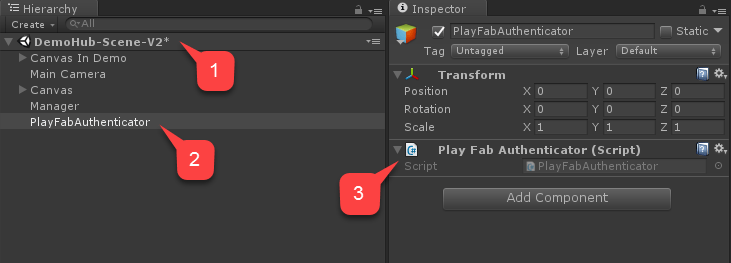 Selecione o ícone de engrenagem e escolha editar o script no menu suspenso. Copie e cole o código do componente `PlayFabAuthenticator` e salve e feche o arquivo.
```csharp theme={null}
using PlayFab;
using PlayFab.ClientModels;
using UnityEngine;
public class PlayFabAuthenticator : MonoBehaviour {
private string _playFabPlayerIdCache;
//Run the entire thing on awake
public void Awake() {
AuthenticateWithPlayFab();
}
/*
* Step 1
* We authenticate a current PlayFab user normally.
* In this case we use the LoginWithCustomID API call for simplicity.
* You can absolutely use any Login method you want.
* We use PlayFabSettings.DeviceUniqueIdentifier as our custom ID.
* We pass RequestPhotonToken as a callback to be our next step, if
* authentication was successful.
*/
private void AuthenticateWithPlayFab(){
LogMessage("PlayFab authenticating using Custom ID...");
PlayFabClientAPI.LoginWithCustomID(new LoginWithCustomIDRequest()
{
CreateAccount = true,
CustomId = PlayFabSettings.DeviceUniqueIdentifier
}, RequestPhotonToken, OnPlayFabError);
}
/*
* Step 2
* We request a Photon authentication token from PlayFab.
* This is a crucial step, because Photon uses different authentication tokens
* than PlayFab. Thus, you cannot directly use PlayFab SessionTicket and
* you need to explicitly request a token. This API call requires you to
* pass a Photon App ID. The App ID may be hard coded, but in this example,
* we are accessing it using convenient static field on PhotonNetwork class.
* We pass in AuthenticateWithPhoton as a callback to be our next step, if
* we have acquired the token successfully.
*/
private void RequestPhotonToken(LoginResult obj) {
LogMessage("PlayFab authenticated. Requesting photon token...");
//We can player PlayFabId. This will come in handy during next step
_playFabPlayerIdCache = obj.PlayFabId;
PlayFabClientAPI.GetPhotonAuthenticationToken(new GetPhotonAuthenticationTokenRequest()
{
PhotonApplicationId = PhotonNetwork.PhotonServerSettings.AppSettings.AppIdRealtime
}, AuthenticateWithPhoton, OnPlayFabError);
}
/*
* Step 3
* This is the final and the simplest step. We create a new AuthenticationValues instance.
* This class describes how to authenticate a player inside the Photon environment.
*/
private void AuthenticateWithPhoton(GetPhotonAuthenticationTokenResult obj) {
LogMessage("Photon token acquired: " + obj.PhotonCustomAuthenticationToken + " Authentication complete.");
//We set AuthType to custom, meaning we bring our own, PlayFab authentication procedure.
var customAuth = new Photon.Realtime.AuthenticationValues { AuthType = CustomAuthenticationType.Custom };
//We add "username" parameter. Do not let it confuse you: PlayFab is expecting this parameter to contain player PlayFab ID (!) and not username.
customAuth.AddAuthParameter("username", _playFabPlayerIdCache); // expected by PlayFab custom auth service
//We add "token" parameter. PlayFab expects it to contain Photon Authentication Token issues to your during previous step.
customAuth.AddAuthParameter("token", obj.PhotonCustomAuthenticationToken);
//We finally tell Photon to use this authentication parameters throughout the entire application.
PhotonNetwork.AuthValues = customAuth;
}
private void OnPlayFabError(PlayFabError obj) {
LogMessage(obj.GenerateErrorReport());
}
public void LogMessage(string message) {
Debug.Log("PlayFab + Photon Example: " + message);
}
}
```
## Testar a autenticação do PlayFab no Photon
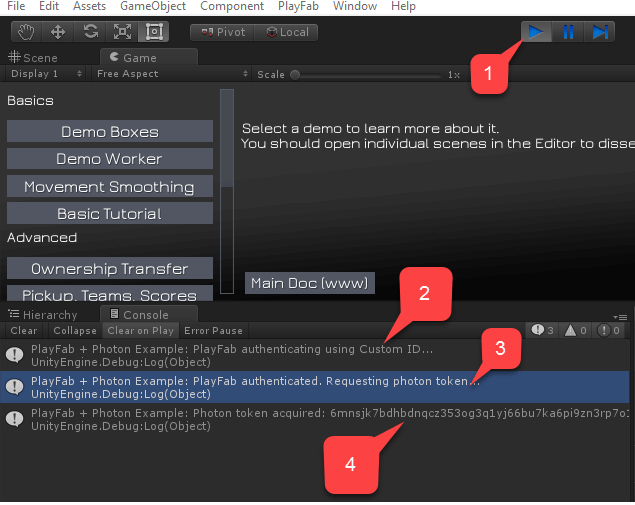
1. Inicie a cena.
2. Inspecione o fluxo de mensagens do console.
Verifique se:
3. A autenticação no próprio PlayFab teve êxito.
4. O token do Photon foi obtido.
A imagem a seguir ilustra o fluxo correto.
Selecione o ícone de engrenagem e escolha editar o script no menu suspenso. Copie e cole o código do componente `PlayFabAuthenticator` e salve e feche o arquivo.
```csharp theme={null}
using PlayFab;
using PlayFab.ClientModels;
using UnityEngine;
public class PlayFabAuthenticator : MonoBehaviour {
private string _playFabPlayerIdCache;
//Run the entire thing on awake
public void Awake() {
AuthenticateWithPlayFab();
}
/*
* Step 1
* We authenticate a current PlayFab user normally.
* In this case we use the LoginWithCustomID API call for simplicity.
* You can absolutely use any Login method you want.
* We use PlayFabSettings.DeviceUniqueIdentifier as our custom ID.
* We pass RequestPhotonToken as a callback to be our next step, if
* authentication was successful.
*/
private void AuthenticateWithPlayFab(){
LogMessage("PlayFab authenticating using Custom ID...");
PlayFabClientAPI.LoginWithCustomID(new LoginWithCustomIDRequest()
{
CreateAccount = true,
CustomId = PlayFabSettings.DeviceUniqueIdentifier
}, RequestPhotonToken, OnPlayFabError);
}
/*
* Step 2
* We request a Photon authentication token from PlayFab.
* This is a crucial step, because Photon uses different authentication tokens
* than PlayFab. Thus, you cannot directly use PlayFab SessionTicket and
* you need to explicitly request a token. This API call requires you to
* pass a Photon App ID. The App ID may be hard coded, but in this example,
* we are accessing it using convenient static field on PhotonNetwork class.
* We pass in AuthenticateWithPhoton as a callback to be our next step, if
* we have acquired the token successfully.
*/
private void RequestPhotonToken(LoginResult obj) {
LogMessage("PlayFab authenticated. Requesting photon token...");
//We can player PlayFabId. This will come in handy during next step
_playFabPlayerIdCache = obj.PlayFabId;
PlayFabClientAPI.GetPhotonAuthenticationToken(new GetPhotonAuthenticationTokenRequest()
{
PhotonApplicationId = PhotonNetwork.PhotonServerSettings.AppSettings.AppIdRealtime
}, AuthenticateWithPhoton, OnPlayFabError);
}
/*
* Step 3
* This is the final and the simplest step. We create a new AuthenticationValues instance.
* This class describes how to authenticate a player inside the Photon environment.
*/
private void AuthenticateWithPhoton(GetPhotonAuthenticationTokenResult obj) {
LogMessage("Photon token acquired: " + obj.PhotonCustomAuthenticationToken + " Authentication complete.");
//We set AuthType to custom, meaning we bring our own, PlayFab authentication procedure.
var customAuth = new Photon.Realtime.AuthenticationValues { AuthType = CustomAuthenticationType.Custom };
//We add "username" parameter. Do not let it confuse you: PlayFab is expecting this parameter to contain player PlayFab ID (!) and not username.
customAuth.AddAuthParameter("username", _playFabPlayerIdCache); // expected by PlayFab custom auth service
//We add "token" parameter. PlayFab expects it to contain Photon Authentication Token issues to your during previous step.
customAuth.AddAuthParameter("token", obj.PhotonCustomAuthenticationToken);
//We finally tell Photon to use this authentication parameters throughout the entire application.
PhotonNetwork.AuthValues = customAuth;
}
private void OnPlayFabError(PlayFabError obj) {
LogMessage(obj.GenerateErrorReport());
}
public void LogMessage(string message) {
Debug.Log("PlayFab + Photon Example: " + message);
}
}
```
## Testar a autenticação do PlayFab no Photon
1. Inicie a cena.
2. Inspecione o fluxo de mensagens do console.
Verifique se:
3. A autenticação no próprio PlayFab teve êxito.
4. O token do Photon foi obtido.
A imagem a seguir ilustra o fluxo correto.
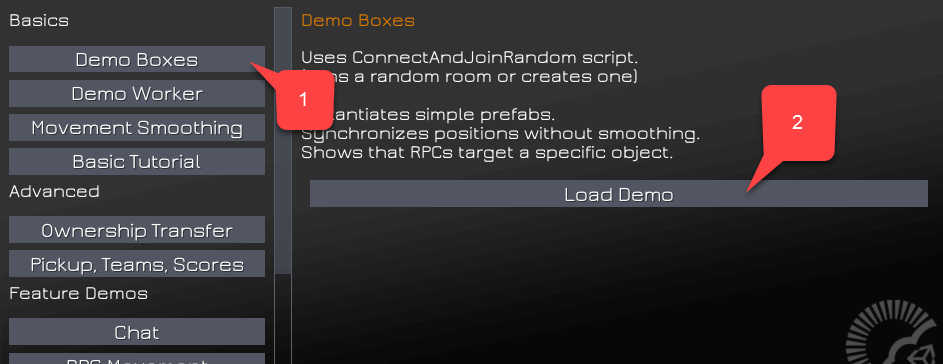
 Depois que o token do Photon tiver sido obtido e a autenticação estiver concluída, poderemos conferir as demonstrações do Photon.
Por exemplo, inicie uma demonstração chamada **Demo Boxes**.
5. Para garantir que a autenticação do PlayFab esteja concluída, selecione **Demo Boxes**.
6. Em seguida, selecione **Load Demo**, conforme mostrado na imagem a seguir.
Depois que o token do Photon tiver sido obtido e a autenticação estiver concluída, poderemos conferir as demonstrações do Photon.
Por exemplo, inicie uma demonstração chamada **Demo Boxes**.
5. Para garantir que a autenticação do PlayFab esteja concluída, selecione **Demo Boxes**.
6. Em seguida, selecione **Load Demo**, conforme mostrado na imagem a seguir.
 O Photon começa a gerar mensagens de depuração. Monitorando o console, você pode identificar facilmente se há algum problema de autenticação.
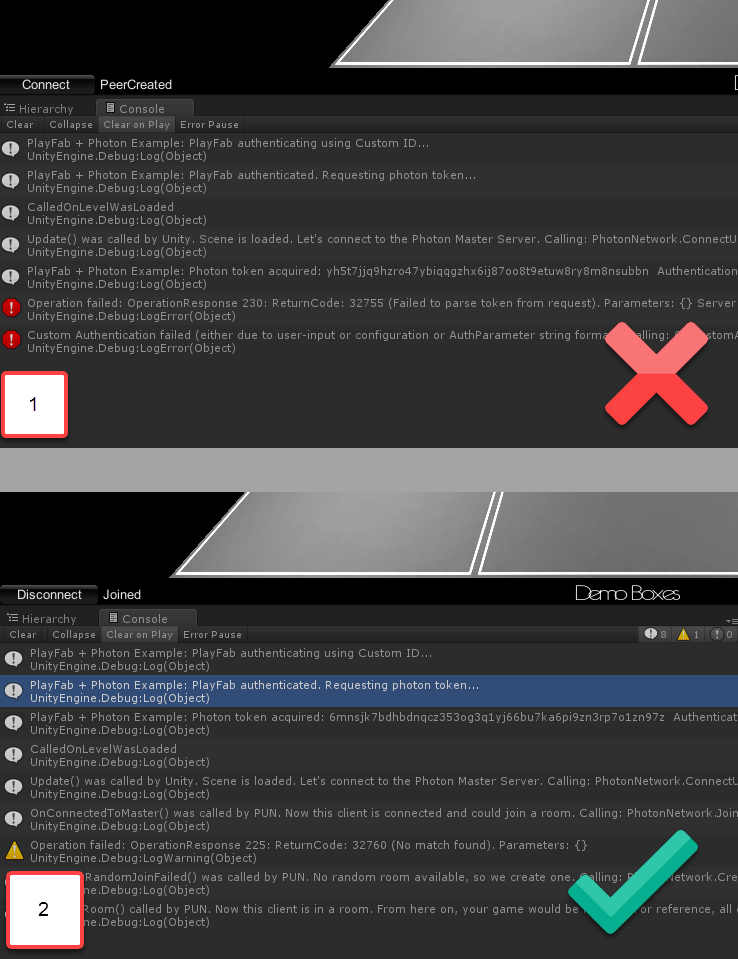 Verifique se não há erros **Authentication Denied** no console. Nesse ponto, você configurou uma integração mínima entre o PlayFab e o Photon.
## Evento de sala do Photon + CloudScript
O sistema de matchmaking do Photon tem o conceito de *sala*. Se você não estiver familiarizado com esse conceito, consulte o [Guia de matchmaking do Photon](https://doc.photonengine.com/realtime/current/lobby-and-matchmaking/matchmaking-and-lobby).
O PlayFab permite interceptar vários eventos de sala. Os seguintes eventos de sala exigem apenas o CloudScript para serem interceptados:
* `RoomCreated`
* `RoomJoined`
* `RoomLeft`
* `RoomClosed`
Os seguintes eventos exigem controle adicional sobre o código do Unity para serem interceptados (os detalhes são fornecidos mais adiante neste documento):
* `RoomPropertyUpdated`
* `RoomEventRaised`
Depois que você introduz um manipulador para um evento de sala, ele se torna uma parte essencial do fluxo de tratamento de eventos. Portanto, erros gerados durante a execução do seu CloudScript podem causar problemas para *todo* o sistema. Por exemplo, se o manipulador `RoomCreated` gerar um erro, seus clientes também gerarão um erro e não conseguirão se conectar corretamente.
Vamos construir um CloudScript do PlayFab definindo um manipulador para cada tipo de evento individualmente.
### Manipulador Room Created
O manipulador `RoomCreated` é invocado sempre que uma sala do Photon é criada. O manipulador do CloudScript a seguir intercepta esses eventos.
```javascript theme={null}
// Triggered automatically when a Photon room is first created
handlers.RoomCreated = function (args) {
return { ResultCode : 0, Message: 'Success' };
};
```
Você pode obter mais dados sobre o evento usando o argumento "args".
```json theme={null}
{
"ActorNr": 1,
"AppVersion": "1.2_1.85",
"AppId": "bfd5f98b-c6a4-4763-80d9-824d20db842b",
// Options with which the room was created.
"CreateOptions": {
"MaxPlayers": 4,
"LobbyId": null,
"LobbyType": 0,
"CustomProperties": {
},
"EmptyRoomTTL": 0,
"PlayerTTL": 0,
"CheckUserOnJoin": false,
"DeleteCacheOnLeave": true,
"SuppressRoomEvents": false,
"PublishUserId": false,
"ExpectedUsers": null
},
// Unique game identifier
"GameId": "8b8322de-096d-4481-a2b2-8db8bb45cfef",
"Region": "EU",
"Type": "Create",
// User that caused the room to be created
"UserId": "834D5AA5BAB1DFB6",
"Username": ""
}
```
### Manipulador Room Joined
O manipulador `RoomJoined` é invocado sempre que um jogador entra na sala. O manipulador do CloudScript a seguir intercepta esse evento.
```javascript theme={null}
// Triggered automatically when a player joins a Photon room
handlers.RoomJoined = function (args) {
return { ResultCode : 0, Message: 'Success' };
};
```
Esse retorno de chamada não é invocado para o primeiro usuário que entra na sala. Use `RoomCreated` para interceptar o primeiro jogador que entra. Você pode obter mais dados sobre o evento usando o argumento "args".
```json theme={null}
{
"ActorNr": 2,
"AppVersion": "1.2_1.85",
"AppId": "bfd5f98b-c6a4-4763-80d9-824d20db842b",
// Unique Game Identifier
"GameId": "b0f55a2e-431d-402a-9809-b0240443267e",
"Region": "EU",
"Type": "Join",
// Id of the player that has joined
"UserId": "AAC7634BF46289DF",
"Username": ""
}
```
### Room left
O manipulador `RoomLeft` é invocado sempre que um jogador sai da sala. O manipulador do CloudScript a seguir intercepta esse evento.
```javascript theme={null}
// Triggered automatically when a player leaves a Photon room
handlers.RoomLeft = function (args) {
return { ResultCode : 0, Message: 'Success' };
};
```
Você pode obter mais dados sobre o evento usando o argumento "args".
```json theme={null}
{
"ActorNr": 2,
"AppVersion": "1.2_1.85",
"AppId": "bfd5f98b-c6a4-4763-80d9-824d20db842b",
// Unique Game Identifier
"GameId": "b0f55a2e-431d-402a-9809-b0240443267e",
"IsInactive": false,
"Reason": "0",
"Region": "EU",
"Type": "ClientDisconnect",
// Id of the user that has left the room
"UserId": "AAC7634BF46289DF",
"Username": ""
}
```
### Manipulador Room Closed
O manipulador `RoomClosed` é invocado sempre que o último jogador sai da sala e ela fica sem jogadores. O manipulador do CloudScript a seguir intercepta esse evento.
```javascript theme={null}
// Triggered automatically when a Photon room closes
// Note: currentPlayerId is undefined in this function
handlers.RoomClosed = function (args) {
return { ResultCode : 0, Message: 'Success' };
};
```
Você pode obter mais dados sobre o evento usando o argumento "args".
```json theme={null}
"ActorCount": 0,
"ActorNr": 1,
"AppVersion": "1.2_1.85",
"AppId": "bfd5f98b-c6a4-4763-80d9-824d20db842b",
// Unique game identifier
"GameId": "b0f55a2e-431d-402a-9809-b0240443267e",
"Region": "EU",
"State2": {
"ActorList": [
]
},
"Type": "Close"
}
```
### Room Property Updated
O manipulador `RoomPropertyUpdated` é invocado sempre que a propriedade da sala é alterada. O manipulador do CloudScript a seguir intercepta esse evento.
```javascript theme={null}
// Triggered automatically when a Photon room game property is updated.
// Note: currentPlayerId is undefined in this function
handlers.RoomPropertyUpdated = function (args) {
return { ResultCode : 0, Message: 'Success' };
};
```
O `currentPlayerId` é indefinido neste manipulador. Se a propriedade da sala tiver sido alterada pelo cliente, você poderá usar o argumento "args" e consultar o UserId para identificar o jogador responsável.
Você pode obter mais dados sobre o evento usando o argumento "args".
```json theme={null}
{
"ActorNr": 1,
"AppVersion": "1.2_1.85",
"AppId": "bfd5f98b-c6a4-4763-80d9-824d20db842b",
// Custom Room Properties
"Properties": {
"CustomProperty": "It's Value"
},
"GameId": "8b8322de-096d-4481-a2b2-8db8bb45cfef",
"Region": "EU",
"State": {
"ActorCounter": 1,
"ActorList": [
{
"ActorNr": 1,
"UserId": "834D5AA5BAB1DFB6",
"Username": "",
"IsActive": true,
"Binary": "RGIAAAEBRAAAAAFi\/3MAAA==",
"DEBUG_BINARY": {
"1": {
"255": ""
}
}
}
],
"Binary": {
"18": "RAAAAANi+nkAAHNzAA1QbGF5ZXJJbmRleGVzRGlpAAEAAAABAAAAAHMADkN1c3RvbVByb3BlcnR5cwAKSXQncyBWYWx1ZQ=="
},
"CheckUserOnJoin": false,
"CustomProperties": {
},
"DeleteCacheOnLeave": true,
"EmptyRoomTTL": 0,
"IsOpen": true,
"IsVisible": true,
"LobbyType": 0,
"LobbyProperties": [
],
"MaxPlayers": 4,
"PlayerTTL": 0,
"SuppressRoomEvents": false,
"Slice": 0,
"DebugInfo": {
"DEBUG_PROPERTIES_18": {
"250": [
],
"PlayerIndexes": {
"1": 0
},
"CustomProperty": "It's Value"
}
},
"ExcludedActors": [
],
"PublishUserId": false,
"ExpectedUsers": [
]
},
"Type": "Game",
"UserId": "834D5AA5BAB1DFB6",
"Username": ""
}
```
Ao alterar propriedades personalizadas da sala usando o cliente Photon do Unity, *é importante marcar a chamada* para que ela passe o evento ao webhook (o PlayFab, neste caso).
```csharp theme={null}
// Properties updates ( this hashtable contains the properties to be changed. Properties not mentioned here will stay as is
var properties = new ExitGames.Client.Photon.Hashtable() { { "CustomProperty" , "It's Value" } };
// Control set. Empty in this case, because our property has not existed before.
// Otherwise you would include previous value of the property.
var expectedProperties = new ExitGames.Client.Photon.Hashtable();
// Set Custom Properties call. Notice the last argument set to "true"
// This tells Photon to forward event to the webhook.
PhotonNetwork.room.SetCustomProperties(properties, expectedProperties, true);
```
### Room Event Raised
O **Room Event Raised** é chamado sempre que um evento de sala personalizado é gerado. O manipulador do **CloudScript** a seguir intercepta esse evento.
```javascript theme={null}
// Triggered by calling "OpRaiseEvent" on the Photon client. The "args.Data" property is
// set to the value of the "customEventContent" HashTable parameter, so you can use
// it to pass in arbitrary data.
handlers.RoomEventRaised= function (args) {
return { ResultCode : 0, Message: 'Success' };
};
```
Você pode obter mais dados sobre o evento usando o argumento "args".
```json theme={null}
{
"ActorNr": 1,
"AppVersion": "1.2_1.85",
"AppId": "bfd5f98b-c6a4-4763-80d9-824d20db842b",
// Custom event data
"Data": {
"Hello": "World"
},
"GameId": "8b8322de-096d-4481-a2b2-8db8bb45cfef",
"Region": "EU",
"State": {
"ActorCounter": 1,
"ActorList": [
{
"ActorNr": 1,
"UserId": "834D5AA5BAB1DFB6",
"Username": "",
"IsActive": true,
"Binary": "RGIAAAEBRAAAAAFi\/3MAAA==",
"DEBUG_BINARY": {
"1": {
"255": ""
}
}
}
],
"Binary": {
"18": "RAAAAAJi+nkAAHNzAA1QbGF5ZXJJbmRleGVzRGlpAAEAAAABAAAAAA=="
},
"CheckUserOnJoin": false,
"CustomProperties": {
},
"DeleteCacheOnLeave": true,
"EmptyRoomTTL": 0,
"IsOpen": true,
"IsVisible": true,
"LobbyType": 0,
"LobbyProperties": [
],
"MaxPlayers": 4,
"PlayerTTL": 0,
"SuppressRoomEvents": false,
"Slice": 0,
"DebugInfo": {
"DEBUG_PROPERTIES_18": {
"250": [
],
"PlayerIndexes": {
"1": 0
}
}
},
"ExcludedActors": [
],
"PublishUserId": false,
"ExpectedUsers": [
]
},
"Type": "Event",
// PlayFab User Id if he/she was the source of the event
"UserId": "834D5AA5BAB1DFB6",
"Username": "",
// Event code
"EvCode": 15
}
```
Ao gerar eventos de sala personalizados usando o cliente Photon do Unity, é importante marcar a chamada para que ela passe o evento aos webhooks (o PlayFab, neste caso).
```csharp theme={null}
var data = new Dictionary() {
{ "Hello" , "World" }
};
// Raise custom room event
// Replace 15 with any custom event code of your choice [0..299]
PhotonNetwork.RaiseEvent(15, data, true, new RaiseEventOptions() {
ForwardToWebhook = true, // Mark call to pass event to Webhook (PlayFab in this case)
});
```
## Testar os manipuladores de eventos de sala
Este exemplo estende o exemplo anterior (autenticação PlayFab + Photon).
Faça upload do seguinte CloudScript para o seu título.
```javascript theme={null}
handlers.RoomCreated = function (args) {
server.WriteTitleEvent({
EventName : "room_created"
});
return { ResultCode : 0, Message: 'Success' };
};
handlers.RoomJoined = function (args) {
server.WriteTitleEvent({
EventName : "room_joined"
});
return { ResultCode : 0, Message: 'Success' };
};
handlers.RoomLeft = function (args) {
server.WriteTitleEvent({
EventName : "room_left"
});
return { ResultCode : 0, Message: 'Success' };
};
handlers.RoomClosed = function (args) {
server.WriteTitleEvent({
EventName : "room_closed"
});
return { ResultCode : 0, Message: 'Success' };
};
handlers.RoomPropertyUpdated = function (args) {
server.WriteTitleEvent({
EventName : "room_property_changed"
});
return { ResultCode : 0, Message: 'Success' };
};
handlers.RoomEventRaised = function (args) {
server.WriteTitleEvent({
EventName : "room_event_raised"
});
return { ResultCode : 0, Message: 'Success' };
};
```
O código não faz nada além de publicar um novo evento de título sempre que um retorno de chamada do Photon é invocado. Sem utilidade em produção, este exemplo nos permite ver claramente como os retornos de chamada são invocados.
Estenda o script `PlayFabAuthenticator` incluindo um novo código de exemplo que gera um evento personalizado e define uma propriedade de sala personalizada. A versão estendida também usa um método `Awake` para não destruir o objeto entre os carregamentos de cena.
```csharp theme={null}
using System.Collections.Generic;
using PlayFab;
using PlayFab.ClientModels;
using UnityEngine;
public class PlayFabAuthenticator : MonoBehaviour {
private string _playFabPlayerIdCache;
//Run the entire thing on awake
public void Awake() {
AuthenticateWithPlayFab();
DontDestroyOnLoad(gameObject);
}
/*
* Step 1
* We authenticate a current PlayFab user normally.
* In this case we use the LoginWithCustomID API call for simplicity.
* You can absolutely use any Login method you want.
* We use PlayFabSettings.DeviceUniqueIdentifier as our custom ID.
* We pass RequestPhotonToken as a callback to be our next step, if
* authentication was successful.
*/
private void AuthenticateWithPlayFab() {
LogMessage("PlayFab authenticating using Custom ID...");
PlayFabClientAPI.LoginWithCustomID(new LoginWithCustomIDRequest()
{
CreateAccount = true,
CustomId = PlayFabSettings.DeviceUniqueIdentifier+"EDITOR"
}, RequestPhotonToken, OnPlayFabError);
}
/*
* Step 2
* We request a Photon authentication token from PlayFab.
* This is a crucial step, because Photon uses different authentication tokens
* than PlayFab. Thus, you cannot directly use PlayFab SessionTicket and
* you need to explicitly request a token. This API call requires you to
* pass a Photon App ID. The App ID may be hard coded, but in this example,
* we are accessing it using convenient static field on PhotonNetwork class.
* We pass in AuthenticateWithPhoton as a callback to be our next step, if
* we have acquired the token successfully.
*/
private void RequestPhotonToken(LoginResult obj) {
LogMessage("PlayFab authenticated. Requesting photon token...");
//We can player PlayFabId. This will come in handy during next step
_playFabPlayerIdCache = obj.PlayFabId;
PlayFabClientAPI.GetPhotonAuthenticationToken(new GetPhotonAuthenticationTokenRequest()
{
PhotonApplicationId = PhotonNetwork.PhotonServerSettings.AppSettings.AppIdRealtime
}, AuthenticateWithPhoton, OnPlayFabError);
}
/*
* Step 3
* This is the final and the simplest step. We create a new AuthenticationValues instance.
* This class describes how to authenticate a player inside the Photon environment.
*/
private void AuthenticateWithPhoton(GetPhotonAuthenticationTokenResult obj) {
LogMessage("Photon token acquired: " + obj.PhotonCustomAuthenticationToken + " Authentication complete.");
//We set AuthType to custom, meaning we bring our own, PlayFab authentication procedure.
var customAuth = new Photon.Realtime.AuthenticationValues { AuthType = CustomAuthenticationType.Custom };
//We add "username" parameter. Do not let it confuse you: PlayFab is expecting this parameter to contain player PlayFab ID (!) and not username.
customAuth.AddAuthParameter("username", _playFabPlayerIdCache); // expected by PlayFab custom auth service
//We add "token" parameter. PlayFab expects it to contain Photon Authentication Token issues to your during previous step.
customAuth.AddAuthParameter("token", obj.PhotonCustomAuthenticationToken);
//We finally tell Photon to use this authentication parameters throughout the entire application.
PhotonNetwork.AuthValues = customAuth;
}
private void OnPlayFabError(PlayFabError obj) {
LogMessage(obj.ErrorMessage);
}
public void LogMessage(string message) {
Debug.Log("PlayFab + Photon Example: " + message);
}
// Add small button to launch our example code
public void OnGUI() {
if (GUILayout.Button("Execute Example ")) ExecuteExample();
}
// Example code which raises custom room event, then sets custom room property
private void ExecuteExample() {
// Raise custom room event
var data = new Dictionary() { {"Hello","World"} };
var result = PhotonNetwork.RaiseEvent(15, data, true, new RaiseEventOptions()
{
ForwardToWebhook = true,
});
LogMessage("New Room Event Post: "+result);
// Set custom room property
var properties = new ExitGames.Client.Photon.Hashtable() { { "CustomProperty", "It's Value" } };
var expectedProperties = new ExitGames.Client.Photon.Hashtable();
PhotonNetwork.room.SetCustomProperties(properties, expectedProperties, true);
LogMessage("New Room Properties Set");
}
}
```
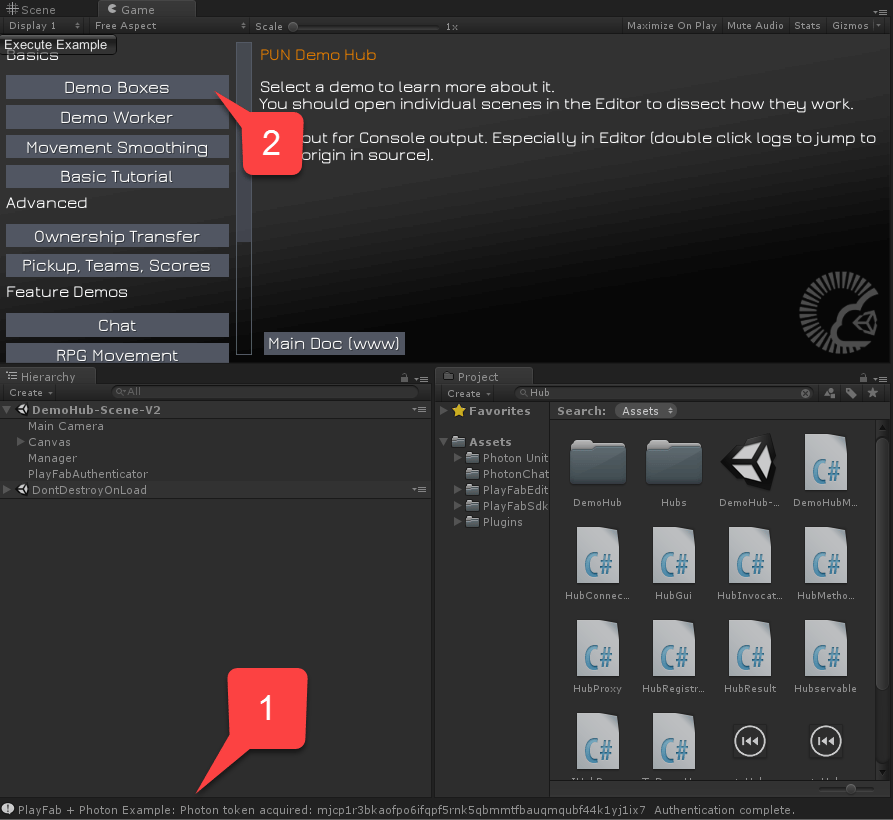
* Execute a cena do hub e aguarde a conclusão da autenticação do PlayFab **(1)**.
* Em seguida, carregue a cena **Boxes Demo** **(2)**.
Verifique se não há erros **Authentication Denied** no console. Nesse ponto, você configurou uma integração mínima entre o PlayFab e o Photon.
## Evento de sala do Photon + CloudScript
O sistema de matchmaking do Photon tem o conceito de *sala*. Se você não estiver familiarizado com esse conceito, consulte o [Guia de matchmaking do Photon](https://doc.photonengine.com/realtime/current/lobby-and-matchmaking/matchmaking-and-lobby).
O PlayFab permite interceptar vários eventos de sala. Os seguintes eventos de sala exigem apenas o CloudScript para serem interceptados:
* `RoomCreated`
* `RoomJoined`
* `RoomLeft`
* `RoomClosed`
Os seguintes eventos exigem controle adicional sobre o código do Unity para serem interceptados (os detalhes são fornecidos mais adiante neste documento):
* `RoomPropertyUpdated`
* `RoomEventRaised`
Depois que você introduz um manipulador para um evento de sala, ele se torna uma parte essencial do fluxo de tratamento de eventos. Portanto, erros gerados durante a execução do seu CloudScript podem causar problemas para *todo* o sistema. Por exemplo, se o manipulador `RoomCreated` gerar um erro, seus clientes também gerarão um erro e não conseguirão se conectar corretamente.
Vamos construir um CloudScript do PlayFab definindo um manipulador para cada tipo de evento individualmente.
### Manipulador Room Created
O manipulador `RoomCreated` é invocado sempre que uma sala do Photon é criada. O manipulador do CloudScript a seguir intercepta esses eventos.
```javascript theme={null}
// Triggered automatically when a Photon room is first created
handlers.RoomCreated = function (args) {
return { ResultCode : 0, Message: 'Success' };
};
```
Você pode obter mais dados sobre o evento usando o argumento "args".
```json theme={null}
{
"ActorNr": 1,
"AppVersion": "1.2_1.85",
"AppId": "bfd5f98b-c6a4-4763-80d9-824d20db842b",
// Options with which the room was created.
"CreateOptions": {
"MaxPlayers": 4,
"LobbyId": null,
"LobbyType": 0,
"CustomProperties": {
},
"EmptyRoomTTL": 0,
"PlayerTTL": 0,
"CheckUserOnJoin": false,
"DeleteCacheOnLeave": true,
"SuppressRoomEvents": false,
"PublishUserId": false,
"ExpectedUsers": null
},
// Unique game identifier
"GameId": "8b8322de-096d-4481-a2b2-8db8bb45cfef",
"Region": "EU",
"Type": "Create",
// User that caused the room to be created
"UserId": "834D5AA5BAB1DFB6",
"Username": ""
}
```
### Manipulador Room Joined
O manipulador `RoomJoined` é invocado sempre que um jogador entra na sala. O manipulador do CloudScript a seguir intercepta esse evento.
```javascript theme={null}
// Triggered automatically when a player joins a Photon room
handlers.RoomJoined = function (args) {
return { ResultCode : 0, Message: 'Success' };
};
```
Esse retorno de chamada não é invocado para o primeiro usuário que entra na sala. Use `RoomCreated` para interceptar o primeiro jogador que entra. Você pode obter mais dados sobre o evento usando o argumento "args".
```json theme={null}
{
"ActorNr": 2,
"AppVersion": "1.2_1.85",
"AppId": "bfd5f98b-c6a4-4763-80d9-824d20db842b",
// Unique Game Identifier
"GameId": "b0f55a2e-431d-402a-9809-b0240443267e",
"Region": "EU",
"Type": "Join",
// Id of the player that has joined
"UserId": "AAC7634BF46289DF",
"Username": ""
}
```
### Room left
O manipulador `RoomLeft` é invocado sempre que um jogador sai da sala. O manipulador do CloudScript a seguir intercepta esse evento.
```javascript theme={null}
// Triggered automatically when a player leaves a Photon room
handlers.RoomLeft = function (args) {
return { ResultCode : 0, Message: 'Success' };
};
```
Você pode obter mais dados sobre o evento usando o argumento "args".
```json theme={null}
{
"ActorNr": 2,
"AppVersion": "1.2_1.85",
"AppId": "bfd5f98b-c6a4-4763-80d9-824d20db842b",
// Unique Game Identifier
"GameId": "b0f55a2e-431d-402a-9809-b0240443267e",
"IsInactive": false,
"Reason": "0",
"Region": "EU",
"Type": "ClientDisconnect",
// Id of the user that has left the room
"UserId": "AAC7634BF46289DF",
"Username": ""
}
```
### Manipulador Room Closed
O manipulador `RoomClosed` é invocado sempre que o último jogador sai da sala e ela fica sem jogadores. O manipulador do CloudScript a seguir intercepta esse evento.
```javascript theme={null}
// Triggered automatically when a Photon room closes
// Note: currentPlayerId is undefined in this function
handlers.RoomClosed = function (args) {
return { ResultCode : 0, Message: 'Success' };
};
```
Você pode obter mais dados sobre o evento usando o argumento "args".
```json theme={null}
"ActorCount": 0,
"ActorNr": 1,
"AppVersion": "1.2_1.85",
"AppId": "bfd5f98b-c6a4-4763-80d9-824d20db842b",
// Unique game identifier
"GameId": "b0f55a2e-431d-402a-9809-b0240443267e",
"Region": "EU",
"State2": {
"ActorList": [
]
},
"Type": "Close"
}
```
### Room Property Updated
O manipulador `RoomPropertyUpdated` é invocado sempre que a propriedade da sala é alterada. O manipulador do CloudScript a seguir intercepta esse evento.
```javascript theme={null}
// Triggered automatically when a Photon room game property is updated.
// Note: currentPlayerId is undefined in this function
handlers.RoomPropertyUpdated = function (args) {
return { ResultCode : 0, Message: 'Success' };
};
```
O `currentPlayerId` é indefinido neste manipulador. Se a propriedade da sala tiver sido alterada pelo cliente, você poderá usar o argumento "args" e consultar o UserId para identificar o jogador responsável.
Você pode obter mais dados sobre o evento usando o argumento "args".
```json theme={null}
{
"ActorNr": 1,
"AppVersion": "1.2_1.85",
"AppId": "bfd5f98b-c6a4-4763-80d9-824d20db842b",
// Custom Room Properties
"Properties": {
"CustomProperty": "It's Value"
},
"GameId": "8b8322de-096d-4481-a2b2-8db8bb45cfef",
"Region": "EU",
"State": {
"ActorCounter": 1,
"ActorList": [
{
"ActorNr": 1,
"UserId": "834D5AA5BAB1DFB6",
"Username": "",
"IsActive": true,
"Binary": "RGIAAAEBRAAAAAFi\/3MAAA==",
"DEBUG_BINARY": {
"1": {
"255": ""
}
}
}
],
"Binary": {
"18": "RAAAAANi+nkAAHNzAA1QbGF5ZXJJbmRleGVzRGlpAAEAAAABAAAAAHMADkN1c3RvbVByb3BlcnR5cwAKSXQncyBWYWx1ZQ=="
},
"CheckUserOnJoin": false,
"CustomProperties": {
},
"DeleteCacheOnLeave": true,
"EmptyRoomTTL": 0,
"IsOpen": true,
"IsVisible": true,
"LobbyType": 0,
"LobbyProperties": [
],
"MaxPlayers": 4,
"PlayerTTL": 0,
"SuppressRoomEvents": false,
"Slice": 0,
"DebugInfo": {
"DEBUG_PROPERTIES_18": {
"250": [
],
"PlayerIndexes": {
"1": 0
},
"CustomProperty": "It's Value"
}
},
"ExcludedActors": [
],
"PublishUserId": false,
"ExpectedUsers": [
]
},
"Type": "Game",
"UserId": "834D5AA5BAB1DFB6",
"Username": ""
}
```
Ao alterar propriedades personalizadas da sala usando o cliente Photon do Unity, *é importante marcar a chamada* para que ela passe o evento ao webhook (o PlayFab, neste caso).
```csharp theme={null}
// Properties updates ( this hashtable contains the properties to be changed. Properties not mentioned here will stay as is
var properties = new ExitGames.Client.Photon.Hashtable() { { "CustomProperty" , "It's Value" } };
// Control set. Empty in this case, because our property has not existed before.
// Otherwise you would include previous value of the property.
var expectedProperties = new ExitGames.Client.Photon.Hashtable();
// Set Custom Properties call. Notice the last argument set to "true"
// This tells Photon to forward event to the webhook.
PhotonNetwork.room.SetCustomProperties(properties, expectedProperties, true);
```
### Room Event Raised
O **Room Event Raised** é chamado sempre que um evento de sala personalizado é gerado. O manipulador do **CloudScript** a seguir intercepta esse evento.
```javascript theme={null}
// Triggered by calling "OpRaiseEvent" on the Photon client. The "args.Data" property is
// set to the value of the "customEventContent" HashTable parameter, so you can use
// it to pass in arbitrary data.
handlers.RoomEventRaised= function (args) {
return { ResultCode : 0, Message: 'Success' };
};
```
Você pode obter mais dados sobre o evento usando o argumento "args".
```json theme={null}
{
"ActorNr": 1,
"AppVersion": "1.2_1.85",
"AppId": "bfd5f98b-c6a4-4763-80d9-824d20db842b",
// Custom event data
"Data": {
"Hello": "World"
},
"GameId": "8b8322de-096d-4481-a2b2-8db8bb45cfef",
"Region": "EU",
"State": {
"ActorCounter": 1,
"ActorList": [
{
"ActorNr": 1,
"UserId": "834D5AA5BAB1DFB6",
"Username": "",
"IsActive": true,
"Binary": "RGIAAAEBRAAAAAFi\/3MAAA==",
"DEBUG_BINARY": {
"1": {
"255": ""
}
}
}
],
"Binary": {
"18": "RAAAAAJi+nkAAHNzAA1QbGF5ZXJJbmRleGVzRGlpAAEAAAABAAAAAA=="
},
"CheckUserOnJoin": false,
"CustomProperties": {
},
"DeleteCacheOnLeave": true,
"EmptyRoomTTL": 0,
"IsOpen": true,
"IsVisible": true,
"LobbyType": 0,
"LobbyProperties": [
],
"MaxPlayers": 4,
"PlayerTTL": 0,
"SuppressRoomEvents": false,
"Slice": 0,
"DebugInfo": {
"DEBUG_PROPERTIES_18": {
"250": [
],
"PlayerIndexes": {
"1": 0
}
}
},
"ExcludedActors": [
],
"PublishUserId": false,
"ExpectedUsers": [
]
},
"Type": "Event",
// PlayFab User Id if he/she was the source of the event
"UserId": "834D5AA5BAB1DFB6",
"Username": "",
// Event code
"EvCode": 15
}
```
Ao gerar eventos de sala personalizados usando o cliente Photon do Unity, é importante marcar a chamada para que ela passe o evento aos webhooks (o PlayFab, neste caso).
```csharp theme={null}
var data = new Dictionary() {
{ "Hello" , "World" }
};
// Raise custom room event
// Replace 15 with any custom event code of your choice [0..299]
PhotonNetwork.RaiseEvent(15, data, true, new RaiseEventOptions() {
ForwardToWebhook = true, // Mark call to pass event to Webhook (PlayFab in this case)
});
```
## Testar os manipuladores de eventos de sala
Este exemplo estende o exemplo anterior (autenticação PlayFab + Photon).
Faça upload do seguinte CloudScript para o seu título.
```javascript theme={null}
handlers.RoomCreated = function (args) {
server.WriteTitleEvent({
EventName : "room_created"
});
return { ResultCode : 0, Message: 'Success' };
};
handlers.RoomJoined = function (args) {
server.WriteTitleEvent({
EventName : "room_joined"
});
return { ResultCode : 0, Message: 'Success' };
};
handlers.RoomLeft = function (args) {
server.WriteTitleEvent({
EventName : "room_left"
});
return { ResultCode : 0, Message: 'Success' };
};
handlers.RoomClosed = function (args) {
server.WriteTitleEvent({
EventName : "room_closed"
});
return { ResultCode : 0, Message: 'Success' };
};
handlers.RoomPropertyUpdated = function (args) {
server.WriteTitleEvent({
EventName : "room_property_changed"
});
return { ResultCode : 0, Message: 'Success' };
};
handlers.RoomEventRaised = function (args) {
server.WriteTitleEvent({
EventName : "room_event_raised"
});
return { ResultCode : 0, Message: 'Success' };
};
```
O código não faz nada além de publicar um novo evento de título sempre que um retorno de chamada do Photon é invocado. Sem utilidade em produção, este exemplo nos permite ver claramente como os retornos de chamada são invocados.
Estenda o script `PlayFabAuthenticator` incluindo um novo código de exemplo que gera um evento personalizado e define uma propriedade de sala personalizada. A versão estendida também usa um método `Awake` para não destruir o objeto entre os carregamentos de cena.
```csharp theme={null}
using System.Collections.Generic;
using PlayFab;
using PlayFab.ClientModels;
using UnityEngine;
public class PlayFabAuthenticator : MonoBehaviour {
private string _playFabPlayerIdCache;
//Run the entire thing on awake
public void Awake() {
AuthenticateWithPlayFab();
DontDestroyOnLoad(gameObject);
}
/*
* Step 1
* We authenticate a current PlayFab user normally.
* In this case we use the LoginWithCustomID API call for simplicity.
* You can absolutely use any Login method you want.
* We use PlayFabSettings.DeviceUniqueIdentifier as our custom ID.
* We pass RequestPhotonToken as a callback to be our next step, if
* authentication was successful.
*/
private void AuthenticateWithPlayFab() {
LogMessage("PlayFab authenticating using Custom ID...");
PlayFabClientAPI.LoginWithCustomID(new LoginWithCustomIDRequest()
{
CreateAccount = true,
CustomId = PlayFabSettings.DeviceUniqueIdentifier+"EDITOR"
}, RequestPhotonToken, OnPlayFabError);
}
/*
* Step 2
* We request a Photon authentication token from PlayFab.
* This is a crucial step, because Photon uses different authentication tokens
* than PlayFab. Thus, you cannot directly use PlayFab SessionTicket and
* you need to explicitly request a token. This API call requires you to
* pass a Photon App ID. The App ID may be hard coded, but in this example,
* we are accessing it using convenient static field on PhotonNetwork class.
* We pass in AuthenticateWithPhoton as a callback to be our next step, if
* we have acquired the token successfully.
*/
private void RequestPhotonToken(LoginResult obj) {
LogMessage("PlayFab authenticated. Requesting photon token...");
//We can player PlayFabId. This will come in handy during next step
_playFabPlayerIdCache = obj.PlayFabId;
PlayFabClientAPI.GetPhotonAuthenticationToken(new GetPhotonAuthenticationTokenRequest()
{
PhotonApplicationId = PhotonNetwork.PhotonServerSettings.AppSettings.AppIdRealtime
}, AuthenticateWithPhoton, OnPlayFabError);
}
/*
* Step 3
* This is the final and the simplest step. We create a new AuthenticationValues instance.
* This class describes how to authenticate a player inside the Photon environment.
*/
private void AuthenticateWithPhoton(GetPhotonAuthenticationTokenResult obj) {
LogMessage("Photon token acquired: " + obj.PhotonCustomAuthenticationToken + " Authentication complete.");
//We set AuthType to custom, meaning we bring our own, PlayFab authentication procedure.
var customAuth = new Photon.Realtime.AuthenticationValues { AuthType = CustomAuthenticationType.Custom };
//We add "username" parameter. Do not let it confuse you: PlayFab is expecting this parameter to contain player PlayFab ID (!) and not username.
customAuth.AddAuthParameter("username", _playFabPlayerIdCache); // expected by PlayFab custom auth service
//We add "token" parameter. PlayFab expects it to contain Photon Authentication Token issues to your during previous step.
customAuth.AddAuthParameter("token", obj.PhotonCustomAuthenticationToken);
//We finally tell Photon to use this authentication parameters throughout the entire application.
PhotonNetwork.AuthValues = customAuth;
}
private void OnPlayFabError(PlayFabError obj) {
LogMessage(obj.ErrorMessage);
}
public void LogMessage(string message) {
Debug.Log("PlayFab + Photon Example: " + message);
}
// Add small button to launch our example code
public void OnGUI() {
if (GUILayout.Button("Execute Example ")) ExecuteExample();
}
// Example code which raises custom room event, then sets custom room property
private void ExecuteExample() {
// Raise custom room event
var data = new Dictionary() { {"Hello","World"} };
var result = PhotonNetwork.RaiseEvent(15, data, true, new RaiseEventOptions()
{
ForwardToWebhook = true,
});
LogMessage("New Room Event Post: "+result);
// Set custom room property
var properties = new ExitGames.Client.Photon.Hashtable() { { "CustomProperty", "It's Value" } };
var expectedProperties = new ExitGames.Client.Photon.Hashtable();
PhotonNetwork.room.SetCustomProperties(properties, expectedProperties, true);
LogMessage("New Room Properties Set");
}
}
```
* Execute a cena do hub e aguarde a conclusão da autenticação do PlayFab **(1)**.
* Em seguida, carregue a cena **Boxes Demo** **(2)**.
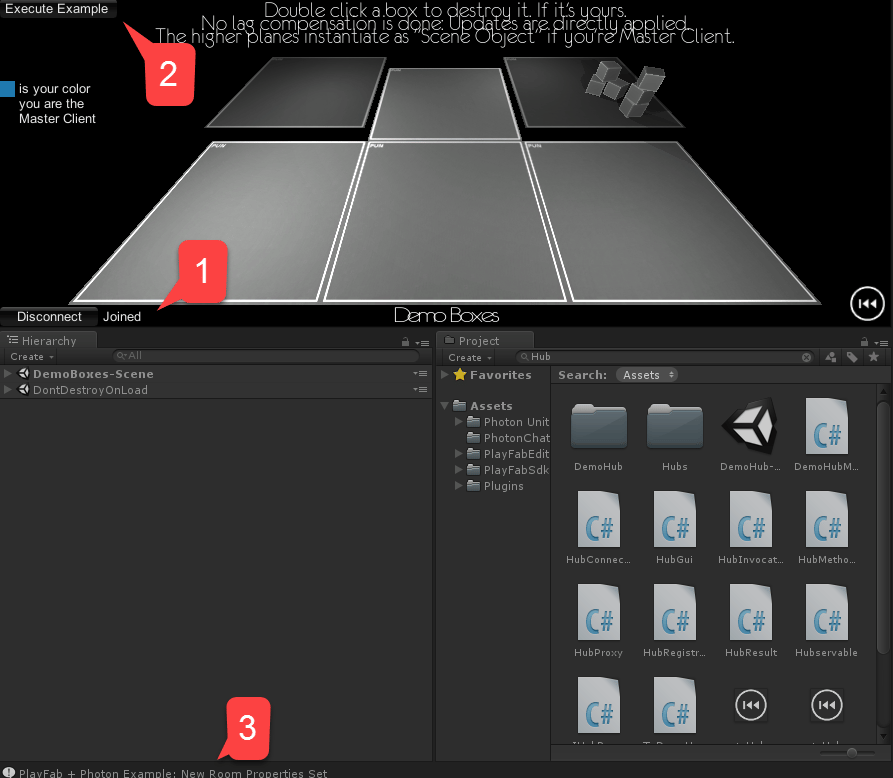
 * Quando a cena carregar, aguarde até que o par se conecte à sala recém-criada **(1)**.
* Em seguida, selecione **Execute Example** no canto superior esquerdo **(2)**.
* Observe a saída do console **(3)**.
* Verifique se nenhum erro ocorreu.
* Quando a cena carregar, aguarde até que o par se conecte à sala recém-criada **(1)**.
* Em seguida, selecione **Execute Example** no canto superior esquerdo **(2)**.
* Observe a saída do console **(3)**.
* Verifique se nenhum erro ocorreu.
 Não se esqueça de interromper a reprodução no Unity. Isso é feito para garantir que também recebamos os eventos **RoomLeft** e **RoomClosed**.
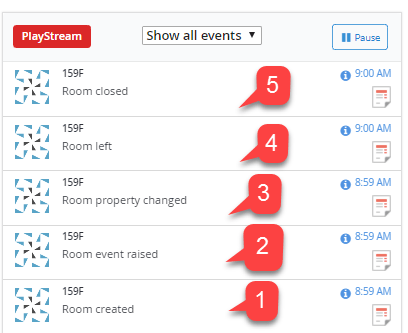
Navegue até a página do Game Manager do título e observe o painel **PlayStream**. Você deverá ver os eventos gerados como resultado do nosso código do CloudScript que manipula os eventos do Photon.
1. Inicialmente, nossa instância do Photon não tinha nenhuma sala aberta. Quando iniciamos o exemplo, o Photon criou a sala para o Boxes Demo.
2. O primeiro jogador a entrar é o jogador que solicitou a sala. Portanto, nenhum **RoomJoined Event** foi registrado. Em seguida, executamos nosso código de exemplo:
* Primeiro, geramos um **Room Event** personalizado.
* Depois, definimos uma **Room Property** personalizada.
* Em seguida, interrompemos o modo de reprodução do Unity. Isso fez com que nosso cliente saísse da sala.
3. Como nosso cliente desconectado era o último, não há mais clientes, e o Photon fecha a sala.
Todos os eventos devem ser registrados no fluxo de eventos do PlayStream, conforme mostrado na imagem a seguir.
Não se esqueça de interromper a reprodução no Unity. Isso é feito para garantir que também recebamos os eventos **RoomLeft** e **RoomClosed**.
Navegue até a página do Game Manager do título e observe o painel **PlayStream**. Você deverá ver os eventos gerados como resultado do nosso código do CloudScript que manipula os eventos do Photon.
1. Inicialmente, nossa instância do Photon não tinha nenhuma sala aberta. Quando iniciamos o exemplo, o Photon criou a sala para o Boxes Demo.
2. O primeiro jogador a entrar é o jogador que solicitou a sala. Portanto, nenhum **RoomJoined Event** foi registrado. Em seguida, executamos nosso código de exemplo:
* Primeiro, geramos um **Room Event** personalizado.
* Depois, definimos uma **Room Property** personalizada.
* Em seguida, interrompemos o modo de reprodução do Unity. Isso fez com que nosso cliente saísse da sala.
3. Como nosso cliente desconectado era o último, não há mais clientes, e o Photon fecha a sala.
Todos os eventos devem ser registrados no fluxo de eventos do PlayStream, conforme mostrado na imagem a seguir.
 Nesse ponto, você integrou totalmente o suporte a eventos do Photon ao seu título do PlayFab.
## Related topics
- [Início rápido](/pt-BR/services/playfab/economy-monetization/economy-v2/quickstart.md)
- [Início rápido do Party](/pt-BR/services/playfab/multiplayer/networking/quickstart.md)
- [Início rápido do Unity](/pt-BR/services/playfab/sdks/unity3d/quickstart.md)
- [Início rápido do Experiments](/pt-BR/services/playfab/live-service-management/game-configuration/experiments/quickstart.md)
- [Início rápido do SDK do Lobby](/pt-BR/services/playfab/multiplayer/lobby/lobby-getting-started.md)
Nesse ponto, você integrou totalmente o suporte a eventos do Photon ao seu título do PlayFab.
## Related topics
- [Início rápido](/pt-BR/services/playfab/economy-monetization/economy-v2/quickstart.md)
- [Início rápido do Party](/pt-BR/services/playfab/multiplayer/networking/quickstart.md)
- [Início rápido do Unity](/pt-BR/services/playfab/sdks/unity3d/quickstart.md)
- [Início rápido do Experiments](/pt-BR/services/playfab/live-service-management/game-configuration/experiments/quickstart.md)
- [Início rápido do SDK do Lobby](/pt-BR/services/playfab/multiplayer/lobby/lobby-getting-started.md)