> ## Documentation Index
> Fetch the complete documentation index at: https://devdocs.xbox.com/llms.txt
> Use this file to discover all available pages before exploring further.
# Configurar a autenticação do PlayFab usando Twitch e HTML5
> Tutorial passo a passo para adicionar o login do Twitch a um título do PlayFab com HTML5 e JavaScript, abordando o registro do aplicativo do Twitch e a autenticação OAuth do jogador.
Este tutorial foi criado para orientar você no processo de autenticação do PlayFab usando Twitch e HTML5/JavaScript.
## Requisitos
Antes de começar, você deve ter:
* Uma [conta do Twitch](https://www.twitch.tv/) para testes.
* Um título do [PlayFab](https://developer.playfab.com/) registrado.
* Familiaridade com os [conceitos básicos e práticas recomendadas de login](/pt-BR/services/playfab/identity/player-identity/login/login-basics-best-practices).
* No mínimo, um servidor com um nome de domínio válido para servir arquivos HTML estáticos.
Consulte o tutorial [Executar um servidor HTTP para testes](/pt-BR/services/playfab/identity/player-identity/platform-specific-authentication/running-an-http-server-for-testing) para obter informações sobre como configurar um servidor com um nome de domínio válido.
## Servidor e domínio
Este tutorial exige um servidor Web para seguir as instruções. Se você ainda não tiver um servidor Web remoto registrado, siga nosso tutorial [Executar um servidor HTTP para testes](/pt-BR/services/playfab/identity/player-identity/platform-specific-authentication/running-an-http-server-for-testing) para obter informações sobre como executar um servidor Web local.
Ao longo deste tutorial, presumiremos que seu domínio é `[http://localhost/](http://localhost/)`.
## Registrar um aplicativo do Twitch
Comece navegando até o [site do Twitch](https://www.twitch.tv/) e verificando se você está conectado.
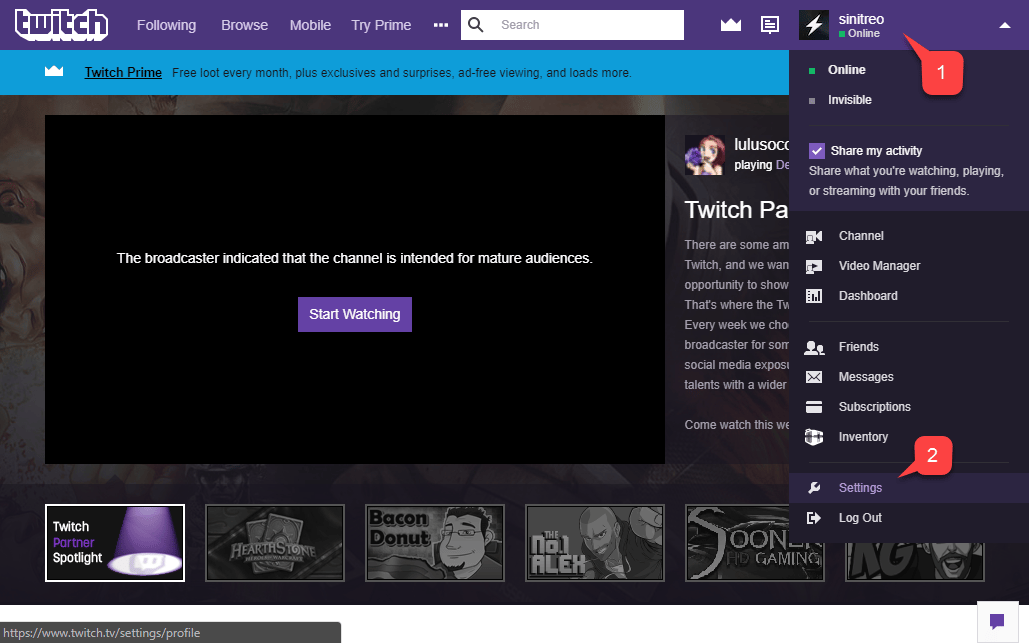
1. Navegue até a lista suspensa **Account**.
2. Selecione **Settings** no menu fornecido.
Na página **Settings**, selecione **Connections (1)**, conforme mostrado abaixo.
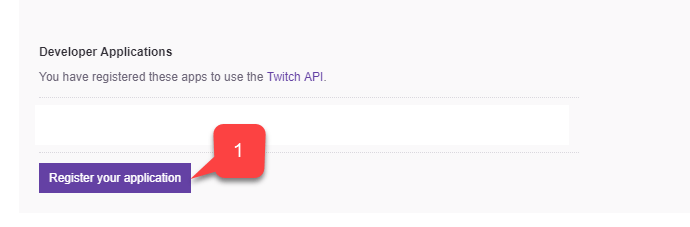
Na parte inferior da página, selecione o botão **Register your application (1)**, conforme mostrado abaixo.
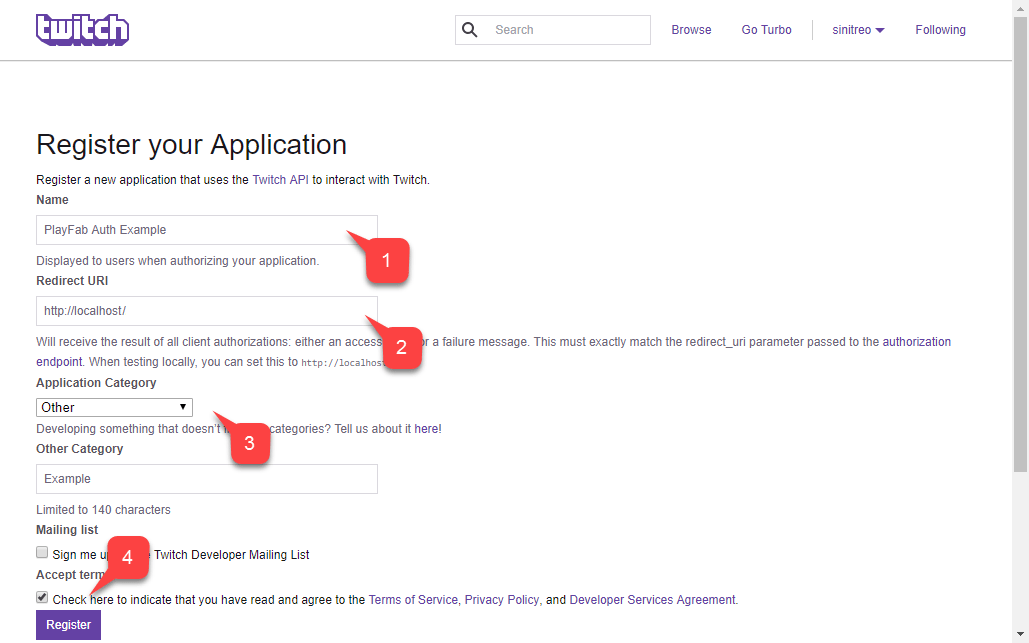
Será aberta uma página que permite configurar um novo aplicativo.
1. Preencha o **Name** do **Application**.
2. Insira a **Redirect URL**.
3. Insira a **Application Category**.
4. Em seguida, aceite os termos do **Twitch** e selecione o botão **Register**.
Ao testar com um servidor Web local, o Twitch permite usar `****` como URL de redirecionamento. Inclua a barra **/** à direita. Sem ela, o Twitch não reconhecerá a URL do localhost.
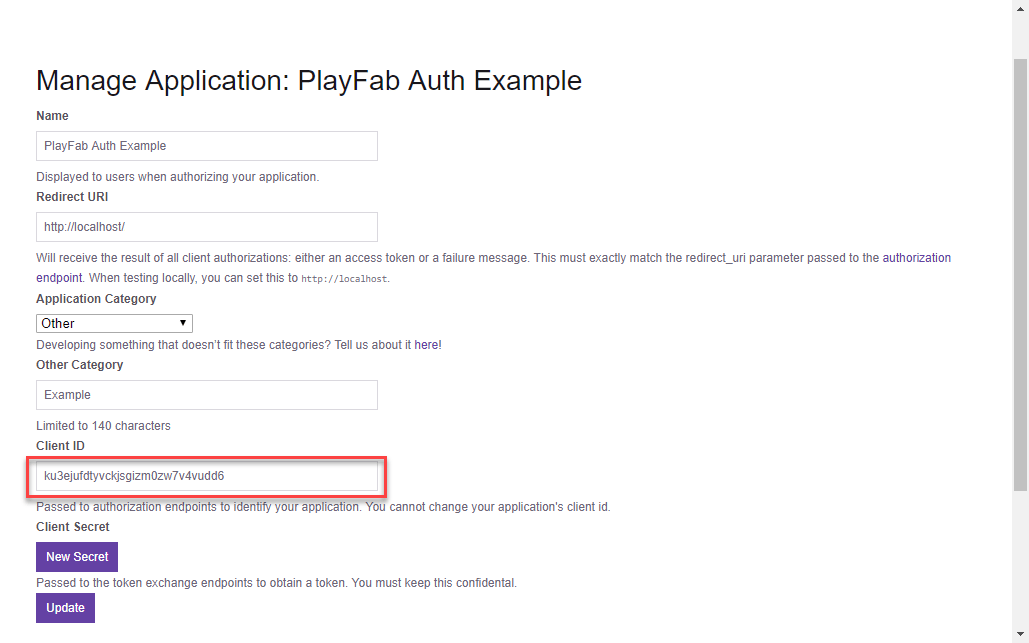
Depois que o aplicativo for registrado, a página será atualizada e revelará a Client ID do seu aplicativo.
Mantenha essa Client ID em um local seguro e de fácil acesso, pois você a usará mais tarde para configurar seu título do PlayFab.
## Configurar um título do PlayFab
Depois de obter a Client ID do Twitch, você poderá habilitar e configurar um complemento do Twitch para seu título do PlayFab.
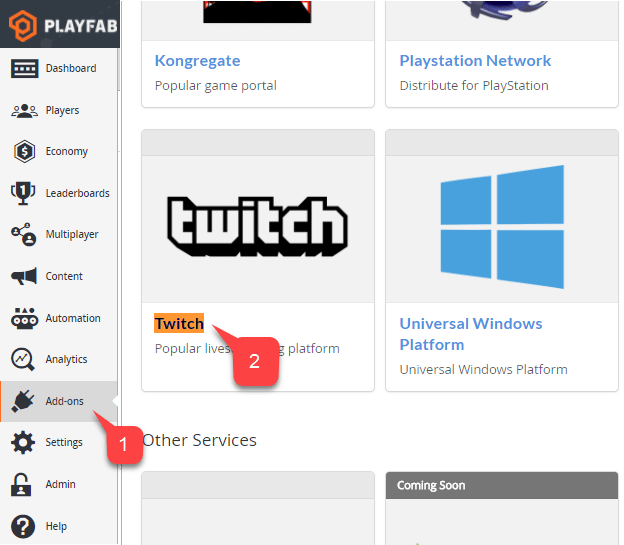
1. Na tela do **PlayFab Title**, acesse o menu e selecione o item **Add-ons**.
2. Em seguida, selecione o link do ícone do **Twitch**.
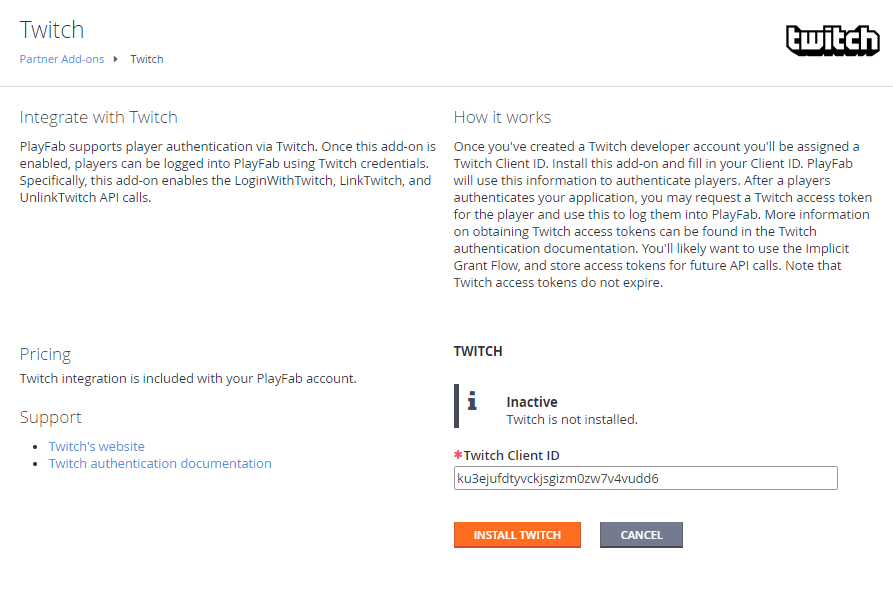
Na página do **Twitch**:
* Uma página **Settings** será aberta para o **Twitch Add-on**.
* Insira sua **Twitch Client ID**.
* Selecione o botão **Install Twitch**.
Reserve um momento para verificar se o complemento foi instalado e se nenhum erro ocorreu. Isso conclui a configuração do título do PlayFab.
## Teste
Use o arquivo HTML a seguir para testar a autenticação do PlayFab usando o Twitch.
Substitua `TWITCH_CLIENT_ID_GOES_HERE` e `PLAYFAB_TITLE_ID_GOES_HERE` pelos seus próprios valores.
```html theme={null}
Twitch Auth Example
```
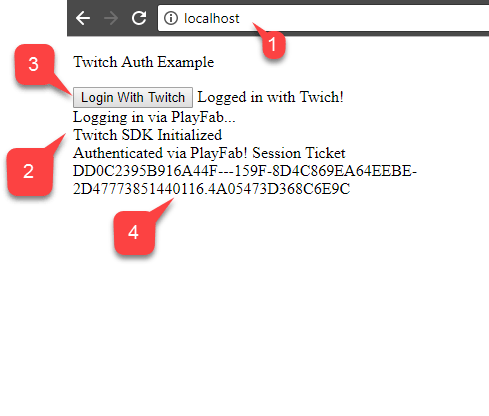
1. Solicite o arquivo a seguir do seu servidor usando o domínio que você configurou durante a configuração do aplicativo do Twitch, `` no nosso caso.
2. Quando a página abrir, aguarde a mensagem indicando que o **Twitch SDK** foi inicializado.
3. Em seguida, selecione o botão **Login with Twitch**.
4. Siga as instruções do **Twitch** na janela pop-up e observe a saída.
Se você *já tiver* uma sessão de autenticação do Twitch em andamento ao acessar a página, é possível que os retornos de chamada sejam disparados em uma ordem diferente e inesperada. Esse caso é mostrado na captura de tela abaixo. No entanto, verifique se apenas **Logging in via PlayFab** vem depois de **Logged in with Twitch**. Isso indica que o token foi recebido ou restaurado do armazenamento local e que não precisamos esperar o Twitch SDK para começar a entrar no PlayFab.
Se o PlayFab conseguir obter um `SessionTicket`, você integrou com êxito a autenticação do Twitch ao seu aplicativo do PlayFab.
## Related topics
- [Autenticação específica da plataforma](/pt-BR/services/playfab/identity/player-identity/platform-specific-authentication/index.md)
- [Configurar a autenticação do PlayFab usando Google e HTML5](/pt-BR/services/playfab/identity/player-identity/platform-specific-authentication/google-html5.md)
- [Configurar a autenticação do PlayFab usando Kongregate e HTML5](/pt-BR/services/playfab/identity/player-identity/platform-specific-authentication/kongregate-html5.md)
- [Configurar a autenticação do PlayFab usando Facebook e HTML5](/pt-BR/services/playfab/identity/player-identity/platform-specific-authentication/facebook-html5.md)
- [Configurar a entrada com Battle.net para o PlayFab](/pt-BR/services/playfab/identity/player-identity/platform-specific-authentication/battlenet-login.md)
 Na página **Settings**, selecione **Connections (1)**, conforme mostrado abaixo.
 Na parte inferior da página, selecione o botão **Register your application (1)**, conforme mostrado abaixo.
 Será aberta uma página que permite configurar um novo aplicativo.
1. Preencha o **Name** do **Application**.
2. Insira a **Redirect URL**.
3. Insira a **Application Category**.
4. Em seguida, aceite os termos do **Twitch** e selecione o botão **Register**.
Será aberta uma página que permite configurar um novo aplicativo.
1. Preencha o **Name** do **Application**.
2. Insira a **Redirect URL**.
3. Insira a **Application Category**.
4. Em seguida, aceite os termos do **Twitch** e selecione o botão **Register**.
 ## Configurar um título do PlayFab
Depois de obter a Client ID do Twitch, você poderá habilitar e configurar um complemento do Twitch para seu título do PlayFab.
1. Na tela do **PlayFab Title**, acesse o menu e selecione o item **Add-ons**.
2. Em seguida, selecione o link do ícone do **Twitch**.
## Configurar um título do PlayFab
Depois de obter a Client ID do Twitch, você poderá habilitar e configurar um complemento do Twitch para seu título do PlayFab.
1. Na tela do **PlayFab Title**, acesse o menu e selecione o item **Add-ons**.
2. Em seguida, selecione o link do ícone do **Twitch**.
 Na página do **Twitch**:
* Uma página **Settings** será aberta para o **Twitch Add-on**.
* Insira sua **Twitch Client ID**.
* Selecione o botão **Install Twitch**.
Na página do **Twitch**:
* Uma página **Settings** será aberta para o **Twitch Add-on**.
* Insira sua **Twitch Client ID**.
* Selecione o botão **Install Twitch**.
 Reserve um momento para verificar se o complemento foi instalado e se nenhum erro ocorreu. Isso conclui a configuração do título do PlayFab.
## Teste
Use o arquivo HTML a seguir para testar a autenticação do PlayFab usando o Twitch.
Substitua `TWITCH_CLIENT_ID_GOES_HERE` e `PLAYFAB_TITLE_ID_GOES_HERE` pelos seus próprios valores.
```html theme={null}
Reserve um momento para verificar se o complemento foi instalado e se nenhum erro ocorreu. Isso conclui a configuração do título do PlayFab.
## Teste
Use o arquivo HTML a seguir para testar a autenticação do PlayFab usando o Twitch.
Substitua `TWITCH_CLIENT_ID_GOES_HERE` e `PLAYFAB_TITLE_ID_GOES_HERE` pelos seus próprios valores.
```html theme={null}
 Se o PlayFab conseguir obter um `SessionTicket`, você integrou com êxito a autenticação do Twitch ao seu aplicativo do PlayFab.
## Related topics
- [Autenticação específica da plataforma](/pt-BR/services/playfab/identity/player-identity/platform-specific-authentication/index.md)
- [Configurar a autenticação do PlayFab usando Google e HTML5](/pt-BR/services/playfab/identity/player-identity/platform-specific-authentication/google-html5.md)
- [Configurar a autenticação do PlayFab usando Kongregate e HTML5](/pt-BR/services/playfab/identity/player-identity/platform-specific-authentication/kongregate-html5.md)
- [Configurar a autenticação do PlayFab usando Facebook e HTML5](/pt-BR/services/playfab/identity/player-identity/platform-specific-authentication/facebook-html5.md)
- [Configurar a entrada com Battle.net para o PlayFab](/pt-BR/services/playfab/identity/player-identity/platform-specific-authentication/battlenet-login.md)
Se o PlayFab conseguir obter um `SessionTicket`, você integrou com êxito a autenticação do Twitch ao seu aplicativo do PlayFab.
## Related topics
- [Autenticação específica da plataforma](/pt-BR/services/playfab/identity/player-identity/platform-specific-authentication/index.md)
- [Configurar a autenticação do PlayFab usando Google e HTML5](/pt-BR/services/playfab/identity/player-identity/platform-specific-authentication/google-html5.md)
- [Configurar a autenticação do PlayFab usando Kongregate e HTML5](/pt-BR/services/playfab/identity/player-identity/platform-specific-authentication/kongregate-html5.md)
- [Configurar a autenticação do PlayFab usando Facebook e HTML5](/pt-BR/services/playfab/identity/player-identity/platform-specific-authentication/facebook-html5.md)
- [Configurar a entrada com Battle.net para o PlayFab](/pt-BR/services/playfab/identity/player-identity/platform-specific-authentication/battlenet-login.md)