> ## Documentation Index
> Fetch the complete documentation index at: https://devdocs.xbox.com/llms.txt
> Use this file to discover all available pages before exploring further.
# Configurar a autenticação do PlayFab usando Google e HTML5
> Tutorial passo a passo para adicionar a entrada com o Google a um título do PlayFab usando HTML5 e JavaScript, abordando a configuração da API do Google e a autenticação de jogadores com OAuth.
Este tutorial orienta você no processo de autenticação do PlayFab usando Google e HTML5/JavaScript.
## Requisitos
Você precisará de:
* Uma [conta do Google](https://google.com/) para testes.
* Um título do `[PlayFab](https://developer.playfab.com/)` registrado.
* Familiaridade com os [conceitos básicos e práticas recomendadas de login](/pt-BR/services/playfab/identity/player-identity/login/login-basics-best-practices).
* No mínimo, um servidor com um nome de domínio válido para servir um arquivo HTML estático. Consulte o tutorial [Executar um servidor HTTP para testes](/pt-BR/services/playfab/identity/player-identity/platform-specific-authentication/running-an-http-server-for-testing) para obter informações sobre como configurar um.
## Servidor e domínio
Este guia requer um servidor com um domínio válido. Se você ainda não tiver um domínio registrado e um servidor Web remoto, siga nosso tutorial [Executar um servidor HTTP para testes](/pt-BR/services/playfab/identity/player-identity/platform-specific-authentication/running-an-http-server-for-testing) para obter informações sobre como configurar e executar um servidor Web local com um nome de domínio válido.
Ao longo deste guia, presumiremos que seu domínio é `[http://playfab.example](http://playfab.example)`.
## Registrar um projeto da API do Google
Comece navegando até o [Console de APIs do Google](https://console.developers.google.com/):
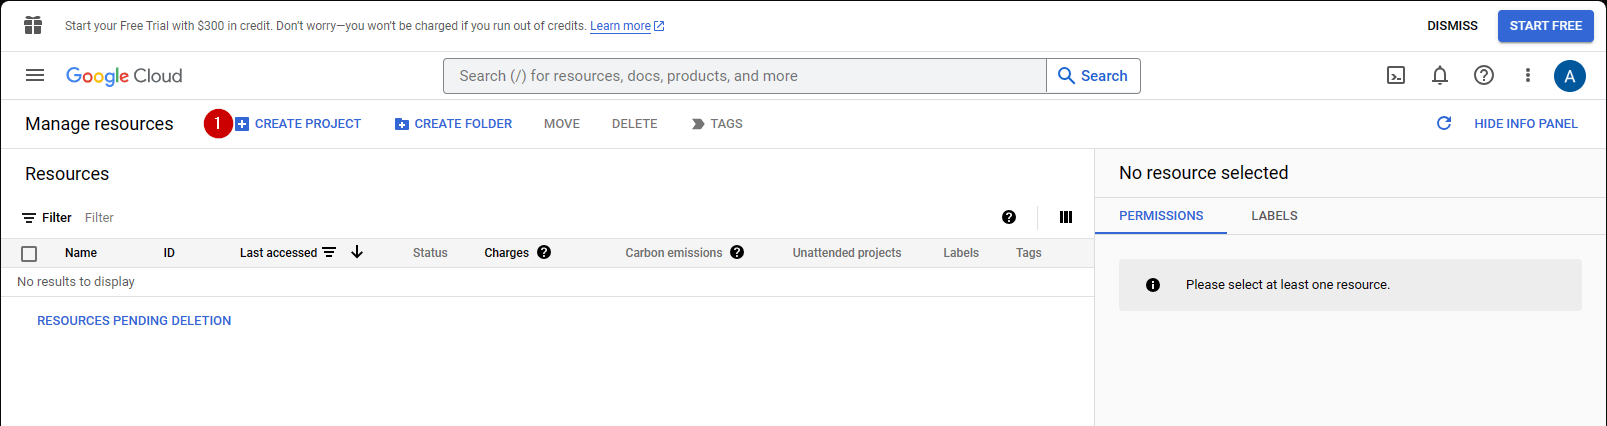
1. Navegue até **CREATE PROJECT** e selecione essa opção.
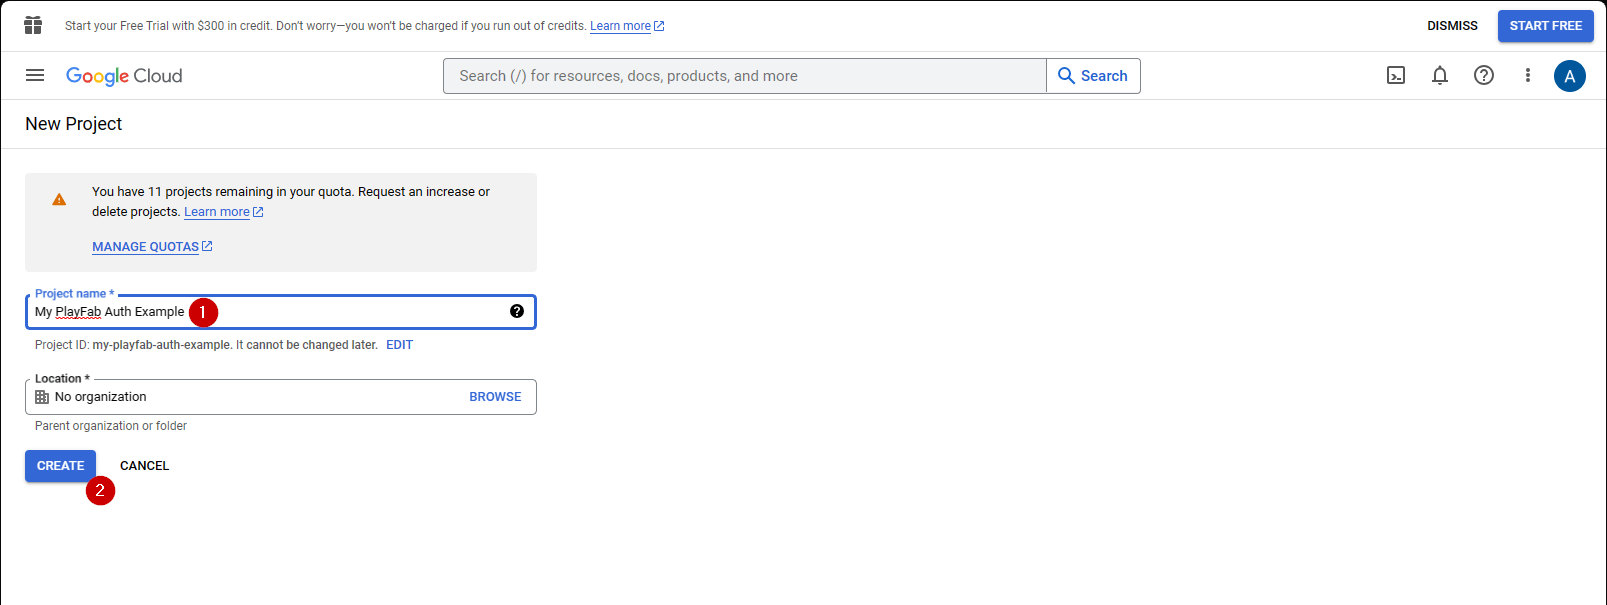
1. Preencha o campo em **Project Name**.
2. Selecione o botão **Create**.
É normal que o **API Manager** leve de 10 a 20 segundos para gerar o projeto.
Depois que o projeto for criado:
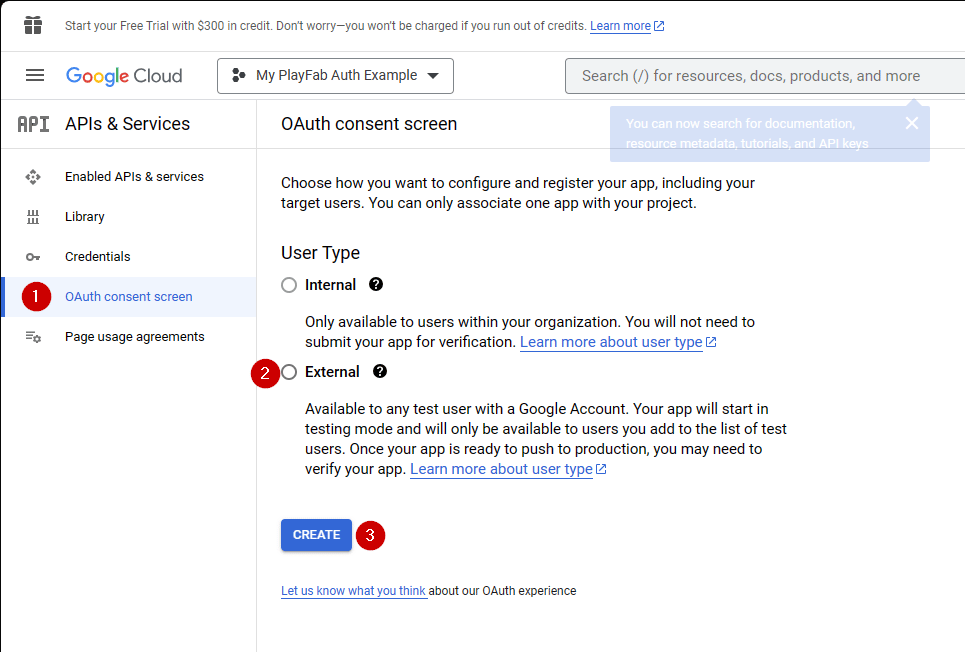
1. Navegue até **OAuth consent screen**.
2. Selecione **External** em User Type
3. Em seguida, selecione **Create**.
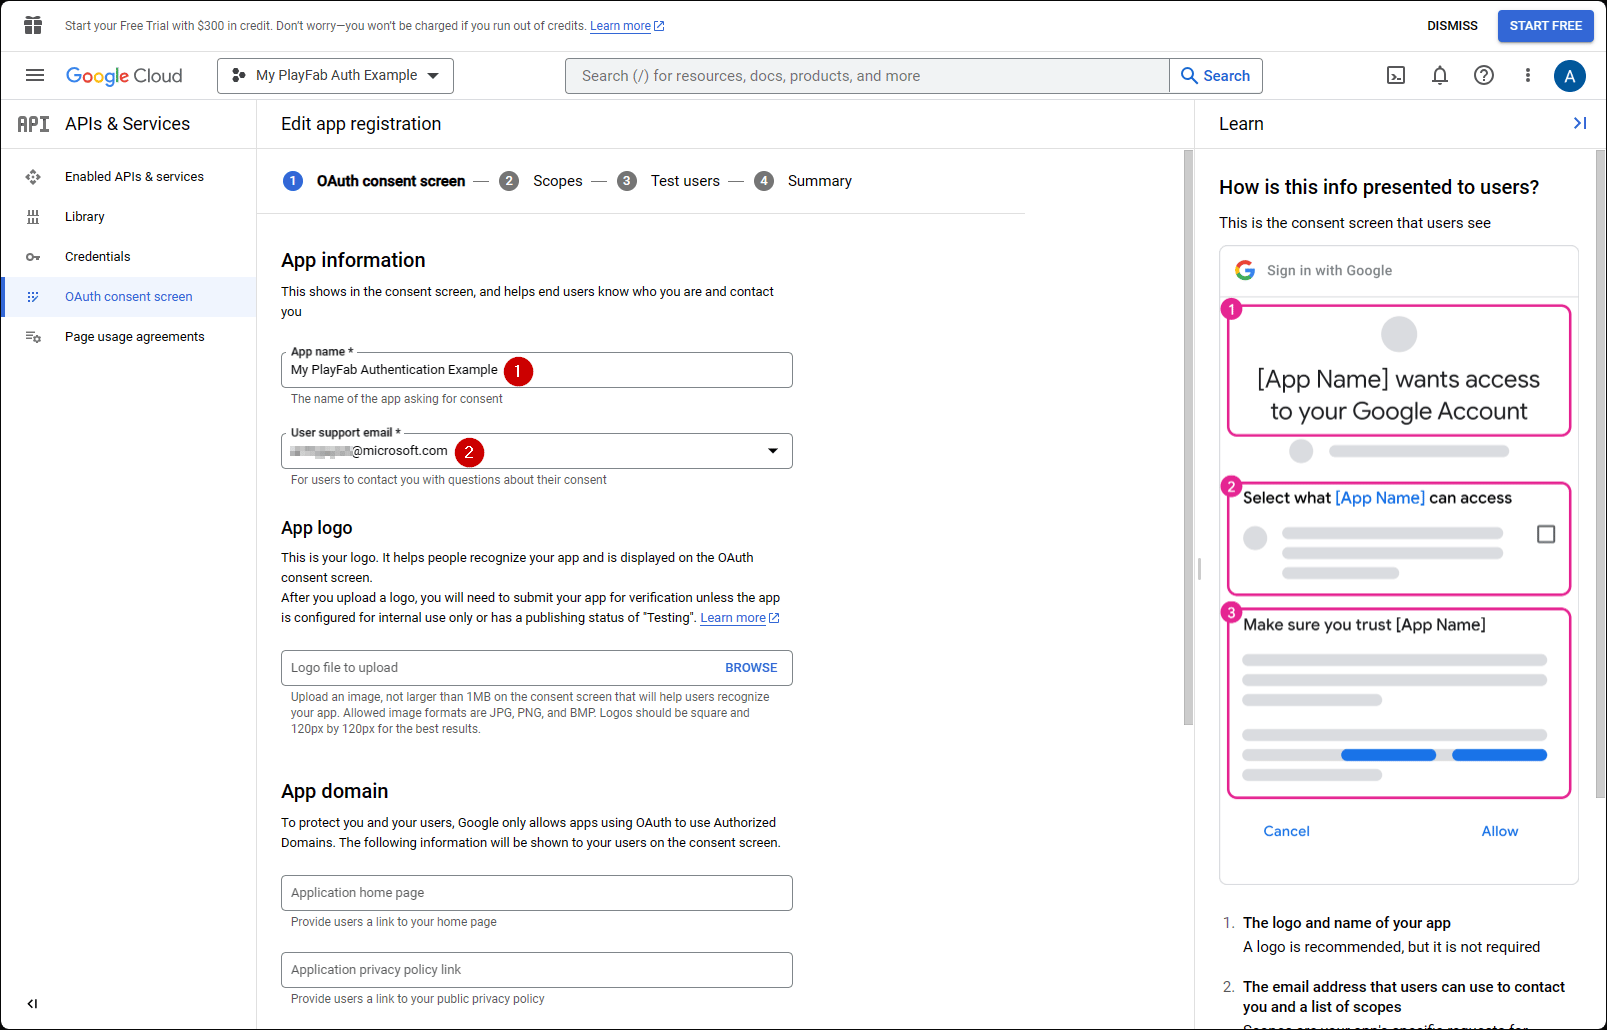
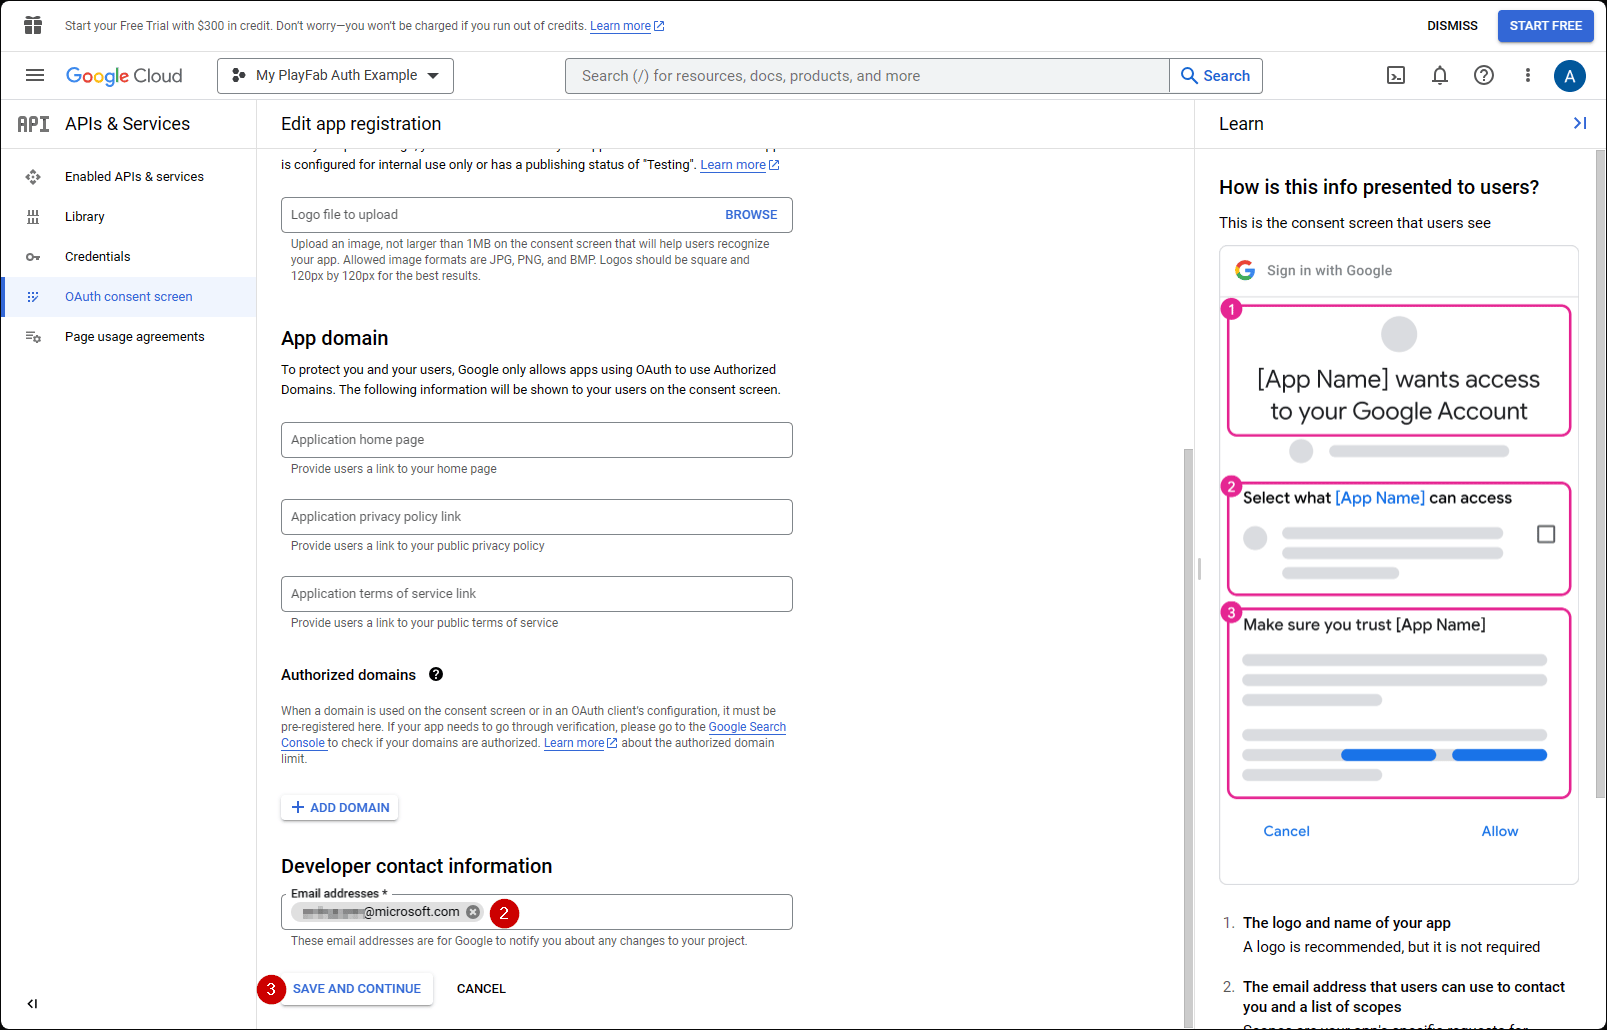
1. Preencha um nome de aplicativo (App Name)
2. Certifique-se de que haja emails em **user support email** e **Developer Contact Email**
3. Em seguida, selecione **SAVE AND CONTINUE**
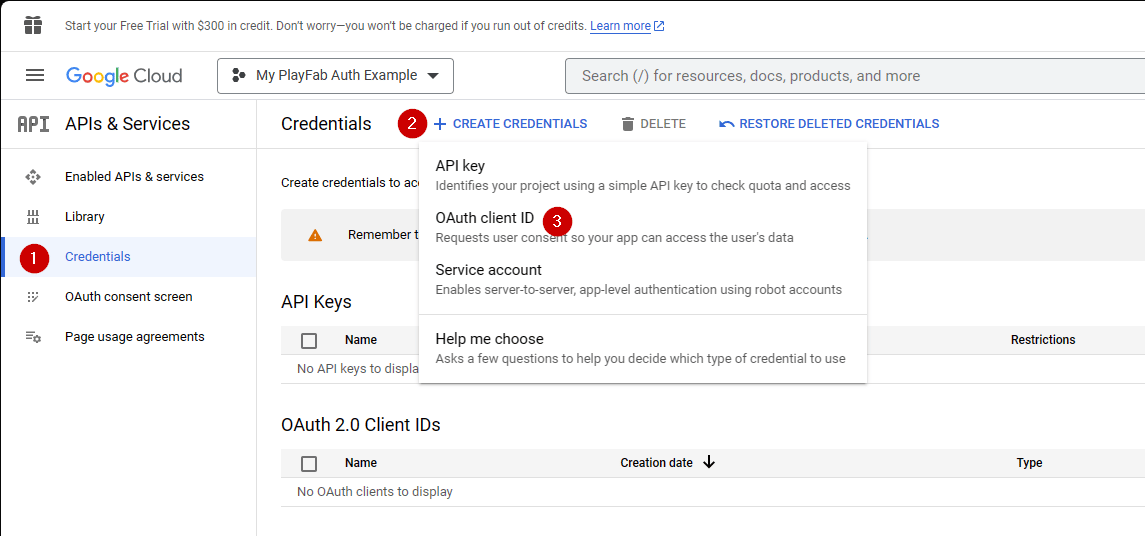
1. Em seguida, navegue até **Credentials**.
2. Selecione **Create credentials**.
3. Em seguida, selecione **OAuth client ID**.
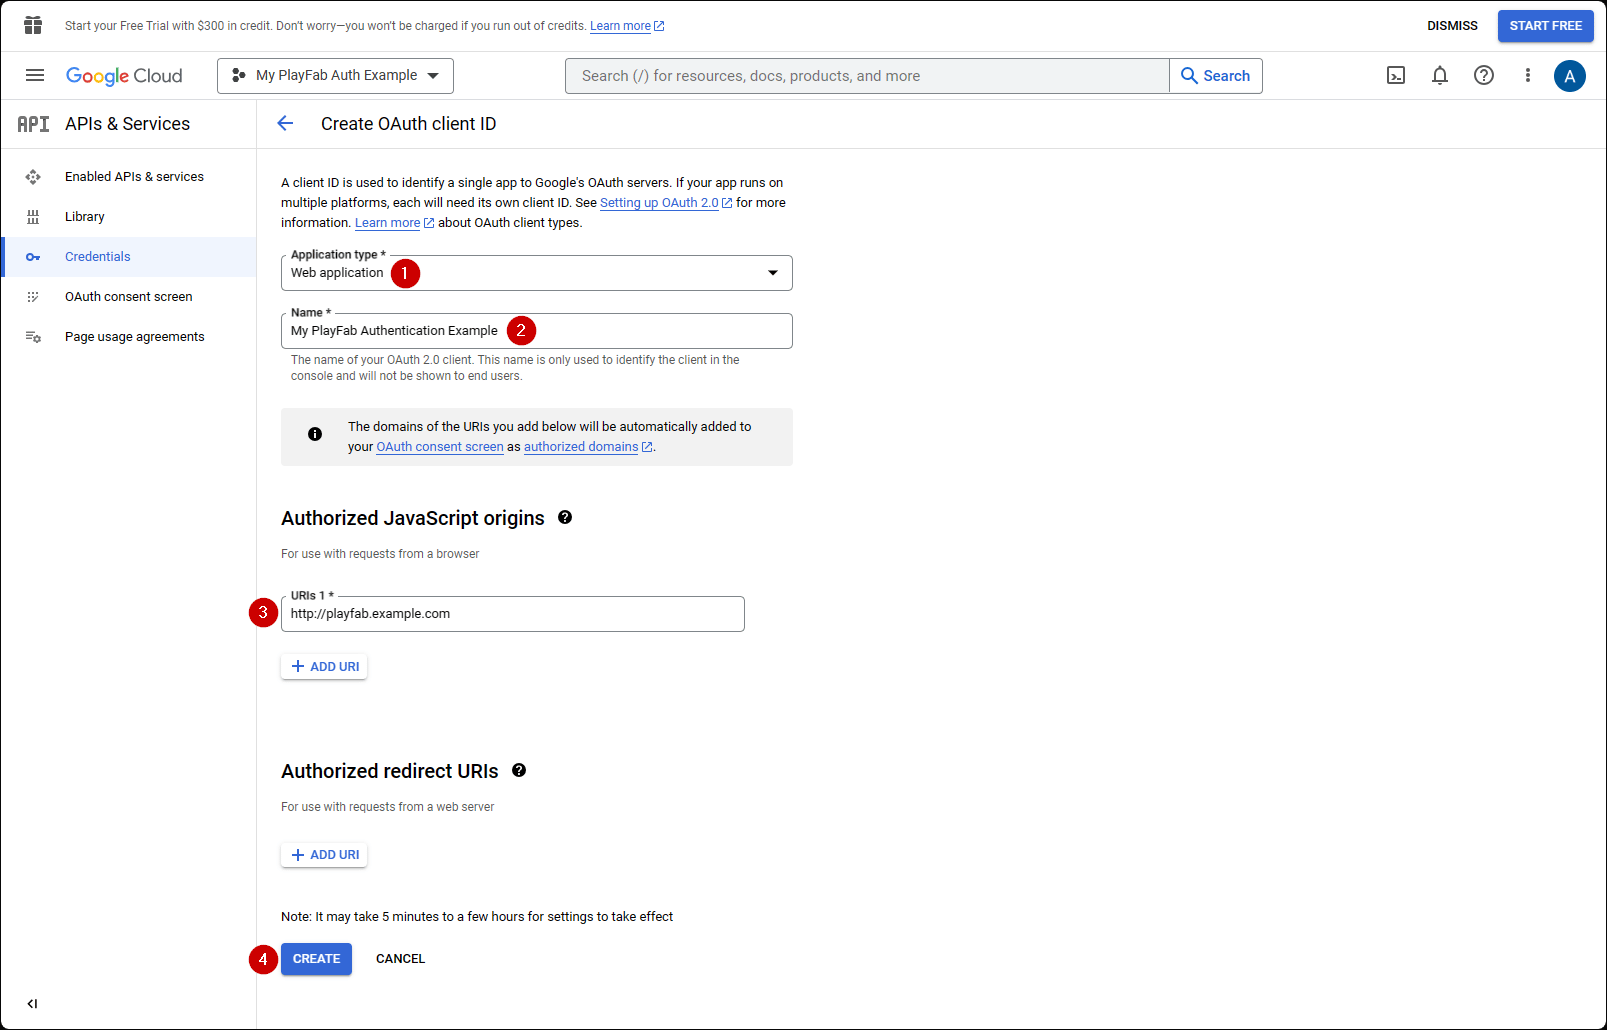
1. Selecione **Web Application** como seu **Application type**.
2. Dê um **Name** ao seu aplicativo.
3. Adicione seu domínio a **Authorized JavaScript origins** - `[PlayFab](http://playfab.example.com)` no nosso caso.
4. Por fim, selecione o botão **Create** para confirmar suas alterações.
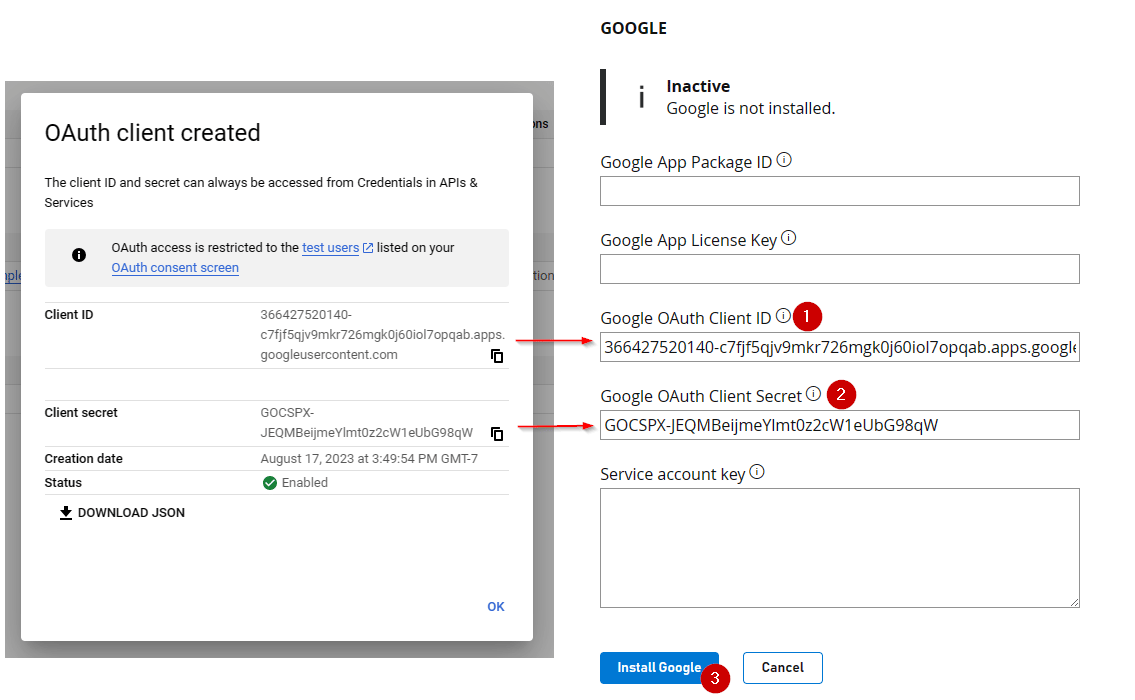
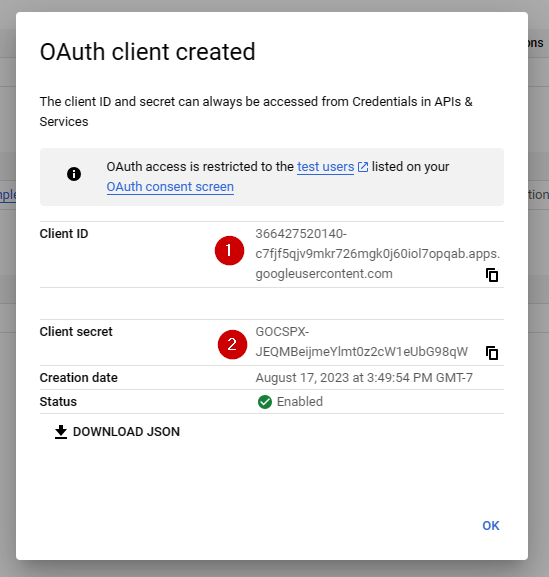
Na tela **OAuth client** mostrada abaixo, o Gerenciador de APIs do Google revela duas informações importantes:
1. A **client ID**
2. O **client secret**.
Certifique-se de copiar e salvar esses valores em um local seguro e de fácil acesso, pois eles serão usados no processo de autorização mostrado mais adiante neste tutorial.
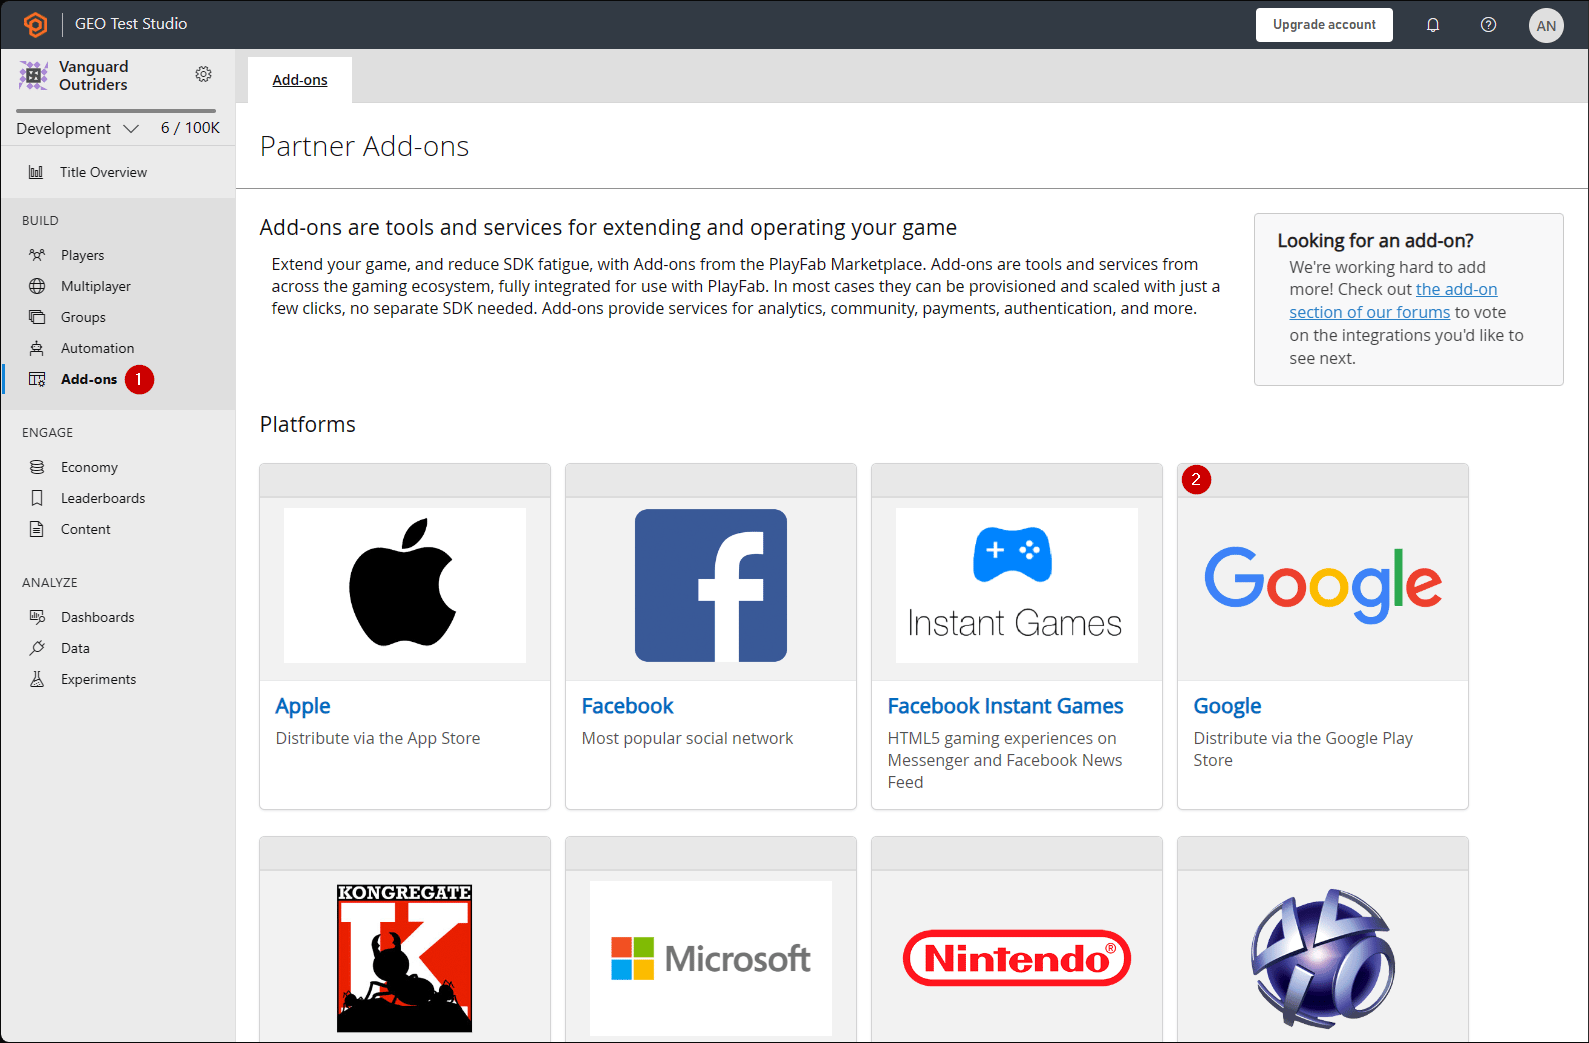
Acesse a página do **Game Manager** do PlayFab para seu título.
1. Navegue até **Add-ons** no menu.
2. Localize e abra o ícone/link **Google Add-on**.
1. Preencha a **Client ID**.
2. Preencha o **Client secret**.
3. Em seguida, selecione o botão **Install Google**.
Desde julho de 2017, o **Google API Manager** tem o mau hábito de *não* vincular corretamente o domínio de origem **Allowed JS**. Se você receber o seguinte erro: **"idpiframe\_initialization\_failed", details: "Not a valid origin for the client: somedomain.com..."**, remova as credenciais e recrie-as. *Não é necessário excluir o projeto inteiro, apenas as credenciais.*
## Testar usando um token de acesso
Neste exemplo, mostramos como testar a API LoginWithGoogleAccount usando a abordagem clássica de token de acesso. Use o código HTML fornecido abaixo para seus testes.
Certifique-se\* de substituir `YOUR_CLIENT_ID` e `YOUR_PLAYFAB_TITLE` pelos seus próprios valores.
o parâmetro **AccessToken** está ausente no objeto **LoginWithGoogleAccountRequest** nos arquivos de tipagem do TypeScript. Se você estiver usando TypeScript com o SDK do Node, poderá criar um tipo personalizado `interface LoginRequest extends PlayFabClientModels.LoginWithGoogleAccountRequest { AccessToken: string; }` e converter o tipo ao usar a API `PlayFabClient.LoginWithGoogleAccount( { AccessToken: accessToken, CreateAccount: true, } as LoginRequest, onPlayFabResponse);`
```html theme={null}
Google Access Token Auth Example
```
**Testar usando a biblioteca Google Sign-in Platform (preterida)**
O exemplo abaixo usa a biblioteca da plataforma Google Sign-In. **De acordo com o [site de documentação pública do Google Identity](https://developers.google.com/identity/gsi/web/guides/migration), a biblioteca da plataforma JavaScript Google Sign-In para Web será preterida em 31 de março de 2023**. Este exemplo não funcionará para clientes do Google criados daqui em diante. Consulte o exemplo de código anterior, que usa a biblioteca mais recente Google Identity Services!
```html theme={null}
Google Access Token Auth Example
```
Lembre-se de abrir esta página usando seu servidor Web e certifique-se de acessá-la usando a URL que você especificou ao configurar o projeto do Google (`http://playfab.example` no nosso caso).
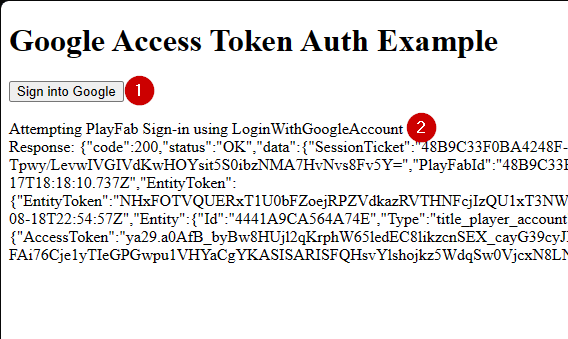
1. Quando a página abrir, selecione **G Signed In** e siga o fluxo geral de autenticação do Google.
2. Quando isso terminar, o script tentará se autenticar no lado do PlayFab e exibirá o resultado.
Se você *já tiver* uma sessão de autenticação do Google em execução, não será necessário selecionar **G Signed In**. Tudo acontecerá automaticamente.
## Related topics
- [Autenticação específica da plataforma](/pt-BR/services/playfab/identity/player-identity/platform-specific-authentication/index.md)
- [Configurar a autenticação do PlayFab usando Kongregate e HTML5](/pt-BR/services/playfab/identity/player-identity/platform-specific-authentication/kongregate-html5.md)
- [Configurar a autenticação do PlayFab usando Twitch e HTML5](/pt-BR/services/playfab/identity/player-identity/platform-specific-authentication/twitch-html5.md)
- [Configurar a autenticação do PlayFab usando Facebook e HTML5](/pt-BR/services/playfab/identity/player-identity/platform-specific-authentication/facebook-html5.md)
- [Configurar a entrada com Battle.net para o PlayFab](/pt-BR/services/playfab/identity/player-identity/platform-specific-authentication/battlenet-login.md)
 1. Preencha o campo em **Project Name**.
2. Selecione o botão **Create**.
1. Preencha o campo em **Project Name**.
2. Selecione o botão **Create**.
 1. Preencha um nome de aplicativo (App Name)
2. Certifique-se de que haja emails em **user support email** e **Developer Contact Email**
3. Em seguida, selecione **SAVE AND CONTINUE**
1. Preencha um nome de aplicativo (App Name)
2. Certifique-se de que haja emails em **user support email** e **Developer Contact Email**
3. Em seguida, selecione **SAVE AND CONTINUE**
 1. Em seguida, navegue até **Credentials**.
2. Selecione **Create credentials**.
3. Em seguida, selecione **OAuth client ID**.
1. Em seguida, navegue até **Credentials**.
2. Selecione **Create credentials**.
3. Em seguida, selecione **OAuth client ID**.
 1. Selecione **Web Application** como seu **Application type**.
2. Dê um **Name** ao seu aplicativo.
3. Adicione seu domínio a **Authorized JavaScript origins** - `[PlayFab](http://playfab.example.com)` no nosso caso.
4. Por fim, selecione o botão **Create** para confirmar suas alterações.
1. Selecione **Web Application** como seu **Application type**.
2. Dê um **Name** ao seu aplicativo.
3. Adicione seu domínio a **Authorized JavaScript origins** - `[PlayFab](http://playfab.example.com)` no nosso caso.
4. Por fim, selecione o botão **Create** para confirmar suas alterações.
 Na tela **OAuth client** mostrada abaixo, o Gerenciador de APIs do Google revela duas informações importantes:
1. A **client ID**
2. O **client secret**.
Na tela **OAuth client** mostrada abaixo, o Gerenciador de APIs do Google revela duas informações importantes:
1. A **client ID**
2. O **client secret**.
 Acesse a página do **Game Manager** do PlayFab para seu título.
1. Navegue até **Add-ons** no menu.
2. Localize e abra o ícone/link **Google Add-on**.
Acesse a página do **Game Manager** do PlayFab para seu título.
1. Navegue até **Add-ons** no menu.
2. Localize e abra o ícone/link **Google Add-on**.
 1. Preencha a **Client ID**.
2. Preencha o **Client secret**.
3. Em seguida, selecione o botão **Install Google**.
1. Preencha a **Client ID**.
2. Preencha o **Client secret**.
3. Em seguida, selecione o botão **Install Google**.