> ## Documentation Index
> Fetch the complete documentation index at: https://devdocs.xbox.com/llms.txt
> Use this file to discover all available pages before exploring further.
# Unreal Engine 빠른 시작
> PlayFab Unreal Marketplace Plugin을 설치하고 C++ 또는 Blueprints를 사용하여 Unreal Engine 프로젝트에서 첫 번째 PlayFab API 호출을 수행합니다.
# 빠른 시작: Unreal Engine용 PlayFab 클라이언트 라이브러리
Unreal Engine용 PlayFab 플러그인을 시작해 봅시다. 이 빠른 시작을 따라 PlayFab Unreal Engine 플러그인을 설치하고 C++ 클라이언트 라이브러리와 Blueprint 인터페이스를 사용하는 예제 앱을 만들어 보세요.
Unreal Engine용 PlayFab 플러그인을 사용하여 타이틀의 LiveOps를 관리하고 다음과 같은 관리자, 클라이언트 및 서버 작업을 수행할 수 있습니다:
* 플레이어 인증.
* 가상 아이템 및 통화 관리.
* 친구 목록과 같은 소셜 기능 만들기.
[API 참조 문서](/services/playfab/api-references) | [라이브러리 소스 코드](https://github.com/PlayFab/UnrealMarketplacePlugin) | [Unreal Marketplace](https://www.unrealengine.com/marketplace/playfab-sdk)
## 필수 조건
* [PlayFab 개발자 계정](https://developer.playfab.com).
* Unreal Engine용으로 구성된 [Visual Studio](https://visualstudio.microsoft.com/downloads/) 설치. Visual Studio 구성에 대한 자세한 내용은 [Setting Up Visual Studio for Unreal Engine](https://docs.unrealengine.com/en-US/Programming/Development/VisualStudioSetup/index.html)을 참조하세요.
* [Unreal Engine](https://www.unrealengine.com/download) 설치. Unreal Engine 설치에 대한 자세한 내용은 [Unreal Engine 설치 가이드](https://docs.unrealengine.com/4.27/en-US/Basics/Projects/Browser/)를 참조하세요.
* PlayFab Unreal 플러그인 설치. [Unreal Engine 마켓플레이스](https://www.unrealengine.com/marketplace/playfab-sdk)에서 Unreal 플러그인을 설치할 수 있습니다.
## Unreal 프로젝트 만들기
Unreal Engine에서 새 Unreal 프로젝트를 만듭니다. 자세한 지침은 [Create a New Project guide](https://docs.unrealengine.com/4.27/en-US/Basics/Projects/Browser/)를 따르세요.
1. **Project Category**의 경우 **Games**를 선택합니다.
2. **Select Template**에서 **Blank**를 선택합니다.
3. **Project Settings**에서 **C++** 또는 **Blueprint**를 선택합니다.
4. **No Starter Content**를 선택합니다.
5. 프로젝트 이름을 **MyProject**와 같이 선택합니다.
## Unreal 프로젝트에서 PlayFab 플러그인 활성화
PlayFab 플러그인을 활성화하려면:
1. **Settings** 메뉴의 **Game Specific Settings**에서 **Plugins**를 선택합니다.
2. **PlayFab** 플러그인을 활성화하고 필요한 경우 Unreal Engine을 다시 시작합니다.
"PlayFab"이 **Plugins**에 나타나지 않는 경우 Unreal Marketplace에서 플러그인이 설치되어 있는지 확인하세요. Unreal Editor를 다시 시작합니다. 그런 다음 **Plugins**를 다시 열고 "PlayFab"을 검색합니다.
### C++에서 PlayFab을 모듈 종속성으로 추가
Visual Studio에서 C++ 프로젝트에 PlayFab을 모듈 종속성으로 추가합니다:
1. **View** 메뉴에서 C++ 프로젝트 파일이 표시되는 **Solution Explorer**를 엽니다.
2. Solution Explorer에서 **Solution\Games\YourProjectName\Source**로 이동하여 **YourProjectName.Build.cs**를 엽니다.
3. 다음 줄을 추가합니다:
```cpp theme={null}
PrivateDependencyModuleNames.AddRange(new string[] { "PlayFab", "PlayFabCpp", "PlayFabCommon" });
```
4. 변경 사항을 저장합니다.
## 필요한 Visual Studio 프로젝트 파일 생성
PlayFab 플러그인을 사용하는 데 필요한 Visual Studio 프로젝트 파일을 업데이트하고 생성하려면:
1. 파일 탐색기 창을 열고 프로젝트 파일이 있는 폴더로 이동합니다.
2. 프로젝트의 루트 폴더에서 YourProjectName.uproject 파일을 마우스 오른쪽 버튼으로 클릭합니다.
3. 컨텍스트 메뉴에서 **Generate Visual Studio project files**를 선택합니다.
## C++로 PlayFab 호출
다음 단계에서는 사용자 지정 ID를 사용하여 PlayFab에 로그인하는 타일을 만드는 과정을 안내합니다. Blueprints 프로젝트에서 로그인하는 방법에 대한 자세한 내용은 이 문서 뒷부분의 "Calling PlayFab from Unreal Blueprints"를 참조하세요.
### 새 Actor 만들기
새 Actor를 만들려면:
1. **File** 메뉴에서 **New C++ Class**를 선택합니다.
2. **Parent Class**에서 **Actor**를 선택합니다.
3. Actor의 이름을 **LoginActor**로 지정합니다. Actor를 만든 후 Unreal Engine이 자동으로 C++ 개발 환경을 열고 LoginActor.cpp 및 LoginActor.h를 로드합니다.
이 빠른 시작의 목적을 위해 Actor의 이름을 반드시 **LoginActor**로 지정해야 합니다. 다른 이름을 지정하는 경우 이 빠른 시작에서 제공된 샘플 코드를 새 이름과 일치하도록 업데이트해야 합니다.
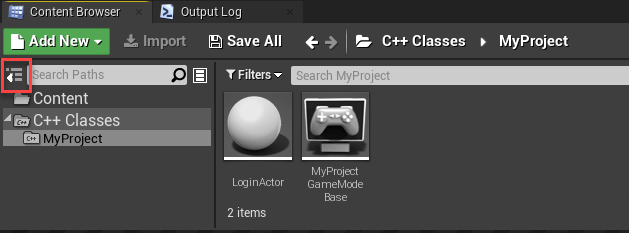
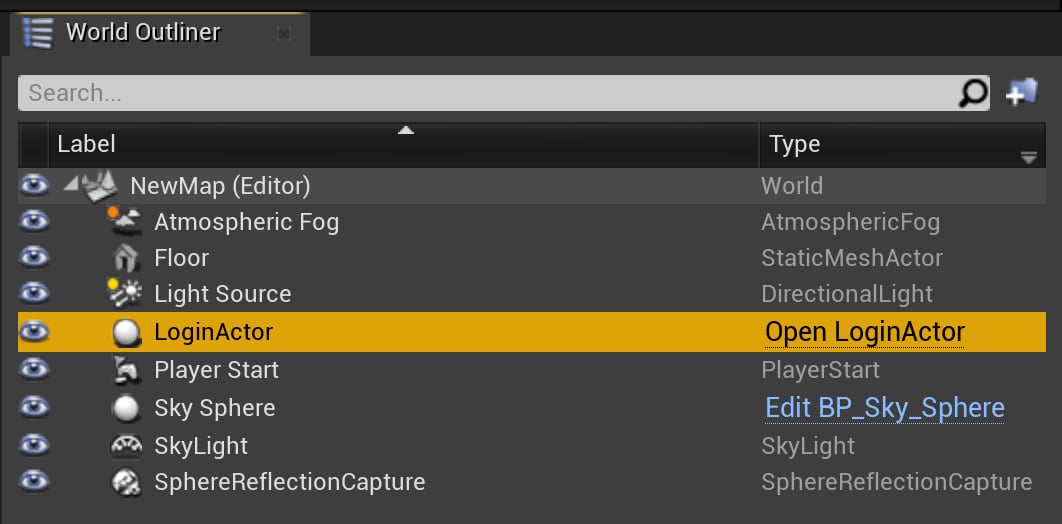
4. Content Browser에서 새 Actor인 **LoginActor**를 Viewport 패널로 끌어다 놓습니다. 이제 "World Outliner" 창에 표시됩니다.
**LoginActor**가 보이지 않는 경우 **Show or hide the source panel** 아이콘을 선택합니다. 그런 다음 C++ 클래스 아래에서 프로젝트 이름을 선택합니다.
 ### C++ LoginActor에 PlayFab API 호출 추가
이 빠른 시작에서는 [LoginWithCustomID](xref:titleid.playfabapi.com.client.authentication.loginwithcustomid)를 사용하여 로그인을 수행합니다. `LoginWithCustomId`는 시작하기 쉽지만 게임을 릴리스할 때는 더 안전한 플레이어 인증 방법으로 이동하는 것이 좋습니다. 강력한 로그인 기능 구현에 대한 정보는 [Login basics and best practices](/services/playfab/identity/player-identity/login/login-basics-best-practices)를 참조하세요.
`LoginWithCustomID` 호출은 **LoginActor**에서 수행됩니다. **LoginActor**에 PlayFab 관련 코드를 추가하려면:
1. LoginActor.h의 내용을 표시된 코드로 바꿉니다:
```cpp theme={null}
#pragma once
#include "CoreMinimal.h"
#include "GameFramework/Actor.h"
#include "PlayFab.h"
#include "Core/PlayFabError.h"
#include "Core/PlayFabClientDataModels.h"
#include "LoginActor.generated.h"
UCLASS()
class ALoginActor : public AActor
{
GENERATED_BODY()
public:
ALoginActor();
virtual void BeginPlay() override;
void OnSuccess(const PlayFab::ClientModels::FLoginResult& Result) const;
void OnError(const PlayFab::FPlayFabCppError& ErrorResult) const;
virtual void Tick(float DeltaSeconds) override;
private:
PlayFabClientPtr clientAPI = nullptr;
};
```
2. LoginActor.cpp의 내용을 다음 코드로 바꿉니다.
```cpp theme={null}
#include "LoginActor.h"
#include "Core/PlayFabClientAPI.h"
ALoginActor::ALoginActor()
{
PrimaryActorTick.bCanEverTick = true;
}
void ALoginActor::BeginPlay()
{
Super::BeginPlay();
GetMutableDefault()->TitleId = TEXT("144");
clientAPI = IPlayFabModuleInterface::Get().GetClientAPI();
PlayFab::ClientModels::FLoginWithCustomIDRequest request;
request.CustomId = TEXT("GettingStartedGuide");
request.CreateAccount = true;
clientAPI->LoginWithCustomID(request,
PlayFab::UPlayFabClientAPI::FLoginWithCustomIDDelegate::CreateUObject(this, &ALoginActor::OnSuccess),
PlayFab::FPlayFabErrorDelegate::CreateUObject(this, &ALoginActor::OnError)
);
}
void ALoginActor::OnSuccess(const PlayFab::ClientModels::FLoginResult& Result) const
{
UE_LOG(LogTemp, Log, TEXT("Congratulations, you made your first successful API call!"));
}
void ALoginActor::OnError(const PlayFab::FPlayFabCppError& ErrorResult) const
{
UE_LOG(LogTemp, Error, TEXT("Something went wrong with your first API call.\nHere's some debug information:\n%s"), *ErrorResult.GenerateErrorReport());
}
void ALoginActor::Tick(float DeltaTime)
{
Super::Tick(DeltaTime);
}
```
Visual Studio의 Intellisense는 include 파일과 PlayFab 네임스페이스를 찾을 수 없다고 표시합니다. 이러한 경고는 무시해도 됩니다. 프로젝트를 실행하면 올바르게 빌드되고 실행됩니다.
### C++로 완료 및 실행
이제 Unreal Engine에서 C++로 PlayFab에 대한 호출을 테스트할 준비가 되었습니다. 테스트 호출 결과는 Unreal Engine의 **Output Log**에 표시됩니다.
Unreal Engine에서:
1. **Windows** 메뉴에서 Output Log를 표시하고 **Developer Tools**를 선택한 다음 **Output Log**를 활성화합니다.
2. 툴바에서 **Compile**을 선택하고 Unreal Engine이 컴파일을 완료할 때까지 기다립니다. 코드가 컴파일되는 동안 Unreal은 "Compiling C++ Code."를 표시합니다.
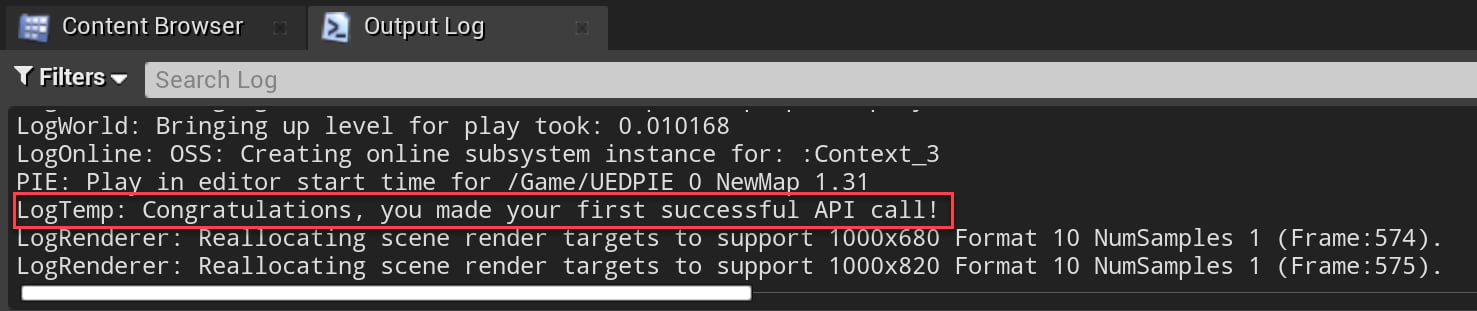
3. **Play**를 선택합니다. 코드가 실행되면 Unreal은 **Output Log** 창에 다음을 표시합니다:
`LogTemp: Congratulations, you made your first successful API call!`
### C++ LoginActor에 PlayFab API 호출 추가
이 빠른 시작에서는 [LoginWithCustomID](xref:titleid.playfabapi.com.client.authentication.loginwithcustomid)를 사용하여 로그인을 수행합니다. `LoginWithCustomId`는 시작하기 쉽지만 게임을 릴리스할 때는 더 안전한 플레이어 인증 방법으로 이동하는 것이 좋습니다. 강력한 로그인 기능 구현에 대한 정보는 [Login basics and best practices](/services/playfab/identity/player-identity/login/login-basics-best-practices)를 참조하세요.
`LoginWithCustomID` 호출은 **LoginActor**에서 수행됩니다. **LoginActor**에 PlayFab 관련 코드를 추가하려면:
1. LoginActor.h의 내용을 표시된 코드로 바꿉니다:
```cpp theme={null}
#pragma once
#include "CoreMinimal.h"
#include "GameFramework/Actor.h"
#include "PlayFab.h"
#include "Core/PlayFabError.h"
#include "Core/PlayFabClientDataModels.h"
#include "LoginActor.generated.h"
UCLASS()
class ALoginActor : public AActor
{
GENERATED_BODY()
public:
ALoginActor();
virtual void BeginPlay() override;
void OnSuccess(const PlayFab::ClientModels::FLoginResult& Result) const;
void OnError(const PlayFab::FPlayFabCppError& ErrorResult) const;
virtual void Tick(float DeltaSeconds) override;
private:
PlayFabClientPtr clientAPI = nullptr;
};
```
2. LoginActor.cpp의 내용을 다음 코드로 바꿉니다.
```cpp theme={null}
#include "LoginActor.h"
#include "Core/PlayFabClientAPI.h"
ALoginActor::ALoginActor()
{
PrimaryActorTick.bCanEverTick = true;
}
void ALoginActor::BeginPlay()
{
Super::BeginPlay();
GetMutableDefault()->TitleId = TEXT("144");
clientAPI = IPlayFabModuleInterface::Get().GetClientAPI();
PlayFab::ClientModels::FLoginWithCustomIDRequest request;
request.CustomId = TEXT("GettingStartedGuide");
request.CreateAccount = true;
clientAPI->LoginWithCustomID(request,
PlayFab::UPlayFabClientAPI::FLoginWithCustomIDDelegate::CreateUObject(this, &ALoginActor::OnSuccess),
PlayFab::FPlayFabErrorDelegate::CreateUObject(this, &ALoginActor::OnError)
);
}
void ALoginActor::OnSuccess(const PlayFab::ClientModels::FLoginResult& Result) const
{
UE_LOG(LogTemp, Log, TEXT("Congratulations, you made your first successful API call!"));
}
void ALoginActor::OnError(const PlayFab::FPlayFabCppError& ErrorResult) const
{
UE_LOG(LogTemp, Error, TEXT("Something went wrong with your first API call.\nHere's some debug information:\n%s"), *ErrorResult.GenerateErrorReport());
}
void ALoginActor::Tick(float DeltaTime)
{
Super::Tick(DeltaTime);
}
```
Visual Studio의 Intellisense는 include 파일과 PlayFab 네임스페이스를 찾을 수 없다고 표시합니다. 이러한 경고는 무시해도 됩니다. 프로젝트를 실행하면 올바르게 빌드되고 실행됩니다.
### C++로 완료 및 실행
이제 Unreal Engine에서 C++로 PlayFab에 대한 호출을 테스트할 준비가 되었습니다. 테스트 호출 결과는 Unreal Engine의 **Output Log**에 표시됩니다.
Unreal Engine에서:
1. **Windows** 메뉴에서 Output Log를 표시하고 **Developer Tools**를 선택한 다음 **Output Log**를 활성화합니다.
2. 툴바에서 **Compile**을 선택하고 Unreal Engine이 컴파일을 완료할 때까지 기다립니다. 코드가 컴파일되는 동안 Unreal은 "Compiling C++ Code."를 표시합니다.
3. **Play**를 선택합니다. 코드가 실행되면 Unreal은 **Output Log** 창에 다음을 표시합니다:
`LogTemp: Congratulations, you made your first successful API call!`
 ## Unreal Blueprints에서 PlayFab 호출
이 섹션에서는 PlayFab API를 사용하여 [LoginWithCustomID](https://learn.microsoft.com/en-us/rest/api/playfab/client/authentication/login-with-custom-id?view=playfab-rest\&preserve-view=true)를 호출하는 Blueprint 구조를 만드는 방법을 안내합니다. `LoginWithCustomId`는 시작하기 쉽지만 게임을 릴리스할 때는 더 안전한 플레이어 인증 방법으로 이동하는 것이 좋습니다. 강력한 로그인 기능 구현에 대한 정보는 [Login basics and best practices](/services/playfab/identity/player-identity/login/login-basics-best-practices)를 참조하세요.
Blueprint 프로젝트에서 시작하는 경우 PlayFab Blueprint Actions가 작동하도록 C++ 프로젝트로 변환해야 합니다.
### Blueprint 구조 만들기
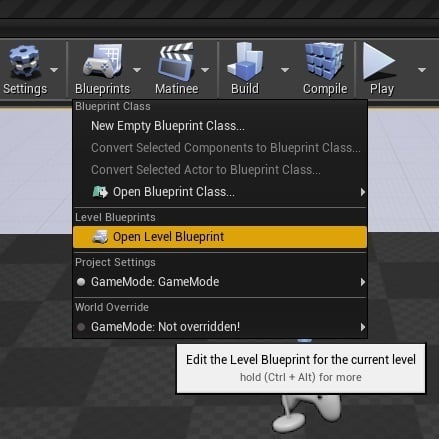
Unreal Engine의 툴바에서 **Open Level Blueprint**를 선택합니다.
## Unreal Blueprints에서 PlayFab 호출
이 섹션에서는 PlayFab API를 사용하여 [LoginWithCustomID](https://learn.microsoft.com/en-us/rest/api/playfab/client/authentication/login-with-custom-id?view=playfab-rest\&preserve-view=true)를 호출하는 Blueprint 구조를 만드는 방법을 안내합니다. `LoginWithCustomId`는 시작하기 쉽지만 게임을 릴리스할 때는 더 안전한 플레이어 인증 방법으로 이동하는 것이 좋습니다. 강력한 로그인 기능 구현에 대한 정보는 [Login basics and best practices](/services/playfab/identity/player-identity/login/login-basics-best-practices)를 참조하세요.
Blueprint 프로젝트에서 시작하는 경우 PlayFab Blueprint Actions가 작동하도록 C++ 프로젝트로 변환해야 합니다.
### Blueprint 구조 만들기
Unreal Engine의 툴바에서 **Open Level Blueprint**를 선택합니다.
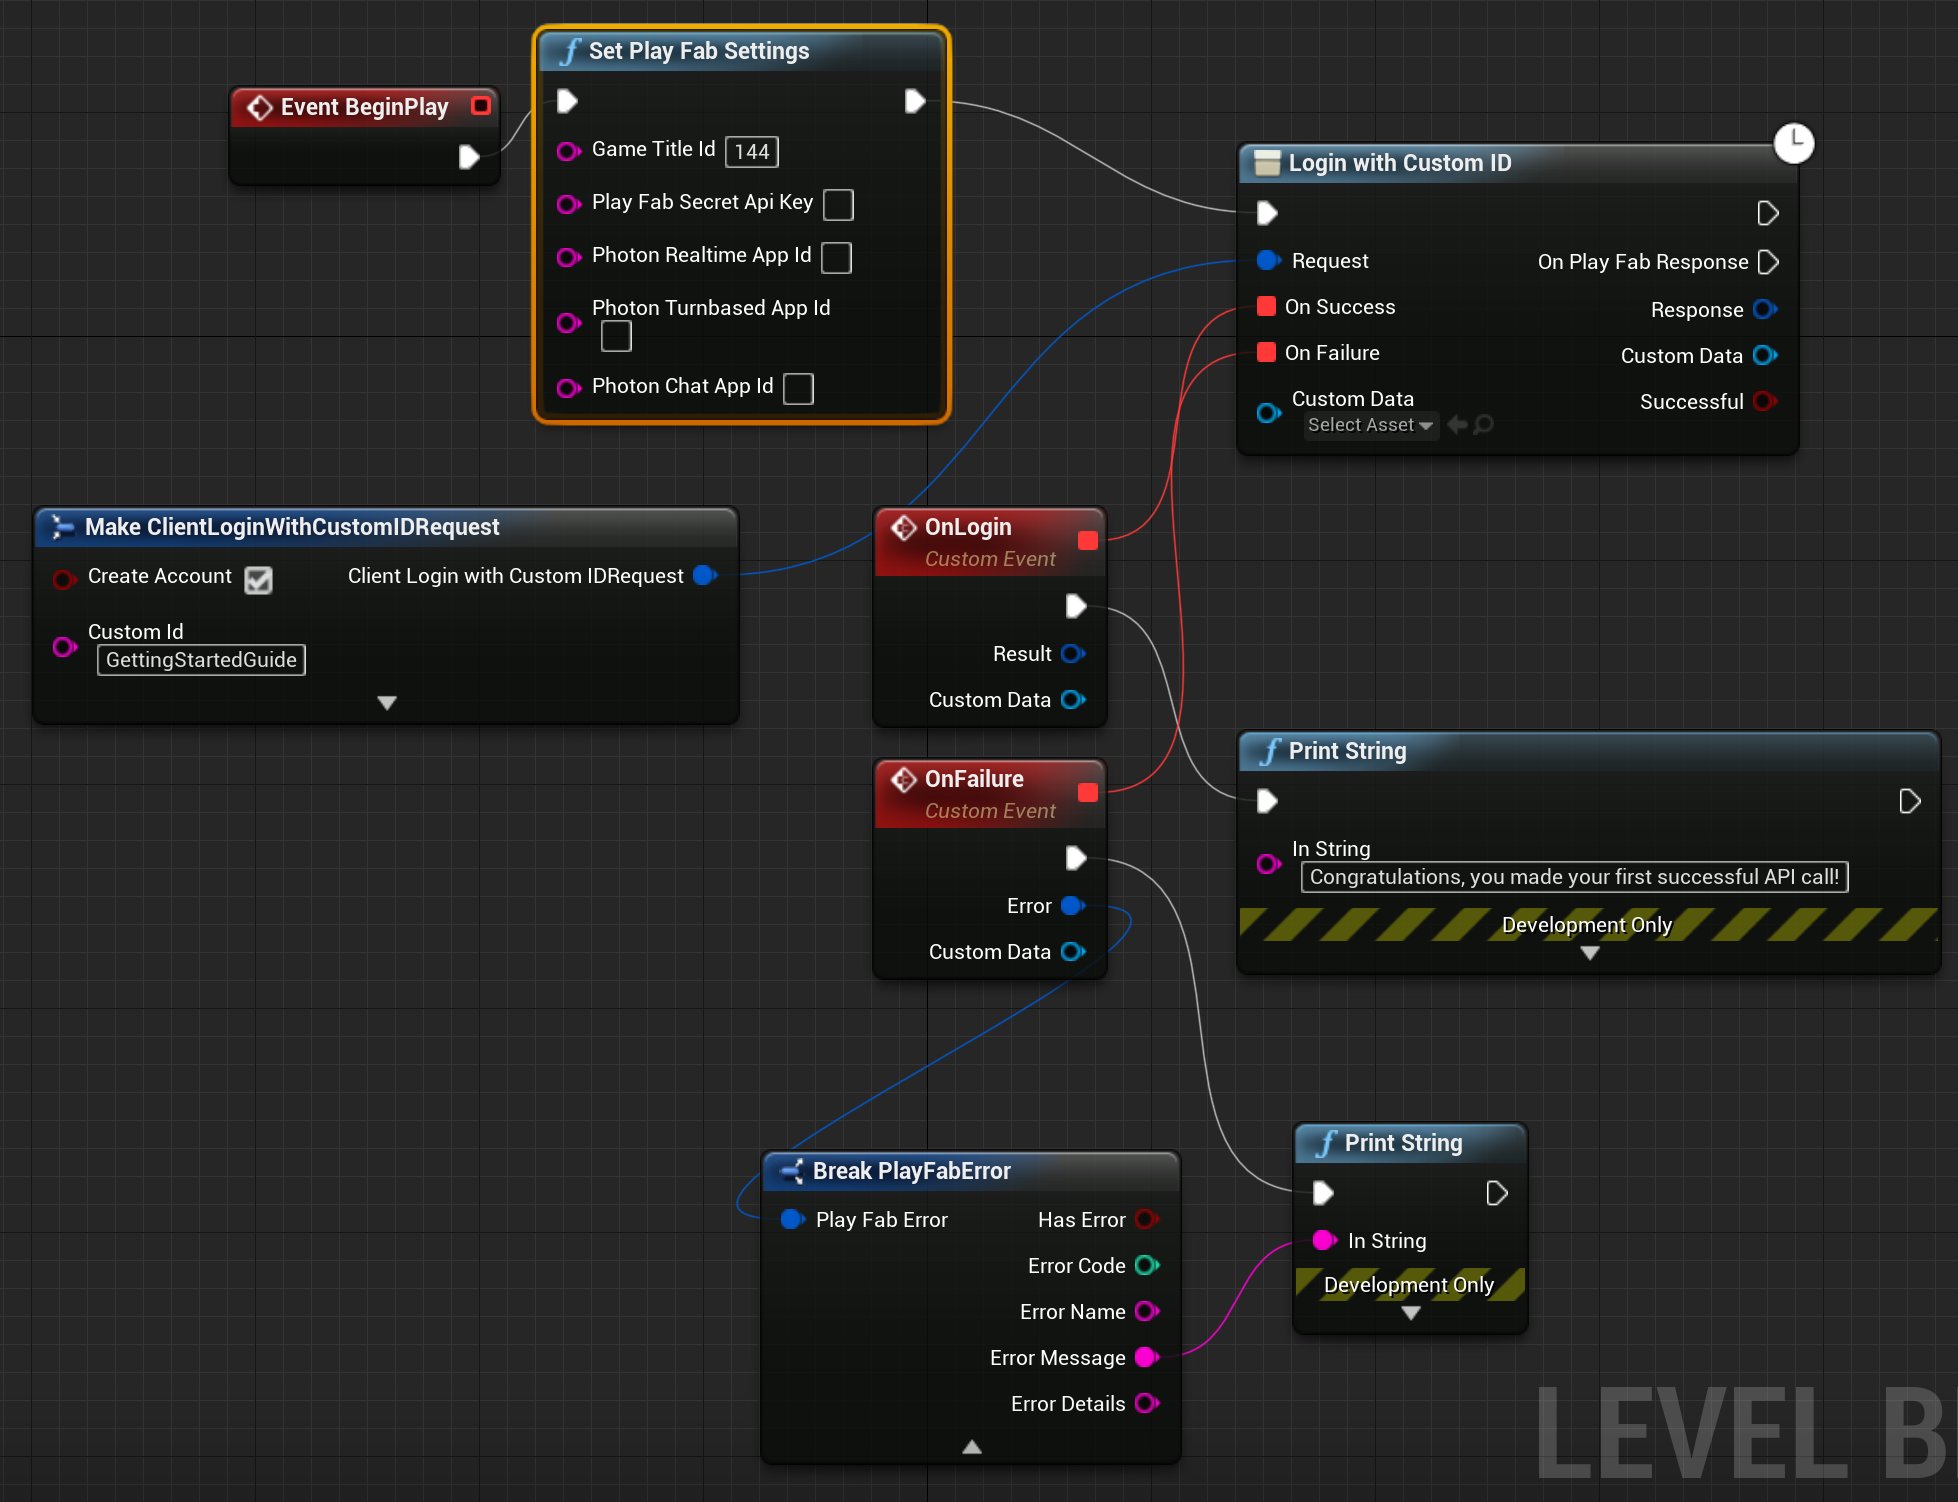
 EventGraph가 열리고 두 개의 Actions가 미리 채워져 있습니다. `Event BeginPlay` 및 `Event Tick`.
이 빠른 시작에서 사용되는 Actions:
* `Set Play Fab Settings`
* `Login with Custom ID`
* `Make ClientLoginWithCustomIDRequest`
* `AddCustomEvent` x 2
* `Break PlayFabError`
* `Print String` x 2
다음과 같이 Blueprint를 만듭니다:
* `Event BeginPlay`의 출력 핀을 선택하고 **Event Graph**의 빈 위치로 끕니다. **Executable Actions** 대화 상자에서 `Set Play Fab Settings`를 검색하여 Blueprint에 추가합니다. `Set Play Fab Settings`에서 **Game Title id**가 비어 있으면 게임의 **Title ID**로 설정합니다.
* `Set Play Fab Settings`의 출력 핀을 선택하고 빈 위치로 끕니다. **Executable Actions** 대화 상자에서 `Login with Custom ID`를 검색하여 Blueprint에 추가합니다.
* `Login with Custom ID`의 **Request** 핀을 선택하고 빈 위치로 끕니다. **Actions providing a(n) Client Login With Custom ID Request Structure**에서 `Make ClientLoginWithCustomIDRequest`를 선택합니다.
* `Make ClientLoginWithCustomIDRequest`에서:
* **Create Account**를 선택합니다.
* **Custom Id**를 GettingStartedGuide로 설정합니다.
* `Login with Custom ID`에서 **On Success** 핀을 선택하고 빈 위치로 끕니다. **Actions providing a(n) Delegate**에서 `Add Custom Event`를 검색하여 Blueprint에 추가합니다.
* 이름을 `OnLogin`으로 지정합니다.
* **On Failure** 핀을 선택하고 빈 위치로 끕니다. **Actions providing a(n) Delegate**에서 `Add Custom Event`를 검색하여 Blueprint에 추가합니다.
* 이름을 `OnFailure`로 지정합니다.
* `OnLogin`의 출력 핀을 선택하고 빈 위치로 끕니다. **Executable Actions** 대화 상자에서 `Print String`을 검색하여 Blueprint에 추가합니다.
* `Print String`에서 **In String** 값을 "Congratulations, you made your first successful PlayFab API call using Blueprint!"로 설정합니다.
* `OnFailure`의 출력 핀을 선택하고 빈 위치로 끕니다. **Executable Actions** 대화 상자에서 `Print String`을 검색하여 Blueprint에 추가합니다.
* `OnFailure`의 **Error** 핀을 선택하고 빈 위치로 끕니다. **Actions providing a(n) string** 대화 상자에서 **Break PlayFabError**를 검색하여 Blueprint에 추가합니다. **Actions taking a(n) PlayFab error structure** 대화 상자에서 **Break PlayFabError**를 검색하여 Blueprint에 추가합니다.
* `Break PlayFabError`의 **Error Message** 핀을 실패 시 `Print String` Action의 **In String** 핀에 연결합니다.
완료되면 Blueprint는 다음 디자인과 유사해야 합니다:
EventGraph가 열리고 두 개의 Actions가 미리 채워져 있습니다. `Event BeginPlay` 및 `Event Tick`.
이 빠른 시작에서 사용되는 Actions:
* `Set Play Fab Settings`
* `Login with Custom ID`
* `Make ClientLoginWithCustomIDRequest`
* `AddCustomEvent` x 2
* `Break PlayFabError`
* `Print String` x 2
다음과 같이 Blueprint를 만듭니다:
* `Event BeginPlay`의 출력 핀을 선택하고 **Event Graph**의 빈 위치로 끕니다. **Executable Actions** 대화 상자에서 `Set Play Fab Settings`를 검색하여 Blueprint에 추가합니다. `Set Play Fab Settings`에서 **Game Title id**가 비어 있으면 게임의 **Title ID**로 설정합니다.
* `Set Play Fab Settings`의 출력 핀을 선택하고 빈 위치로 끕니다. **Executable Actions** 대화 상자에서 `Login with Custom ID`를 검색하여 Blueprint에 추가합니다.
* `Login with Custom ID`의 **Request** 핀을 선택하고 빈 위치로 끕니다. **Actions providing a(n) Client Login With Custom ID Request Structure**에서 `Make ClientLoginWithCustomIDRequest`를 선택합니다.
* `Make ClientLoginWithCustomIDRequest`에서:
* **Create Account**를 선택합니다.
* **Custom Id**를 GettingStartedGuide로 설정합니다.
* `Login with Custom ID`에서 **On Success** 핀을 선택하고 빈 위치로 끕니다. **Actions providing a(n) Delegate**에서 `Add Custom Event`를 검색하여 Blueprint에 추가합니다.
* 이름을 `OnLogin`으로 지정합니다.
* **On Failure** 핀을 선택하고 빈 위치로 끕니다. **Actions providing a(n) Delegate**에서 `Add Custom Event`를 검색하여 Blueprint에 추가합니다.
* 이름을 `OnFailure`로 지정합니다.
* `OnLogin`의 출력 핀을 선택하고 빈 위치로 끕니다. **Executable Actions** 대화 상자에서 `Print String`을 검색하여 Blueprint에 추가합니다.
* `Print String`에서 **In String** 값을 "Congratulations, you made your first successful PlayFab API call using Blueprint!"로 설정합니다.
* `OnFailure`의 출력 핀을 선택하고 빈 위치로 끕니다. **Executable Actions** 대화 상자에서 `Print String`을 검색하여 Blueprint에 추가합니다.
* `OnFailure`의 **Error** 핀을 선택하고 빈 위치로 끕니다. **Actions providing a(n) string** 대화 상자에서 **Break PlayFabError**를 검색하여 Blueprint에 추가합니다. **Actions taking a(n) PlayFab error structure** 대화 상자에서 **Break PlayFabError**를 검색하여 Blueprint에 추가합니다.
* `Break PlayFabError`의 **Error Message** 핀을 실패 시 `Print String` Action의 **In String** 핀에 연결합니다.
완료되면 Blueprint는 다음 디자인과 유사해야 합니다:
 Blueprint를 **저장**하고 Blueprint Editor 창을 닫습니다.
### Blueprint로 PlayFab 호출 실행
1. 툴바에서 **Play** 버튼을 선택합니다.
2. Blueprint가 실행되면 Viewport 창에 다음 출력이 표시됩니다.
Blueprint를 **저장**하고 Blueprint Editor 창을 닫습니다.
### Blueprint로 PlayFab 호출 실행
1. 툴바에서 **Play** 버튼을 선택합니다.
2. Blueprint가 실행되면 Viewport 창에 다음 출력이 표시됩니다.
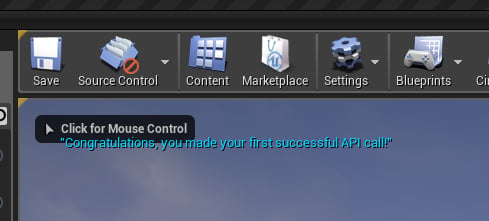 축하합니다. Blueprint를 사용하여 첫 번째 성공적인 PlayFab API 호출을 수행했습니다!
## 추가 리소스
* [Blueprints Visual Scripting](https://docs.unrealengine.com/en-US/Engine/Blueprints/index.html)에 대한 Unreal Engine 문서.
* [Unreal Engine 문서](https://docs.unrealengine.com/).
## Related topics
- [PlayFab 지원 게임 엔진](/ko/services/playfab/sdks/game-engines/index.md)
- [PlayFab 릴리스 노트 2018](/ko/services/playfab/release-notes/2018.md)
- [Integrate the PlayFab Unreal Engine Marketplace plugin](/ko/services/playfab/multiplayer/networking/party-unreal-engine-oss-playfab-plugin-integration.md)
- [Lobby SDK 빠른 시작](/ko/services/playfab/multiplayer/lobby/lobby-getting-started.md)
- [Unreal Engine와 함께 GDK 사용](/ko/build/gdk-and-engines/unreal/unreal.md)
축하합니다. Blueprint를 사용하여 첫 번째 성공적인 PlayFab API 호출을 수행했습니다!
## 추가 리소스
* [Blueprints Visual Scripting](https://docs.unrealengine.com/en-US/Engine/Blueprints/index.html)에 대한 Unreal Engine 문서.
* [Unreal Engine 문서](https://docs.unrealengine.com/).
## Related topics
- [PlayFab 지원 게임 엔진](/ko/services/playfab/sdks/game-engines/index.md)
- [PlayFab 릴리스 노트 2018](/ko/services/playfab/release-notes/2018.md)
- [Integrate the PlayFab Unreal Engine Marketplace plugin](/ko/services/playfab/multiplayer/networking/party-unreal-engine-oss-playfab-plugin-integration.md)
- [Lobby SDK 빠른 시작](/ko/services/playfab/multiplayer/lobby/lobby-getting-started.md)
- [Unreal Engine와 함께 GDK 사용](/ko/build/gdk-and-engines/unreal/unreal.md)