> ## Documentation Index
> Fetch the complete documentation index at: https://devdocs.xbox.com/llms.txt
> Use this file to discover all available pages before exploring further.
# Postman용 PlayFab REST API 컬렉션 빠른 시작
> PlayFab REST API 컬렉션을 Postman으로 가져오고, 엔터티 토큰을 획득한 후 타이틀과 엔터티를 관리하는 첫 번째 PlayFab API를 호출합니다.
# 빠른 시작: Postman용 PlayFab REST API 컬렉션
Postman용 PlayFab REST API 컬렉션을 시작하세요. 단계를 따라 패키지를 설치하고 기본 작업을 위한 예제 코드를 실행해 봅니다. PlayFab은 라이브 게임을 위한 완전한 백엔드 플랫폼입니다. Postman용 PlayFab REST API 컬렉션을 사용하여 다음을 수행할 수 있습니다.
* 엔터티 토큰 획득
* 타이틀에서 엔터티 추가/수정/삭제
* 타이틀 콘텐츠 구성
[API 참조 문서](/services/playfab/api-references) | [PlayFab Postman 컬렉션 GitHub 리포지토리](https://github.com/PlayFab/PostmanCollection)
## 필수 조건
* [PlayFab 개발자 계정](https://developer.playfab.com)
* [Postman 네이티브 앱](https://www.getpostman.com/)
* [TLS](https://learn.microsoft.com/en-us/windows/win32/secauthn/transport-layer-security-protocol) 1.2 이상을 실행하는 OS ([Windows의 TLS 1.2 지원](https://learn.microsoft.com/en-us/dotnet/framework/network-programming/tls#support-for-tls-12))
### PlayFab 컬렉션 추가
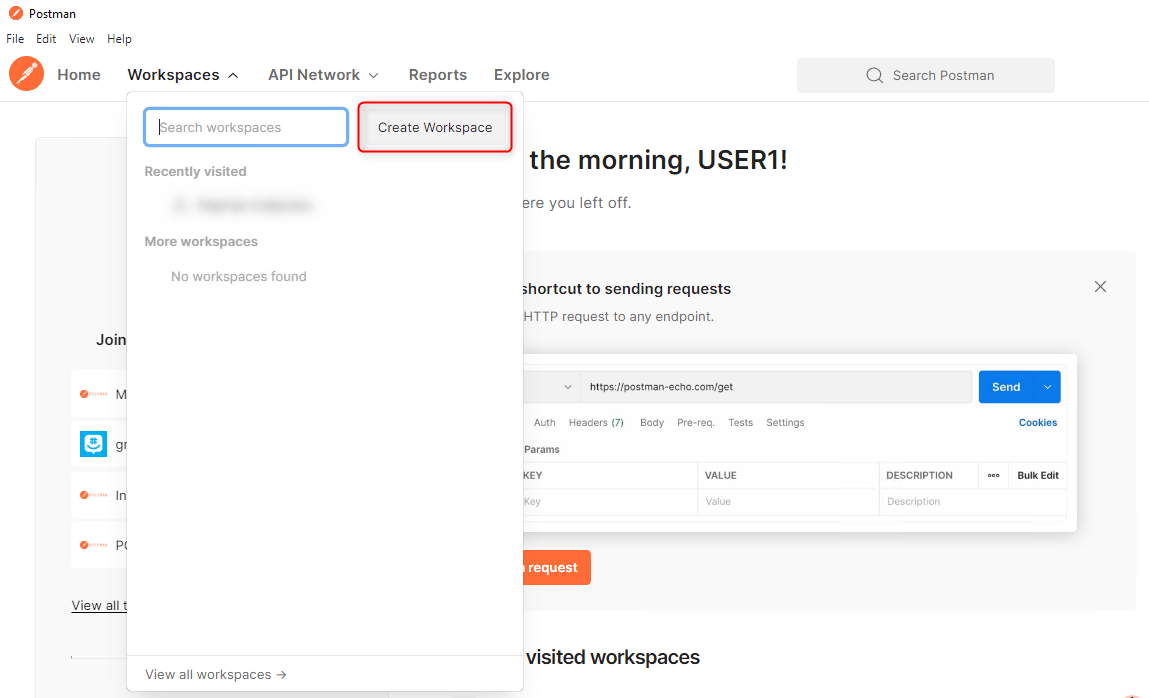
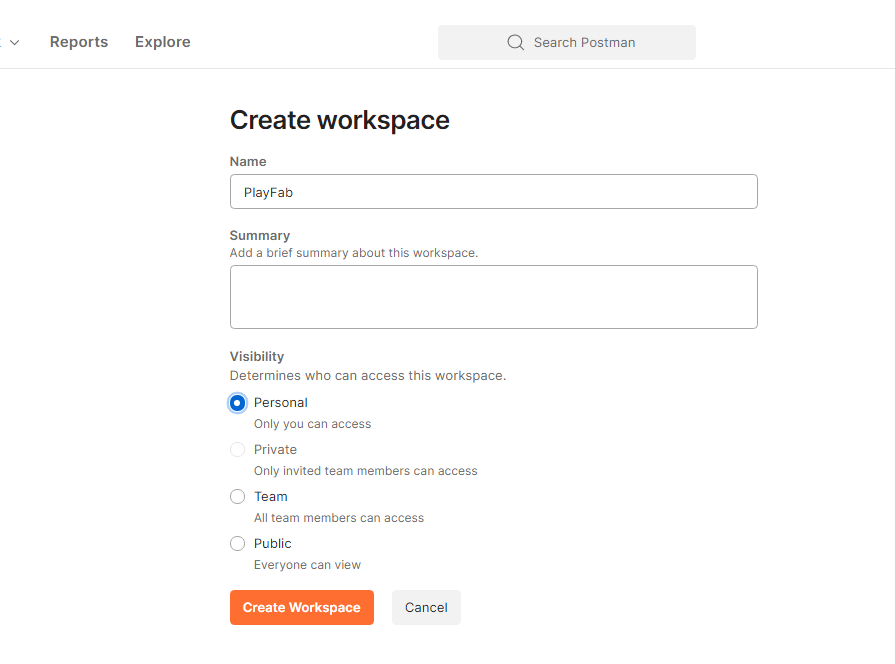
* 작업 영역 생성
> \[!div class="mx-imgBorder"]
>
>  > \[!div class="mx-imgBorder"]
>
>
> \[!div class="mx-imgBorder"]
>
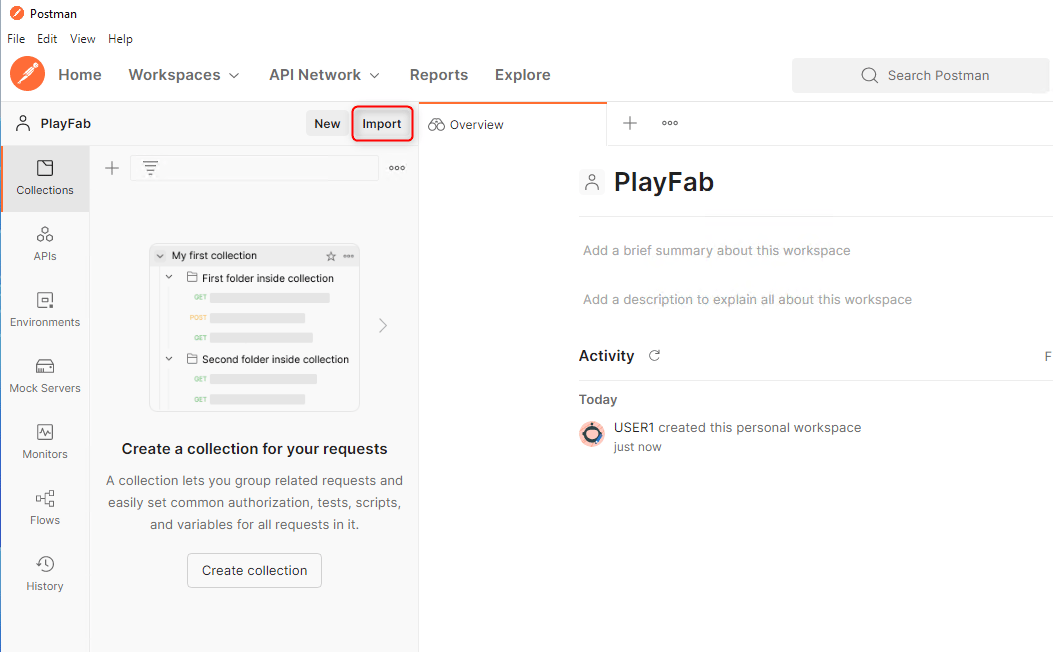
>  * **Import** 선택 *(창의 왼쪽 상단)*
> \[!div class="mx-imgBorder"]
>
>
* **Import** 선택 *(창의 왼쪽 상단)*
> \[!div class="mx-imgBorder"]
>
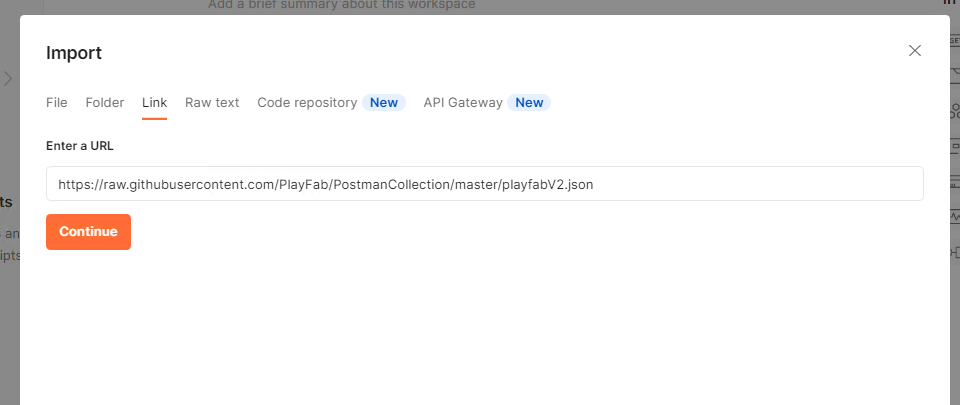
>  * **Link** 선택
> \[!div class="mx-imgBorder"]
>
>
* **Link** 선택
> \[!div class="mx-imgBorder"]
>
>  > \[!div class="mx-imgBorder"]
>
>
> \[!div class="mx-imgBorder"]
>
> 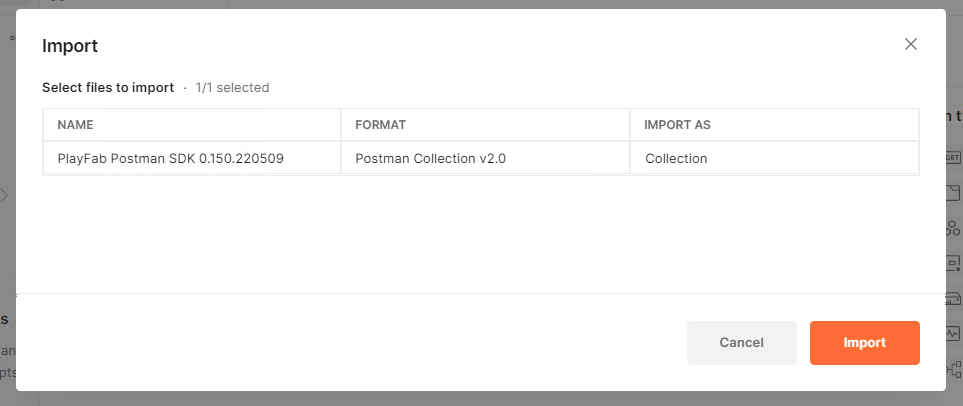 * 다음 링크를 URL 텍스트 상자에 붙여넣고 **Continue** 및 **Import**를 선택합니다.
[https://raw.githubusercontent.com/PlayFab/PostmanCollection/master/playfabV2.json](https://raw.githubusercontent.com/PlayFab/PostmanCollection/master/playfabV2.json)
* 베타 SDK를 다운로드하려면 [Postman Beta GitHub 리포지토리](https://github.com/PlayFab/PostmanCollection/blob/master/playfabV2.json)의 playfabV2.json 파일로 이동합니다.
* **View Raw**를 선택합니다.
> \[!div class="mx-imgBorder"]
>
>
* 다음 링크를 URL 텍스트 상자에 붙여넣고 **Continue** 및 **Import**를 선택합니다.
[https://raw.githubusercontent.com/PlayFab/PostmanCollection/master/playfabV2.json](https://raw.githubusercontent.com/PlayFab/PostmanCollection/master/playfabV2.json)
* 베타 SDK를 다운로드하려면 [Postman Beta GitHub 리포지토리](https://github.com/PlayFab/PostmanCollection/blob/master/playfabV2.json)의 playfabV2.json 파일로 이동합니다.
* **View Raw**를 선택합니다.
> \[!div class="mx-imgBorder"]
>
> 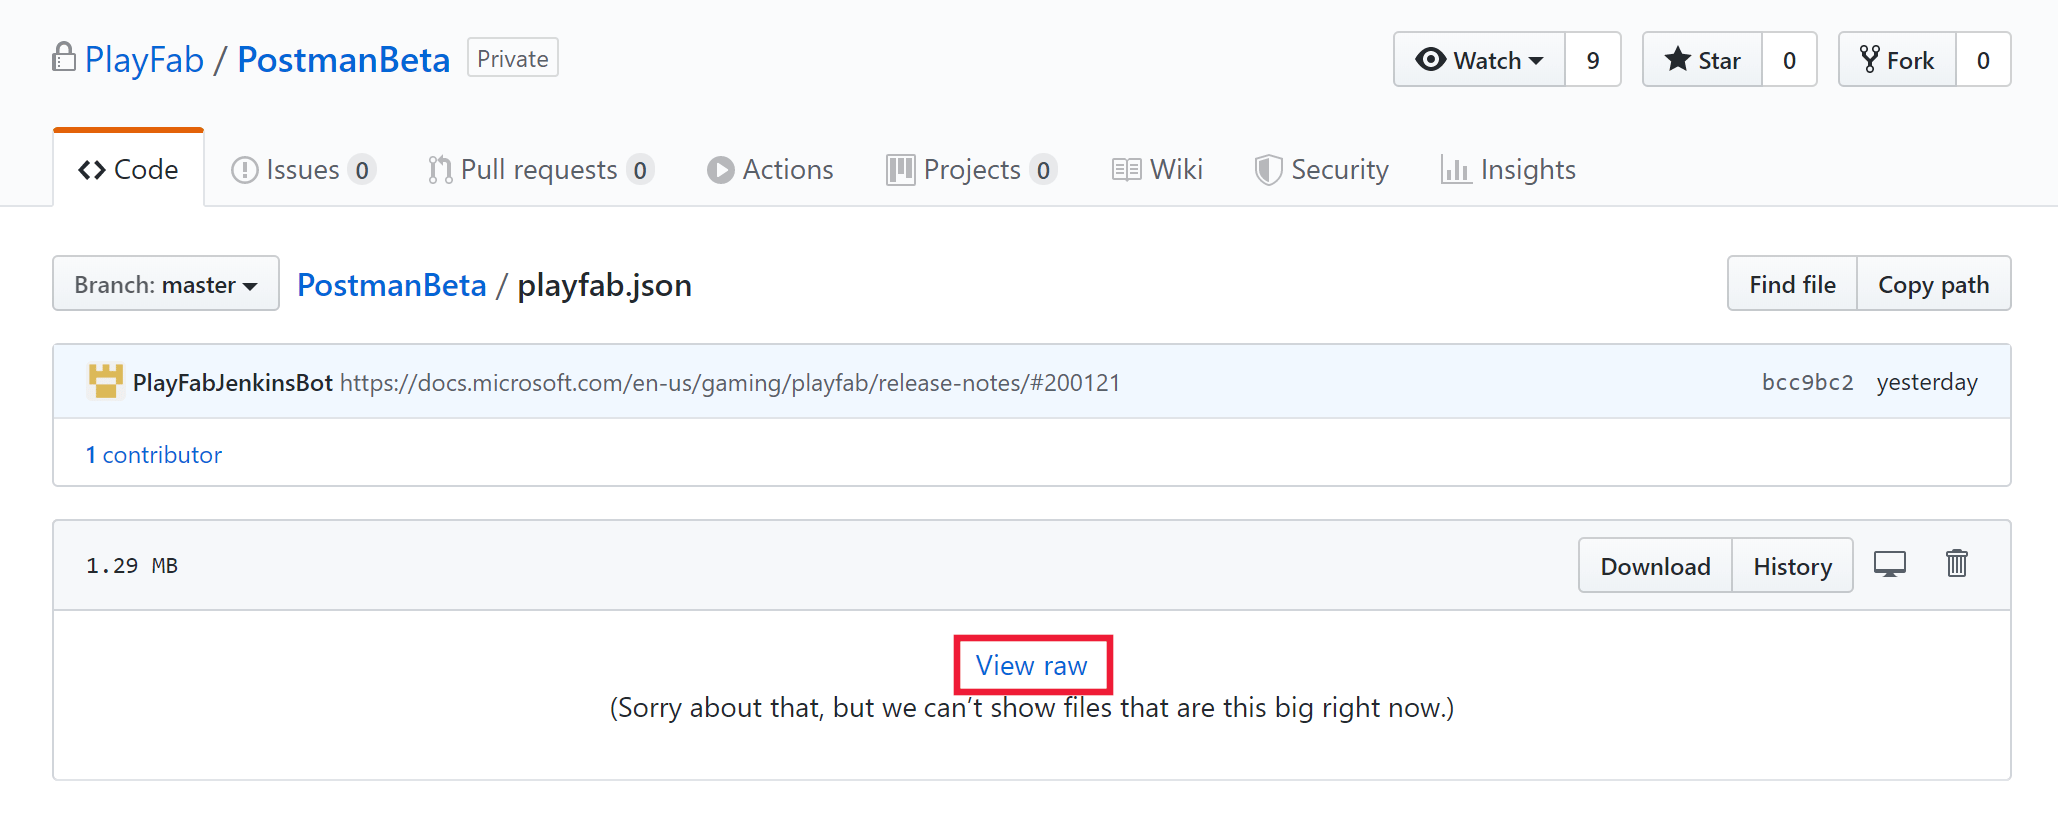 * 브라우저에서 URL을 복사하고 URL 텍스트 상자에 링크를 붙여넣은 후 **Continue** 및 **Import**를 선택합니다.
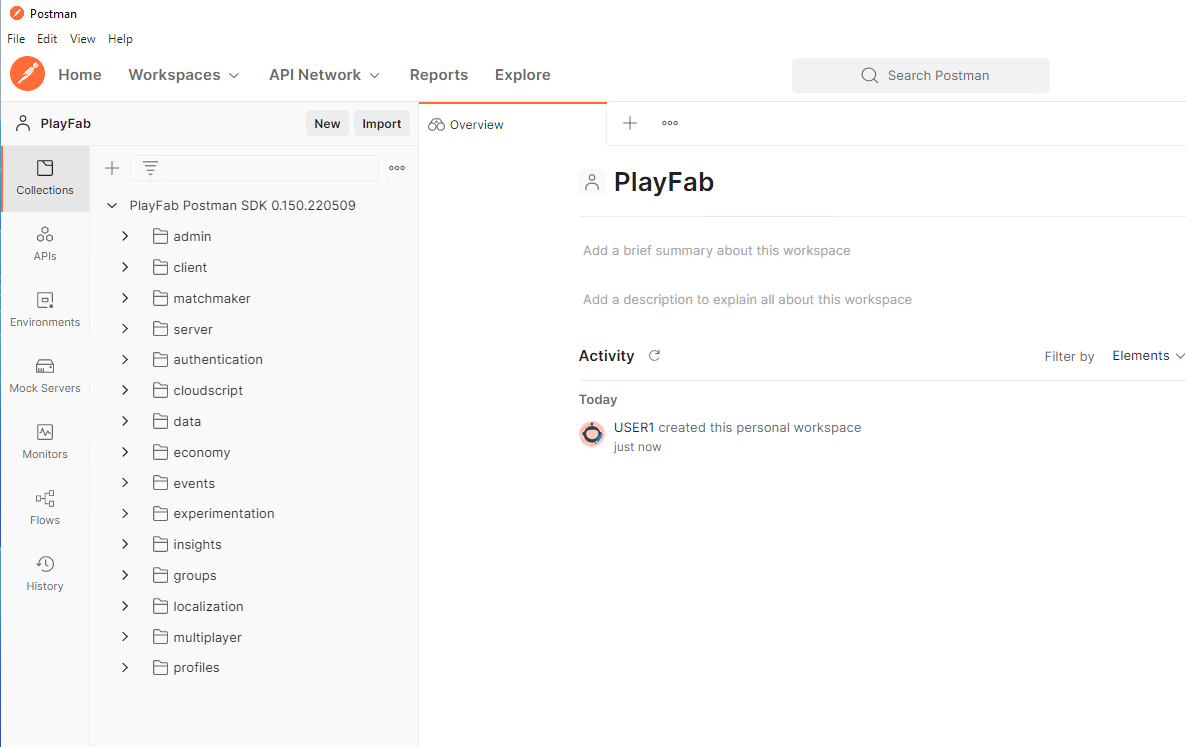
* 이제 컬렉션 탭 아래에 PlayFab Postman SDK가 표시됩니다 *(창의 왼쪽 상단)*.
> \[!div class="mx-imgBorder"]
>
>
* 브라우저에서 URL을 복사하고 URL 텍스트 상자에 링크를 붙여넣은 후 **Continue** 및 **Import**를 선택합니다.
* 이제 컬렉션 탭 아래에 PlayFab Postman SDK가 표시됩니다 *(창의 왼쪽 상단)*.
> \[!div class="mx-imgBorder"]
>
>  ### 환경 변수 추가
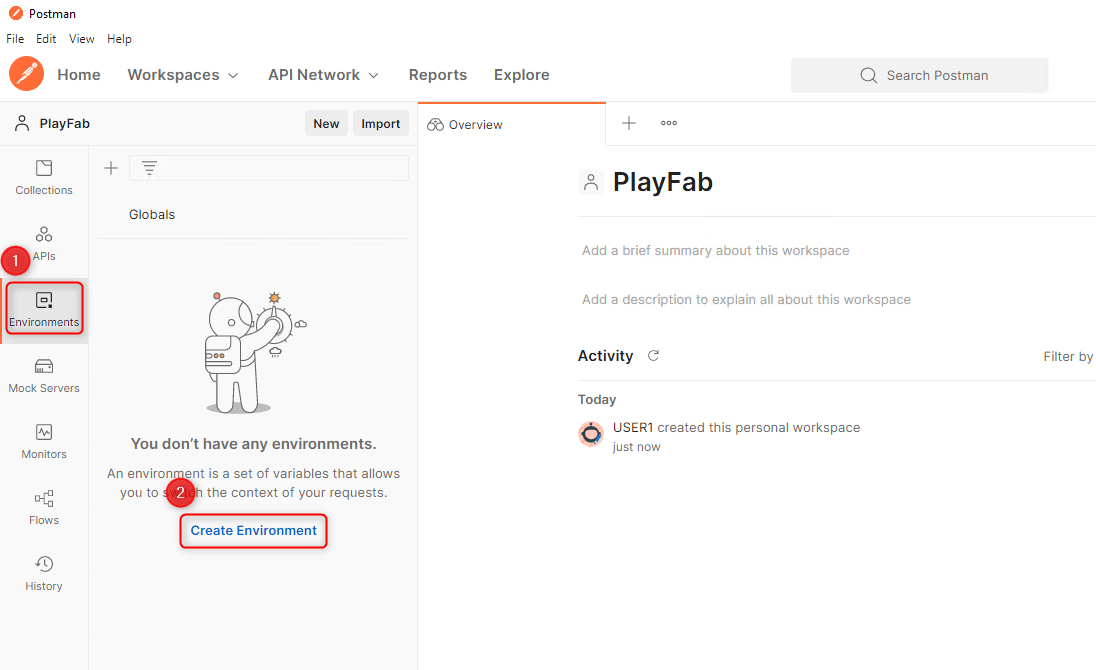
* **Environments** 및 **Create Environment**를 선택하여 새 환경을 만듭니다.
> \[!div class="mx-imgBorder"]
>
>
### 환경 변수 추가
* **Environments** 및 **Create Environment**를 선택하여 새 환경을 만듭니다.
> \[!div class="mx-imgBorder"]
>
>  * 환경 이름을 지정합니다. "\[titleId] - Test Environment"를 권장합니다.
타이틀 ID는 [Game Manager](https://developer.playfab.com/en-us/my-games)에 로그인하여 **My Studios and Titles** 기본 페이지에서 타이틀 이름 아래의 16진수 값을 복사하여 확인할 수 있습니다.
* 다음 3개의 변수를 환경에 추가합니다.
| Variable | Initial Value | Current Value |
| ----------- | ------------- | ------------- |
| TitleId | \[titleId] | \[titleId] |
| SecretKey | \[secretKey] | \[secretKey] |
| EntityToken | | |
타이틀 비밀 키와 그 위치에 대한 자세한 내용은 [비밀 키 관리](/services/playfab/live-service-management/gamemanager/secret-key-management) 문서에서 확인할 수 있습니다.
> \[!div class="mx-imgBorder"]
>
>
* 환경 이름을 지정합니다. "\[titleId] - Test Environment"를 권장합니다.
타이틀 ID는 [Game Manager](https://developer.playfab.com/en-us/my-games)에 로그인하여 **My Studios and Titles** 기본 페이지에서 타이틀 이름 아래의 16진수 값을 복사하여 확인할 수 있습니다.
* 다음 3개의 변수를 환경에 추가합니다.
| Variable | Initial Value | Current Value |
| ----------- | ------------- | ------------- |
| TitleId | \[titleId] | \[titleId] |
| SecretKey | \[secretKey] | \[secretKey] |
| EntityToken | | |
타이틀 비밀 키와 그 위치에 대한 자세한 내용은 [비밀 키 관리](/services/playfab/live-service-management/gamemanager/secret-key-management) 문서에서 확인할 수 있습니다.
> \[!div class="mx-imgBorder"]
>
> 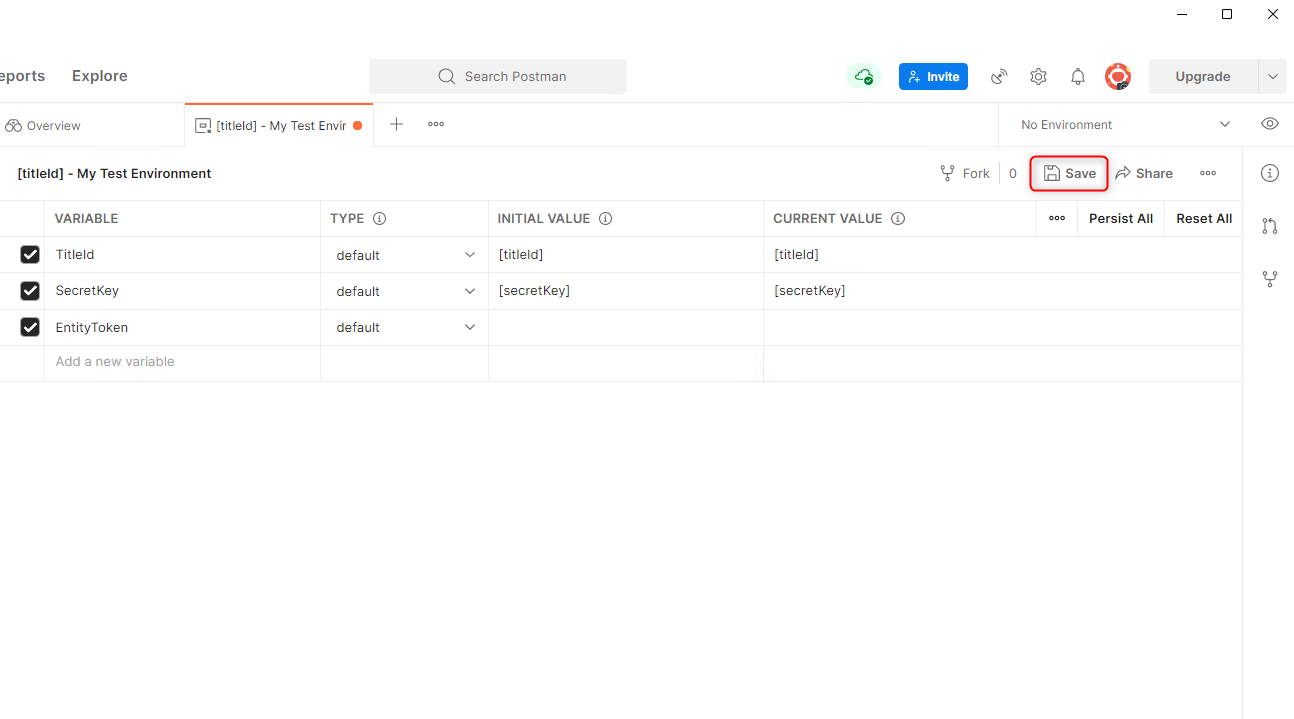 * 완료되면 **Save**를 선택하여 새 환경을 저장합니다.
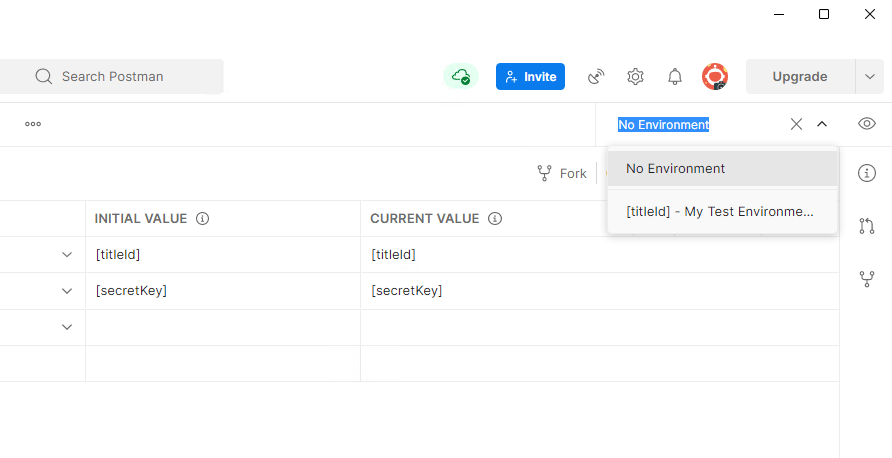
* 환경 드롭다운을 선택하여 새 환경으로 전환합니다 *(창의 오른쪽 상단)*.
> \[!div class="mx-imgBorder"]
>
>
* 완료되면 **Save**를 선택하여 새 환경을 저장합니다.
* 환경 드롭다운을 선택하여 새 환경으로 전환합니다 *(창의 오른쪽 상단)*.
> \[!div class="mx-imgBorder"]
>
>  ### 타이틀 엔터티 토큰 얻기
PlayFab의 [엔터티 프로그래밍 모델](/services/playfab/live-service-management/game-configuration/entities)과 상호 작용하는 한 가지 방법은 타이틀 엔터티 토큰을 얻는 것입니다. 타이틀 구성 데이터를 변경하거나 많은 수의 플레이어에 대해 조정을 수행하려는 경우 유용할 수 있습니다.
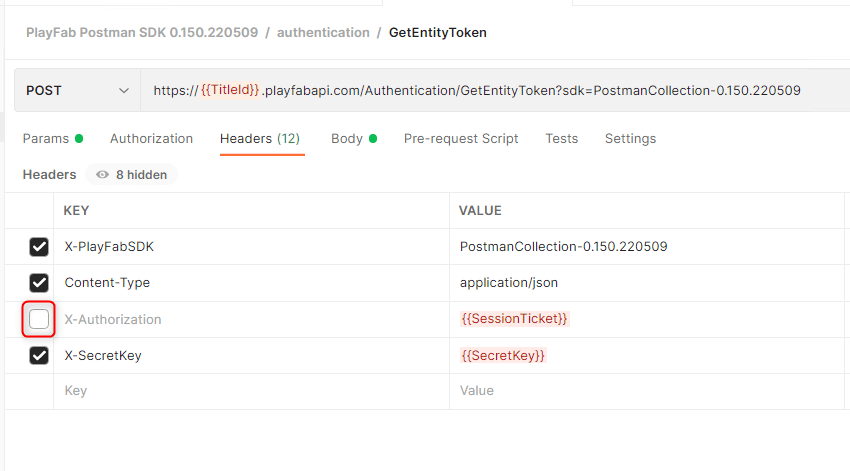
* **PlayFab Collections** 폴더 아래에서 **Authentication** 네임스페이스를 확장하고 `GetEntityToken`을 선택합니다.
* **Headers**에서 `X-Authorization`의 체크를 해제합니다.
> \[!div class="mx-imgBorder"]
>
>
### 타이틀 엔터티 토큰 얻기
PlayFab의 [엔터티 프로그래밍 모델](/services/playfab/live-service-management/game-configuration/entities)과 상호 작용하는 한 가지 방법은 타이틀 엔터티 토큰을 얻는 것입니다. 타이틀 구성 데이터를 변경하거나 많은 수의 플레이어에 대해 조정을 수행하려는 경우 유용할 수 있습니다.
* **PlayFab Collections** 폴더 아래에서 **Authentication** 네임스페이스를 확장하고 `GetEntityToken`을 선택합니다.
* **Headers**에서 `X-Authorization`의 체크를 해제합니다.
> \[!div class="mx-imgBorder"]
>
>  * **Send**를 선택합니다.
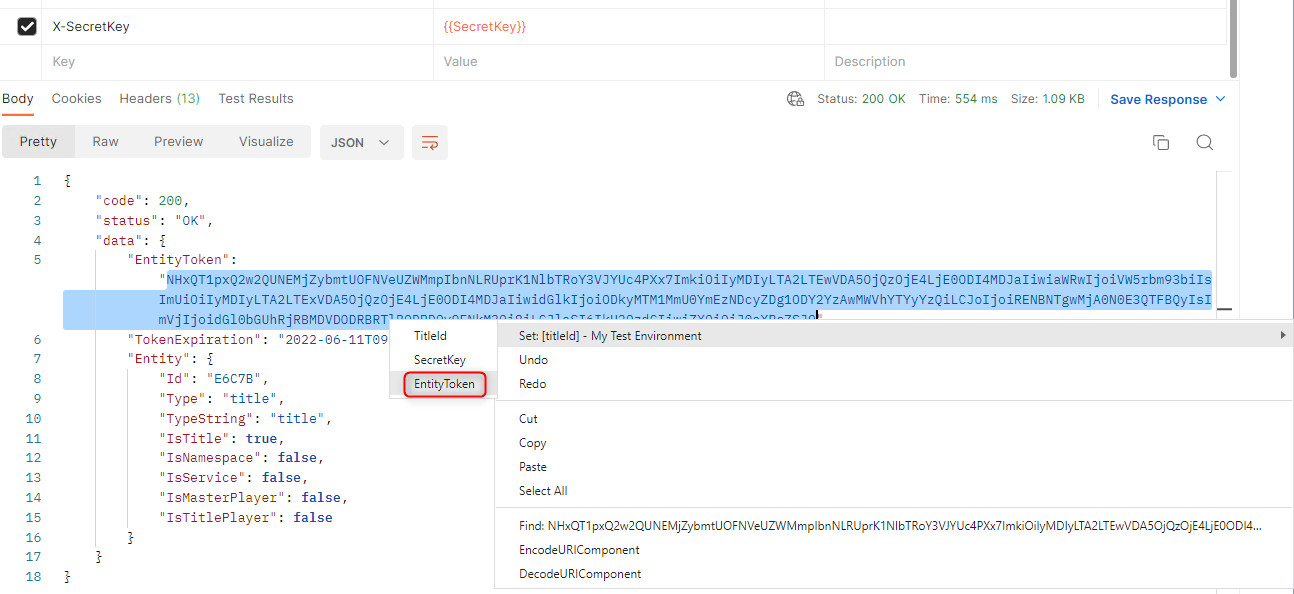
* 반환된 엔터티 토큰을 `EntityToken` 환경 변수로 설정합니다.
* 응답에서 `EntityToken` 문자열을 강조 표시합니다.
* 마우스 오른쪽 버튼을 클릭하고 새 환경에 대해 \*\*Set: \[Environment]\*\*를 선택합니다.
* **EntityToken**을 선택합니다.
> \[!div class="mx-imgBorder"]
>
>
* **Send**를 선택합니다.
* 반환된 엔터티 토큰을 `EntityToken` 환경 변수로 설정합니다.
* 응답에서 `EntityToken` 문자열을 강조 표시합니다.
* 마우스 오른쪽 버튼을 클릭하고 새 환경에 대해 \*\*Set: \[Environment]\*\*를 선택합니다.
* **EntityToken**을 선택합니다.
> \[!div class="mx-imgBorder"]
>
>  엔터티 토큰은 **24시간** 후에 만료됩니다. 이후에는 `GetEntityToken`을 다시 실행하여 새 엔터티 토큰을 얻고 환경 변수를 업데이트해야 합니다.
### Title\_Player\_Account 엔터티 토큰 얻기
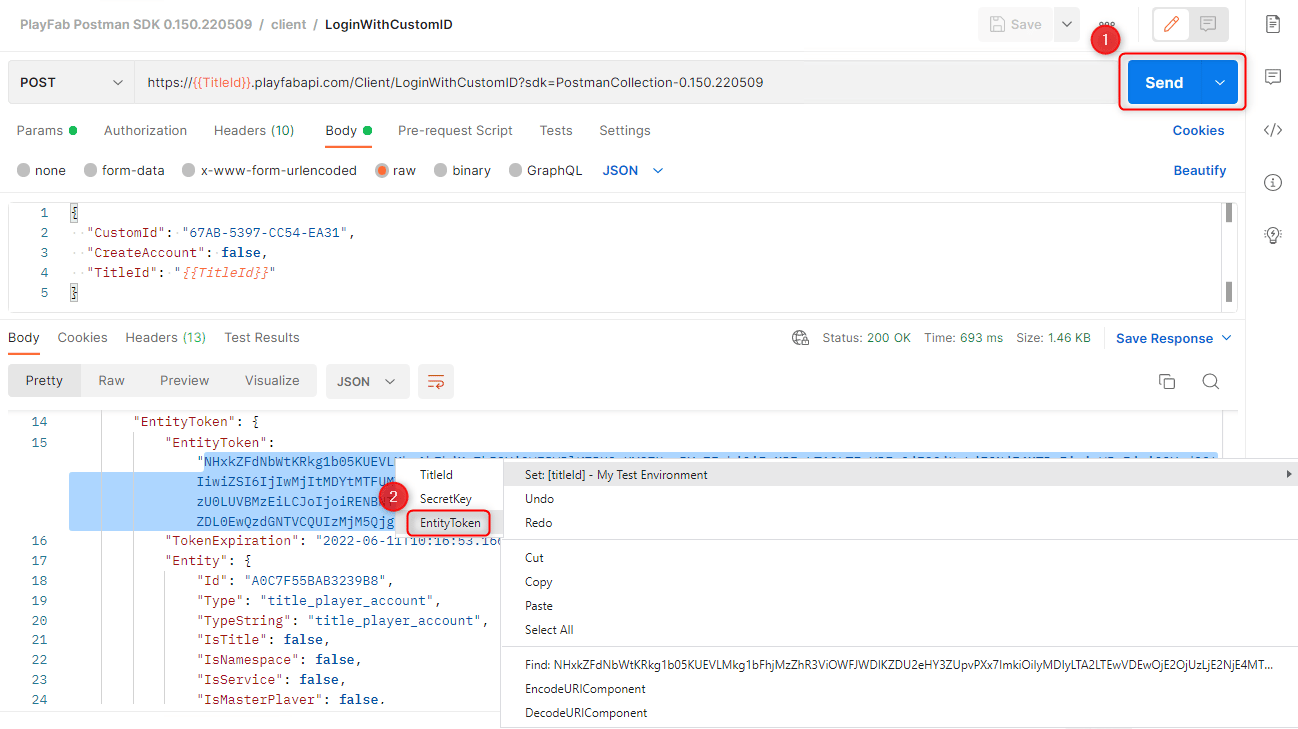
PlayFab의 [엔터티 프로그래밍 모델](/services/playfab/live-service-management/game-configuration/entities)과 상호 작용하는 또 다른 방법은 Title\_Player\_Account 엔터티 토큰을 얻는 것입니다. 이는 단일 플레이어에 대해 변경 사항을 적용하려는 경우 유용합니다.
* **PlayFab Collections** 폴더 아래에서 **Client** 네임스페이스를 확장하고 `LoginWithCustomID`를 선택합니다.
* **Body**에서 `CreateAccount` 값을 `false`에서 `true`로 변경합니다.
* **Send**를 선택합니다.
* 반환된 엔터티 토큰을 `EntityToken` 환경 변수로 설정합니다.
* 응답에서 `EntityToken` 문자열을 강조 표시합니다.
* 마우스 오른쪽 버튼을 클릭하고 새 환경에 대해 \*\*Set: \[Environment]\*\*를 선택합니다.
* **EntityToken**을 선택합니다.
> \[!div class="mx-imgBorder"]
>
>
엔터티 토큰은 **24시간** 후에 만료됩니다. 이후에는 `GetEntityToken`을 다시 실행하여 새 엔터티 토큰을 얻고 환경 변수를 업데이트해야 합니다.
### Title\_Player\_Account 엔터티 토큰 얻기
PlayFab의 [엔터티 프로그래밍 모델](/services/playfab/live-service-management/game-configuration/entities)과 상호 작용하는 또 다른 방법은 Title\_Player\_Account 엔터티 토큰을 얻는 것입니다. 이는 단일 플레이어에 대해 변경 사항을 적용하려는 경우 유용합니다.
* **PlayFab Collections** 폴더 아래에서 **Client** 네임스페이스를 확장하고 `LoginWithCustomID`를 선택합니다.
* **Body**에서 `CreateAccount` 값을 `false`에서 `true`로 변경합니다.
* **Send**를 선택합니다.
* 반환된 엔터티 토큰을 `EntityToken` 환경 변수로 설정합니다.
* 응답에서 `EntityToken` 문자열을 강조 표시합니다.
* 마우스 오른쪽 버튼을 클릭하고 새 환경에 대해 \*\*Set: \[Environment]\*\*를 선택합니다.
* **EntityToken**을 선택합니다.
> \[!div class="mx-imgBorder"]
>
>  ## 문제 해결
* 타이틀 ID / 비밀 키 불일치
* 타이틀 엔터티 토큰을 얻으려고 하는데 `401: Unauthorized` 오류가 발생하는 경우 [Game Manager](https://developer.playfab.com/en-us/my-games)에 로그인하여 타이틀 ID와 비밀 키가 올바른지 확인합니다.
* 만료된 엔터티 토큰
* 이전에 엔터티 토큰을 얻었지만 다른 API 호출에 실패하는 경우 엔터티 토큰이 만료되었을 수 있습니다. 새 엔터티 토큰을 얻어 `EntityToken` 환경 변수에 저장하고 이전 API를 다시 호출해 봅니다.
* 잘못된 엔터티 토큰 유형
* 다양한 유형의 엔터티가 있습니다([사용 가능한 기본 제공 엔터티 유형](/services/playfab/live-service-management/game-configuration/entities/available-built-in-entity-types) 참조). 서로 다른 API는 서로 다른 엔터티 유형을 허용합니다. 예를 들어, 타이틀 엔터티 토큰 대신 title\_player\_account 엔터티 토큰으로 `GetLanguageList`를 호출하려고 시도할 수 있습니다.
* 잘못된 환경:
* 환경 드롭다운을 확인하여 올바른 환경을 사용하고 있는지 확인합니다 *(창의 오른쪽 상단)*.
## 다음 단계
이제 다른 API 호출에 전달할 엔터티 토큰이 있으므로 PlayFab 타이틀 설정을 시작할 수 있습니다.
\[!div class="nextstepaction"] [PlayFab 빠른 시작 >](/services/playfab/live-service-management/gamemanager/quickstart) \[!div class="nextstepaction"] [API 참조 >](/services/playfab/api-references)
## Related topics
- [네이티브 및 Phaser용 JavaScript 빠른 시작](/ko/services/playfab/sdks/javascript/quickstart.md)
- [Unity 빠른 시작](/ko/services/playfab/sdks/unity3d/quickstart.md)
- [빠른 시작 - C#용 PlayFab Client 라이브러리](/ko/services/playfab/sdks/c-sharp/quickstart.md)
- [Unreal Engine 빠른 시작](/ko/services/playfab/sdks/unreal/quickstart.md)
- [NodeJS 빠른 시작](/ko/services/playfab/sdks/nodejs/quickstart.md)
## 문제 해결
* 타이틀 ID / 비밀 키 불일치
* 타이틀 엔터티 토큰을 얻으려고 하는데 `401: Unauthorized` 오류가 발생하는 경우 [Game Manager](https://developer.playfab.com/en-us/my-games)에 로그인하여 타이틀 ID와 비밀 키가 올바른지 확인합니다.
* 만료된 엔터티 토큰
* 이전에 엔터티 토큰을 얻었지만 다른 API 호출에 실패하는 경우 엔터티 토큰이 만료되었을 수 있습니다. 새 엔터티 토큰을 얻어 `EntityToken` 환경 변수에 저장하고 이전 API를 다시 호출해 봅니다.
* 잘못된 엔터티 토큰 유형
* 다양한 유형의 엔터티가 있습니다([사용 가능한 기본 제공 엔터티 유형](/services/playfab/live-service-management/game-configuration/entities/available-built-in-entity-types) 참조). 서로 다른 API는 서로 다른 엔터티 유형을 허용합니다. 예를 들어, 타이틀 엔터티 토큰 대신 title\_player\_account 엔터티 토큰으로 `GetLanguageList`를 호출하려고 시도할 수 있습니다.
* 잘못된 환경:
* 환경 드롭다운을 확인하여 올바른 환경을 사용하고 있는지 확인합니다 *(창의 오른쪽 상단)*.
## 다음 단계
이제 다른 API 호출에 전달할 엔터티 토큰이 있으므로 PlayFab 타이틀 설정을 시작할 수 있습니다.
\[!div class="nextstepaction"] [PlayFab 빠른 시작 >](/services/playfab/live-service-management/gamemanager/quickstart) \[!div class="nextstepaction"] [API 참조 >](/services/playfab/api-references)
## Related topics
- [네이티브 및 Phaser용 JavaScript 빠른 시작](/ko/services/playfab/sdks/javascript/quickstart.md)
- [Unity 빠른 시작](/ko/services/playfab/sdks/unity3d/quickstart.md)
- [빠른 시작 - C#용 PlayFab Client 라이브러리](/ko/services/playfab/sdks/c-sharp/quickstart.md)
- [Unreal Engine 빠른 시작](/ko/services/playfab/sdks/unreal/quickstart.md)
- [NodeJS 빠른 시작](/ko/services/playfab/sdks/nodejs/quickstart.md)