> ## Documentation Index
> Fetch the complete documentation index at: https://devdocs.xbox.com/llms.txt
> Use this file to discover all available pages before exploring further.
# Android용 푸시 알림
> Firebase 프로젝트를 설정하고, 서버 개인 키를 업로드하고, Unity3D 클라이언트로 테스트하여 Android용 PlayFab 푸시 알림을 구성합니다.
# Android용 푸시 알림
## 사전 요구 사항
* [푸시 알림 빠른 시작](/services/playfab/live-service-management/game-configuration/title-communications/push-notifications/quickstart)
* [Unity3D 빠른 시작](/services/playfab/sdks/unity3d/quickstart)
* **선택 사항** [Unity Editor Extensions](https://blog.playfab.com/blog/new-unity-editor-extensions-beta)
* **선택 사항** [Postman 빠른 시작](/services/playfab/sdks/postman/postman-quickstart)
## Android 알림 채널 구성
### Firebase 설정
사용하고 동기화해야 하는 세 개의 Google 웹사이트가 있습니다. Google/Firebase에는 프로젝트와 앱이 모두 있습니다.
* **프로젝트**:
* 아직 없는 경우 [Firebase Console](https://console.firebase.google.com/)로 프로젝트를 가져옵니다.
* **앱**:
* [Firebase](https://console.firebase.google.com/) 프로젝트에는 앱이 포함되어 있습니다.
* 앱이 두 위치 모두에 동일한 이름과 식별자로 존재하는지 확인하세요(예: [Unicorn Battle 및 com.playfab.unicornbattle2](https://play.google.com/store/apps/details?id=com.playfab.unicornbattle2)).
### PlayFab에는 서버 개인 키 파일이 필요합니다
* 이 개인 키 파일은 [Firebase Console](https://console.firebase.google.com/)에서 가져올 수 있습니다.
* **Firebase Console**:
* **Project** 또는 **App**을 선택하고 **Settings** 옵션을 찾습니다(여러 방법이 있으며 모두 동일한 곳으로 안내합니다).
* **Service accounts** 탭에서 **Generate new private key** 버튼을 선택하여 JSON 파일을 다운로드합니다.
## 개인 키 파일 사용
* 개인 키 파일은 다음 두 가지 방법 중 하나로 제공합니다.
1. 개인 키 파일을 **Game Manager UI**: **Settings**(사용하는 **Title**) > **Push Notifications** > **Android**에 직접 업로드합니다.
2. 또는 Postman이나 Server API 메서드가 활성화된 Unity 프로젝트를 사용하여 [SetupPushNotification](xref:titleid.playfabapi.com.admin.title-widedatamanagement.setuppushnotification)을 호출합니다.
* Name: **your\_game\_name**
* Platform: **GCM**
* Credential: (**private key file contents as a string**): `{ ... }`
* Overwrite OldARN: `true`
* 다음과 유사한 데이터가 포함된 **HTTP 200 OK** 응답을 받게 됩니다.
```json theme={null}
// Postman JSON result output
{
"code": 200,
"status": "OK",
"data": { "ARN" : "arn:*******/GCM/your_game_name" }
}
```
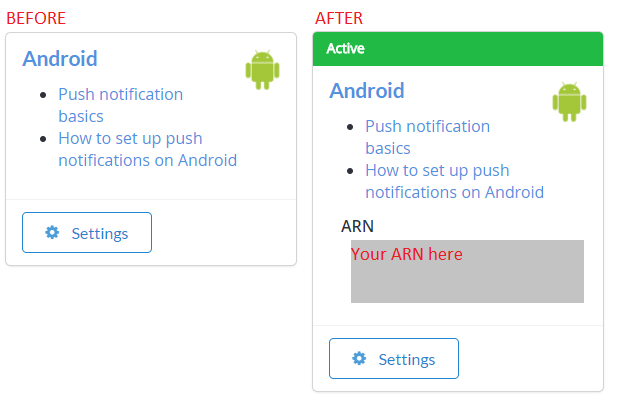
* (두 방법 중 하나를 사용하여) 제대로 설정되면 **Game Manager UI**의 **Settings(사용하는 타이틀) > Push Notifications > Android**에서 이 항목을 확인할 수 있습니다.
 ## 시작하기: Android + Unity용 푸시 알림
Unity 프로젝트를 설정하려면 다음을 수행하세요.
* 새 Unity 프로젝트를 만듭니다.
* **선택 사항** [PlayFab Unity Editor Extensions](https://aka.ms/playfabunityextension) 패키지를 가져옵니다.
* [Unity PlayFab SDK](https://aka.ms/playfabunitysdkdownload) 패키지를 가져옵니다.
* [FCM Unity](https://firebase.google.com/docs/cloud-messaging/unity/client) 가이드를 따라 FCM 메시징을 설치하고 푸시 알림을 위한 프로젝트를 설정합니다.
* 완료되면 이 가이드를 계속 진행하여 PlayFab에서 메시지를 수신할 수 있습니다.
* 다음 예제에서는 FCM과 PlayFab을 결합한 완전한 FCM 지원 monoBehaviour 스크립트를 제공합니다.
* FCM 가이드에서 Firebase 플러그인을 설정하는 monobehavior 스크립트를 만들었습니다.
* 해당 monobehavior 스크립트를 계속 사용하거나, 다음 예제의 스크립트로 대체할 수 있습니다.
### 첫 번째 푸시 알림 설정
Unity에서 FCM 자습서에서 만든 스크립트를 열고 내용을 대체합니다.
```csharp theme={null}
using PlayFab;
using PlayFab.ClientModels;
using PlayFab.Json;
using UnityEngine;
public class MsgCatcher : MonoBehaviour
{
public string pushToken;
public string playFabId;
public string lastMsg;
// OnGUI should be deleted/replaced with your own gui - This is only provided for debugging
public void OnGUI()
{
GUI.Label(new Rect(0, 0, Screen.width, 200), pushToken);
GUI.Label(new Rect(0, 200, Screen.width, Screen.height - 200), lastMsg);
}
private void OnPfFail(PlayFabError error)
{
Debug.Log("PlayFab: api error: " + error.GenerateErrorReport());
}
public void Start()
{
// PlayFabSettings.TitleId = "TITLE_ID";
Firebase.Messaging.FirebaseMessaging.TokenReceived += OnTokenReceived;
Firebase.Messaging.FirebaseMessaging.MessageReceived += OnMessageReceived;
LoginToPlayFab();
}
private void LoginToPlayFab()
{
#if UNITY_ANDROID
var request = new LoginWithAndroidDeviceIDRequest { AndroidDeviceId = SystemInfo.deviceUniqueIdentifier, CreateAccount = true, };
PlayFabClientAPI.LoginWithAndroidDeviceID(request, OnPfLogin, OnPfFail);
#endif
}
private void OnPfLogin(LoginResult result)
{
Debug.Log("PlayFab: login successful");
playFabId = result.PlayFabId;
RegisterForPush();
}
private void RegisterForPush()
{
if (string.IsNullOrEmpty(pushToken) || string.IsNullOrEmpty(playFabId))
return;
#if UNITY_ANDROID
var request = new AndroidDevicePushNotificationRegistrationRequest {
DeviceToken = pushToken,
SendPushNotificationConfirmation = true,
ConfirmationMessage = "Push notifications registered successfully"
};
PlayFabClientAPI.AndroidDevicePushNotificationRegistration(request, OnPfAndroidReg, OnPfFail);
#endif
}
private void OnPfAndroidReg(AndroidDevicePushNotificationRegistrationResult result)
{
Debug.Log("PlayFab: Push Registration Successful");
}
private void OnTokenReceived(object sender, Firebase.Messaging.TokenReceivedEventArgs token)
{
Debug.Log("PlayFab: Received Registration Token: " + token.Token);
pushToken = token.Token;
RegisterForPush();
}
private void OnMessageReceived(object sender, Firebase.Messaging.MessageReceivedEventArgs e)
{
Debug.Log("PlayFab: Received a new message from: " + e.Message.From);
lastMsg = "";
if (e.Message.Data != null)
{
lastMsg += "DATA: " + JsonWrapper.SerializeObject(e.Message.Data) + "\n";
Debug.Log("PlayFab: Received a message with data:");
foreach (var pair in e.Message.Data)
Debug.Log("PlayFab data element: " + pair.Key + "," + pair.Value);
}
if (e.Message.Notification != null)
{
Debug.Log("PlayFab: Received a notification:");
lastMsg += "TITLE: " + e.Message.Notification.Title + "\n";
lastMsg += "BODY: " + e.Message.Notification.Body + "\n";
}
}
}
```
장치에서 Unity 프로젝트를 빌드하고 실행합니다. **Push notifications registered successfully** 텍스트가 포함된 푸시 알림을 수신하면 모든 것이 예상대로 작동한 것입니다.
`PlayFabSettings.TitleId = TITLE_ID`. 자신만의 `TitleId`를 설정해야 합니다. 우리의 타이틀은 우리의 Firebase 키와 설정으로 등록되어 있으며 *귀하의 것이 아니므로*, 이 `TitleId`를 업데이트하지 않으면 이 예제는 작동하지 않습니다. 이 줄의 주석을 해제하고 `TITLE_ID`를 자신의 `titleId`로 대체하거나, 이전 섹션에서 언급한 선택적 Editor Extensions 플러그인에서 타이틀을 선택할 수 있습니다.
### Android 문제 해결
* Firebase Console에서 테스트 푸시 알림을 보낼 수 있는지 확인합니다.
* 그렇지 않으면 Firebase 플러그인이 올바르게 설정되지 않은 것이며, 이유를 파악하려면 Firebase 문서를 검토하거나 Firebase 지원팀에 문의해야 합니다.
* FCM 클라이언트 pushToken이 제대로 설정되었는지 확인합니다.
* 예제의 `OnTokenReceived` 함수가 호출되어야 하며, 유효한 토큰이 있어야 합니다.
* 호출되지 *않으면* Firebase 플러그인이 올바르게 설정되지 *않은* 것이므로, 이유를 파악하려면 Firebase 문서를 검토하거나 Firebase 지원팀에 문의해야 합니다.
* `titleId`가 소유한 타이틀로 설정되어 있고, Firebase 프로젝트의 서버 API 키로 등록되어 있는지 확인합니다.
### 고급 기능
**server.[SendPushNotification](xref:titleid.playfabapi.com.server.accountmanagement.sendpushnotification)** 에서 **[request.Package](xref:titleid.playfabapi.com.server.accountmanagement.sendpushnotification#pushnotificationpackage).CustomData** 를 사용하여 임의의 데이터를 장치에 전달할 수 있습니다. 위 예제에서는 다음 주석이 있는 섹션으로 전달됩니다.
```csharp theme={null}
Debug.Log("PlayFab: Received a message with data:");
```
원하는 방식으로 해당 데이터를 활용하도록 클라이언트 수신기를 사용자 지정할 수 있습니다. **CustomData**는 플레이어에게 표시되지 않으므로, 클라이언트에 사용자 지정 게임 정보를 전달하거나 **FCM** 플러그인을 사용하여 다른 향후 알림을 로컬로 예약하는 데 사용할 수 있습니다.
또한 **[request.Package](xref:titleid.playfabapi.com.server.accountmanagement.sendpushnotification#pushnotificationpackage).CustomData** 또는 요청 **[AdvancedPlatformDelivery](xref:titleid.playfabapi.com.server.accountmanagement.sendpushnotification#advancedpushplatformmsg)** 를 사용하여 여러 타사 플러그인에 전달할 수 있습니다.
타사 플러그인 전달은 지원되거나 보장되지는 않지만, 고급 사용자에게 제공됩니다.
## 추가 지원
도움말, 예제 버그 및 관련 질문은 [포럼](https://community.playfab.com/index.html)에 메시지를 남겨 주세요.
현재 이 문서에 설명된 표준 흐름에 대해서만 서비스를 지원합니다. 다른 일반적인 푸시 서비스 또는 플러그인에 대한 추가 기능을 팀에서 찾고 있다면 알려주세요! 개발자 커뮤니티로부터 피드백을 받는 것을 즐깁니다.
Amazon SNS를 통한 푸시 페이로드에 대한 문서:
* [Amazon SNS 메시지 및 JSON 형식](https://docs.aws.amazon.com/sns/latest/dg/json-formats.html)
## Related topics
- [푸시 알림 빠른 시작](/ko/services/playfab/live-service-management/game-configuration/title-communications/push-notifications/quickstart.md)
- [iOS용 푸시 알림](/ko/services/playfab/live-service-management/game-configuration/title-communications/push-notifications/push-notifications-for-ios.md)
- [Android Studio 및 푸시 알림 시작하기](/ko/services/playfab/live-service-management/game-configuration/title-communications/push-notifications/getting-started-android-studio-push-notifications.md)
- [푸시 알림](/ko/services/playfab/live-service-management/game-configuration/title-communications/push-notifications/index.md)
- [푸시 알림 템플릿](/ko/services/playfab/live-service-management/game-configuration/title-communications/push-notifications/push-notification-templates.md)
## 시작하기: Android + Unity용 푸시 알림
Unity 프로젝트를 설정하려면 다음을 수행하세요.
* 새 Unity 프로젝트를 만듭니다.
* **선택 사항** [PlayFab Unity Editor Extensions](https://aka.ms/playfabunityextension) 패키지를 가져옵니다.
* [Unity PlayFab SDK](https://aka.ms/playfabunitysdkdownload) 패키지를 가져옵니다.
* [FCM Unity](https://firebase.google.com/docs/cloud-messaging/unity/client) 가이드를 따라 FCM 메시징을 설치하고 푸시 알림을 위한 프로젝트를 설정합니다.
* 완료되면 이 가이드를 계속 진행하여 PlayFab에서 메시지를 수신할 수 있습니다.
* 다음 예제에서는 FCM과 PlayFab을 결합한 완전한 FCM 지원 monoBehaviour 스크립트를 제공합니다.
* FCM 가이드에서 Firebase 플러그인을 설정하는 monobehavior 스크립트를 만들었습니다.
* 해당 monobehavior 스크립트를 계속 사용하거나, 다음 예제의 스크립트로 대체할 수 있습니다.
### 첫 번째 푸시 알림 설정
Unity에서 FCM 자습서에서 만든 스크립트를 열고 내용을 대체합니다.
```csharp theme={null}
using PlayFab;
using PlayFab.ClientModels;
using PlayFab.Json;
using UnityEngine;
public class MsgCatcher : MonoBehaviour
{
public string pushToken;
public string playFabId;
public string lastMsg;
// OnGUI should be deleted/replaced with your own gui - This is only provided for debugging
public void OnGUI()
{
GUI.Label(new Rect(0, 0, Screen.width, 200), pushToken);
GUI.Label(new Rect(0, 200, Screen.width, Screen.height - 200), lastMsg);
}
private void OnPfFail(PlayFabError error)
{
Debug.Log("PlayFab: api error: " + error.GenerateErrorReport());
}
public void Start()
{
// PlayFabSettings.TitleId = "TITLE_ID";
Firebase.Messaging.FirebaseMessaging.TokenReceived += OnTokenReceived;
Firebase.Messaging.FirebaseMessaging.MessageReceived += OnMessageReceived;
LoginToPlayFab();
}
private void LoginToPlayFab()
{
#if UNITY_ANDROID
var request = new LoginWithAndroidDeviceIDRequest { AndroidDeviceId = SystemInfo.deviceUniqueIdentifier, CreateAccount = true, };
PlayFabClientAPI.LoginWithAndroidDeviceID(request, OnPfLogin, OnPfFail);
#endif
}
private void OnPfLogin(LoginResult result)
{
Debug.Log("PlayFab: login successful");
playFabId = result.PlayFabId;
RegisterForPush();
}
private void RegisterForPush()
{
if (string.IsNullOrEmpty(pushToken) || string.IsNullOrEmpty(playFabId))
return;
#if UNITY_ANDROID
var request = new AndroidDevicePushNotificationRegistrationRequest {
DeviceToken = pushToken,
SendPushNotificationConfirmation = true,
ConfirmationMessage = "Push notifications registered successfully"
};
PlayFabClientAPI.AndroidDevicePushNotificationRegistration(request, OnPfAndroidReg, OnPfFail);
#endif
}
private void OnPfAndroidReg(AndroidDevicePushNotificationRegistrationResult result)
{
Debug.Log("PlayFab: Push Registration Successful");
}
private void OnTokenReceived(object sender, Firebase.Messaging.TokenReceivedEventArgs token)
{
Debug.Log("PlayFab: Received Registration Token: " + token.Token);
pushToken = token.Token;
RegisterForPush();
}
private void OnMessageReceived(object sender, Firebase.Messaging.MessageReceivedEventArgs e)
{
Debug.Log("PlayFab: Received a new message from: " + e.Message.From);
lastMsg = "";
if (e.Message.Data != null)
{
lastMsg += "DATA: " + JsonWrapper.SerializeObject(e.Message.Data) + "\n";
Debug.Log("PlayFab: Received a message with data:");
foreach (var pair in e.Message.Data)
Debug.Log("PlayFab data element: " + pair.Key + "," + pair.Value);
}
if (e.Message.Notification != null)
{
Debug.Log("PlayFab: Received a notification:");
lastMsg += "TITLE: " + e.Message.Notification.Title + "\n";
lastMsg += "BODY: " + e.Message.Notification.Body + "\n";
}
}
}
```
장치에서 Unity 프로젝트를 빌드하고 실행합니다. **Push notifications registered successfully** 텍스트가 포함된 푸시 알림을 수신하면 모든 것이 예상대로 작동한 것입니다.
`PlayFabSettings.TitleId = TITLE_ID`. 자신만의 `TitleId`를 설정해야 합니다. 우리의 타이틀은 우리의 Firebase 키와 설정으로 등록되어 있으며 *귀하의 것이 아니므로*, 이 `TitleId`를 업데이트하지 않으면 이 예제는 작동하지 않습니다. 이 줄의 주석을 해제하고 `TITLE_ID`를 자신의 `titleId`로 대체하거나, 이전 섹션에서 언급한 선택적 Editor Extensions 플러그인에서 타이틀을 선택할 수 있습니다.
### Android 문제 해결
* Firebase Console에서 테스트 푸시 알림을 보낼 수 있는지 확인합니다.
* 그렇지 않으면 Firebase 플러그인이 올바르게 설정되지 않은 것이며, 이유를 파악하려면 Firebase 문서를 검토하거나 Firebase 지원팀에 문의해야 합니다.
* FCM 클라이언트 pushToken이 제대로 설정되었는지 확인합니다.
* 예제의 `OnTokenReceived` 함수가 호출되어야 하며, 유효한 토큰이 있어야 합니다.
* 호출되지 *않으면* Firebase 플러그인이 올바르게 설정되지 *않은* 것이므로, 이유를 파악하려면 Firebase 문서를 검토하거나 Firebase 지원팀에 문의해야 합니다.
* `titleId`가 소유한 타이틀로 설정되어 있고, Firebase 프로젝트의 서버 API 키로 등록되어 있는지 확인합니다.
### 고급 기능
**server.[SendPushNotification](xref:titleid.playfabapi.com.server.accountmanagement.sendpushnotification)** 에서 **[request.Package](xref:titleid.playfabapi.com.server.accountmanagement.sendpushnotification#pushnotificationpackage).CustomData** 를 사용하여 임의의 데이터를 장치에 전달할 수 있습니다. 위 예제에서는 다음 주석이 있는 섹션으로 전달됩니다.
```csharp theme={null}
Debug.Log("PlayFab: Received a message with data:");
```
원하는 방식으로 해당 데이터를 활용하도록 클라이언트 수신기를 사용자 지정할 수 있습니다. **CustomData**는 플레이어에게 표시되지 않으므로, 클라이언트에 사용자 지정 게임 정보를 전달하거나 **FCM** 플러그인을 사용하여 다른 향후 알림을 로컬로 예약하는 데 사용할 수 있습니다.
또한 **[request.Package](xref:titleid.playfabapi.com.server.accountmanagement.sendpushnotification#pushnotificationpackage).CustomData** 또는 요청 **[AdvancedPlatformDelivery](xref:titleid.playfabapi.com.server.accountmanagement.sendpushnotification#advancedpushplatformmsg)** 를 사용하여 여러 타사 플러그인에 전달할 수 있습니다.
타사 플러그인 전달은 지원되거나 보장되지는 않지만, 고급 사용자에게 제공됩니다.
## 추가 지원
도움말, 예제 버그 및 관련 질문은 [포럼](https://community.playfab.com/index.html)에 메시지를 남겨 주세요.
현재 이 문서에 설명된 표준 흐름에 대해서만 서비스를 지원합니다. 다른 일반적인 푸시 서비스 또는 플러그인에 대한 추가 기능을 팀에서 찾고 있다면 알려주세요! 개발자 커뮤니티로부터 피드백을 받는 것을 즐깁니다.
Amazon SNS를 통한 푸시 페이로드에 대한 문서:
* [Amazon SNS 메시지 및 JSON 형식](https://docs.aws.amazon.com/sns/latest/dg/json-formats.html)
## Related topics
- [푸시 알림 빠른 시작](/ko/services/playfab/live-service-management/game-configuration/title-communications/push-notifications/quickstart.md)
- [iOS용 푸시 알림](/ko/services/playfab/live-service-management/game-configuration/title-communications/push-notifications/push-notifications-for-ios.md)
- [Android Studio 및 푸시 알림 시작하기](/ko/services/playfab/live-service-management/game-configuration/title-communications/push-notifications/getting-started-android-studio-push-notifications.md)
- [푸시 알림](/ko/services/playfab/live-service-management/game-configuration/title-communications/push-notifications/index.md)
- [푸시 알림 템플릿](/ko/services/playfab/live-service-management/game-configuration/title-communications/push-notifications/push-notification-templates.md)