> ## Documentation Index
> Fetch the complete documentation index at: https://devdocs.xbox.com/llms.txt
> Use this file to discover all available pages before exploring further.
# Android Studio 및 푸시 알림 시작하기
> Android Studio, Google Play Services, Firebase Cloud Messaging, PlayFab을 연결하여 Android 클라이언트 애플리케이션에 푸시 알림을 보냅니다.
## 개요
이 자습서는 Android PlayFab을 푸시 알림과 통합하여 시작할 수 있도록 도와주기 위해 설계되었습니다.
푸시 알림에는 여러 시스템에서의 구성이 필요합니다. 시작하기 전에 인프라가 어떻게 작동하는지 살펴보겠습니다. 이 프로세스에는 4개의 엔티티가 참여합니다.
1. **Google Play Services**
2. **Firebase Cloud Messaging Services**(**FCM**, 기존 **Google Cloud Messaging** 위에 구축됨.)
3. **PlayFab Services**
4. **Client Applications**
### 1. Google Play Services
Google Play Services는 패키지 이름을 사용하여 플레이 마켓에서 페이지를 식별합니다.
예를 들면 다음과 같습니다: **com.bob.games.matchthree**.
Google Play에 등록되면 패키지 이름은 고유한 애플리케이션 ID가 되며, 플레이 스토어를 통한 설치부터 사칭 방지까지 다양한 목적으로 사용됩니다.
### 2. Firebase Cloud Messaging (FCM)
Firebase Cloud Messaging 서비스는 푸시 알림을 전송하고, 라우팅하며, 전달하기 위한 클라우드 기반 시스템을 제공합니다.
또한 FCM 서버 키를 사용하여 다른 서비스(예: PlayFab)가 사용자를 대신해 푸시 알림을 보낼 수 있게 해줍니다.
### 3. PlayFab Services
그런 다음 PlayFab Services는 FCM 서버 키를 사용하여 클라이언트에 푸시 알림을 보냅니다.
### 4. Client Services
마지막으로, 클라이언트 애플리케이션은 알림을 수신하고 필요에 따라 처리합니다.
### 4개로 나뉜 구성
이에 따라 *4가지의 서로 다른 시스템*을 설정해야 합니다. 이를 위해 본 자습서는 각 부분의 구성을 다루는 4개의 챕터로 나뉘어 있습니다.
시스템을 구성하는 *순서*가 중요합니다.
## 사전 요구 사항
* Google 계정이 있어야 합니다.
* PlayFab 계정이 있어야 합니다.
* Android Asset Studio [Notification icon generator](https://romannurik.github.io/AndroidAssetStudio/icons-notification.html)로 생성된 알림 아이콘.
## 시나리오
이 자습서 섹션에서는 Foo PlayFab App이라는 애플리케이션을 조립합니다. 이는 다음 기능을 가진 Android 앱입니다.
* Android Device ID를 사용하여 PlayFab에 로그인합니다.
* PlayFab으로부터 푸시 알림을 수신합니다.
패키지 이름은 com.foo.playfab.app입니다.
이 자습서를 따라 하는 동안 자신의 패키지 이름과 타이틀을 사용해야 합니다.
### 챕터 1: Firebase 구성
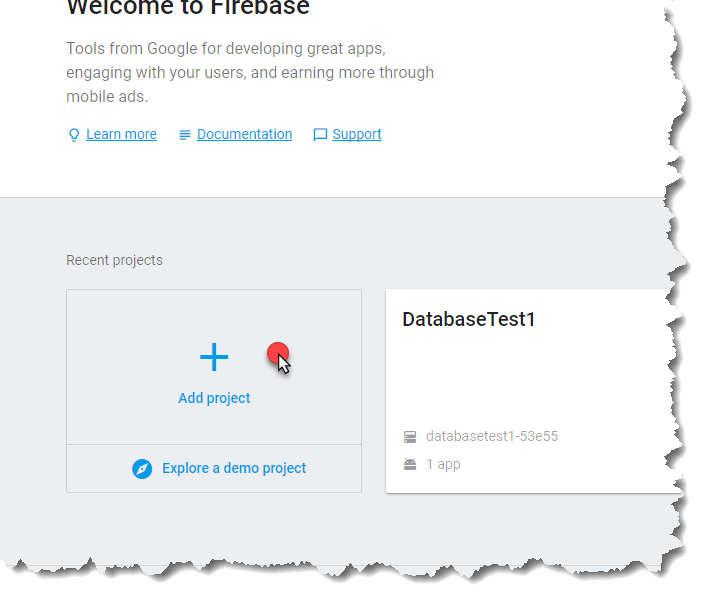
Firebase [공식 콘솔 페이지](https://console.firebase.google.com/)를 사용하여 Firebase 구성을 시작합니다. 새 프로젝트를 추가할 수 있는 페이지가 표시됩니다.
* 이를 위해, 다음 그림과 같이 **Add project** 영역을 선택합니다.
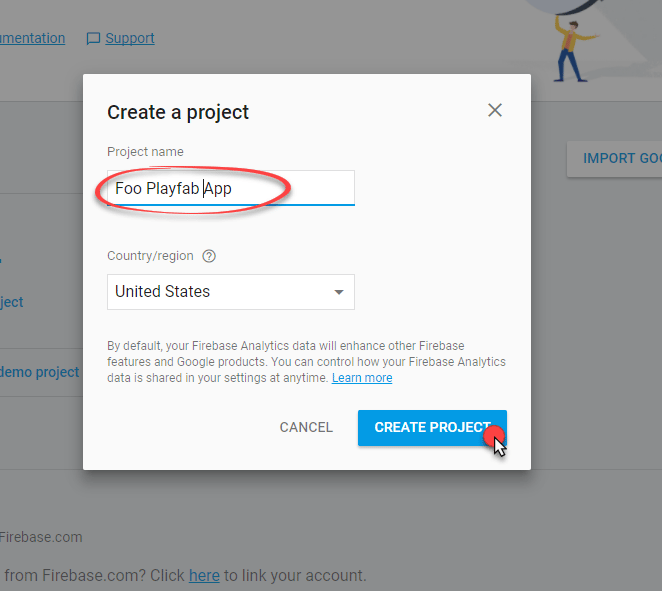
 * **Project Name**을 제공하라는 메시지가 표시됩니다(이 자습서에서는 **Foo PlayFab App**을 사용하지만, 자습서를 따라 하는 동안 *반드시* *본인만의* 이름을 사용해야 합니다).
* **Create Project** 버튼을 선택하여 다음 단계로 이동합니다.
* **Project Name**을 제공하라는 메시지가 표시됩니다(이 자습서에서는 **Foo PlayFab App**을 사용하지만, 자습서를 따라 하는 동안 *반드시* *본인만의* 이름을 사용해야 합니다).
* **Create Project** 버튼을 선택하여 다음 단계로 이동합니다.
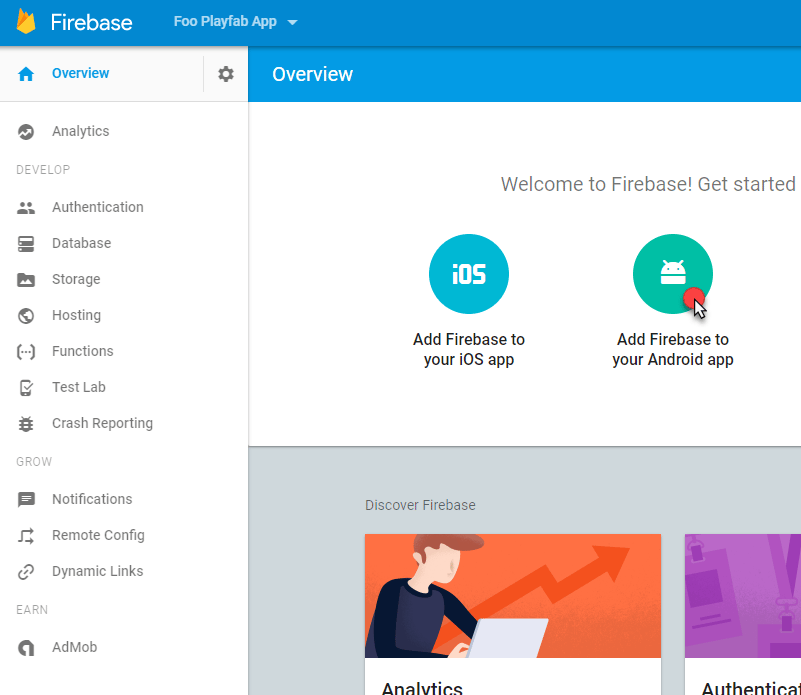
 **New Project Dashboard**로 리디렉션됩니다.
* 다음 그림과 같이 영역을 선택하여 프로젝트에 새 **Android Application**을 추가합니다.
**New Project Dashboard**로 리디렉션됩니다.
* 다음 그림과 같이 영역을 선택하여 프로젝트에 새 **Android Application**을 추가합니다.
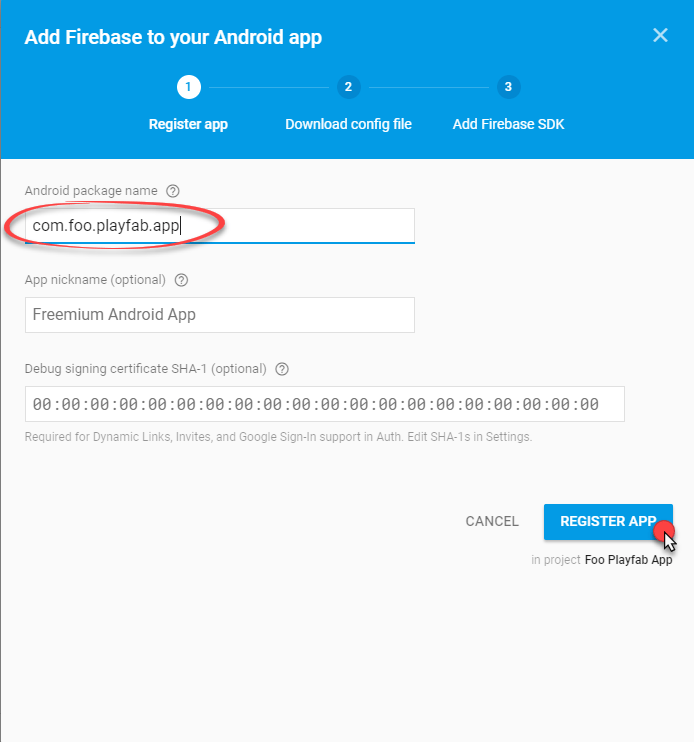
 새 **Application**을 추가하려면 3단계가 필요합니다.
1. 먼저, **Android Package Name**을 제공해야 합니다. 여기서는 **com.foo.playfab.app**을 사용하고 있지만, 이 자습서를 따라 하는 동안 반드시 *본인만의* **Package Name**을 사용해야 합니다.
2. **Register App** 버튼을 선택하여 다음 단계로 이동합니다.
새 **Application**을 추가하려면 3단계가 필요합니다.
1. 먼저, **Android Package Name**을 제공해야 합니다. 여기서는 **com.foo.playfab.app**을 사용하고 있지만, 이 자습서를 따라 하는 동안 반드시 *본인만의* **Package Name**을 사용해야 합니다.
2. **Register App** 버튼을 선택하여 다음 단계로 이동합니다.
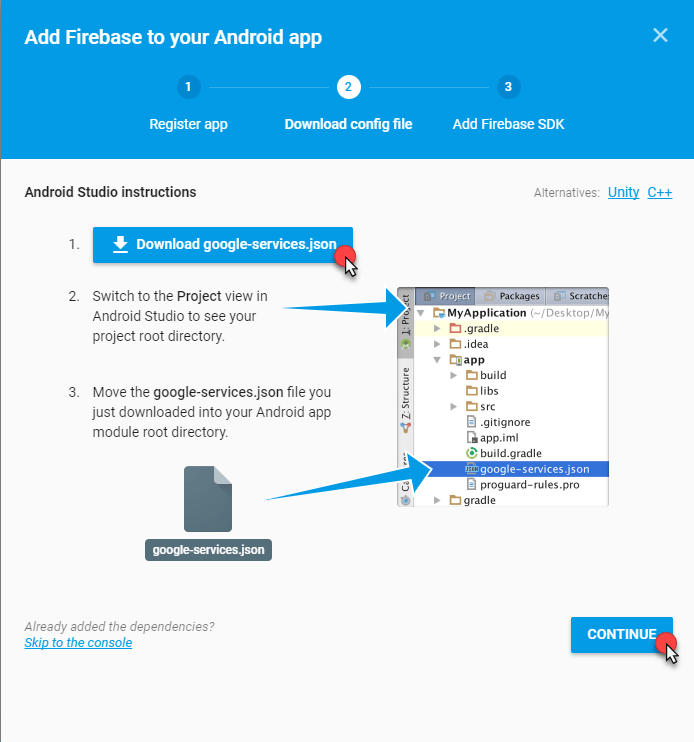
 2단계에서는 **google-services.json**이라는 설정 파일을 다운로드할 수 있습니다. 이 파일은 나중에 **App**에서 **Google** 서비스를 자동으로 구성하는 데 사용됩니다.
* 다운로드 후, **Continue** 버튼을 선택하여 다음 단계로 이동합니다.
2단계에서는 **google-services.json**이라는 설정 파일을 다운로드할 수 있습니다. 이 파일은 나중에 **App**에서 **Google** 서비스를 자동으로 구성하는 데 사용됩니다.
* 다운로드 후, **Continue** 버튼을 선택하여 다음 단계로 이동합니다.
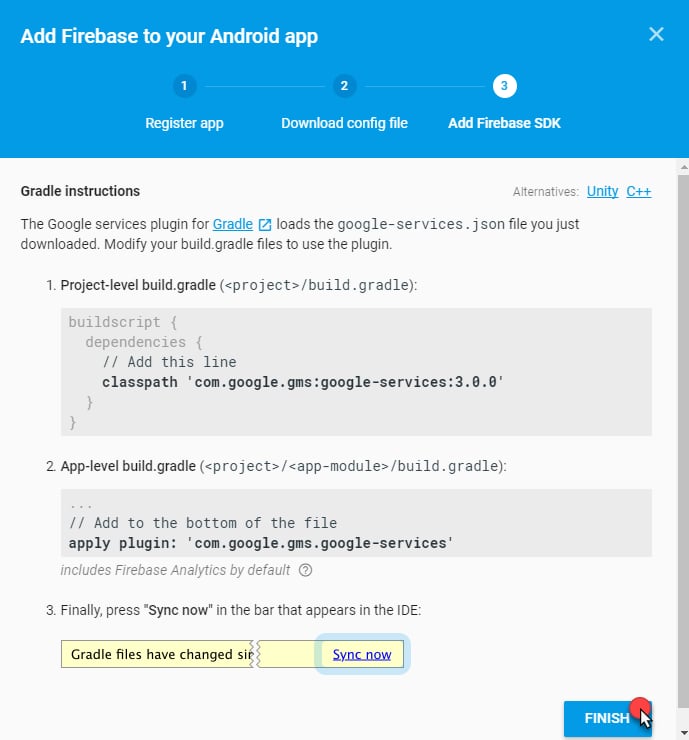
 3. 마지막 단계에서는 Firebase와 Google Play SDK를 연결하도록 빌드 프로세스를 설정하는 방법에 대한 정보를 제공합니다.
Android Studio에 내장된 자동화된 도구를 사용하여 이 설정을 자동으로 수행할 것이므로, 이 정보는 무시해도 됩니다.
* 진행하려면 **Finish** 버튼을 선택합니다.
3. 마지막 단계에서는 Firebase와 Google Play SDK를 연결하도록 빌드 프로세스를 설정하는 방법에 대한 정보를 제공합니다.
Android Studio에 내장된 자동화된 도구를 사용하여 이 설정을 자동으로 수행할 것이므로, 이 정보는 무시해도 됩니다.
* 진행하려면 **Finish** 버튼을 선택합니다.
 * **Application**이 추가되면 대시보드에 나타납니다.
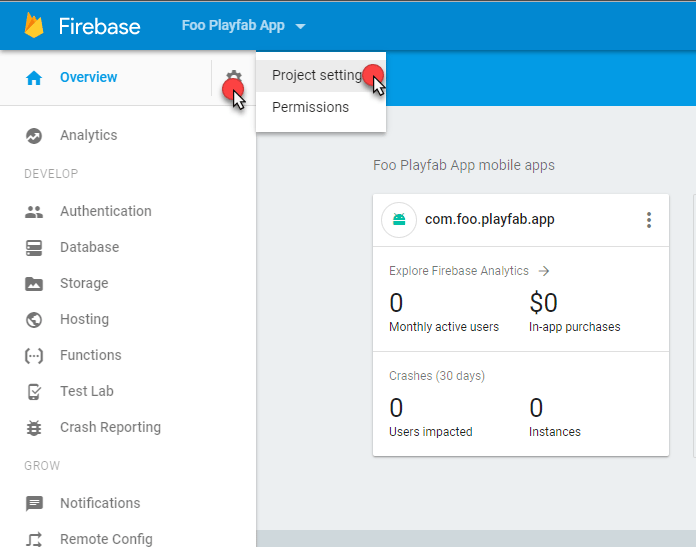
* 이 시점에서 구성이 완료되었으므로, FCM 서버 키를 추출해야 합니다(PlayFab 푸시 알림을 연결하는 데 사용됩니다).
* 다음 그림과 같이 **Project settings**로 이동합니다.
* **Application**이 추가되면 대시보드에 나타납니다.
* 이 시점에서 구성이 완료되었으므로, FCM 서버 키를 추출해야 합니다(PlayFab 푸시 알림을 연결하는 데 사용됩니다).
* 다음 그림과 같이 **Project settings**로 이동합니다.
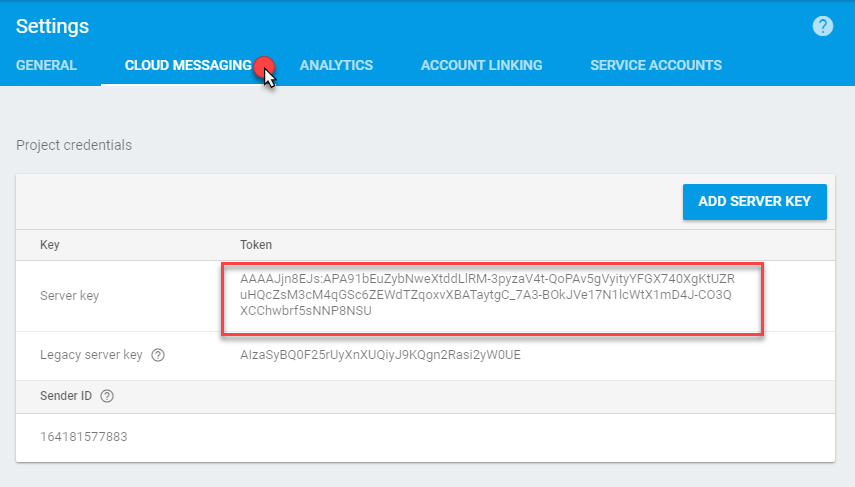
 * **Project settings**에서 **Cloud Messaging** 탭으로 이동합니다.
* **Server Key** 영역(아래 그림에서 빨간색 영역)을 찾습니다.
* 이 **Key**를 복사하여 안전하고 쉽게 접근할 수 있는 장소에 저장합니다.
* **Project settings**에서 **Cloud Messaging** 탭으로 이동합니다.
* **Server Key** 영역(아래 그림에서 빨간색 영역)을 찾습니다.
* 이 **Key**를 복사하여 안전하고 쉽게 접근할 수 있는 장소에 저장합니다.
 이 시점에서, 푸시 알림을 활성화하기 위해 Firebase에서 필요한 모든 작업을 완료했습니다.
### 챕터 2: Google Play 콘솔 구성
앱이 준비되면, 제품 Play Store 페이지를 유지 관리하기 위해 Google Console Project를 만들 가능성이 높습니다. GooglePlay 프로젝트를 만들고 Firebase 프로젝트에 연결하는 과정을 살펴봅시다.
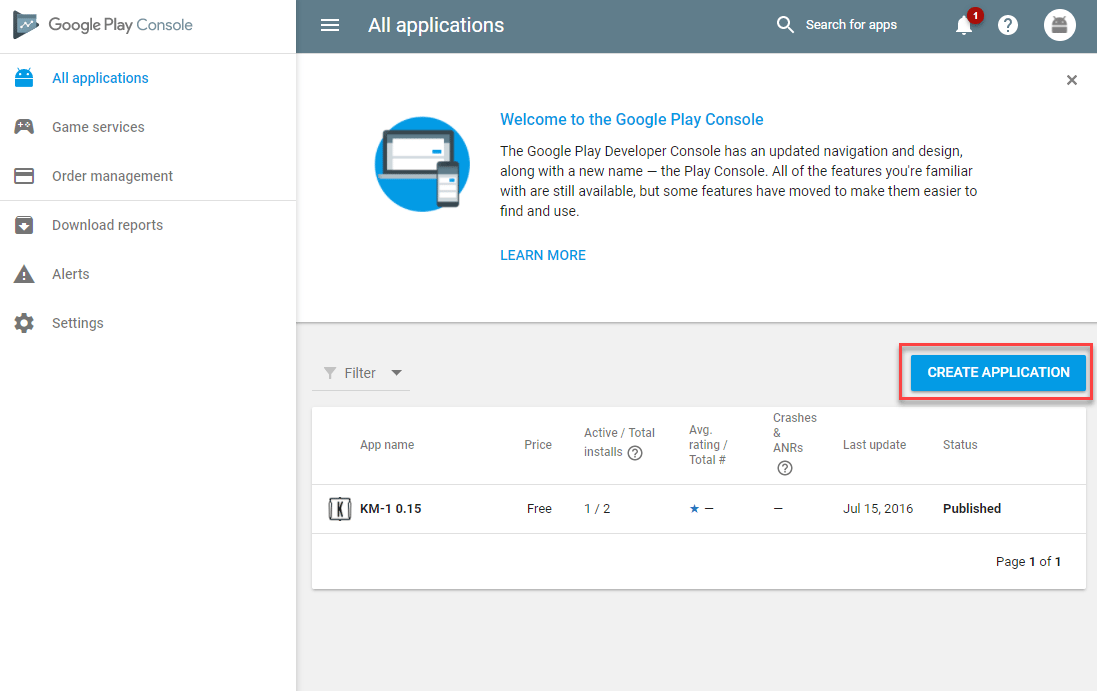
[Google Play Console 페이지](https://play.google.com/apps/publish)를 방문하고 다음 그림과 같이 새 프로젝트를 생성하는 것으로 시작합니다.
이 시점에서, 푸시 알림을 활성화하기 위해 Firebase에서 필요한 모든 작업을 완료했습니다.
### 챕터 2: Google Play 콘솔 구성
앱이 준비되면, 제품 Play Store 페이지를 유지 관리하기 위해 Google Console Project를 만들 가능성이 높습니다. GooglePlay 프로젝트를 만들고 Firebase 프로젝트에 연결하는 과정을 살펴봅시다.
[Google Play Console 페이지](https://play.google.com/apps/publish)를 방문하고 다음 그림과 같이 새 프로젝트를 생성하는 것으로 시작합니다.
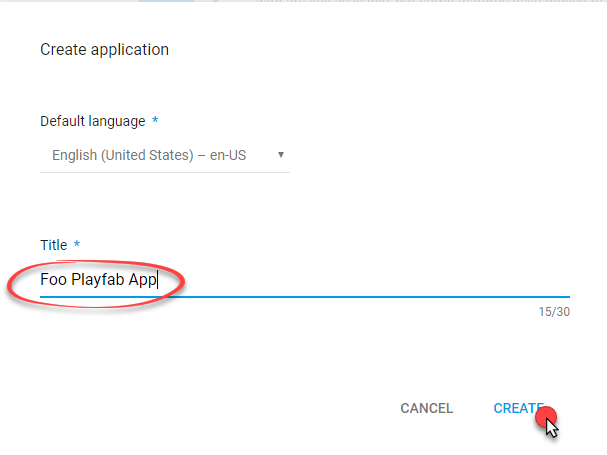
 * **Title**을 할당합니다.
이 예제에서는 **Foo PlayFab App**을 사용합니다. 이 자습서를 따라 하는 동안 *반드시* *본인만의* 타이틀과 패키지 이름을 사용해야 합니다.
* 계속하려면 **Create** 버튼을 선택합니다.
* **Title**을 할당합니다.
이 예제에서는 **Foo PlayFab App**을 사용합니다. 이 자습서를 따라 하는 동안 *반드시* *본인만의* 타이틀과 패키지 이름을 사용해야 합니다.
* 계속하려면 **Create** 버튼을 선택합니다.
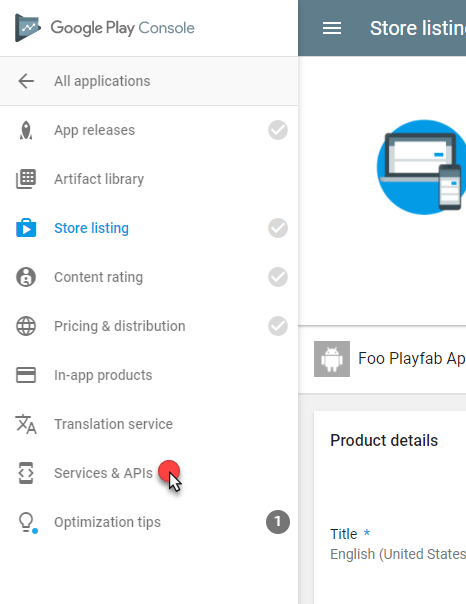
 * **Google Play Console Project** 페이지가 열립니다.
* 측면 메뉴에서 **Services & APIs**를 선택합니다.
* **Google Play Console Project** 페이지가 열립니다.
* 측면 메뉴에서 **Services & APIs**를 선택합니다.
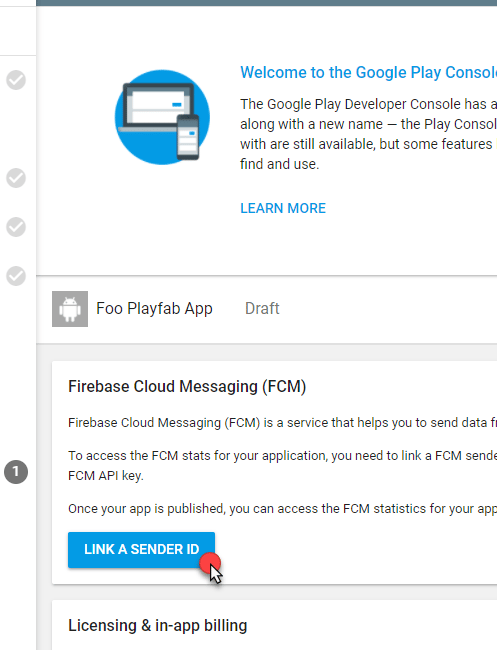
 * **Services configuration** 페이지가 열립니다.
* **Firebase Cloud Messaging** 패널을 찾습니다.
* 다음 그림과 같이 **Link a Sender ID** 버튼을 선택합니다.
* **Services configuration** 페이지가 열립니다.
* **Firebase Cloud Messaging** 패널을 찾습니다.
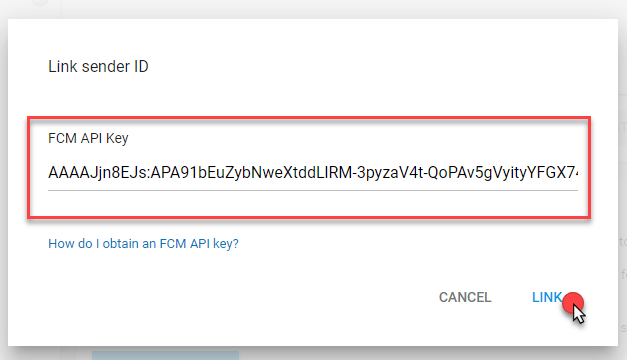
* 다음 그림과 같이 **Link a Sender ID** 버튼을 선택합니다.
 **Sender ID**를 연결하려면 다음을 수행합니다.
* 이전 챕터에서 Firebase 콘솔을 사용하는 동안 받은(그리고 저장한) FCM 서버 키를 사용합니다.
* 완료되면, 예제와 같이 **Link** 버튼을 선택합니다.
**Sender ID**를 연결하려면 다음을 수행합니다.
* 이전 챕터에서 Firebase 콘솔을 사용하는 동안 받은(그리고 저장한) FCM 서버 키를 사용합니다.
* 완료되면, 예제와 같이 **Link** 버튼을 선택합니다.
 * 아래 예제와 같이, **Google Play Console**에 표시된 **Sender ID**가 **Firebase Console**의 것과 일치하는지 잠시 확인합니다.
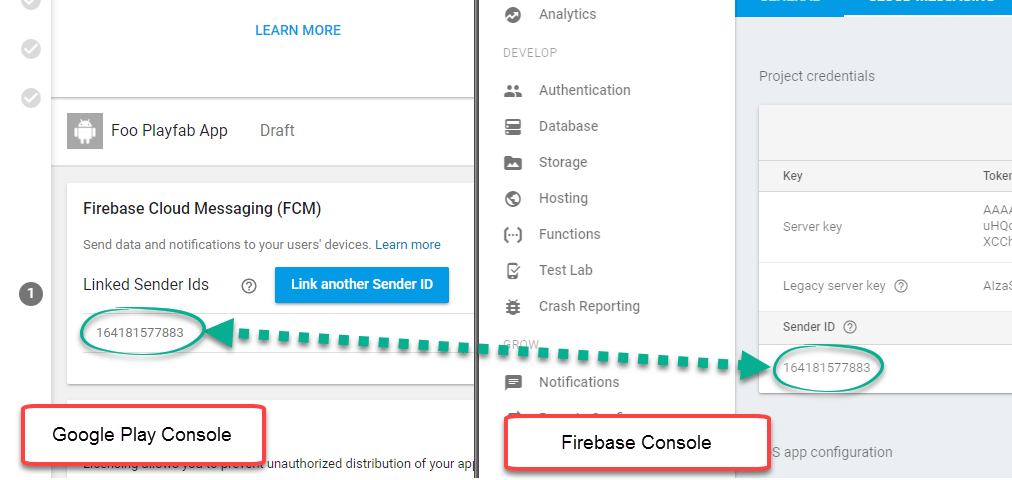 이 시점에서, **Google Play Console Project**가 **Firebase Project**에 성공적으로 연결되었습니다.
### 챕터 3: PlayFab 타이틀 구성
이 챕터의 목적은 PlayFab Services가 사용자를 대신하여 플레이어에게 푸시 알림을 보낼 수 있도록 이를 구성하는 방법을 보여주는 것입니다.
* 먼저, 타이틀의 Settings 메뉴에서 **Title settings**로 이동해야 합니다.
* **Push Notifications** 탭을 선택합니다.
* Android 옵션에서 **Settings** 아이콘을 선택합니다.
이 시점에서, **Google Play Console Project**가 **Firebase Project**에 성공적으로 연결되었습니다.
### 챕터 3: PlayFab 타이틀 구성
이 챕터의 목적은 PlayFab Services가 사용자를 대신하여 플레이어에게 푸시 알림을 보낼 수 있도록 이를 구성하는 방법을 보여주는 것입니다.
* 먼저, 타이틀의 Settings 메뉴에서 **Title settings**로 이동해야 합니다.
* **Push Notifications** 탭을 선택합니다.
* Android 옵션에서 **Settings** 아이콘을 선택합니다.
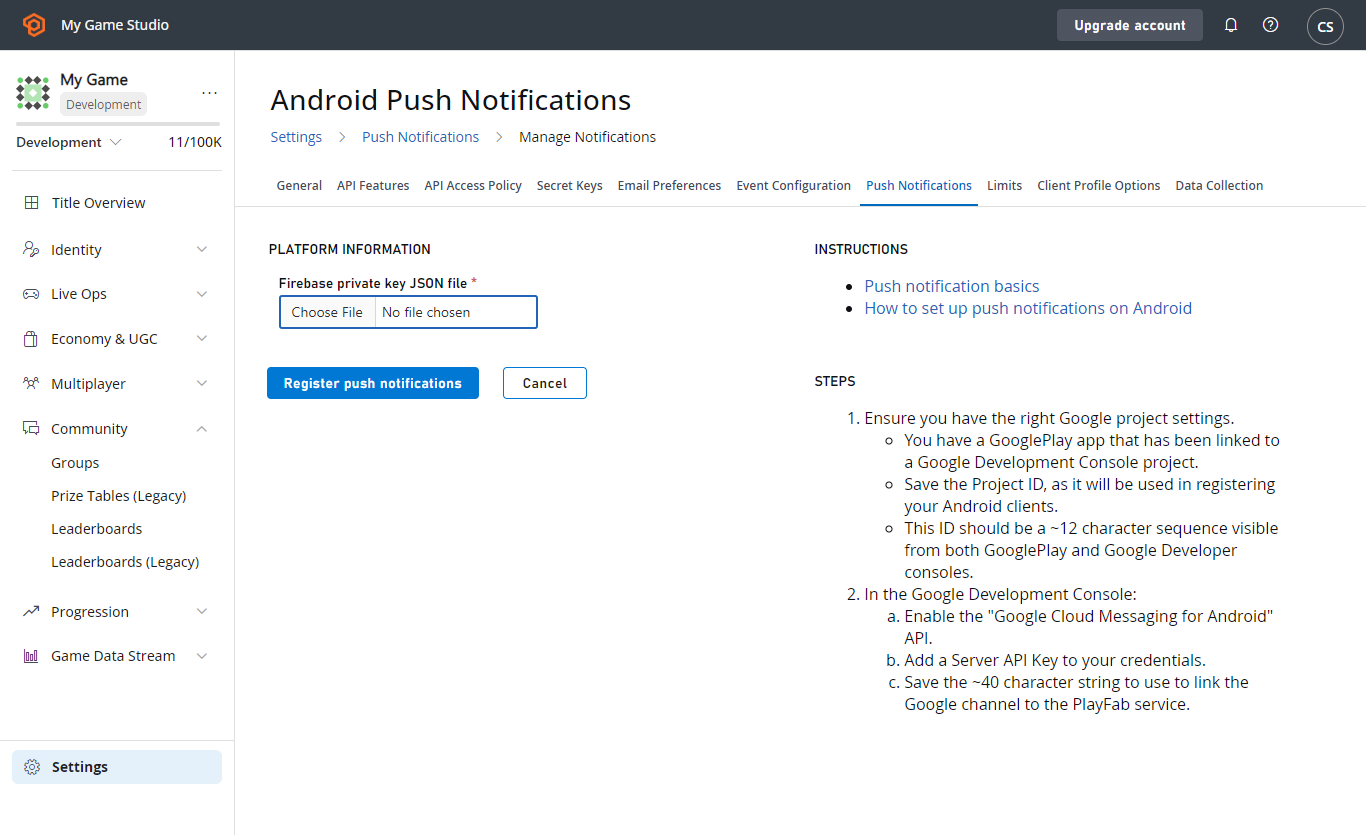 * **Google server API key**를 입력하라는 메시지가 표시됩니다.
* 아래 예제와 같이 Firebase 콘솔을 통해 받은 키를 복사합니다.
* **Google server API key**를 입력하라는 메시지가 표시됩니다.
* 아래 예제와 같이 Firebase 콘솔을 통해 받은 키를 복사합니다.
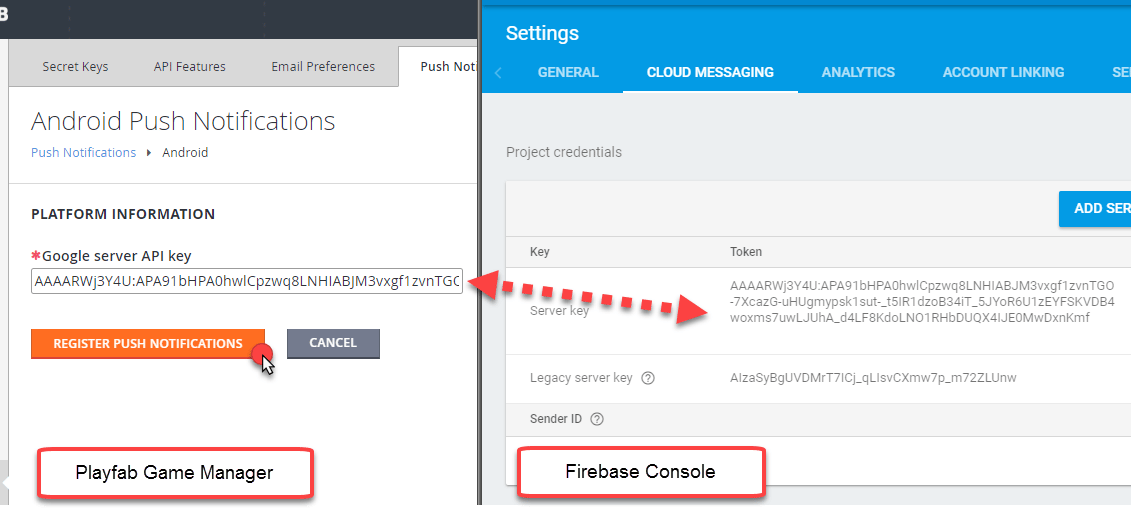 * 모든 것이 올바르면, **Push Notifications**가 **Active**로 표시된 페이지가 나타납니다.
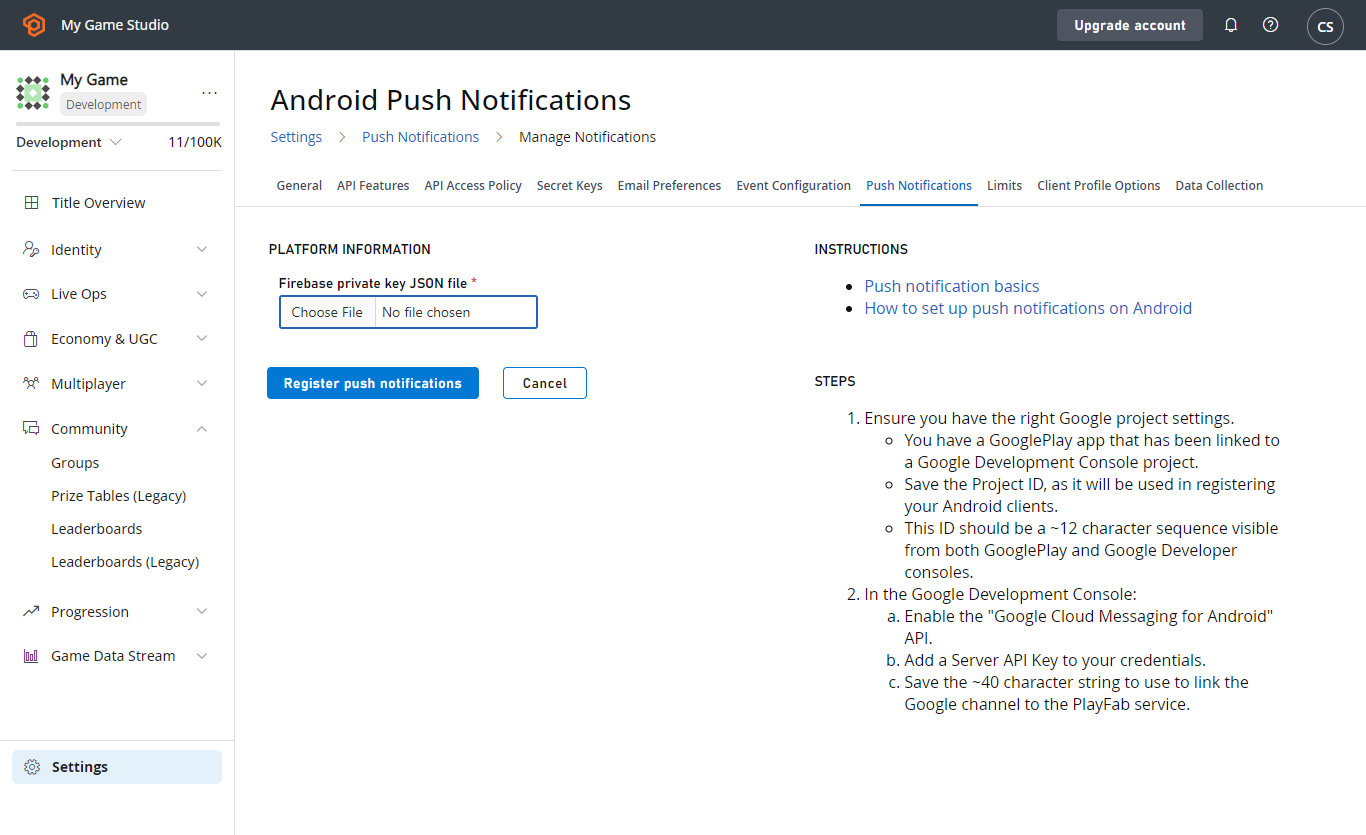 이로써 PlayFab 타이틀 구성이 완료됩니다.
### 챕터 4: Android Studio 프로젝트 구성
PlayFab JavaSDK를 활용하려면 PlayFab Client JavaSDK와 그 종속성인 Google GSON이 필요합니다.
* 여기에서 PlayFab client JavaSDK JAR 라이브러리를 다운로드합니다.
* `client-sdk-*.jar` 파일과, 필요한 경우 해당 Java Doc을 찾습니다.
* 최신 Google GSON을 다운로드합니다.
* `gson-*.jar`를 찾습니다.
* 앞서 언급한 .jar 파일을 준비해 둡니다.
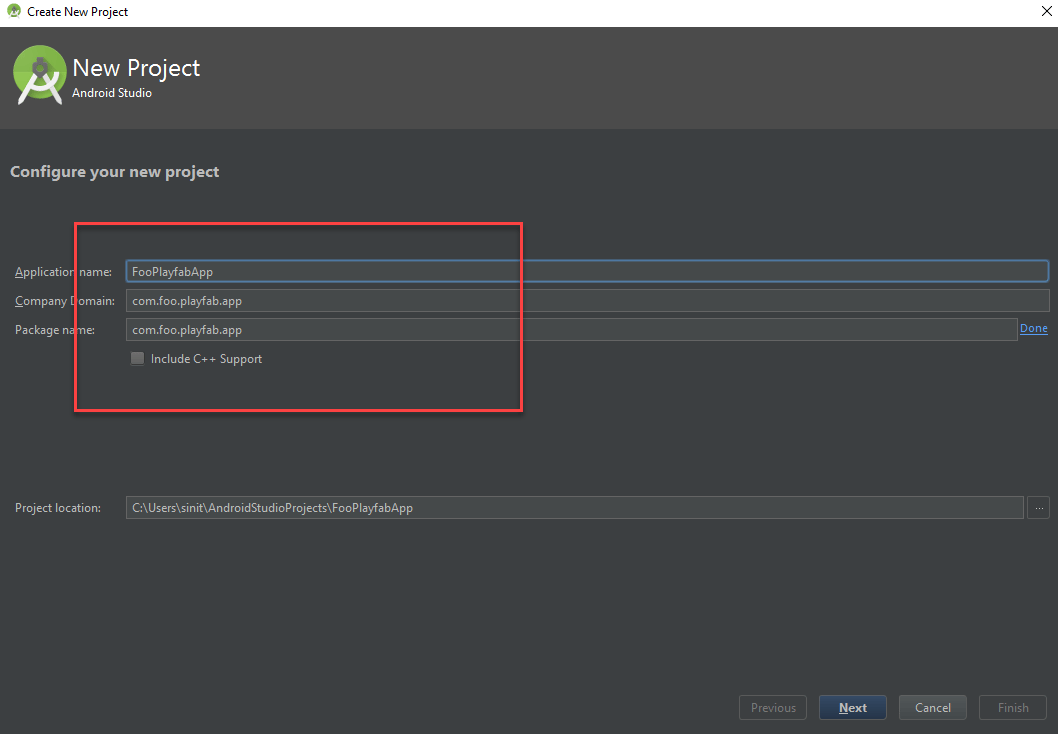
일반적인 Android Studio 프로젝트를 만드는 것으로 시작합니다.
* **Package name**이 이 자습서 전체에서 사용한 이름(예: Firebase에서)과 일치하는지 확인합니다.
*이* 예제의 경우에는 **com.foo.playfab.app**을 사용하지만, 이 자습서를 따라 하는 동안 반드시 본인의 패키지 이름과 타이틀을 사용해야 함을 기억하세요.
이로써 PlayFab 타이틀 구성이 완료됩니다.
### 챕터 4: Android Studio 프로젝트 구성
PlayFab JavaSDK를 활용하려면 PlayFab Client JavaSDK와 그 종속성인 Google GSON이 필요합니다.
* 여기에서 PlayFab client JavaSDK JAR 라이브러리를 다운로드합니다.
* `client-sdk-*.jar` 파일과, 필요한 경우 해당 Java Doc을 찾습니다.
* 최신 Google GSON을 다운로드합니다.
* `gson-*.jar`를 찾습니다.
* 앞서 언급한 .jar 파일을 준비해 둡니다.
일반적인 Android Studio 프로젝트를 만드는 것으로 시작합니다.
* **Package name**이 이 자습서 전체에서 사용한 이름(예: Firebase에서)과 일치하는지 확인합니다.
*이* 예제의 경우에는 **com.foo.playfab.app**을 사용하지만, 이 자습서를 따라 하는 동안 반드시 본인의 패키지 이름과 타이틀을 사용해야 함을 기억하세요.
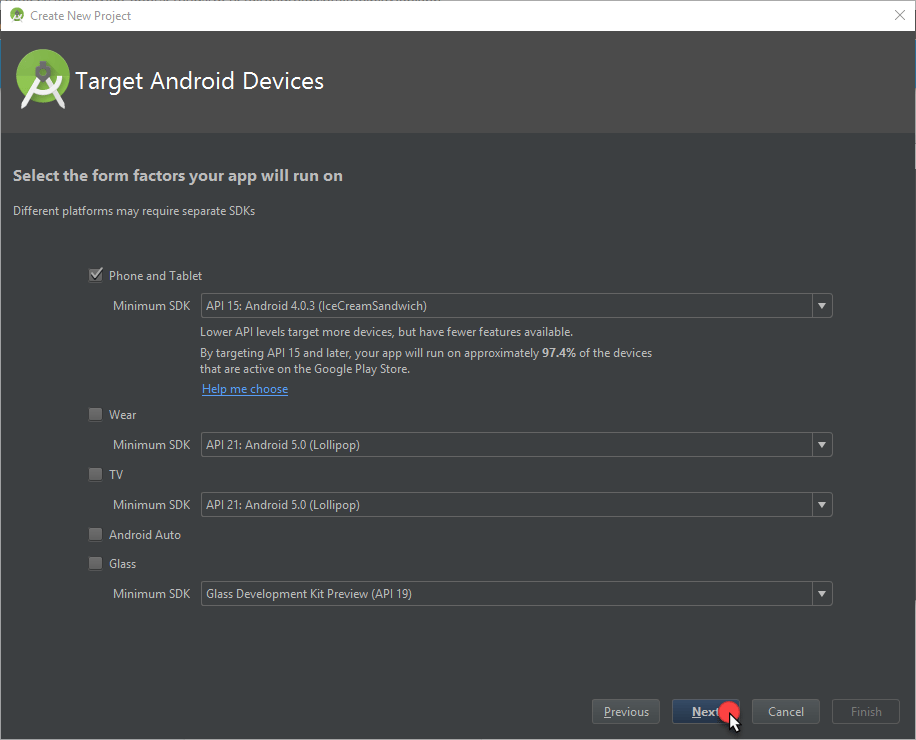
 * 원하는 **Minimum SDK**를 선택합니다.
* 그런 다음 **Next** 버튼을 선택합니다.
* 원하는 **Minimum SDK**를 선택합니다.
* 그런 다음 **Next** 버튼을 선택합니다.
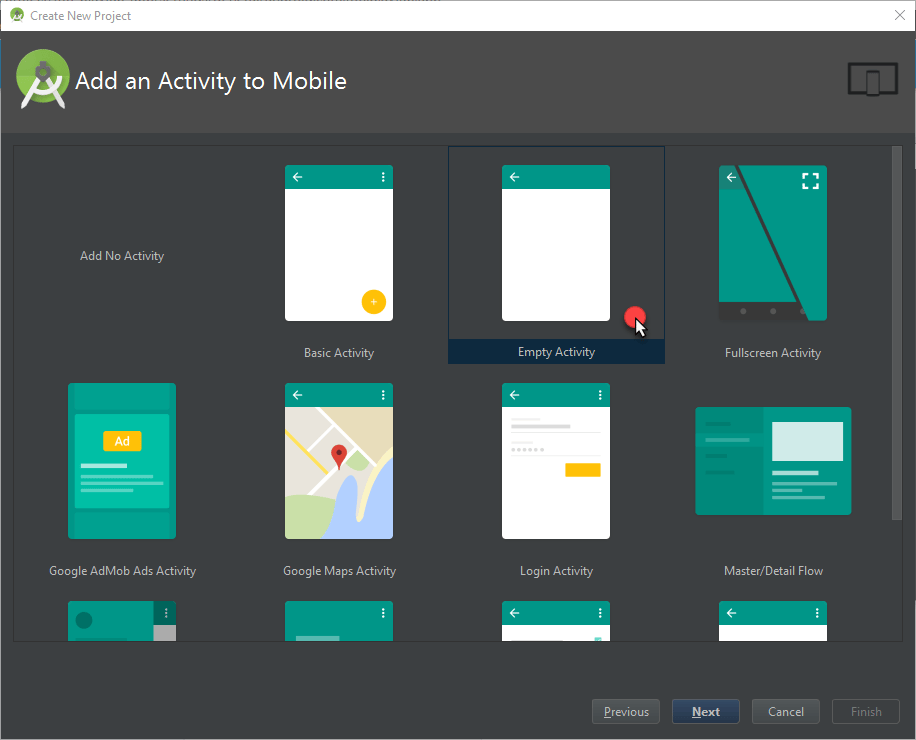
 이 자습서에서는 처음에 **Empty Activity** 템플릿을 사용하는 것을 권장합니다.
* 사용할 템플릿을 선택합니다.
* 그런 다음 **Next** 버튼을 선택합니다.
이 자습서에서는 처음에 **Empty Activity** 템플릿을 사용하는 것을 권장합니다.
* 사용할 템플릿을 선택합니다.
* 그런 다음 **Next** 버튼을 선택합니다.
 * 원하는 대로 템플릿을 구성합니다.
* **Finish** 버튼을 선택합니다.
* 원하는 대로 템플릿을 구성합니다.
* **Finish** 버튼을 선택합니다.
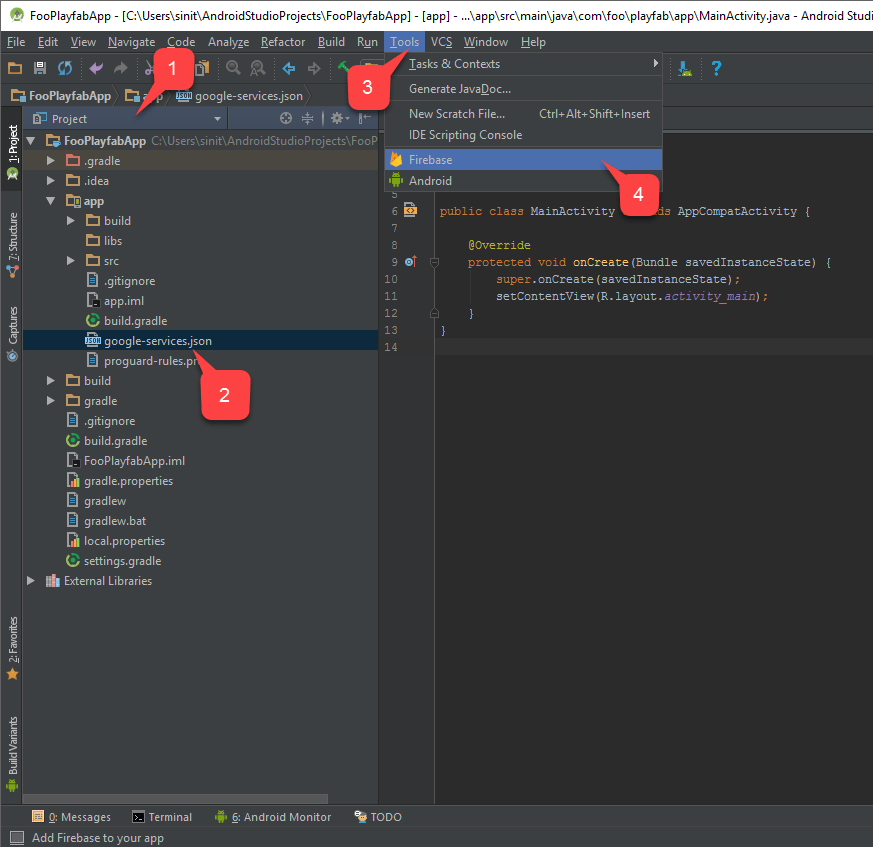
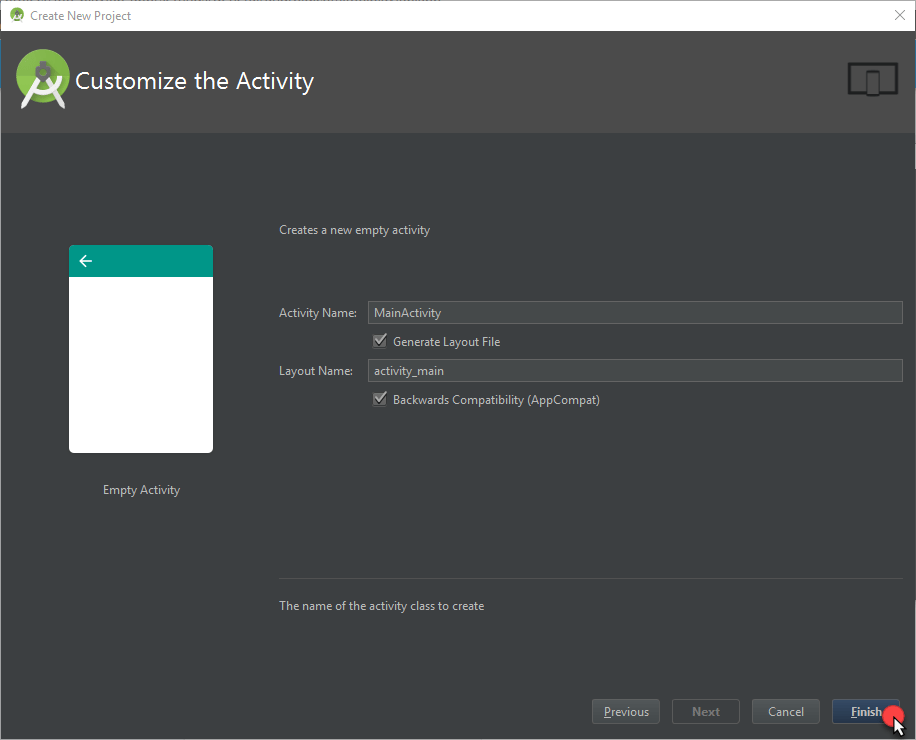 새로 생성한 프로젝트를 열면:
* **Project** 탭 **(1)** 으로 전환합니다.
이전 챕터에서 Firebase 콘솔에서 `google-services.json` 구성 파일을 다운로드했습니다. 다음 단계에서 이를 사용합니다.
* 이 파일이 **App** 폴더 **(2)** 아래에 배치되었는지 확인합니다.
* 그런 다음, **Tools (3)** 로 이동합니다.
* 아래 예제와 같이 **Firebase (4)** 를 선택합니다.
새로 생성한 프로젝트를 열면:
* **Project** 탭 **(1)** 으로 전환합니다.
이전 챕터에서 Firebase 콘솔에서 `google-services.json` 구성 파일을 다운로드했습니다. 다음 단계에서 이를 사용합니다.
* 이 파일이 **App** 폴더 **(2)** 아래에 배치되었는지 확인합니다.
* 그런 다음, **Tools (3)** 로 이동합니다.
* 아래 예제와 같이 **Firebase (4)** 를 선택합니다.
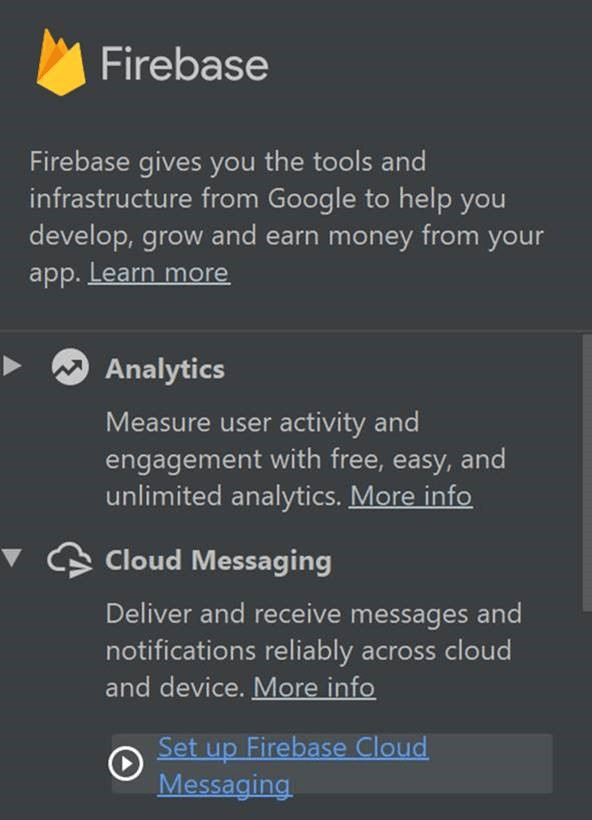
 **Firebase Assistant**가 창의 오른쪽에 열립니다.
* 아래와 같이 **Cloud Messaging** 폴더를 찾고 **Set up Firebase Cloud Messaging**을 선택합니다.
**Firebase Assistant**가 창의 오른쪽에 열립니다.
* 아래와 같이 **Cloud Messaging** 폴더를 찾고 **Set up Firebase Cloud Messaging**을 선택합니다.
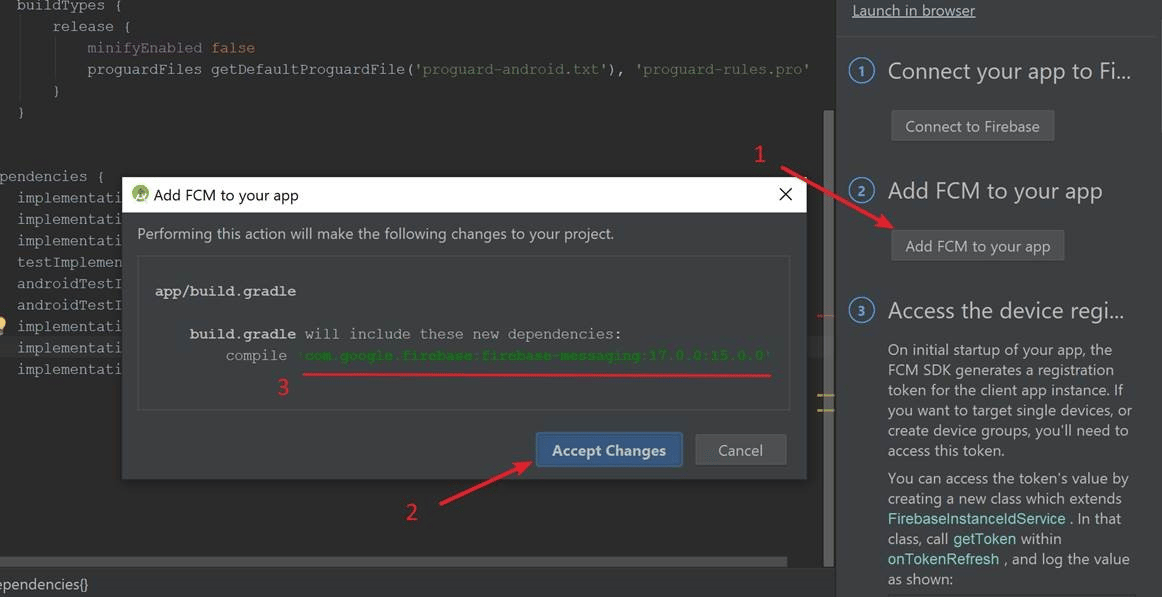
 * **Firebase Notifications Assistant**에서 다음 그림과 같이 **Add FCM to your app (1)** 버튼을 선택합니다.
* **Gradle**을 통해 새 종속성이 추가될 것임을 알리는 대화 상자가 열립니다.
* 변경 사항을 승인하려면 **Accept Changes (2)** 를 선택합니다.
안타깝게도, **Gradle** 동기화 프로세스(**3**)에 의해 자동으로 추가되는 종속성은 잘못되어 있으며 실패를 보고합니다!
* 종속성을 올바르게 설정하려면, 자동으로 추가된 문장을 다음으로 대체합니다.
`implementation 'com.google.firebase:firebase-core:16.0.3`\
`implementation 'com.google.firebase:firebase-messaging:17.0.0`
* **Firebase Notifications Assistant**에서 다음 그림과 같이 **Add FCM to your app (1)** 버튼을 선택합니다.
* **Gradle**을 통해 새 종속성이 추가될 것임을 알리는 대화 상자가 열립니다.
* 변경 사항을 승인하려면 **Accept Changes (2)** 를 선택합니다.
안타깝게도, **Gradle** 동기화 프로세스(**3**)에 의해 자동으로 추가되는 종속성은 잘못되어 있으며 실패를 보고합니다!
* 종속성을 올바르게 설정하려면, 자동으로 추가된 문장을 다음으로 대체합니다.
`implementation 'com.google.firebase:firebase-core:16.0.3`\
`implementation 'com.google.firebase:firebase-messaging:17.0.0`
 해당 프로세스가 완료되면:
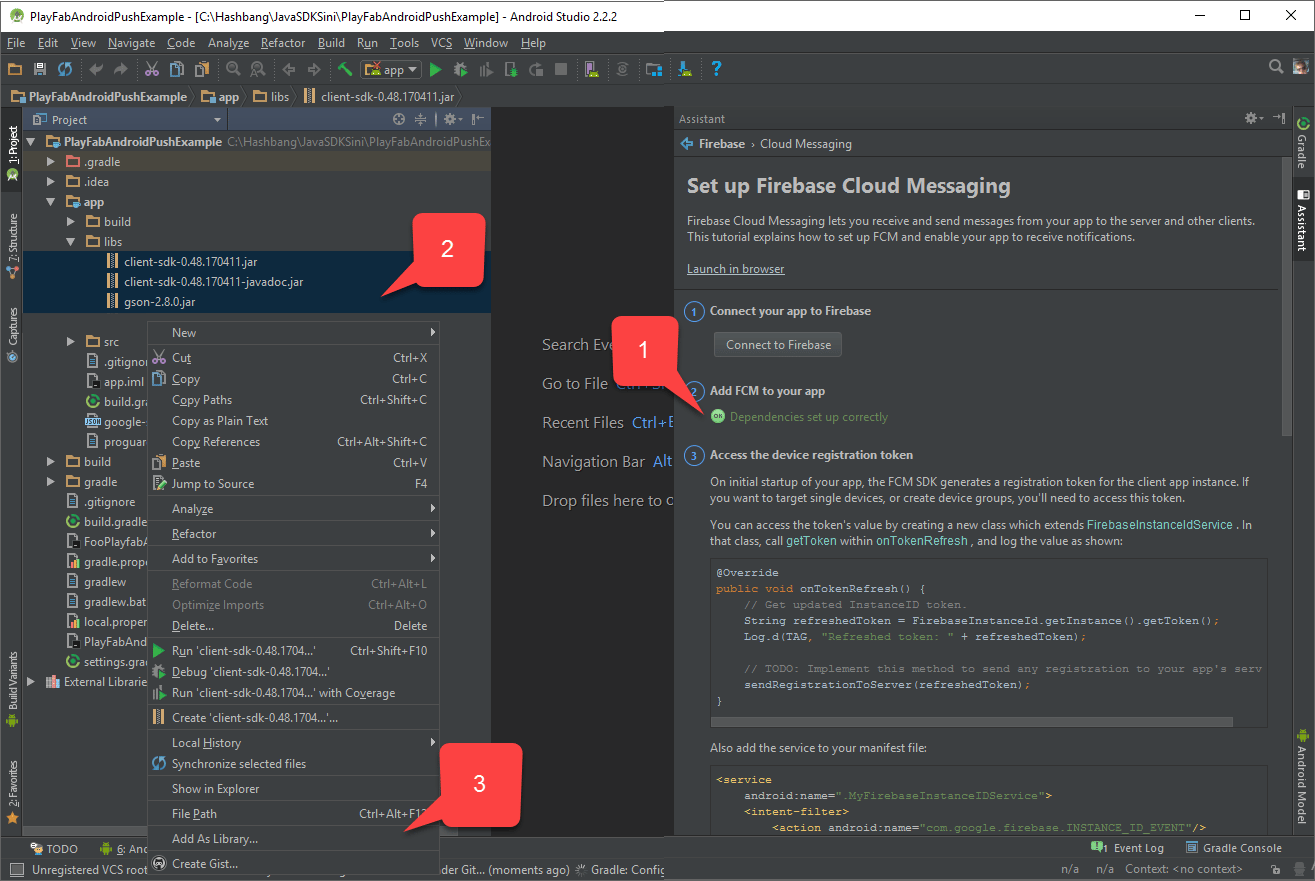
* **Firebase Notifications Assistant**가 이제 종속성이 올바르게 설정되었음을 나타내는지 확인합니다 **(1)**.
이 챕터의 시작 부분에서, 필요한 JAR 파일을 획득했습니다. 보통, 빌드 파일이 자동으로 이러한 파일을 가져옵니다.
* 이러한 JAR 파일이 **app/libs** 폴더 **(2)** 에 나열되어 있는지 확인하려면, 모든 파일을 선택하고 마우스 오른쪽 버튼으로 클릭합니다.
* 그런 다음 아래 예제와 같이 **Add as library... (3)** 를 선택합니다.
해당 프로세스가 완료되면:
* **Firebase Notifications Assistant**가 이제 종속성이 올바르게 설정되었음을 나타내는지 확인합니다 **(1)**.
이 챕터의 시작 부분에서, 필요한 JAR 파일을 획득했습니다. 보통, 빌드 파일이 자동으로 이러한 파일을 가져옵니다.
* 이러한 JAR 파일이 **app/libs** 폴더 **(2)** 에 나열되어 있는지 확인하려면, 모든 파일을 선택하고 마우스 오른쪽 버튼으로 클릭합니다.
* 그런 다음 아래 예제와 같이 **Add as library... (3)** 를 선택합니다.
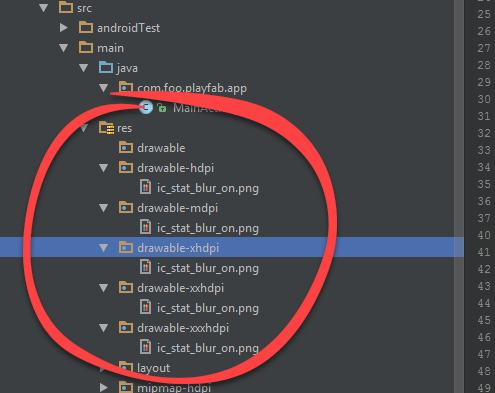
 * Android Asset Studio [Notification icon generator](https://romannurik.github.io/AndroidAssetStudio/icons-notification.html)를 사용하여 아이콘을 준비하고 **app/src/main/res** 안에 배치합니다.
* 아래 예제에서는 아이콘 이름을 **ic\_stat\_blur\_on**으로 지정했습니다.
* Android Asset Studio [Notification icon generator](https://romannurik.github.io/AndroidAssetStudio/icons-notification.html)를 사용하여 아이콘을 준비하고 **app/src/main/res** 안에 배치합니다.
* 아래 예제에서는 아이콘 이름을 **ic\_stat\_blur\_on**으로 지정했습니다.
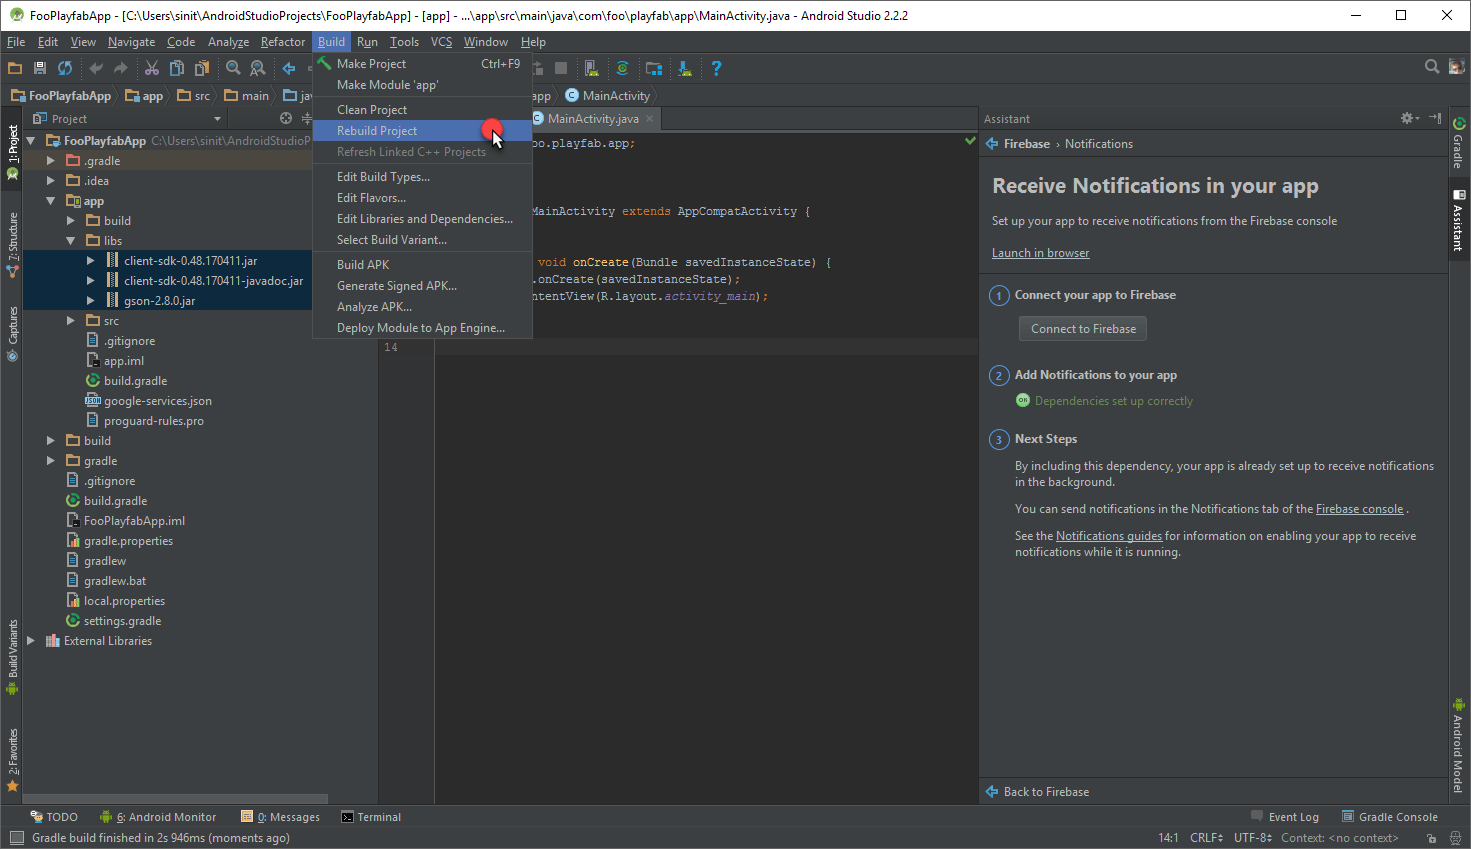
 * 마지막으로, **Rebuild Project**를 선택합니다.
 이제 알림 수신 및 처리를 위한 코드 구현을 시작할 수 있습니다. 우리는 다음 4개의 파일을 수정(필요한 경우 생성)합니다.
1. **app/src/main/AndroidManifest.xml**
2. **app/src/main/java/..packagePath../MainActivity.java**
3. **app/src/main/java/..packagePath../FooAppFirebaseInstanceIdService.java**
4. **app/src/main/java/..packagePath../FooAppFirebaseMessagingService.java**
현재 구현은 알림을 신속하게 테스트하기 위해 가능한 한 짧게 작성되었습니다. 고품질 모범 사례 및 더 복잡한 구현 예제는 [FCM Guides](https://firebase.google.com/docs/cloud-messaging/concept-options)를 참조하세요.
#### AndroidManifest.xml
다음 코드에서, 모든 `MY_PACKAGE_IDENTIFIER` 자리 표시자를 *본인의* 패키지 식별자로 바꿉니다.
```xml theme={null}
```
#### MainActivity.java
코드의 다음 자리 표시자는 시나리오에 맞게 바꿔야 합니다.
* `PLAYFAB_TITLE_ID`
* PlayFab Game Manager에서 받은 타이틀의 ID를 사용합니다.
* `PACKAGE_IDENTIFIER`
* 설정과 일치하는 Java 패키지 식별자를 사용합니다.
```java theme={null}
package PACKAGE_IDENTIFIER;
import android.os.AsyncTask;
import android.support.v7.app.AppCompatActivity;
import android.os.Bundle;
import android.util.Log;
import com.playfab.PlayFabClientAPI;
import com.playfab.PlayFabClientModels.*;
import com.playfab.PlayFabErrors;
import com.playfab.PlayFabSettings;
import java.util.List;
import java.util.Map;
public class MainActivity extends AppCompatActivity {
// Invoked when activity is started
@Override
protected void onCreate(Bundle savedInstanceState) {
super.onCreate(savedInstanceState);
setContentView(R.layout.activity_main);
// Set PlayFab title
PlayFabSettings.TitleId = "PLAYFAB_TITLE_ID";
// Start login operation
AsyncTask.execute(new Runnable() {
@Override
public void run() {
if(login()) FooAppFirebaseInstanceIdService.setAllowRegisterForPush(true); // Ready to register for push notifications
}
});
}
public boolean login(){
LoginWithAndroidDeviceIDRequest request = new LoginWithAndroidDeviceIDRequest();
request.CreateAccount = true;
// There are several approaches on getting unique android device id.
// https://stackoverflow.com/questions/2785485/is-there-a-unique-android-device-id
request.AndroidDeviceId = "qwerty";
PlayFabErrors.PlayFabResult response = PlayFabClientAPI.LoginWithAndroidDeviceID(request);
if(response.Error != null){
Log.d("Foo PlayFab App",CompileErrorsFromResult(response.Error));
return false;
}
return true;
}
// Utility method to compose an error message out of PlayFab result.
private static String CompileErrorsFromResult(PlayFabErrors.PlayFabError error) {
if (error == null)
return null;
String errorMessage = "";
if (error.errorMessage != null)
errorMessage += error.errorMessage;
if (error.errorDetails != null)
for (Map.Entry> pair : error.errorDetails.entrySet())
for (String msg : pair.getValue())
errorMessage += "\n" + pair.getKey() + ": " + msg;
return errorMessage;
}
}
```
#### FooAppFirebaseInstanceIdService.java
아래에 표시된 코드의 자리 표시자는 시나리오에 맞게 바꿔야 합니다.
* `PACKAGE_IDENTIFIER`
* 설정과 일치하는 Java 패키지 식별자입니다.
```java theme={null}
package PACKAGE_IDENTIFIER;
import android.text.TextUtils;
import android.util.Log;
import com.google.firebase.iid.FirebaseInstanceId;
import com.google.firebase.iid.FirebaseInstanceIdService;
import com.playfab.PlayFabClientAPI;
import com.playfab.PlayFabClientModels;
import com.playfab.PlayFabErrors;
import java.util.List;
import java.util.Map;
public class FooAppFirebaseInstanceIdService extends FirebaseInstanceIdService {
private static String _token;
private static boolean _allowRegistration;
// This is invoked from activity that performs authentication.
// Once login is complete this method is invoked.
// If we have a pending token, we use it to register for push notifications
public static void setAllowRegisterForPush(boolean isAllowed) {
_allowRegistration = isAllowed;
if (_allowRegistration && !TextUtils.isEmpty(_token)) {
registerForPush(_token);
}
}
// Invoked when firebase has fetched a token
// If we already have logged in, we use new token to register for push
@Override
public void onTokenRefresh() {
_token = FirebaseInstanceId.getInstance().getToken();
if (_allowRegistration && !TextUtils.isEmpty(_token)) {
registerForPush(_token);
}
}
private static void registerForPush(String token) {
PlayFabClientModels.AndroidDevicePushNotificationRegistrationRequest request = new PlayFabClientModels.AndroidDevicePushNotificationRegistrationRequest();
request.DeviceToken = token;
PlayFabErrors.PlayFabResult response = PlayFabClientAPI.AndroidDevicePushNotificationRegistration(request);
if (response.Error != null) {
Log.d("Foo PlayFab App", CompileErrorsFromResult(response.Error));
}
}
// Utility method to compose an error message out of PlayFab result.
private static String CompileErrorsFromResult(PlayFabErrors.PlayFabError error) {
if (error == null)
return null;
String errorMessage = "";
if (error.errorMessage != null)
errorMessage += error.errorMessage;
if (error.errorDetails != null)
for (Map.Entry> pair : error.errorDetails.entrySet())
for (String msg : pair.getValue())
errorMessage += "\n" + pair.getKey() + ": " + msg;
return errorMessage;
}
}
```
#### FooAppFirebaseMessagingService.java
아래에 표시된 코드의 자리 표시자는 시나리오에 맞게 바꿔야 합니다.
* `PACKAGE_IDENTIFIER`
* 설정과 일치하는 Java 패키지 식별자입니다.
```java theme={null}
package com.foo.playfab.app;
import android.util.Log;
import com.google.firebase.messaging.FirebaseMessagingService;
import com.google.firebase.messaging.RemoteMessage;
public class FooAppFirebaseMessagingService extends FirebaseMessagingService {
@Override
public void onMessageReceived(RemoteMessage message) {
// Intercept the message here
Log.d("Foo PlayFab App","Message received: "+message.getNotification().getBody());
}
}
```
## 테스트
이 시점에서 애플리케이션을 장치에 배포할 수 있어야 합니다.
* 애플리케이션을 시작하면, 자동으로 로그인하고 푸시 알림에 등록됩니다.
* 장치의 **Home** 버튼을 선택하여 애플리케이션을 최소화합니다. *이는 중요한데*, 시스템 트레이로 도착하는 알림을 테스트할 수 있게 해주기 때문입니다.
* 다음으로, PlayFab 타이틀 Game Manager 페이지로 이동하여 Dashboard를 사용하여 최신 **Push Registration**을 찾습니다.
* **Player ID (1)** 를 선택합니다.
이제 알림 수신 및 처리를 위한 코드 구현을 시작할 수 있습니다. 우리는 다음 4개의 파일을 수정(필요한 경우 생성)합니다.
1. **app/src/main/AndroidManifest.xml**
2. **app/src/main/java/..packagePath../MainActivity.java**
3. **app/src/main/java/..packagePath../FooAppFirebaseInstanceIdService.java**
4. **app/src/main/java/..packagePath../FooAppFirebaseMessagingService.java**
현재 구현은 알림을 신속하게 테스트하기 위해 가능한 한 짧게 작성되었습니다. 고품질 모범 사례 및 더 복잡한 구현 예제는 [FCM Guides](https://firebase.google.com/docs/cloud-messaging/concept-options)를 참조하세요.
#### AndroidManifest.xml
다음 코드에서, 모든 `MY_PACKAGE_IDENTIFIER` 자리 표시자를 *본인의* 패키지 식별자로 바꿉니다.
```xml theme={null}
```
#### MainActivity.java
코드의 다음 자리 표시자는 시나리오에 맞게 바꿔야 합니다.
* `PLAYFAB_TITLE_ID`
* PlayFab Game Manager에서 받은 타이틀의 ID를 사용합니다.
* `PACKAGE_IDENTIFIER`
* 설정과 일치하는 Java 패키지 식별자를 사용합니다.
```java theme={null}
package PACKAGE_IDENTIFIER;
import android.os.AsyncTask;
import android.support.v7.app.AppCompatActivity;
import android.os.Bundle;
import android.util.Log;
import com.playfab.PlayFabClientAPI;
import com.playfab.PlayFabClientModels.*;
import com.playfab.PlayFabErrors;
import com.playfab.PlayFabSettings;
import java.util.List;
import java.util.Map;
public class MainActivity extends AppCompatActivity {
// Invoked when activity is started
@Override
protected void onCreate(Bundle savedInstanceState) {
super.onCreate(savedInstanceState);
setContentView(R.layout.activity_main);
// Set PlayFab title
PlayFabSettings.TitleId = "PLAYFAB_TITLE_ID";
// Start login operation
AsyncTask.execute(new Runnable() {
@Override
public void run() {
if(login()) FooAppFirebaseInstanceIdService.setAllowRegisterForPush(true); // Ready to register for push notifications
}
});
}
public boolean login(){
LoginWithAndroidDeviceIDRequest request = new LoginWithAndroidDeviceIDRequest();
request.CreateAccount = true;
// There are several approaches on getting unique android device id.
// https://stackoverflow.com/questions/2785485/is-there-a-unique-android-device-id
request.AndroidDeviceId = "qwerty";
PlayFabErrors.PlayFabResult response = PlayFabClientAPI.LoginWithAndroidDeviceID(request);
if(response.Error != null){
Log.d("Foo PlayFab App",CompileErrorsFromResult(response.Error));
return false;
}
return true;
}
// Utility method to compose an error message out of PlayFab result.
private static String CompileErrorsFromResult(PlayFabErrors.PlayFabError error) {
if (error == null)
return null;
String errorMessage = "";
if (error.errorMessage != null)
errorMessage += error.errorMessage;
if (error.errorDetails != null)
for (Map.Entry> pair : error.errorDetails.entrySet())
for (String msg : pair.getValue())
errorMessage += "\n" + pair.getKey() + ": " + msg;
return errorMessage;
}
}
```
#### FooAppFirebaseInstanceIdService.java
아래에 표시된 코드의 자리 표시자는 시나리오에 맞게 바꿔야 합니다.
* `PACKAGE_IDENTIFIER`
* 설정과 일치하는 Java 패키지 식별자입니다.
```java theme={null}
package PACKAGE_IDENTIFIER;
import android.text.TextUtils;
import android.util.Log;
import com.google.firebase.iid.FirebaseInstanceId;
import com.google.firebase.iid.FirebaseInstanceIdService;
import com.playfab.PlayFabClientAPI;
import com.playfab.PlayFabClientModels;
import com.playfab.PlayFabErrors;
import java.util.List;
import java.util.Map;
public class FooAppFirebaseInstanceIdService extends FirebaseInstanceIdService {
private static String _token;
private static boolean _allowRegistration;
// This is invoked from activity that performs authentication.
// Once login is complete this method is invoked.
// If we have a pending token, we use it to register for push notifications
public static void setAllowRegisterForPush(boolean isAllowed) {
_allowRegistration = isAllowed;
if (_allowRegistration && !TextUtils.isEmpty(_token)) {
registerForPush(_token);
}
}
// Invoked when firebase has fetched a token
// If we already have logged in, we use new token to register for push
@Override
public void onTokenRefresh() {
_token = FirebaseInstanceId.getInstance().getToken();
if (_allowRegistration && !TextUtils.isEmpty(_token)) {
registerForPush(_token);
}
}
private static void registerForPush(String token) {
PlayFabClientModels.AndroidDevicePushNotificationRegistrationRequest request = new PlayFabClientModels.AndroidDevicePushNotificationRegistrationRequest();
request.DeviceToken = token;
PlayFabErrors.PlayFabResult response = PlayFabClientAPI.AndroidDevicePushNotificationRegistration(request);
if (response.Error != null) {
Log.d("Foo PlayFab App", CompileErrorsFromResult(response.Error));
}
}
// Utility method to compose an error message out of PlayFab result.
private static String CompileErrorsFromResult(PlayFabErrors.PlayFabError error) {
if (error == null)
return null;
String errorMessage = "";
if (error.errorMessage != null)
errorMessage += error.errorMessage;
if (error.errorDetails != null)
for (Map.Entry> pair : error.errorDetails.entrySet())
for (String msg : pair.getValue())
errorMessage += "\n" + pair.getKey() + ": " + msg;
return errorMessage;
}
}
```
#### FooAppFirebaseMessagingService.java
아래에 표시된 코드의 자리 표시자는 시나리오에 맞게 바꿔야 합니다.
* `PACKAGE_IDENTIFIER`
* 설정과 일치하는 Java 패키지 식별자입니다.
```java theme={null}
package com.foo.playfab.app;
import android.util.Log;
import com.google.firebase.messaging.FirebaseMessagingService;
import com.google.firebase.messaging.RemoteMessage;
public class FooAppFirebaseMessagingService extends FirebaseMessagingService {
@Override
public void onMessageReceived(RemoteMessage message) {
// Intercept the message here
Log.d("Foo PlayFab App","Message received: "+message.getNotification().getBody());
}
}
```
## 테스트
이 시점에서 애플리케이션을 장치에 배포할 수 있어야 합니다.
* 애플리케이션을 시작하면, 자동으로 로그인하고 푸시 알림에 등록됩니다.
* 장치의 **Home** 버튼을 선택하여 애플리케이션을 최소화합니다. *이는 중요한데*, 시스템 트레이로 도착하는 알림을 테스트할 수 있게 해주기 때문입니다.
* 다음으로, PlayFab 타이틀 Game Manager 페이지로 이동하여 Dashboard를 사용하여 최신 **Push Registration**을 찾습니다.
* **Player ID (1)** 를 선택합니다.
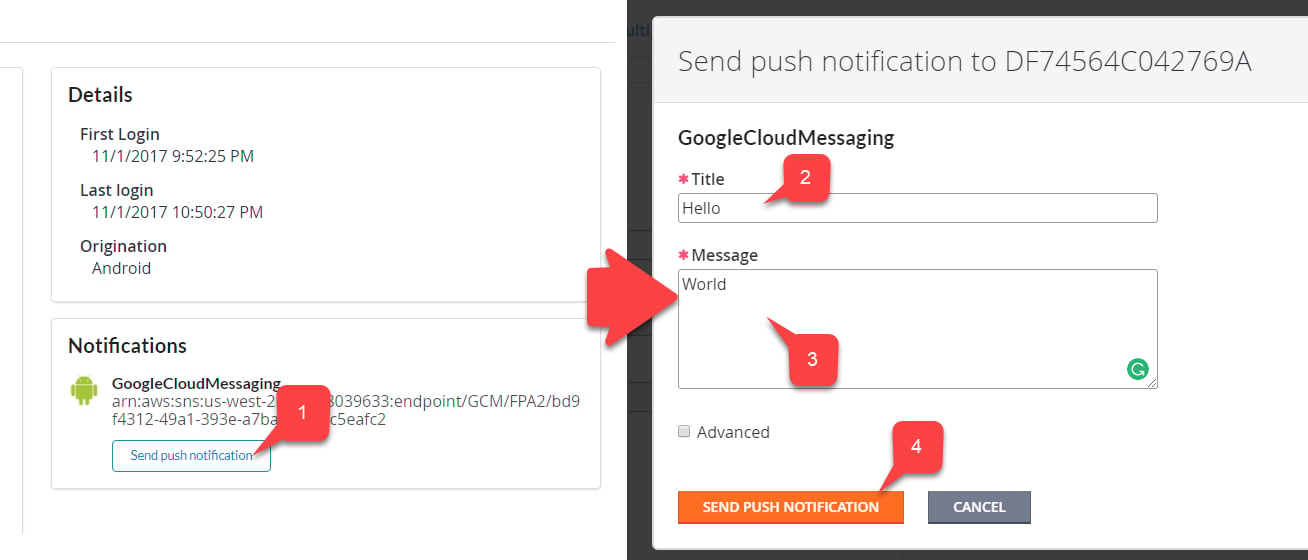
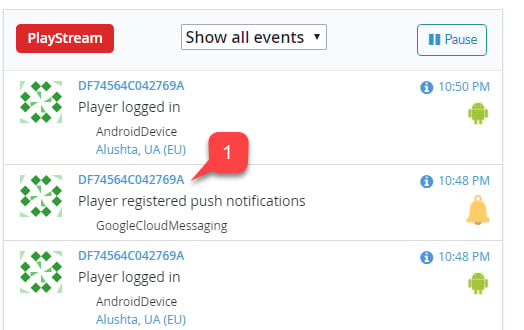 이렇게 하면 해당 플레이어에 대한 **Send Push Notification** 페이지가 열립니다.
* **Send Push Notification** 버튼 **(1)** 을 선택합니다.
* **Title (2)** 을 입력합니다.
* 메시지 본문 **(3)** 을 입력합니다.
* **Send Push Notification** 버튼 **(4)** 을 선택하여 변경 사항을 커밋합니다.
이렇게 하면 해당 플레이어에 대한 **Send Push Notification** 페이지가 열립니다.
* **Send Push Notification** 버튼 **(1)** 을 선택합니다.
* **Title (2)** 을 입력합니다.
* 메시지 본문 **(3)** 을 입력합니다.
* **Send Push Notification** 버튼 **(4)** 을 선택하여 변경 사항을 커밋합니다.
 * 메시지가 장치에 도착하는지 확인합니다.
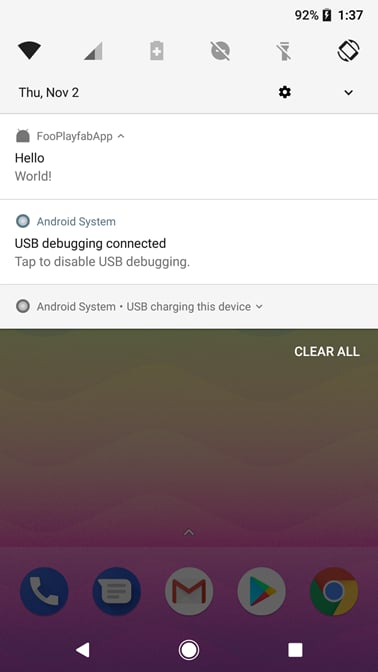 메시지가 도착하면, 메시지가 애플리케이션에 성공적으로 전달되고 있는 것입니다.
이 시점에서 통합에 성공했습니다. **FooAppFirebaseMessagingService**를 사용하여 애플리케이션이 실제로 실행 중일 때 들어오는 메시지를 처리할 수 있습니다.
## Related topics
- [Android용 푸시 알림](/ko/services/playfab/live-service-management/game-configuration/title-communications/push-notifications/push-notifications-for-android.md)
- [푸시 알림 빠른 시작](/ko/services/playfab/live-service-management/game-configuration/title-communications/push-notifications/quickstart.md)
- [Multiplayer Android 시작하기](/ko/services/playfab/multiplayer/lobby/lobby-matchmaking-sdks/android-specific-requirements.md)
- [푸시 알림](/ko/services/playfab/live-service-management/game-configuration/title-communications/push-notifications/index.md)
- [푸시 알림 템플릿](/ko/services/playfab/live-service-management/game-configuration/title-communications/push-notifications/push-notification-templates.md)
메시지가 도착하면, 메시지가 애플리케이션에 성공적으로 전달되고 있는 것입니다.
이 시점에서 통합에 성공했습니다. **FooAppFirebaseMessagingService**를 사용하여 애플리케이션이 실제로 실행 중일 때 들어오는 메시지를 처리할 수 있습니다.
## Related topics
- [Android용 푸시 알림](/ko/services/playfab/live-service-management/game-configuration/title-communications/push-notifications/push-notifications-for-android.md)
- [푸시 알림 빠른 시작](/ko/services/playfab/live-service-management/game-configuration/title-communications/push-notifications/quickstart.md)
- [Multiplayer Android 시작하기](/ko/services/playfab/multiplayer/lobby/lobby-matchmaking-sdks/android-specific-requirements.md)
- [푸시 알림](/ko/services/playfab/live-service-management/game-configuration/title-communications/push-notifications/index.md)
- [푸시 알림 템플릿](/ko/services/playfab/live-service-management/game-configuration/title-communications/push-notifications/push-notification-templates.md)