> ## Documentation Index
> Fetch the complete documentation index at: https://devdocs.xbox.com/llms.txt
> Use this file to discover all available pages before exploring further.

# Twitch와 HTML5를 사용하여 PlayFab 인증 설정하기

> HTML5와 JavaScript를 사용해 PlayFab 타이틀에 Twitch 로그인을 추가하는 단계별 튜토리얼로 Twitch 앱 등록과 OAuth 플레이어 인증을 다룹니다.

이 튜토리얼은 Twitch와 HTML5/JavaScript를 사용한 PlayFab 인증 프로세스를 안내하도록 설계되었습니다.

## 요구 사항

시작하기 전에 다음이 필요합니다.

* 테스트용 [Twitch 계정](https://www.twitch.tv/).
* 등록된 [PlayFab](https://developer.playfab.com/) 타이틀.
* [로그인 기본 사항 및 모범 사례](/services/playfab/identity/player-identity/login/login-basics-best-practices)에 대한 이해.
* 최소한 정적 HTML 파일을 제공할 유효한 도메인 이름을 가진 서버.

<Note>
  유효한 도메인 이름으로 서버를 설정하는 방법에 대한 정보는 [테스트용 HTTP 서버 실행하기](/services/playfab/identity/player-identity/platform-specific-authentication/running-an-http-server-for-testing) 튜토리얼을 참조하세요.
</Note>

## 서버 및 도메인

이 튜토리얼을 따르려면 웹 서버가 필요합니다. 등록된 원격 웹 서버가 아직 없다면 로컬 웹 서버를 실행하는 방법에 대한 정보를 [테스트용 HTTP 서버 실행하기](/services/playfab/identity/player-identity/platform-specific-authentication/running-an-http-server-for-testing) 튜토리얼에서 확인하세요.

<Note>
  이 튜토리얼 전반에 걸쳐 도메인이 `[http://localhost/](http://localhost/)`이라고 가정합니다.
</Note>

## Twitch 애플리케이션 등록

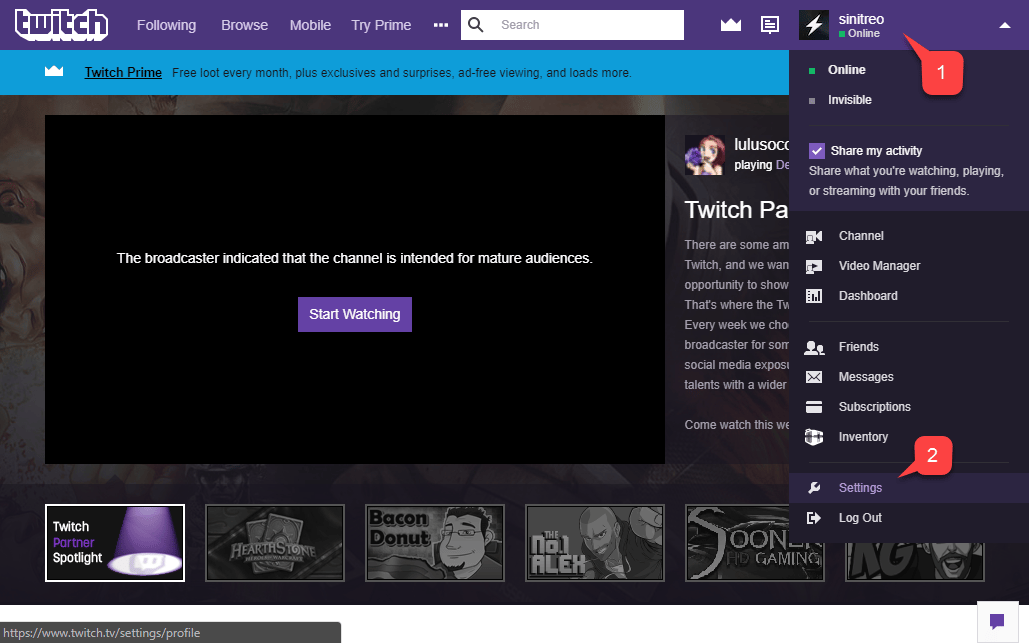
[Twitch 웹사이트](https://www.twitch.tv/)로 이동하여 로그인되어 있는지 확인하는 것부터 시작합니다.

1. **Account** 드롭다운으로 이동합니다.
2. 제공된 메뉴에서 **Settings**를 선택합니다.

<img src="https://mintcdn.com/microsoft-4404708b/mLCHf0iQv3VidfBe/images/playfab/identity/player-identity/platform-specific-authentication/tutorials/twitch-html5/twitch-account-settings.png?fit=max&auto=format&n=mLCHf0iQv3VidfBe&q=85&s=16b0349a480883b4517f021b9f43b337" alt="Twitch 계정 설정" width="1029" height="643" data-path="images/playfab/identity/player-identity/platform-specific-authentication/tutorials/twitch-html5/twitch-account-settings.png" />

**Settings** 페이지에서 아래와 같이 \*\*Connections (1)\*\*을 선택합니다.

<img src="https://mintcdn.com/microsoft-4404708b/3hg2JQs0m7qmDqay/images/playfab/identity/player-identity/platform-specific-authentication/tutorials/twitch-html5/twitch-settings-connections.png?fit=max&auto=format&n=3hg2JQs0m7qmDqay&q=85&s=4f6e6dc81498ffe1a7007c0ae060eab4" alt="Twitch 설정 연결" width="1016" height="198" data-path="images/playfab/identity/player-identity/platform-specific-authentication/tutorials/twitch-html5/twitch-settings-connections.png" />

페이지 하단에서 아래와 같이 **Register your application (1)** 버튼을 선택합니다.
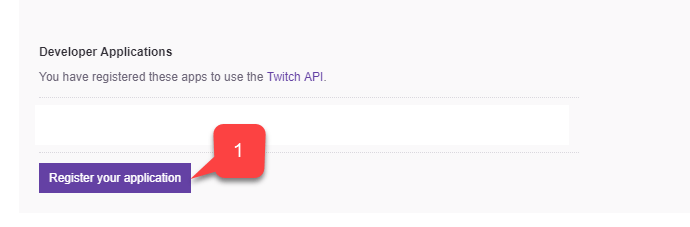
<img src="https://mintcdn.com/microsoft-4404708b/3hg2JQs0m7qmDqay/images/playfab/identity/player-identity/platform-specific-authentication/tutorials/twitch-html5/twitch-open-application-registration.png?fit=max&auto=format&n=3hg2JQs0m7qmDqay&q=85&s=d9b6a12d357e2364a422502ce3e943bd" alt="Twitch 애플리케이션 등록 페이지 열기" width="690" height="227" data-path="images/playfab/identity/player-identity/platform-specific-authentication/tutorials/twitch-html5/twitch-open-application-registration.png" />

새 앱을 구성할 수 있는 페이지가 열립니다.

1. **애플리케이션**의 **Name**을 입력합니다.
2. **Redirect URL**을 입력합니다.
3. **Application Category**를 입력합니다.
4. 그런 다음 **Twitch** 약관에 동의하고 **Register** 버튼을 선택합니다.
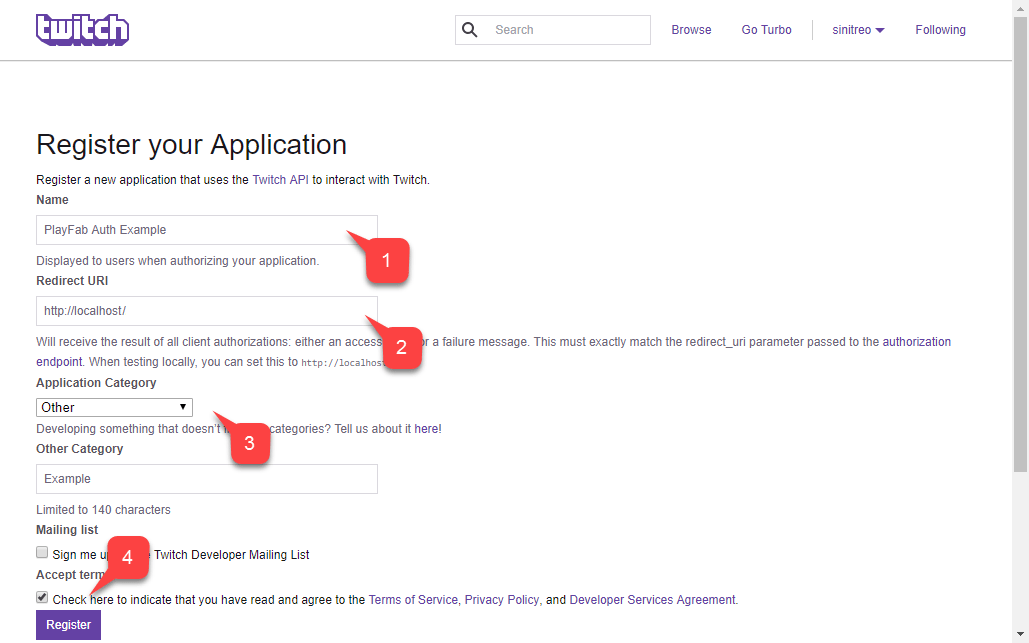
<img src="https://mintcdn.com/microsoft-4404708b/3hg2JQs0m7qmDqay/images/playfab/identity/player-identity/platform-specific-authentication/tutorials/twitch-html5/twitch-register-your-application.png?fit=max&auto=format&n=3hg2JQs0m7qmDqay&q=85&s=2f039af883eeeea4f5141f2b5f560cae" alt="Twitch 애플리케이션 등록" width="1029" height="643" data-path="images/playfab/identity/player-identity/platform-specific-authentication/tutorials/twitch-html5/twitch-register-your-application.png" />

<Info>
  로컬 웹 서버를 사용하여 테스트할 때 Twitch는 리디렉션 URL로 `**<http://localhost>**` 사용을 허용합니다. 선행 슬래시 \*\*/\*\*를 반드시 포함하세요. 선행 슬래시가 없으면 Twitch가 localhost URL을 인식하지 못합니다.
</Info>

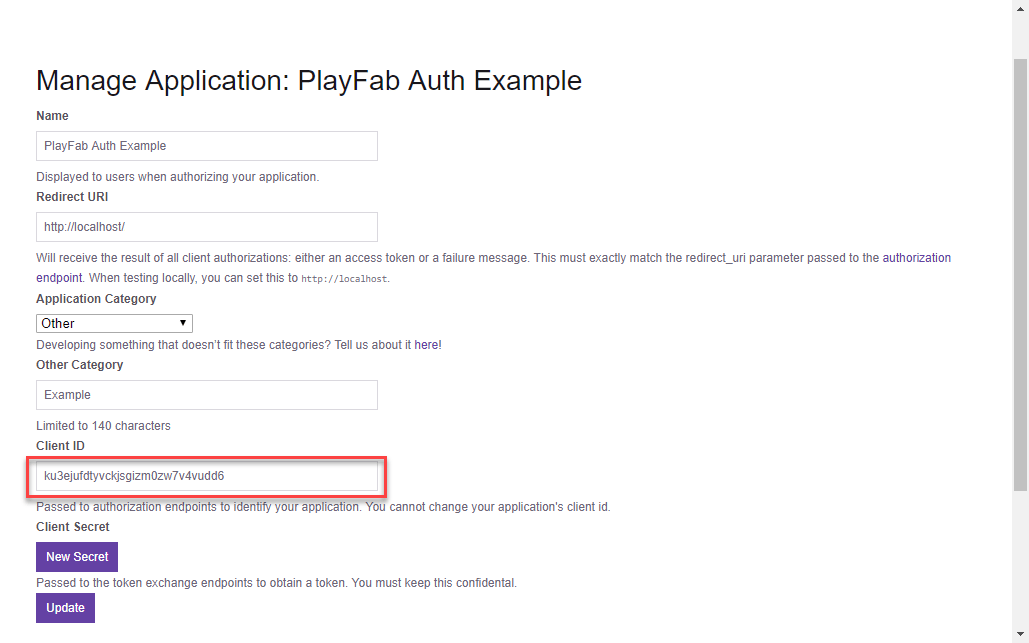
애플리케이션이 등록되면 페이지가 업데이트되고 애플리케이션의 Client ID가 표시됩니다.

<Note>
  이 Client ID는 나중에 PlayFab 타이틀을 구성하는 데 사용되므로 안전하고 쉽게 접근할 수 있는 곳에 보관하세요.
</Note>

<img src="https://mintcdn.com/microsoft-4404708b/mLCHf0iQv3VidfBe/images/playfab/identity/player-identity/platform-specific-authentication/tutorials/twitch-html5/twitch-manage-application.png?fit=max&auto=format&n=mLCHf0iQv3VidfBe&q=85&s=a540ab15379f0a9890594bb1f0b8b57a" alt="Twitch 애플리케이션 관리" width="1029" height="643" data-path="images/playfab/identity/player-identity/platform-specific-authentication/tutorials/twitch-html5/twitch-manage-application.png" />

## PlayFab 타이틀 구성

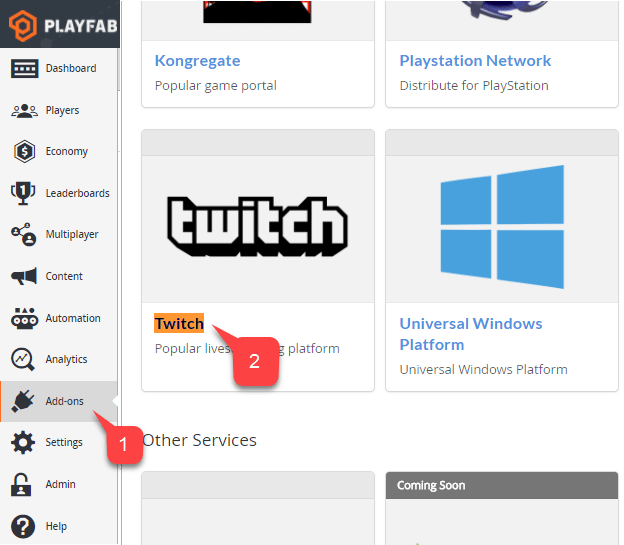
Twitch Client ID를 획득하면 PlayFab 타이틀에 대해 Twitch Add-on을 활성화하고 구성할 수 있습니다.

1. **PlayFab 타이틀** 화면에서 메뉴로 이동하여 **Add-ons** 항목을 선택합니다.
2. 그런 다음 **Twitch** 아이콘 링크를 선택합니다.
<img src="https://mintcdn.com/microsoft-4404708b/mLCHf0iQv3VidfBe/images/playfab/identity/player-identity/platform-specific-authentication/tutorials/twitch-html5/game-manager-addons-tab-twitch.png?fit=max&auto=format&n=mLCHf0iQv3VidfBe&q=85&s=50176ba6202f1f26b095ed278ce8c1ed" alt="Game Manager Add-ons 탭" width="624" height="545" data-path="images/playfab/identity/player-identity/platform-specific-authentication/tutorials/twitch-html5/game-manager-addons-tab-twitch.png" />

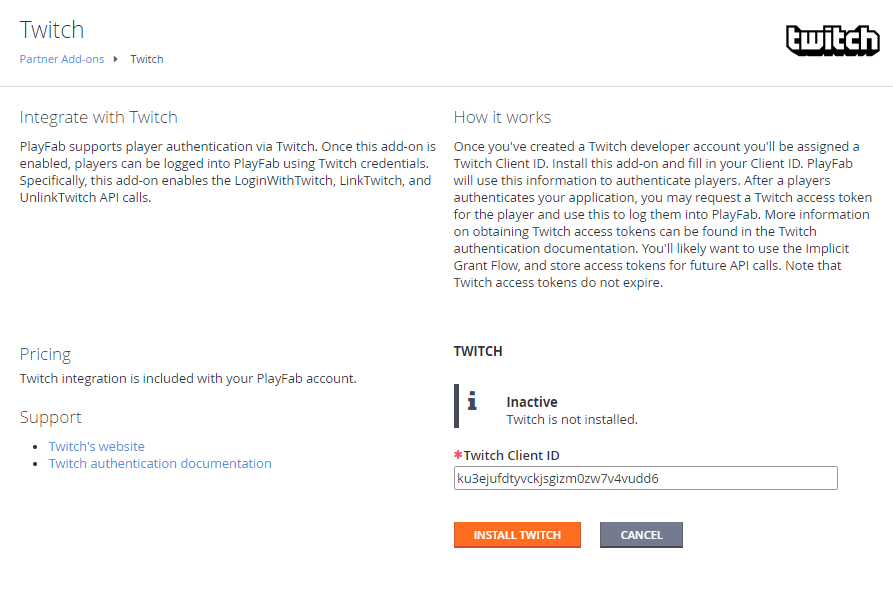
**Twitch** 페이지에서:

* **Twitch Add-on**에 대한 **Settings** 페이지가 열립니다.
* **Twitch Client ID**를 입력합니다.
* **Install Twitch** 버튼을 선택합니다.
<img src="https://mintcdn.com/microsoft-4404708b/mLCHf0iQv3VidfBe/images/playfab/identity/player-identity/platform-specific-authentication/tutorials/twitch-html5/game-manager-twitch-addon-settings.png?fit=max&auto=format&n=mLCHf0iQv3VidfBe&q=85&s=ade8d576e742ccb6492da588c5f12cbc" alt="Game Manager Twitch Add-on 설정 및 설치" width="893" height="599" data-path="images/playfab/identity/player-identity/platform-specific-authentication/tutorials/twitch-html5/game-manager-twitch-addon-settings.png" />

애드온이 설치되었고 오류가 발생하지 않았는지 잠시 확인하세요. 이것으로 PlayFab 타이틀 구성이 마무리됩니다.

## 테스트

다음 HTML 파일을 사용하여 Twitch를 통한 PlayFab 인증을 테스트합니다.

`TWITCH_CLIENT_ID_GOES_HERE`와 `PLAYFAB_TITLE_ID_GOES_HERE`를 자신의 값으로 반드시 교체하세요.

```html theme={null}
<!DOCTYPE html>
<html>
<head>
    <!-- Include JQuery - dependency of Twitch JS SDK -->
    <script src="//code.jquery.com/jquery.min.js"></script>
    <!-- Include Twitch SDK -->
    <script src="https://ttv-api.s3.amazonaws.com/twitch.min.js"></script>
    <!-- Include PlayFab SDK -->
    <script src="https://download.playfab.com/PlayFabClientApi.js"></script>
</head>
<body>
    <p>Twitch Auth Example</p>
    <button onclick="login()">Login With Twitch</button>
    <script>
        // Establish Twitch Auth Callback (invoked when logged in with Twitch)
        Twitch.events.addListener('auth.login', function() {
            logLine("Logged in with Twitch!");
            // Invoke login with PlayFab code and pass the token
            loginWithPlayFab(Twitch.getToken());
        });

        // Run Twitch SDK initialization
        Twitch.init({clientId: 'TWITCH_CLIENT_ID_GOES_HERE'}, function(error, status) {
            logLine("Twitch SDK Initialized");
        });

        // This method is invoked when you press the button

        function login() {
            logLine("Logging in via Twitch...");
            Twitch.login({
                scope: ['user_read', 'channel_read']
            });
        }

        function loginWithPlayFab(accessToken){
            logLine("Logging in via PlayFab...");

            // When given accessToken, make call to LoginWithTwitch API Call
            // Make sure to use your own PlayFab Title ID
            PlayFabClientSDK.LoginWithTwitch({
                AccessToken: accessToken,
                TitleId: "PLAYFAB_TITLE_ID_GOES_HERE",
                CreateAccount: true
            }, onPlayFabResponse);
        }

        // Handles response from playfab.
        function onPlayFabResponse(response, error) {
            if (response)
                logLine("Response: " + JSON.stringify(response));
            if (error)
                logLine("Error: " + JSON.stringify(error));
        }

        function logLine(message) {
        console.log(message);
            var textnode = document.createTextNode(message);
            document.body.appendChild(textnode);
            var br = document.createElement("br");
            document.body.appendChild(br);
        }
    </script>
</body>
</html>
```

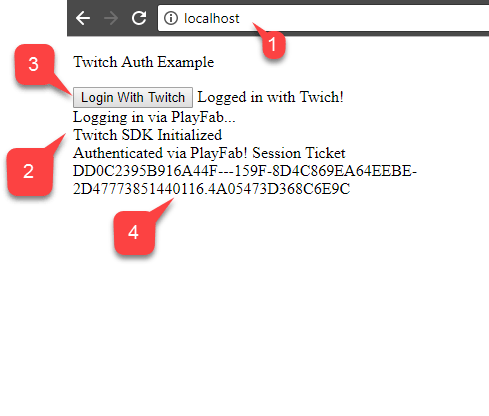
1. Twitch 애플리케이션 구성 중에 설정한 도메인(이 경우 `<http://localhost>`)을 사용하여 서버에서 다음 파일을 요청합니다.

2. 페이지가 열리면 **Twitch SDK**가 초기화되었음을 나타내는 메시지를 기다립니다.

3. 그런 다음 **Login with Twitch** 버튼을 선택합니다.

4. 팝업 창의 **Twitch** 지시 사항을 따르고 출력을 확인합니다.

<Info>
  페이지에 도달할 때 Twitch 인증 세션이 *이미 진행 중*이면 콜백이 다른 예상치 못한 순서로 실행될 수 있습니다. 이 경우는 아래 스크린샷에 나와 있습니다. 그러나 **Logged in with Twitch** 다음에는 **Logging in via PlayFab**만 나오는지 확인해야 합니다. 이는 토큰이 로컬 저장소에서 수신되거나 복원되었으며 Twitch SDK가 PlayFab에 로그인을 시작하기를 기다릴 필요가 없음을 나타냅니다.
</Info>

<img src="https://mintcdn.com/microsoft-4404708b/mLCHf0iQv3VidfBe/images/playfab/identity/player-identity/platform-specific-authentication/tutorials/twitch-html5/twitch-auth-example.png?fit=max&auto=format&n=mLCHf0iQv3VidfBe&q=85&s=8e4934020a31d60a0c4eb5ee8c017558" alt="Twitch 인증 예시" width="489" height="416" data-path="images/playfab/identity/player-identity/platform-specific-authentication/tutorials/twitch-html5/twitch-auth-example.png" />

PlayFab이 `SessionTicket`을 획득하면 PlayFab 앱과의 Twitch 인증 통합에 성공했습니다.


## Related topics

- [Kongregate와 HTML5를 사용하여 PlayFab 인증 설정하기](/ko/services/playfab/identity/player-identity/platform-specific-authentication/kongregate-html5.md)
- [Google과 HTML5를 사용하여 PlayFab 인증 설정하기](/ko/services/playfab/identity/player-identity/platform-specific-authentication/google-html5.md)
- [Facebook과 HTML5를 사용하여 PlayFab 인증 설정하기](/ko/services/playfab/identity/player-identity/platform-specific-authentication/facebook-html5.md)
- [PlayFab용 Battle.net 로그인 설정하기](/ko/services/playfab/identity/player-identity/platform-specific-authentication/battlenet-login.md)
- [Kongregate와 Unity를 사용하여 PlayFab 인증 설정하기](/ko/services/playfab/identity/player-identity/platform-specific-authentication/kongregate-unity.md)
