> ## Documentation Index
> Fetch the complete documentation index at: https://devdocs.xbox.com/llms.txt
> Use this file to discover all available pages before exploring further.
# 테스트용 HTTP 서버 실행하기
> Facebook, Google 또는 Twitch용 PlayFab 인증 튜토리얼을 따를 수 있도록 Node.js http-server를 설치하고 정적 HTML 파일을 로컬에서 제공하는 방법입니다.
일부 시나리오에서는 테스트 목적으로 로컬 HTTP 서버를 실행해야 할 수 있습니다. 예를 들어, [Facebook과 HTML5](/services/playfab/identity/player-identity/platform-specific-authentication/facebook-html5), [Google과 HTML5](/services/playfab/identity/player-identity/platform-specific-authentication/google-html5) 또는 [Twitch와 HTML5](/services/playfab/identity/player-identity/platform-specific-authentication/twitch-html5)를 사용하여 PlayFab 인증을 설정하는 튜토리얼을 따르고 있고, 도메인이 있는 원격 서버가 없는 경우 이 튜토리얼이 유용할 수 있습니다.
## 사전 요구 사항
* 설치된 [Node.JS](https://nodejs.org/en/)
## npm을 사용하여 HTTP 서버 설치
시스템에서 명령줄/터미널을 실행합니다(현재 어느 디렉토리에 있든 상관없습니다).
`npm install -g http-server`를 실행합니다. npm이 완료되면 작은 HTTP 서버가 설치됩니다. 그게 전부입니다.
## 파일 제공
정적 파일을 제공하려는 시스템에 새 폴더를 만듭니다. Windows의 경로에는 특별한 제한이 없습니다.
macOS에서는 폴더에 대한 액세스를 확인해야 할 수 있습니다. 새로 만든 폴더 내에 **index.html**이라는 파일을 만듭니다.
파일을 아래 제공된 콘텐츠로 채웁니다.
```html theme={null}
My Page
Hello world!
```
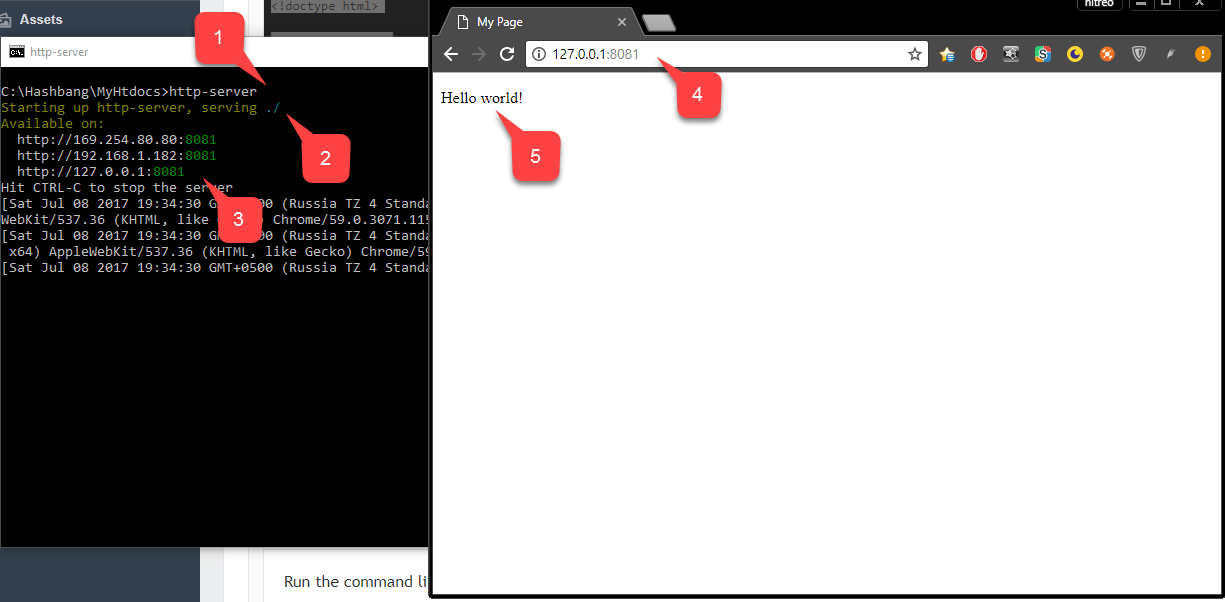
**명령줄/터미널**을 실행하고 **index.html** 파일이 있는 폴더로 cd한 다음:
1. **http-server**를 실행합니다.
2. **HTTP-server**가 현재 디렉토리에서 파일을 제공하기 시작합니다.
3. 서버가 수신 대기 중인 모든 **IP** 엔드포인트도 출력합니다.
4. 그중 하나를 사용하여 브라우저를 통해 웹 서버에 접근합니다.
5. 페이지가 로드되는 것을 확인합니다.
 선택적으로 서버를 실행할 포트를 지정할 수 있습니다.
* **예시**: `http-server -p 80`을 실행하여 **포트 80**에서 서버를 실행합니다. 포트가 사용 중인 경우 이 포트를 사용하는 애플리케이션을 찾아서 종료한 후 HTTP 서버 실행을 다시 시도해야 합니다.
### 사용자 지정 도메인 이름으로 파일 제공
[Google](/services/playfab/identity/player-identity/platform-specific-authentication/google-html5) 또는 [Facebook](/services/playfab/identity/player-identity/platform-specific-authentication/facebook-html5)과 같은 다른 SDK를 테스트할 때 일부 서비스는 특정 유효한 도메인 이름으로만 구성할 수 있음을 알 수 있습니다.
예를 들어, 일반 IP 주소 + 포트는 허용되지 않습니다. 특정 서비스는 브라우저가 특정 안전한 도메인에서 코드를 가져오도록 이러한 구성을 사용합니다.
또한 사용자가 도메인에서만 애플리케이션에 로그인할 수 있도록 하고, 다른 사람이 이를 위조하여 사용자 데이터를 훔칠 수 없도록 이러한 구성을 자주 사용합니다.
이는 중요하고 유용한 보안 제한이지만, 코드를 로컬에서 테스트하려고 할 때 복잡성을 초래할 수 있습니다.
포트 80에서 서버를 실행하고 사용 사례가 충분히 단순한 경우, 운영 체제의 HOSTS 파일을 활용하여 유효한 도메인 이름을 통해 HTTP 서버에 액세스할 수 있습니다.
HOSTS 파일은 Windows와 macOS 모두에서 사용할 수 있는 특별한 파일입니다. 특정 도메인 이름을 사용자 지정 엔드포인트로 재정의할 수 있습니다. 도식적으로 HOSTS 파일은 다음과 같습니다.
```cmd theme={null}
IP_ADDRESS_1 DOMAIN_NAME_1
IP_ADDRESS_2 DOMAIN_NAME_2
IP_ADDRESS_3 DOMAIN_NAME_3
# This is comment
# IP_ADDRESS_4 DOMAIN_NAME_4 <- this entry is commented out and is inactive
...
```
각 줄은 정확히 *하나*의 항목을 나타냅니다. `DOMAIN_NAME_1`에 접근하려고 할 때 브라우저는 요청을 `IP_ADDRESS_1`로 전달합니다.
HOSTS 파일의 *각* 항목에 대해서도 동일하게 적용됩니다. 위 예제에서 항목 번호 `4`는 `#`로 시작합니다. 이는 주석에 대한 구문입니다.
특정 항목을 *주석 처리*하면 HOSTS 파일에서 반드시 제거하지 않고도 비활성화할 수 있습니다.
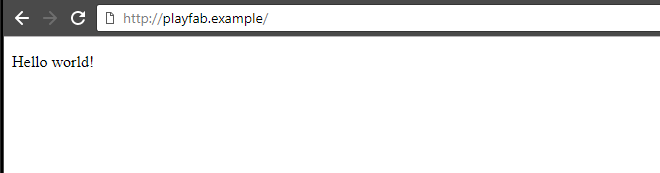
`playfab.example`은 유효한 도메인 이름이지만, 브라우저가 이를 사용하여 웹사이트에 도달할 가능성은 없습니다. HOSTS 파일에 다음 항목을 추가하면 해당 도메인 이름으로 로컬 HTTP 서버에 접근할 수 있게 됩니다.
```cmd theme={null}
127.0.0.1 playfab.example
```
80이 아닌 다른 포트를 사용하는 경우 URL 끝에 로컬 서버가 시작될 때 생성된 포트(예: 포트 8080)를 추가해야 합니다(``).
선택적으로 서버를 실행할 포트를 지정할 수 있습니다.
* **예시**: `http-server -p 80`을 실행하여 **포트 80**에서 서버를 실행합니다. 포트가 사용 중인 경우 이 포트를 사용하는 애플리케이션을 찾아서 종료한 후 HTTP 서버 실행을 다시 시도해야 합니다.
### 사용자 지정 도메인 이름으로 파일 제공
[Google](/services/playfab/identity/player-identity/platform-specific-authentication/google-html5) 또는 [Facebook](/services/playfab/identity/player-identity/platform-specific-authentication/facebook-html5)과 같은 다른 SDK를 테스트할 때 일부 서비스는 특정 유효한 도메인 이름으로만 구성할 수 있음을 알 수 있습니다.
예를 들어, 일반 IP 주소 + 포트는 허용되지 않습니다. 특정 서비스는 브라우저가 특정 안전한 도메인에서 코드를 가져오도록 이러한 구성을 사용합니다.
또한 사용자가 도메인에서만 애플리케이션에 로그인할 수 있도록 하고, 다른 사람이 이를 위조하여 사용자 데이터를 훔칠 수 없도록 이러한 구성을 자주 사용합니다.
이는 중요하고 유용한 보안 제한이지만, 코드를 로컬에서 테스트하려고 할 때 복잡성을 초래할 수 있습니다.
포트 80에서 서버를 실행하고 사용 사례가 충분히 단순한 경우, 운영 체제의 HOSTS 파일을 활용하여 유효한 도메인 이름을 통해 HTTP 서버에 액세스할 수 있습니다.
HOSTS 파일은 Windows와 macOS 모두에서 사용할 수 있는 특별한 파일입니다. 특정 도메인 이름을 사용자 지정 엔드포인트로 재정의할 수 있습니다. 도식적으로 HOSTS 파일은 다음과 같습니다.
```cmd theme={null}
IP_ADDRESS_1 DOMAIN_NAME_1
IP_ADDRESS_2 DOMAIN_NAME_2
IP_ADDRESS_3 DOMAIN_NAME_3
# This is comment
# IP_ADDRESS_4 DOMAIN_NAME_4 <- this entry is commented out and is inactive
...
```
각 줄은 정확히 *하나*의 항목을 나타냅니다. `DOMAIN_NAME_1`에 접근하려고 할 때 브라우저는 요청을 `IP_ADDRESS_1`로 전달합니다.
HOSTS 파일의 *각* 항목에 대해서도 동일하게 적용됩니다. 위 예제에서 항목 번호 `4`는 `#`로 시작합니다. 이는 주석에 대한 구문입니다.
특정 항목을 *주석 처리*하면 HOSTS 파일에서 반드시 제거하지 않고도 비활성화할 수 있습니다.
`playfab.example`은 유효한 도메인 이름이지만, 브라우저가 이를 사용하여 웹사이트에 도달할 가능성은 없습니다. HOSTS 파일에 다음 항목을 추가하면 해당 도메인 이름으로 로컬 HTTP 서버에 접근할 수 있게 됩니다.
```cmd theme={null}
127.0.0.1 playfab.example
```
80이 아닌 다른 포트를 사용하는 경우 URL 끝에 로컬 서버가 시작될 때 생성된 포트(예: 포트 8080)를 추가해야 합니다(``).
 Windows OS에서 HOSTS 파일은 일반적으로 다음 위치에 있습니다.
`C:\Windows\System32\drivers\etc\hosts`.
macOS에서 HOSTS 파일은 일반적으로 다음 위치에 있습니다.
`/private/etc/hosts`.
브라우저 주소 표시줄에 도메인 이름을 입력할 때 항상 스키마를 포함해야 합니다: ``.
## Related topics
- [서버 익명 로그인 인증](/ko/services/playfab/identity/player-identity/platform-specific-authentication/anonymous-login.md)
- [Google과 HTML5를 사용하여 PlayFab 인증 설정하기](/ko/services/playfab/identity/player-identity/platform-specific-authentication/google-html5.md)
- [PlayFab용 Battle.net 로그인 설정하기](/ko/services/playfab/identity/player-identity/platform-specific-authentication/battlenet-login.md)
- [Twitch와 HTML5를 사용하여 PlayFab 인증 설정하기](/ko/services/playfab/identity/player-identity/platform-specific-authentication/twitch-html5.md)
- [Facebook과 HTML5를 사용하여 PlayFab 인증 설정하기](/ko/services/playfab/identity/player-identity/platform-specific-authentication/facebook-html5.md)
Windows OS에서 HOSTS 파일은 일반적으로 다음 위치에 있습니다.
`C:\Windows\System32\drivers\etc\hosts`.
macOS에서 HOSTS 파일은 일반적으로 다음 위치에 있습니다.
`/private/etc/hosts`.
브라우저 주소 표시줄에 도메인 이름을 입력할 때 항상 스키마를 포함해야 합니다: ``.
## Related topics
- [서버 익명 로그인 인증](/ko/services/playfab/identity/player-identity/platform-specific-authentication/anonymous-login.md)
- [Google과 HTML5를 사용하여 PlayFab 인증 설정하기](/ko/services/playfab/identity/player-identity/platform-specific-authentication/google-html5.md)
- [PlayFab용 Battle.net 로그인 설정하기](/ko/services/playfab/identity/player-identity/platform-specific-authentication/battlenet-login.md)
- [Twitch와 HTML5를 사용하여 PlayFab 인증 설정하기](/ko/services/playfab/identity/player-identity/platform-specific-authentication/twitch-html5.md)
- [Facebook과 HTML5를 사용하여 PlayFab 인증 설정하기](/ko/services/playfab/identity/player-identity/platform-specific-authentication/facebook-html5.md)