> ## Documentation Index
> Fetch the complete documentation index at: https://devdocs.xbox.com/llms.txt
> Use this file to discover all available pages before exploring further.
# Kongregate와 Unity를 사용하여 PlayFab 인증 설정하기
> WebGL을 사용하는 Unity에서 PlayFab 타이틀에 Kongregate 인증을 추가하는 단계별 튜토리얼로 Kongregate 앱 업로드와 플레이어 로그인 코드를 다룹니다.
이 튜토리얼에서는 Kongregate와 Unity를 사용하여 PlayFab에서 플레이어를 인증하는 데 필요한 최소한의 설정을 보여줍니다.
## 요구 사항
* 등록된 [Kongregate](https://www.kongregate.com/) 계정.
* [Kongregate 개발자 가이드](https://www.kongregate.com/developer_center/docs/en/kongregate-api)에 대한 이해.
* 등록된 PlayFab 타이틀.
* 타이틀에 대해 PlayFab이 구성된 Unity 프로젝트.
* 설치된 Unity WebGL 지원.
* [로그인 기본 사항 및 모범 사례](/services/playfab/identity/player-identity/login/login-basics-best-practices)에 대한 이해.
## Kongregate 앱 설정
Kongregate는 필요한 앱 정보에 액세스하기 전에 앱의 미리보기 버전을 업로드하도록 요구합니다. 첫 번째 단계는 아래 콘텐츠로 **index.html** 파일을 준비하는 것입니다.
```html theme={null}
Placeholder
```
[Kongregate 웹사이트](https://www.kongregate.com/)로 이동합니다.
1. **Games** 탭을 선택합니다.
2. 그런 다음 **Upload your game** 버튼을 선택합니다.
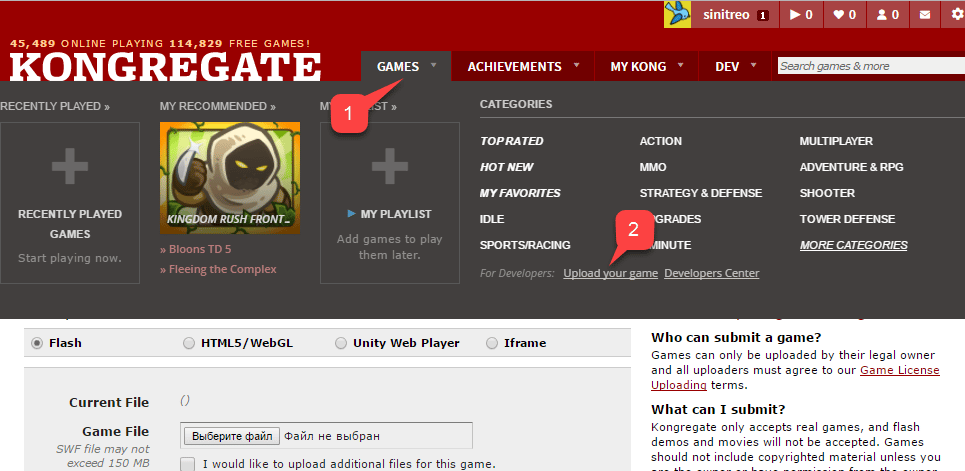 새 애플리케이션을 설정하는 페이지가 열립니다.
1. **애플리케이션 이름**을 반드시 입력하세요.
2. **게임 설명**을 입력합니다.
3. 그런 다음 **Category**를 선택합니다.
4. **Continue** 버튼을 선택하여 새 앱을 제출합니다.
새 애플리케이션을 설정하는 페이지가 열립니다.
1. **애플리케이션 이름**을 반드시 입력하세요.
2. **게임 설명**을 입력합니다.
3. 그런 다음 **Category**를 선택합니다.
4. **Continue** 버튼을 선택하여 새 앱을 제출합니다.
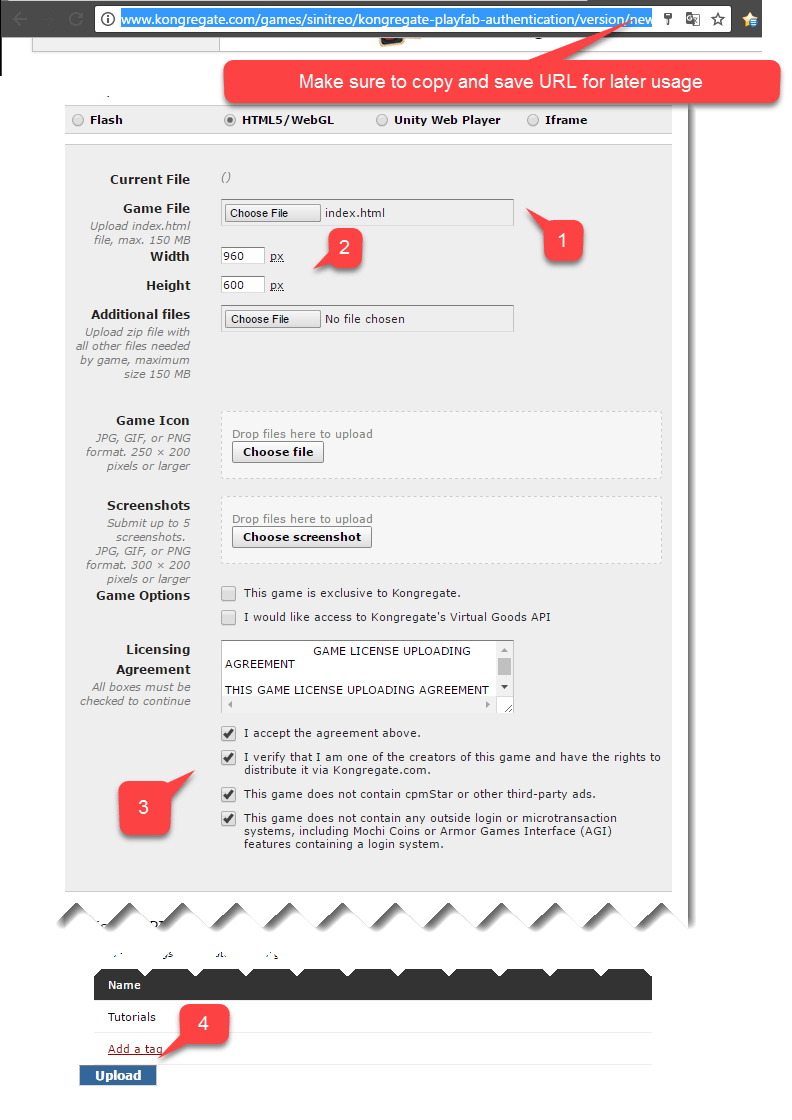
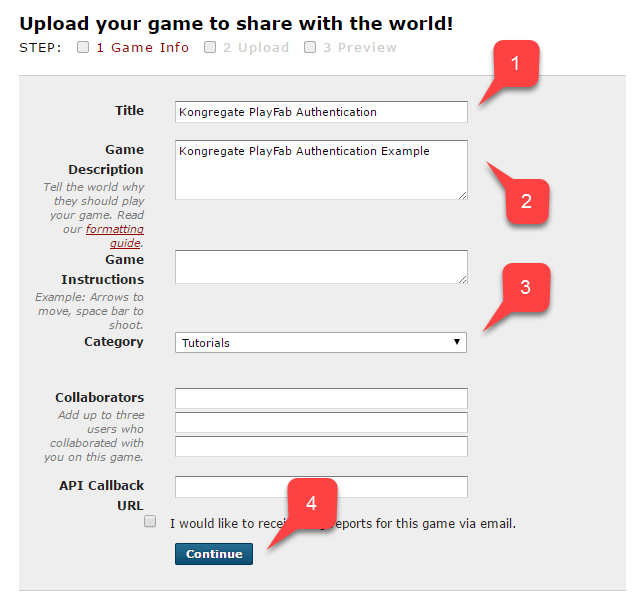 **Application Upload** 페이지로 이동됩니다.
먼저 - 그리고 *가장 중요하게* - **웹 주소 표시줄**의 URL을 안전하고 쉽게 접근할 수 있는 곳에 반드시 저장하세요. *이는 페이지를 닫은 후 애플리케이션에 대한 액세스를 복원하는 시간을 많이 절약해 줍니다*.
1. 완료되면 준비한 **index.html** 파일을 **Game File**로 선택합니다.
2. 그런 다음 화면 크기를 설정합니다.
3. 필요한 모든 라이선스를 반드시 수락하세요.
4. 마지막으로 **Upload** 버튼을 선택하여 애플리케이션을 업로드합니다.
**Application Upload** 페이지로 이동됩니다.
먼저 - 그리고 *가장 중요하게* - **웹 주소 표시줄**의 URL을 안전하고 쉽게 접근할 수 있는 곳에 반드시 저장하세요. *이는 페이지를 닫은 후 애플리케이션에 대한 액세스를 복원하는 시간을 많이 절약해 줍니다*.
1. 완료되면 준비한 **index.html** 파일을 **Game File**로 선택합니다.
2. 그런 다음 화면 크기를 설정합니다.
3. 필요한 모든 라이선스를 반드시 수락하세요.
4. 마지막으로 **Upload** 버튼을 선택하여 애플리케이션을 업로드합니다.
 미리보기가 열리면 콘텐츠를 무시하고 **api information** 링크를 엽니다.
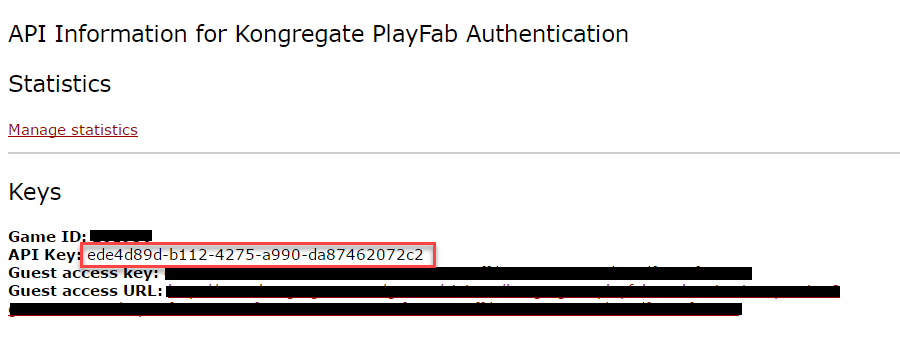
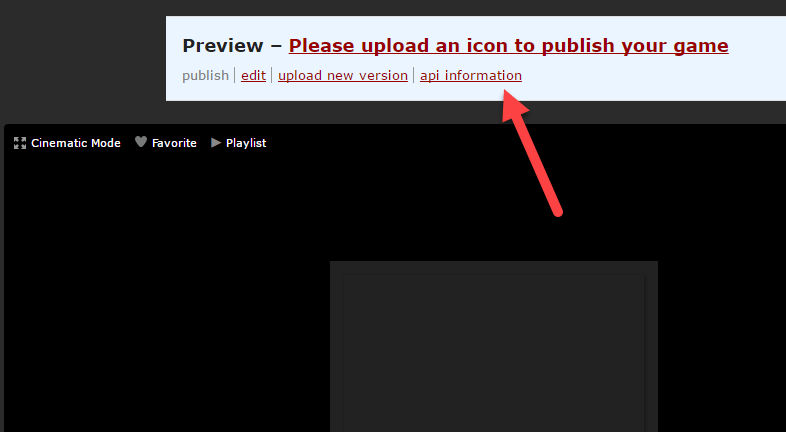 **API Information** 페이지가 열리면 **API Key**를 찾아 나중에 사용할 수 있도록 쉽게 접근할 수 있는 안전한 곳에 보관하세요.
 ## PlayFab 타이틀 구성
PlayFab 타이틀 Game Manager에서:
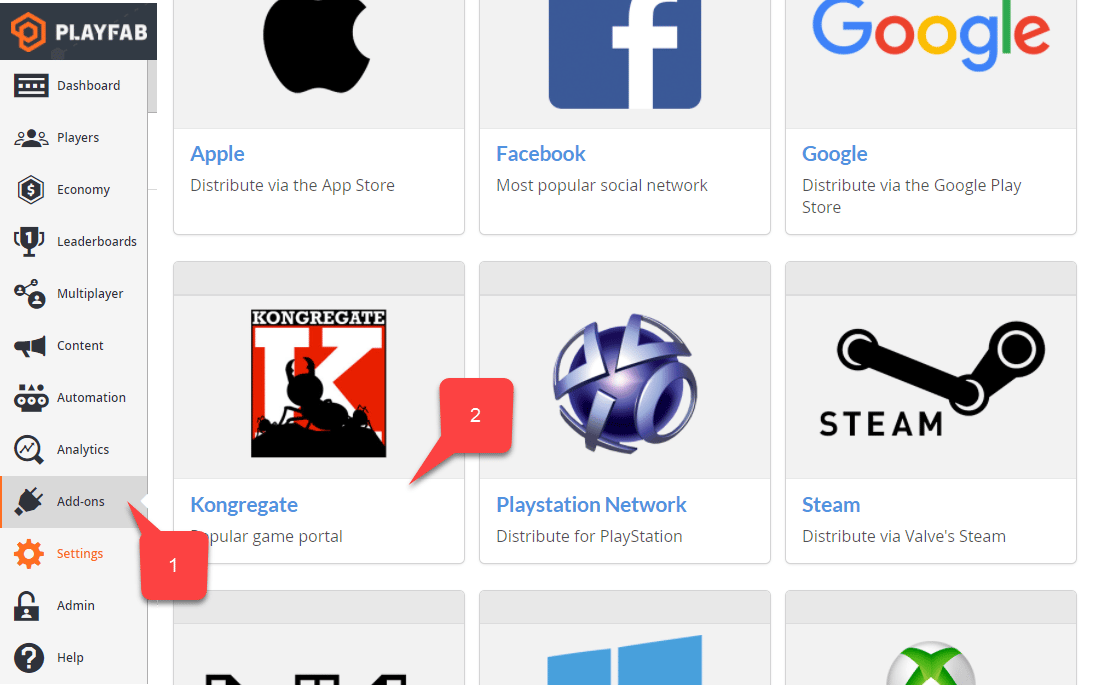
1. 왼쪽 메뉴에서 **Add-ons**를 선택합니다.
2. **Kongregate** 아이콘을 찾아 선택합니다.
## PlayFab 타이틀 구성
PlayFab 타이틀 Game Manager에서:
1. 왼쪽 메뉴에서 **Add-ons**를 선택합니다.
2. **Kongregate** 아이콘을 찾아 선택합니다.
 **Kongregate** 통합을 설정할 수 있는 새 페이지가 열립니다.
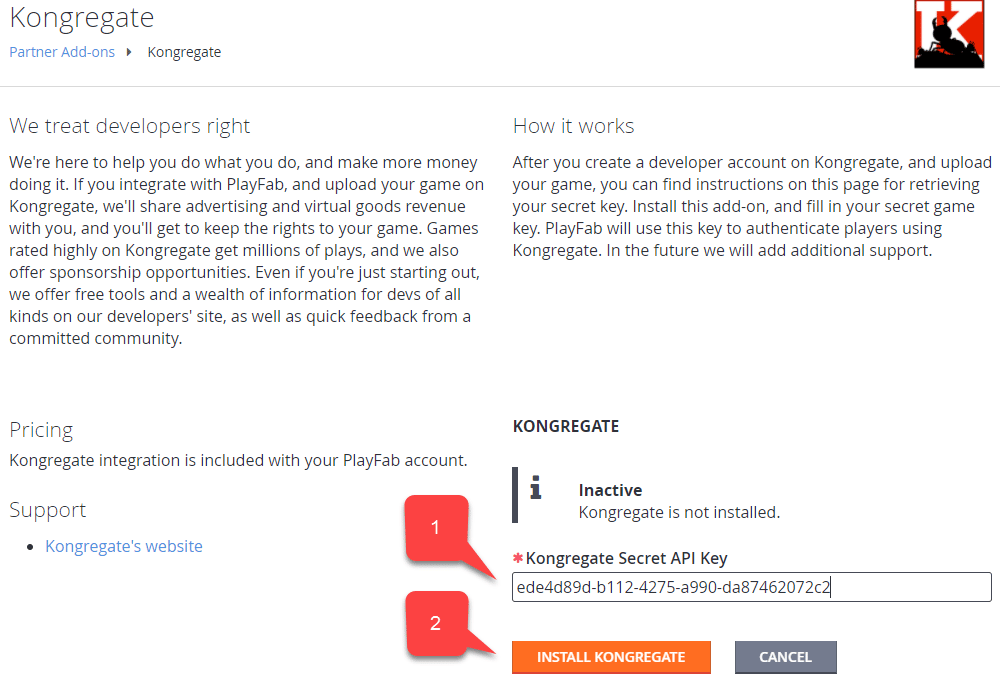
1. 이전 섹션에서 얻은 **API Key**를 입력합니다.
2. **Install Kongregate** 버튼을 선택합니다.
**Kongregate** 통합을 설정할 수 있는 새 페이지가 열립니다.
1. 이전 섹션에서 얻은 **API Key**를 입력합니다.
2. **Install Kongregate** 버튼을 선택합니다.
 이 시점에서 오류 메시지를 받지 않으면 Kongregate 애플리케이션과의 PlayFab 타이틀 통합이 올바르게 구성된 것입니다.
## Unity 프로젝트 설정
다음 Unity 설정 체크리스트를 사용하세요.
* \[선택 사항] [PlayFab Editor Extensions](https://aka.ms/playfabunityextension)를 설치합니다.
* `PlayFabSharedSettings` Scriptable Object에서 `TitleId`를 설정합니다.
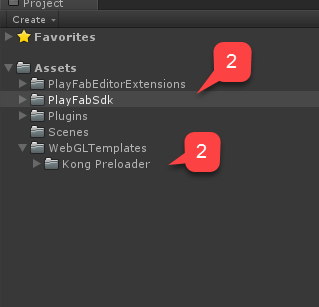
* Unity 5.6+의 경우 [Kongregate Preloader WebGL Template](https://github.com/kongregate/webgl-preloader)를 다운로드하여 `Assets/WebGLTemplates` 폴더 **(2)** 안에 배치합니다.
* Unity \< 5.6의 경우 [Kongregate Preloader WebGL Template 5.5 이하](https://github.com/kongregate/webgl-preloader/tree/unity-5.5-and-below)를 다운로드하여 `Assets/WebGLTemplates` 폴더 **(2)** 안에 배치합니다.
이 시점에서 오류 메시지를 받지 않으면 Kongregate 애플리케이션과의 PlayFab 타이틀 통합이 올바르게 구성된 것입니다.
## Unity 프로젝트 설정
다음 Unity 설정 체크리스트를 사용하세요.
* \[선택 사항] [PlayFab Editor Extensions](https://aka.ms/playfabunityextension)를 설치합니다.
* `PlayFabSharedSettings` Scriptable Object에서 `TitleId`를 설정합니다.
* Unity 5.6+의 경우 [Kongregate Preloader WebGL Template](https://github.com/kongregate/webgl-preloader)를 다운로드하여 `Assets/WebGLTemplates` 폴더 **(2)** 안에 배치합니다.
* Unity \< 5.6의 경우 [Kongregate Preloader WebGL Template 5.5 이하](https://github.com/kongregate/webgl-preloader/tree/unity-5.5-and-below)를 다운로드하여 `Assets/WebGLTemplates` 폴더 **(2)** 안에 배치합니다.
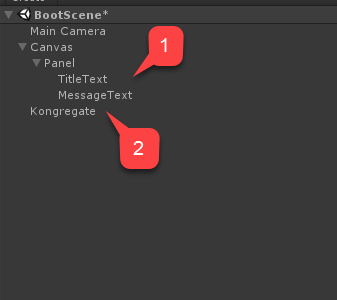
 이제 작업 씬을 만들어 봅시다.
1. 테스트 목적으로 몇 개의 텍스트 레이블이 있는 화면 스케일링 캔버스를 사용합니다.
디버그 메시지를 표시하기 위해 *하나*의 텍스트 레이블만 필요합니다.
2. 빈 **GameObject**를 생성하고 **Kongregate**로 이름을 바꿉니다.
이제 작업 씬을 만들어 봅시다.
1. 테스트 목적으로 몇 개의 텍스트 레이블이 있는 화면 스케일링 캔버스를 사용합니다.
디버그 메시지를 표시하기 위해 *하나*의 텍스트 레이블만 필요합니다.
2. 빈 **GameObject**를 생성하고 **Kongregate**로 이름을 바꿉니다.
 이 `GameObject`에는 디버그 메시지를 위한 텍스트 레이블이 연결된 `KongregateHandler` 컴포넌트가 포함됩니다.
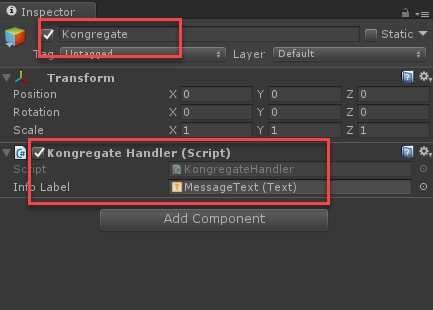 `KongregateHandler` 컴포넌트의 코드는 아래에 제공되어 있습니다.
```csharp theme={null}
// We are specifically interested in importing PlayFab related namespaces
using PlayFab;
using PlayFab.ClientModels;
using UnityEngine;
using UnityEngine.UI;
public class KongregateHandler : MonoBehaviour
{
// Standard unity callback, executed once for the script to start
public void Start()
{
// Utility: show feedback
SetMessage("Loading kongregate api...");
/*
* Important: execute Javascript in the external context to initialize
* Kongregate API, Unity Support and set up callback GameObject and Method.
* In this case, callback is set to a GameObject called Kongregate and a
* method called OnKongregateAPILoaded, which we define later in this class.
* Once Kongregate API is initialized, Unity will locate this object by name
* ("Kongregate") and execute a method "OnKongregateAPILoaded" passing in user
* info string as an argument.
*/
Application.ExternalEval(
"if(typeof(kongregateUnitySupport) != 'undefined'){" +
" kongregateUnitySupport.initAPI('Kongregate', 'OnKongregateAPILoaded');" +
"} else {" +
" console.error('No unity support!');" +
"};"
);
}
/*
* Executed once Kongregate API is ready. This method is invoked by KongregateAPI
* and receives a structured text with multiple pieces of data you must parse manually.
* The userInfo string parameter has the following structure: 'user_identifier|user_name|auth_token'
*/
public void OnKongregateAPILoaded(string userInfo)
{
SetMessage("Received user info! Logging though playfab...");
// We split userInfo string using '|' character to acquire auth token and Kongregate ID.
var userInfoArray = userInfo.Split('|');
var authTicket = userInfoArray[2];
var kongregateId = userInfoArray[0];
LogToBrowser("Auth Token: " + authTicket);
LogToBrowser("Kongregate Id: " + kongregateId);
/*
* We then execute PlayFab API call called LoginWithKongregate.
* LoginWithKongregate requires KongregateID and AuthTicket.
* We also pass CreateAccount flag, to automatically create player account.
*/
PlayFabClientAPI.LoginWithKongregate(new LoginWithKongregateRequest
{
KongregateId = kongregateId,
AuthTicket = authTicket,
CreateAccount = true
}, OnLoggedIn, OnFailed);
}
/*
* The rest of the code serves as a utility to process results, log debug statements
* and display them using Text message label.
*/
private void OnLoggedIn(LoginResult obj)
{
SetMessage("Logged in through PlayFab!");
}
private void OnFailed(PlayFabError error)
{
SetMessage("Failed to login in with PlayFab: " + error.GenerateErrorReport());
}
private void SetMessage(string message)
{
InfoLabel.text = message;
}
private void LogToBrowser(string message)
{
Application.ExternalEval(string.Format("console.log('{0}')", message));
}
public Text InfoLabel;
}
```
## 테스트
통합을 진정으로 테스트할 수 있는 유일한 방법은 프로토타입을 Kongregate에 업로드하는 것입니다.
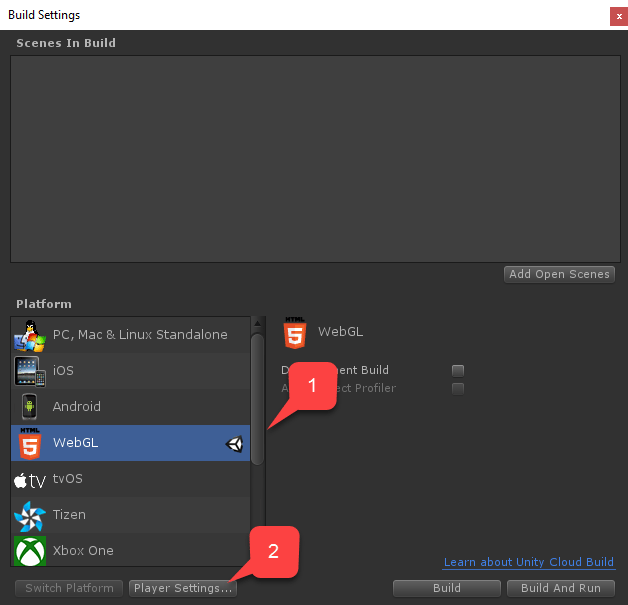
1. **Build** 창을 열고 메뉴에서 **WebGL**이 선택되어 있는지 확인합니다.
2. 그런 다음 버튼을 선택하여 **Player Settings**를 엽니다.
`KongregateHandler` 컴포넌트의 코드는 아래에 제공되어 있습니다.
```csharp theme={null}
// We are specifically interested in importing PlayFab related namespaces
using PlayFab;
using PlayFab.ClientModels;
using UnityEngine;
using UnityEngine.UI;
public class KongregateHandler : MonoBehaviour
{
// Standard unity callback, executed once for the script to start
public void Start()
{
// Utility: show feedback
SetMessage("Loading kongregate api...");
/*
* Important: execute Javascript in the external context to initialize
* Kongregate API, Unity Support and set up callback GameObject and Method.
* In this case, callback is set to a GameObject called Kongregate and a
* method called OnKongregateAPILoaded, which we define later in this class.
* Once Kongregate API is initialized, Unity will locate this object by name
* ("Kongregate") and execute a method "OnKongregateAPILoaded" passing in user
* info string as an argument.
*/
Application.ExternalEval(
"if(typeof(kongregateUnitySupport) != 'undefined'){" +
" kongregateUnitySupport.initAPI('Kongregate', 'OnKongregateAPILoaded');" +
"} else {" +
" console.error('No unity support!');" +
"};"
);
}
/*
* Executed once Kongregate API is ready. This method is invoked by KongregateAPI
* and receives a structured text with multiple pieces of data you must parse manually.
* The userInfo string parameter has the following structure: 'user_identifier|user_name|auth_token'
*/
public void OnKongregateAPILoaded(string userInfo)
{
SetMessage("Received user info! Logging though playfab...");
// We split userInfo string using '|' character to acquire auth token and Kongregate ID.
var userInfoArray = userInfo.Split('|');
var authTicket = userInfoArray[2];
var kongregateId = userInfoArray[0];
LogToBrowser("Auth Token: " + authTicket);
LogToBrowser("Kongregate Id: " + kongregateId);
/*
* We then execute PlayFab API call called LoginWithKongregate.
* LoginWithKongregate requires KongregateID and AuthTicket.
* We also pass CreateAccount flag, to automatically create player account.
*/
PlayFabClientAPI.LoginWithKongregate(new LoginWithKongregateRequest
{
KongregateId = kongregateId,
AuthTicket = authTicket,
CreateAccount = true
}, OnLoggedIn, OnFailed);
}
/*
* The rest of the code serves as a utility to process results, log debug statements
* and display them using Text message label.
*/
private void OnLoggedIn(LoginResult obj)
{
SetMessage("Logged in through PlayFab!");
}
private void OnFailed(PlayFabError error)
{
SetMessage("Failed to login in with PlayFab: " + error.GenerateErrorReport());
}
private void SetMessage(string message)
{
InfoLabel.text = message;
}
private void LogToBrowser(string message)
{
Application.ExternalEval(string.Format("console.log('{0}')", message));
}
public Text InfoLabel;
}
```
## 테스트
통합을 진정으로 테스트할 수 있는 유일한 방법은 프로토타입을 Kongregate에 업로드하는 것입니다.
1. **Build** 창을 열고 메뉴에서 **WebGL**이 선택되어 있는지 확인합니다.
2. 그런 다음 버튼을 선택하여 **Player Settings**를 엽니다.
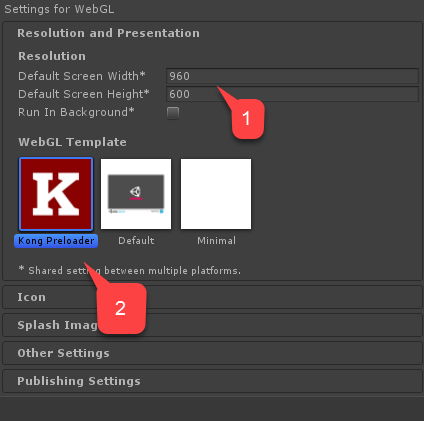
 **Player Settings** 화면 내에서 **Settings for WebGL** 빌드를 찾습니다.
1. 크기가 올바르게 설정되어 있는지 확인합니다.
2. 그런 다음 **Kongregate Preloader Template**을 선택합니다.
**Player Settings** 화면 내에서 **Settings for WebGL** 빌드를 찾습니다.
1. 크기가 올바르게 설정되어 있는지 확인합니다.
2. 그런 다음 **Kongregate Preloader Template**을 선택합니다.
 애플리케이션을 빌드하고 **Build** 폴더를 엽니다.
* 결국 **index.html**과 여러 다른 파일들(Unity 버전에 따라 다름)을 얻게 됩니다.
* 아래 예시와 같이 **index.html**을 제외한 모든 파일을 zip 아카이브 안에 배치합니다.
애플리케이션을 빌드하고 **Build** 폴더를 엽니다.
* 결국 **index.html**과 여러 다른 파일들(Unity 버전에 따라 다름)을 얻게 됩니다.
* 아래 예시와 같이 **index.html**을 제외한 모든 파일을 zip 아카이브 안에 배치합니다.
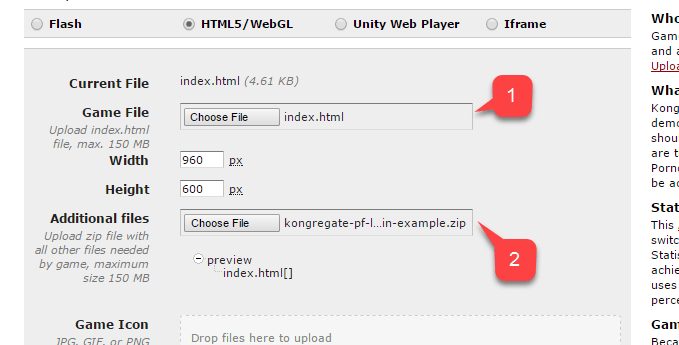
 이전에 저장한 URL을 사용하여 **Application Upload** 페이지에 액세스합니다.
1. **index.html**을 **Game File**로 선택합니다.
2. 그런 다음 zip 아카이브를 **Additional files**로 선택합니다.
* 라이선스를 수락하고 업로드합니다.
이전에 저장한 URL을 사용하여 **Application Upload** 페이지에 액세스합니다.
1. **index.html**을 **Game File**로 선택합니다.
2. 그런 다음 zip 아카이브를 **Additional files**로 선택합니다.
* 라이선스를 수락하고 업로드합니다.
 미리보기가 열리면 메시지가 변경되면서 게임이 라이브로 실행되는 것을 볼 수 있어야 합니다.
완료 시 메시지는 PlayFab을 통한 성공적인 로그인을 나타내야 합니다.
이 시점에서 PlayFab와 Kongregate 통합에 성공했습니다.
## Related topics
- [Kongregate와 HTML5를 사용하여 PlayFab 인증 설정하기](/ko/services/playfab/identity/player-identity/platform-specific-authentication/kongregate-html5.md)
- [Steam과 Unity를 사용하여 PlayFab 인증 설정하기](/ko/services/playfab/identity/player-identity/platform-specific-authentication/steam-unity.md)
- [Twitch와 HTML5를 사용하여 PlayFab 인증 설정하기](/ko/services/playfab/identity/player-identity/platform-specific-authentication/twitch-html5.md)
- [Facebook과 Unity를 사용하여 PlayFab 인증 설정하기](/ko/services/playfab/identity/player-identity/platform-specific-authentication/facebook-unity.md)
- [Google과 HTML5를 사용하여 PlayFab 인증 설정하기](/ko/services/playfab/identity/player-identity/platform-specific-authentication/google-html5.md)
미리보기가 열리면 메시지가 변경되면서 게임이 라이브로 실행되는 것을 볼 수 있어야 합니다.
완료 시 메시지는 PlayFab을 통한 성공적인 로그인을 나타내야 합니다.
이 시점에서 PlayFab와 Kongregate 통합에 성공했습니다.
## Related topics
- [Kongregate와 HTML5를 사용하여 PlayFab 인증 설정하기](/ko/services/playfab/identity/player-identity/platform-specific-authentication/kongregate-html5.md)
- [Steam과 Unity를 사용하여 PlayFab 인증 설정하기](/ko/services/playfab/identity/player-identity/platform-specific-authentication/steam-unity.md)
- [Twitch와 HTML5를 사용하여 PlayFab 인증 설정하기](/ko/services/playfab/identity/player-identity/platform-specific-authentication/twitch-html5.md)
- [Facebook과 Unity를 사용하여 PlayFab 인증 설정하기](/ko/services/playfab/identity/player-identity/platform-specific-authentication/facebook-unity.md)
- [Google과 HTML5를 사용하여 PlayFab 인증 설정하기](/ko/services/playfab/identity/player-identity/platform-specific-authentication/google-html5.md)