> ## Documentation Index
> Fetch the complete documentation index at: https://devdocs.xbox.com/llms.txt
> Use this file to discover all available pages before exploring further.
# Unity에서 Google Play Games 로그인을 사용한 PlayFab 인증
> PlayFab SDK를 사용해 Unity 프로젝트에 Google Play Games 로그인을 추가하는 단계별 튜토리얼로 Play Console 설정과 플레이어 인증을 다룹니다.
# Unity에서 Google Play Games 로그인을 사용하여 PlayFab 인증 설정하기
## 사전 요구 사항
* Unity 게임 엔진을 사용하여 빌드된 프로젝트.
* Google 개발자 계정.
* PlayFab에서 게임 타이틀에 액세스할 수 있는 PlayFab 개발자 계정.
* [PlayFab Unity Editor Extensions 및 Unity SDK](/services/playfab/sdks/unity3d/quickstart).
* [Google Play Games SDK](https://github.com/playgameservices/play-games-plugin-for-unity).
* [로그인 기본 사항 및 모범 사례](/services/playfab/identity/player-identity/login/login-basics-best-practices)에 대한 이해.
## 시작하기
먼저 Google Play에서 몇 가지 기본 사항을 설정하는 것부터 시작합니다. 이러한 작업 중 일부를 수행하는 방법에 대한 좋은 가이드가 몇 개 있으므로 바퀴를 다시 발명하지는 않겠습니다.
1. **애플리케이션** 생성 - 애플리케이션을 만들지 않은 경우 [Google Play Developer Console](https://play.google.com/apps/publish)에서 만들어야 합니다.
2. 게임 AAB를 빌드하고 내부 테스트용으로 업로드합니다. **Internal testing** 트랙에 앱을 릴리스하는 방법에 대해서는 [이](https://support.google.com/googleplay/android-developer/answer/9859348?visit_id=638373214207471441-2235763004\&rd=1) 가이드를 따를 수 있습니다. 서명 프로세스 동안 앱 번들의 경우 이 목적을 위해 자신만의 키스토어를 사용해야 한다는 점을 고려하세요. 키스토어를 만드는 방법은 [이](https://docs.unity3d.com/Manual/android-keystore-create.html) 문서를 참조하세요.
3. 이 페이지의 지침에 따라 Google Play Games 서비스를 설정합니다: [Google Play Games 서비스 설정](https://developers.google.com/games/services/console/enabling).
4. [Google Play Games SDK](https://github.com/playgameservices/play-games-plugin-for-unity)를 다운로드하여 설치합니다.
5. PlayFab Unity SDK를 설치합니다(이 작업을 수행하는 방법을 모르는 경우 [Unity3D 빠른 시작 가이드](/services/playfab/sdks/unity3d/quickstart)를 따르세요).
## Google Play Games 구성
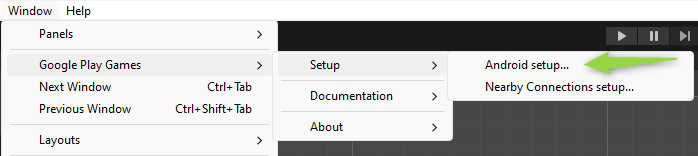
Google Play Games SDK와 함께 설치된 도구 세트에서 Google Play Games를 구성할 수 있습니다. 다음과 같이 이러한 도구에 도달할 수 있습니다.
* **Window** 탭으로 이동합니다.
* **Google Play Games**를 선택합니다.
* **Setup**으로 이동합니다.
* 그런 다음 **Android Setup**에 액세스합니다.
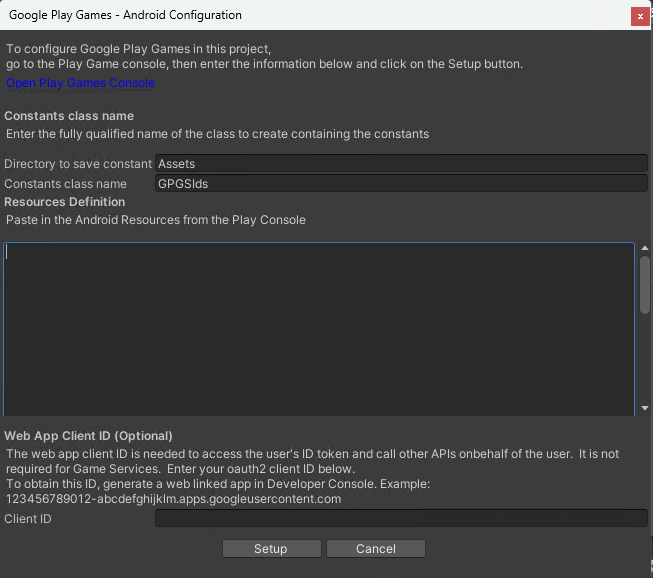
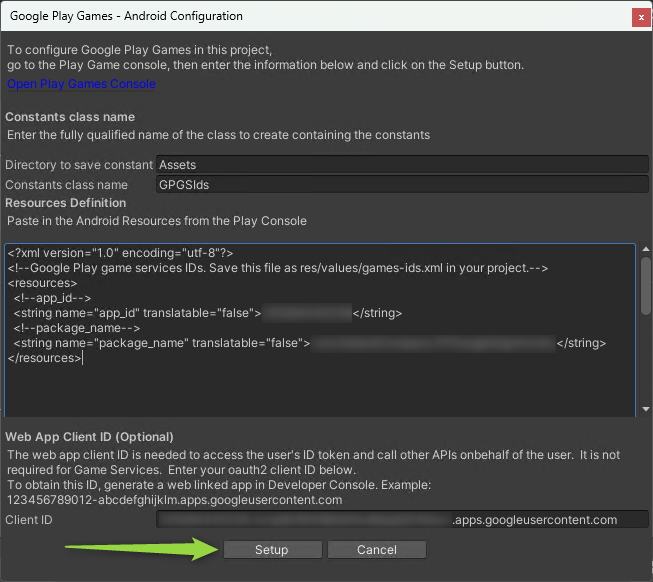
 * Android 구성 창이 표시되며, 이 화면에서 Resources Definition과 Web App Client ID를 입력해야 합니다.
 ### Resources Definition 얻기
* [이](https://developer.android.com/games/pgs/unity/unity-start#get-android-resources) 단계에 따라 Android Resources 정의를 가져옵니다.
### Web App Client ID 얻기
PlayFab에서 Google 로그인을 작동시키려면 "Web application" 유형의 OAuth Client ID 자격 증명을 생성하여 얻을 수 있는 Web Client ID를 사용해야 합니다.
OAuth Client ID를 생성하기 전에 PlayFab **API Endpoint**를 알아야 하며, 다음 단계에 따라 찾을 수 있습니다.
* [Game Manager](https://developer.playfab.com/)에 로그인합니다.
* 타이틀을 선택합니다.
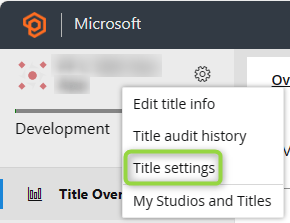
* 타이틀 이름 옆의 **기어 아이콘**을 클릭하고 **Title Settings**를 선택하여 타이틀 설정으로 이동합니다.
### Resources Definition 얻기
* [이](https://developer.android.com/games/pgs/unity/unity-start#get-android-resources) 단계에 따라 Android Resources 정의를 가져옵니다.
### Web App Client ID 얻기
PlayFab에서 Google 로그인을 작동시키려면 "Web application" 유형의 OAuth Client ID 자격 증명을 생성하여 얻을 수 있는 Web Client ID를 사용해야 합니다.
OAuth Client ID를 생성하기 전에 PlayFab **API Endpoint**를 알아야 하며, 다음 단계에 따라 찾을 수 있습니다.
* [Game Manager](https://developer.playfab.com/)에 로그인합니다.
* 타이틀을 선택합니다.
* 타이틀 이름 옆의 **기어 아이콘**을 클릭하고 **Title Settings**를 선택하여 타이틀 설정으로 이동합니다.
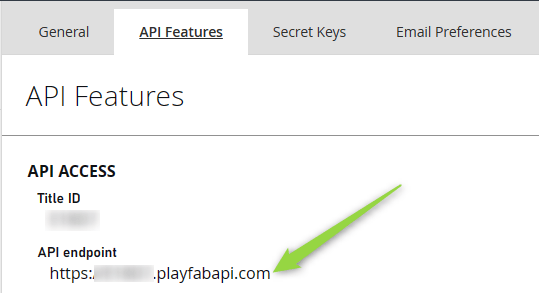
 * **API Features** 탭을 선택합니다.
* **API endpoint** 필드에 복사합니다.
* **API Features** 탭을 선택합니다.
* **API endpoint** 필드에 복사합니다.
 이제 타이틀 API 엔드포인트를 알았으니 OAuth Client ID 자격 증명 생성에 대해 [여기](https://developers.google.com/workspace/guides/create-credentials#web-application)에 설명된 단계를 따르세요.
* Client ID를 생성할 때 Client ID에 대한 **Authorized JavaScript origin**으로 API 엔드포인트를 추가해야 합니다.
이제 타이틀 API 엔드포인트를 알았으니 OAuth Client ID 자격 증명 생성에 대해 [여기](https://developers.google.com/workspace/guides/create-credentials#web-application)에 설명된 단계를 따르세요.
* Client ID를 생성할 때 Client ID에 대한 **Authorized JavaScript origin**으로 API 엔드포인트를 추가해야 합니다.
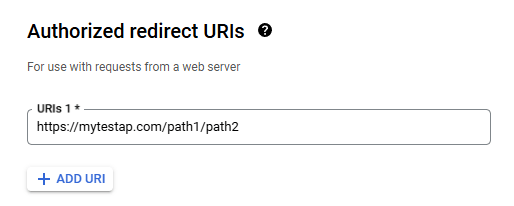
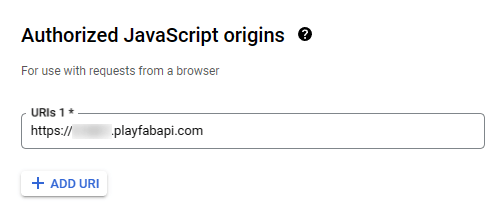 * 또한 자신의 애플리케이션 리디렉션 URI를 **Authorized Redirect URI**로 추가하세요. 이 단계를 수행하지 않으면 **mismatch redirect\_uri** 오류가 발생합니다.
 Client ID를 생성한 후에는 다음과 유사한 화면이 표시되며, 여기서 생성된 Client ID 문자열과 Client Secret을 얻을 수 있습니다.
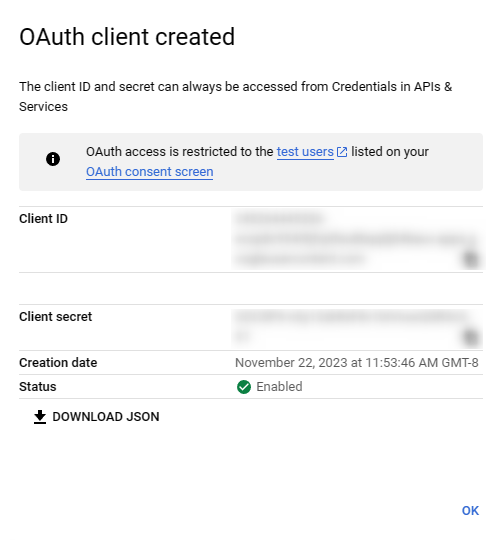 이제 Unity의 Android 구성 창으로 돌아가 **Client ID** 텍스트 상자에 클라이언트 ID를 붙여넣을 수 있습니다.
 이제 두 값이 모두 채워졌으므로 **Setup**을 선택할 수 있습니다.
 ## PlayFab Google 로그인 설정
PlayFab에는 Google 로그인 설정을 위한 자체 프로세스가 있습니다. PlayFab 개발자 계정에서 이 설정을 수행할 수 있습니다. 계정이 없는 경우 [무료 개발자 계정에 가입](https://developer.playfab.com)할 수 있습니다.
PlayFab에서 Google을 설정하려면:
* 대시보드의 **Add-ons** 섹션으로 이동합니다.
* **Google Add-On**으로 이동합니다.
* 거기서 **Install Google** 버튼을 선택합니다.
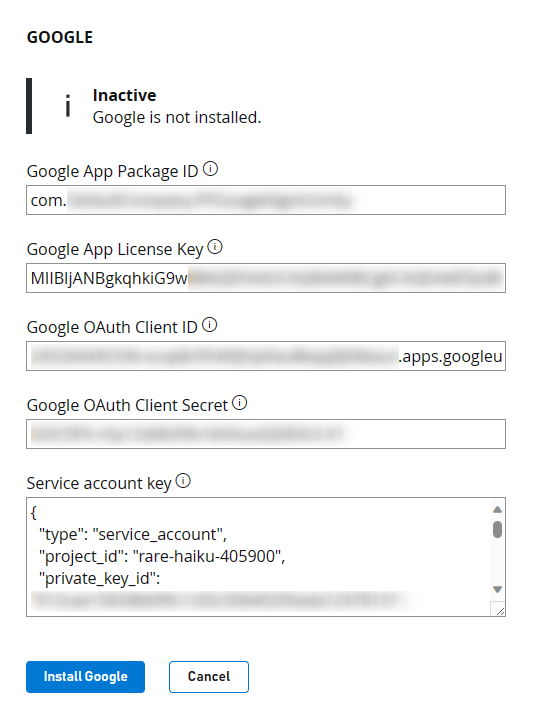
이 양식에 입력해야 하는 몇 가지 항목이 있습니다.
* **Google App Package ID** - 이 필드는 Android 패키지의 이름입니다. 예를 들어, 샘플에서는 `com.playfab.gpgexample`을 사용합니다.
* **Google App License Key** - 이 필드는 필수이지만 Google 로그인과는 관련이 없습니다. 이 필드는 **영수증 검증 API**를 사용하여 영수증 검증을 설정하기 위한 것입니다.
[Google Developer Console](https://play.google.com/apps/publish)에서 앱으로 이동하여 **Monetize** 섹션 아래에서 이 License Key를 얻을 수 있습니다. **Monetization Setup**이라는 섹션을 선택하세요. 여기서 **Licensing** 텍스트 상자가 보일 때까지 아래로 스크롤하고, Base64로 인코딩된 RSA 공개 키를 이 필드에 복사하여 붙여넣습니다.
* **Google OAuth Client ID** - Unity의 **Google Play Games SDK** 설정에서 사용한 Web Client ID.
* **Google OAuth Client Secret** - OAuth Client ID를 생성할 때 얻은 Secret Key.
* **Service Account Key** - 이 필드에는 서비스 계정 키 JSON 문자열이 필요하며, [이](https://developers.google.com/workspace/guides/create-credentials#create_a_service_account) 단계에 따라 서비스 계정 키를 만들어야 합니다. 그런 다음 [여기](https://developers.google.com/workspace/guides/create-credentials#create_credentials_for_a_service_account)의 단계에 따라 해당 서비스 계정에 대한 자격 증명을 만듭니다. 자격 증명 JSON 파일을 얻은 후 전체 JSON 콘텐츠를 이 필드에 붙여넣습니다.
애드온 구성은 저장하기 전에 다음과 같이 표시되어야 합니다.
## PlayFab Google 로그인 설정
PlayFab에는 Google 로그인 설정을 위한 자체 프로세스가 있습니다. PlayFab 개발자 계정에서 이 설정을 수행할 수 있습니다. 계정이 없는 경우 [무료 개발자 계정에 가입](https://developer.playfab.com)할 수 있습니다.
PlayFab에서 Google을 설정하려면:
* 대시보드의 **Add-ons** 섹션으로 이동합니다.
* **Google Add-On**으로 이동합니다.
* 거기서 **Install Google** 버튼을 선택합니다.
이 양식에 입력해야 하는 몇 가지 항목이 있습니다.
* **Google App Package ID** - 이 필드는 Android 패키지의 이름입니다. 예를 들어, 샘플에서는 `com.playfab.gpgexample`을 사용합니다.
* **Google App License Key** - 이 필드는 필수이지만 Google 로그인과는 관련이 없습니다. 이 필드는 **영수증 검증 API**를 사용하여 영수증 검증을 설정하기 위한 것입니다.
[Google Developer Console](https://play.google.com/apps/publish)에서 앱으로 이동하여 **Monetize** 섹션 아래에서 이 License Key를 얻을 수 있습니다. **Monetization Setup**이라는 섹션을 선택하세요. 여기서 **Licensing** 텍스트 상자가 보일 때까지 아래로 스크롤하고, Base64로 인코딩된 RSA 공개 키를 이 필드에 복사하여 붙여넣습니다.
* **Google OAuth Client ID** - Unity의 **Google Play Games SDK** 설정에서 사용한 Web Client ID.
* **Google OAuth Client Secret** - OAuth Client ID를 생성할 때 얻은 Secret Key.
* **Service Account Key** - 이 필드에는 서비스 계정 키 JSON 문자열이 필요하며, [이](https://developers.google.com/workspace/guides/create-credentials#create_a_service_account) 단계에 따라 서비스 계정 키를 만들어야 합니다. 그런 다음 [여기](https://developers.google.com/workspace/guides/create-credentials#create_credentials_for_a_service_account)의 단계에 따라 해당 서비스 계정에 대한 자격 증명을 만듭니다. 자격 증명 JSON 파일을 얻은 후 전체 JSON 콘텐츠를 이 필드에 붙여넣습니다.
애드온 구성은 저장하기 전에 다음과 같이 표시되어야 합니다.
 반드시 **Save Settings**를 클릭하세요!
## Unity 게임에 Google 로그인 추가
Google 로그인이 작동하도록 하는 코드는 상당히 최소한입니다. Start(또는 앱을 초기화하거나 시작하는 곳)에 배치하는 초기화 코드가 있습니다.
이 코드는 게임이나 앱의 아키텍처와 프레임워크에 따라 다른 곳에 있을 수 있습니다. 어쨌든 다음 코드는 Google Play Games를 초기화합니다.
Google Play Games SDK를 사용할 수 있도록 **using** 문을 잊지 *마세요*.
```csharp theme={null}
using GooglePlayGames;
using GooglePlayGames.BasicApi;
using PlayFab;
using PlayFab.ClientModels;
using UnityEngine;
public class PFGoogleSignInUnity : MonoBehaviour
{
void Start()
{
PlayGamesPlatform.Instance.Authenticate(ProcessAuthentication);
}
internal void ProcessAuthentication(SignInStatus status)
{
if (status == SignInStatus.Success)
{
PlayGamesPlatform.Instance.RequestServerSideAccess(false, ProcessServerAuthCode);
}
}
private void ProcessServerAuthCode(string serverAuthCode)
{
Debug.Log("Server Auth Code: " + serverAuthCode);
var request = new LoginWithGooglePlayGamesServicesRequest
{
ServerAuthCode = serverAuthCode,
CreateAccount = true,
TitleId = PlayFabSettings.TitleId
};
PlayFabClientAPI.LoginWithGooglePlayGamesServices(request, OnLoginWithGooglePlayGamesServicesSuccess, OnLoginWithGooglePlayGamesServicesFailure);
}
private void OnLoginWithGooglePlayGamesServicesSuccess(LoginResult result)
{
Debug.Log("PF Login Success LoginWithGooglePlayGamesServices");
}
private void OnLoginWithGooglePlayGamesServicesFailure(PlayFabError error)
{
Debug.Log("PF Login Failure LoginWithGooglePlayGamesServices: " + error.GenerateErrorReport());
}
}
```
정확히 무슨 일이 일어나고 있는지 분석해 봅시다.
* 먼저 `PlayGamesPlatform.Instance.Authenticate`로 로그인합니다. 이 함수는 결과를 처리하는 콜백 함수를 매개변수로 받으며, 수신된 *SignInStatus*를 기반으로 사용자가 성공적으로 로그인할 수 있었는지 알려줍니다.
* 테스트 계정을 앱에 추가하지 않으면 테스트 중에 콜백 *SignInStatus* 결과가 항상 *Canceled*입니다. 이 문제가 발생하는 경우 [이](https://developers.google.com/games/services/console/testpub) 가이드의 단계에 따라 Google 애플리케이션에 테스터를 추가하세요.
`PlayGamesPlatform.Instance.Authenticate` 호출은 **Google Play Games** 로그인 대화 상자를 팝업으로 트리거하는 것입니다.
* 다음으로, 로그인이 성공하면 `PlayGamesPlatform.Instance.RequestServerSideAccess`를 호출합니다. 이는 또 다른 콜백을 받고 ServerAuthCode 문자열을 반환합니다.
* 그런 다음 `PlayFabClientAPI.LoginWithGooglePlayGamesServices` 호출을 하고, 방금 Google에서 얻은 `AuthCode`를 `ServerAuthCode` 매개변수로 전달합니다.
* 마지막으로 `LoginWithGooglePlayGamesServices` 호출 결과에 따라 `OnLoginWithGooglePlayGamesServicesSuccess` 또는 `OnLoginWithGooglePlayGamesServicesFailure`가 호출됩니다. 이러한 콜백은 PlayFab에 대한 로그인 작업 결과를 처리하는 콜백입니다. 이 시점에서 대시보드에서 로그인 성공을 볼 수 있어야 합니다!
이 가이드가 도움이 되었기를 바랍니다. 하지만 질문이 있는 경우 [커뮤니티 포럼](https://community.playfab.com/)에서 자유롭게 질문하세요.
## Related topics
- [서버 익명 로그인 인증](/ko/services/playfab/identity/player-identity/platform-specific-authentication/anonymous-login.md)
- [Unity에서 Google 로그인에서 Google Play Games로 마이그레이션하기](/ko/services/playfab/identity/player-identity/platform-specific-authentication/google-play-games-sign-in-migration-details.md)
- [Google 로그인에서 Play Games 로그인으로 마이그레이션 폴백](/ko/services/playfab/identity/player-identity/platform-specific-authentication/google-play-games-sign-in-migration-fallback.md)
- [Google Marketplace 리뎀션](/ko/services/playfab/economy-monetization/economy-v2/marketplace/marketplace-redemption/google.md)
- [플레이어 로그인](/ko/services/playfab/identity/player-identity/login/index.md)
반드시 **Save Settings**를 클릭하세요!
## Unity 게임에 Google 로그인 추가
Google 로그인이 작동하도록 하는 코드는 상당히 최소한입니다. Start(또는 앱을 초기화하거나 시작하는 곳)에 배치하는 초기화 코드가 있습니다.
이 코드는 게임이나 앱의 아키텍처와 프레임워크에 따라 다른 곳에 있을 수 있습니다. 어쨌든 다음 코드는 Google Play Games를 초기화합니다.
Google Play Games SDK를 사용할 수 있도록 **using** 문을 잊지 *마세요*.
```csharp theme={null}
using GooglePlayGames;
using GooglePlayGames.BasicApi;
using PlayFab;
using PlayFab.ClientModels;
using UnityEngine;
public class PFGoogleSignInUnity : MonoBehaviour
{
void Start()
{
PlayGamesPlatform.Instance.Authenticate(ProcessAuthentication);
}
internal void ProcessAuthentication(SignInStatus status)
{
if (status == SignInStatus.Success)
{
PlayGamesPlatform.Instance.RequestServerSideAccess(false, ProcessServerAuthCode);
}
}
private void ProcessServerAuthCode(string serverAuthCode)
{
Debug.Log("Server Auth Code: " + serverAuthCode);
var request = new LoginWithGooglePlayGamesServicesRequest
{
ServerAuthCode = serverAuthCode,
CreateAccount = true,
TitleId = PlayFabSettings.TitleId
};
PlayFabClientAPI.LoginWithGooglePlayGamesServices(request, OnLoginWithGooglePlayGamesServicesSuccess, OnLoginWithGooglePlayGamesServicesFailure);
}
private void OnLoginWithGooglePlayGamesServicesSuccess(LoginResult result)
{
Debug.Log("PF Login Success LoginWithGooglePlayGamesServices");
}
private void OnLoginWithGooglePlayGamesServicesFailure(PlayFabError error)
{
Debug.Log("PF Login Failure LoginWithGooglePlayGamesServices: " + error.GenerateErrorReport());
}
}
```
정확히 무슨 일이 일어나고 있는지 분석해 봅시다.
* 먼저 `PlayGamesPlatform.Instance.Authenticate`로 로그인합니다. 이 함수는 결과를 처리하는 콜백 함수를 매개변수로 받으며, 수신된 *SignInStatus*를 기반으로 사용자가 성공적으로 로그인할 수 있었는지 알려줍니다.
* 테스트 계정을 앱에 추가하지 않으면 테스트 중에 콜백 *SignInStatus* 결과가 항상 *Canceled*입니다. 이 문제가 발생하는 경우 [이](https://developers.google.com/games/services/console/testpub) 가이드의 단계에 따라 Google 애플리케이션에 테스터를 추가하세요.
`PlayGamesPlatform.Instance.Authenticate` 호출은 **Google Play Games** 로그인 대화 상자를 팝업으로 트리거하는 것입니다.
* 다음으로, 로그인이 성공하면 `PlayGamesPlatform.Instance.RequestServerSideAccess`를 호출합니다. 이는 또 다른 콜백을 받고 ServerAuthCode 문자열을 반환합니다.
* 그런 다음 `PlayFabClientAPI.LoginWithGooglePlayGamesServices` 호출을 하고, 방금 Google에서 얻은 `AuthCode`를 `ServerAuthCode` 매개변수로 전달합니다.
* 마지막으로 `LoginWithGooglePlayGamesServices` 호출 결과에 따라 `OnLoginWithGooglePlayGamesServicesSuccess` 또는 `OnLoginWithGooglePlayGamesServicesFailure`가 호출됩니다. 이러한 콜백은 PlayFab에 대한 로그인 작업 결과를 처리하는 콜백입니다. 이 시점에서 대시보드에서 로그인 성공을 볼 수 있어야 합니다!
이 가이드가 도움이 되었기를 바랍니다. 하지만 질문이 있는 경우 [커뮤니티 포럼](https://community.playfab.com/)에서 자유롭게 질문하세요.
## Related topics
- [서버 익명 로그인 인증](/ko/services/playfab/identity/player-identity/platform-specific-authentication/anonymous-login.md)
- [Unity에서 Google 로그인에서 Google Play Games로 마이그레이션하기](/ko/services/playfab/identity/player-identity/platform-specific-authentication/google-play-games-sign-in-migration-details.md)
- [Google 로그인에서 Play Games 로그인으로 마이그레이션 폴백](/ko/services/playfab/identity/player-identity/platform-specific-authentication/google-play-games-sign-in-migration-fallback.md)
- [Google Marketplace 리뎀션](/ko/services/playfab/economy-monetization/economy-v2/marketplace/marketplace-redemption/google.md)
- [플레이어 로그인](/ko/services/playfab/identity/player-identity/login/index.md)