> ## Documentation Index
> Fetch the complete documentation index at: https://devdocs.xbox.com/llms.txt
> Use this file to discover all available pages before exploring further.

# Google과 HTML5를 사용하여 PlayFab 인증 설정하기

> HTML5와 JavaScript를 사용해 PlayFab 타이틀에 Google 로그인을 추가하는 단계별 튜토리얼로 Google API 설정과 OAuth 플레이어 인증을 다룹니다.

이 튜토리얼에서는 Google과 HTML5/JavaScript를 사용한 PlayFab 인증 프로세스를 안내합니다.

## 요구 사항

다음이 필요합니다.

* 테스트용 [Google 계정](https://google.com/).
* 등록된 `[PlayFab](https://developer.playfab.com/)` 타이틀.
* [로그인 기본 사항 및 모범 사례](/services/playfab/identity/player-identity/login/login-basics-best-practices)에 대한 이해.
* 최소한 정적 HTML 파일 역할을 할 유효한 도메인 이름이 있는 서버. 설정 방법에 대한 정보는 [테스트용 HTTP 서버 실행하기](/services/playfab/identity/player-identity/platform-specific-authentication/running-an-http-server-for-testing) 튜토리얼을 참조하세요.

## 서버 및 도메인

이 가이드를 따라가려면 유효한 도메인이 있는 서버가 필요합니다. 등록된 도메인과 원격 웹 서버가 아직 없다면 유효한 도메인 이름으로 로컬 웹 서버를 실행하는 방법에 대한 정보는 [테스트용 HTTP 서버 실행하기](/services/playfab/identity/player-identity/platform-specific-authentication/running-an-http-server-for-testing) 튜토리얼을 따르세요.

이 가이드 전반에 걸쳐 도메인이 `[http://playfab.example](http://playfab.example)`이라고 가정합니다.

## Google API 프로젝트 등록

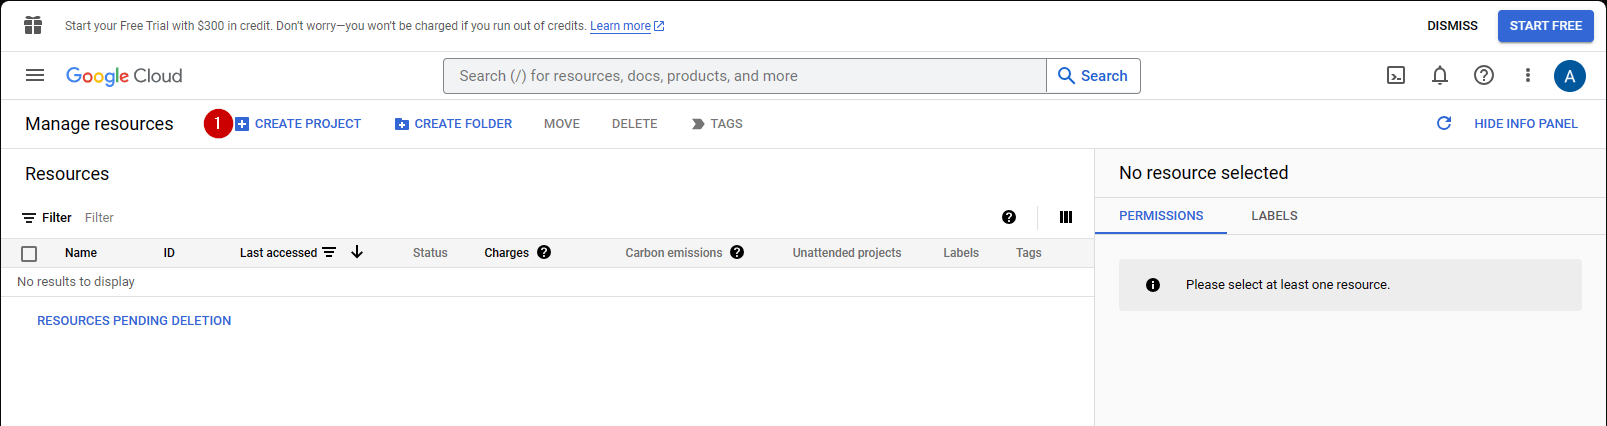
[Google API Console](https://console.developers.google.com/)로 이동하여 시작합니다.

1. **CREATE PROJECT**로 이동하여 선택합니다.

<img src="https://mintcdn.com/microsoft-4404708b/mLCHf0iQv3VidfBe/images/playfab/identity/player-identity/platform-specific-authentication/tutorials/google-html5/create-project.png?fit=max&auto=format&n=mLCHf0iQv3VidfBe&q=85&s=5b9ba00fd573b49ddbdc0a4b47d173a4" alt="Google API Manager 새 자격 증명 생성" width="1607" height="426" data-path="images/playfab/identity/player-identity/platform-specific-authentication/tutorials/google-html5/create-project.png" />

1. **Project Name** 아래의 필드를 채웁니다.
2. **Create** 버튼을 선택합니다.
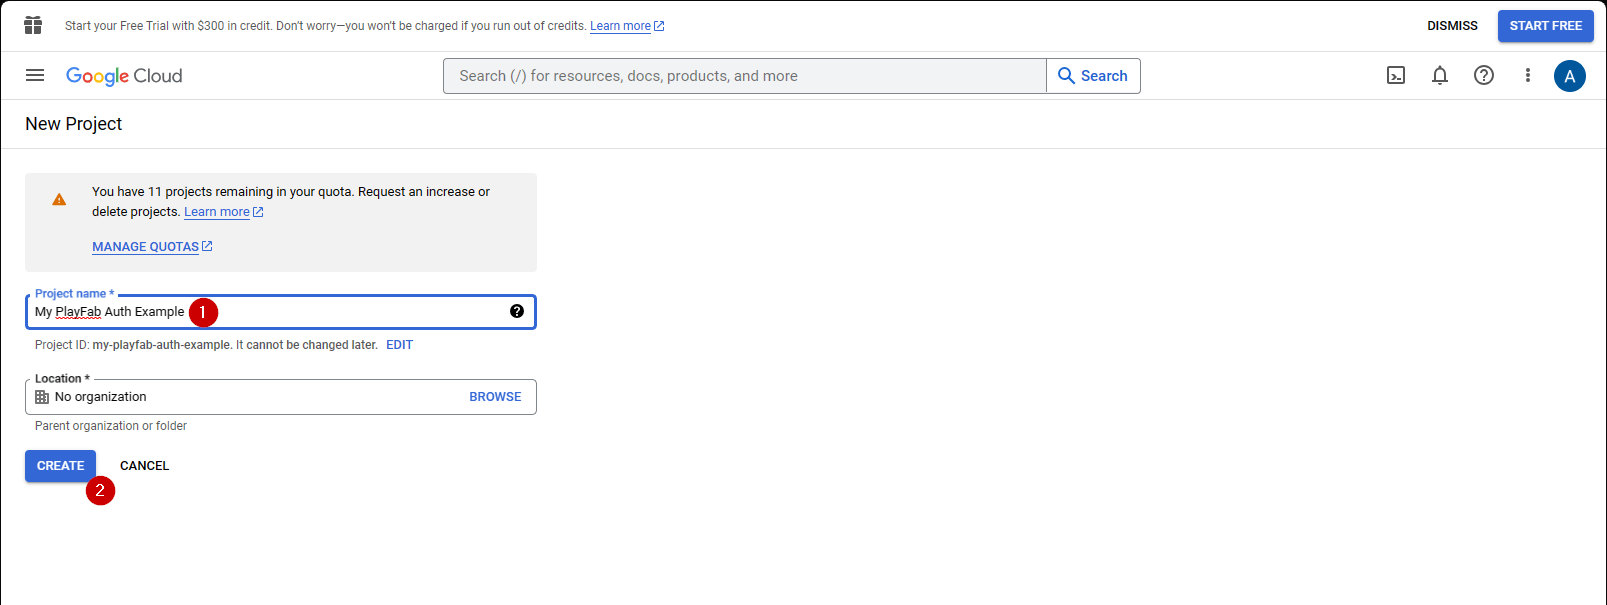
<img src="https://mintcdn.com/microsoft-4404708b/mLCHf0iQv3VidfBe/images/playfab/identity/player-identity/platform-specific-authentication/tutorials/google-html5/create-new-project.png?fit=max&auto=format&n=mLCHf0iQv3VidfBe&q=85&s=10b5bb3e56749cdc940cc756f0285d0d" alt="Google API Manager 새 프로젝트" width="1607" height="605" data-path="images/playfab/identity/player-identity/platform-specific-authentication/tutorials/google-html5/create-new-project.png" />

<Note>
  **API Manager**가 프로젝트를 생성하는 데 10-20초가 걸리는 것은 정상입니다.
</Note>

프로젝트가 생성되면:

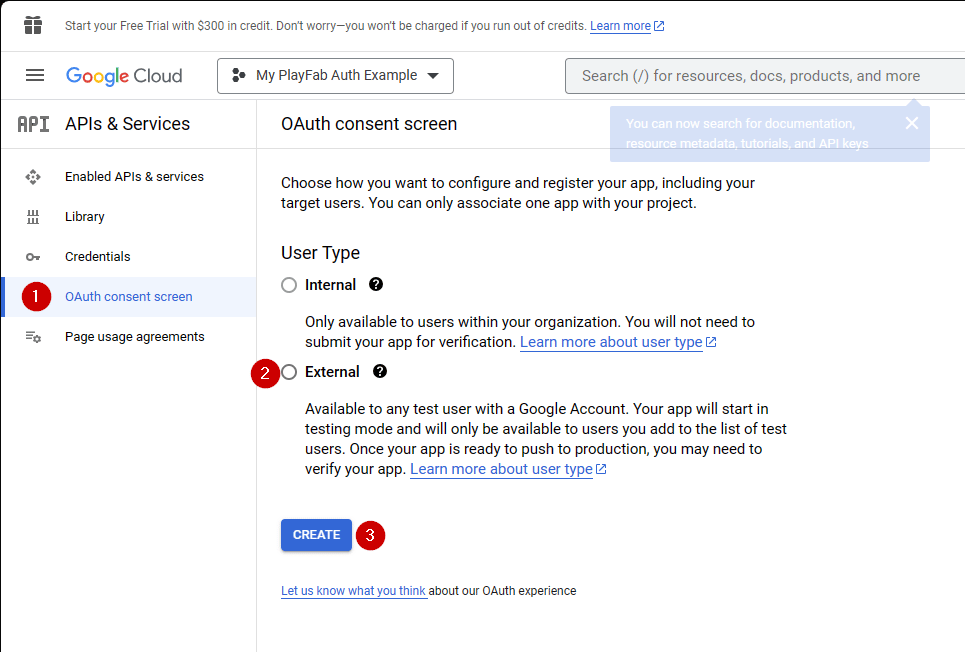
1. **OAuth consent screen**으로 이동합니다.
2. User Type 아래에서 **External**을 선택합니다.
3. 그런 다음 **Create**를 선택합니다.

<img src="https://mintcdn.com/microsoft-4404708b/mLCHf0iQv3VidfBe/images/playfab/identity/player-identity/platform-specific-authentication/tutorials/google-html5/oauth-consent-screen.png?fit=max&auto=format&n=mLCHf0iQv3VidfBe&q=85&s=f6889444d347b1f9d78f0309c2e75193" alt="Google API Manager OAuth 동의 화면" width="965" height="652" data-path="images/playfab/identity/player-identity/platform-specific-authentication/tutorials/google-html5/oauth-consent-screen.png" />

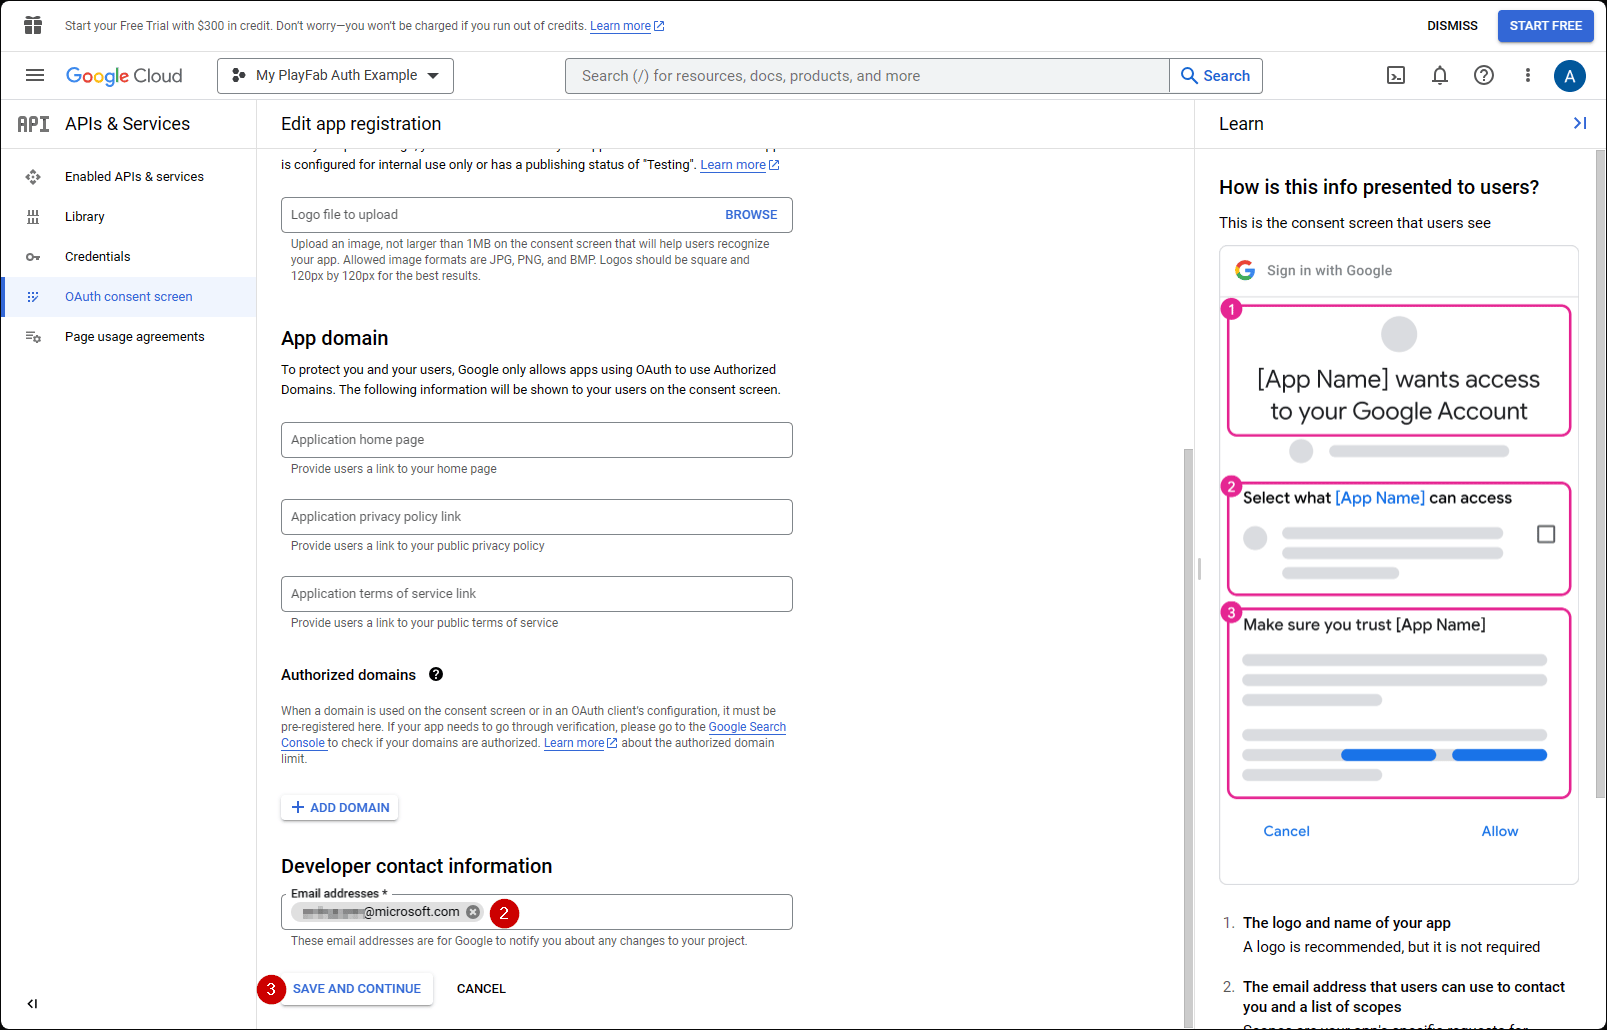
1. 앱 이름을 작성합니다.
2. **user support email**과 **Developer Contact Email**에 이메일이 있는지 확인합니다.
3. 그런 다음 **SAVE AND CONTINUE**를 선택합니다.
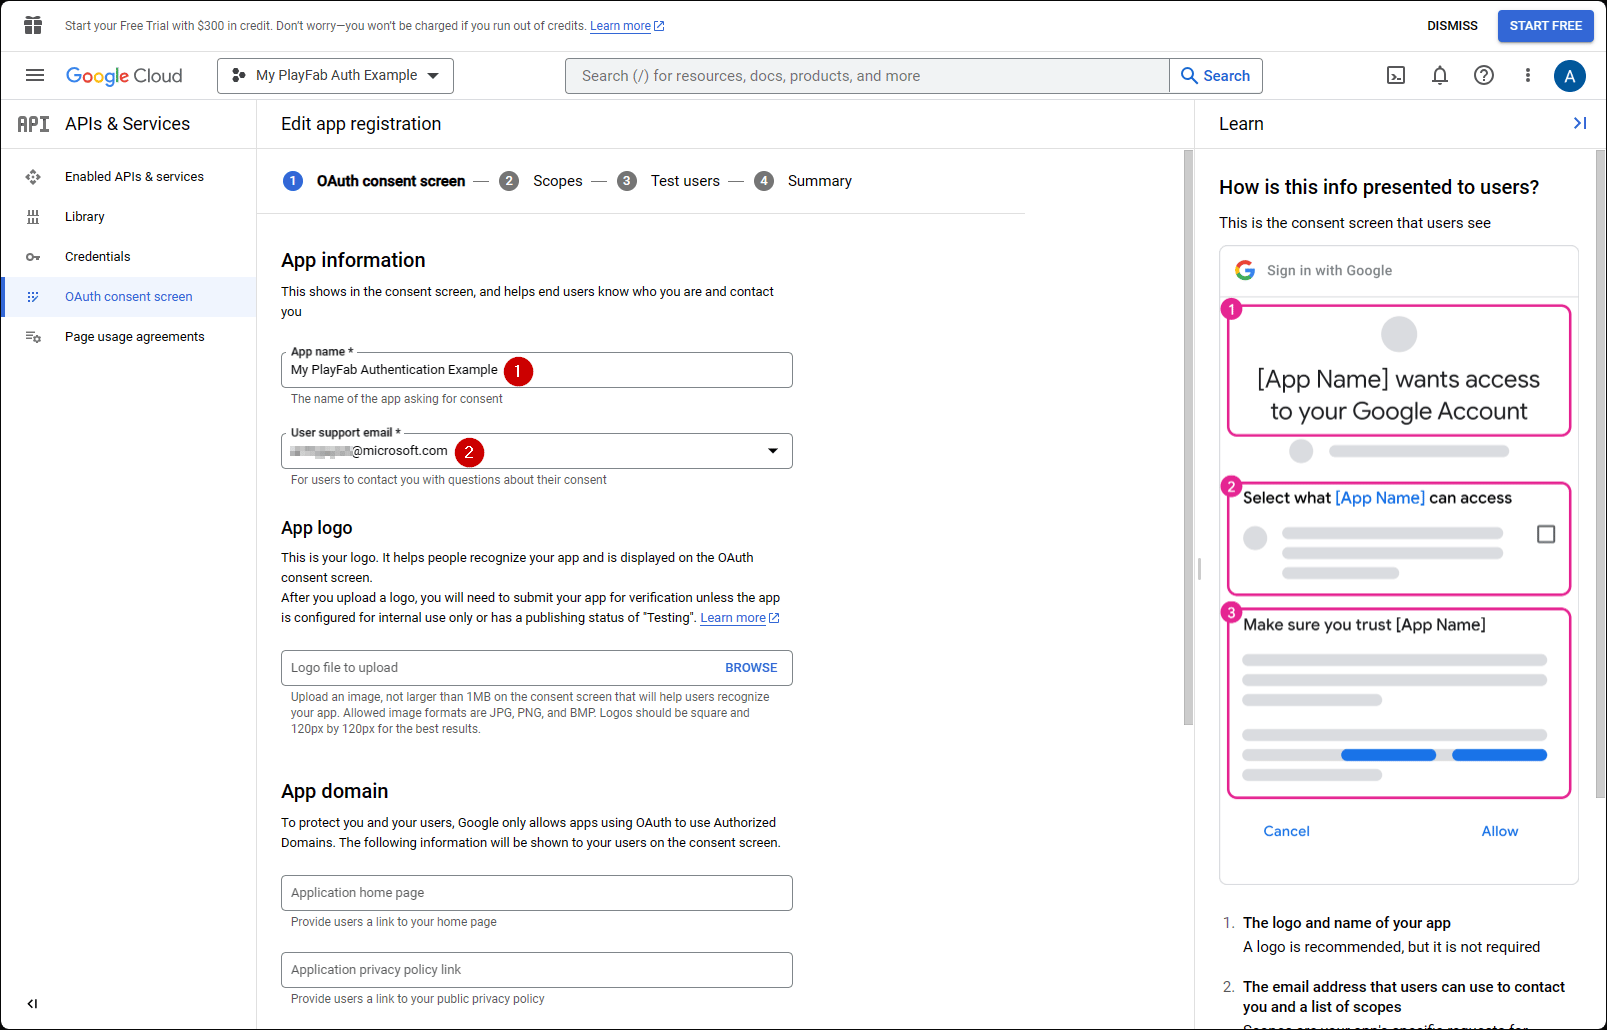
<img src="https://mintcdn.com/microsoft-4404708b/mLCHf0iQv3VidfBe/images/playfab/identity/player-identity/platform-specific-authentication/tutorials/google-html5/create-oauth-consent-screen-1.png?fit=max&auto=format&n=mLCHf0iQv3VidfBe&q=85&s=f3d7855e3f4b8ecd65cf3eb41f8f358c" alt="Google API Manager OAuth 동의 화면 구성" width="1607" height="1030" data-path="images/playfab/identity/player-identity/platform-specific-authentication/tutorials/google-html5/create-oauth-consent-screen-1.png" />

<img src="https://mintcdn.com/microsoft-4404708b/mLCHf0iQv3VidfBe/images/playfab/identity/player-identity/platform-specific-authentication/tutorials/google-html5/create-oauth-consent-screen-2.png?fit=max&auto=format&n=mLCHf0iQv3VidfBe&q=85&s=d6013db1014b105eae236b04f61a92b9" alt="Google API Manager OAuth 동의 화면 구성 2" width="1607" height="1030" data-path="images/playfab/identity/player-identity/platform-specific-authentication/tutorials/google-html5/create-oauth-consent-screen-2.png" />

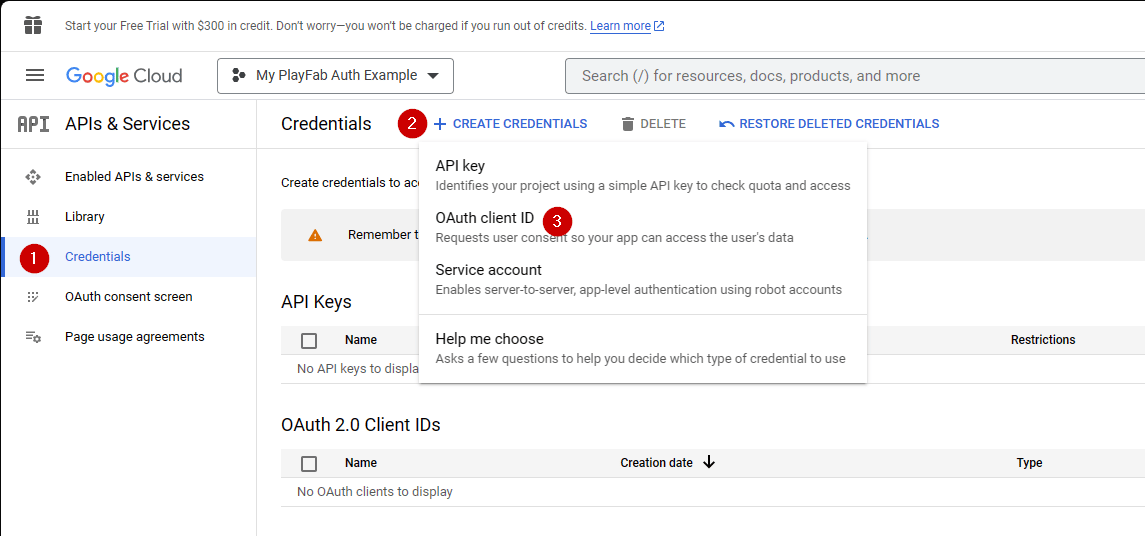
1. 다음으로, **Credentials**로 이동합니다.
2. **Create credentials**를 선택합니다.
3. 그런 다음 **OAuth client ID**를 선택합니다.
<img src="https://mintcdn.com/microsoft-4404708b/mLCHf0iQv3VidfBe/images/playfab/identity/player-identity/platform-specific-authentication/tutorials/google-html5/open-oauth-credentials.png?fit=max&auto=format&n=mLCHf0iQv3VidfBe&q=85&s=6d594083a2d96943f337a0c2489c40eb" alt="Google API Manager OAuth 자격 증명 열기" width="1145" height="536" data-path="images/playfab/identity/player-identity/platform-specific-authentication/tutorials/google-html5/open-oauth-credentials.png" />

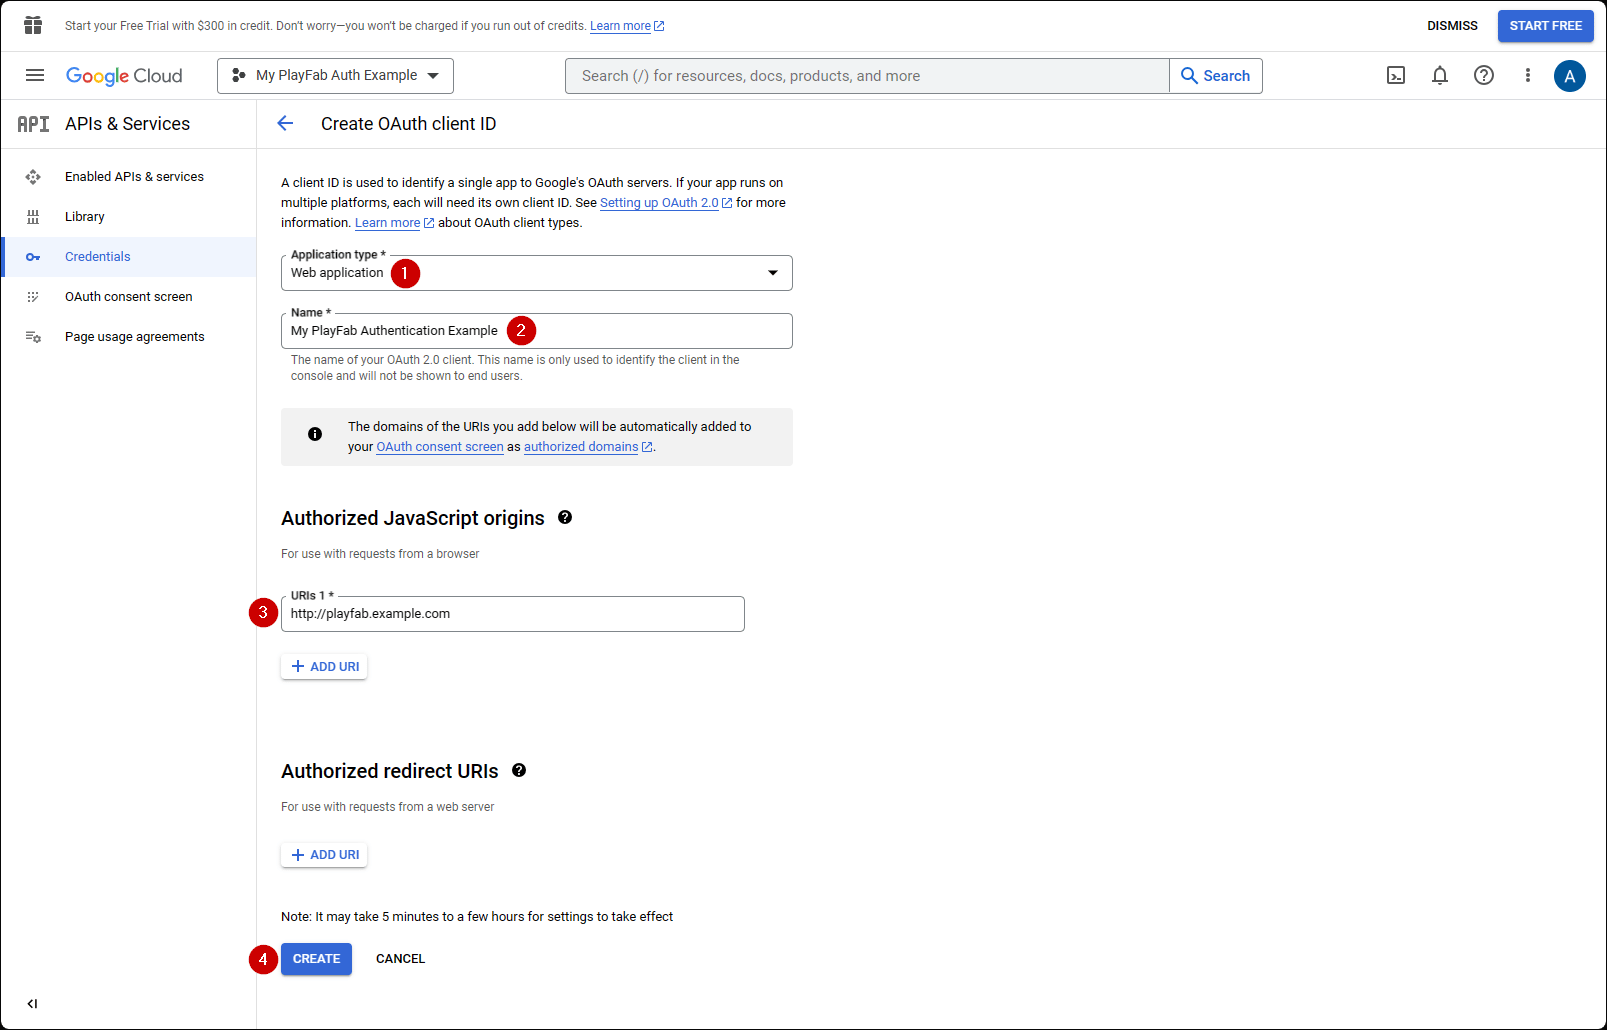
1. **Application type**으로 **Web Application**을 선택합니다.
2. 애플리케이션에 **Name**을 지정합니다.
3. **Authorized JavaScript origins**에 도메인을 추가합니다(이 경우 `[PlayFab](http://playfab.example.com)`).
4. 마지막으로 **Create** 버튼을 선택하여 변경 사항을 커밋합니다.
<img src="https://mintcdn.com/microsoft-4404708b/mLCHf0iQv3VidfBe/images/playfab/identity/player-identity/platform-specific-authentication/tutorials/google-html5/create-oauth-credentials.png?fit=max&auto=format&n=mLCHf0iQv3VidfBe&q=85&s=0cc913b14a6883d7f2286121ce8af563" alt="Google API Manager OAuth 자격 증명 생성" width="1607" height="1030" data-path="images/playfab/identity/player-identity/platform-specific-authentication/tutorials/google-html5/create-oauth-credentials.png" />

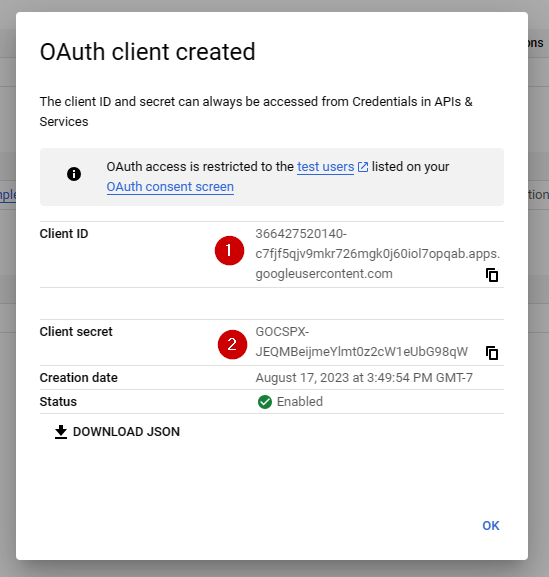
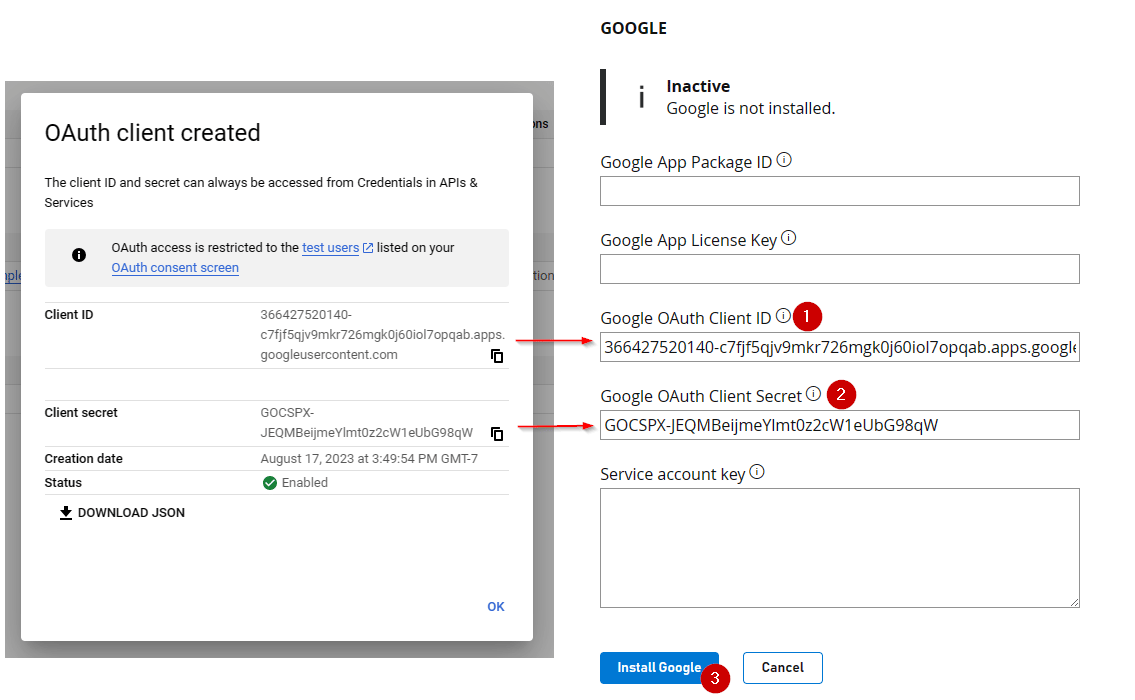
아래 표시된 **OAuth client** 화면에서 Google API Manager는 두 가지 중요한 정보를 표시합니다.

1. **client ID**
2. **client secret**
<Note>
  이 값들은 이 튜토리얼 후반부에 표시된 승인 프로세스에서 사용되므로 쉽게 접근할 수 있는 안전한 곳에 복사하여 저장하세요.
</Note>

<img src="https://mintcdn.com/microsoft-4404708b/mLCHf0iQv3VidfBe/images/playfab/identity/player-identity/platform-specific-authentication/tutorials/google-html5/oauth-client-credentials.png?fit=max&auto=format&n=mLCHf0iQv3VidfBe&q=85&s=33427703b3ddb679666f2d4c0632e0c8" alt="Google API Manager OAuth 클라이언트 ID 및 시크릿" width="549" height="577" data-path="images/playfab/identity/player-identity/platform-specific-authentication/tutorials/google-html5/oauth-client-credentials.png" />

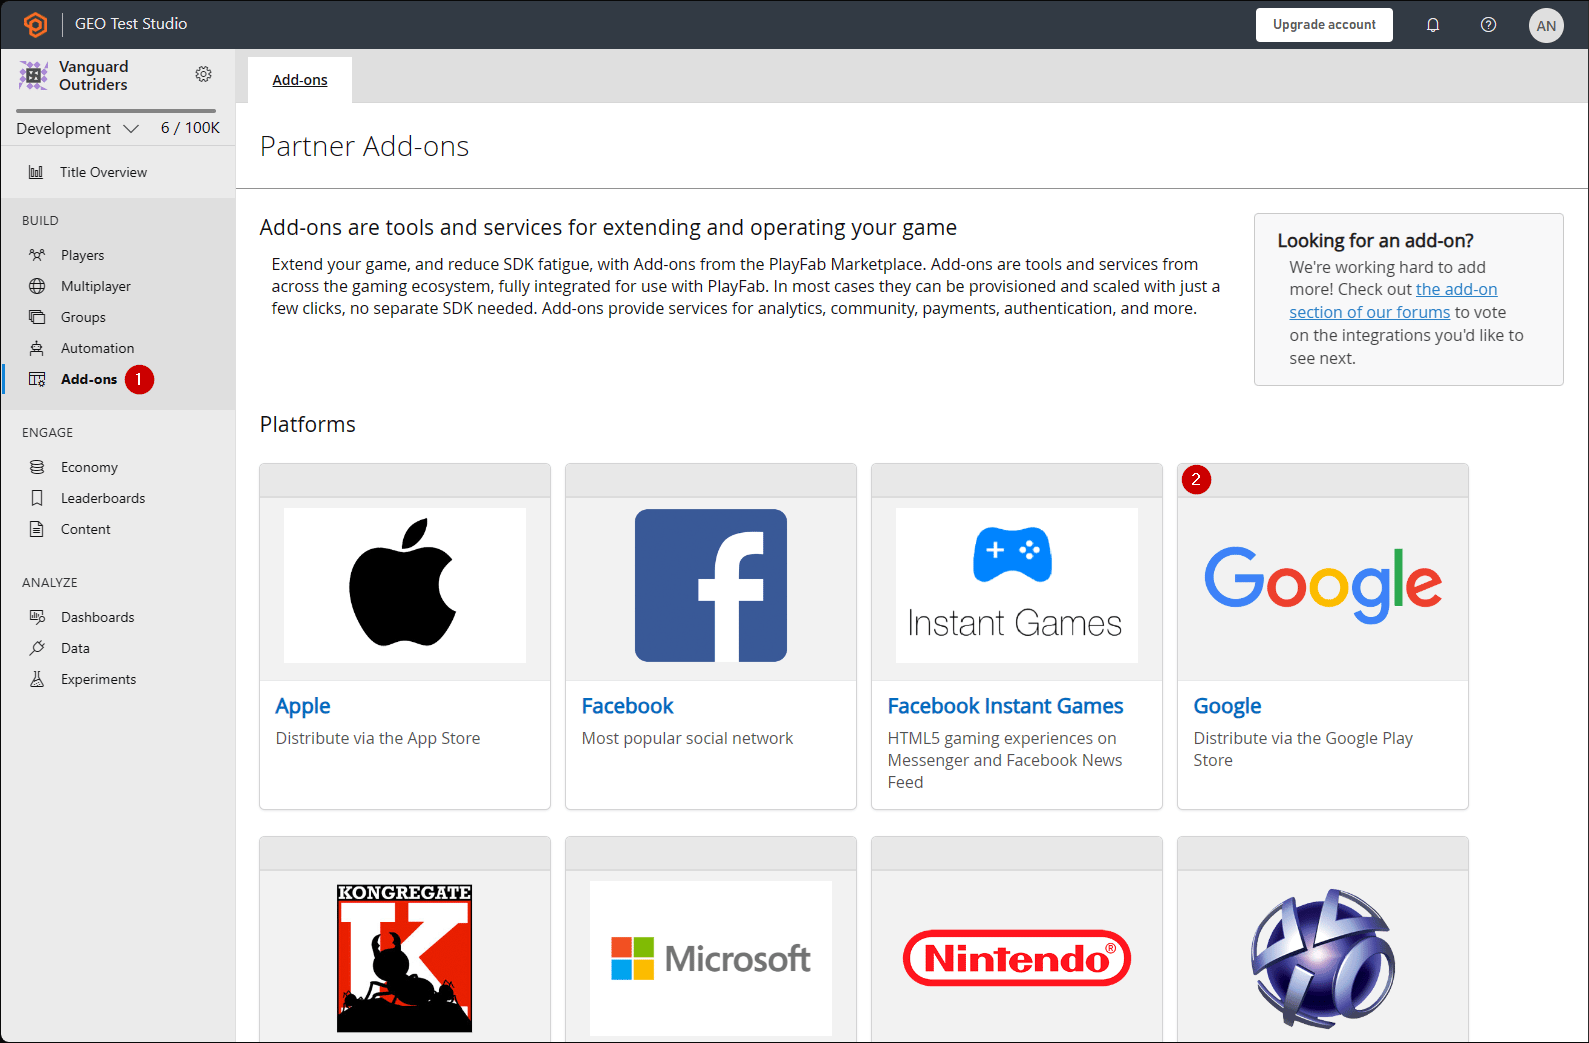
타이틀의 PlayFab **Game Manager** 페이지로 이동합니다.

1. 메뉴에서 **Add-ons**로 이동합니다.
2. **Google Add-on** 아이콘/링크를 찾아 엽니다.
<img src="https://mintcdn.com/microsoft-4404708b/mLCHf0iQv3VidfBe/images/playfab/identity/player-identity/platform-specific-authentication/tutorials/google-html5/open-google-add-on.png?fit=max&auto=format&n=mLCHf0iQv3VidfBe&q=85&s=1b0af874b0d7e46cf30337e322f0004a" alt="PlayFab Game Manager Add-on" width="1589" height="1043" data-path="images/playfab/identity/player-identity/platform-specific-authentication/tutorials/google-html5/open-google-add-on.png" />

1. **Client ID**를 입력합니다.
2. **Client secret**을 입력합니다.
3. 그런 다음 **Install Google** 버튼을 선택합니다.
<img src="https://mintcdn.com/microsoft-4404708b/mLCHf0iQv3VidfBe/images/playfab/identity/player-identity/platform-specific-authentication/tutorials/google-html5/install-google-add-on.png?fit=max&auto=format&n=mLCHf0iQv3VidfBe&q=85&s=d84b1601417c536b97d909df1ae1f58c" alt="PlayFab Game Manager Google Add-on 설치" width="1135" height="700" data-path="images/playfab/identity/player-identity/platform-specific-authentication/tutorials/google-html5/install-google-add-on.png" />

<Note>
  2017년 7월 기준으로 **Google API Manager**는 **Allowed JS** 원본 도메인을 제대로 연결하지 *않는* 경우가 있습니다. **"idpiframe\_initialization\_failed", details: "Not a valid origin for the client: somedomain.com..."** 오류가 발생하는 경우, 자격 증명을 제거하고 다시 생성하세요. *전체 프로젝트를 삭제할 필요는 없으며, 자격 증명만 삭제하면 됩니다.*
</Note>

## 액세스 토큰을 사용한 테스트

이 예제에서는 기존 액세스 토큰 방식을 사용하여 LoginWithGoogleAccount API를 테스트하는 방법을 보여줍니다. 테스트를 위해 아래 제공된 HTML 코드를 사용하세요.

<Note>
  `YOUR_CLIENT_ID`와 `YOUR_PLAYFAB_TITLE`을 자신의 값으로 *반드시* 교체하세요.
</Note>

<Note>
  TypeScript 타이핑 파일의 **LoginWithGoogleAccountRequest** 객체에 **AccessToken** 매개변수가 누락되어 있습니다. Node SDK와 함께 TypeScript를 사용하는 경우, 커스텀 타입 `interface LoginRequest extends PlayFabClientModels.LoginWithGoogleAccountRequest { AccessToken: string; }`을 생성하고 API를 사용할 때 타입을 캐스팅할 수 있습니다: `PlayFabClient.LoginWithGoogleAccount( { AccessToken: accessToken, CreateAccount: true, } as LoginRequest, onPlayFabResponse);`.
</Note>

```html theme={null}
<!DOCTYPE html>
<html>
  <head>
    <script src="https://accounts.google.com/gsi/client" onload="initClient()" async defer></script>
    <script src="https://download.playfab.com/PlayFabClientApi.js"></script>
  </head>
  <body>
    <script>
      var client;
      function initClient() {
          console.log("Initializing Google token client on page load");
          client = google.accounts.oauth2.initTokenClient({
              client_id: "YOUR_CLIENT_ID", // TODO: PUT YOUR GOOGLE CLIENT_ID HERE!
              callback: "onTokenResponse",
              scope: "https://www.googleapis.com/auth/userinfo.profile",
              callback: (tokenResponse) => {
                  access_token = tokenResponse.access_token;
                  onSignIn();
              }
          });
      }

      function getToken() {
        client.requestAccessToken();
      }

      // Invoked after user has signed in with Google
      function onSignIn() {
          // Execute LoginWithGoogleAccount API call using the Google access token. Please replace TitleId.
          logLine("Attempting PlayFab Sign-in using LoginWithGoogleAccount");
          PlayFabClientSDK.LoginWithGoogleAccount({
              AccessToken: access_token, // This access token is generated after a user has signed into Google
              CreateAccount: true,
              TitleId: "YOUR_PLAYFAB_TITLE", // TODO: PUT YOUR TITLE ID HERE!
          }, onPlayFabResponse);
      }

      // Handles response from PlayFab
      function onPlayFabResponse(response, error) {
          if (response)
              logLine("Response: " + JSON.stringify(response));
          if (error)
              logLine("Error: " + JSON.stringify(error));
      }

      function logLine(message) {
          var textnode = document.createTextNode(message);
          document.body.appendChild(textnode);
          var br = document.createElement("br");
          document.body.appendChild(br);
      }
    </script>
    <h1>Google Access Token Auth Example</h1>
    <!-- Clicking this button will prompt the user to sign into Google. Once they have signed into Google, LoginWithGoogleAccount is automatically called. -->
    <button onclick="getToken();">Sign into Google</button><br><br>
  </body>
</html>
```

**(사용 중단된) Google Sign-in Platform 라이브러리를 사용한 테스트**

<Note>
  아래 샘플은 Google Sign-In 플랫폼 라이브러리를 사용합니다. **[Google Identity 공개 문서 사이트](https://developers.google.com/identity/gsi/web/guides/migration)에 따르면 웹용 Google Sign-In JavaScript 플랫폼 라이브러리는 2023년 3월 31일에 사용 중단됩니다**. 이 샘플은 향후 새로 생성된 Google 클라이언트에서는 작동하지 않습니다. 최신 Google Identity Services 라이브러리를 사용하는 이전 코드 샘플을 참조하세요!
</Note>

```html theme={null}
<!DOCTYPE html>
<html>
<head>
    <!-- Special meta tag allows you to pass Google Client ID. Replace the content attribute value with your own Client Id -->
    <meta name="google-signin-client_id" content="YOUR_CLIENT_ID"><!-- // TODO: PUT YOUR GOOGLE CLIENT_ID HERE! -->
    <!-- Load Google platform SDK-->
    <script src="https://apis.google.com/js/platform.js" async defer></script>
    <!-- Load PlayFab Client JavaScript SDK -->
    <script src="https://download.playfab.com/PlayFabClientApi.js"></script>
</head>
<body>
    <p>Google Access Token Auth Example</p>
    <!-- Neat Google button gets styled automatically when Google platform SDK is loaded -->
    <div class="g-signin2" data-onsuccess="onSignIn"></div>
    <script>
        // Invoked when user has signed in with Google
        function onSignIn() {
            // Retrieve access token
            var accessToken = gapi.auth2.getAuthInstance().currentUser.get().getAuthResponse(true).access_token;
            // Execute LoginWithGoogleAccount API call using the access token. Please replace TitleID with your own.
            logLine("Attempting PlayFab Sign-in using LoginWithGoogleAccount");
            PlayFabClientSDK.LoginWithGoogleAccount({
                ServerAuthCode: accessToken,
                CreateAccount : true,
                TitleId: "YOUR_PLAYFAB_TITLE", // TODO: PUT YOUR TITLE ID HERE!
            }, onPlayFabResponse);
        }

        // Handles response from PlayFab
        function onPlayFabResponse(response, error) {
            if (response)
                logLine("Response: " + JSON.stringify(response));
            if (error)
                logLine("Error: " + JSON.stringify(error));
        }

        function logLine(message) {
            var textnode = document.createTextNode(message);
            document.body.appendChild(textnode);
            var br = document.createElement("br");
            document.body.appendChild(br);
        }
    </script>
</body>
</html>
```

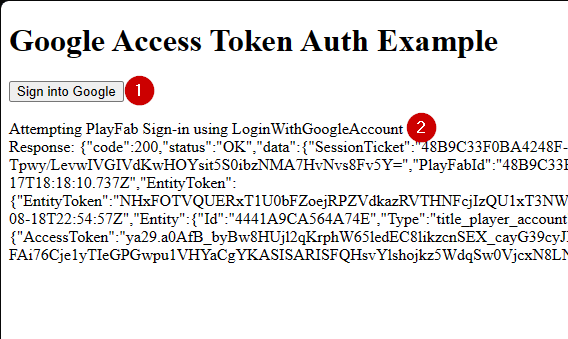
웹 서버를 사용하여 이 페이지를 열고, Google 프로젝트 구성 중에 지정한 URL(이 경우 `http://playfab.example`)을 사용하여 이 페이지에 접근하세요.

1. 페이지가 열리면 **G Signed In**을 선택하고 일반적인 Google 인증 흐름을 따르세요.
2. 완료되면 스크립트가 PlayFab 측에서 인증을 시도하고 결과를 출력합니다.
<img src="https://mintcdn.com/microsoft-4404708b/mLCHf0iQv3VidfBe/images/playfab/identity/player-identity/platform-specific-authentication/tutorials/google-html5/google-auth-example.png?fit=max&auto=format&n=mLCHf0iQv3VidfBe&q=85&s=b931669ffe5a96cb90404383ab650072" alt="Google 인증 예시" width="568" height="339" data-path="images/playfab/identity/player-identity/platform-specific-authentication/tutorials/google-html5/google-auth-example.png" />

<Note>
  Google 인증 세션이 *이미 실행 중*인 경우 **G Signed In**을 선택할 필요가 없습니다. 모든 것이 자동으로 진행됩니다.
</Note>


## Related topics

- [Facebook과 HTML5를 사용하여 PlayFab 인증 설정하기](/ko/services/playfab/identity/player-identity/platform-specific-authentication/facebook-html5.md)
- [Kongregate와 HTML5를 사용하여 PlayFab 인증 설정하기](/ko/services/playfab/identity/player-identity/platform-specific-authentication/kongregate-html5.md)
- [Twitch와 HTML5를 사용하여 PlayFab 인증 설정하기](/ko/services/playfab/identity/player-identity/platform-specific-authentication/twitch-html5.md)
- [PlayFab용 Battle.net 로그인 설정하기](/ko/services/playfab/identity/player-identity/platform-specific-authentication/battlenet-login.md)
- [Steam과 Unity를 사용하여 PlayFab 인증 설정하기](/ko/services/playfab/identity/player-identity/platform-specific-authentication/steam-unity.md)