> ## Documentation Index
> Fetch the complete documentation index at: https://devdocs.xbox.com/llms.txt
> Use this file to discover all available pages before exploring further.
# Facebook과 Unity를 사용하여 PlayFab 인증 설정하기
> PlayFab SDK를 사용해 Unity 프로젝트에 Facebook 로그인을 통합하는 단계별 튜토리얼로 Facebook 앱 설정과 플레이어 인증 코드를 다룹니다.
이 튜토리얼에서는 Facebook과 Unity를 사용한 PlayFab 인증 예제를 안내합니다.
## 요구 사항
* [Unity 5+](https://unity3d.com/)와 생성된 프로젝트.
* 테스트용 [Facebook 계정](https://www.facebook.com/).
* 프로젝트로 임포트된 [Facebook SDK](https://developers.facebook.com/docs/unity/).
* 등록된 [PlayFab](https://developer.playfab.com/) 타이틀.
* 타이틀 참조가 구성되어 프로젝트로 임포트된 [PlayFab SDK](https://aka.ms/playfabunitysdkdownload).
* [로그인 기본 사항 및 모범 사례](/services/playfab/identity/player-identity/login/login-basics-best-practices)에 대한 이해.
## 구현
### Facebook 애플리케이션 등록
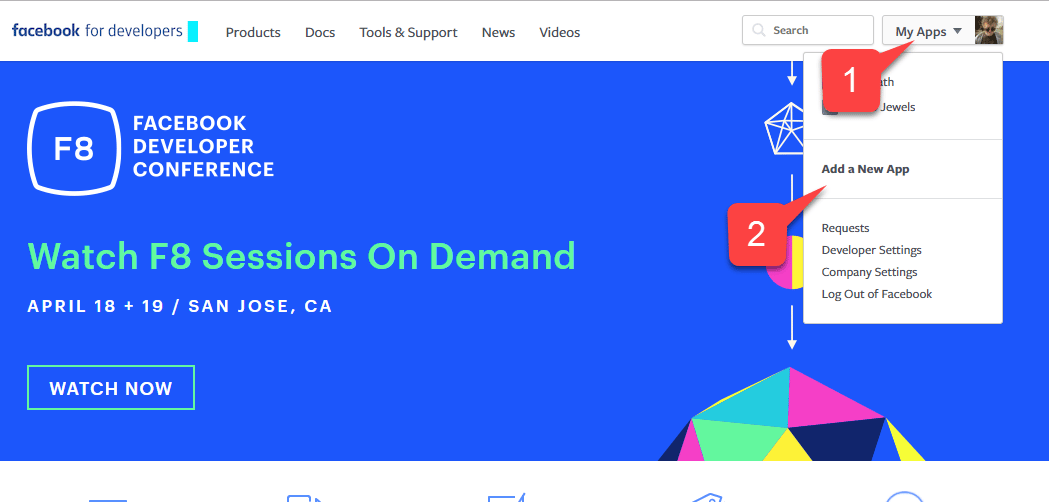
[Facebook Developer Portal](https://developers.facebook.com/)로 이동하여 시작합니다.
1. 마우스를 **My Apps** 버튼 위로 이동합니다.
2. 아래 그림과 같이 **Add a New App**을 선택합니다.
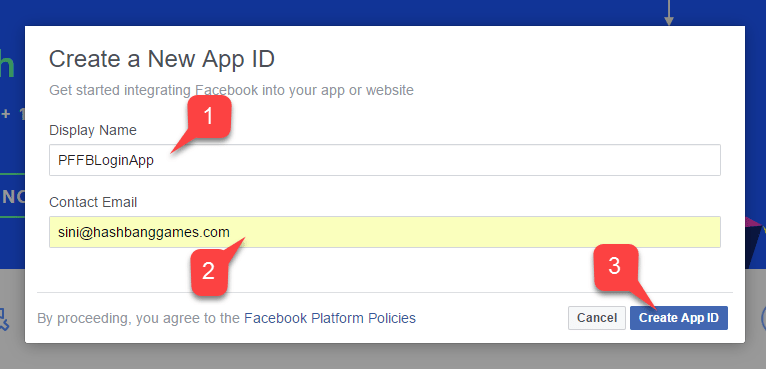
 새 **애플리케이션** 팝업이 열립니다.
1. **애플리케이션** 이름을 입력합니다.
2. **Contact Email**을 입력합니다.
아래 그림과 같이 자신만의 *고유한* **애플리케이션 이름**과 **이메일**을 사용하세요.
새 **애플리케이션** 팝업이 열립니다.
1. **애플리케이션** 이름을 입력합니다.
2. **Contact Email**을 입력합니다.
아래 그림과 같이 자신만의 *고유한* **애플리케이션 이름**과 **이메일**을 사용하세요.
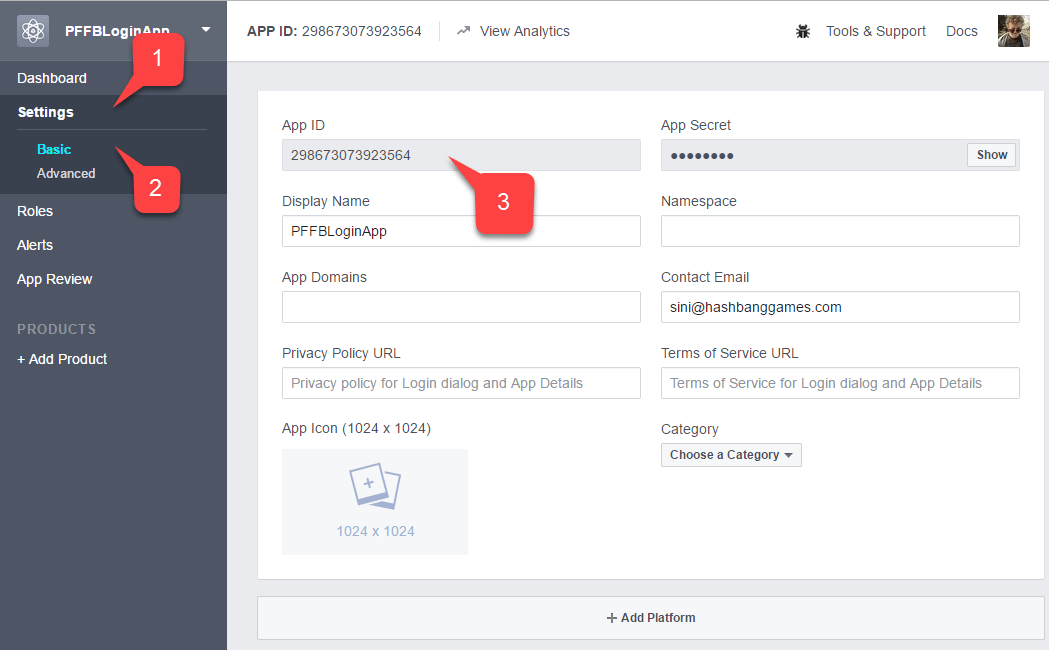
 1. **Settings** 탭으로 이동합니다.
2. 그런 다음 **Basic** 하위 탭으로 이동합니다.
3. **애플리케이션 ID**를 찾습니다.
* 쉽게 접근할 수 있는 안전한 곳에 복사해 두세요.
나중에 Facebook SDK를 설정하는 데 사용합니다.
1. **Settings** 탭으로 이동합니다.
2. 그런 다음 **Basic** 하위 탭으로 이동합니다.
3. **애플리케이션 ID**를 찾습니다.
* 쉽게 접근할 수 있는 안전한 곳에 복사해 두세요.
나중에 Facebook SDK를 설정하는 데 사용합니다.
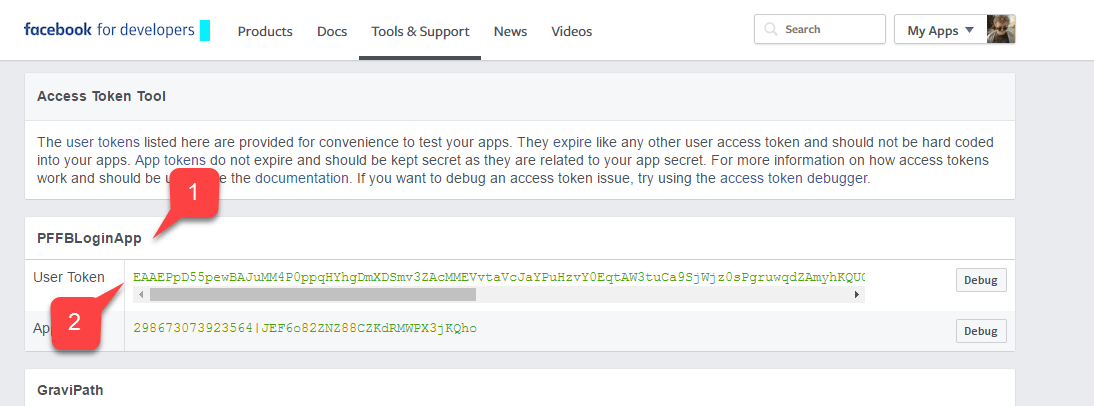
 [Facebook Access Token Tool](https://developers.facebook.com/tools/accesstoken/)로 이동합니다.
1. 목록에서 **App**을 찾습니다.
2. 할당된 **User Token**이 있는지 확인합니다.
할당된 사용자 토큰이 *없는* 경우 화면 오른쪽의 버튼을 사용하여 요청하세요. 새로운 사용자 토큰이 필요할 때마다 이 페이지를 참조하세요. PC에서 테스트 중 인증이 실패하면 토큰 만료가 가장 유력한 원인일 수 있습니다. 페이지를 새로 고쳐 새 사용자 토큰을 받고 다시 테스트하세요.
[Facebook Access Token Tool](https://developers.facebook.com/tools/accesstoken/)로 이동합니다.
1. 목록에서 **App**을 찾습니다.
2. 할당된 **User Token**이 있는지 확인합니다.
할당된 사용자 토큰이 *없는* 경우 화면 오른쪽의 버튼을 사용하여 요청하세요. 새로운 사용자 토큰이 필요할 때마다 이 페이지를 참조하세요. PC에서 테스트 중 인증이 실패하면 토큰 만료가 가장 유력한 원인일 수 있습니다. 페이지를 새로 고쳐 새 사용자 토큰을 받고 다시 테스트하세요.
 1. **Application Manager** 페이지에서 **+ Add Products**로 이동합니다.
2. **Facebook Login** 항목을 찾아 **Get Started**를 선택합니다.
1. **Application Manager** 페이지에서 **+ Add Products**로 이동합니다.
2. **Facebook Login** 항목을 찾아 **Get Started**를 선택합니다.
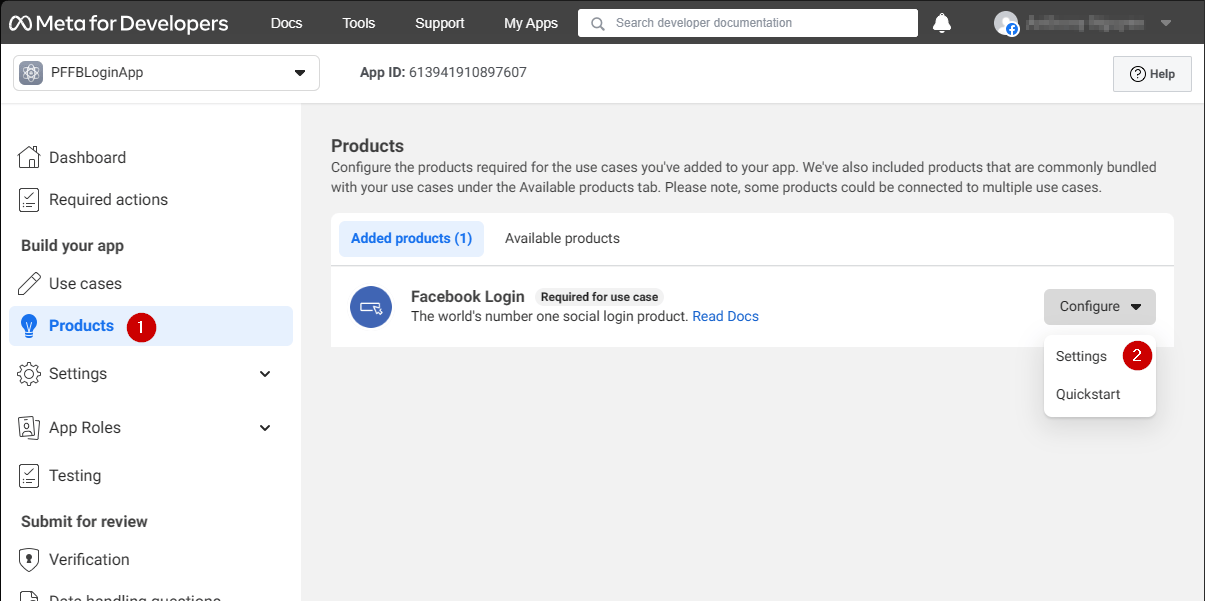 **Login** 제품 설정 페이지가 열립니다.
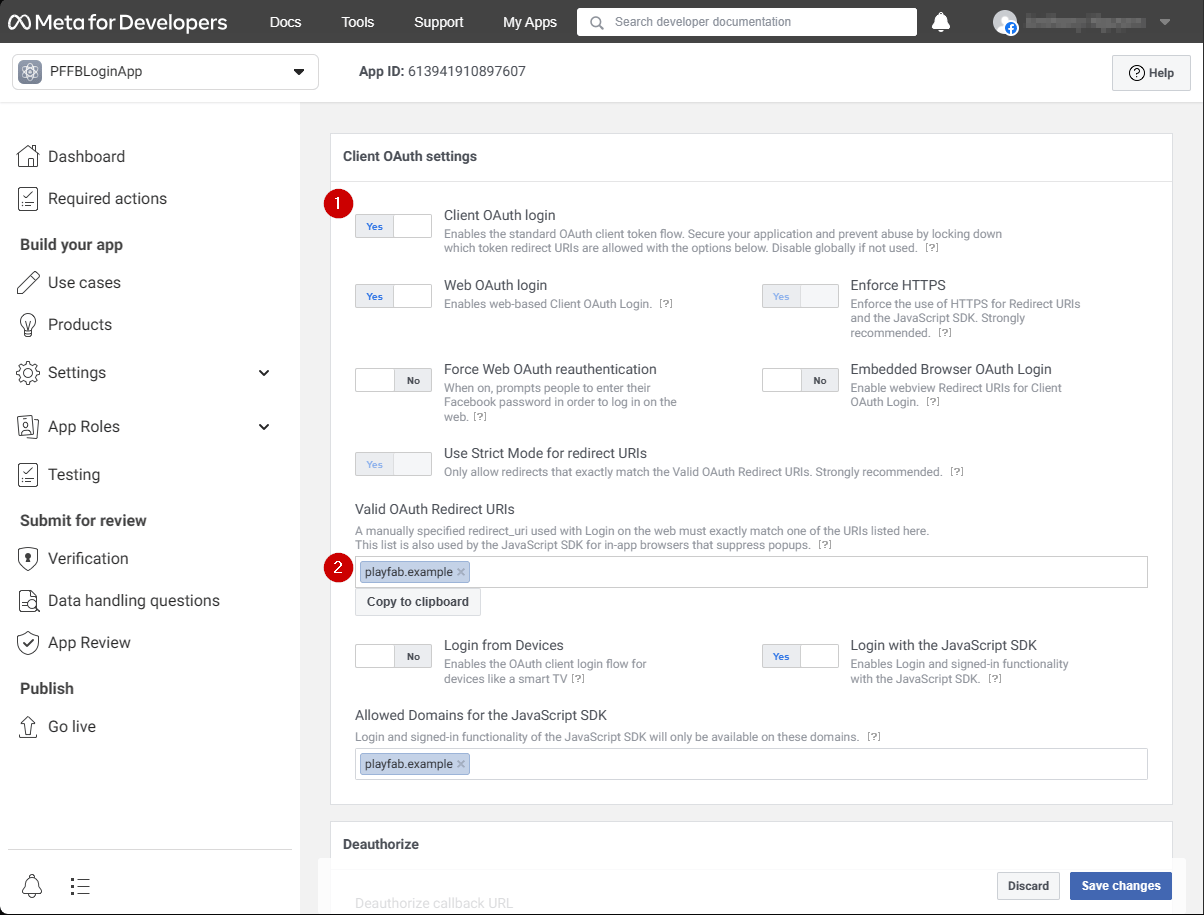
1. **Login** 제품 **Settings** 페이지가 열려 있는지 확인합니다.
2. **Client OAuth**와 **Web OAuth**가 모두 켜져 있는지 확인합니다.
**Login** 제품 설정 페이지가 열립니다.
1. **Login** 제품 **Settings** 페이지가 열려 있는지 확인합니다.
2. **Client OAuth**와 **Web OAuth**가 모두 켜져 있는지 확인합니다.
 ### Facebook SDK 설정
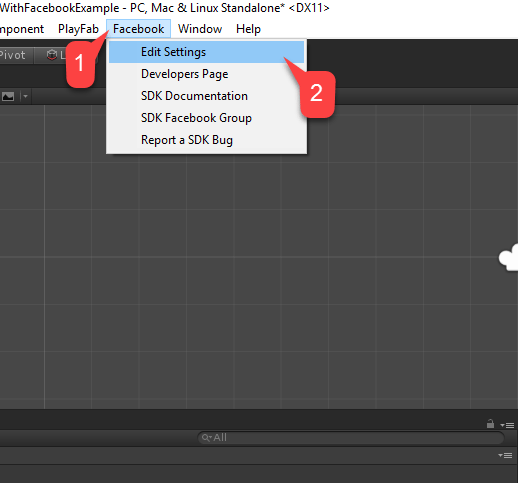
**Unity 프로젝트**를 엽니다.
1. 파일 메뉴에서 **Facebook**을 선택합니다.
2. 그런 다음 **Edit Settings**를 선택합니다.
### Facebook SDK 설정
**Unity 프로젝트**를 엽니다.
1. 파일 메뉴에서 **Facebook**을 선택합니다.
2. 그런 다음 **Edit Settings**를 선택합니다.
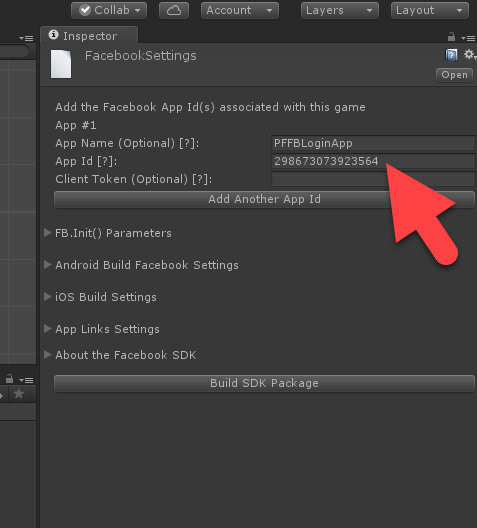
 **Inspector** 창에 현재 **Facebook SDK** 구성이 표시됩니다.
* 아래 그림과 같이 해당 필드에 **애플리케이션 ID**를 입력합니다.
**Inspector** 창에 현재 **Facebook SDK** 구성이 표시됩니다.
* 아래 그림과 같이 해당 필드에 **애플리케이션 ID**를 입력합니다.
 ### 간단한 인증 스크립트
새 **Game Object**를 생성하고 아래 그림과 같이 **PlayfabFacebookAuthExample**로 이름을 바꿉니다.
### 간단한 인증 스크립트
새 **Game Object**를 생성하고 아래 그림과 같이 **PlayfabFacebookAuthExample**로 이름을 바꿉니다.
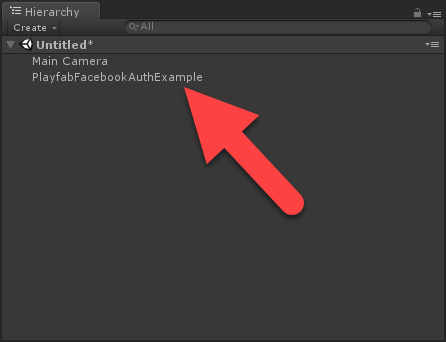 1. **PlayfabFacebookAuthExample.cs**라는 스크립트를 생성합니다.
2. 아래 그림과 같이 **Game Object**에 추가합니다.
1. **PlayfabFacebookAuthExample.cs**라는 스크립트를 생성합니다.
2. 아래 그림과 같이 **Game Object**에 추가합니다.
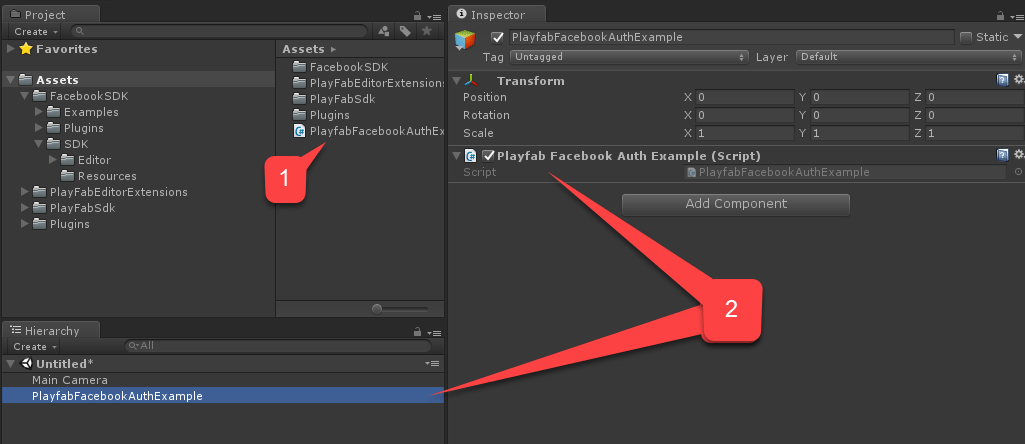 `PlayfabFacebookAuthExample.cs` 안에 다음 코드를 넣습니다.
```csharp theme={null}
// Import statements introduce all the necessary classes for this example.
using Facebook.Unity;
using PlayFab;
using PlayFab.ClientModels;
using UnityEngine;
using LoginResult = PlayFab.ClientModels.LoginResult;
public class PlayfabFacebookAuthExample : MonoBehaviour
{
// holds the latest message to be displayed on the screen
private string _message;
public void Start()
{
SetMessage("Initializing Facebook..."); // logs the given message and displays it on the screen using OnGUI method
// This call is required before any other calls to the Facebook API. We pass in the callback to be invoked once initialization is finished
FB.Init(OnFacebookInitialized);
}
private void OnFacebookInitialized()
{
SetMessage("Logging into Facebook...");
// Once Facebook SDK is initialized, if we are logged in, we log out to demonstrate the entire authentication cycle.
if (FB.IsLoggedIn)
FB.LogOut();
// We invoke basic login procedure and pass in the callback to process the result
FB.LogInWithReadPermissions(null, OnFacebookLoggedIn);
}
private void OnFacebookLoggedIn(ILoginResult result)
{
// If result has no errors, it means we have authenticated in Facebook successfully
if (result == null || string.IsNullOrEmpty(result.Error))
{
SetMessage("Facebook Auth Complete! Access Token: " + AccessToken.CurrentAccessToken.TokenString + "\nLogging into PlayFab...");
/*
* We proceed with making a call to PlayFab API. We pass in current Facebook AccessToken and let it create
* and account using CreateAccount flag set to true. We also pass the callback for Success and Failure results
*/
PlayFabClientAPI.LoginWithFacebook(new LoginWithFacebookRequest { CreateAccount = true, AccessToken = AccessToken.CurrentAccessToken.TokenString},
OnPlayfabFacebookAuthComplete, OnPlayfabFacebookAuthFailed);
}
else
{
// If Facebook authentication failed, we stop the cycle with the message
SetMessage("Facebook Auth Failed: " + result.Error + "\n" + result.RawResult, true);
}
}
// When processing both results, we just set the message, explaining what's going on.
private void OnPlayfabFacebookAuthComplete(LoginResult result)
{
SetMessage("PlayFab Facebook Auth Complete. Session ticket: " + result.SessionTicket);
}
private void OnPlayfabFacebookAuthFailed(PlayFabError error)
{
SetMessage("PlayFab Facebook Auth Failed: " + error.GenerateErrorReport(), true);
}
public void SetMessage(string message, bool error = false)
{
_message = message;
if (error)
Debug.LogError(_message);
else
Debug.Log(_message);
}
public void OnGUI()
{
var style = new GUIStyle { fontSize = 40, normal = new GUIStyleState { textColor = Color.white }, alignment = TextAnchor.MiddleCenter, wordWrap = true };
var area = new Rect(0,0,Screen.width,Screen.height);
GUI.Label(area, _message,style);
}
}
```
## 테스트
### 에디터에서 애플리케이션 실행
1. **Play** 버튼을 선택합니다. **Facebook**이 초기화되고 (인증 호출이 이루어지면) **Facebook** 인증 대화 상자가 게임 뷰에 나타납니다.
2. **User Token**을 입력합니다.
3. 아래 그림과 같이 **Send Success** 버튼을 선택합니다.
`PlayfabFacebookAuthExample.cs` 안에 다음 코드를 넣습니다.
```csharp theme={null}
// Import statements introduce all the necessary classes for this example.
using Facebook.Unity;
using PlayFab;
using PlayFab.ClientModels;
using UnityEngine;
using LoginResult = PlayFab.ClientModels.LoginResult;
public class PlayfabFacebookAuthExample : MonoBehaviour
{
// holds the latest message to be displayed on the screen
private string _message;
public void Start()
{
SetMessage("Initializing Facebook..."); // logs the given message and displays it on the screen using OnGUI method
// This call is required before any other calls to the Facebook API. We pass in the callback to be invoked once initialization is finished
FB.Init(OnFacebookInitialized);
}
private void OnFacebookInitialized()
{
SetMessage("Logging into Facebook...");
// Once Facebook SDK is initialized, if we are logged in, we log out to demonstrate the entire authentication cycle.
if (FB.IsLoggedIn)
FB.LogOut();
// We invoke basic login procedure and pass in the callback to process the result
FB.LogInWithReadPermissions(null, OnFacebookLoggedIn);
}
private void OnFacebookLoggedIn(ILoginResult result)
{
// If result has no errors, it means we have authenticated in Facebook successfully
if (result == null || string.IsNullOrEmpty(result.Error))
{
SetMessage("Facebook Auth Complete! Access Token: " + AccessToken.CurrentAccessToken.TokenString + "\nLogging into PlayFab...");
/*
* We proceed with making a call to PlayFab API. We pass in current Facebook AccessToken and let it create
* and account using CreateAccount flag set to true. We also pass the callback for Success and Failure results
*/
PlayFabClientAPI.LoginWithFacebook(new LoginWithFacebookRequest { CreateAccount = true, AccessToken = AccessToken.CurrentAccessToken.TokenString},
OnPlayfabFacebookAuthComplete, OnPlayfabFacebookAuthFailed);
}
else
{
// If Facebook authentication failed, we stop the cycle with the message
SetMessage("Facebook Auth Failed: " + result.Error + "\n" + result.RawResult, true);
}
}
// When processing both results, we just set the message, explaining what's going on.
private void OnPlayfabFacebookAuthComplete(LoginResult result)
{
SetMessage("PlayFab Facebook Auth Complete. Session ticket: " + result.SessionTicket);
}
private void OnPlayfabFacebookAuthFailed(PlayFabError error)
{
SetMessage("PlayFab Facebook Auth Failed: " + error.GenerateErrorReport(), true);
}
public void SetMessage(string message, bool error = false)
{
_message = message;
if (error)
Debug.LogError(_message);
else
Debug.Log(_message);
}
public void OnGUI()
{
var style = new GUIStyle { fontSize = 40, normal = new GUIStyleState { textColor = Color.white }, alignment = TextAnchor.MiddleCenter, wordWrap = true };
var area = new Rect(0,0,Screen.width,Screen.height);
GUI.Label(area, _message,style);
}
}
```
## 테스트
### 에디터에서 애플리케이션 실행
1. **Play** 버튼을 선택합니다. **Facebook**이 초기화되고 (인증 호출이 이루어지면) **Facebook** 인증 대화 상자가 게임 뷰에 나타납니다.
2. **User Token**을 입력합니다.
3. 아래 그림과 같이 **Send Success** 버튼을 선택합니다.
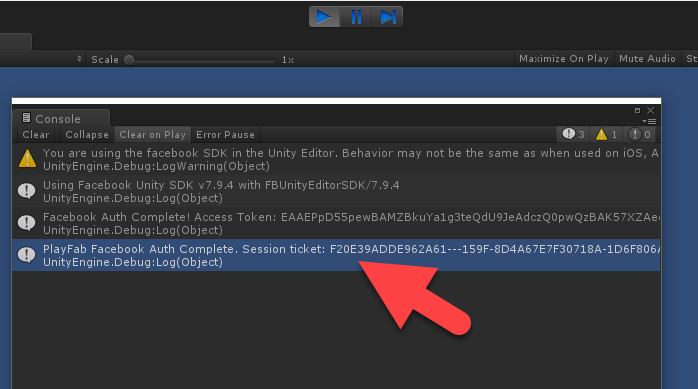
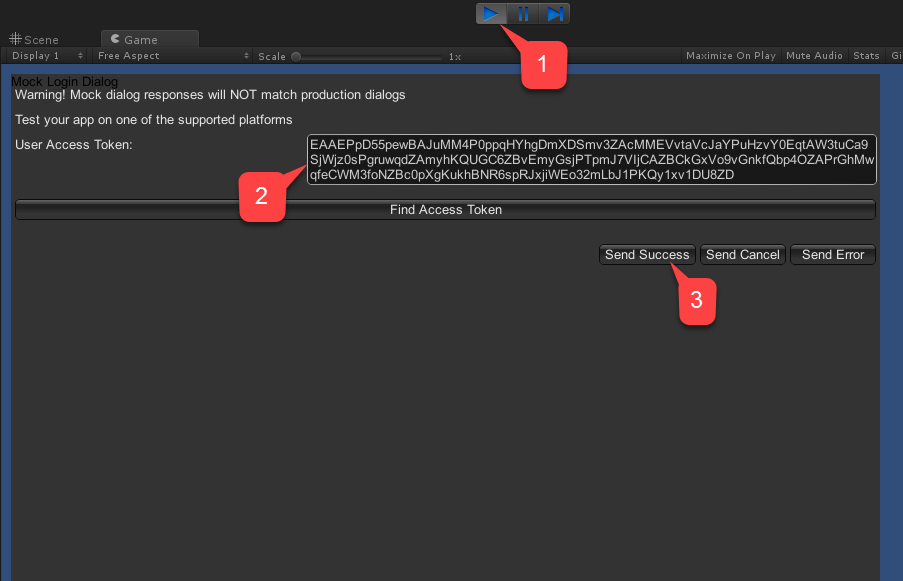 * 콘솔 출력을 확인합니다. 아래 그림과 같이 디버그 문이 렌더링되어야 합니다.
* 오류가 없다면 인증이 성공했다는 의미입니다.
* 콘솔 출력을 확인합니다. 아래 그림과 같이 디버그 문이 렌더링되어야 합니다.
* 오류가 없다면 인증이 성공했다는 의미입니다.
 ### Android에서 애플리케이션 실행
Android에서 애플리케이션을 시작하기 전에 추가 구성 단계를 수행해야 합니다.
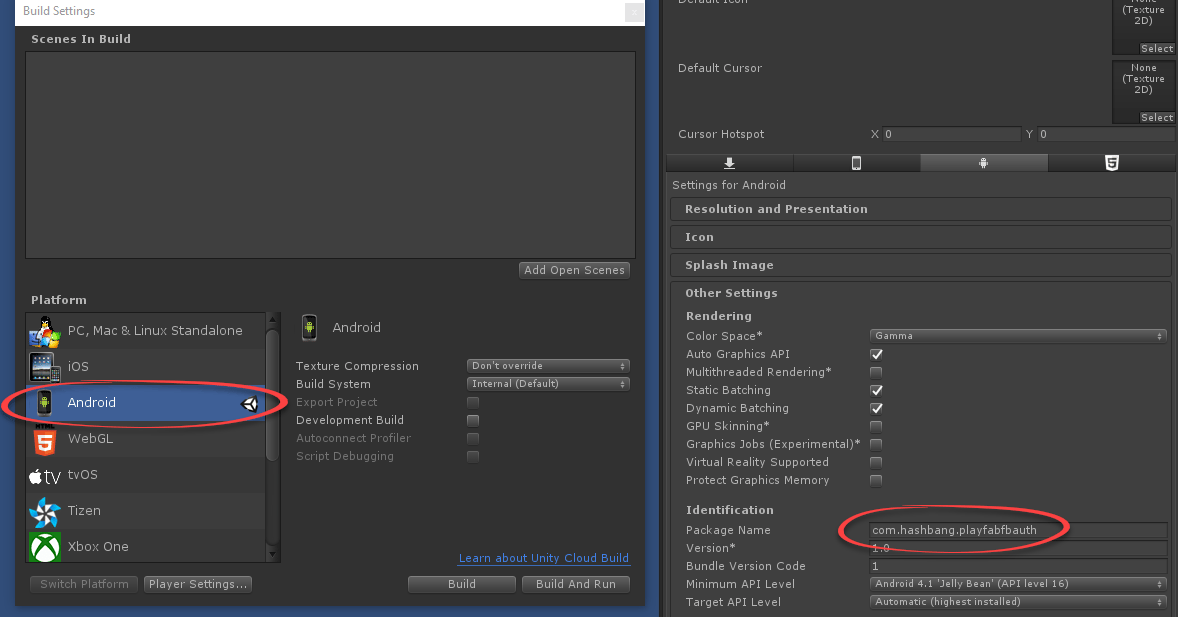
* 먼저 Android 플랫폼이 선택되어 있고 고유한 **Package ID**가 설정되어 있는지 확인해야 합니다(아래 예시 참조).
자신만의 *고유한* **Package ID**를 만드세요.
### Android에서 애플리케이션 실행
Android에서 애플리케이션을 시작하기 전에 추가 구성 단계를 수행해야 합니다.
* 먼저 Android 플랫폼이 선택되어 있고 고유한 **Package ID**가 설정되어 있는지 확인해야 합니다(아래 예시 참조).
자신만의 *고유한* **Package ID**를 만드세요.
 **선택 단계**: [Open SSL](https://wiki.openssl.org/index.php/Binaries)을 설치하고 **PATH** 환경 변수에 추가합니다. 없으면 Unity가 빌드 중에 무해한 오류를 생성합니다. 이 오류는 빌드를 중단시키거나 실행에 영향을 주지 *않습니다*.
다음으로, **Facebook 애플리케이션** 콘솔에서:
1. **Basic** 설정으로 이동합니다.
2. 아래 예시와 같이 **+ Add Platform**을 선택합니다.
**선택 단계**: [Open SSL](https://wiki.openssl.org/index.php/Binaries)을 설치하고 **PATH** 환경 변수에 추가합니다. 없으면 Unity가 빌드 중에 무해한 오류를 생성합니다. 이 오류는 빌드를 중단시키거나 실행에 영향을 주지 *않습니다*.
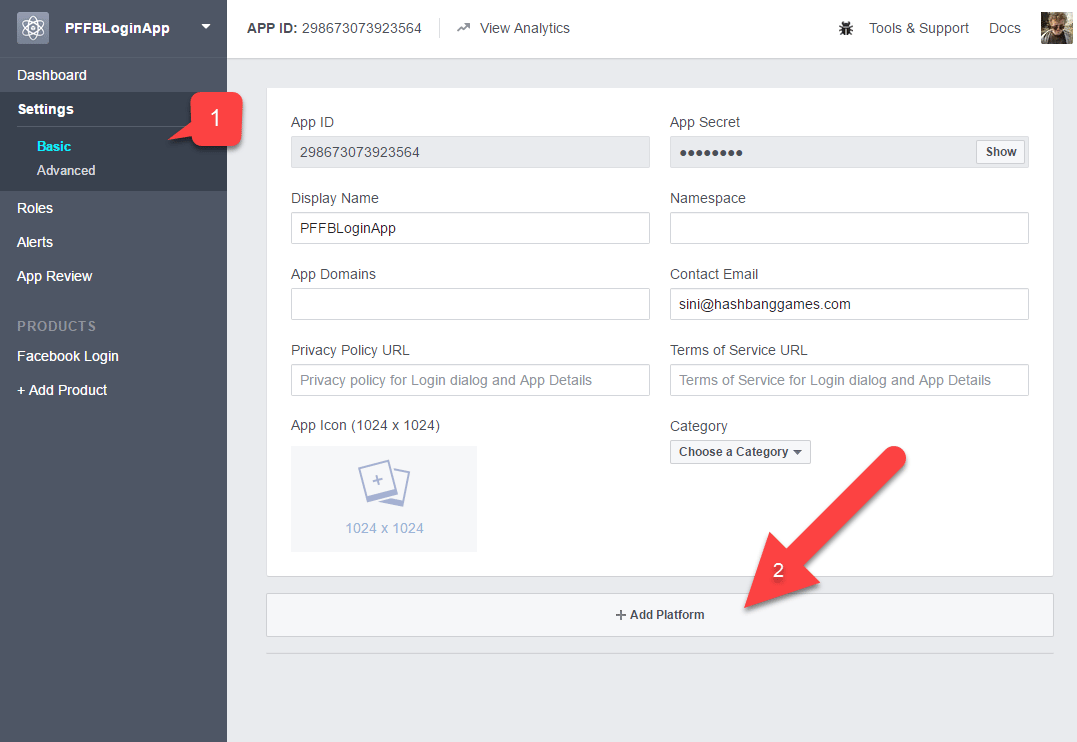
다음으로, **Facebook 애플리케이션** 콘솔에서:
1. **Basic** 설정으로 이동합니다.
2. 아래 예시와 같이 **+ Add Platform**을 선택합니다.
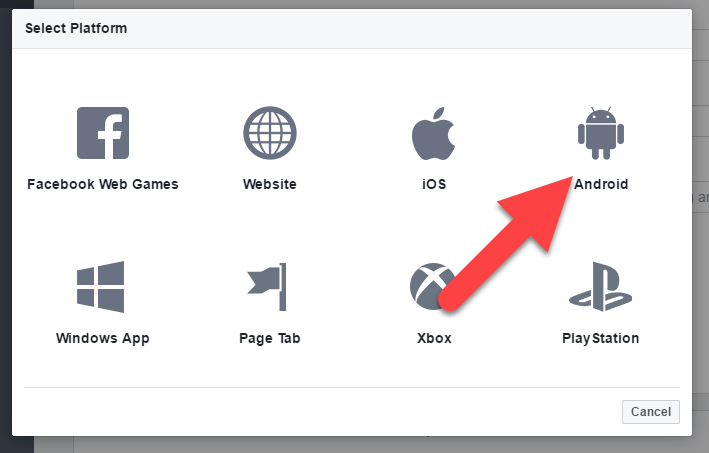
 * 사용 가능한 플랫폼 목록에서 **Android**를 선택합니다.
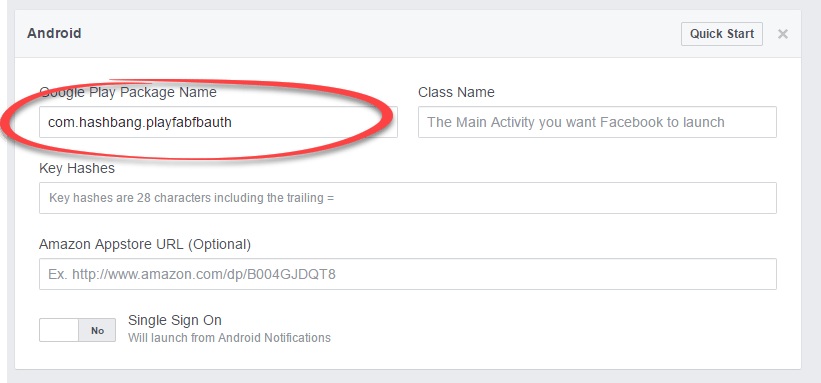
 플랫폼별 설정 패널이 나타납니다.
* **Package ID**를 입력합니다.
* **Save**를 선택합니다(**Save** 버튼은 페이지 오른쪽 하단 모서리에 숨겨져 있습니다).
플랫폼별 설정 패널이 나타납니다.
* **Package ID**를 입력합니다.
* **Save**를 선택합니다(**Save** 버튼은 페이지 오른쪽 하단 모서리에 숨겨져 있습니다).
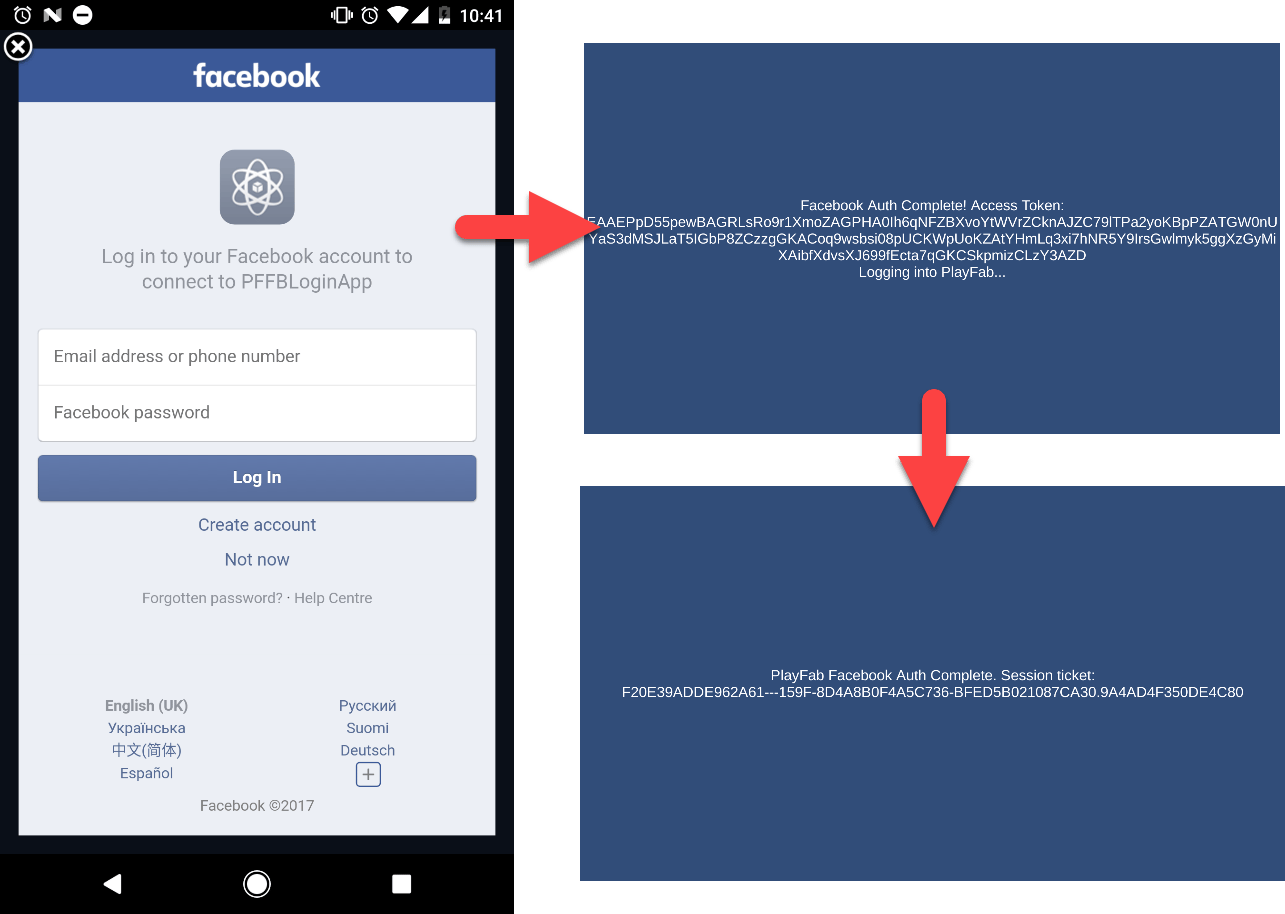
 Android 기기에서 애플리케이션을 정상적으로 빌드하고 실행합니다.
* 애플리케이션이 Facebook 로그인 페이지를 표시하면서 반겨줄 것입니다.
* 로그인하면 화면의 메시지가 변경되는 것을 확인하세요.
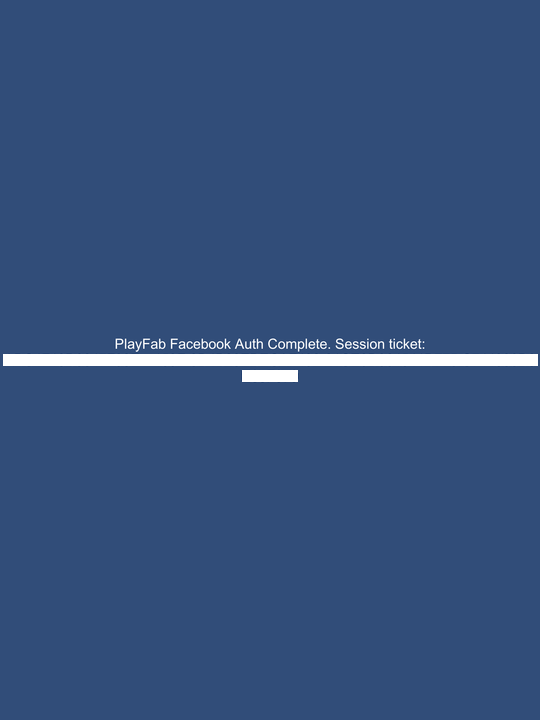
* 마지막으로, PlayFab의 인증 성공을 나타내는 메시지가 표시되어야 합니다. 전체 절차는 아래 예시에 나와 있습니다.
Android 기기에서 애플리케이션을 정상적으로 빌드하고 실행합니다.
* 애플리케이션이 Facebook 로그인 페이지를 표시하면서 반겨줄 것입니다.
* 로그인하면 화면의 메시지가 변경되는 것을 확인하세요.
* 마지막으로, PlayFab의 인증 성공을 나타내는 메시지가 표시되어야 합니다. 전체 절차는 아래 예시에 나와 있습니다.
 ### iOS에서 애플리케이션 실행
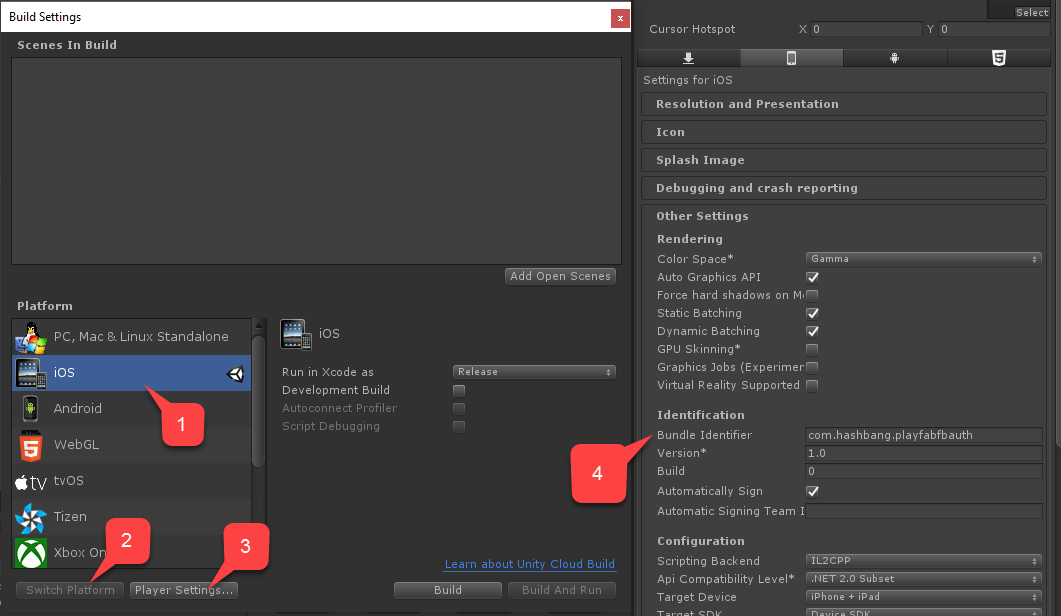
iOS에서 애플리케이션을 시작하기 전에 추가 구성 단계를 수행해야 합니다.
* 먼저 **iOS** 플랫폼이 선택되어 있는지 확인합니다.
* 그런 다음 아래 예시와 같이 고유한 **Bundle ID**를 설정합니다.
* 자신만의 *고유한* **Package ID**를 만드세요.
### iOS에서 애플리케이션 실행
iOS에서 애플리케이션을 시작하기 전에 추가 구성 단계를 수행해야 합니다.
* 먼저 **iOS** 플랫폼이 선택되어 있는지 확인합니다.
* 그런 다음 아래 예시와 같이 고유한 **Bundle ID**를 설정합니다.
* 자신만의 *고유한* **Package ID**를 만드세요.
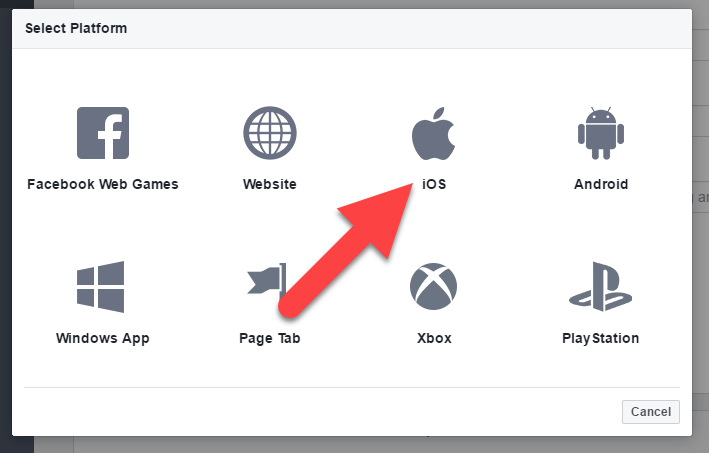
 다음으로, **Facebook 애플리케이션 콘솔**에서:
1. **Basic** 설정으로 이동합니다.
2. 아래 예시와 같이 **+ Add Platform**을 선택합니다.
* 사용 가능한 플랫폼 목록에서 **iOS**를 선택합니다.
다음으로, **Facebook 애플리케이션 콘솔**에서:
1. **Basic** 설정으로 이동합니다.
2. 아래 예시와 같이 **+ Add Platform**을 선택합니다.
* 사용 가능한 플랫폼 목록에서 **iOS**를 선택합니다.
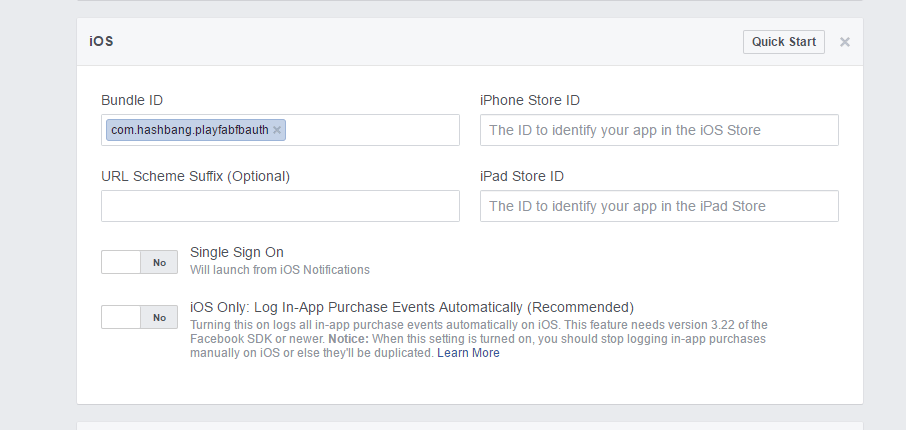
 플랫폼별 설정 패널이 나타납니다.
* **Package ID**를 입력합니다.
* **Save** 버튼을 선택합니다(**Save** 버튼은 페이지 오른쪽 하단 모서리에 숨겨져 있습니다).
플랫폼별 설정 패널이 나타납니다.
* **Package ID**를 입력합니다.
* **Save** 버튼을 선택합니다(**Save** 버튼은 페이지 오른쪽 하단 모서리에 숨겨져 있습니다).
 * 다음으로, 애플리케이션을 일반적으로 빌드합니다.
* 완료되면 **XCode**를 사용하여 **프로젝트**를 엽니다.
* 다음으로, 애플리케이션을 일반적으로 빌드합니다.
* 완료되면 **XCode**를 사용하여 **프로젝트**를 엽니다.
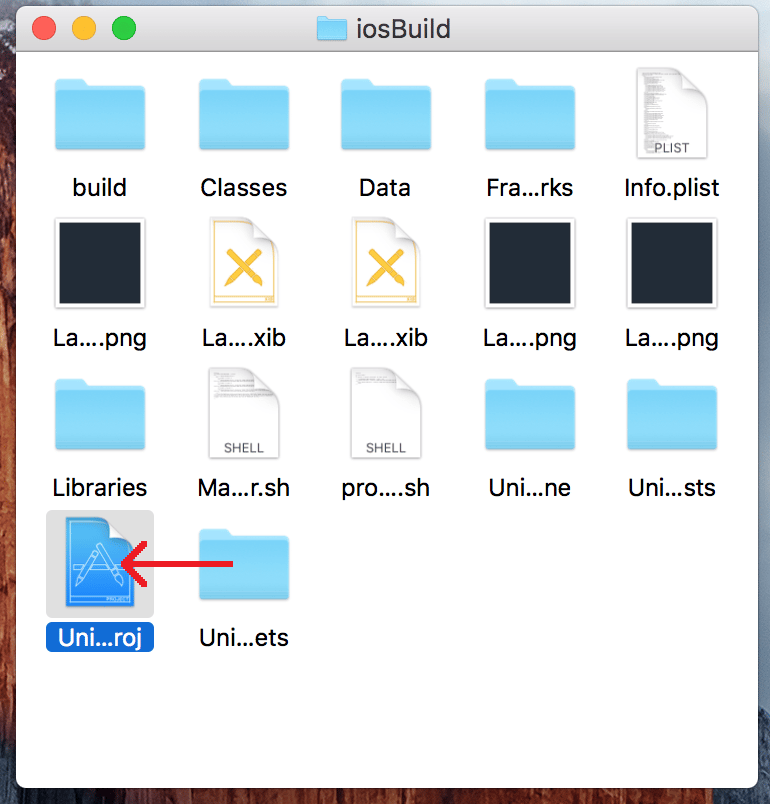 * **프로젝트**를 선택하여 **프로젝트 설정**을 엽니다.
* **Bundle ID**가 고유한 **Package ID**와 일치하는지 확인합니다.
* **프로젝트**를 선택하여 **프로젝트 설정**을 엽니다.
* **Bundle ID**가 고유한 **Package ID**와 일치하는지 확인합니다.
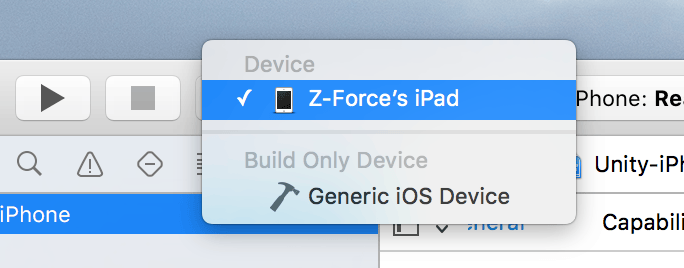
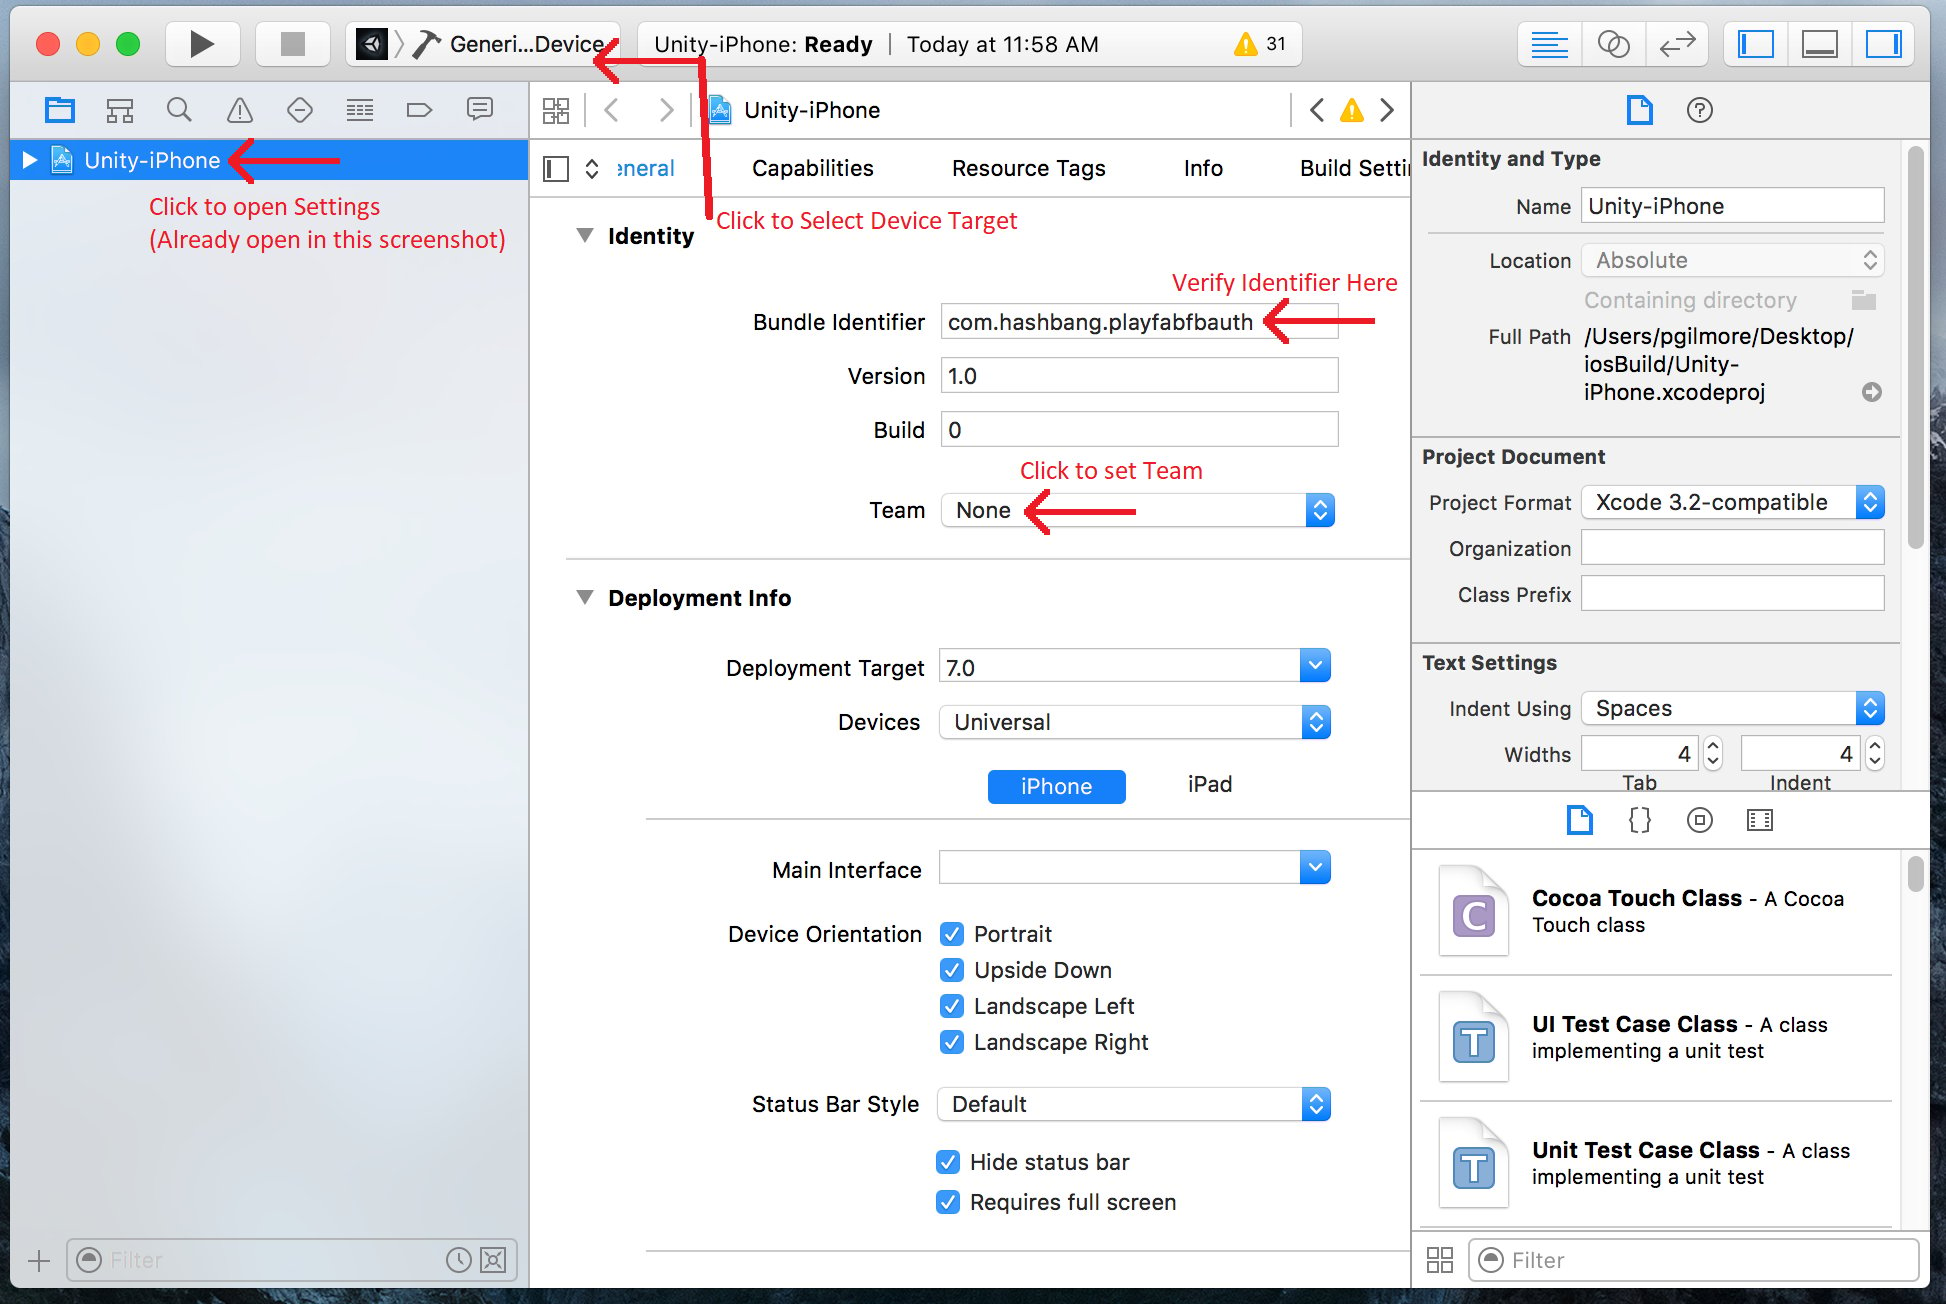 * 올바른 기기를 선택합니다.
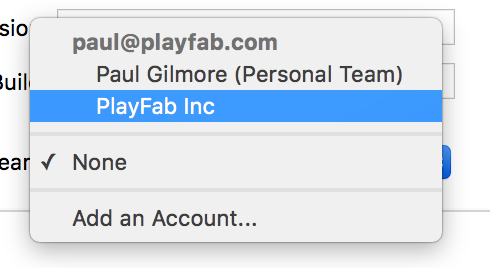
 * 그리고 올바른 **Identity Team**을 선택합니다.
 마지막으로, 애플리케이션을 정상적으로 실행합니다.
* 시작되면 애플리케이션에서 웹 브라우저를 사용하여 Facebook에 로그인할 수 있습니다.
* 완료되면 PlayFab 인증이 호출되고 결과를 나타내는 메시지가 표시됩니다.
마지막으로, 애플리케이션을 정상적으로 실행합니다.
* 시작되면 애플리케이션에서 웹 브라우저를 사용하여 Facebook에 로그인할 수 있습니다.
* 완료되면 PlayFab 인증이 호출되고 결과를 나타내는 메시지가 표시됩니다.
 ### PlayFab Game Manager를 통해 확인
Game Manager에서 PlayFab 타이틀을 엽니다.
* 대시보드로 이동합니다.
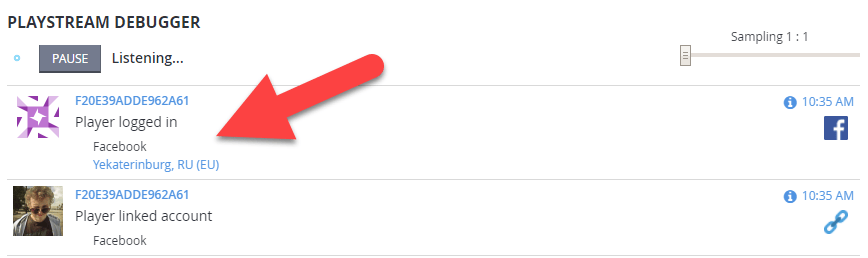
* 최신 이벤트를 확인하기 위해 **PlayStream Debugger** 패널을 참조합니다. 다음 예시와 같이 Facebook 인증 이벤트를 볼 수 있어야 합니다.
### PlayFab Game Manager를 통해 확인
Game Manager에서 PlayFab 타이틀을 엽니다.
* 대시보드로 이동합니다.
* 최신 이벤트를 확인하기 위해 **PlayStream Debugger** 패널을 참조합니다. 다음 예시와 같이 Facebook 인증 이벤트를 볼 수 있어야 합니다.
 이 시점에서 PlayFab의 Facebook 인증 통합에 성공했습니다.
## Related topics
- [Facebook과 HTML5를 사용하여 PlayFab 인증 설정하기](/ko/services/playfab/identity/player-identity/platform-specific-authentication/facebook-html5.md)
- [Steam과 Unity를 사용하여 PlayFab 인증 설정하기](/ko/services/playfab/identity/player-identity/platform-specific-authentication/steam-unity.md)
- [Google과 HTML5를 사용하여 PlayFab 인증 설정하기](/ko/services/playfab/identity/player-identity/platform-specific-authentication/google-html5.md)
- [Kongregate와 Unity를 사용하여 PlayFab 인증 설정하기](/ko/services/playfab/identity/player-identity/platform-specific-authentication/kongregate-unity.md)
- [PlayFab용 Battle.net 로그인 설정하기](/ko/services/playfab/identity/player-identity/platform-specific-authentication/battlenet-login.md)
이 시점에서 PlayFab의 Facebook 인증 통합에 성공했습니다.
## Related topics
- [Facebook과 HTML5를 사용하여 PlayFab 인증 설정하기](/ko/services/playfab/identity/player-identity/platform-specific-authentication/facebook-html5.md)
- [Steam과 Unity를 사용하여 PlayFab 인증 설정하기](/ko/services/playfab/identity/player-identity/platform-specific-authentication/steam-unity.md)
- [Google과 HTML5를 사용하여 PlayFab 인증 설정하기](/ko/services/playfab/identity/player-identity/platform-specific-authentication/google-html5.md)
- [Kongregate와 Unity를 사용하여 PlayFab 인증 설정하기](/ko/services/playfab/identity/player-identity/platform-specific-authentication/kongregate-unity.md)
- [PlayFab용 Battle.net 로그인 설정하기](/ko/services/playfab/identity/player-identity/platform-specific-authentication/battlenet-login.md)