> ## Documentation Index
> Fetch the complete documentation index at: https://devdocs.xbox.com/llms.txt
> Use this file to discover all available pages before exploring further.

# Facebook과 HTML5를 사용하여 PlayFab 인증 설정하기

> HTML5와 JavaScript를 사용해 PlayFab 타이틀에 Facebook 로그인을 추가하는 단계별 튜토리얼로 Facebook 앱 등록과 플레이어 인증을 다룹니다.

이 튜토리얼은 Facebook과 HTML5/JavaScript를 사용한 PlayFab 인증을 안내하도록 설계되었습니다.

## 요구 사항

* 테스트용 [Facebook 계정](https://www.facebook.com/).
* 등록된 [PlayFab](https://developer.playfab.com/) 타이틀.
* [로그인 기본 사항 및 모범 사례](/services/playfab/identity/player-identity/login/login-basics-best-practices)에 대한 이해.
* 정적 HTML 파일을 제공할 유효한 도메인 이름을 가진 최소한의 서버.

<Note>
  이 활동에 필요한 요구 사항이 있는지 확실하지 않은 경우 [테스트용 HTTP 서버 실행하기](/services/playfab/identity/player-identity/platform-specific-authentication/running-an-http-server-for-testing) 튜토리얼을 참조하세요.
</Note>

## 서버 및 도메인

PlayFab 인증 설정 요구 사항의 일부로, 따라 진행할 유효한 도메인이 있는 서버가 있어야 합니다. 등록된 도메인과 원격 웹 서버가 아직 없다면 유효한 도메인 이름으로 로컬 웹 서버를 실행하기 위해 [테스트용 HTTP 서버 실행하기](/services/playfab/identity/player-identity/platform-specific-authentication/running-an-http-server-for-testing) 튜토리얼을 따르세요.

이 가이드 전반에 걸쳐 도메인이 `['http://playfab.example'](http://playfab.example)`이라고 가정합니다.

## Facebook 애플리케이션 등록

[Facebook Developer Portal](https://developers.facebook.com/)로 이동하여 시작하세요.

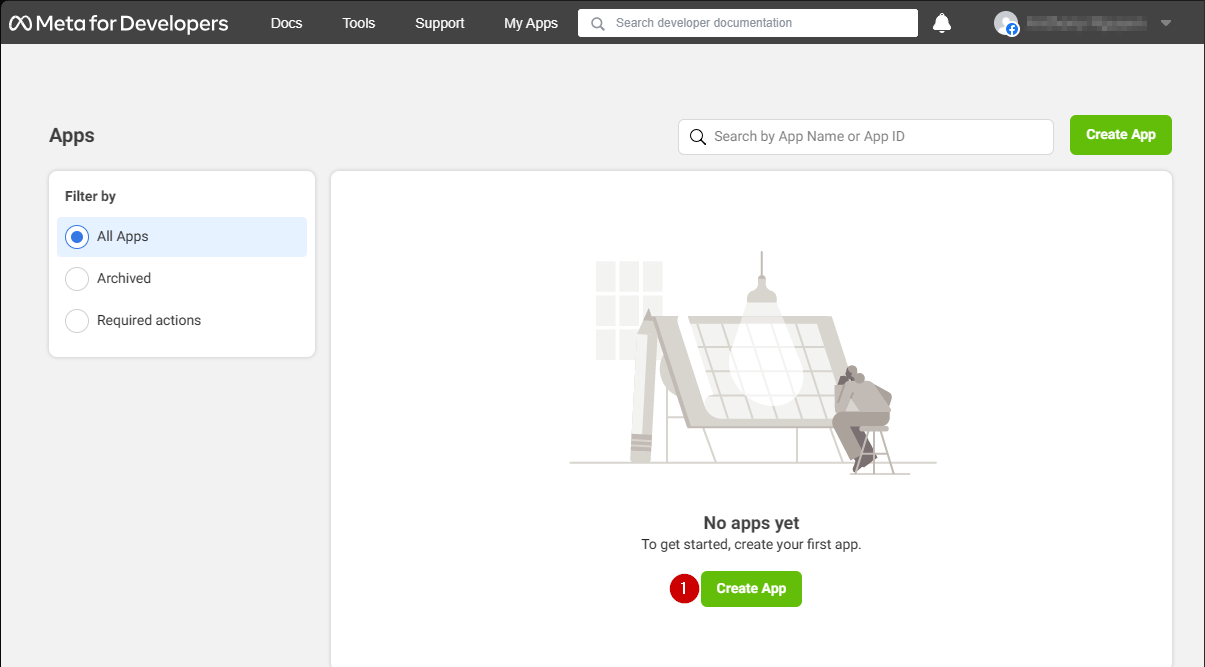
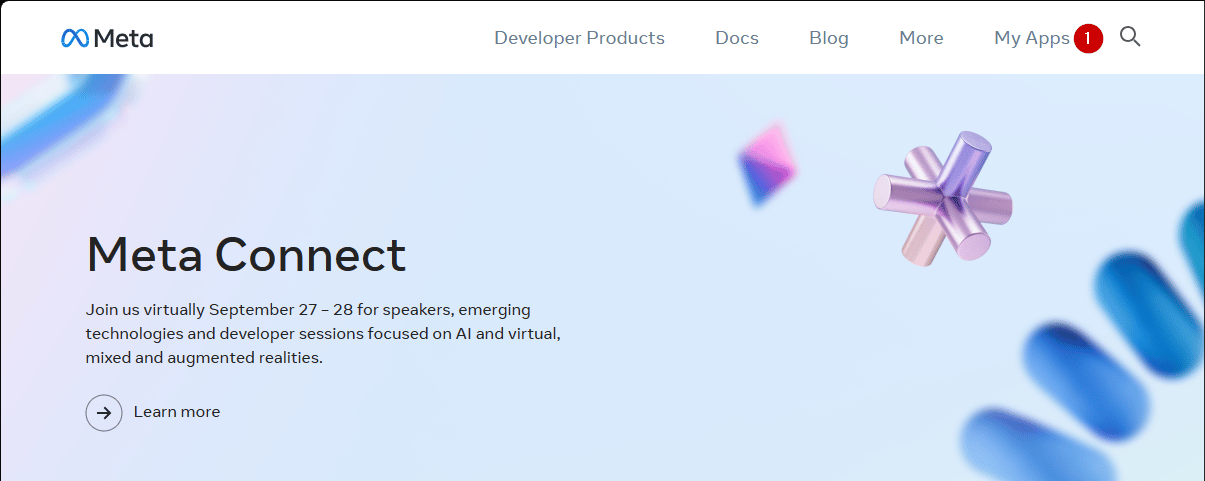
1. **My Apps** 버튼을 선택합니다.

<img src="https://mintcdn.com/microsoft-4404708b/mLCHf0iQv3VidfBe/images/playfab/identity/player-identity/platform-specific-authentication/tutorials/facebook-html5/my-apps.png?fit=max&auto=format&n=mLCHf0iQv3VidfBe&q=85&s=c533fd072cd7b47233fd2c7eb8c431a6" alt="Facebook 새 앱 추가" width="1205" height="481" data-path="images/playfab/identity/player-identity/platform-specific-authentication/tutorials/facebook-html5/my-apps.png" />

1. **Create App**을 선택하여 새 앱을 생성합니다.

<img src="https://mintcdn.com/microsoft-4404708b/mLCHf0iQv3VidfBe/images/playfab/identity/player-identity/platform-specific-authentication/tutorials/facebook-html5/facebook-add-a-new-app.png?fit=max&auto=format&n=mLCHf0iQv3VidfBe&q=85&s=ab8793987c97a532fa9e970436afe2a3" alt="Facebook 새 앱 생성" width="1205" height="667" data-path="images/playfab/identity/player-identity/platform-specific-authentication/tutorials/facebook-html5/facebook-add-a-new-app.png" />

새 **애플리케이션** 팝업이 열립니다.

1. **Add an app name** 아래의 필드에 **애플리케이션** 이름을 입력합니다.
2. **App contact email** 아래의 필드에 연락처 이메일 주소를 입력합니다.
3. **Create app** 버튼을 선택하여 저장합니다.
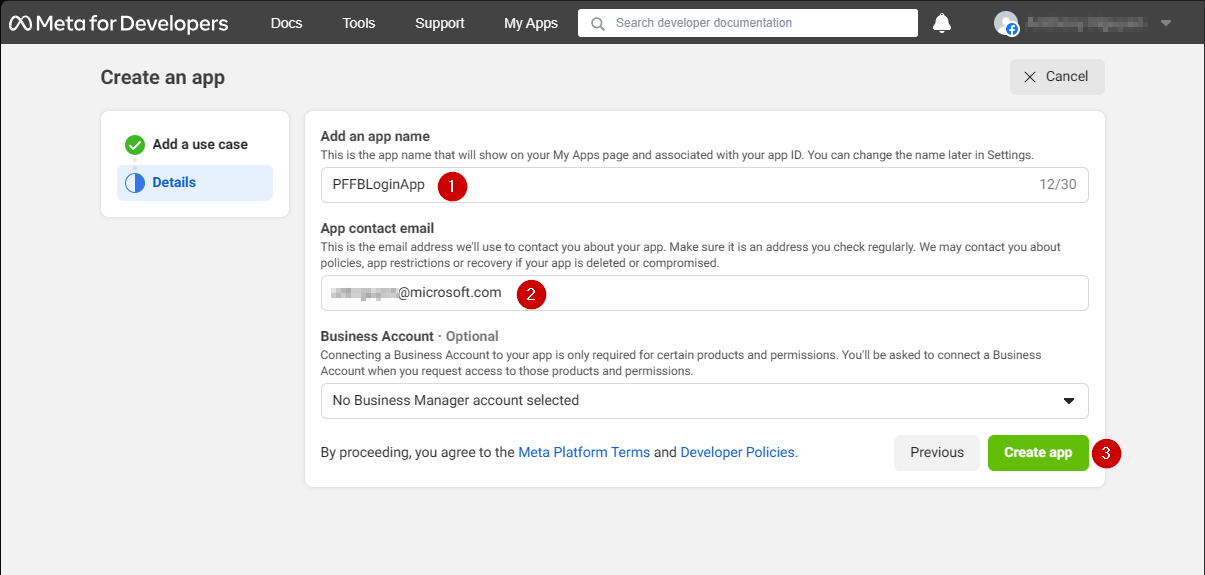
<Note>
  아래에 제공된 예시와 같이 자신만의 고유한 애플리케이션 이름과 이메일을 사용하세요.
</Note>

<img src="https://mintcdn.com/microsoft-4404708b/mLCHf0iQv3VidfBe/images/playfab/identity/player-identity/platform-specific-authentication/tutorials/facebook-html5/facebook-new-app-id.png?fit=max&auto=format&n=mLCHf0iQv3VidfBe&q=85&s=43a15fe0906efcfb030b98c375ef610f" alt="Facebook 새 앱 ID" width="1205" height="575" data-path="images/playfab/identity/player-identity/platform-specific-authentication/tutorials/facebook-html5/facebook-new-app-id.png" />

1. **Settings** 탭으로 이동합니다.
2. **Basic** 하위 탭을 선택합니다.
3. **App ID**를 찾습니다.
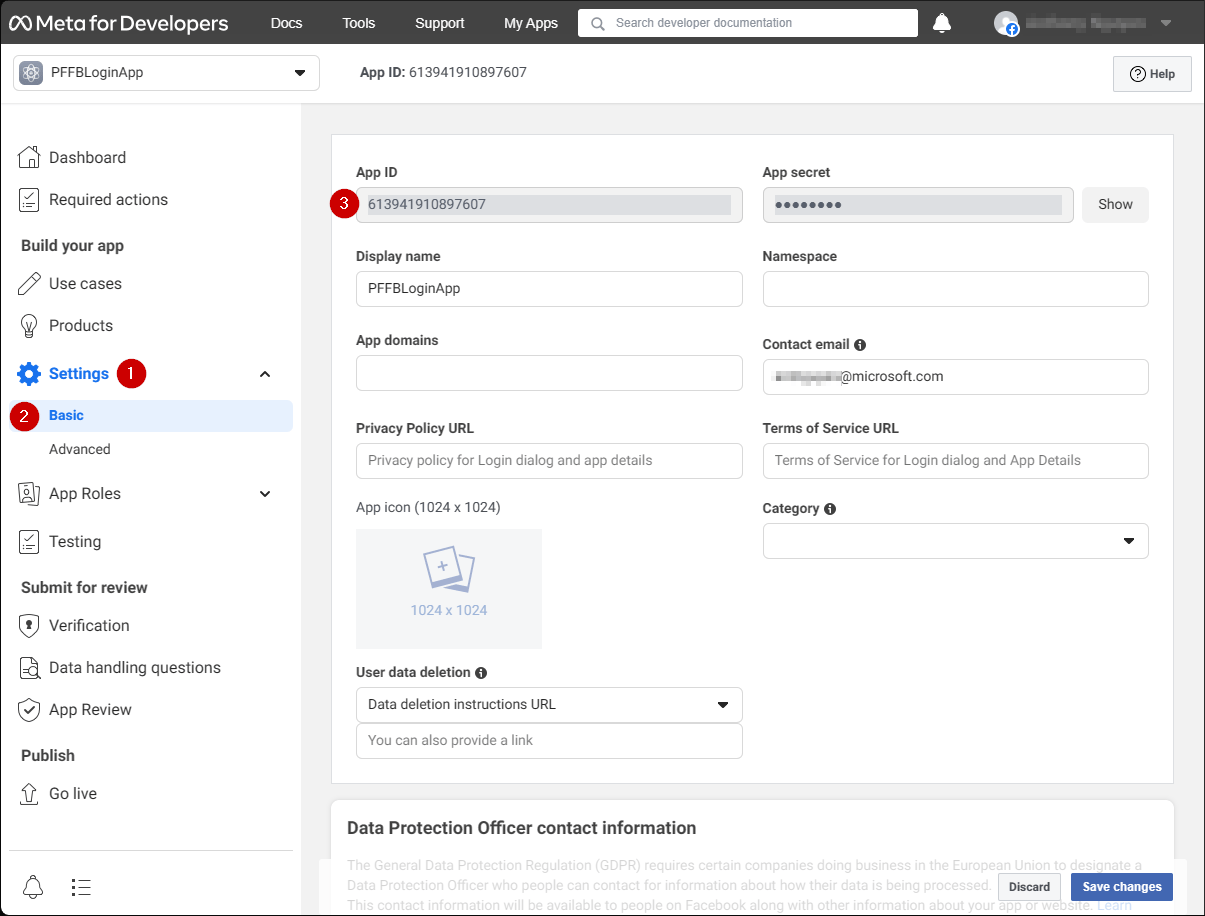
<Note>
  **App ID**를 안전한 곳에 복사하세요. 나중에 **Facebook SDK**를 설정하는 데 사용합니다.
</Note>

<img src="https://mintcdn.com/microsoft-4404708b/mLCHf0iQv3VidfBe/images/playfab/identity/player-identity/platform-specific-authentication/tutorials/facebook-html5/facebook-save-app-id.png?fit=max&auto=format&n=mLCHf0iQv3VidfBe&q=85&s=724d5c403c24e3077b1fe09f59791f46" alt="Facebook 앱 ID 저장" width="1205" height="916" data-path="images/playfab/identity/player-identity/platform-specific-authentication/tutorials/facebook-html5/facebook-save-app-id.png" />

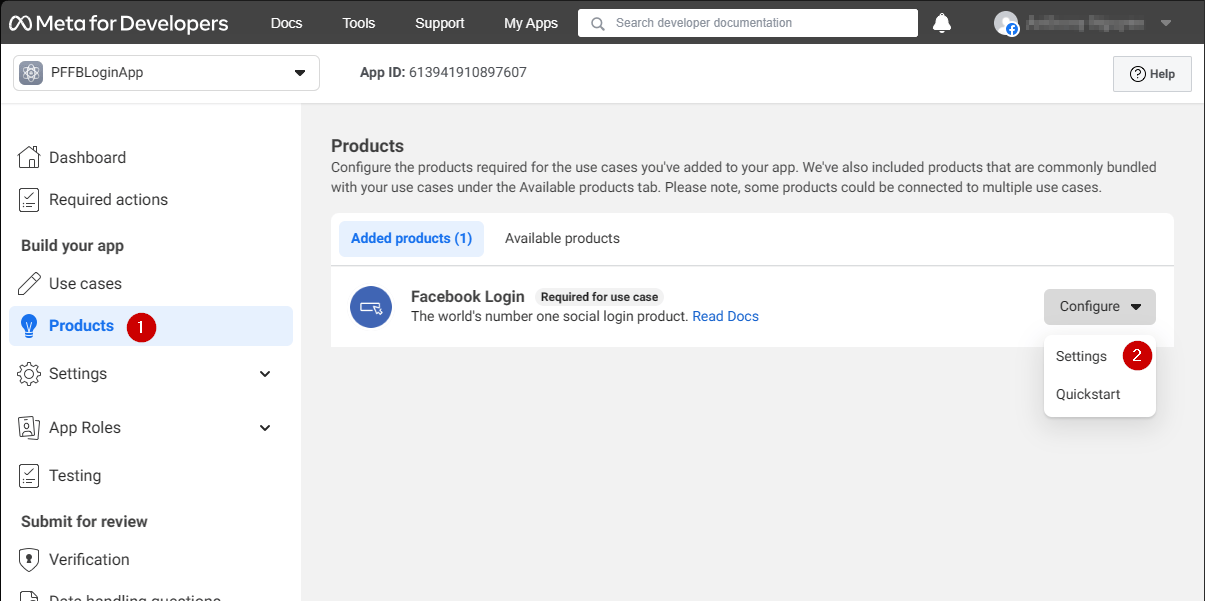
1. 화면 왼쪽의 메뉴로 이동하여 **Products** 항목을 선택합니다.
2. **Facebook Login** 영역에서 **Configure**를 찾고 드롭다운 메뉴에서 **Settings**를 선택합니다.
<img src="https://mintcdn.com/microsoft-4404708b/mLCHf0iQv3VidfBe/images/playfab/identity/player-identity/platform-specific-authentication/tutorials/facebook-html5/login-get-started.png?fit=max&auto=format&n=mLCHf0iQv3VidfBe&q=85&s=bd346c82af2a1914bd8dfca79653f5c6" alt="Facebook 로그인 시작하기" width="1205" height="601" data-path="images/playfab/identity/player-identity/platform-specific-authentication/tutorials/facebook-html5/login-get-started.png" />

페이지는 아래와 같은 예시를 표시하도록 열립니다.

1. **Client OAuth**와 **Web OAuth**가 모두 켜져 있는지(**Yes**로 표시됨) 확인합니다.
2. **Valid OAuth redirect URIs**를 자신의 인증 페이지 **URI**로 설정합니다.
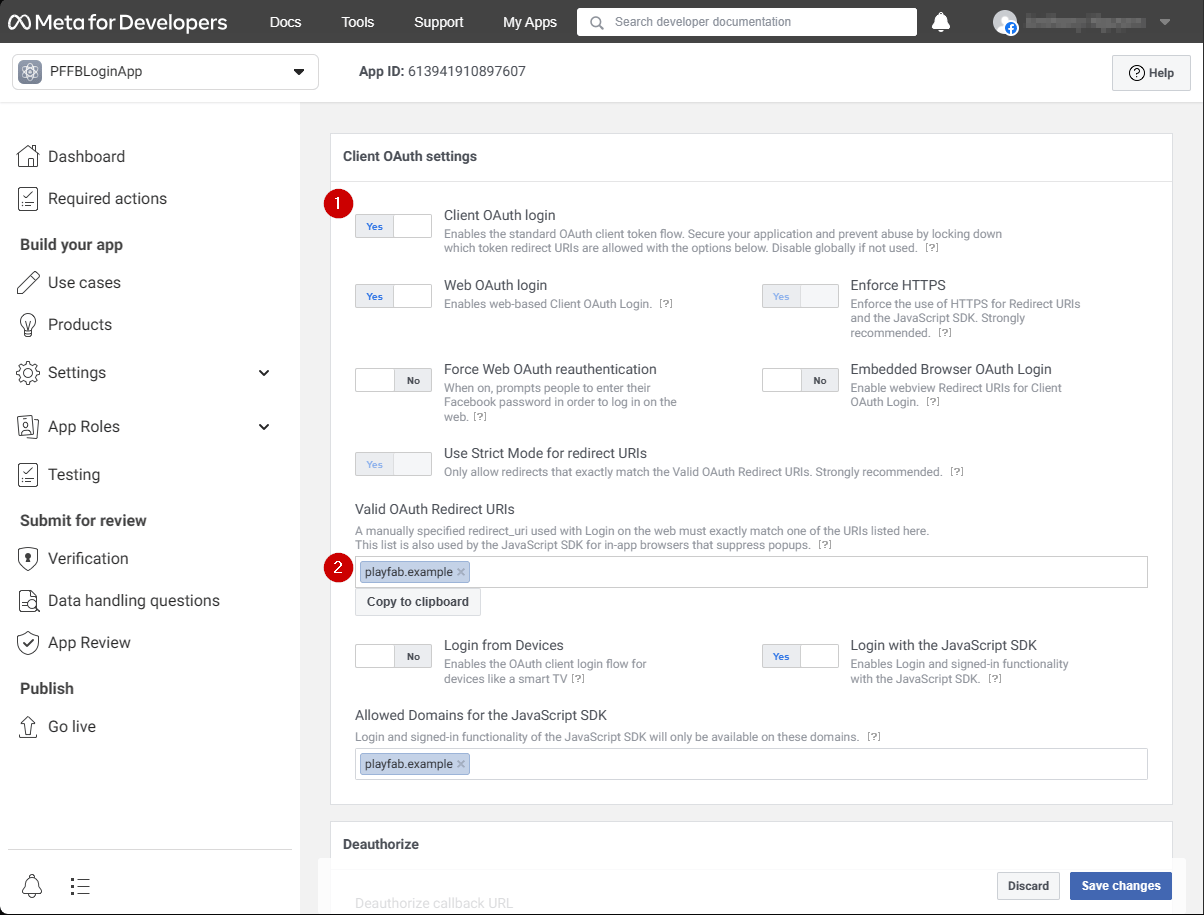
<Note>
  이 경우 `playfab.example`이 됩니다.
</Note>

<img src="https://mintcdn.com/microsoft-4404708b/mLCHf0iQv3VidfBe/images/playfab/identity/player-identity/platform-specific-authentication/tutorials/facebook-html5/login-product-settings.png?fit=max&auto=format&n=mLCHf0iQv3VidfBe&q=85&s=493c1ca8600489493ca47ced5c579204" alt="Facebook 로그인 제품 설정" width="1204" height="915" data-path="images/playfab/identity/player-identity/platform-specific-authentication/tutorials/facebook-html5/login-product-settings.png" />

**Client OAuth Settings** 화면에서:

1. **Login with the JavaScript SDK**가 켜져 있는지(**Yes**로 표시됨) 확인합니다.
2. **Valid OAuth redirect URIs**를 자신의 인증 페이지 **URI**로 설정합니다.
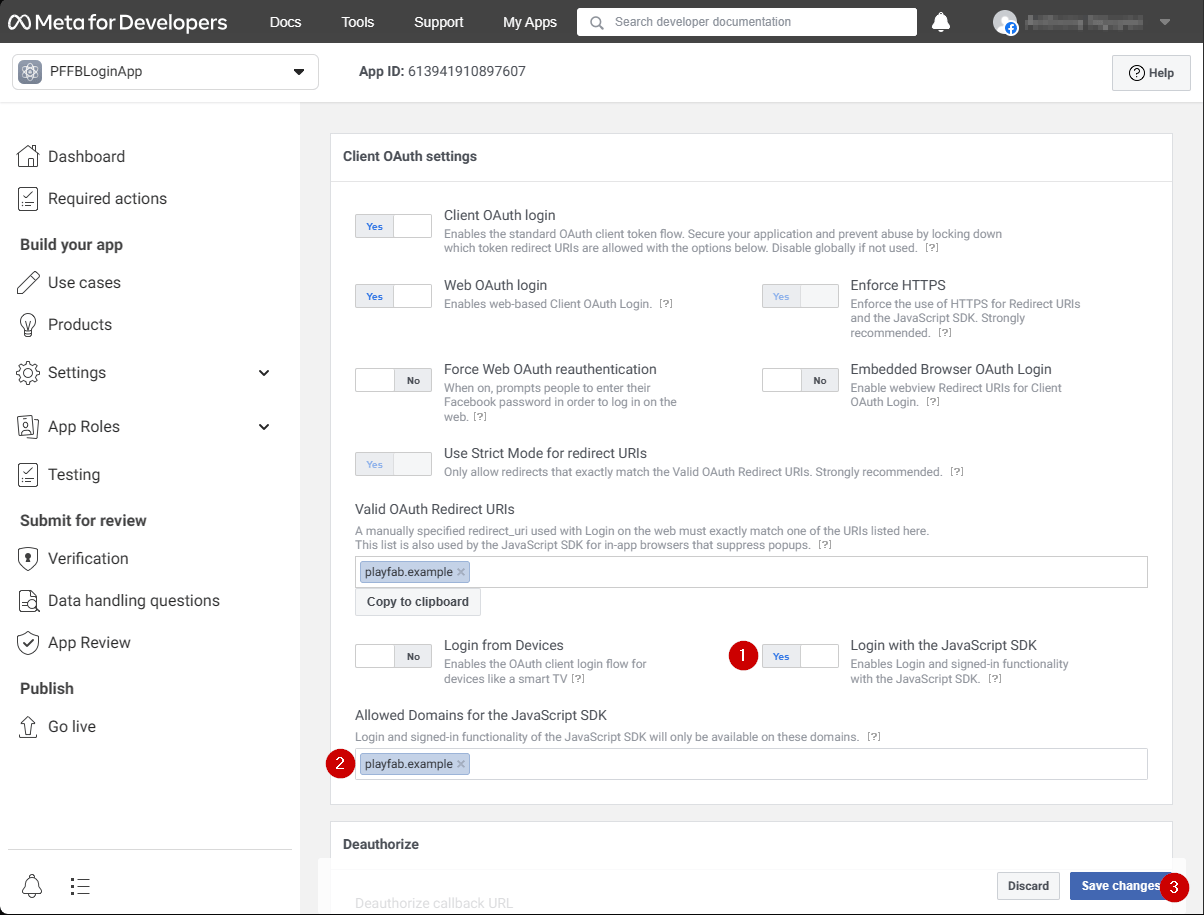
<Note>
  이 경우 `playfab.example`이 됩니다.
</Note>

3. **Save Changes**를 선택하여 커밋합니다.

<img src="https://mintcdn.com/microsoft-4404708b/mLCHf0iQv3VidfBe/images/playfab/identity/player-identity/platform-specific-authentication/tutorials/facebook-html5/set-oauth-redirect.png?fit=max&auto=format&n=mLCHf0iQv3VidfBe&q=85&s=1d900349086b3efc854d19e7e394bbfa" alt="Facebook OAuth 리디렉션 URI 설정" width="1204" height="915" data-path="images/playfab/identity/player-identity/platform-specific-authentication/tutorials/facebook-html5/set-oauth-redirect.png" />

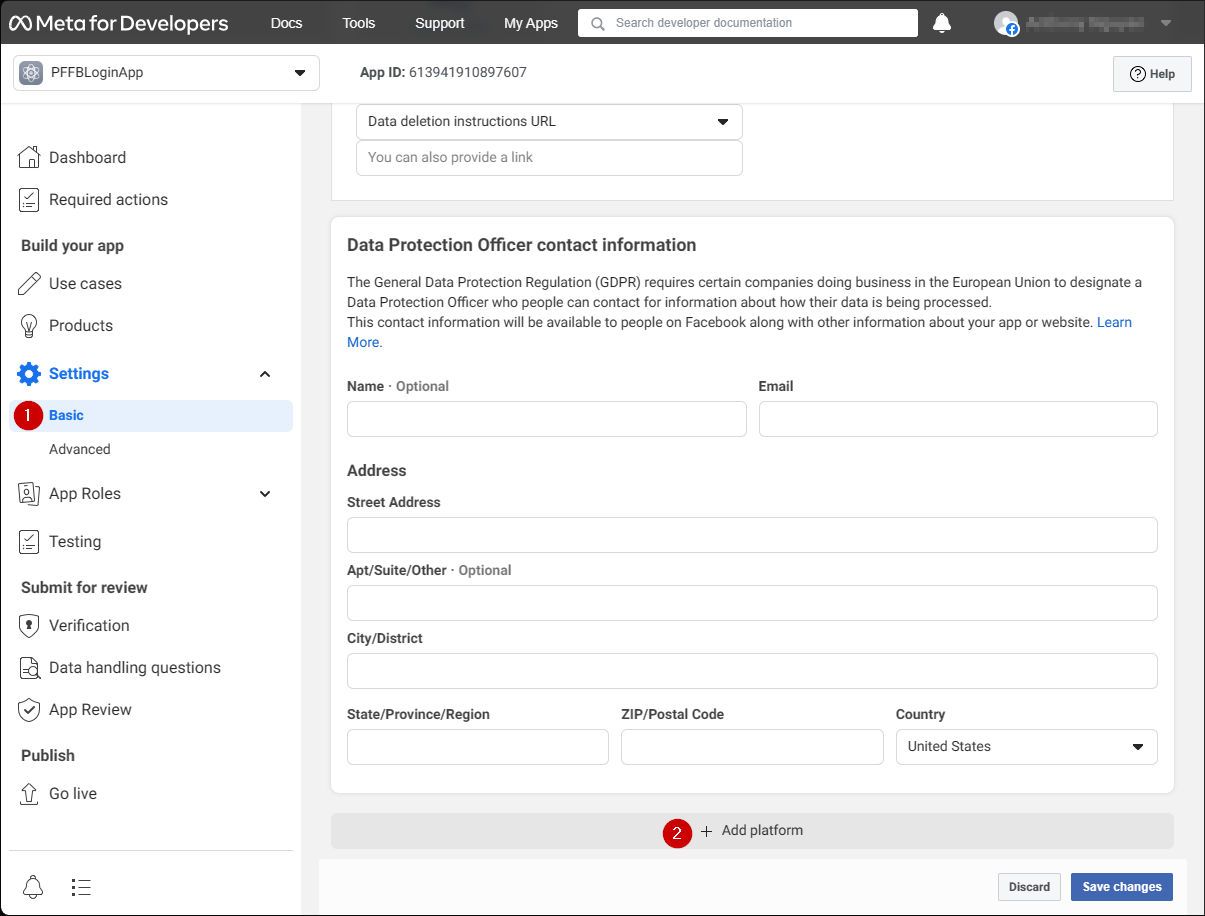
**Application Manager** 페이지에서:

* 메뉴에서 \*\*Settings/Basic (1)\*\*을 엽니다.
* **Add Platform (2)** 버튼을 선택합니다.
<img src="https://mintcdn.com/microsoft-4404708b/mLCHf0iQv3VidfBe/images/playfab/identity/player-identity/platform-specific-authentication/tutorials/facebook-html5/add-platform.png?fit=max&auto=format&n=mLCHf0iQv3VidfBe&q=85&s=d715322d7bdb36fdb0cca082e6394fd7" alt="Facebook Application Manager 플랫폼 추가" width="1205" height="916" data-path="images/playfab/identity/player-identity/platform-specific-authentication/tutorials/facebook-html5/add-platform.png" />

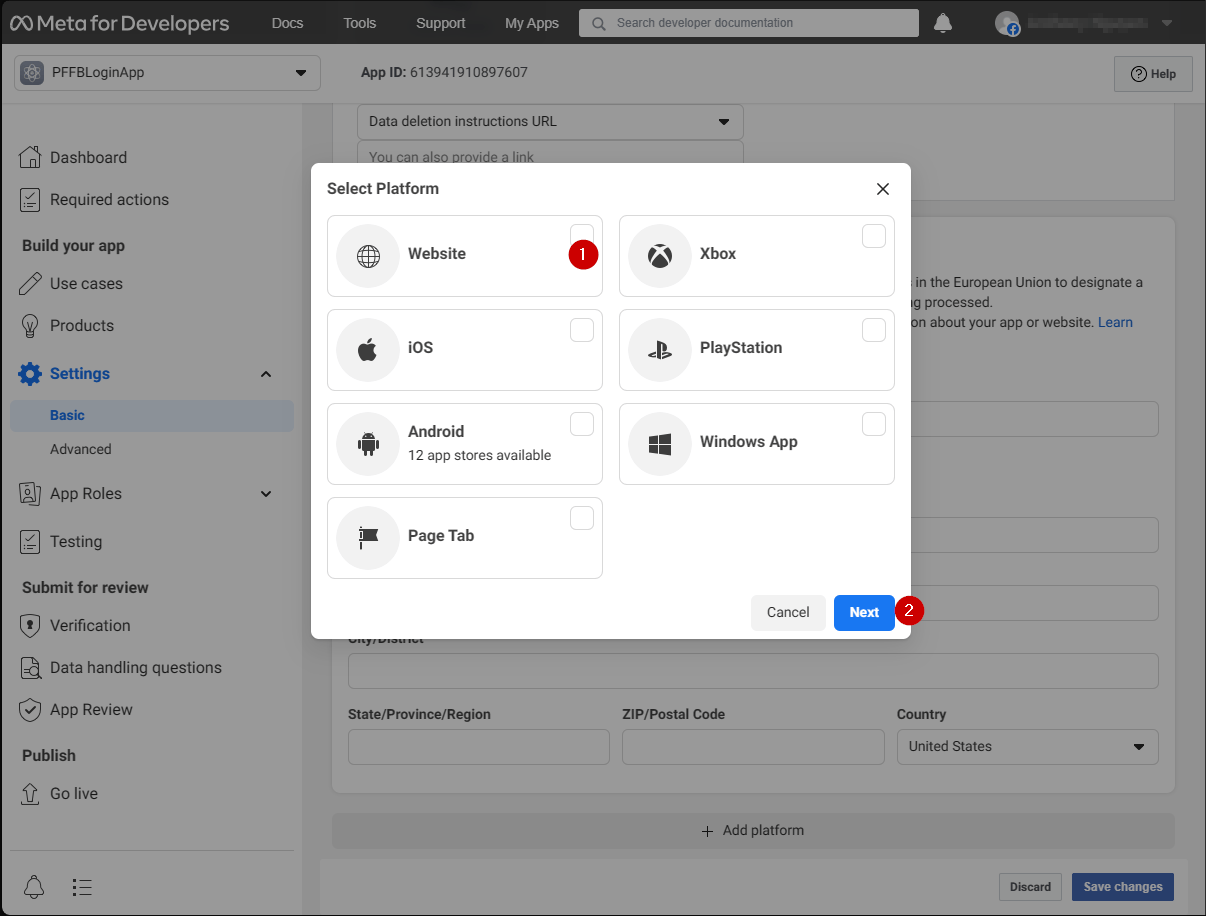
화면에 팝업이 나타납니다.

1. **Website icon**을 선택합니다.
2. 그런 다음 **Next**를 선택합니다.
<img src="https://mintcdn.com/microsoft-4404708b/mLCHf0iQv3VidfBe/images/playfab/identity/player-identity/platform-specific-authentication/tutorials/facebook-html5/website-options.png?fit=max&auto=format&n=mLCHf0iQv3VidfBe&q=85&s=96645e531316bffa3730f606c1b799ce" alt="Facebook 플랫폼 웹사이트 옵션 선택" width="1206" height="916" data-path="images/playfab/identity/player-identity/platform-specific-authentication/tutorials/facebook-html5/website-options.png" />

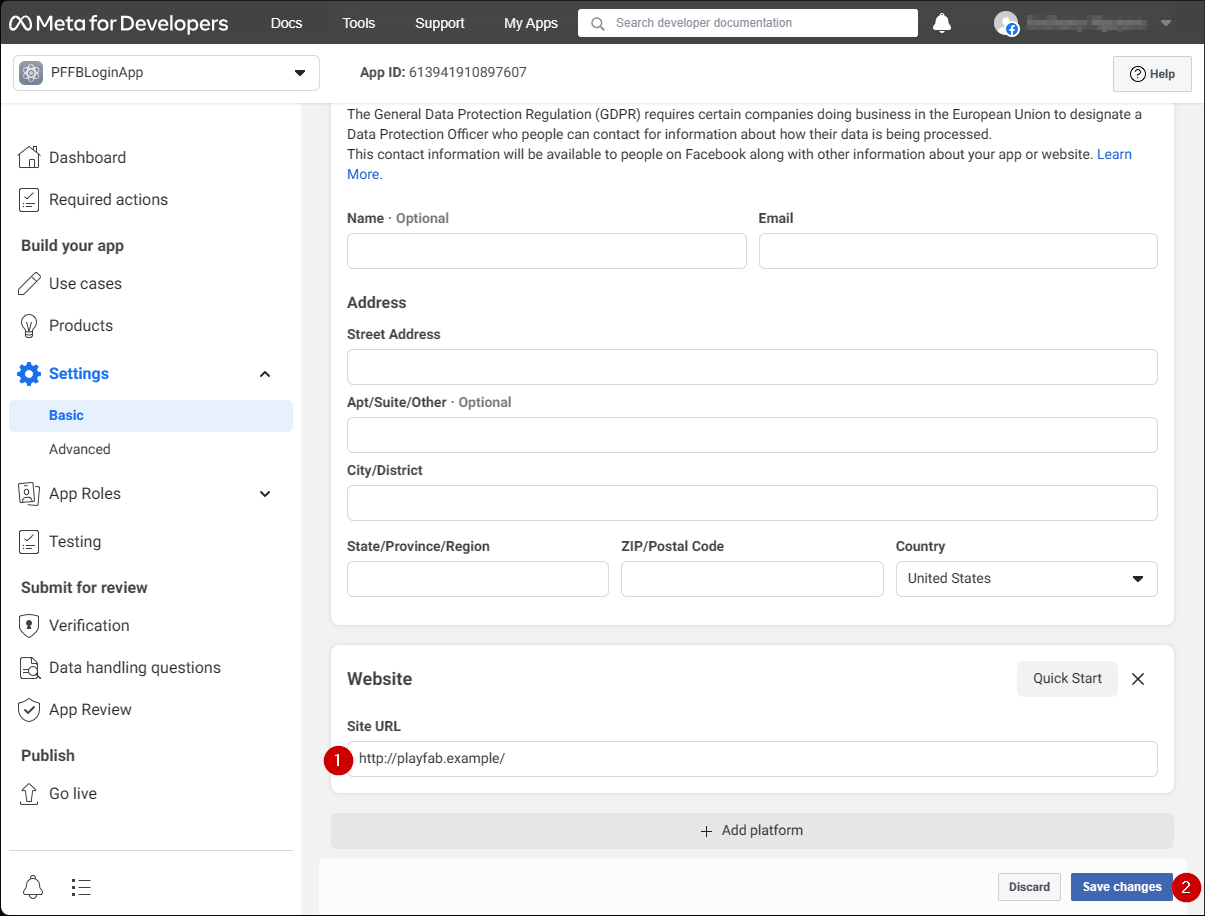
**Website** 구성 패널이 이제 나타나야 합니다.

1. **Site URL** 필드에 자신의 인증 페이지 **URL**을 입력합니다(이 경우 `playfab.example`).
2. **Save changes**를 선택하여 커밋합니다.
<img src="https://mintcdn.com/microsoft-4404708b/mLCHf0iQv3VidfBe/images/playfab/identity/player-identity/platform-specific-authentication/tutorials/facebook-html5/website-configuration.png?fit=max&auto=format&n=mLCHf0iQv3VidfBe&q=85&s=ef19a6ad2bf003e8e58802abeea329c5" alt="Facebook 웹사이트 구성 패널" width="1205" height="916" data-path="images/playfab/identity/player-identity/platform-specific-authentication/tutorials/facebook-html5/website-configuration.png" />

## 테스트

다음 HTML 파일을 사용하여 Facebook을 통한 PlayFab 인증을 테스트합니다.

<Note>
  **YOUR-APPLICATION-ID**와 **YOUR-PLAYFAB-TITLE**을 자신의 값으로 교체하세요.
</Note>

```html theme={null}
<!DOCTYPE html>
<html>
<head>
   <script>
        // This function will be called when Facebook SDK is loaded
        window.fbAsyncInit = function() {

            // Make sure to use your own App ID for the configuration
            FB.init({
                appId      : 'YOUR-APPLICATION-ID',
                xfbml      : true,
                version    : 'v2.9'
            });

            // Record PageView event for analytics
            FB.AppEvents.logPageView();
        };

        // Facebook SDK loader. Creates a script entry to load the SDK
        (function(d, s, id){
            var js, fjs = d.getElementsByTagName(s)[0];
            if (d.getElementById(id)) {return;}
            js = d.createElement(s); js.id = id;
            js.src = "//connect.facebook.net/en_US/sdk.js";
            fjs.parentNode.insertBefore(js, fjs);
        }(document, 'script', 'facebook-jssdk'));
    </script>
    <script src="https://download.playfab.com/PlayFabClientApi.js"></script>
</head>
<body>
    <p>Facebook Auth Example</p>
    <button onclick="loginWithFacebook()">Log In with Facebook</button>
    <script>
        // This method is invoked when you press the button
        function loginWithFacebook() {
            logLine("Logging in via Facebook...");

            // Standard practice: make call to FB.login.
            // This will show Facebook popup window. To prevent browsers from locking it,
            // always make sure to call it from Button click event
            FB.login(function(response){
                if(!response.authResponse){
                    logLine("Problem authenticating via Facebook!");
                } else {
                    loginWithPlayfab(response.authResponse.accessToken);
                }
            });
        }

        function loginWithPlayfab(accessToken){

            logLine("Logging in via PlayFab...");

            // When given accessToken, make call to LoginWithFacebook API Call
            // Make sure to use your own PlayFab Title ID
            PlayFabClientSDK.LoginWithFacebook({
                AccessToken: accessToken,
                TitleId: "YOUR-PLAYFAB-TITLE",
                CreateAccount: true
            }, onPlayFabResponse);
        }

        // Handles response from playfab.
        function onPlayFabResponse(response, error) {
            if (response)
                logLine("Response: " + JSON.stringify(response));
            if (error)
                logLine("Error: " + JSON.stringify(error));
        }

        function logLine(message) {
            var textnode = document.createTextNode(message);
            document.body.appendChild(textnode);
            var br = document.createElement("br");
            document.body.appendChild(br);
        }
    </script>
</body>
</html>
```

**Facebook 애플리케이션** 구성 중에 설정한 도메인(이 경우 `playfab.example`)을 사용하여 서버에서 다음 파일을 요청합니다.

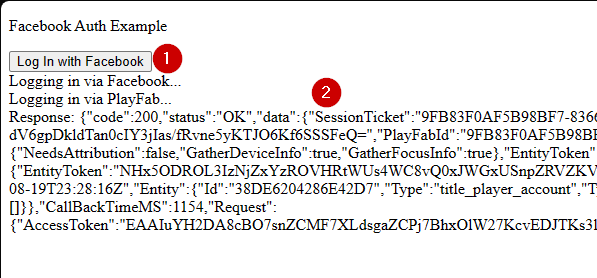
1. **Facebook Auth Example** 페이지가 열리면 **Log In with Facebook** 버튼을 선택합니다.
2. 팝업 창의 Facebook 지시 사항을 따릅니다.

출력을 확인합니다.
<img src="https://mintcdn.com/microsoft-4404708b/mLCHf0iQv3VidfBe/images/playfab/identity/player-identity/platform-specific-authentication/tutorials/facebook-html5/facebook-auth-example.png?fit=max&auto=format&n=mLCHf0iQv3VidfBe&q=85&s=e6f77a4ce2fae3bfd5dfcc97acd2e88b" alt="Facebook 인증 예시" width="597" height="278" data-path="images/playfab/identity/player-identity/platform-specific-authentication/tutorials/facebook-html5/facebook-auth-example.png" />

PlayFab 세션 티켓을 얻게 됩니다. 이 시점에서 HTML5와 JavaScript를 사용하여 PlayFab와 Facebook 인증을 성공적으로 구성했습니다.


## Related topics

- [Google과 HTML5를 사용하여 PlayFab 인증 설정하기](/ko/services/playfab/identity/player-identity/platform-specific-authentication/google-html5.md)
- [Kongregate와 HTML5를 사용하여 PlayFab 인증 설정하기](/ko/services/playfab/identity/player-identity/platform-specific-authentication/kongregate-html5.md)
- [Twitch와 HTML5를 사용하여 PlayFab 인증 설정하기](/ko/services/playfab/identity/player-identity/platform-specific-authentication/twitch-html5.md)
- [PlayFab용 Battle.net 로그인 설정하기](/ko/services/playfab/identity/player-identity/platform-specific-authentication/battlenet-login.md)
- [Facebook과 Unity를 사용하여 PlayFab 인증 설정하기](/ko/services/playfab/identity/player-identity/platform-specific-authentication/facebook-unity.md)