> ## Documentation Index
> Fetch the complete documentation index at: https://devdocs.xbox.com/llms.txt
> Use this file to discover all available pages before exploring further.
# 서버 익명 로그인 인증
> CustomID 인증을 사용하는 서버 측 플레이어 생성으로 PlayFab 익명 로그인을 설정하여 HTML5 및 JavaScript 타이틀을 무단 가입으로부터 보호하세요.
# 익명 로그인을 사용하여 PlayFab 인증 설정하기
이 가이드에서는 HTML5/JavaScript를 사용한 CustomID 인증에만 초점을 맞춰 서버 측 보호와 함께 익명 로그인 API를 사용하여 PlayFab 인증을 구현하는 방법을 설명합니다.
## 개요
2025년 6월 30일부터 새로 생성되는 모든 타이틀은 익명 API를 통한 플레이어 생성이 비활성화됩니다.
익명 로그인의 보안을 강화하기 위해 PlayFab는 클라이언트 측과 서버 측 API 간에 플레이어 생성 기능을 분리하는 중요한 보안 기능을 구현했습니다.
1. **클라이언트 측 플레이어 생성 비활성화**:
* 새로 생성된 타이틀의 경우 클라이언트 측의 모든 익명 로그인 API(`LoginWithCustomID`, `LoginWithAndroidDeviceID`, `LoginWithIOSDeviceID`, `LoginWithNintendoSwitchDeviceId`)는 더 이상 자동으로 새 플레이어 계정을 생성하지 않습니다. 2025년 6월 30일 이전에 생성된 타이틀은 [Game Manager 구성](/services/playfab/identity/player-identity/platform-specific-authentication/anonymous-login#configuring-player-creation-settings)을 통해 익명 로그인을 비활성화할 수 있습니다.
* 클라이언트 측 플레이어 생성을 비활성화하면 승인되지 않은 클라이언트에서 직접 무단으로 계정을 생성하는 것을 방지합니다.
* 클라이언트 측 API를 통해서는 기존 플레이어만 로그인할 수 있습니다.
2. **서버 측 플레이어 생성 활성화**:
* 이제 플레이어 계정 생성은 서버 측 API(`LoginWithCustomID`, `LoginWithAndroidDeviceID`, `LoginWithIOSDeviceID`, `LoginWithNintendoDeviceId`)를 통해 처리됩니다.
* 이는 모든 계정 생성이 안전하고 통제된 환경에서 발생하도록 보장합니다.
## 사전 요구 사항
* 플레이어의 고유 식별자(CustomID)
* 등록된 [PlayFab](https://developer.playfab.com/) 타이틀
* PlayFab 타이틀의 비밀 키
* [로그인 기본 사항 및 모범 사례](/services/playfab/identity/player-identity/login/login-basics-best-practices)에 대한 이해
* 정적 HTML 파일을 제공할 수 있는 유효한 도메인 이름을 가진 서버
서버 설정에 도움이 필요한 경우 [테스트용 HTTP 서버 실행하기](/services/playfab/identity/player-identity/platform-specific-authentication/running-an-http-server-for-testing) 튜토리얼을 참조하세요. 이 가이드 전반에 걸쳐 도메인이 `http://playfab.example`이라고 가정합니다.
## 인증 흐름
1. **서버 측 계정 생성**:
* 서버 API의 `Server/LoginWithCustomID`를 사용하여 새 플레이어 생성
* 타이틀 비밀 키 필요
* 참조: [Server API - Login With Custom ID](xref:titleid.playfabapi.com.server.authentication.loginwithcustomid)
2. **클라이언트 측 로그인**:
* 클라이언트 API의 `Client/LoginWithCustomID`를 사용하여 기존 플레이어 로그인
* 참조: [Client API - Login With Custom ID](xref:titleid.playfabapi.com.client.authentication.loginwithcustomid)
## 구현 단계
### 1. 개발 환경 설정
1. [JavaScript SDK 문서](/services/playfab/sdks/javascript/)에서 JavaScript SDK를 다운로드합니다.
2. 필요한 Node.js 패키지를 설치합니다.
```bash theme={null}
npm install playfab-sdk
```
### 2. 서버 측 구현 (Node.js)
타이틀 비밀 키를 안전하게 보관하고 클라이언트 측 코드에 절대 노출하지 마세요. 비밀 키는 안전한 서버 환경에서만 사용해야 합니다.
```javascript theme={null}
const { create } = require('domain');
const http = require('http');
const PlayFab = require('playfab-sdk');
const PlayFabServer = require('playfab-sdk/Scripts/PlayFab/PlayFabServer');
// Initialize PlayFab settings
PlayFab.settings.titleId = "YOUR_TITLE_ID"; // Replace with your actual PlayFab Title ID
PlayFab.settings.developerSecretKey = "YOUR_SECRET_KEY"; // Replace with your actual secret key
// Callback function for PlayFab API responses
function onPlayFabResponse(error, result) {
if (error) {
console.error("PlayFab Error:", error);
return;
}
console.log("PlayFab Success:", result);
}
// Function to create user with custom ID
function createUserWithCustomId(customId, callback) {
PlayFab.PlayFabServer.LoginWithCustomID({
CreateAccount: true,
CustomId: customId,
}, (error, result) => {
if (error) {
console.error("PlayFab Error:", error);
callback(error);
return;
}
console.log("PlayFab Success:", result);
callback(null, result.data);
});
}
const customId = "YOUR_CUSTOM_ID"; // Replace with your actual custom ID
const server = http.createServer((req, res) => {
res.writeHead(200, {'Content-Type': 'application/json'});
createUserWithCustomId(customId, (error, result) => {
if (error) {
res.end(JSON.stringify({ error: error }));
return;
}
res.end(JSON.stringify({ success: result }));
});
});
const port = 3000;
server.listen(port, () => {
console.log(`Server running at http://localhost:${port}/`);
});
```
### 3. 클라이언트 측 구현 (HTML)
```html theme={null}
Server LoginWithCustomId Auth Example
```
## 플레이어 생성 설정 구성
### 기존 타이틀의 경우
1. PlayFab 개발자 포털로 이동하여 타이틀을 선택합니다.
2. **Settings**로 이동합니다.
3. **API Features** 탭을 선택합니다.
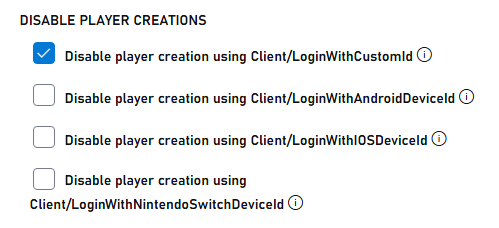
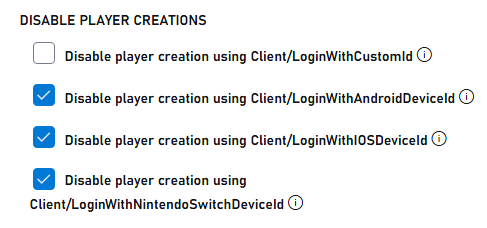
4. 익명 로그인 API를 통해 새 플레이어 계정이 생성되지 않도록 하는 체크박스를 선택합니다.
### 새 타이틀의 경우
익명 로그인 API에 대한 자동 플레이어 생성을 활성화하면 보안이 저하될 수 있습니다. 개발 또는 테스트 중에만 일시적으로 이 기능을 활성화하세요. 프로덕션으로 이전하기 전에 항상 비활성화하세요.
새 타이틀은 기본적으로 익명 API를 통한 플레이어 생성이 비활성화되어 있습니다. 테스트를 위해 활성화하려면 다음을 수행하세요.
1. PlayFab 개발자 포털로 이동하여 타이틀을 선택합니다.
2. **Settings**로 이동합니다.
3. **API Features** 탭을 선택합니다.
4. 익명 로그인 API를 통해 새 플레이어 계정이 생성되도록 허용하는 체크박스를 해제합니다.
## 테스트 및 응답 예시
### 서버 응답 예시
서버 API를 통해 사용자를 성공적으로 생성하면 다음과 유사한 응답을 받습니다.
```json theme={null}
{
"code": 200,
"status": "OK",
"data": {
"PlayFabId": "PLAYFAB_ID",
"SessionTicket": "SESSION_TICKET",
"NewlyCreated": true
}
}
```
### 클라이언트 응답 예시
이제 비활성화된 클라이언트 API에서 새 계정을 생성하려고 하면 오류를 받습니다.
```json theme={null}
{
"code": 400,
"status": "BadRequest",
"error": "PlayerCreationDisabled"
}
```
클라이언트 API를 통해 기존 사용자를 성공적으로 로그인하는 경우:
```json theme={null}
{
"code": 200,
"status": "OK",
"data": {
"PlayFabId": "PLAYFAB_ID",
"SessionTicket": "SESSION_TICKET",
"NewlyCreated": false
}
}
```
## 추가 자료
* [PlayFab 인증 개요](/services/playfab/identity/player-identity/authentication)
* [로그인 기본 사항 및 모범 사례](/services/playfab/identity/player-identity/login/login-basics-best-practices)
* [테스트용 HTTP 서버 실행하기](/services/playfab/identity/player-identity/platform-specific-authentication/running-an-http-server-for-testing)
 ### 새 타이틀의 경우
 ## 테스트 및 응답 예시
### 서버 응답 예시
서버 API를 통해 사용자를 성공적으로 생성하면 다음과 유사한 응답을 받습니다.
```json theme={null}
{
"code": 200,
"status": "OK",
"data": {
"PlayFabId": "PLAYFAB_ID",
"SessionTicket": "SESSION_TICKET",
"NewlyCreated": true
}
}
```
### 클라이언트 응답 예시
이제 비활성화된 클라이언트 API에서 새 계정을 생성하려고 하면 오류를 받습니다.
```json theme={null}
{
"code": 400,
"status": "BadRequest",
"error": "PlayerCreationDisabled"
}
```
클라이언트 API를 통해 기존 사용자를 성공적으로 로그인하는 경우:
```json theme={null}
{
"code": 200,
"status": "OK",
"data": {
"PlayFabId": "PLAYFAB_ID",
"SessionTicket": "SESSION_TICKET",
"NewlyCreated": false
}
}
```
## 추가 자료
* [PlayFab 인증 개요](/services/playfab/identity/player-identity/authentication)
* [로그인 기본 사항 및 모범 사례](/services/playfab/identity/player-identity/login/login-basics-best-practices)
* [테스트용 HTTP 서버 실행하기](/services/playfab/identity/player-identity/platform-specific-authentication/running-an-http-server-for-testing)
## 테스트 및 응답 예시
### 서버 응답 예시
서버 API를 통해 사용자를 성공적으로 생성하면 다음과 유사한 응답을 받습니다.
```json theme={null}
{
"code": 200,
"status": "OK",
"data": {
"PlayFabId": "PLAYFAB_ID",
"SessionTicket": "SESSION_TICKET",
"NewlyCreated": true
}
}
```
### 클라이언트 응답 예시
이제 비활성화된 클라이언트 API에서 새 계정을 생성하려고 하면 오류를 받습니다.
```json theme={null}
{
"code": 400,
"status": "BadRequest",
"error": "PlayerCreationDisabled"
}
```
클라이언트 API를 통해 기존 사용자를 성공적으로 로그인하는 경우:
```json theme={null}
{
"code": 200,
"status": "OK",
"data": {
"PlayFabId": "PLAYFAB_ID",
"SessionTicket": "SESSION_TICKET",
"NewlyCreated": false
}
}
```
## 추가 자료
* [PlayFab 인증 개요](/services/playfab/identity/player-identity/authentication)
* [로그인 기본 사항 및 모범 사례](/services/playfab/identity/player-identity/login/login-basics-best-practices)
* [테스트용 HTTP 서버 실행하기](/services/playfab/identity/player-identity/platform-specific-authentication/running-an-http-server-for-testing)