> ## Documentation Index
> Fetch the complete documentation index at: https://devdocs.xbox.com/llms.txt
> Use this file to discover all available pages before exploring further.
# PlayFab Economy 레거시, Unity IAP, Android 시작하기
> Android 기기에서 작동하는 인앱 구매 흐름을 위해 Unity IAP와 Android Billing API를 PlayFab 레거시 Economy 카탈로그 아이템에 연결합니다.
# PlayFab(레거시 Economy), Unity IAP, Android 시작하기
Economy v1 API는 유지 관리 모드에 있으며 새 기능은 제공되지 않고 버그 수정만 이루어집니다. **v1 API는 예측 가능한 미래 동안 유지됩니다.** 다음 버전의 PlayFab Economy에 대해 자세히 알아보려면 [Economy v2 개요](/services/playfab/economy-monetization/economy-v2/overview)를 참조하세요!
이 튜토리얼에서는 PlayFab, Unity + IAP 서비스, Android Billing API를 사용해 인앱 구매(IAP)를 설정하는 방법을 보여줍니다.
## 시작하기 전
IAP 설정은 특히 다양한 서비스가 어떻게 통합되고 협력해야 하는지 확실치 않다면 지루할 수 있습니다.
다음 이미지는 Android Billing API와 PlayFab이 함께 작동하여 클라이언트에게 견고한 IAP 경험을 제공하는 방식을 보여줍니다.
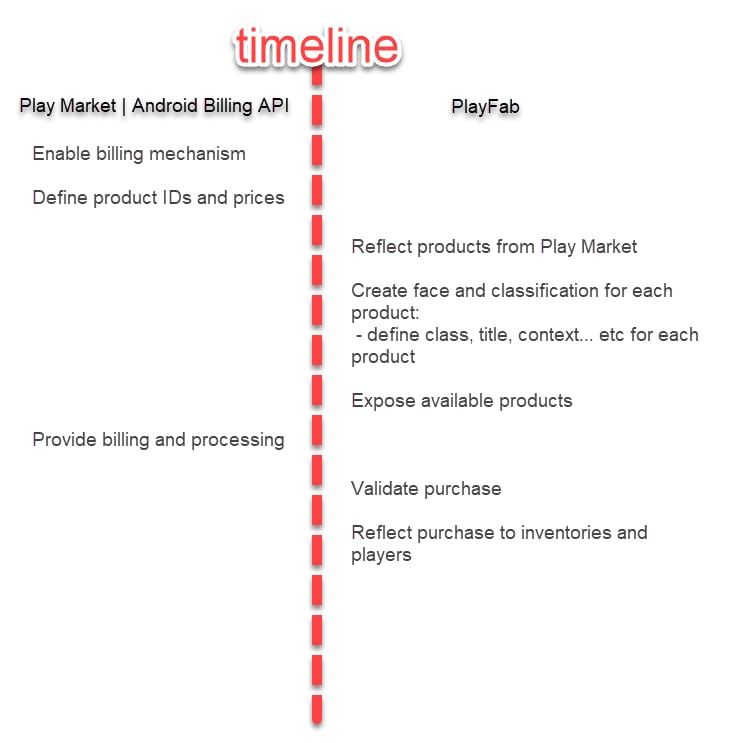 PlayMarket을 통해 **제품 ID**와 **가격**을 설정하는 것으로 시작합니다. 처음에는 모든 제품이 *이름 없는* 상태입니다. 즉, 플레이어가 구매할 수 있는 디지털 엔터티이지만 PlayFab 플레이어에게는 아무런 의미가 없습니다.
이러한 엔터티를 유용하게 만들려면 PlayFab 아이템 카탈로그에 미러링해야 합니다. 이렇게 하면 이름 없는 엔터티가 번들, 컨테이너, 개별 아이템으로 바뀝니다.
각각은 다음과 같은 고유한 얼굴을 가집니다.
* **제목**
* **설명**
* **태그**
* **유형**
* **이미지**
* **동작**
이러한 모든 것은 ID를 공유하여 마켓 제품에 연결됩니다.
구매 가능한 실제 돈 아이템에 액세스하는 가장 좋은 방법은 [GetCatalogItems](xref:titleid.playfabapi.com.client.title-widedatamanagement.getcatalogitems)와 [GetStoreItems](xref:titleid.playfabapi.com.client.title-widedatamanagement.getstoreitems)를 사용하는 것입니다. 이는 무료 화폐 스토어에서 사용하는 것과 동일한 API 메서드이므로 프로세스가 익숙할 것입니다.
아이템의 ID는 PlayFab과 외부 IAP 시스템 간의 링크입니다. 따라서 IAP 서비스에 아이템 ID를 전달합니다.
이 시점에서 구매 프로세스가 시작됩니다. 플레이어는 IAP 인터페이스와 상호 작용하며, 구매가 성공하면 영수증을 받습니다.
그런 다음 PlayFab은 영수증을 검증하고 구매를 등록하여 PlayFab 플레이어에게 방금 구매한 아이템을 부여할 수 있습니다.
이것이 IAP 통합이 작동하는 방식에 대한 대략적인 아이디어이며, 다음 예제는 대부분의 내용을 실제로 보여줍니다.
## 클라이언트 애플리케이션 설정
이 섹션에서는 PlayFab, UnityIAP, Android Billing API를 사용해 IAP를 테스트하기 위한 매우 원시적인 애플리케이션을 구성하는 방법을 보여줍니다.
필수 구성 요소:
* Unity 프로젝트.
* 타이틀에서 작동하도록 가져오고 구성된 PlayFab SDK.
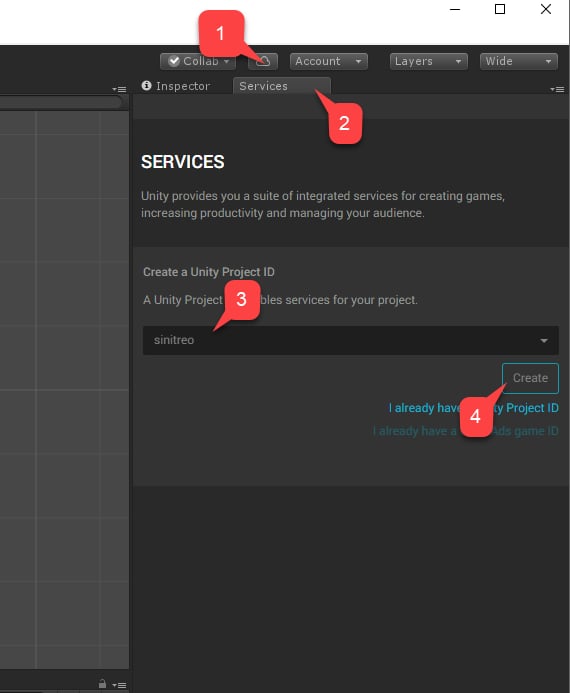
첫 번째 단계는 UnityIAP 설정입니다.
1. **Services**로 이동합니다.
2. **Services** 탭이 선택되어 있는지 확인합니다.
3. **Unity Services** 프로필 또는 조직을 선택합니다.
4. **Create** 버튼을 선택합니다.
PlayMarket을 통해 **제품 ID**와 **가격**을 설정하는 것으로 시작합니다. 처음에는 모든 제품이 *이름 없는* 상태입니다. 즉, 플레이어가 구매할 수 있는 디지털 엔터티이지만 PlayFab 플레이어에게는 아무런 의미가 없습니다.
이러한 엔터티를 유용하게 만들려면 PlayFab 아이템 카탈로그에 미러링해야 합니다. 이렇게 하면 이름 없는 엔터티가 번들, 컨테이너, 개별 아이템으로 바뀝니다.
각각은 다음과 같은 고유한 얼굴을 가집니다.
* **제목**
* **설명**
* **태그**
* **유형**
* **이미지**
* **동작**
이러한 모든 것은 ID를 공유하여 마켓 제품에 연결됩니다.
구매 가능한 실제 돈 아이템에 액세스하는 가장 좋은 방법은 [GetCatalogItems](xref:titleid.playfabapi.com.client.title-widedatamanagement.getcatalogitems)와 [GetStoreItems](xref:titleid.playfabapi.com.client.title-widedatamanagement.getstoreitems)를 사용하는 것입니다. 이는 무료 화폐 스토어에서 사용하는 것과 동일한 API 메서드이므로 프로세스가 익숙할 것입니다.
아이템의 ID는 PlayFab과 외부 IAP 시스템 간의 링크입니다. 따라서 IAP 서비스에 아이템 ID를 전달합니다.
이 시점에서 구매 프로세스가 시작됩니다. 플레이어는 IAP 인터페이스와 상호 작용하며, 구매가 성공하면 영수증을 받습니다.
그런 다음 PlayFab은 영수증을 검증하고 구매를 등록하여 PlayFab 플레이어에게 방금 구매한 아이템을 부여할 수 있습니다.
이것이 IAP 통합이 작동하는 방식에 대한 대략적인 아이디어이며, 다음 예제는 대부분의 내용을 실제로 보여줍니다.
## 클라이언트 애플리케이션 설정
이 섹션에서는 PlayFab, UnityIAP, Android Billing API를 사용해 IAP를 테스트하기 위한 매우 원시적인 애플리케이션을 구성하는 방법을 보여줍니다.
필수 구성 요소:
* Unity 프로젝트.
* 타이틀에서 작동하도록 가져오고 구성된 PlayFab SDK.
첫 번째 단계는 UnityIAP 설정입니다.
1. **Services**로 이동합니다.
2. **Services** 탭이 선택되어 있는지 확인합니다.
3. **Unity Services** 프로필 또는 조직을 선택합니다.
4. **Create** 버튼을 선택합니다.
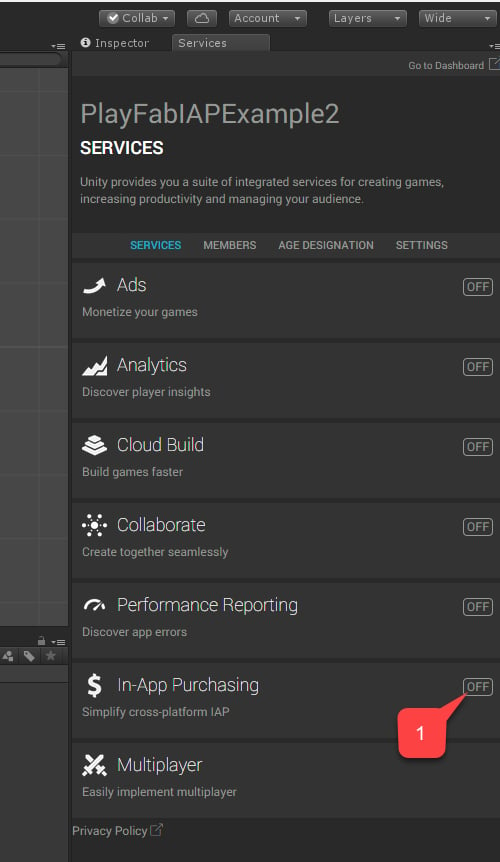
 1. 다음으로 **In-App Purchasing (IAP)** 서비스로 이동합니다.
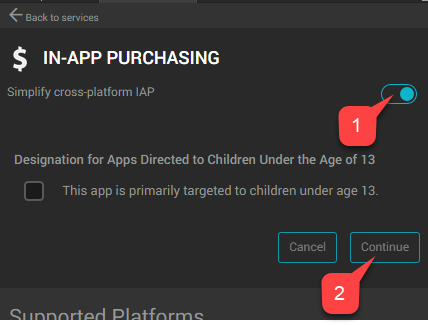
 1. **Simplify cross-platform IAP** 토글을 설정하여 **서비스**를 활성화해야 합니다.
2. 그런 다음 **Continue** 버튼을 선택합니다.
1. **Simplify cross-platform IAP** 토글을 설정하여 **서비스**를 활성화해야 합니다.
2. 그런 다음 **Continue** 버튼을 선택합니다.
 플러그인 목록이 있는 페이지가 나타납니다.
1. **Import** 버튼을 선택합니다.
플러그인 목록이 있는 페이지가 나타납니다.
1. **Import** 버튼을 선택합니다.
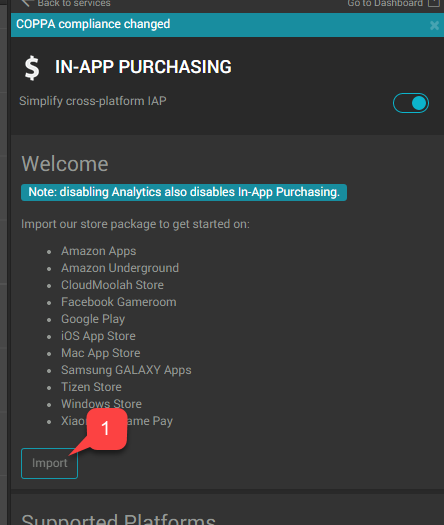 Unity 설치를 계속 진행하고 모든 플러그인을 가져올 때까지 가져오기 절차를 진행합니다.
1. 플러그인이 제자리에 있는지 확인합니다.
2. 그런 다음 **AndroidIAPExample.cs**라는 새 스크립트를 만듭니다.
Unity 설치를 계속 진행하고 모든 플러그인을 가져올 때까지 가져오기 절차를 진행합니다.
1. 플러그인이 제자리에 있는지 확인합니다.
2. 그런 다음 **AndroidIAPExample.cs**라는 새 스크립트를 만듭니다.
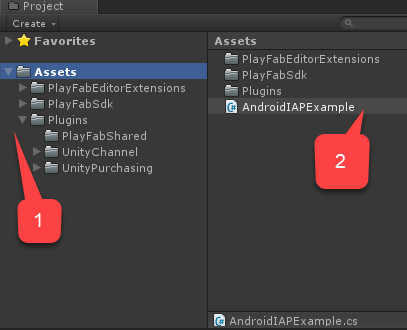 `AndroidIAPExample.cs`에는 아래에 표시된 코드가 포함됩니다(자세한 내용은 코드 주석을 참조).
```csharp theme={null}
using PlayFab;
using PlayFab.ClientModels;
using PlayFab.Json;
using System;
using System.Collections.Generic;
using UnityEngine;
using UnityEngine.Purchasing;
public class AndroidIAPExample : MonoBehaviour, IStoreListener {
// Items list, configurable via inspector
private List Catalog;
// The Unity Purchasing system
private static IStoreController m_StoreController;
// Bootstrap the whole thing
public void Start() {
// Make PlayFab log in
Login();
}
public void OnGUI() {
// This line just scales the UI up for high-res devices
// Comment it out if you find the UI too large.
GUI.matrix = Matrix4x4.TRS(new Vector3(0, 0, 0), Quaternion.identity, new Vector3(3, 3, 3));
// if we are not initialized, only draw a message
if (!IsInitialized) {
GUILayout.Label("Initializing IAP and logging in...");
return;
}
// Draw menu to purchase items
foreach (var item in Catalog) {
if (GUILayout.Button("Buy " + item.DisplayName)) {
// On button click buy a product
BuyProductID(item.ItemId);
}
}
}
// This is invoked manually on Start to initiate login ops
private void Login() {
// Login with Android ID
PlayFabClientAPI.LoginWithAndroidDeviceID(new LoginWithAndroidDeviceIDRequest() {
CreateAccount = true,
AndroidDeviceId = SystemInfo.deviceUniqueIdentifier
}, result => {
Debug.Log("Logged in");
// Refresh available items
RefreshIAPItems();
}, error => Debug.LogError(error.GenerateErrorReport()));
}
private void RefreshIAPItems() {
PlayFabClientAPI.GetCatalogItems(new GetCatalogItemsRequest(), result => {
Catalog = result.Catalog;
// Make UnityIAP initialize
InitializePurchasing();
}, error => Debug.LogError(error.GenerateErrorReport()));
}
// This is invoked manually on Start to initialize UnityIAP
public void InitializePurchasing() {
// If IAP is already initialized, return gently
if (IsInitialized) return;
// Create a builder for IAP service
var builder = ConfigurationBuilder.Instance(StandardPurchasingModule.Instance(AppStore.GooglePlay));
// Register each item from the catalog
foreach (var item in Catalog) {
builder.AddProduct(item.ItemId, ProductType.Consumable);
}
// Trigger IAP service initialization
UnityPurchasing.Initialize(this, builder);
}
// We are initialized when StoreController and Extensions are set and we are logged in
public bool IsInitialized {
get {
return m_StoreController != null && Catalog != null;
}
}
// This is automatically invoked automatically when IAP service is initialized
public void OnInitialized(IStoreController controller, IExtensionProvider extensions) {
m_StoreController = controller;
}
// This is automatically invoked automatically when IAP service failed to initialized
public void OnInitializeFailed(InitializationFailureReason error) {
Debug.Log("OnInitializeFailed InitializationFailureReason:" + error);
}
// This is automatically invoked automatically when purchase failed
public void OnPurchaseFailed(Product product, PurchaseFailureReason failureReason) {
Debug.Log(string.Format("OnPurchaseFailed: FAIL. Product: '{0}', PurchaseFailureReason: {1}", product.definition.storeSpecificId, failureReason));
}
// This is invoked automatically when successful purchase is ready to be processed
public PurchaseProcessingResult ProcessPurchase(PurchaseEventArgs e) {
// NOTE: this code does not account for purchases that were pending and are
// delivered on application start.
// Production code should account for such case:
// More: https://docs.unity3d.com/ScriptReference/Purchasing.PurchaseProcessingResult.Pending.html
if (!IsInitialized) {
return PurchaseProcessingResult.Complete;
}
// Test edge case where product is unknown
if (e.purchasedProduct == null) {
Debug.LogWarning("Attempted to process purchase with unknown product. Ignoring");
return PurchaseProcessingResult.Complete;
}
// Test edge case where purchase has no receipt
if (string.IsNullOrEmpty(e.purchasedProduct.receipt)) {
Debug.LogWarning("Attempted to process purchase with no receipt: ignoring");
return PurchaseProcessingResult.Complete;
}
Debug.Log("Processing transaction: " + e.purchasedProduct.transactionID);
// Deserialize receipt
var googleReceipt = GooglePurchase.FromJson(e.purchasedProduct.receipt);
// Invoke receipt validation
// This will not only validate a receipt, but will also grant player corresponding items
// only if receipt is valid.
PlayFabClientAPI.ValidateGooglePlayPurchase(new ValidateGooglePlayPurchaseRequest() {
// Pass in currency code in ISO format
CurrencyCode = e.purchasedProduct.metadata.isoCurrencyCode,
// Convert and set Purchase price
PurchasePrice = (uint)(e.purchasedProduct.metadata.localizedPrice * 100),
// Pass in the receipt
ReceiptJson = googleReceipt.PayloadData.json,
// Pass in the signature
Signature = googleReceipt.PayloadData.signature
}, result => Debug.Log("Validation successful!"),
error => Debug.Log("Validation failed: " + error.GenerateErrorReport())
);
return PurchaseProcessingResult.Complete;
}
// This is invoked manually to initiate purchase
void BuyProductID(string productId) {
// If IAP service has not been initialized, fail hard
if (!IsInitialized) throw new Exception("IAP Service is not initialized!");
// Pass in the product id to initiate purchase
m_StoreController.InitiatePurchase(productId);
}
}
// The following classes are used to deserialize JSON results provided by IAP Service
// Please, note that JSON fields are case-sensitive and should remain fields to support Unity Deserialization via JsonUtilities
public class JsonData {
// JSON Fields, ! Case-sensitive
public string orderId;
public string packageName;
public string productId;
public long purchaseTime;
public int purchaseState;
public string purchaseToken;
}
public class PayloadData {
public JsonData JsonData;
// JSON Fields, ! Case-sensitive
public string signature;
public string json;
public static PayloadData FromJson(string json) {
var payload = JsonUtility.FromJson(json);
payload.JsonData = JsonUtility.FromJson(payload.json);
return payload;
}
}
public class GooglePurchase {
public PayloadData PayloadData;
// JSON Fields, ! Case-sensitive
public string Store;
public string TransactionID;
public string Payload;
public static GooglePurchase FromJson(string json) {
var purchase = JsonUtility.FromJson(json);
purchase.PayloadData = PayloadData.FromJson(purchase.Payload);
return purchase;
}
}
```
1. **Code**라는 새 **Game** 오브젝트를 만듭니다.
2. `AndroidIAPExample` 컴포넌트를 여기에 추가합니다(2단계 프로세스).
3. `AndroidIAPExample` 컴포넌트를 여기에 추가합니다.
4. 씬을 반드시 **저장**합니다.
`AndroidIAPExample.cs`에는 아래에 표시된 코드가 포함됩니다(자세한 내용은 코드 주석을 참조).
```csharp theme={null}
using PlayFab;
using PlayFab.ClientModels;
using PlayFab.Json;
using System;
using System.Collections.Generic;
using UnityEngine;
using UnityEngine.Purchasing;
public class AndroidIAPExample : MonoBehaviour, IStoreListener {
// Items list, configurable via inspector
private List Catalog;
// The Unity Purchasing system
private static IStoreController m_StoreController;
// Bootstrap the whole thing
public void Start() {
// Make PlayFab log in
Login();
}
public void OnGUI() {
// This line just scales the UI up for high-res devices
// Comment it out if you find the UI too large.
GUI.matrix = Matrix4x4.TRS(new Vector3(0, 0, 0), Quaternion.identity, new Vector3(3, 3, 3));
// if we are not initialized, only draw a message
if (!IsInitialized) {
GUILayout.Label("Initializing IAP and logging in...");
return;
}
// Draw menu to purchase items
foreach (var item in Catalog) {
if (GUILayout.Button("Buy " + item.DisplayName)) {
// On button click buy a product
BuyProductID(item.ItemId);
}
}
}
// This is invoked manually on Start to initiate login ops
private void Login() {
// Login with Android ID
PlayFabClientAPI.LoginWithAndroidDeviceID(new LoginWithAndroidDeviceIDRequest() {
CreateAccount = true,
AndroidDeviceId = SystemInfo.deviceUniqueIdentifier
}, result => {
Debug.Log("Logged in");
// Refresh available items
RefreshIAPItems();
}, error => Debug.LogError(error.GenerateErrorReport()));
}
private void RefreshIAPItems() {
PlayFabClientAPI.GetCatalogItems(new GetCatalogItemsRequest(), result => {
Catalog = result.Catalog;
// Make UnityIAP initialize
InitializePurchasing();
}, error => Debug.LogError(error.GenerateErrorReport()));
}
// This is invoked manually on Start to initialize UnityIAP
public void InitializePurchasing() {
// If IAP is already initialized, return gently
if (IsInitialized) return;
// Create a builder for IAP service
var builder = ConfigurationBuilder.Instance(StandardPurchasingModule.Instance(AppStore.GooglePlay));
// Register each item from the catalog
foreach (var item in Catalog) {
builder.AddProduct(item.ItemId, ProductType.Consumable);
}
// Trigger IAP service initialization
UnityPurchasing.Initialize(this, builder);
}
// We are initialized when StoreController and Extensions are set and we are logged in
public bool IsInitialized {
get {
return m_StoreController != null && Catalog != null;
}
}
// This is automatically invoked automatically when IAP service is initialized
public void OnInitialized(IStoreController controller, IExtensionProvider extensions) {
m_StoreController = controller;
}
// This is automatically invoked automatically when IAP service failed to initialized
public void OnInitializeFailed(InitializationFailureReason error) {
Debug.Log("OnInitializeFailed InitializationFailureReason:" + error);
}
// This is automatically invoked automatically when purchase failed
public void OnPurchaseFailed(Product product, PurchaseFailureReason failureReason) {
Debug.Log(string.Format("OnPurchaseFailed: FAIL. Product: '{0}', PurchaseFailureReason: {1}", product.definition.storeSpecificId, failureReason));
}
// This is invoked automatically when successful purchase is ready to be processed
public PurchaseProcessingResult ProcessPurchase(PurchaseEventArgs e) {
// NOTE: this code does not account for purchases that were pending and are
// delivered on application start.
// Production code should account for such case:
// More: https://docs.unity3d.com/ScriptReference/Purchasing.PurchaseProcessingResult.Pending.html
if (!IsInitialized) {
return PurchaseProcessingResult.Complete;
}
// Test edge case where product is unknown
if (e.purchasedProduct == null) {
Debug.LogWarning("Attempted to process purchase with unknown product. Ignoring");
return PurchaseProcessingResult.Complete;
}
// Test edge case where purchase has no receipt
if (string.IsNullOrEmpty(e.purchasedProduct.receipt)) {
Debug.LogWarning("Attempted to process purchase with no receipt: ignoring");
return PurchaseProcessingResult.Complete;
}
Debug.Log("Processing transaction: " + e.purchasedProduct.transactionID);
// Deserialize receipt
var googleReceipt = GooglePurchase.FromJson(e.purchasedProduct.receipt);
// Invoke receipt validation
// This will not only validate a receipt, but will also grant player corresponding items
// only if receipt is valid.
PlayFabClientAPI.ValidateGooglePlayPurchase(new ValidateGooglePlayPurchaseRequest() {
// Pass in currency code in ISO format
CurrencyCode = e.purchasedProduct.metadata.isoCurrencyCode,
// Convert and set Purchase price
PurchasePrice = (uint)(e.purchasedProduct.metadata.localizedPrice * 100),
// Pass in the receipt
ReceiptJson = googleReceipt.PayloadData.json,
// Pass in the signature
Signature = googleReceipt.PayloadData.signature
}, result => Debug.Log("Validation successful!"),
error => Debug.Log("Validation failed: " + error.GenerateErrorReport())
);
return PurchaseProcessingResult.Complete;
}
// This is invoked manually to initiate purchase
void BuyProductID(string productId) {
// If IAP service has not been initialized, fail hard
if (!IsInitialized) throw new Exception("IAP Service is not initialized!");
// Pass in the product id to initiate purchase
m_StoreController.InitiatePurchase(productId);
}
}
// The following classes are used to deserialize JSON results provided by IAP Service
// Please, note that JSON fields are case-sensitive and should remain fields to support Unity Deserialization via JsonUtilities
public class JsonData {
// JSON Fields, ! Case-sensitive
public string orderId;
public string packageName;
public string productId;
public long purchaseTime;
public int purchaseState;
public string purchaseToken;
}
public class PayloadData {
public JsonData JsonData;
// JSON Fields, ! Case-sensitive
public string signature;
public string json;
public static PayloadData FromJson(string json) {
var payload = JsonUtility.FromJson(json);
payload.JsonData = JsonUtility.FromJson(payload.json);
return payload;
}
}
public class GooglePurchase {
public PayloadData PayloadData;
// JSON Fields, ! Case-sensitive
public string Store;
public string TransactionID;
public string Payload;
public static GooglePurchase FromJson(string json) {
var purchase = JsonUtility.FromJson(json);
purchase.PayloadData = PayloadData.FromJson(purchase.Payload);
return purchase;
}
}
```
1. **Code**라는 새 **Game** 오브젝트를 만듭니다.
2. `AndroidIAPExample` 컴포넌트를 여기에 추가합니다(2단계 프로세스).
3. `AndroidIAPExample` 컴포넌트를 여기에 추가합니다.
4. 씬을 반드시 **저장**합니다.
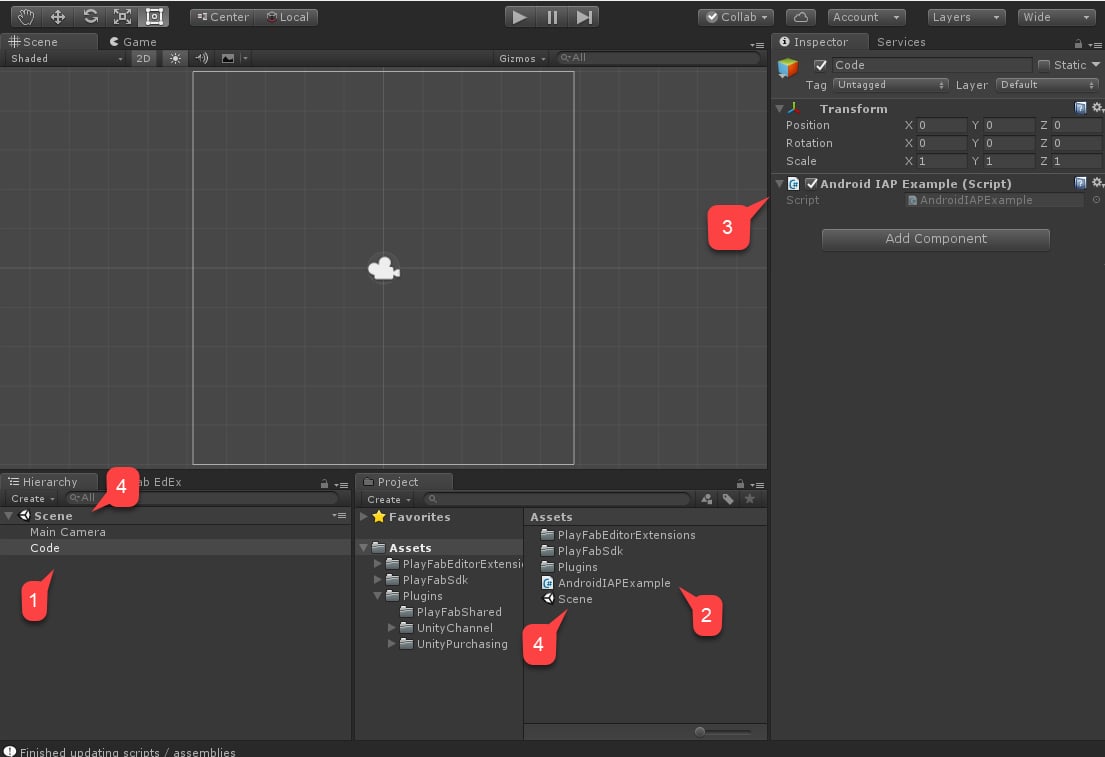 마지막으로 **Build Settings**로 이동합니다.
1. 씬이 **Scenes In Build** 영역에 추가되었는지 확인합니다.
2. **Android** 플랫폼이 선택되었는지 확인합니다.
3. **Player Settings** 영역으로 이동합니다.
4. **Package Name**을 지정합니다.
**PlayMarket** 충돌을 피하기 위해 반드시 *자체* 패키지 이름을 만들어야 합니다.
마지막으로 **Build Settings**로 이동합니다.
1. 씬이 **Scenes In Build** 영역에 추가되었는지 확인합니다.
2. **Android** 플랫폼이 선택되었는지 확인합니다.
3. **Player Settings** 영역으로 이동합니다.
4. **Package Name**을 지정합니다.
**PlayMarket** 충돌을 피하기 위해 반드시 *자체* 패키지 이름을 만들어야 합니다.
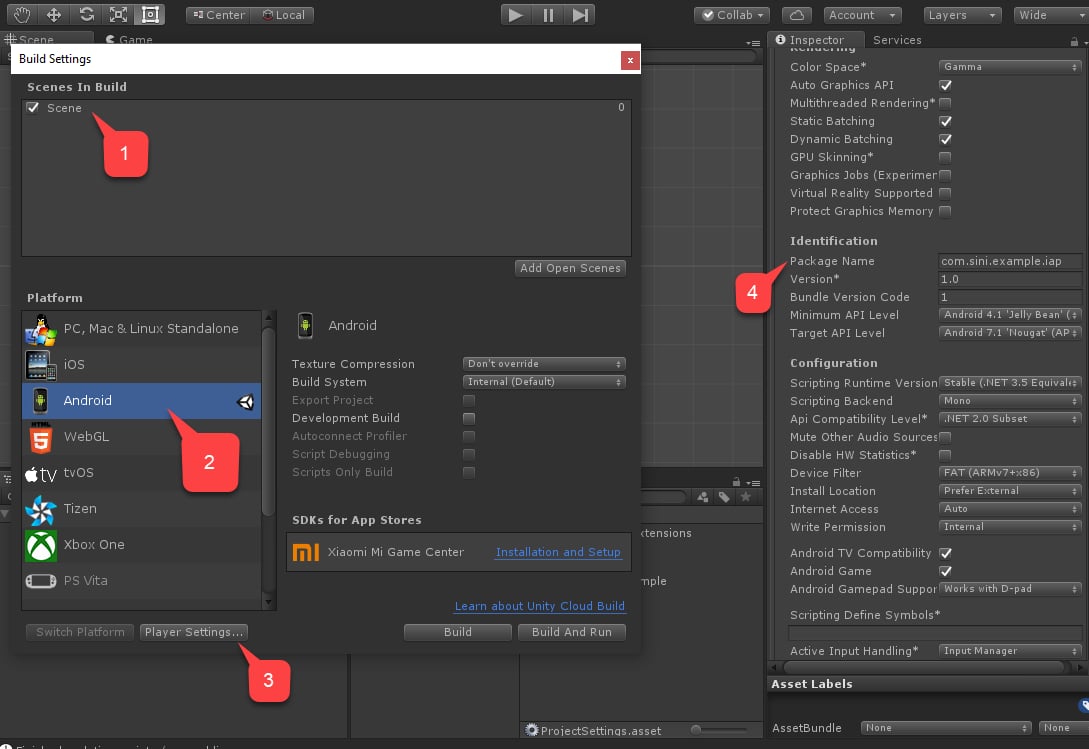 마지막으로 애플리케이션을 평소대로 빌드하고 APK가 안전하게 있는지 확인합니다.
아직 이를 테스트할 수 있는 방법이 없습니다. 먼저 PlayMarket과 PlayFab을 구성해야 하며, 이는 다음 섹션에서 설명합니다.
## IAP용 PlayMarket 애플리케이션 설정
이 섹션에서는 PlayMarket 애플리케이션에 대해 IAP를 활성화하는 방법의 세부 사항을 설명합니다.
애플리케이션 자체를 설정하는 것은 이 튜토리얼의 범위를 벗어납니다. 이미 애플리케이션이 있고 최소한 Alpha 릴리스를 게시하도록 구성되어 있다고 가정합니다.
마지막으로 애플리케이션을 평소대로 빌드하고 APK가 안전하게 있는지 확인합니다.
아직 이를 테스트할 수 있는 방법이 없습니다. 먼저 PlayMarket과 PlayFab을 구성해야 하며, 이는 다음 섹션에서 설명합니다.
## IAP용 PlayMarket 애플리케이션 설정
이 섹션에서는 PlayMarket 애플리케이션에 대해 IAP를 활성화하는 방법의 세부 사항을 설명합니다.
애플리케이션 자체를 설정하는 것은 이 튜토리얼의 범위를 벗어납니다. 이미 애플리케이션이 있고 최소한 Alpha 릴리스를 게시하도록 구성되어 있다고 가정합니다.
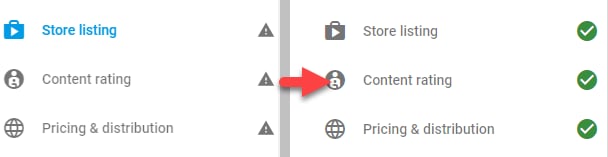 유용한 참고 사항:
* 해당 지점에 도달하려면 APK가 업로드되어 있어야 합니다. 이전 섹션에서 만든 APK를 사용하세요.
* APK 업로드를 요청받으면 IAP 샌드박스를 활성화하기 위해 Alpha 또는 Beta 애플리케이션으로 업로드할 수 있습니다.
* **Content Rating**을 구성하는 것은 애플리케이션에서 IAP가 어떻게 활성화되는지에 대한 질문을 포함합니다.
* PlayMarket은 게시자가 IAP를 사용하거나 테스트하는 것을 *허용하지 않습니다*. 따라서 테스트 목적으로 *다른* Google 계정을 선택하고 Alpha/Beta 빌드의 테스터로 추가하세요.
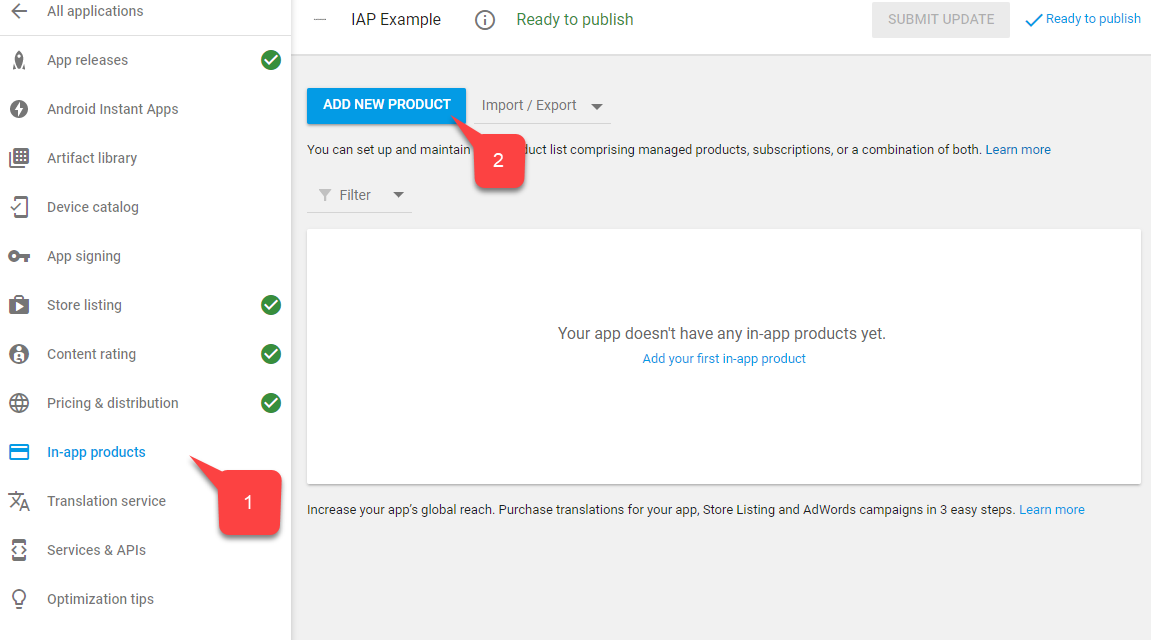
애플리케이션 빌드를 게시했으면:
1. 메뉴에서 **In-app products**를 선택합니다.
* **Merchant Account**를 요청받으면 연결하거나 만듭니다.
2. **Add New Product** 버튼을 선택합니다.
유용한 참고 사항:
* 해당 지점에 도달하려면 APK가 업로드되어 있어야 합니다. 이전 섹션에서 만든 APK를 사용하세요.
* APK 업로드를 요청받으면 IAP 샌드박스를 활성화하기 위해 Alpha 또는 Beta 애플리케이션으로 업로드할 수 있습니다.
* **Content Rating**을 구성하는 것은 애플리케이션에서 IAP가 어떻게 활성화되는지에 대한 질문을 포함합니다.
* PlayMarket은 게시자가 IAP를 사용하거나 테스트하는 것을 *허용하지 않습니다*. 따라서 테스트 목적으로 *다른* Google 계정을 선택하고 Alpha/Beta 빌드의 테스터로 추가하세요.
애플리케이션 빌드를 게시했으면:
1. 메뉴에서 **In-app products**를 선택합니다.
* **Merchant Account**를 요청받으면 연결하거나 만듭니다.
2. **Add New Product** 버튼을 선택합니다.
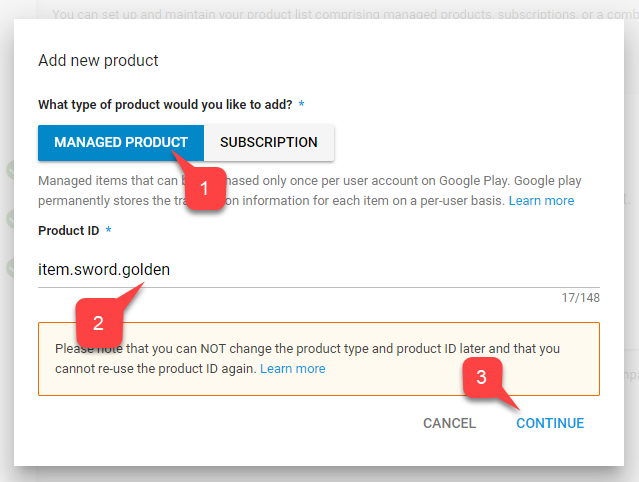
 1. 아래에 표시된 이 화면에서 **Managed Product**를 선택합니다.
2. 설명적인 **Product ID**를 지정합니다.
3. **Continue**를 선택합니다.
1. 아래에 표시된 이 화면에서 **Managed Product**를 선택합니다.
2. 설명적인 **Product ID**를 지정합니다.
3. **Continue**를 선택합니다.
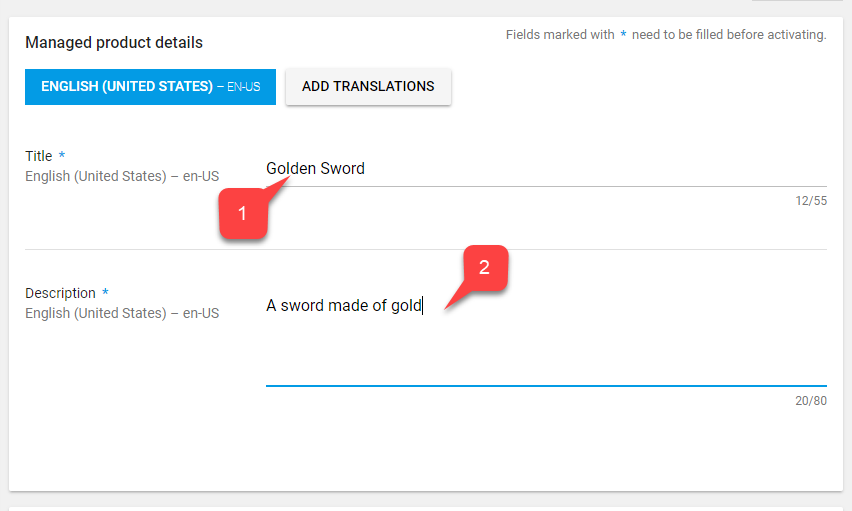
 PlayMarket은 \*\*Title (1)\*\*과 \*\*Description (2)\*\*을 입력하도록 요구합니다. 그러나 우리 사례에서는 별로 유용하지 않습니다.
**Data Item** 데이터는 오로지 PlayFab 서비스에서만 가져오며, ID만 일치하면 됩니다.
PlayMarket은 \*\*Title (1)\*\*과 \*\*Description (2)\*\*을 입력하도록 요구합니다. 그러나 우리 사례에서는 별로 유용하지 않습니다.
**Data Item** 데이터는 오로지 PlayFab 서비스에서만 가져오며, ID만 일치하면 됩니다.
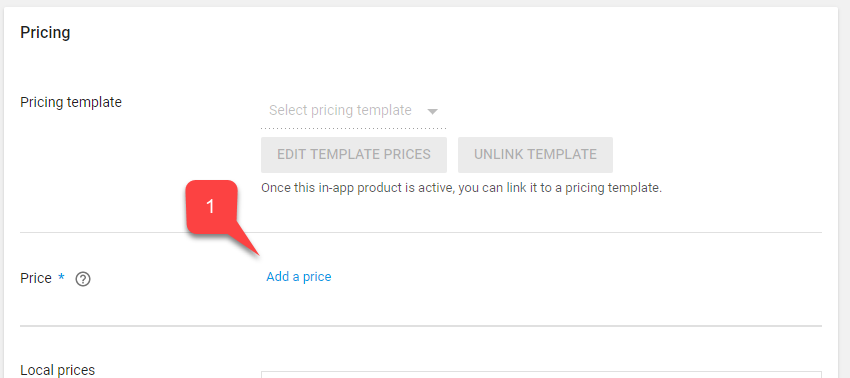
 1. 아래로 스크롤하고 **Add a price** 버튼을 선택합니다.
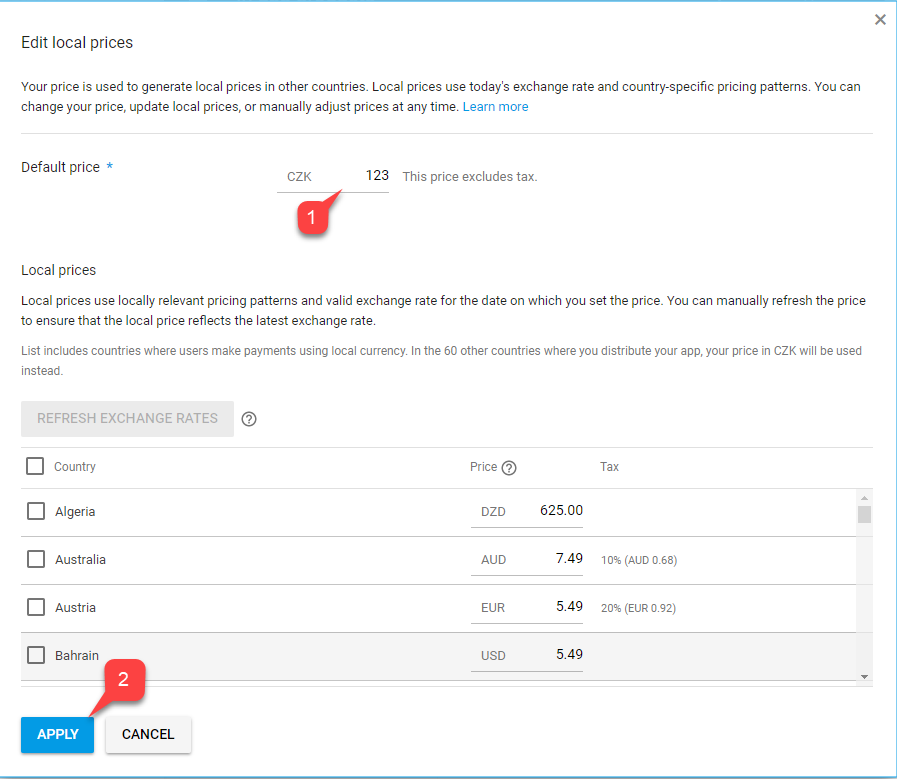
 1. 유효한 가격을 입력합니다(가격이 각 국가/지역별로 독립적으로 변환되는 방식에 유의).
2. **Apply** 버튼을 선택합니다.
1. 유효한 가격을 입력합니다(가격이 각 국가/지역별로 독립적으로 변환되는 방식에 유의).
2. **Apply** 버튼을 선택합니다.
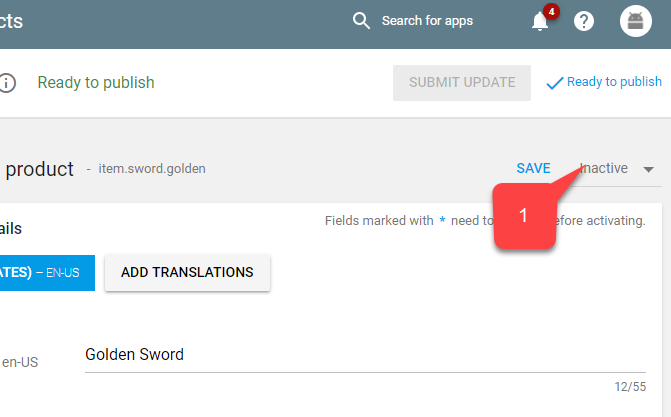
 1. 마지막으로 화면 상단으로 다시 스크롤하고 아이템 상태를 **Active**로 변경합니다.
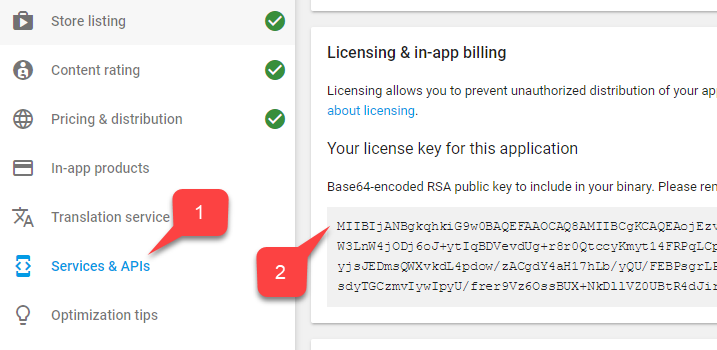
 앱 구성은 이것으로 마무리되지만, 몇 가지 추가 조정이 필요합니다. 먼저 **Licensing Key**를 저장하겠습니다(이는 PlayFab을 PlayMarket과 연결하는 데 유용할 것입니다).
1. 메뉴에서 **Services & APIs**로 이동합니다.
2. 그런 다음 **Key**의 **Base64** 버전을 찾아 저장합니다.
앱 구성은 이것으로 마무리되지만, 몇 가지 추가 조정이 필요합니다. 먼저 **Licensing Key**를 저장하겠습니다(이는 PlayFab을 PlayMarket과 연결하는 데 유용할 것입니다).
1. 메뉴에서 **Services & APIs**로 이동합니다.
2. 그런 다음 **Key**의 **Base64** 버전을 찾아 저장합니다.
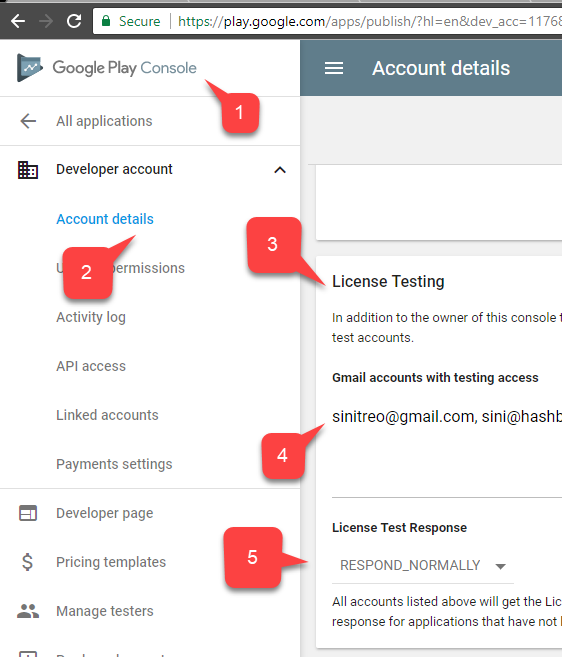
 다음 단계는 IAP 테스트를 활성화하는 것입니다. 샌드박스는 Alpha 및 Beta 빌드에 대해 자동으로 활성화되지만 앱을 테스트할 권한이 있는 계정을 설정해야 합니다.
1. **Home**으로 이동합니다.
2. 왼쪽 메뉴에서 **Account details**를 찾아 선택합니다.
3. **License Testing** 영역을 찾습니다.
4. **Test Accounts**가 목록에 있는지 확인합니다.
5. **License Test Response**가 **RESPOND\_NORMALLY**로 설정되어 있는지 확인합니다.
설정을 적용하는 것을 잊지 마세요!
다음 단계는 IAP 테스트를 활성화하는 것입니다. 샌드박스는 Alpha 및 Beta 빌드에 대해 자동으로 활성화되지만 앱을 테스트할 권한이 있는 계정을 설정해야 합니다.
1. **Home**으로 이동합니다.
2. 왼쪽 메뉴에서 **Account details**를 찾아 선택합니다.
3. **License Testing** 영역을 찾습니다.
4. **Test Accounts**가 목록에 있는지 확인합니다.
5. **License Test Response**가 **RESPOND\_NORMALLY**로 설정되어 있는지 확인합니다.
설정을 적용하는 것을 잊지 마세요!
 이 시점에서 통합의 Play Market 측 설정이 완료되어야 합니다.
## PlayFab 타이틀 설정
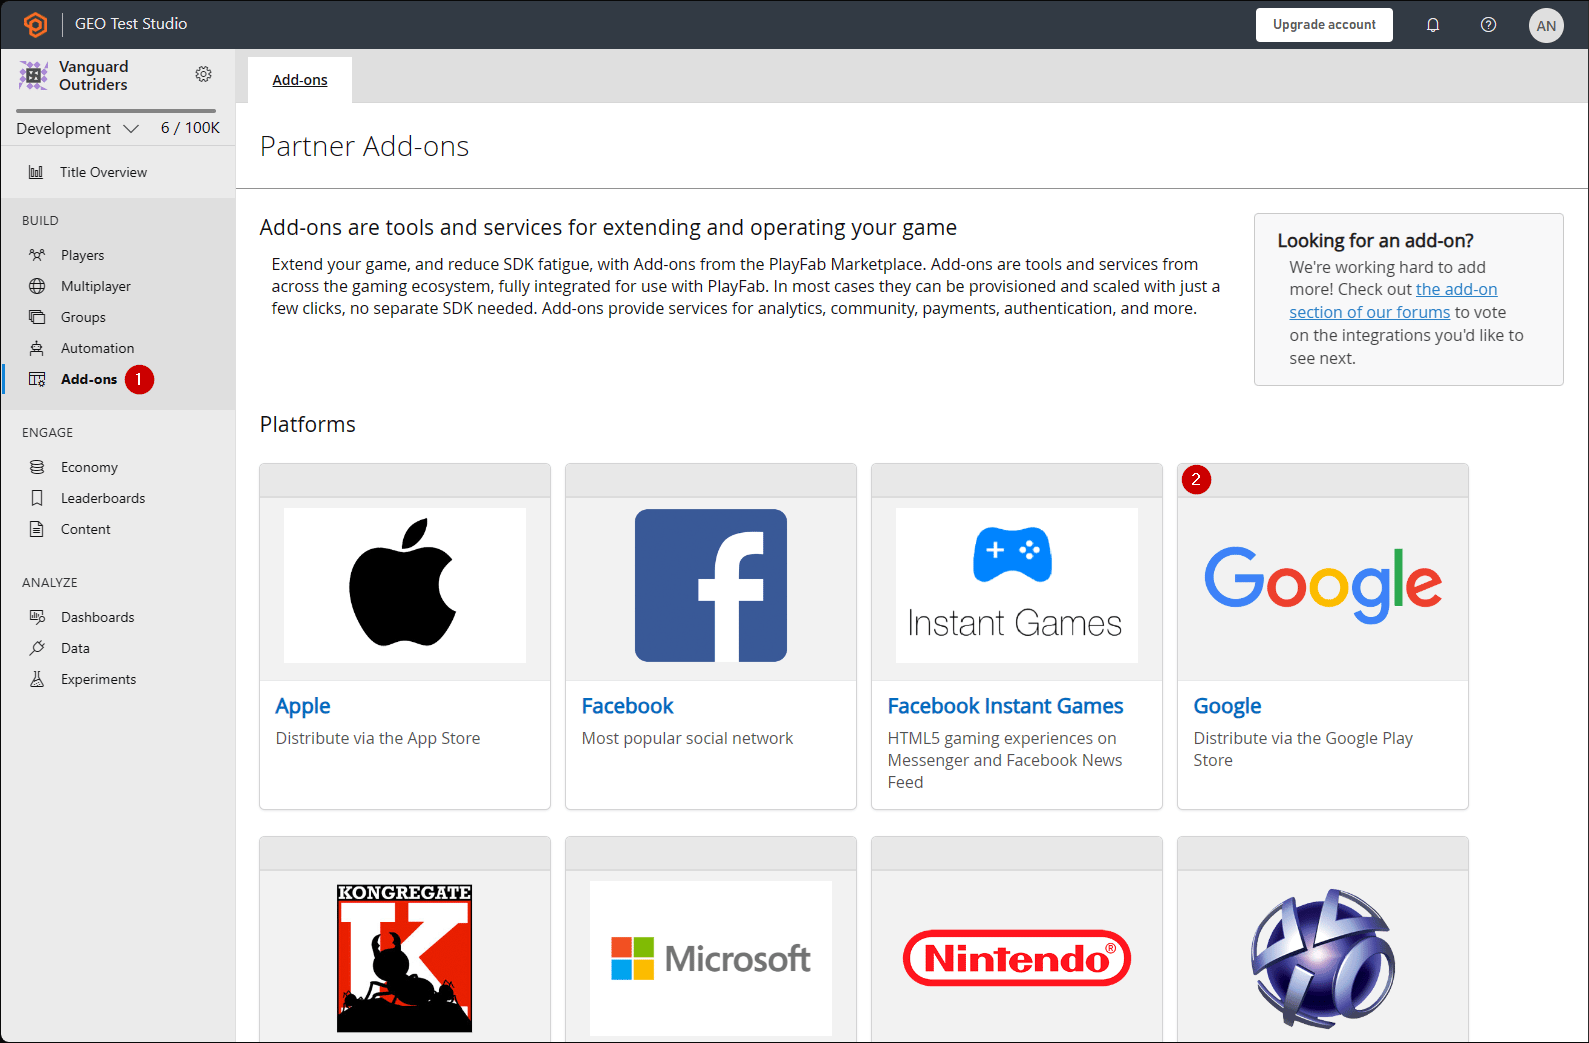
마지막 단계는 제품을 반영하고 Google Billing API와 통합하도록 PlayFab 타이틀을 구성하는 것입니다.
1. **Add-ons**를 선택합니다.
2. 그런 다음 **Google** 애드온을 선택합니다.
이 시점에서 통합의 Play Market 측 설정이 완료되어야 합니다.
## PlayFab 타이틀 설정
마지막 단계는 제품을 반영하고 Google Billing API와 통합하도록 PlayFab 타이틀을 구성하는 것입니다.
1. **Add-ons**를 선택합니다.
2. 그런 다음 **Google** 애드온을 선택합니다.
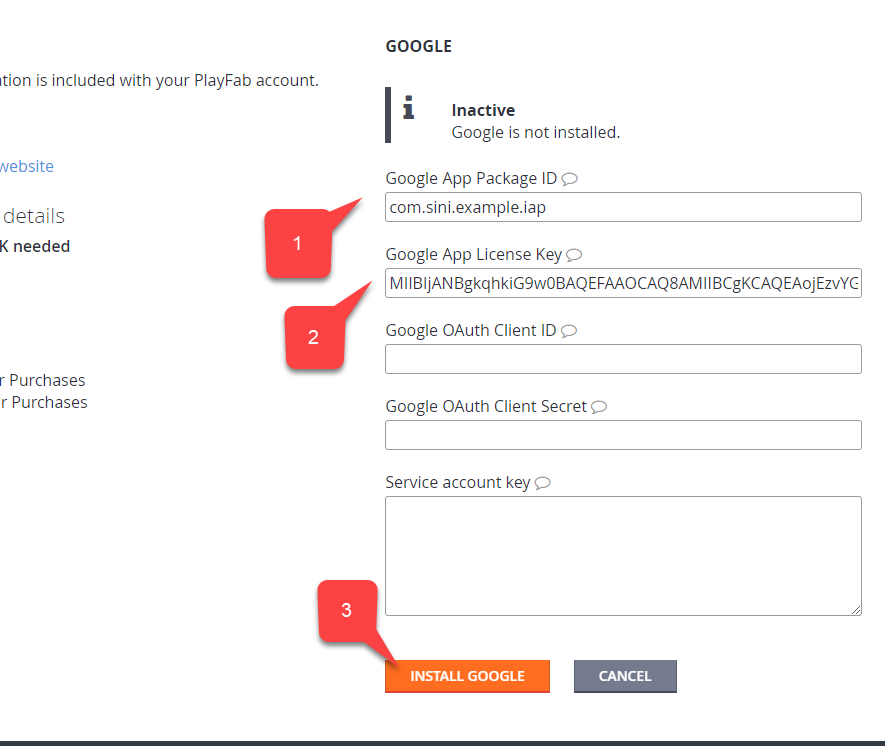
 1. **Package ID**를 입력합니다.
2. 이전 섹션에서 얻은 **Google App License Key**를 입력합니다.
3. **Install Google** 버튼을 선택하여 변경 사항을 커밋합니다.
1. **Package ID**를 입력합니다.
2. 이전 섹션에서 얻은 **Google App License Key**를 입력합니다.
3. **Install Google** 버튼을 선택하여 변경 사항을 커밋합니다.
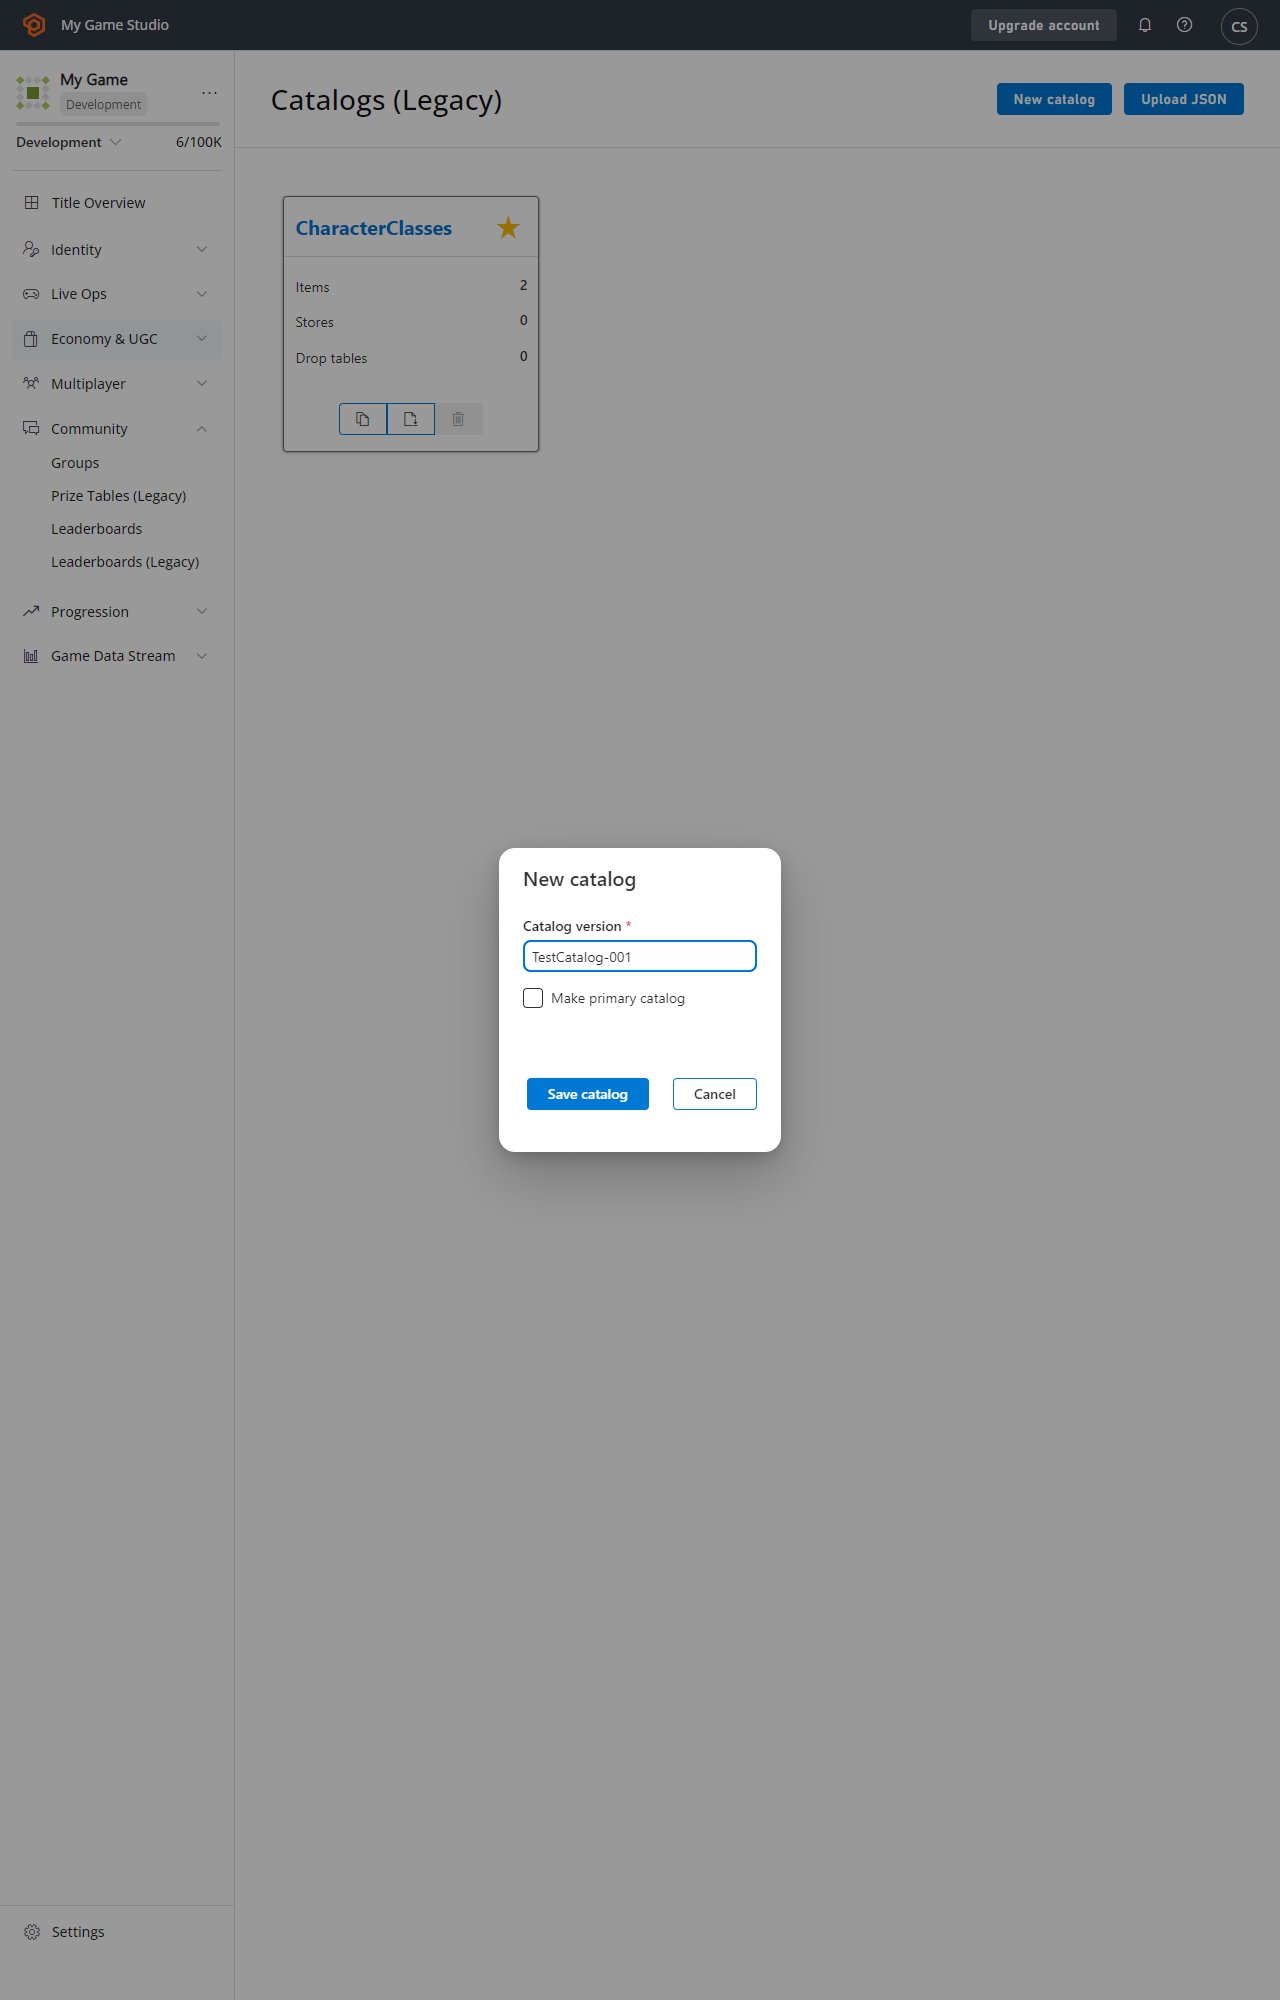
 다음 단계는 PlayFab에서 Golden Sword 아이템을 반영하는 것입니다.
1. **Economy**를 선택합니다.
2. **Catalogs** 하위 탭이 선택되어 있는지 확인합니다.
3. **New Catalog**를 선택합니다.
4. **Catalog version** 이름을 제공합니다.
5. **Save Catalog**를 선택합니다.
다음 단계는 PlayFab에서 Golden Sword 아이템을 반영하는 것입니다.
1. **Economy**를 선택합니다.
2. **Catalogs** 하위 탭이 선택되어 있는지 확인합니다.
3. **New Catalog**를 선택합니다.
4. **Catalog version** 이름을 제공합니다.
5. **Save Catalog**를 선택합니다.
 카탈로그에 아이템이 없으면 *자동으로* 제거됩니다. 그래서 모든 새 카탈로그는 **One**이라는 미리 추가된 아이템과 함께 제공됩니다.
*새* 아이템은 *언제든지* 만들 수 있지만, 깔끔하게 유지하기 위해 기존 **One** 아이템을 수정하겠습니다.
1. 아이템을 선택하여 **Item ID**를 PlayMarket의 ID와 일치하도록 편집합니다.
2. 이제 **Display name**을 편집하고 **Description**을 추가합니다.
이 데이터는 **Play Market Item Title** 및 **Description**과 *아무런 관련이 없다*는 점을 명심하세요. *완전히* 독립적입니다.
1. **Item**에 **가격**을 할당합니다.
2. **Save Item**을 선택하여 변경 사항을 커밋합니다.
카탈로그에 아이템이 없으면 *자동으로* 제거됩니다. 그래서 모든 새 카탈로그는 **One**이라는 미리 추가된 아이템과 함께 제공됩니다.
*새* 아이템은 *언제든지* 만들 수 있지만, 깔끔하게 유지하기 위해 기존 **One** 아이템을 수정하겠습니다.
1. 아이템을 선택하여 **Item ID**를 PlayMarket의 ID와 일치하도록 편집합니다.
2. 이제 **Display name**을 편집하고 **Description**을 추가합니다.
이 데이터는 **Play Market Item Title** 및 **Description**과 *아무런 관련이 없다*는 점을 명심하세요. *완전히* 독립적입니다.
1. **Item**에 **가격**을 할당합니다.
2. **Save Item**을 선택하여 변경 사항을 커밋합니다.
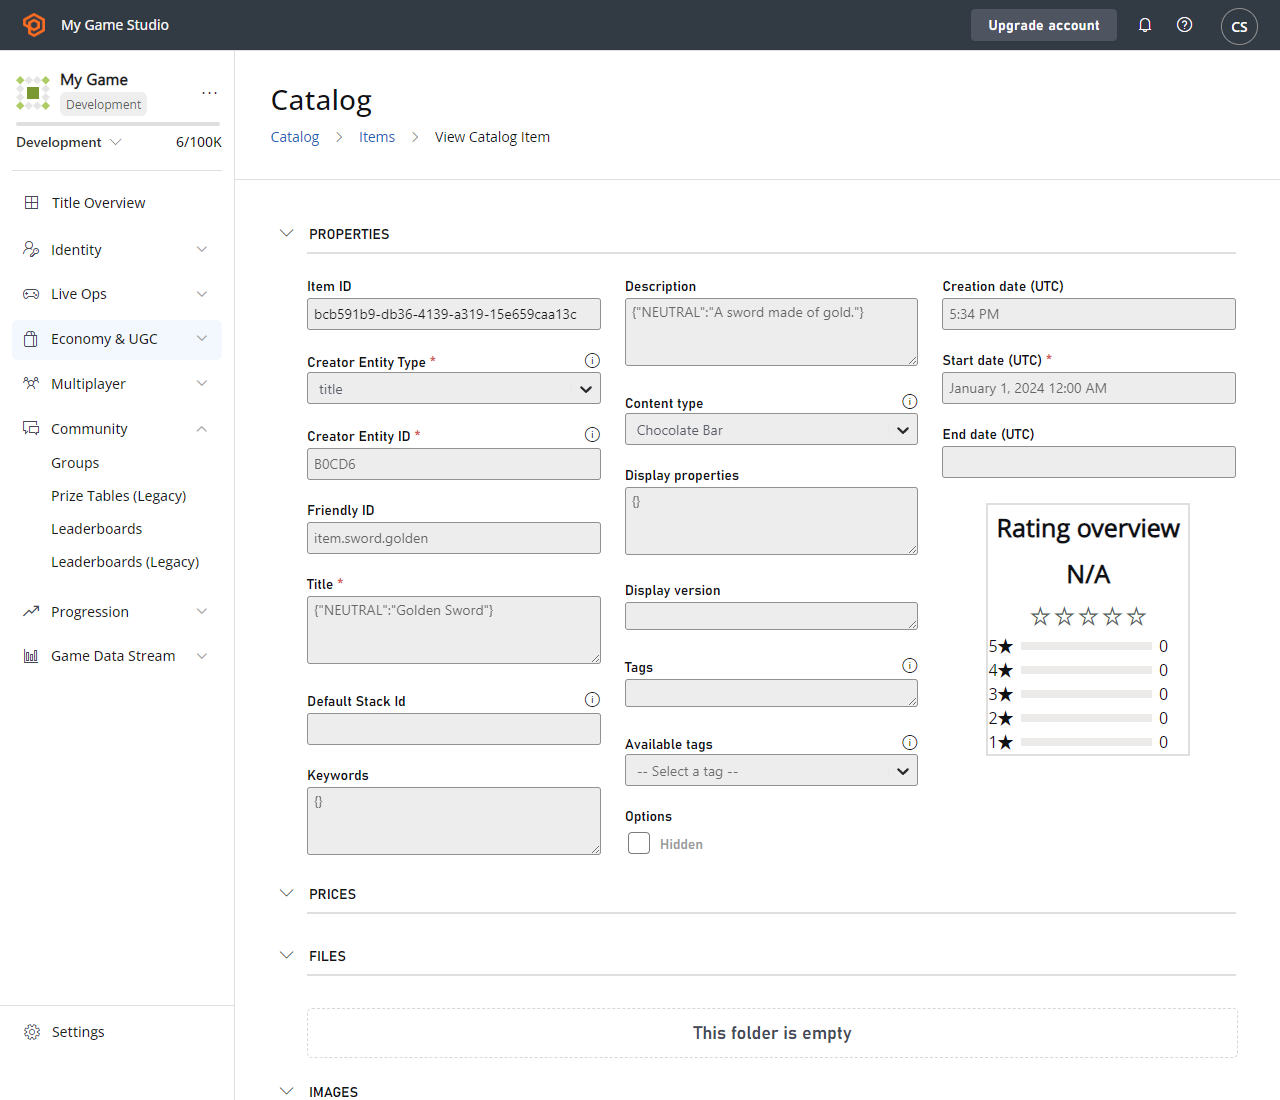 이 튜토리얼에서 IAP는 주로 실제 돈으로의 구매를 나타냅니다. 그래서 우리는 특별한 실제 통화인 **RM**을 사용합니다. PlayFab 금액은 미국 센트로 정의됩니다.
1. **Item ID** 목록에서 아이템을 확인합니다.
이 튜토리얼에서 IAP는 주로 실제 돈으로의 구매를 나타냅니다. 그래서 우리는 특별한 실제 통화인 **RM**을 사용합니다. PlayFab 금액은 미국 센트로 정의됩니다.
1. **Item ID** 목록에서 아이템을 확인합니다.
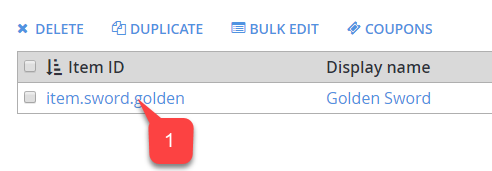 이것으로 PlayFab 타이틀의 설정이 완료됩니다.
## 테스트
테스트 목적으로 Alpha/Beta 릴리스를 사용해 앱을 다운로드합니다.
* 테스트 계정과 실제 Android 기기를 사용해야 합니다.
* 앱을 시작하면 IAP가 초기화되고 아이템을 나타내는 *버튼 하나*가 표시됩니다.
* 해당 버튼을 선택합니다.
이것으로 PlayFab 타이틀의 설정이 완료됩니다.
## 테스트
테스트 목적으로 Alpha/Beta 릴리스를 사용해 앱을 다운로드합니다.
* 테스트 계정과 실제 Android 기기를 사용해야 합니다.
* 앱을 시작하면 IAP가 초기화되고 아이템을 나타내는 *버튼 하나*가 표시됩니다.
* 해당 버튼을 선택합니다.
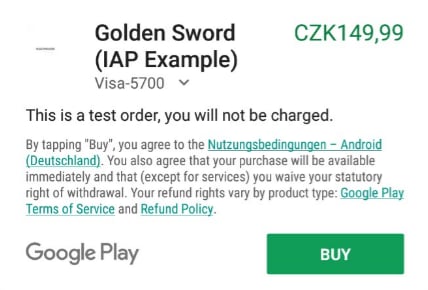
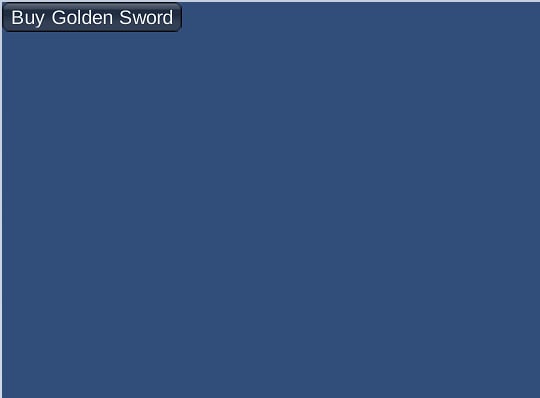 IAP 구매가 시작됩니다. 구매가 성공할 때까지 Google Play 지시를 따르세요.
 마지막으로 PlayFab **Game Manager** 대시보드에서 타이틀로 이동하여 **New Events**를 찾습니다.
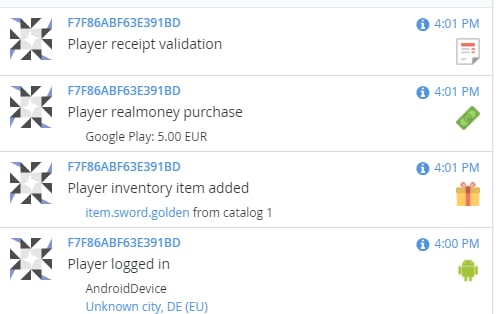 이는 구매가 성공적으로 제공되고, 검증되며, PlayFab 생태계로 전달되었음을 의미합니다.
이 시점에서 UnityIAP와 Android Billing API를 PlayFab 애플리케이션에 성공적으로 통합했습니다.
## Related topics
- [Economy v2, Unity IAP, Android 시작하기](/ko/services/playfab/economy-monetization/economy-v2/tutorials/getting-started-with-unity-and-android.md)
- [Multiplayer Android 시작하기](/ko/services/playfab/multiplayer/lobby/lobby-matchmaking-sdks/android-specific-requirements.md)
- [Unity용 PlayFab Multiplayer 시작하기](/ko/services/playfab/multiplayer/lobby/lobby-matchmaking-sdks/multiplayer-unity-sdk-getting-started.md)
- [Economy(레거시) 빠른 시작](/ko/services/playfab/economy-monetization/economy/quickstart.md)
- [레거시 C++ PlayFab SDK](/ko/services/playfab/sdks/playfab-cpp/index.md)
이는 구매가 성공적으로 제공되고, 검증되며, PlayFab 생태계로 전달되었음을 의미합니다.
이 시점에서 UnityIAP와 Android Billing API를 PlayFab 애플리케이션에 성공적으로 통합했습니다.
## Related topics
- [Economy v2, Unity IAP, Android 시작하기](/ko/services/playfab/economy-monetization/economy-v2/tutorials/getting-started-with-unity-and-android.md)
- [Multiplayer Android 시작하기](/ko/services/playfab/multiplayer/lobby/lobby-matchmaking-sdks/android-specific-requirements.md)
- [Unity용 PlayFab Multiplayer 시작하기](/ko/services/playfab/multiplayer/lobby/lobby-matchmaking-sdks/multiplayer-unity-sdk-getting-started.md)
- [Economy(레거시) 빠른 시작](/ko/services/playfab/economy-monetization/economy/quickstart.md)
- [레거시 C++ PlayFab SDK](/ko/services/playfab/sdks/playfab-cpp/index.md)