> ## Documentation Index
> Fetch the complete documentation index at: https://devdocs.xbox.com/llms.txt
> Use this file to discover all available pages before exploring further.
# チュートリアル プレイヤープロファイルの取得
> Unity で GetPlayerProfile を使用して PlayFab プレイヤープロファイルデータを取得し、PlayerProfileViewConstraints を設定し、作成日および最終ログインのタイムスタンプを読み取ります。
# チュートリアル: プレイヤープロファイルの取得
このチュートリアルでは、次の方法を学びます:
\[!div class="checklist"] \* 表示名を持つユーザーを作成する \* プレイヤープロファイル呼び出しを行う \* プレイヤー作成時間と最終ログイン時間を取得する \* タイトルのプレイヤープロファイルビュー制約を設定する \* ログイン操作を介してプレイヤープロファイルを取得する
## 要件
* [PlayFab 開発者アカウント](https://developer.playfab.com)。
* Unity Editor のインストール済みコピー。個人用に Unity Hub 経由で Unity をインストールするか、プロフェッショナル向けに Unity+ をインストールするには、[Download Unity](https://unity3d.com/get-unity/download) を参照してください。
PlayFab Unity3D SDK は、Unity Editor バージョン 5.3 (2015 年 12 月リリース) 以上をサポートしています。
* Unity プロジェクト \* これは以下のいずれかです:
* まったく新しいプロジェクト。詳細については、[Starting Unity for the first time](https://docs.unity3d.com/550/Documentation/Manual/GettingStarted.html) を参照してください。
* ガイド付きチュートリアルプロジェクト。詳細については、[Getting Started with Unity](https://learn.unity.com/) を参照してください。
* 既存のプロジェクト。
* PlayFab [Unity3D SDK](/services/playfab/sdks/unity3d)。
このチュートリアルでは、プレイヤーで `GetPlayerProfile` を実行できるように、タイトルのプレイヤーを作成する方法の基本的な知識が必要です。
Game Manager に不慣れな場合、[Game Manager クイックスタート](/services/playfab/live-service-management/gamemanager/quickstart) も読む価値があります。ここでプロファイル制約を設定するためです。
この記事の C# サンプルは Unity SDK 用に書かれています。Unity SDK は、非同期タスクを処理するためにイベントドリブンモデルを使用します。C# SDK を使用してサンプルコードを実行するには、非同期タスクモデルを使用するようにコードを変更する必要があります。変更が必要なメソッドは、シグネチャ内のメソッド名に Async が追加されています。たとえば、Unity SDK の SetObject は C# SDK では SetObjectAsync になります。詳細については、[Asynchronous programming with async and await](https://learn.microsoft.com/en-us/dotnet/csharp/programming-guide/concepts/async/) を参照してください。
## 表示名を持つユーザーを作成する
最初の手順は、プレイヤーを作成し、ユーザーに表示名を追加することです。この例では、表示名 `UnicornTossMaster` で新しいユーザーを作成します。
```csharp theme={null}
void CreatePlayerAndUpdateDisplayName() {
PlayFabClientAPI.LoginWithCustomID( new LoginWithCustomIDRequest {
CustomId = "PlayFabGetPlayerProfileCustomId",
CreateAccount = true
}, result => {
Debug.Log("Successfully logged in a player with PlayFabId: " + result.PlayFabId);
UpdateDisplayName();
}, error => Debug.LogError(error.GenerateErrorReport()));
}
void UpdateDisplayName() {
PlayFabClientAPI.UpdateUserTitleDisplayName( new UpdateUserTitleDisplayNameRequest {
DisplayName = "UnicornTossMaster"
}, result => {
Debug.Log("The player's display name is now: " + result.DisplayName);
}, error => Debug.LogError(error.GenerateErrorReport()));
}
```
コンソール出力は次のように表示されます:
```
Successfully logged in a player with PlayFabId: SOME_PLAYFAB_ID
The player's display name is now: UnicornTossMaster
```
## プレイヤープロファイル呼び出しを行う
次の手順は、プレイヤーの非常に基本的なプロファイルを作成することです。
次の例では、基本的な [GetPlayerProfile](xref:titleid.playfabapi.com.server.accountmanagement.getplayerprofile) 呼び出しを使用します。
```csharp theme={null}
void GetPlayerProfile(string playFabId) {
PlayFabClientAPI.GetPlayerProfile( new GetPlayerProfileRequest() {
PlayFabId = playFabId,
ProfileConstraints = new PlayerProfileViewConstraints() {
ShowDisplayName = true
}
},
result => Debug.Log("The player's DisplayName profile data is: " + result.PlayerProfile.DisplayName),
error => Debug.LogError(error.GenerateErrorReport()));
}
```
応答には、プレイヤーの表示名 `UnicornTossMaster` を含む [PlayerProfileModel](xref:titleid.playfabapi.com.server.accountmanagement.getplayerprofile#playerprofilemodel) オブジェクトが含まれます。
## プレイヤー作成時間と最終ログイン時間を取得する
[PlayerProfileModel](xref:titleid.playfabapi.com.server.accountmanagement.getplayerprofile#playerprofilemodel) オブジェクトには、プレイヤーに関するかなりの量のデータがあります。前の手順では、`GetPlayerProfile` が発行され、受信した応答には表示名情報のみが含まれていました。
次の手順は、プレイヤーの*さらに*多くのプロファイルデータを取得することです。そのためには、[PlayerProfileViewConstraints](xref:titleid.playfabapi.com.server.accountmanagement.getplayerprofile#playerprofileviewconstraints) リクエストパラメーターに追加のフィールドを設定して `GetPlayerProfile` を呼び出します。
次の **C#** の例では、手順 2 の `GetPlayerProfile` メソッドを変更し、[ProfileConstraints](xref:titleid.playfabapi.com.server.accountmanagement.getplayerprofile#playerprofileviewconstraints) 内でフラグを設定することにより `Created` および `LastLogin` フィールドを要求するように `GetPlayerProfile` を呼び出します。
**この手順では、この呼び出しは失敗します!!!**
```csharp theme={null}
void CreatePlayerAndUpdateDisplayName(string playFabId) {
PlayFabClientAPI.GetPlayerProfile( new GetPlayerProfileRequest() {
PlayFabId = playFabId,
ProfileConstraints = new PlayerProfileViewConstraints {
ShowDisplayName = true,
ShowCreated = true,
ShowLastLogin = true
}
},
result => Debug.Log("The player's profile Created date is: " + result.PlayerProfile.Created),
error => Debug.LogError(error.GenerateErrorReport()));
}
```
この時点でこのサンプルコードを実行すると、`Error Code 1303`、`RequestViewConstraintParamsNotAllowed`、および `Invalid view constraints` があることを示すエラーメッセージが、タイトルが現在設定している制約の JSON 出力とともに返されます。
このエラーは、タイトルのプロファイル制約設定で `Created` と `LastLogin` を表示する機能をまだ設定していないために発生します。
## タイトルのプレイヤープロファイルビュー制約を設定する
[GetPlayerProfile](xref:titleid.playfabapi.com.server.accountmanagement.getplayerprofile) API を呼び出すときに、より多くのデータを取得するには、利用可能なデータの制約を設定する必要があります。これらの設定は、Game Manager のタイトルの設定にあります。
デフォルトでは、**ALLOW CLIENT ACCESS TO PROFILE PROPERTIES:** は **Display name** のみが有効になっており、**Display Name** の値を取得できていました。
タイトルに追加の制約を設定するには:
* [Game Manager](https://developer.playfab.com) で、タイトルを選択します。
* 左上隅の歯車アイコンを選択してから、**Title settings** を選択します。
* **Client Profile Options** タブを選択します。
* [ProfileConstraints](xref:titleid.playfabapi.com.server.accountmanagement.getplayerprofile#playerprofileviewconstraints) で **Created** と **LastLogin** の両方を有効にするには、**Creation date** と **Last login time** をチェックしてから、**SAVE CLIENT PROFILE OPTIONS** を選択します。
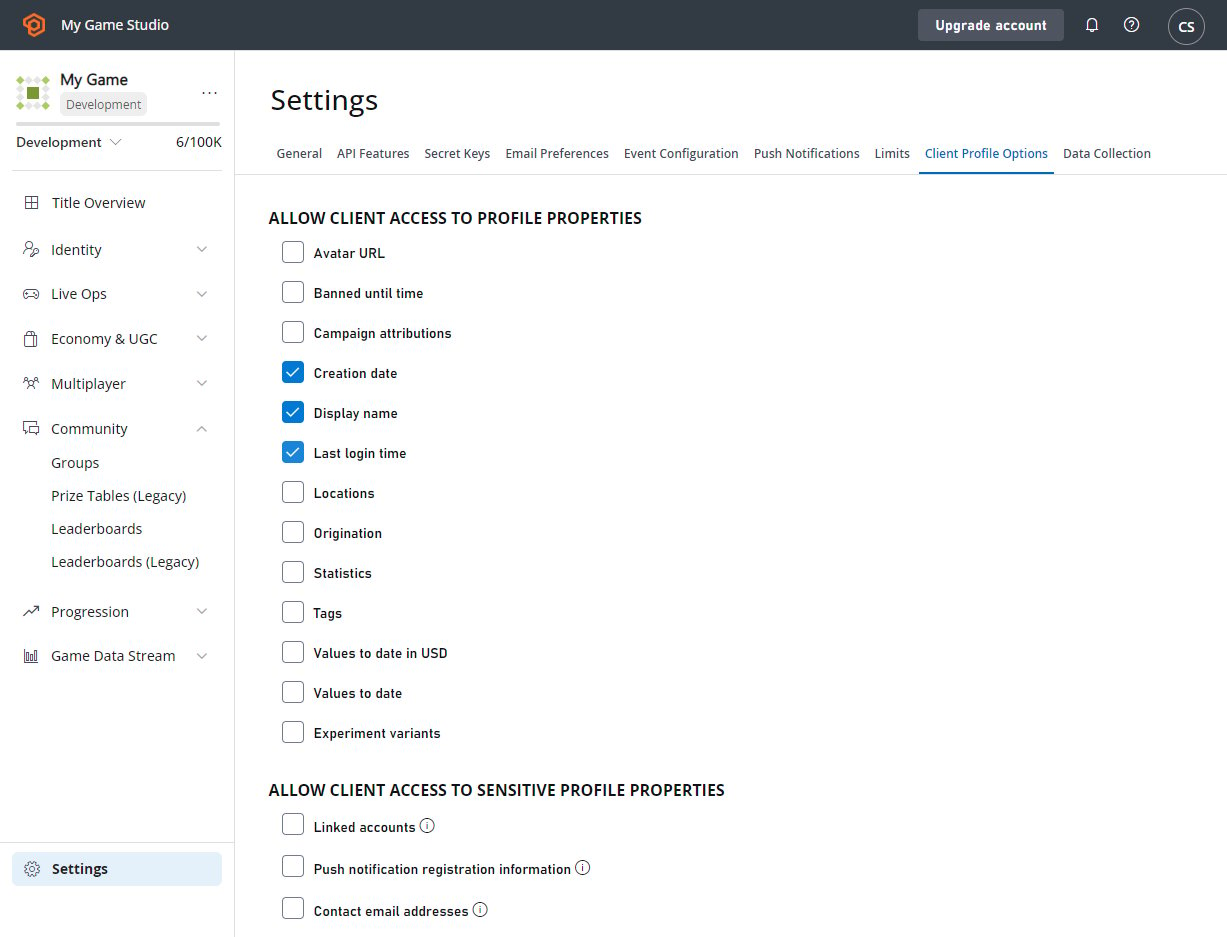 これで、`CreatePlayerAndUpdateDisplayName` を呼び出すと、ユーザーの作成時間、最終ログイン、および表示名 `UnicornTossMaster` に関するデータを含む [PlayerProfileModel](xref:titleid.playfabapi.com.server.accountmanagement.getplayerprofile#playerprofilemodel) オブジェクトが返されます。
## ログイン操作を介してプレイヤープロファイルを取得する
ほとんどの場合、プレイヤーがログインするとすぐにプレイヤープロファイルデータを取得する必要があります。PlayFab API を使用すると、ログイン呼び出しとプレイヤープロファイルを取得する呼び出しを 1 つの呼び出しに組み合わせることができます。
次の例は、ログインリクエストを介してプロファイル情報を取得する方法を示し、例として `LoginWithCustomId` を使用します。
これは、*すべての*ログインメカニズムで機能します。
```csharp theme={null}
void CreatePlayerAndUpdateDisplayName(string customId) {
PlayFabClientAPI.LoginWithCustomID( new LoginWithCustomIDRequest() {
CustomId = customId,
// Define info request parameters
InfoRequestParameters = new GetPlayerCombinedInfoRequestParams() {
// And make sure PlayerProfile is included
GetPlayerProfile = true,
// Define rules for PlayerProfile request
ProfileConstraints = new PlayerProfileViewConstraints() {
// And make sure that both AvatarUrl and LastLogin are included.
ShowAvatarUrl = true,
ShowLastLogin = true,
}
}
},
result =>
{
// Extract the data you have requested
var avatarUrl = result.InfoResultPayload.PlayerProfile.AvatarUrl;
},
error => Debug.LogError(error.GenerateErrorReport()));
}
```
## Related topics
- [セグメント内のプレイヤーをエクスポートするチュートリアル](/ja-jp/services/playfab/live-service-management/game-configuration/segmentation/segmentation-export-players-in-a-segment.md)
- [高度なリーダーボードにプロファイルを使用する](/ja-jp/services/playfab/community/leaderboards/tournaments-leaderboards/using-the-profile-for-advanced-leaderboards.md)
- [セグメントのプレイヤーをカウントするチュートリアル](/ja-jp/services/playfab/live-service-management/game-configuration/segmentation/segmentation-player-count.md)
- [既定の言語の設定](/ja-jp/services/playfab/live-service-management/game-configuration/title-communications/news/setting-default-languages.md)
- [GSDK サンプルプロジェクトの作成](/ja-jp/services/playfab/multiplayer/servers/server-sdks/unreal-gsdk/third-person-mp-example-project-setup.md)
これで、`CreatePlayerAndUpdateDisplayName` を呼び出すと、ユーザーの作成時間、最終ログイン、および表示名 `UnicornTossMaster` に関するデータを含む [PlayerProfileModel](xref:titleid.playfabapi.com.server.accountmanagement.getplayerprofile#playerprofilemodel) オブジェクトが返されます。
## ログイン操作を介してプレイヤープロファイルを取得する
ほとんどの場合、プレイヤーがログインするとすぐにプレイヤープロファイルデータを取得する必要があります。PlayFab API を使用すると、ログイン呼び出しとプレイヤープロファイルを取得する呼び出しを 1 つの呼び出しに組み合わせることができます。
次の例は、ログインリクエストを介してプロファイル情報を取得する方法を示し、例として `LoginWithCustomId` を使用します。
これは、*すべての*ログインメカニズムで機能します。
```csharp theme={null}
void CreatePlayerAndUpdateDisplayName(string customId) {
PlayFabClientAPI.LoginWithCustomID( new LoginWithCustomIDRequest() {
CustomId = customId,
// Define info request parameters
InfoRequestParameters = new GetPlayerCombinedInfoRequestParams() {
// And make sure PlayerProfile is included
GetPlayerProfile = true,
// Define rules for PlayerProfile request
ProfileConstraints = new PlayerProfileViewConstraints() {
// And make sure that both AvatarUrl and LastLogin are included.
ShowAvatarUrl = true,
ShowLastLogin = true,
}
}
},
result =>
{
// Extract the data you have requested
var avatarUrl = result.InfoResultPayload.PlayerProfile.AvatarUrl;
},
error => Debug.LogError(error.GenerateErrorReport()));
}
```
## Related topics
- [セグメント内のプレイヤーをエクスポートするチュートリアル](/ja-jp/services/playfab/live-service-management/game-configuration/segmentation/segmentation-export-players-in-a-segment.md)
- [高度なリーダーボードにプロファイルを使用する](/ja-jp/services/playfab/community/leaderboards/tournaments-leaderboards/using-the-profile-for-advanced-leaderboards.md)
- [セグメントのプレイヤーをカウントするチュートリアル](/ja-jp/services/playfab/live-service-management/game-configuration/segmentation/segmentation-player-count.md)
- [既定の言語の設定](/ja-jp/services/playfab/live-service-management/game-configuration/title-communications/news/setting-default-languages.md)
- [GSDK サンプルプロジェクトの作成](/ja-jp/services/playfab/multiplayer/servers/server-sdks/unreal-gsdk/third-person-mp-example-project-setup.md)