> ## Documentation Index
> Fetch the complete documentation index at: https://devdocs.xbox.com/llms.txt
> Use this file to discover all available pages before exploring further.
# Photon クイックスタート
> Photon Realtime および PUN マルチプレイヤーを PlayFab と接続して、Unity プロジェクトで CloudScript コールバックを通じてプレイヤーを認証し、部屋イベントを受信します。
このセクションでは、Photon Realtime や Photon Unity Networking (PUN) などの Photon マルチプレイヤー サービスと PlayFab を併用する情報を提供します。
現在、次の Photon 統合を提供しています:
* Photon プレイヤーを PlayFab で認証。
* PlayFab CloudScript コールバックを使用して部屋のイベントをリッスン。
## Photon クイックスタート
このクイックスタートでは、Photon マルチプレイヤーを PlayFab で動作するようにセットアップする方法を示します。現在、PlayFab は次の Photon 統合を提供しています:
* Photon プレイヤーを PlayFab で認証。
* PlayFab CloudScript コールバックを使用して部屋のイベントをリッスン。
このクイックスタートでは、最新の [Photon Unity サンプル プロジェクト](https://assetstore.unity.com/packages/tools/network/photon-unity-networking-classic-free-1786) を使用して、両方の機能がどのように動作するかを示します。
Unity で完全にサポートされている PlayFab マルチプレイヤーおよびチャット体験については、詳細は [PlayFab Party Unity プラグイン](/services/playfab/multiplayer/networking/party-unity-overview) を参照してください。
## 前提条件
1. PlayFab SDK がインポートされ、タイトルが構成されている [Unity](/services/playfab/sdks/unity3d/quickstart) プロジェクト。
2. 登録された PlayFab タイトル。
このガイドではチャット アプリケーションの設定を省略します。チャット アプリケーションを統合するには、新しい Photon Chat アプリケーションを作成し、Unity と PlayFab Game Manager - Photon Add-on ページの対応するボックスに App ID を入力します。
## Photon アプリケーションのセットアップ
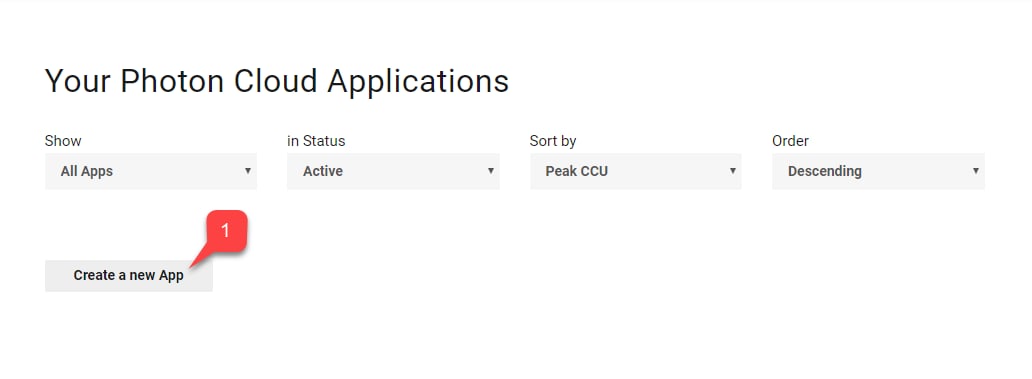
1. Photon ダッシュボードに登録してログインしたら、**Create a new App** を選択します。
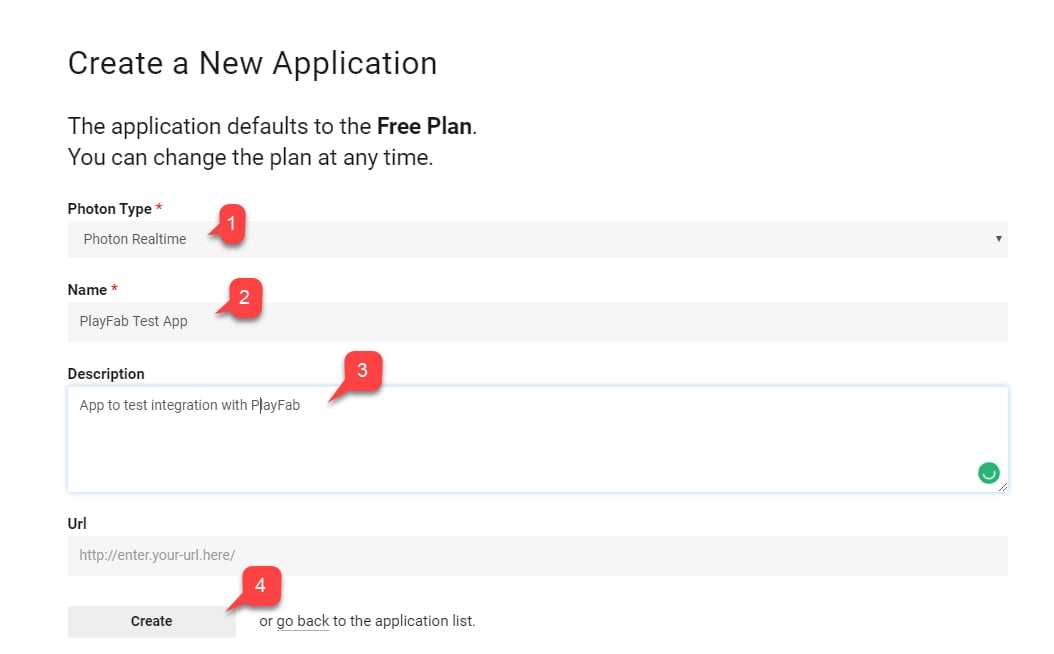
 2. **Photon Type** を選択します。
3. **Name** を選択します。
4. **Description** を作成します。
5. **Create** を選択して送信します。
2. **Photon Type** を選択します。
3. **Name** を選択します。
4. **Description** を作成します。
5. **Create** を選択して送信します。
 ## 認証のセットアップ
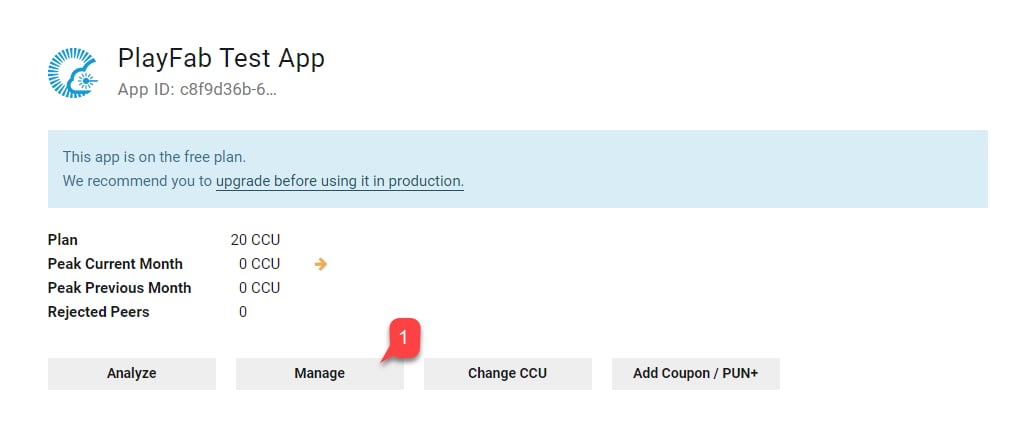
1. リストで新しく作成したアプリケーションを見つけ、**Manage** を選択します。
## 認証のセットアップ
1. リストで新しく作成したアプリケーションを見つけ、**Manage** を選択します。
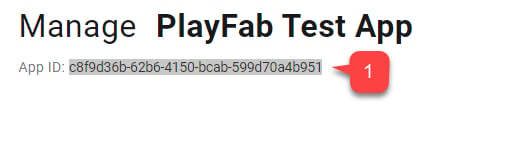
 2. **Application** ダッシュボードで、ページ **Title** の下にある **App ID** を見つけて保存します。
 3. **Authentication** セクションを見つけます。
4. **Custom Server** を選択します。
3. **Authentication** セクションを見つけます。
4. **Custom Server** を選択します。
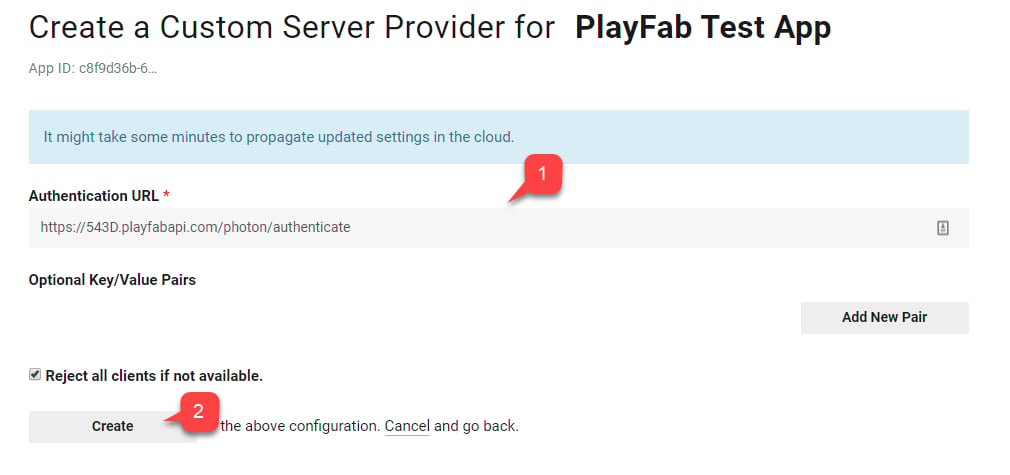
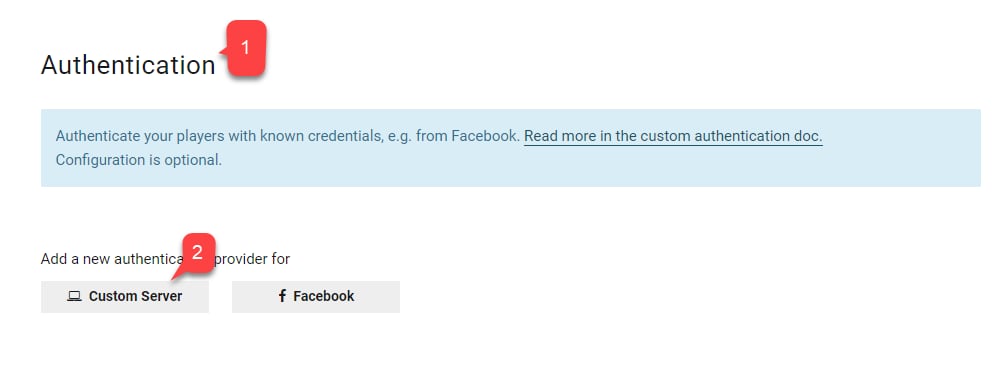 次のページでは、Photon の認証 URL を構成できます。
```html theme={null}
https://{PlayFabTitleId}.playfabapi.com/photon/authenticate
```
`PlayFabTitleId` プレースホルダーをご自分の Title Id に置き換えます。
```html theme={null}
{PlayFabTitleId}
```
5. **URL** を入力します。
6. **Create** ボタンを選択して送信します。
次のページでは、Photon の認証 URL を構成できます。
```html theme={null}
https://{PlayFabTitleId}.playfabapi.com/photon/authenticate
```
`PlayFabTitleId` プレースホルダーをご自分の Title Id に置き換えます。
```html theme={null}
{PlayFabTitleId}
```
5. **URL** を入力します。
6. **Create** ボタンを選択して送信します。
 ## Photon 用に PlayFab タイトルをセットアップ
タイトルの **Game Manager** ページに移動し、次を実行します:
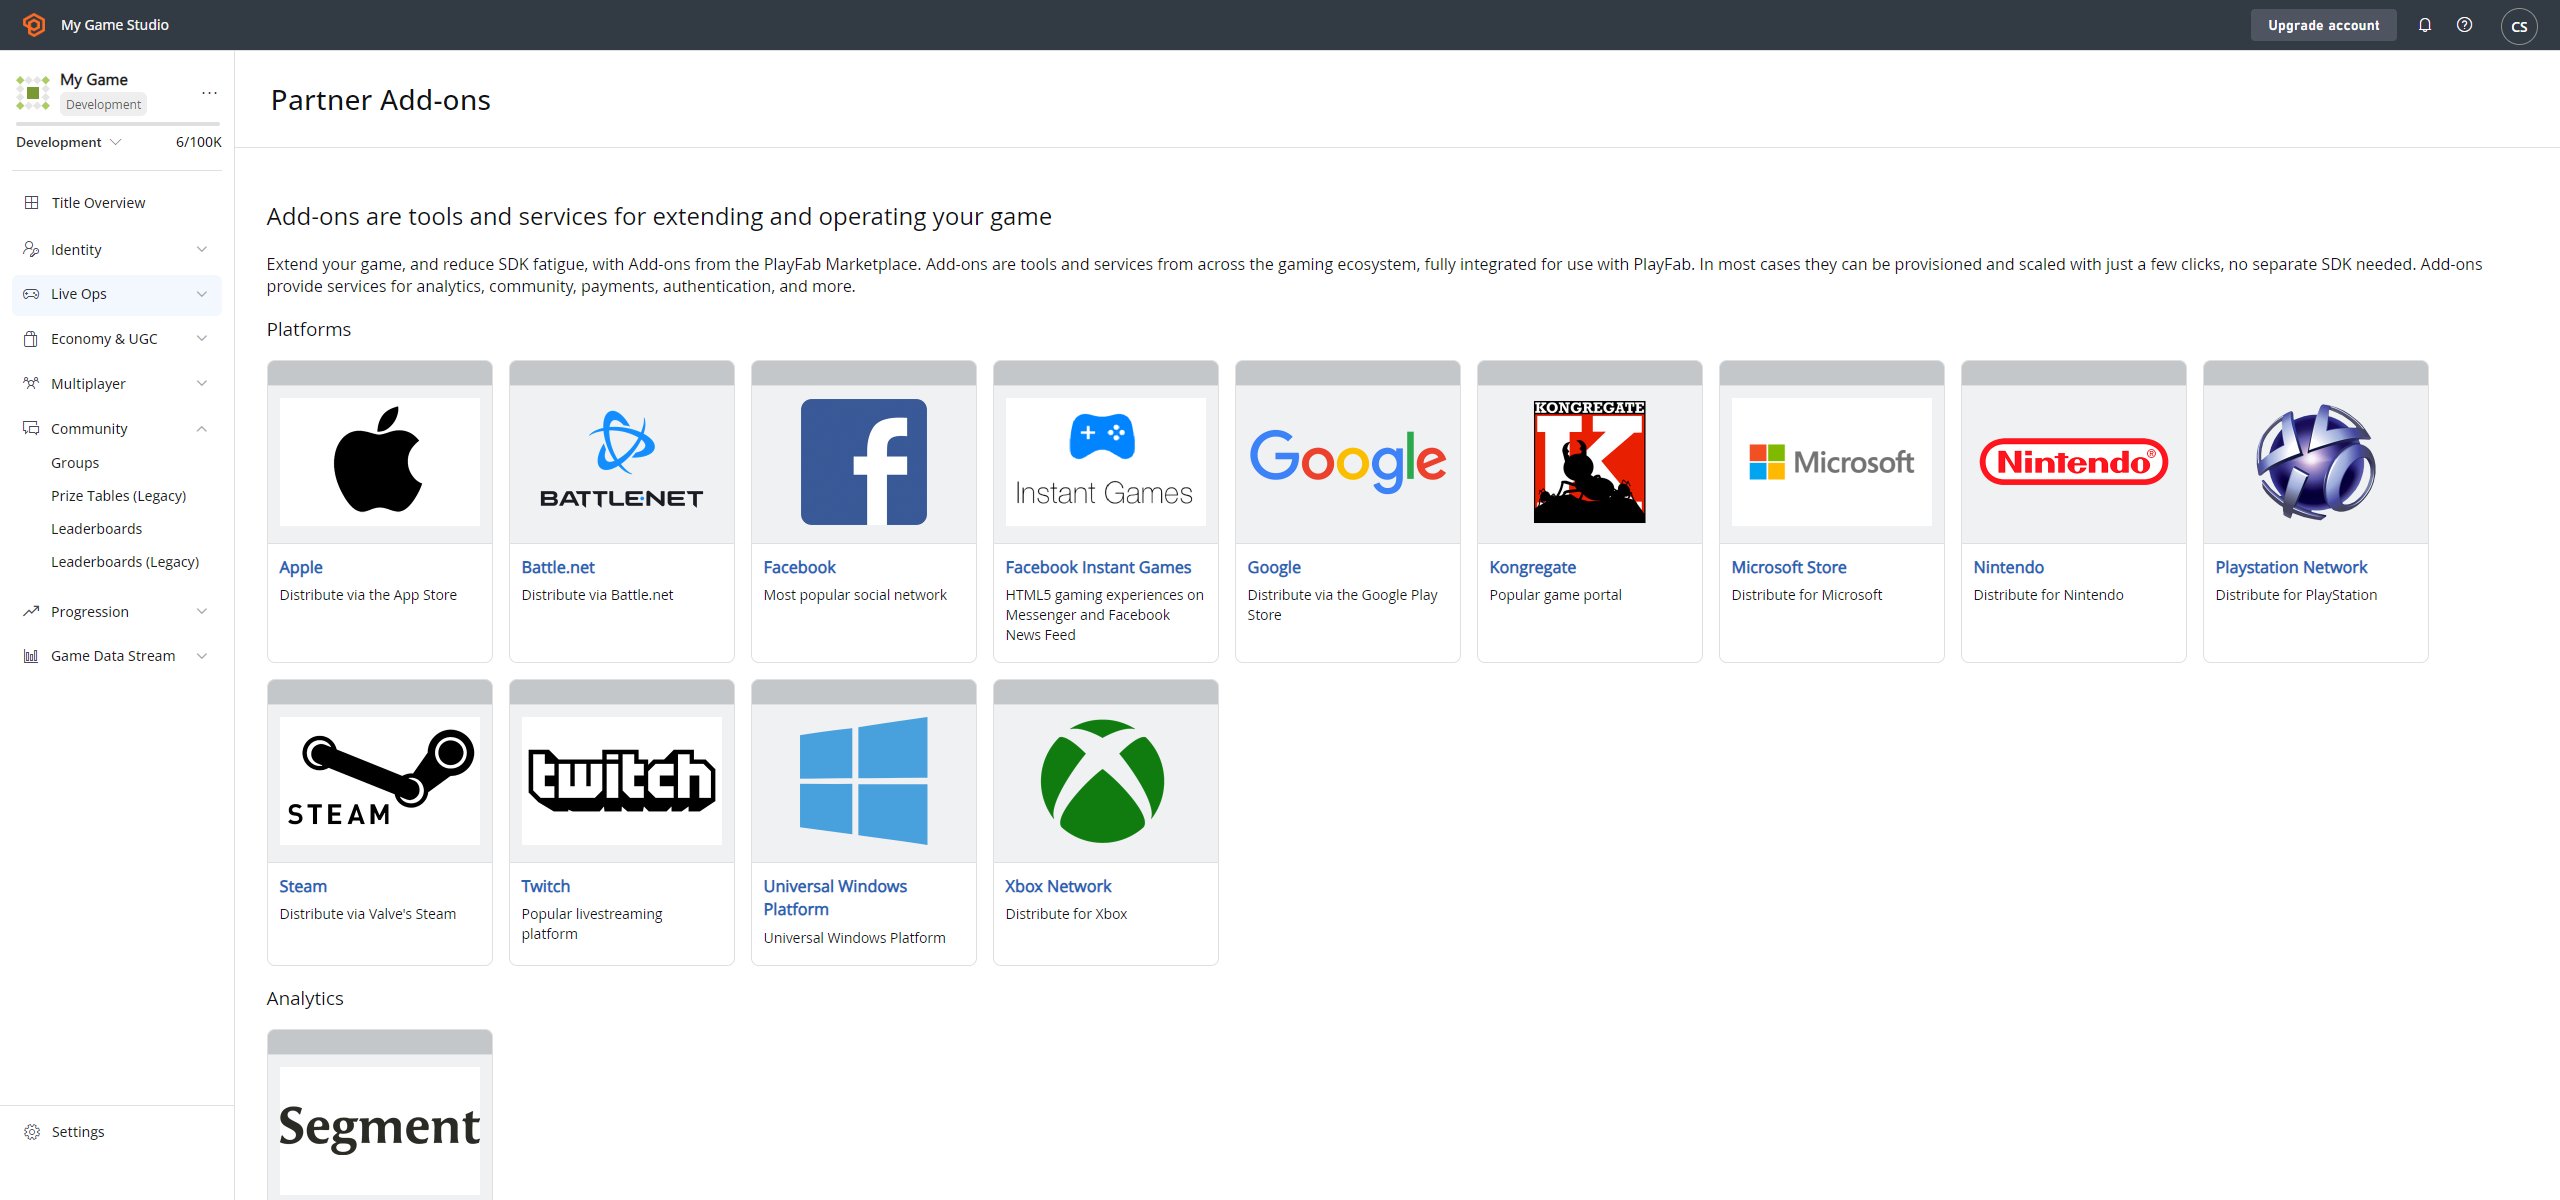
1. **Add-ons** タブに移動します。
2. **Add-ons** のリストで、**Photon** を見つけて選択します。
## Photon 用に PlayFab タイトルをセットアップ
タイトルの **Game Manager** ページに移動し、次を実行します:
1. **Add-ons** タブに移動します。
2. **Add-ons** のリストで、**Photon** を見つけて選択します。
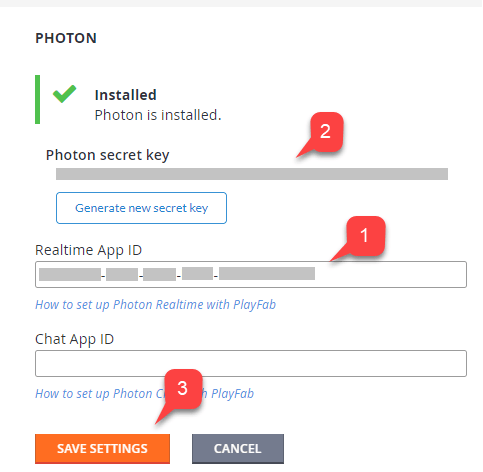
 3. **Photon Add-on** ページでは、**Photon Realtime Application ID** を指定して Photon をインストールできます。
* 任意で、**Chat App ID** を指定できます。
* **Add-on (3)** をインストールすると、**Photon secret Key** が生成されます **(2)**。
* Webhook を構成するときに将来使用するために保存します。
Photon シークレット キーを安全でアクセスしやすい場所に保存することを忘れないでください。Webhook を構成する際に役立ちます。
3. **Photon Add-on** ページでは、**Photon Realtime Application ID** を指定して Photon をインストールできます。
* 任意で、**Chat App ID** を指定できます。
* **Add-on (3)** をインストールすると、**Photon secret Key** が生成されます **(2)**。
* Webhook を構成するときに将来使用するために保存します。
Photon シークレット キーを安全でアクセスしやすい場所に保存することを忘れないでください。Webhook を構成する際に役立ちます。
 ## Photon の Webhook の設定
任意の統合として、Photon は特定のイベントを PlayFab CloudScript に送信できます。これは Webhook で行われます:
* Base URL を指定します。
* 次に、利用可能な各イベントのパスを指定します。
* パスは、事実上、CloudScript で実装されたハンドラー名です。
Base URL は次の形式です:
```html theme={null}
https://{PlayFabTitleId}.playfablogic.com/webhook/1/prod/{PhotonSecretKey}
```
`Title Id` プレースホルダーをご自分の Title Id に置き換えてください。
```html theme={null}
{PlayFabTitleId}
```
`PhotonSecretKey` トークンを、**Photon Add-on** ページで生成したシークレット キーに置き換えてください。
```html theme={null}
{PhotonSecretKey}
```
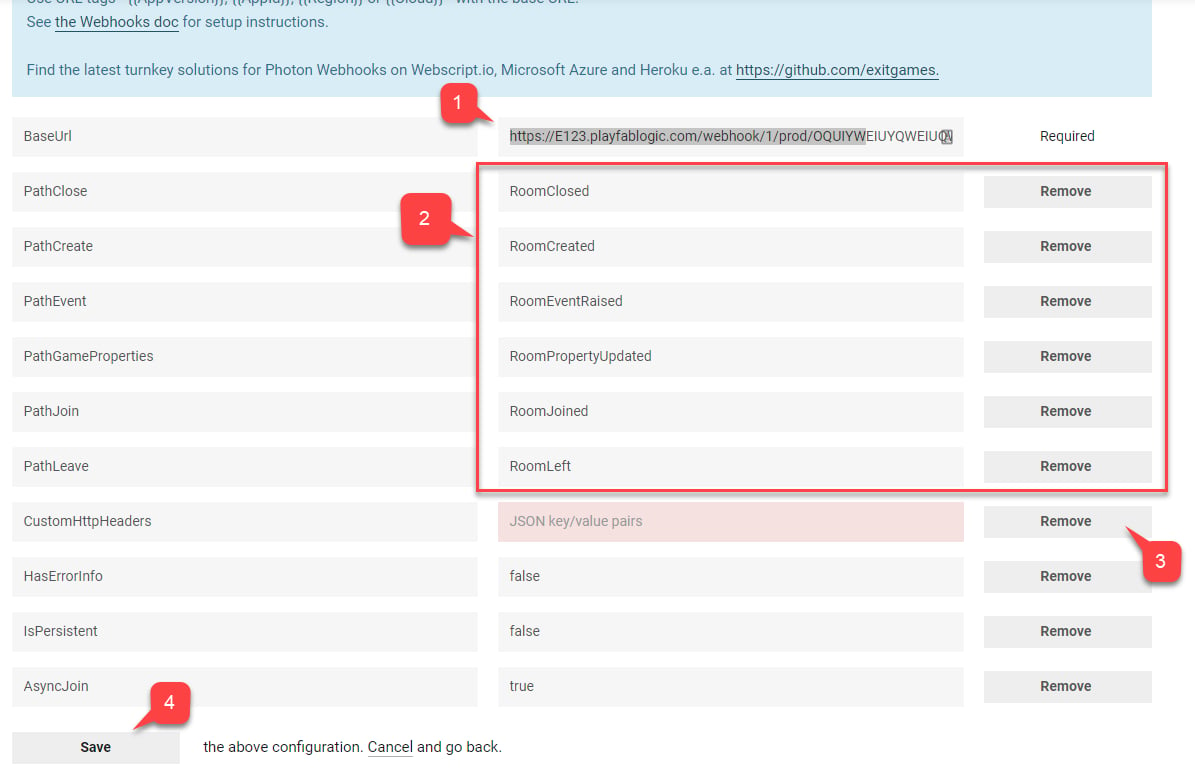
1. **Base URL** を入力します。
2. 利用可能な各 **Events** に対して **CloudScript** ハンドラー **Name** を割り当てます。
3. **CustomHttpHeaders** をすべて削除します。
4. **Save** ボタンを選択して送信します。
## Photon の Webhook の設定
任意の統合として、Photon は特定のイベントを PlayFab CloudScript に送信できます。これは Webhook で行われます:
* Base URL を指定します。
* 次に、利用可能な各イベントのパスを指定します。
* パスは、事実上、CloudScript で実装されたハンドラー名です。
Base URL は次の形式です:
```html theme={null}
https://{PlayFabTitleId}.playfablogic.com/webhook/1/prod/{PhotonSecretKey}
```
`Title Id` プレースホルダーをご自分の Title Id に置き換えてください。
```html theme={null}
{PlayFabTitleId}
```
`PhotonSecretKey` トークンを、**Photon Add-on** ページで生成したシークレット キーに置き換えてください。
```html theme={null}
{PhotonSecretKey}
```
1. **Base URL** を入力します。
2. 利用可能な各 **Events** に対して **CloudScript** ハンドラー **Name** を割り当てます。
3. **CustomHttpHeaders** をすべて削除します。
4. **Save** ボタンを選択して送信します。
 ## Unity プロジェクトのセットアップ
このガイドでは、PlayFab SDK が既にインポート、セットアップされ、タイトル設定が構成されていることを前提としています。
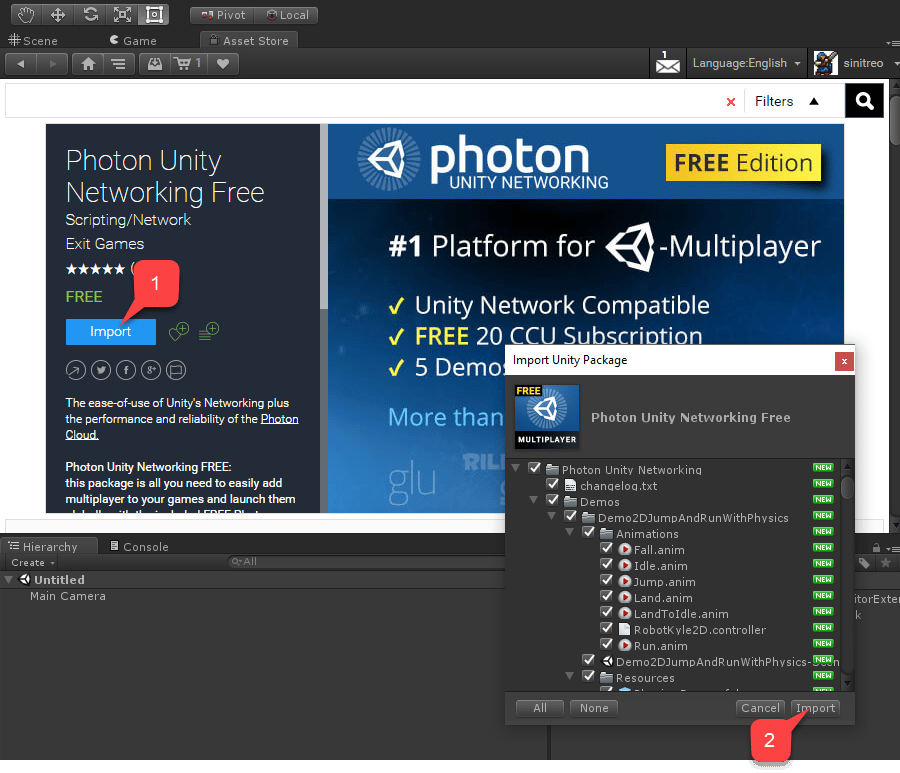
* **Asset Store** に移動して開始します。
* [Photon Unity Networking Free パッケージ](https://assetstore.unity.com/packages/tools/network/photon-unity-networking-classic-free-1786) を見つけます。
* **Import (1)** を選択します。
* インポートされたファイルを検査できます。
* 次に **Import (2)** を選択します。
## Unity プロジェクトのセットアップ
このガイドでは、PlayFab SDK が既にインポート、セットアップされ、タイトル設定が構成されていることを前提としています。
* **Asset Store** に移動して開始します。
* [Photon Unity Networking Free パッケージ](https://assetstore.unity.com/packages/tools/network/photon-unity-networking-classic-free-1786) を見つけます。
* **Import (1)** を選択します。
* インポートされたファイルを検査できます。
* 次に **Import (2)** を選択します。
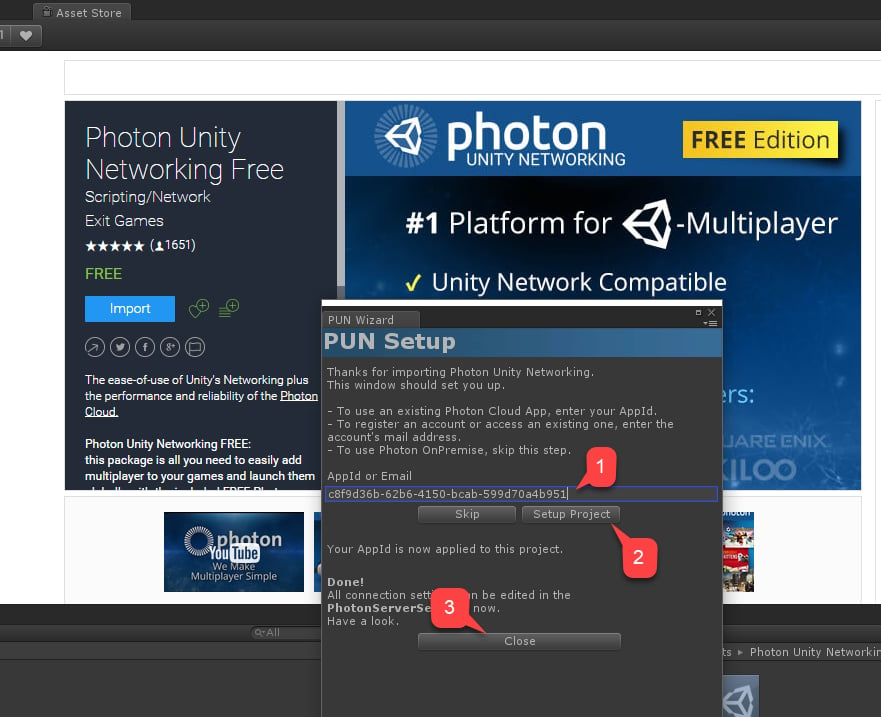
 インポート プロセスが完了した直後に、**PUN Setup** ウィンドウが開きます。
* 作成した **Photon App** の **Photon Application Dashboard** で見つけた **Realtime Application ID (1)** を入力します。
* **Setup Project (2)** を選択します。
* セットアップが完了したら、**Close (3)** を選択します。
インポート プロセスが完了した直後に、**PUN Setup** ウィンドウが開きます。
* 作成した **Photon App** の **Photon Application Dashboard** で見つけた **Realtime Application ID (1)** を入力します。
* **Setup Project (2)** を選択します。
* セットアップが完了したら、**Close (3)** を選択します。
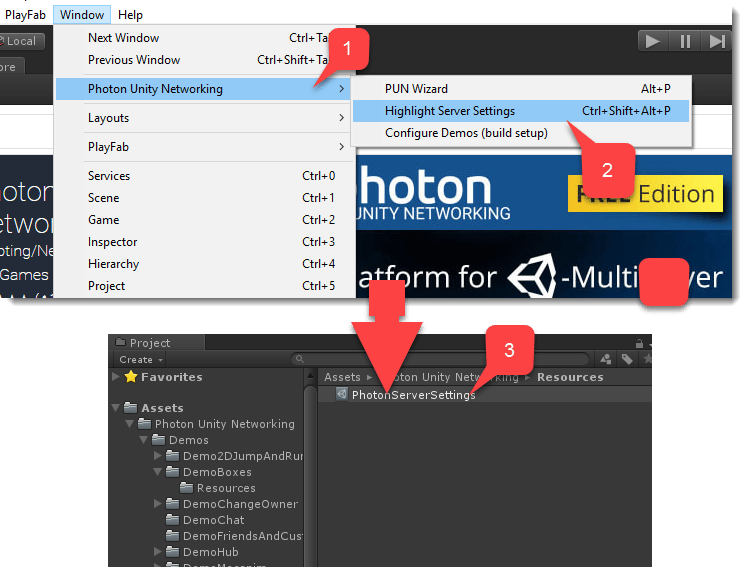
 **AppId** が受け入れられた場合、**Photon Server Settings** オブジェクトが選択され、**Unity Inspector** ウィンドウで表示できます。**Server Settings** オブジェクトに手動でアクセスするには:
* トップ ウィンドウ パネルに移動します。
* **Window** を選択します。
* 次に **Photon Unity Networking (1)** を選択します。
* 最後に **Highlight Server Settings (2)** を選択します。
* **Standard Unity** プロジェクト ウィンドウに **PhotonServerSettings (3)** オブジェクトが表示されます。
* オブジェクトを選択して **Unity Inspector** ウィンドウに設定を表示します。
**AppId** が受け入れられた場合、**Photon Server Settings** オブジェクトが選択され、**Unity Inspector** ウィンドウで表示できます。**Server Settings** オブジェクトに手動でアクセスするには:
* トップ ウィンドウ パネルに移動します。
* **Window** を選択します。
* 次に **Photon Unity Networking (1)** を選択します。
* 最後に **Highlight Server Settings (2)** を選択します。
* **Standard Unity** プロジェクト ウィンドウに **PhotonServerSettings (3)** オブジェクトが表示されます。
* オブジェクトを選択して **Unity Inspector** ウィンドウに設定を表示します。
 **PhotonServerSettings** の一部として、**Chat Application ID** を割り当てるオプションがあります。
この時点で、プロジェクトが構成されています。
## PlayFab から Photon への認証の実装
PlayFab Game Manager でタイトルの **Photon Add-on** を有効にし、**Photon Application** ダッシュボードで認証を構成すると、PlayFab は Photon 環境内で既存の PlayFab プレイヤーを認証できるようになります。
これは、Photon 用のユーザー管理の実装を完全に回避できることを意味します。
1. **Photon Unity Networking Free** パッケージ、**Classic** バージョンの **DemoHub-Scene-V2** シーンに移動します。
* このシーンは、パッケージのすべての例のハブです。
* これは *最初* に読み込むシーンなので、PlayFab を Photon で認証できるようにする小さなスクリプトを追加しましょう。
2. **PlayFabAuthenticator** という空の **GameObject** を作成します。
3. 次に **Unity Inspector** ウィンドウで、同じ名前のコンポーネントをこの **GameObject** に追加します。
**PhotonServerSettings** の一部として、**Chat Application ID** を割り当てるオプションがあります。
この時点で、プロジェクトが構成されています。
## PlayFab から Photon への認証の実装
PlayFab Game Manager でタイトルの **Photon Add-on** を有効にし、**Photon Application** ダッシュボードで認証を構成すると、PlayFab は Photon 環境内で既存の PlayFab プレイヤーを認証できるようになります。
これは、Photon 用のユーザー管理の実装を完全に回避できることを意味します。
1. **Photon Unity Networking Free** パッケージ、**Classic** バージョンの **DemoHub-Scene-V2** シーンに移動します。
* このシーンは、パッケージのすべての例のハブです。
* これは *最初* に読み込むシーンなので、PlayFab を Photon で認証できるようにする小さなスクリプトを追加しましょう。
2. **PlayFabAuthenticator** という空の **GameObject** を作成します。
3. 次に **Unity Inspector** ウィンドウで、同じ名前のコンポーネントをこの **GameObject** に追加します。
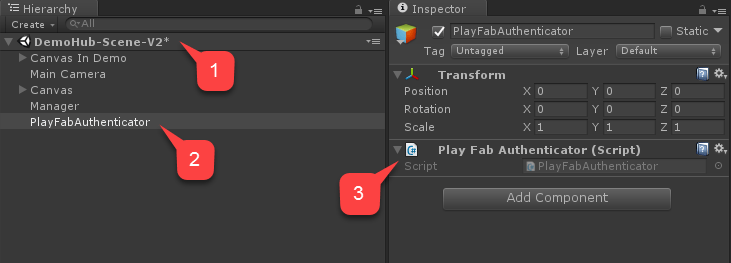 歯車アイコンを選択し、ドロップダウン メニューからスクリプトを編集するように選択します。`PlayFabAuthenticator` コンポーネントのコードをコピーして貼り付け、ファイルを保存して閉じます。
```csharp theme={null}
using PlayFab;
using PlayFab.ClientModels;
using UnityEngine;
public class PlayFabAuthenticator : MonoBehaviour {
private string _playFabPlayerIdCache;
//Run the entire thing on awake
public void Awake() {
AuthenticateWithPlayFab();
}
/*
* Step 1
* We authenticate a current PlayFab user normally.
* In this case we use the LoginWithCustomID API call for simplicity.
* You can absolutely use any Login method you want.
* We use PlayFabSettings.DeviceUniqueIdentifier as our custom ID.
* We pass RequestPhotonToken as a callback to be our next step, if
* authentication was successful.
*/
private void AuthenticateWithPlayFab(){
LogMessage("PlayFab authenticating using Custom ID...");
PlayFabClientAPI.LoginWithCustomID(new LoginWithCustomIDRequest()
{
CreateAccount = true,
CustomId = PlayFabSettings.DeviceUniqueIdentifier
}, RequestPhotonToken, OnPlayFabError);
}
/*
* Step 2
* We request a Photon authentication token from PlayFab.
* This is a crucial step, because Photon uses different authentication tokens
* than PlayFab. Thus, you cannot directly use PlayFab SessionTicket and
* you need to explicitly request a token. This API call requires you to
* pass a Photon App ID. The App ID may be hard coded, but in this example,
* we are accessing it using convenient static field on PhotonNetwork class.
* We pass in AuthenticateWithPhoton as a callback to be our next step, if
* we have acquired the token successfully.
*/
private void RequestPhotonToken(LoginResult obj) {
LogMessage("PlayFab authenticated. Requesting photon token...");
//We can player PlayFabId. This will come in handy during next step
_playFabPlayerIdCache = obj.PlayFabId;
PlayFabClientAPI.GetPhotonAuthenticationToken(new GetPhotonAuthenticationTokenRequest()
{
PhotonApplicationId = PhotonNetwork.PhotonServerSettings.AppSettings.AppIdRealtime
}, AuthenticateWithPhoton, OnPlayFabError);
}
/*
* Step 3
* This is the final and the simplest step. We create a new AuthenticationValues instance.
* This class describes how to authenticate a player inside the Photon environment.
*/
private void AuthenticateWithPhoton(GetPhotonAuthenticationTokenResult obj) {
LogMessage("Photon token acquired: " + obj.PhotonCustomAuthenticationToken + " Authentication complete.");
//We set AuthType to custom, meaning we bring our own, PlayFab authentication procedure.
var customAuth = new Photon.Realtime.AuthenticationValues { AuthType = CustomAuthenticationType.Custom };
//We add "username" parameter. Do not let it confuse you: PlayFab is expecting this parameter to contain player PlayFab ID (!) and not username.
customAuth.AddAuthParameter("username", _playFabPlayerIdCache); // expected by PlayFab custom auth service
//We add "token" parameter. PlayFab expects it to contain Photon Authentication Token issues to your during previous step.
customAuth.AddAuthParameter("token", obj.PhotonCustomAuthenticationToken);
//We finally tell Photon to use this authentication parameters throughout the entire application.
PhotonNetwork.AuthValues = customAuth;
}
private void OnPlayFabError(PlayFabError obj) {
LogMessage(obj.GenerateErrorReport());
}
public void LogMessage(string message) {
Debug.Log("PlayFab + Photon Example: " + message);
}
}
```
## PlayFab から Photon への認証のテスト
1. シーンを開始します。
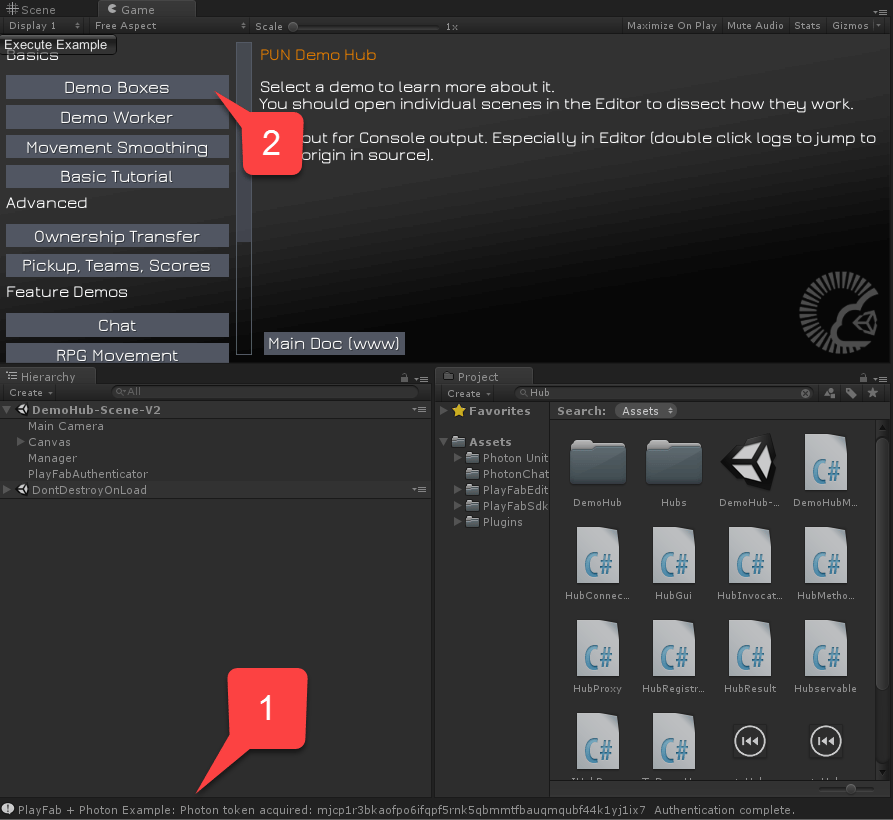
2. コンソール メッセージのフローを検査します。
次を確認します:
3. PlayFab 自体への認証が成功しました。
4. Photon トークンが取得されました。
次の画像は正しいフローを示しています。
歯車アイコンを選択し、ドロップダウン メニューからスクリプトを編集するように選択します。`PlayFabAuthenticator` コンポーネントのコードをコピーして貼り付け、ファイルを保存して閉じます。
```csharp theme={null}
using PlayFab;
using PlayFab.ClientModels;
using UnityEngine;
public class PlayFabAuthenticator : MonoBehaviour {
private string _playFabPlayerIdCache;
//Run the entire thing on awake
public void Awake() {
AuthenticateWithPlayFab();
}
/*
* Step 1
* We authenticate a current PlayFab user normally.
* In this case we use the LoginWithCustomID API call for simplicity.
* You can absolutely use any Login method you want.
* We use PlayFabSettings.DeviceUniqueIdentifier as our custom ID.
* We pass RequestPhotonToken as a callback to be our next step, if
* authentication was successful.
*/
private void AuthenticateWithPlayFab(){
LogMessage("PlayFab authenticating using Custom ID...");
PlayFabClientAPI.LoginWithCustomID(new LoginWithCustomIDRequest()
{
CreateAccount = true,
CustomId = PlayFabSettings.DeviceUniqueIdentifier
}, RequestPhotonToken, OnPlayFabError);
}
/*
* Step 2
* We request a Photon authentication token from PlayFab.
* This is a crucial step, because Photon uses different authentication tokens
* than PlayFab. Thus, you cannot directly use PlayFab SessionTicket and
* you need to explicitly request a token. This API call requires you to
* pass a Photon App ID. The App ID may be hard coded, but in this example,
* we are accessing it using convenient static field on PhotonNetwork class.
* We pass in AuthenticateWithPhoton as a callback to be our next step, if
* we have acquired the token successfully.
*/
private void RequestPhotonToken(LoginResult obj) {
LogMessage("PlayFab authenticated. Requesting photon token...");
//We can player PlayFabId. This will come in handy during next step
_playFabPlayerIdCache = obj.PlayFabId;
PlayFabClientAPI.GetPhotonAuthenticationToken(new GetPhotonAuthenticationTokenRequest()
{
PhotonApplicationId = PhotonNetwork.PhotonServerSettings.AppSettings.AppIdRealtime
}, AuthenticateWithPhoton, OnPlayFabError);
}
/*
* Step 3
* This is the final and the simplest step. We create a new AuthenticationValues instance.
* This class describes how to authenticate a player inside the Photon environment.
*/
private void AuthenticateWithPhoton(GetPhotonAuthenticationTokenResult obj) {
LogMessage("Photon token acquired: " + obj.PhotonCustomAuthenticationToken + " Authentication complete.");
//We set AuthType to custom, meaning we bring our own, PlayFab authentication procedure.
var customAuth = new Photon.Realtime.AuthenticationValues { AuthType = CustomAuthenticationType.Custom };
//We add "username" parameter. Do not let it confuse you: PlayFab is expecting this parameter to contain player PlayFab ID (!) and not username.
customAuth.AddAuthParameter("username", _playFabPlayerIdCache); // expected by PlayFab custom auth service
//We add "token" parameter. PlayFab expects it to contain Photon Authentication Token issues to your during previous step.
customAuth.AddAuthParameter("token", obj.PhotonCustomAuthenticationToken);
//We finally tell Photon to use this authentication parameters throughout the entire application.
PhotonNetwork.AuthValues = customAuth;
}
private void OnPlayFabError(PlayFabError obj) {
LogMessage(obj.GenerateErrorReport());
}
public void LogMessage(string message) {
Debug.Log("PlayFab + Photon Example: " + message);
}
}
```
## PlayFab から Photon への認証のテスト
1. シーンを開始します。
2. コンソール メッセージのフローを検査します。
次を確認します:
3. PlayFab 自体への認証が成功しました。
4. Photon トークンが取得されました。
次の画像は正しいフローを示しています。
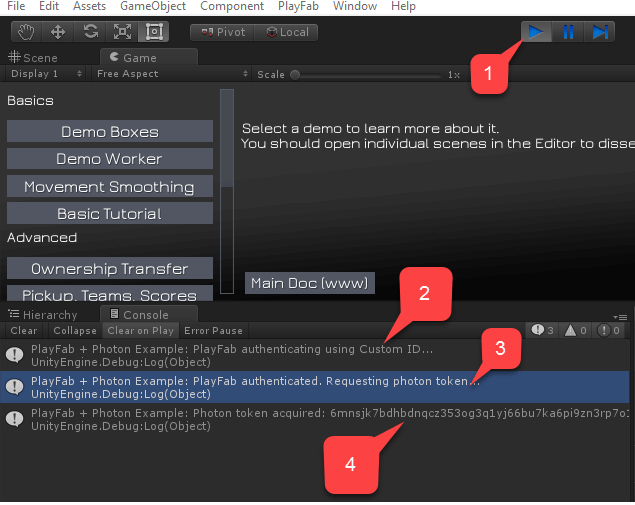 Photon トークンが取得され、認証が完了すると、Photon デモをチェックする準備ができました。
たとえば、**Demo Boxes** というデモを開始します。
5. PlayFab 認証が完了していることを確認するには、**Demo Boxes** を選択します。
6. 次に、以下の画像に示すように **Load Demo** を選択します。
Photon トークンが取得され、認証が完了すると、Photon デモをチェックする準備ができました。
たとえば、**Demo Boxes** というデモを開始します。
5. PlayFab 認証が完了していることを確認するには、**Demo Boxes** を選択します。
6. 次に、以下の画像に示すように **Load Demo** を選択します。
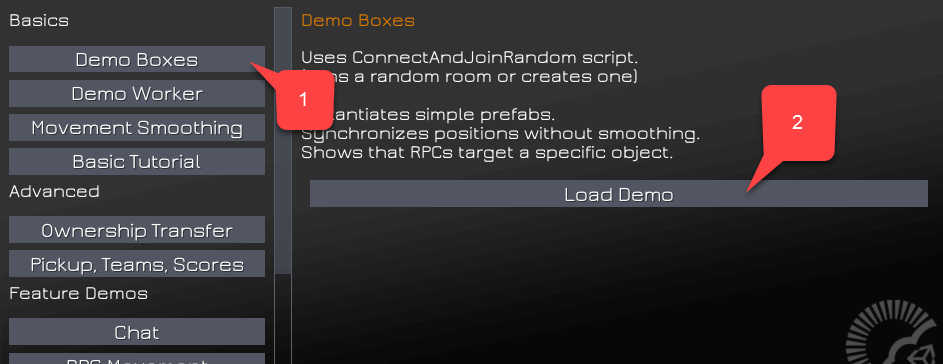 Photon はデバッグ メッセージの出力を開始します。コンソールを監視することで、認証の問題があるかどうかを簡単に見つけられます。
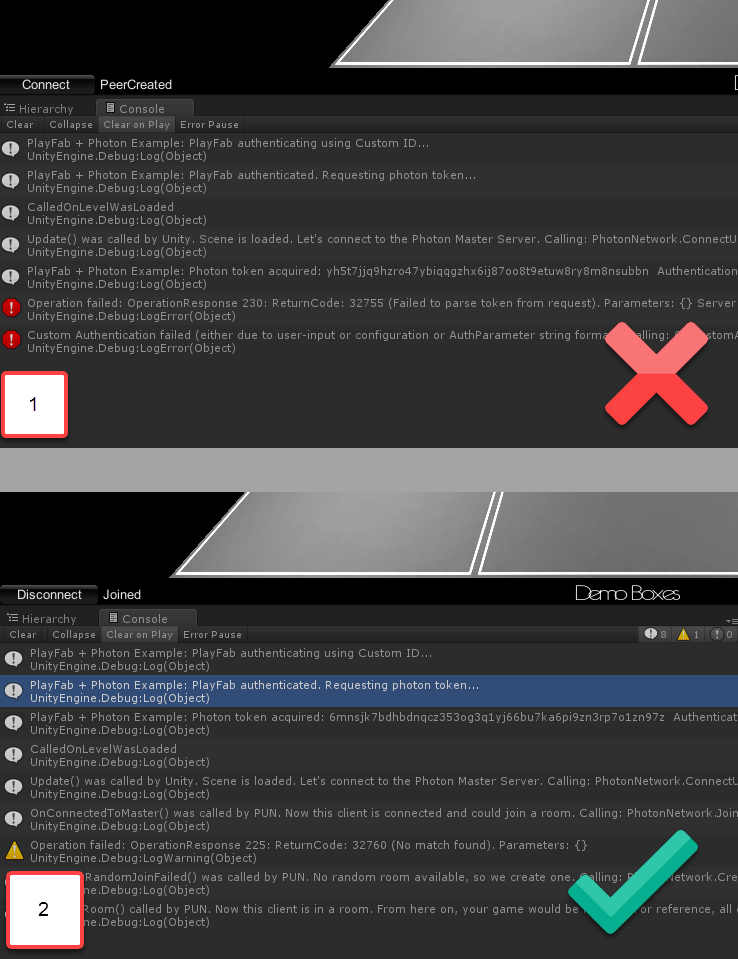 コンソールに **Authentication Denied** エラーがないことを確認します。この時点で、最小限の PlayFab と Photon の統合がセットアップされました。
## Photon の部屋イベント + CloudScript
Photon マッチメイキング システムには *Room* の概念があります。この概念に慣れていない場合は、[Photon マッチメイキング ガイド](https://doc.photonengine.com/realtime/current/lobby-and-matchmaking/matchmaking-and-lobby) を参照してください。
PlayFab では、さまざまな部屋のイベントをインターセプトできます。次の部屋のイベントはインターセプトに CloudScript のみが必要です:
* `RoomCreated`
* `RoomJoined`
* `RoomLeft`
* `RoomClosed`
以下のイベントをインターセプトするには、Unity コードの追加の制御が必要です (詳細については後述):
* `RoomPropertyUpdated`
* `RoomEventRaised`
部屋イベントのハンドラーを導入すると、それがイベント処理フローの重要な部分になります。したがって、CloudScript の実行中に発生するエラーは、*システム全体* に問題を引き起こす可能性があります。たとえば、`RoomCreated` ハンドラーがエラーをスローすると、クライアントもエラーをスローし、適切に接続できなくなります。
各イベント タイプごとにハンドラーを定義することで PlayFab CloudScript を構築しましょう。
### Room Created ハンドラー
`RoomCreated` ハンドラーは、Photon の部屋が作成されるたびに呼び出されます。次の CloudScript ハンドラーはそのようなイベントをインターセプトします。
```javascript theme={null}
// Triggered automatically when a Photon room is first created
handlers.RoomCreated = function (args) {
return { ResultCode : 0, Message: 'Success' };
};
```
"args" 引数を使用して、イベントに関する詳細データを取得できます。
```json theme={null}
{
"ActorNr": 1,
"AppVersion": "1.2_1.85",
"AppId": "bfd5f98b-c6a4-4763-80d9-824d20db842b",
// Options with which the room was created.
"CreateOptions": {
"MaxPlayers": 4,
"LobbyId": null,
"LobbyType": 0,
"CustomProperties": {
},
"EmptyRoomTTL": 0,
"PlayerTTL": 0,
"CheckUserOnJoin": false,
"DeleteCacheOnLeave": true,
"SuppressRoomEvents": false,
"PublishUserId": false,
"ExpectedUsers": null
},
// Unique game identifier
"GameId": "8b8322de-096d-4481-a2b2-8db8bb45cfef",
"Region": "EU",
"Type": "Create",
// User that caused the room to be created
"UserId": "834D5AA5BAB1DFB6",
"Username": ""
}
```
### Room Joined ハンドラー
`RoomJoined` ハンドラーは、プレイヤーが部屋に参加するたびに呼び出されます。次の CloudScript ハンドラーはそのようなイベントをインターセプトします。
```javascript theme={null}
// Triggered automatically when a player joins a Photon room
handlers.RoomJoined = function (args) {
return { ResultCode : 0, Message: 'Success' };
};
```
このコールバックは、部屋に入る最初のユーザーに対しては呼び出されません。参加する最初のプレイヤーをインターセプトするには `RoomCreated` を使用します。"args" 引数を使用して、イベントに関する詳細データを取得できます。
```json theme={null}
{
"ActorNr": 2,
"AppVersion": "1.2_1.85",
"AppId": "bfd5f98b-c6a4-4763-80d9-824d20db842b",
// Unique Game Identifier
"GameId": "b0f55a2e-431d-402a-9809-b0240443267e",
"Region": "EU",
"Type": "Join",
// Id of the player that has joined
"UserId": "AAC7634BF46289DF",
"Username": ""
}
```
### Room Left
`RoomLeft` ハンドラーは、プレイヤーが部屋を離れるたびに呼び出されます。次の CloudScript ハンドラーはそのようなイベントをインターセプトします。
```javascript theme={null}
// Triggered automatically when a player leaves a Photon room
handlers.RoomLeft = function (args) {
return { ResultCode : 0, Message: 'Success' };
};
```
"args" 引数を使用して、イベントに関する詳細データを取得できます。
```json theme={null}
{
"ActorNr": 2,
"AppVersion": "1.2_1.85",
"AppId": "bfd5f98b-c6a4-4763-80d9-824d20db842b",
// Unique Game Identifier
"GameId": "b0f55a2e-431d-402a-9809-b0240443267e",
"IsInactive": false,
"Reason": "0",
"Region": "EU",
"Type": "ClientDisconnect",
// Id of the user that has left the room
"UserId": "AAC7634BF46289DF",
"Username": ""
}
```
### Room Closed ハンドラー
`RoomClosed` ハンドラーは、最後のプレイヤーが部屋を離れ、部屋にプレイヤーが残っていないたびに呼び出されます。次の CloudScript ハンドラーはそのようなイベントをインターセプトします。
```javascript theme={null}
// Triggered automatically when a Photon room closes
// Note: currentPlayerId is undefined in this function
handlers.RoomClosed = function (args) {
return { ResultCode : 0, Message: 'Success' };
};
```
"args" 引数を使用して、イベントに関する詳細データを取得できます。
```json theme={null}
"ActorCount": 0,
"ActorNr": 1,
"AppVersion": "1.2_1.85",
"AppId": "bfd5f98b-c6a4-4763-80d9-824d20db842b",
// Unique game identifier
"GameId": "b0f55a2e-431d-402a-9809-b0240443267e",
"Region": "EU",
"State2": {
"ActorList": [
]
},
"Type": "Close"
}
```
### Room Property Updated
`RoomPropertyUpdated` ハンドラーは、部屋のプロパティが変更されるたびに呼び出されます。次の CloudScript ハンドラーはそのようなイベントをインターセプトします。
```javascript theme={null}
// Triggered automatically when a Photon room game property is updated.
// Note: currentPlayerId is undefined in this function
handlers.RoomPropertyUpdated = function (args) {
return { ResultCode : 0, Message: 'Success' };
};
```
このハンドラーでは `currentPlayerId` は未定義です。部屋のプロパティがクライアントから変更された場合、"args" 引数を使用して UserId を参照し、担当プレイヤーを取得できます。
"args" 引数を使用して、イベントに関する詳細データを取得できます。
```json theme={null}
{
"ActorNr": 1,
"AppVersion": "1.2_1.85",
"AppId": "bfd5f98b-c6a4-4763-80d9-824d20db842b",
// Custom Room Properties
"Properties": {
"CustomProperty": "It's Value"
},
"GameId": "8b8322de-096d-4481-a2b2-8db8bb45cfef",
"Region": "EU",
"State": {
"ActorCounter": 1,
"ActorList": [
{
"ActorNr": 1,
"UserId": "834D5AA5BAB1DFB6",
"Username": "",
"IsActive": true,
"Binary": "RGIAAAEBRAAAAAFi\/3MAAA==",
"DEBUG_BINARY": {
"1": {
"255": ""
}
}
}
],
"Binary": {
"18": "RAAAAANi+nkAAHNzAA1QbGF5ZXJJbmRleGVzRGlpAAEAAAABAAAAAHMADkN1c3RvbVByb3BlcnR5cwAKSXQncyBWYWx1ZQ=="
},
"CheckUserOnJoin": false,
"CustomProperties": {
},
"DeleteCacheOnLeave": true,
"EmptyRoomTTL": 0,
"IsOpen": true,
"IsVisible": true,
"LobbyType": 0,
"LobbyProperties": [
],
"MaxPlayers": 4,
"PlayerTTL": 0,
"SuppressRoomEvents": false,
"Slice": 0,
"DebugInfo": {
"DEBUG_PROPERTIES_18": {
"250": [
],
"PlayerIndexes": {
"1": 0
},
"CustomProperty": "It's Value"
}
},
"ExcludedActors": [
],
"PublishUserId": false,
"ExpectedUsers": [
]
},
"Type": "Game",
"UserId": "834D5AA5BAB1DFB6",
"Username": ""
}
```
Unity Photon クライアントを使用してカスタム部屋プロパティを変更する場合、*Webhook (この場合は PlayFab) にイベントを渡すため、呼び出しをマークすることが重要です*。
```csharp theme={null}
// Properties updates ( this hashtable contains the properties to be changed. Properties not mentioned here will stay as is
var properties = new ExitGames.Client.Photon.Hashtable() { { "CustomProperty" , "It's Value" } };
// Control set. Empty in this case, because our property has not existed before.
// Otherwise you would include previous value of the property.
var expectedProperties = new ExitGames.Client.Photon.Hashtable();
// Set Custom Properties call. Notice the last argument set to "true"
// This tells Photon to forward event to the webhook.
PhotonNetwork.room.SetCustomProperties(properties, expectedProperties, true);
```
### Room Event Raised
**Room Event Raised** は、カスタム部屋イベントが発生するたびに呼び出されます。次の **CloudScript** ハンドラーはそのようなイベントをインターセプトします。
```javascript theme={null}
// Triggered by calling "OpRaiseEvent" on the Photon client. The "args.Data" property is
// set to the value of the "customEventContent" HashTable parameter, so you can use
// it to pass in arbitrary data.
handlers.RoomEventRaised= function (args) {
return { ResultCode : 0, Message: 'Success' };
};
```
"args" 引数を使用して、イベントに関する詳細データを取得できます。
```json theme={null}
{
"ActorNr": 1,
"AppVersion": "1.2_1.85",
"AppId": "bfd5f98b-c6a4-4763-80d9-824d20db842b",
// Custom event data
"Data": {
"Hello": "World"
},
"GameId": "8b8322de-096d-4481-a2b2-8db8bb45cfef",
"Region": "EU",
"State": {
"ActorCounter": 1,
"ActorList": [
{
"ActorNr": 1,
"UserId": "834D5AA5BAB1DFB6",
"Username": "",
"IsActive": true,
"Binary": "RGIAAAEBRAAAAAFi\/3MAAA==",
"DEBUG_BINARY": {
"1": {
"255": ""
}
}
}
],
"Binary": {
"18": "RAAAAAJi+nkAAHNzAA1QbGF5ZXJJbmRleGVzRGlpAAEAAAABAAAAAA=="
},
"CheckUserOnJoin": false,
"CustomProperties": {
},
"DeleteCacheOnLeave": true,
"EmptyRoomTTL": 0,
"IsOpen": true,
"IsVisible": true,
"LobbyType": 0,
"LobbyProperties": [
],
"MaxPlayers": 4,
"PlayerTTL": 0,
"SuppressRoomEvents": false,
"Slice": 0,
"DebugInfo": {
"DEBUG_PROPERTIES_18": {
"250": [
],
"PlayerIndexes": {
"1": 0
}
}
},
"ExcludedActors": [
],
"PublishUserId": false,
"ExpectedUsers": [
]
},
"Type": "Event",
// PlayFab User Id if he/she was the source of the event
"UserId": "834D5AA5BAB1DFB6",
"Username": "",
// Event code
"EvCode": 15
}
```
Unity Photon クライアントを使用してカスタム部屋イベントを発生させる場合、Webhook (この場合は PlayFab) にイベントを渡すために呼び出しをマークすることが重要です。
```csharp theme={null}
var data = new Dictionary() {
{ "Hello" , "World" }
};
// Raise custom room event
// Replace 15 with any custom event code of your choice [0..299]
PhotonNetwork.RaiseEvent(15, data, true, new RaiseEventOptions() {
ForwardToWebhook = true, // Mark call to pass event to Webhook (PlayFab in this case)
});
```
## 部屋イベント ハンドラーのテスト
この例は、前の例 (PlayFab + Photon 認証) を拡張します。
タイトル用に次の CloudScript をアップロードします。
```javascript theme={null}
handlers.RoomCreated = function (args) {
server.WriteTitleEvent({
EventName : "room_created"
});
return { ResultCode : 0, Message: 'Success' };
};
handlers.RoomJoined = function (args) {
server.WriteTitleEvent({
EventName : "room_joined"
});
return { ResultCode : 0, Message: 'Success' };
};
handlers.RoomLeft = function (args) {
server.WriteTitleEvent({
EventName : "room_left"
});
return { ResultCode : 0, Message: 'Success' };
};
handlers.RoomClosed = function (args) {
server.WriteTitleEvent({
EventName : "room_closed"
});
return { ResultCode : 0, Message: 'Success' };
};
handlers.RoomPropertyUpdated = function (args) {
server.WriteTitleEvent({
EventName : "room_property_changed"
});
return { ResultCode : 0, Message: 'Success' };
};
handlers.RoomEventRaised = function (args) {
server.WriteTitleEvent({
EventName : "room_event_raised"
});
return { ResultCode : 0, Message: 'Success' };
};
```
このコードは、Photon コールバックが呼び出されるたびに新しいタイトル イベントを投稿するだけです。本番環境で使用できない場合、この例ではコールバックがどのように呼び出されるかを明確に確認できます。
カスタム イベントを発生させ、カスタム部屋プロパティを設定する新しい例のコードを含めて `PlayFabAuthenticator` スクリプトを拡張します。拡張版では、シーン読み込み間でオブジェクトを破棄しないために `Awake` メソッドも活用します。
```csharp theme={null}
using System.Collections.Generic;
using PlayFab;
using PlayFab.ClientModels;
using UnityEngine;
public class PlayFabAuthenticator : MonoBehaviour {
private string _playFabPlayerIdCache;
//Run the entire thing on awake
public void Awake() {
AuthenticateWithPlayFab();
DontDestroyOnLoad(gameObject);
}
/*
* Step 1
* We authenticate a current PlayFab user normally.
* In this case we use the LoginWithCustomID API call for simplicity.
* You can absolutely use any Login method you want.
* We use PlayFabSettings.DeviceUniqueIdentifier as our custom ID.
* We pass RequestPhotonToken as a callback to be our next step, if
* authentication was successful.
*/
private void AuthenticateWithPlayFab() {
LogMessage("PlayFab authenticating using Custom ID...");
PlayFabClientAPI.LoginWithCustomID(new LoginWithCustomIDRequest()
{
CreateAccount = true,
CustomId = PlayFabSettings.DeviceUniqueIdentifier+"EDITOR"
}, RequestPhotonToken, OnPlayFabError);
}
/*
* Step 2
* We request a Photon authentication token from PlayFab.
* This is a crucial step, because Photon uses different authentication tokens
* than PlayFab. Thus, you cannot directly use PlayFab SessionTicket and
* you need to explicitly request a token. This API call requires you to
* pass a Photon App ID. The App ID may be hard coded, but in this example,
* we are accessing it using convenient static field on PhotonNetwork class.
* We pass in AuthenticateWithPhoton as a callback to be our next step, if
* we have acquired the token successfully.
*/
private void RequestPhotonToken(LoginResult obj) {
LogMessage("PlayFab authenticated. Requesting photon token...");
//We can player PlayFabId. This will come in handy during next step
_playFabPlayerIdCache = obj.PlayFabId;
PlayFabClientAPI.GetPhotonAuthenticationToken(new GetPhotonAuthenticationTokenRequest()
{
PhotonApplicationId = PhotonNetwork.PhotonServerSettings.AppSettings.AppIdRealtime
}, AuthenticateWithPhoton, OnPlayFabError);
}
/*
* Step 3
* This is the final and the simplest step. We create a new AuthenticationValues instance.
* This class describes how to authenticate a player inside the Photon environment.
*/
private void AuthenticateWithPhoton(GetPhotonAuthenticationTokenResult obj) {
LogMessage("Photon token acquired: " + obj.PhotonCustomAuthenticationToken + " Authentication complete.");
//We set AuthType to custom, meaning we bring our own, PlayFab authentication procedure.
var customAuth = new Photon.Realtime.AuthenticationValues { AuthType = CustomAuthenticationType.Custom };
//We add "username" parameter. Do not let it confuse you: PlayFab is expecting this parameter to contain player PlayFab ID (!) and not username.
customAuth.AddAuthParameter("username", _playFabPlayerIdCache); // expected by PlayFab custom auth service
//We add "token" parameter. PlayFab expects it to contain Photon Authentication Token issues to your during previous step.
customAuth.AddAuthParameter("token", obj.PhotonCustomAuthenticationToken);
//We finally tell Photon to use this authentication parameters throughout the entire application.
PhotonNetwork.AuthValues = customAuth;
}
private void OnPlayFabError(PlayFabError obj) {
LogMessage(obj.ErrorMessage);
}
public void LogMessage(string message) {
Debug.Log("PlayFab + Photon Example: " + message);
}
// Add small button to launch our example code
public void OnGUI() {
if (GUILayout.Button("Execute Example ")) ExecuteExample();
}
// Example code which raises custom room event, then sets custom room property
private void ExecuteExample() {
// Raise custom room event
var data = new Dictionary() { {"Hello","World"} };
var result = PhotonNetwork.RaiseEvent(15, data, true, new RaiseEventOptions()
{
ForwardToWebhook = true,
});
LogMessage("New Room Event Post: "+result);
// Set custom room property
var properties = new ExitGames.Client.Photon.Hashtable() { { "CustomProperty", "It's Value" } };
var expectedProperties = new ExitGames.Client.Photon.Hashtable();
PhotonNetwork.room.SetCustomProperties(properties, expectedProperties, true);
LogMessage("New Room Properties Set");
}
}
```
* ハブ シーンを実行し、PlayFab 認証の完了を待ちます **(1)**。
* 次に **Boxes Demo** シーンを読み込みます **(2)**。
コンソールに **Authentication Denied** エラーがないことを確認します。この時点で、最小限の PlayFab と Photon の統合がセットアップされました。
## Photon の部屋イベント + CloudScript
Photon マッチメイキング システムには *Room* の概念があります。この概念に慣れていない場合は、[Photon マッチメイキング ガイド](https://doc.photonengine.com/realtime/current/lobby-and-matchmaking/matchmaking-and-lobby) を参照してください。
PlayFab では、さまざまな部屋のイベントをインターセプトできます。次の部屋のイベントはインターセプトに CloudScript のみが必要です:
* `RoomCreated`
* `RoomJoined`
* `RoomLeft`
* `RoomClosed`
以下のイベントをインターセプトするには、Unity コードの追加の制御が必要です (詳細については後述):
* `RoomPropertyUpdated`
* `RoomEventRaised`
部屋イベントのハンドラーを導入すると、それがイベント処理フローの重要な部分になります。したがって、CloudScript の実行中に発生するエラーは、*システム全体* に問題を引き起こす可能性があります。たとえば、`RoomCreated` ハンドラーがエラーをスローすると、クライアントもエラーをスローし、適切に接続できなくなります。
各イベント タイプごとにハンドラーを定義することで PlayFab CloudScript を構築しましょう。
### Room Created ハンドラー
`RoomCreated` ハンドラーは、Photon の部屋が作成されるたびに呼び出されます。次の CloudScript ハンドラーはそのようなイベントをインターセプトします。
```javascript theme={null}
// Triggered automatically when a Photon room is first created
handlers.RoomCreated = function (args) {
return { ResultCode : 0, Message: 'Success' };
};
```
"args" 引数を使用して、イベントに関する詳細データを取得できます。
```json theme={null}
{
"ActorNr": 1,
"AppVersion": "1.2_1.85",
"AppId": "bfd5f98b-c6a4-4763-80d9-824d20db842b",
// Options with which the room was created.
"CreateOptions": {
"MaxPlayers": 4,
"LobbyId": null,
"LobbyType": 0,
"CustomProperties": {
},
"EmptyRoomTTL": 0,
"PlayerTTL": 0,
"CheckUserOnJoin": false,
"DeleteCacheOnLeave": true,
"SuppressRoomEvents": false,
"PublishUserId": false,
"ExpectedUsers": null
},
// Unique game identifier
"GameId": "8b8322de-096d-4481-a2b2-8db8bb45cfef",
"Region": "EU",
"Type": "Create",
// User that caused the room to be created
"UserId": "834D5AA5BAB1DFB6",
"Username": ""
}
```
### Room Joined ハンドラー
`RoomJoined` ハンドラーは、プレイヤーが部屋に参加するたびに呼び出されます。次の CloudScript ハンドラーはそのようなイベントをインターセプトします。
```javascript theme={null}
// Triggered automatically when a player joins a Photon room
handlers.RoomJoined = function (args) {
return { ResultCode : 0, Message: 'Success' };
};
```
このコールバックは、部屋に入る最初のユーザーに対しては呼び出されません。参加する最初のプレイヤーをインターセプトするには `RoomCreated` を使用します。"args" 引数を使用して、イベントに関する詳細データを取得できます。
```json theme={null}
{
"ActorNr": 2,
"AppVersion": "1.2_1.85",
"AppId": "bfd5f98b-c6a4-4763-80d9-824d20db842b",
// Unique Game Identifier
"GameId": "b0f55a2e-431d-402a-9809-b0240443267e",
"Region": "EU",
"Type": "Join",
// Id of the player that has joined
"UserId": "AAC7634BF46289DF",
"Username": ""
}
```
### Room Left
`RoomLeft` ハンドラーは、プレイヤーが部屋を離れるたびに呼び出されます。次の CloudScript ハンドラーはそのようなイベントをインターセプトします。
```javascript theme={null}
// Triggered automatically when a player leaves a Photon room
handlers.RoomLeft = function (args) {
return { ResultCode : 0, Message: 'Success' };
};
```
"args" 引数を使用して、イベントに関する詳細データを取得できます。
```json theme={null}
{
"ActorNr": 2,
"AppVersion": "1.2_1.85",
"AppId": "bfd5f98b-c6a4-4763-80d9-824d20db842b",
// Unique Game Identifier
"GameId": "b0f55a2e-431d-402a-9809-b0240443267e",
"IsInactive": false,
"Reason": "0",
"Region": "EU",
"Type": "ClientDisconnect",
// Id of the user that has left the room
"UserId": "AAC7634BF46289DF",
"Username": ""
}
```
### Room Closed ハンドラー
`RoomClosed` ハンドラーは、最後のプレイヤーが部屋を離れ、部屋にプレイヤーが残っていないたびに呼び出されます。次の CloudScript ハンドラーはそのようなイベントをインターセプトします。
```javascript theme={null}
// Triggered automatically when a Photon room closes
// Note: currentPlayerId is undefined in this function
handlers.RoomClosed = function (args) {
return { ResultCode : 0, Message: 'Success' };
};
```
"args" 引数を使用して、イベントに関する詳細データを取得できます。
```json theme={null}
"ActorCount": 0,
"ActorNr": 1,
"AppVersion": "1.2_1.85",
"AppId": "bfd5f98b-c6a4-4763-80d9-824d20db842b",
// Unique game identifier
"GameId": "b0f55a2e-431d-402a-9809-b0240443267e",
"Region": "EU",
"State2": {
"ActorList": [
]
},
"Type": "Close"
}
```
### Room Property Updated
`RoomPropertyUpdated` ハンドラーは、部屋のプロパティが変更されるたびに呼び出されます。次の CloudScript ハンドラーはそのようなイベントをインターセプトします。
```javascript theme={null}
// Triggered automatically when a Photon room game property is updated.
// Note: currentPlayerId is undefined in this function
handlers.RoomPropertyUpdated = function (args) {
return { ResultCode : 0, Message: 'Success' };
};
```
このハンドラーでは `currentPlayerId` は未定義です。部屋のプロパティがクライアントから変更された場合、"args" 引数を使用して UserId を参照し、担当プレイヤーを取得できます。
"args" 引数を使用して、イベントに関する詳細データを取得できます。
```json theme={null}
{
"ActorNr": 1,
"AppVersion": "1.2_1.85",
"AppId": "bfd5f98b-c6a4-4763-80d9-824d20db842b",
// Custom Room Properties
"Properties": {
"CustomProperty": "It's Value"
},
"GameId": "8b8322de-096d-4481-a2b2-8db8bb45cfef",
"Region": "EU",
"State": {
"ActorCounter": 1,
"ActorList": [
{
"ActorNr": 1,
"UserId": "834D5AA5BAB1DFB6",
"Username": "",
"IsActive": true,
"Binary": "RGIAAAEBRAAAAAFi\/3MAAA==",
"DEBUG_BINARY": {
"1": {
"255": ""
}
}
}
],
"Binary": {
"18": "RAAAAANi+nkAAHNzAA1QbGF5ZXJJbmRleGVzRGlpAAEAAAABAAAAAHMADkN1c3RvbVByb3BlcnR5cwAKSXQncyBWYWx1ZQ=="
},
"CheckUserOnJoin": false,
"CustomProperties": {
},
"DeleteCacheOnLeave": true,
"EmptyRoomTTL": 0,
"IsOpen": true,
"IsVisible": true,
"LobbyType": 0,
"LobbyProperties": [
],
"MaxPlayers": 4,
"PlayerTTL": 0,
"SuppressRoomEvents": false,
"Slice": 0,
"DebugInfo": {
"DEBUG_PROPERTIES_18": {
"250": [
],
"PlayerIndexes": {
"1": 0
},
"CustomProperty": "It's Value"
}
},
"ExcludedActors": [
],
"PublishUserId": false,
"ExpectedUsers": [
]
},
"Type": "Game",
"UserId": "834D5AA5BAB1DFB6",
"Username": ""
}
```
Unity Photon クライアントを使用してカスタム部屋プロパティを変更する場合、*Webhook (この場合は PlayFab) にイベントを渡すため、呼び出しをマークすることが重要です*。
```csharp theme={null}
// Properties updates ( this hashtable contains the properties to be changed. Properties not mentioned here will stay as is
var properties = new ExitGames.Client.Photon.Hashtable() { { "CustomProperty" , "It's Value" } };
// Control set. Empty in this case, because our property has not existed before.
// Otherwise you would include previous value of the property.
var expectedProperties = new ExitGames.Client.Photon.Hashtable();
// Set Custom Properties call. Notice the last argument set to "true"
// This tells Photon to forward event to the webhook.
PhotonNetwork.room.SetCustomProperties(properties, expectedProperties, true);
```
### Room Event Raised
**Room Event Raised** は、カスタム部屋イベントが発生するたびに呼び出されます。次の **CloudScript** ハンドラーはそのようなイベントをインターセプトします。
```javascript theme={null}
// Triggered by calling "OpRaiseEvent" on the Photon client. The "args.Data" property is
// set to the value of the "customEventContent" HashTable parameter, so you can use
// it to pass in arbitrary data.
handlers.RoomEventRaised= function (args) {
return { ResultCode : 0, Message: 'Success' };
};
```
"args" 引数を使用して、イベントに関する詳細データを取得できます。
```json theme={null}
{
"ActorNr": 1,
"AppVersion": "1.2_1.85",
"AppId": "bfd5f98b-c6a4-4763-80d9-824d20db842b",
// Custom event data
"Data": {
"Hello": "World"
},
"GameId": "8b8322de-096d-4481-a2b2-8db8bb45cfef",
"Region": "EU",
"State": {
"ActorCounter": 1,
"ActorList": [
{
"ActorNr": 1,
"UserId": "834D5AA5BAB1DFB6",
"Username": "",
"IsActive": true,
"Binary": "RGIAAAEBRAAAAAFi\/3MAAA==",
"DEBUG_BINARY": {
"1": {
"255": ""
}
}
}
],
"Binary": {
"18": "RAAAAAJi+nkAAHNzAA1QbGF5ZXJJbmRleGVzRGlpAAEAAAABAAAAAA=="
},
"CheckUserOnJoin": false,
"CustomProperties": {
},
"DeleteCacheOnLeave": true,
"EmptyRoomTTL": 0,
"IsOpen": true,
"IsVisible": true,
"LobbyType": 0,
"LobbyProperties": [
],
"MaxPlayers": 4,
"PlayerTTL": 0,
"SuppressRoomEvents": false,
"Slice": 0,
"DebugInfo": {
"DEBUG_PROPERTIES_18": {
"250": [
],
"PlayerIndexes": {
"1": 0
}
}
},
"ExcludedActors": [
],
"PublishUserId": false,
"ExpectedUsers": [
]
},
"Type": "Event",
// PlayFab User Id if he/she was the source of the event
"UserId": "834D5AA5BAB1DFB6",
"Username": "",
// Event code
"EvCode": 15
}
```
Unity Photon クライアントを使用してカスタム部屋イベントを発生させる場合、Webhook (この場合は PlayFab) にイベントを渡すために呼び出しをマークすることが重要です。
```csharp theme={null}
var data = new Dictionary() {
{ "Hello" , "World" }
};
// Raise custom room event
// Replace 15 with any custom event code of your choice [0..299]
PhotonNetwork.RaiseEvent(15, data, true, new RaiseEventOptions() {
ForwardToWebhook = true, // Mark call to pass event to Webhook (PlayFab in this case)
});
```
## 部屋イベント ハンドラーのテスト
この例は、前の例 (PlayFab + Photon 認証) を拡張します。
タイトル用に次の CloudScript をアップロードします。
```javascript theme={null}
handlers.RoomCreated = function (args) {
server.WriteTitleEvent({
EventName : "room_created"
});
return { ResultCode : 0, Message: 'Success' };
};
handlers.RoomJoined = function (args) {
server.WriteTitleEvent({
EventName : "room_joined"
});
return { ResultCode : 0, Message: 'Success' };
};
handlers.RoomLeft = function (args) {
server.WriteTitleEvent({
EventName : "room_left"
});
return { ResultCode : 0, Message: 'Success' };
};
handlers.RoomClosed = function (args) {
server.WriteTitleEvent({
EventName : "room_closed"
});
return { ResultCode : 0, Message: 'Success' };
};
handlers.RoomPropertyUpdated = function (args) {
server.WriteTitleEvent({
EventName : "room_property_changed"
});
return { ResultCode : 0, Message: 'Success' };
};
handlers.RoomEventRaised = function (args) {
server.WriteTitleEvent({
EventName : "room_event_raised"
});
return { ResultCode : 0, Message: 'Success' };
};
```
このコードは、Photon コールバックが呼び出されるたびに新しいタイトル イベントを投稿するだけです。本番環境で使用できない場合、この例ではコールバックがどのように呼び出されるかを明確に確認できます。
カスタム イベントを発生させ、カスタム部屋プロパティを設定する新しい例のコードを含めて `PlayFabAuthenticator` スクリプトを拡張します。拡張版では、シーン読み込み間でオブジェクトを破棄しないために `Awake` メソッドも活用します。
```csharp theme={null}
using System.Collections.Generic;
using PlayFab;
using PlayFab.ClientModels;
using UnityEngine;
public class PlayFabAuthenticator : MonoBehaviour {
private string _playFabPlayerIdCache;
//Run the entire thing on awake
public void Awake() {
AuthenticateWithPlayFab();
DontDestroyOnLoad(gameObject);
}
/*
* Step 1
* We authenticate a current PlayFab user normally.
* In this case we use the LoginWithCustomID API call for simplicity.
* You can absolutely use any Login method you want.
* We use PlayFabSettings.DeviceUniqueIdentifier as our custom ID.
* We pass RequestPhotonToken as a callback to be our next step, if
* authentication was successful.
*/
private void AuthenticateWithPlayFab() {
LogMessage("PlayFab authenticating using Custom ID...");
PlayFabClientAPI.LoginWithCustomID(new LoginWithCustomIDRequest()
{
CreateAccount = true,
CustomId = PlayFabSettings.DeviceUniqueIdentifier+"EDITOR"
}, RequestPhotonToken, OnPlayFabError);
}
/*
* Step 2
* We request a Photon authentication token from PlayFab.
* This is a crucial step, because Photon uses different authentication tokens
* than PlayFab. Thus, you cannot directly use PlayFab SessionTicket and
* you need to explicitly request a token. This API call requires you to
* pass a Photon App ID. The App ID may be hard coded, but in this example,
* we are accessing it using convenient static field on PhotonNetwork class.
* We pass in AuthenticateWithPhoton as a callback to be our next step, if
* we have acquired the token successfully.
*/
private void RequestPhotonToken(LoginResult obj) {
LogMessage("PlayFab authenticated. Requesting photon token...");
//We can player PlayFabId. This will come in handy during next step
_playFabPlayerIdCache = obj.PlayFabId;
PlayFabClientAPI.GetPhotonAuthenticationToken(new GetPhotonAuthenticationTokenRequest()
{
PhotonApplicationId = PhotonNetwork.PhotonServerSettings.AppSettings.AppIdRealtime
}, AuthenticateWithPhoton, OnPlayFabError);
}
/*
* Step 3
* This is the final and the simplest step. We create a new AuthenticationValues instance.
* This class describes how to authenticate a player inside the Photon environment.
*/
private void AuthenticateWithPhoton(GetPhotonAuthenticationTokenResult obj) {
LogMessage("Photon token acquired: " + obj.PhotonCustomAuthenticationToken + " Authentication complete.");
//We set AuthType to custom, meaning we bring our own, PlayFab authentication procedure.
var customAuth = new Photon.Realtime.AuthenticationValues { AuthType = CustomAuthenticationType.Custom };
//We add "username" parameter. Do not let it confuse you: PlayFab is expecting this parameter to contain player PlayFab ID (!) and not username.
customAuth.AddAuthParameter("username", _playFabPlayerIdCache); // expected by PlayFab custom auth service
//We add "token" parameter. PlayFab expects it to contain Photon Authentication Token issues to your during previous step.
customAuth.AddAuthParameter("token", obj.PhotonCustomAuthenticationToken);
//We finally tell Photon to use this authentication parameters throughout the entire application.
PhotonNetwork.AuthValues = customAuth;
}
private void OnPlayFabError(PlayFabError obj) {
LogMessage(obj.ErrorMessage);
}
public void LogMessage(string message) {
Debug.Log("PlayFab + Photon Example: " + message);
}
// Add small button to launch our example code
public void OnGUI() {
if (GUILayout.Button("Execute Example ")) ExecuteExample();
}
// Example code which raises custom room event, then sets custom room property
private void ExecuteExample() {
// Raise custom room event
var data = new Dictionary() { {"Hello","World"} };
var result = PhotonNetwork.RaiseEvent(15, data, true, new RaiseEventOptions()
{
ForwardToWebhook = true,
});
LogMessage("New Room Event Post: "+result);
// Set custom room property
var properties = new ExitGames.Client.Photon.Hashtable() { { "CustomProperty", "It's Value" } };
var expectedProperties = new ExitGames.Client.Photon.Hashtable();
PhotonNetwork.room.SetCustomProperties(properties, expectedProperties, true);
LogMessage("New Room Properties Set");
}
}
```
* ハブ シーンを実行し、PlayFab 認証の完了を待ちます **(1)**。
* 次に **Boxes Demo** シーンを読み込みます **(2)**。
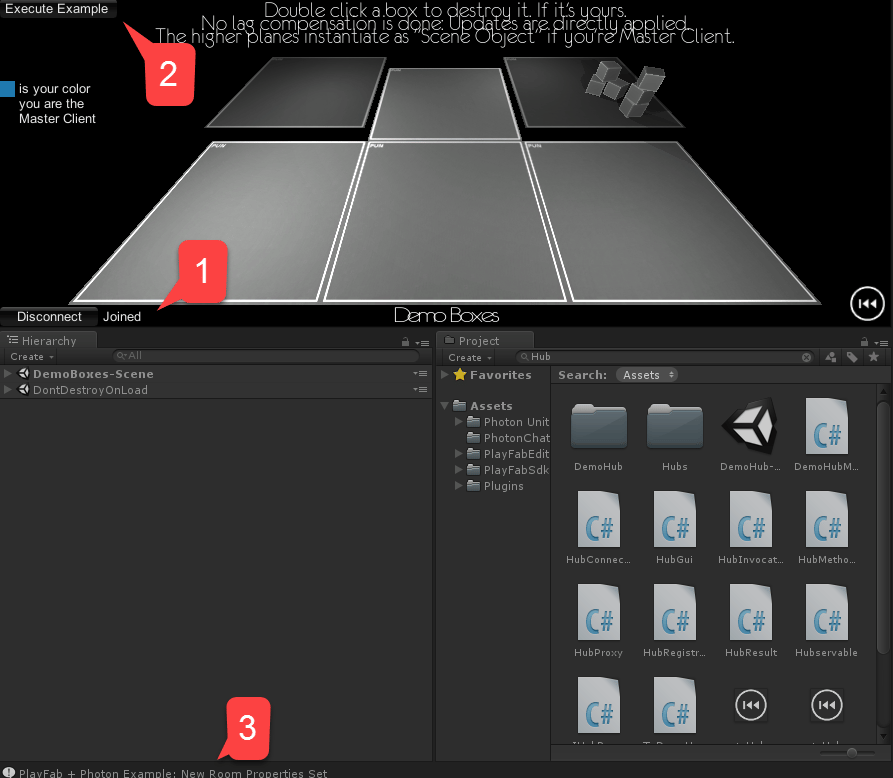
 * シーンが読み込まれたら、ピアが新しく作成された部屋に接続するのを待ちます **(1)**。
* 次に、左上の **Execute Example** を選択します **(2)**。
* コンソール出力を確認します **(3)**。
* エラーが発生していないことを確認します。
* シーンが読み込まれたら、ピアが新しく作成された部屋に接続するのを待ちます **(1)**。
* 次に、左上の **Execute Example** を選択します **(2)**。
* コンソール出力を確認します **(3)**。
* エラーが発生していないことを確認します。
 **RoomLeft** および **RoomClosed** イベントも受信できるように、Unity のプレイを停止することを忘れないでください。
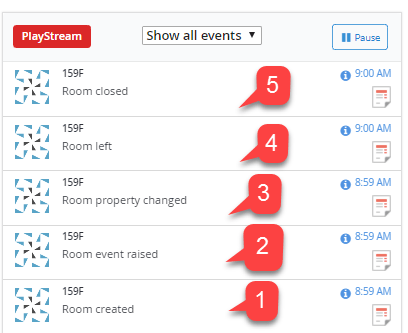
タイトルの Game Manager ページに移動し、**PlayStream** パネルを確認します。CloudScript コードが Photon イベントを処理した結果生成されたイベントが表示されるはずです。
1. 初期状態では、Photon インスタンスには開かれた部屋がありませんでした。例を起動すると、Photon は Boxes Demo 用の部屋を作成しました。
2. 参加する最初のプレイヤーは、部屋をリクエストしたプレイヤーです。したがって、**RoomJoined Event** は記録されませんでした。次に例のコードを実行しました:
* まず、カスタム **Room Event** を発生させました。
* 次に、カスタム **Room Property** を設定しました。
* 次に Unity プレイ モードを停止しました。これにより、クライアントは部屋を退出しました。
3. 切断されたクライアントが最後だったので、他にクライアントがいないため、Photon は部屋を閉じます。
すべてのイベントは、次の画像に示すように、PlayStream イベント フローにログされる必要があります。
**RoomLeft** および **RoomClosed** イベントも受信できるように、Unity のプレイを停止することを忘れないでください。
タイトルの Game Manager ページに移動し、**PlayStream** パネルを確認します。CloudScript コードが Photon イベントを処理した結果生成されたイベントが表示されるはずです。
1. 初期状態では、Photon インスタンスには開かれた部屋がありませんでした。例を起動すると、Photon は Boxes Demo 用の部屋を作成しました。
2. 参加する最初のプレイヤーは、部屋をリクエストしたプレイヤーです。したがって、**RoomJoined Event** は記録されませんでした。次に例のコードを実行しました:
* まず、カスタム **Room Event** を発生させました。
* 次に、カスタム **Room Property** を設定しました。
* 次に Unity プレイ モードを停止しました。これにより、クライアントは部屋を退出しました。
3. 切断されたクライアントが最後だったので、他にクライアントがいないため、Photon は部屋を閉じます。
すべてのイベントは、次の画像に示すように、PlayStream イベント フローにログされる必要があります。
 この時点で、Photon イベント サポートを PlayFab タイトルに完全に統合しました。
## Related topics
- [クイックスタート](/ja-jp/services/playfab/economy-monetization/economy-v2/quickstart.md)
- [クイックスタート iOS](/ja-jp/services/playfab/sdks/c/quickstart-ios.md)
- [クイックスタート Linux](/ja-jp/services/playfab/sdks/c/quickstart-linux.md)
- [クイックスタート Win32](/ja-jp/services/playfab/sdks/c/quickstart-win32.md)
- [クイックスタート Android](/ja-jp/services/playfab/sdks/c/quickstart-android.md)
この時点で、Photon イベント サポートを PlayFab タイトルに完全に統合しました。
## Related topics
- [クイックスタート](/ja-jp/services/playfab/economy-monetization/economy-v2/quickstart.md)
- [クイックスタート iOS](/ja-jp/services/playfab/sdks/c/quickstart-ios.md)
- [クイックスタート Linux](/ja-jp/services/playfab/sdks/c/quickstart-linux.md)
- [クイックスタート Win32](/ja-jp/services/playfab/sdks/c/quickstart-win32.md)
- [クイックスタート Android](/ja-jp/services/playfab/sdks/c/quickstart-android.md)