> ## Documentation Index
> Fetch the complete documentation index at: https://devdocs.xbox.com/llms.txt
> Use this file to discover all available pages before exploring further.
# iOS 用プッシュ通知
> APNS 証明書を作成し、それを .p12 にエクスポートし、Game Manager でアップロードして配信することで、iOS 向けの PlayFab プッシュ通知を構成します。
# iOS 用プッシュ通知
## 前提条件
このチュートリアルでは、[プッシュ通知クイックスタート](/services/playfab/live-service-management/game-configuration/title-communications/push-notifications/quickstart) で扱われる概念に慣れていることを前提としています。
## Apple 通知チャネルの構成
1. アクティブな iOS 開発 (APNS\_SANDBOX) または本番 (APNS) 証明書があることを確認します。ない場合は、**Apple Developer Portal** の **Certificates, Identities and Profiles** で作成します。
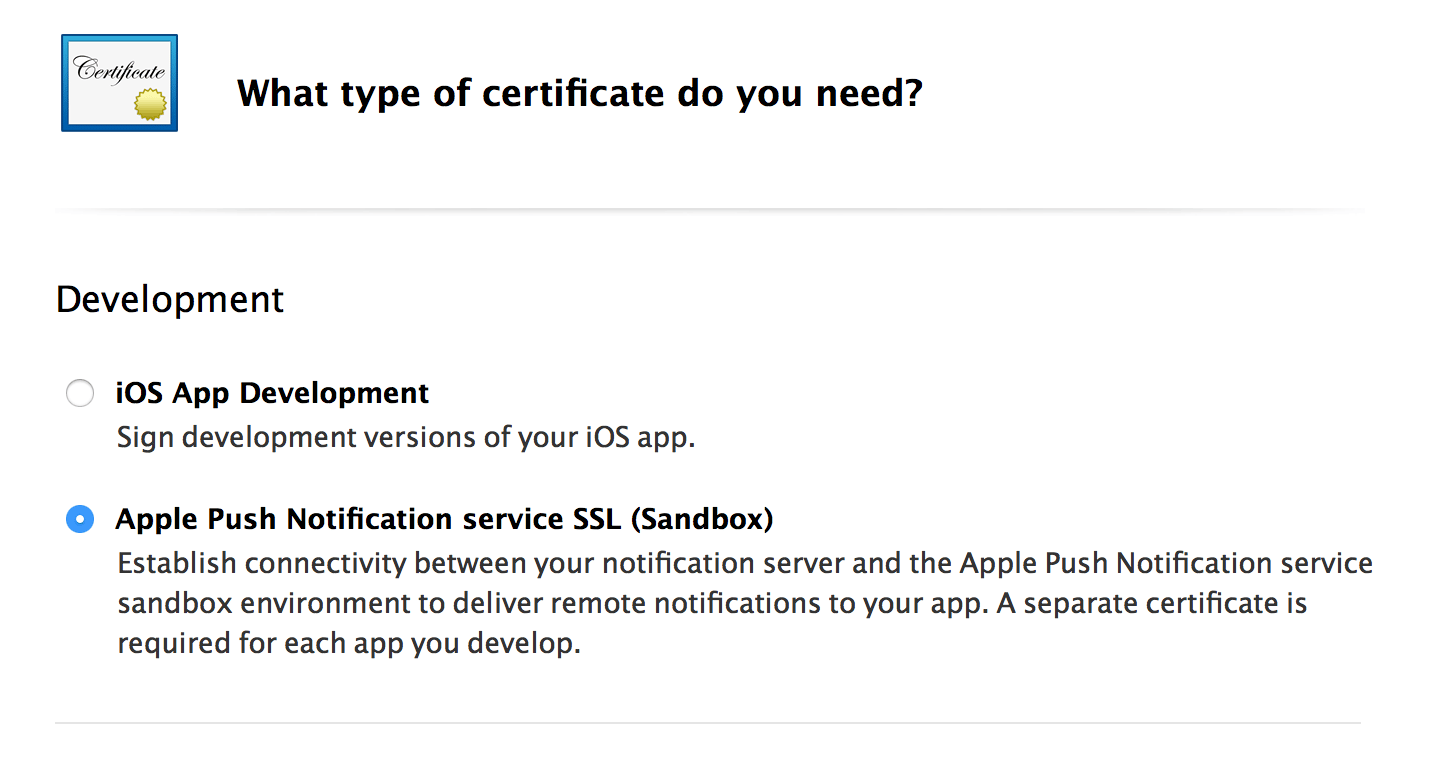 2. 選択した証明書 (開発または本番) をエクスポートします:
* まず、**Apple Developer Portal** の **Certificates, Identities and Profiles** から証明書のコピーをダウンロードします。これにより **.cer** ファイルが作成されます。
* 証明書を開いて **Keychain Access** にインストールします。
* **Certificates** サブカテゴリの下にインストールされた証明書を表示します。
* **Keychain Access Certificate** を **.p12** 形式にエクスポートします。
2. 選択した証明書 (開発または本番) をエクスポートします:
* まず、**Apple Developer Portal** の **Certificates, Identities and Profiles** から証明書のコピーをダウンロードします。これにより **.cer** ファイルが作成されます。
* 証明書を開いて **Keychain Access** にインストールします。
* **Certificates** サブカテゴリの下にインストールされた証明書を表示します。
* **Keychain Access Certificate** を **.p12** 形式にエクスポートします。
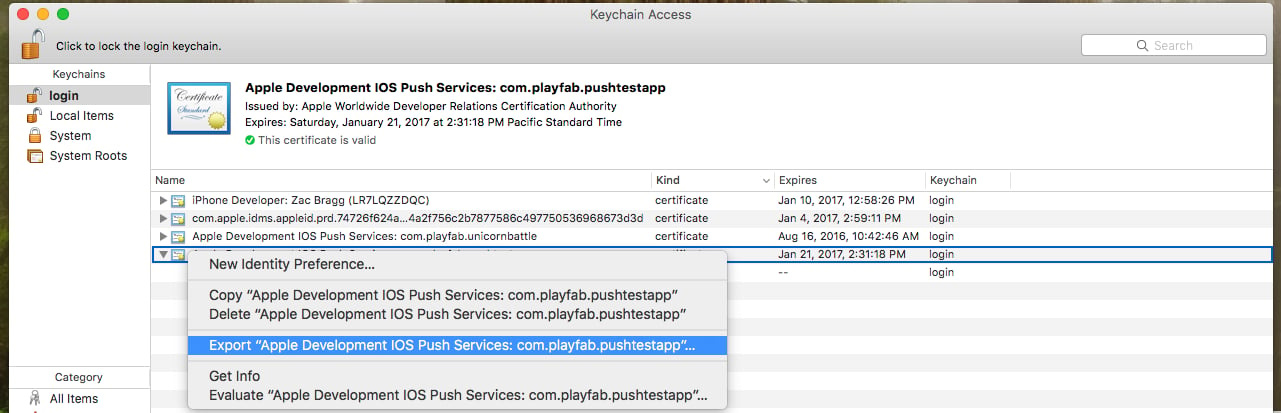 * 次のコンソール コマンドを使用して **.p12 ファイル** を **.pem ファイル** に変換します:
* `openssl pkcs12 -in apns-dev-cert.p12 -out apns-dev-cert.pem -nodes -clcerts`
* **.pem ファイル** ができたら、PlayFab の **Game Manager** の **Title's settings** > **Push Notifications** の下に直接アップロードできます。
* あるいは、以下のジェネレーターを使用して `SetupPushNotification` の JSON リクエストを作成します。
### SetupPushNotification 用の JSON リクエスト ジェネレーター
リクエスト ジェネレーターは、JSON リクエストを作成するために次の情報を使用します:
* **Platform** - 次のいずれかの値を使用: APNS (iOS)、APNS\_SANDBOX (iOS)、GCM (Android)
* **Application Name** - メッセージを送信するアプリケーションの名前を入力します。
アプリケーション名は、大文字と小文字の ASCII 文字、数字、アンダースコア、ハイフン、ピリオドのみで構成される必要があり、1〜256 文字の長さでなければなりません。また *一意* でなければなりません。
* **PEM Certificate / API Key** - iOS (APNS または APNS\_SANDBOX) の場合、PEM ファイルの完全な内容を使用します。
JSON が生成されたら、それを使用して `SetupPushNotification` の呼び出しを実行します。応答は次の例のようになるはずです。
```json theme={null}
{
“code” : 200,
“status” : “OK”,
“data” :
{
“ARN” : “arn:*******/GCM/your_game_name”
}
}
```
おめでとうございます! これでタイトルの iOS メッセージング チャネルを構成しました。
## iOS クライアントをプッシュに登録する
iOS では、現時点で PlayFab は Unity 上のネイティブ実装を提供していないため、iOS がプッシュ通知を処理する既定の動作に依存する必要があります。
既定では、ゲームがバックグラウンドにある間に受信した通知は **Notification** エリアにルーティングされます。
一方、ゲームがアクティブなアプリの間に受信した通知はサイレントで受信され、**Notification** エリアに表示されません。
* サンプルの次のコードは `client Start()` で実行されます。
```csharp theme={null}
// must be called before trying to obtain the push token
// an asynchronous call with no callback into native iOS code that takes a moment or two before
// the token is available. (so spin and wait, or call this one early on)
// this will always return null if your app is not signed
UnityEngine.iOS.NotificationServices.RegisterForNotifications(UnityEngine.iOS.NotificationType.Alert | UnityEngine.iOS.NotificationType.Badge | UnityEngine.iOS.NotificationType.Sound, true);
```
* この時点で、ユーザーが通知にオプトインしていれば、PlayFab API [RegisterForIOSPushNotification](xref:titleid.playfabapi.com.client.platformspecificmethods.registerforiospushnotification) を呼び出すことができます。
```csharp theme={null}
byte[] token = UnityEngine.iOS.NotificationServices.deviceToken;
if(token != null)
{
RegisterForIOSPushNotificationRequest request = new RegisterForIOSPushNotificationRequest();
request.DeviceToken = System.BitConverter.ToString(token).Replace("-", "").ToLower();
PlayFabClientAPI.RegisterForIOSPushNotification(request, (RegisterForIOSPushNotificationResult result) =>
{
Debug.Log("Push Registration Successful");
}, OnPlayFabError);
}
else
{
Debug.Log("Push Token was null!");
}
```
* エラーが発生しなかった場合、おめでとうございます! iOS クライアントはタイトルの Apple 通知チャネルに正常にリンクされました。
## iOS のトラブルシューティング
* [有効な .pem ファイルを持っていることを確認します](https://docs.aws.amazon.com/sns/latest/dg/mobile-push-apns.html)。
* `SetupPushNotification` で使用したのと同じ証明書が、XCode でアプリの署名に使用されていることを確認します。
* XCode でビルドに対して Push Notification API が有効になっていることを確認します。
* 署名証明書が PlayFab プラットフォームと一致することを確認します。**[SetupPushNotification](xref:titleid.playfabapi.com.admin.title-widedatamanagement.setuppushnotification)** を実行するときは、`OverwriteOldARN = true` を使用して、チャネルを新しいプラットフォームに再バインドします。特定の時点で、1 つのタイトルにアクティブになれる iOS 環境 (APNS または APNS\_SANDBOX) は *1 つだけ* です。
## 追加のサポート
ヘルプ、バグの例、および関連する質問については、[フォーラム](https://community.playfab.com/index.html) までご連絡ください。
現在、当社はこのドキュメントで説明されている標準フローに対してのみサポートしています。他の一般的なプッシュ サービスやプラグインでさらなる機能が必要な場合はお知らせください! 開発者コミュニティからのフィードバックをいただくのが大好きです。
## Related topics
- [プッシュ通知クイックスタート](/ja-jp/services/playfab/live-service-management/game-configuration/title-communications/push-notifications/quickstart.md)
- [Android 用プッシュ通知](/ja-jp/services/playfab/live-service-management/game-configuration/title-communications/push-notifications/push-notifications-for-android.md)
- [プッシュ通知](/ja-jp/services/playfab/live-service-management/game-configuration/title-communications/push-notifications/index.md)
- [プッシュ通知テンプレート](/ja-jp/services/playfab/live-service-management/game-configuration/title-communications/push-notifications/push-notification-templates.md)
- [Android Studio とプッシュ通知の使い始め](/ja-jp/services/playfab/live-service-management/game-configuration/title-communications/push-notifications/getting-started-android-studio-push-notifications.md)
* 次のコンソール コマンドを使用して **.p12 ファイル** を **.pem ファイル** に変換します:
* `openssl pkcs12 -in apns-dev-cert.p12 -out apns-dev-cert.pem -nodes -clcerts`
* **.pem ファイル** ができたら、PlayFab の **Game Manager** の **Title's settings** > **Push Notifications** の下に直接アップロードできます。
* あるいは、以下のジェネレーターを使用して `SetupPushNotification` の JSON リクエストを作成します。
### SetupPushNotification 用の JSON リクエスト ジェネレーター
リクエスト ジェネレーターは、JSON リクエストを作成するために次の情報を使用します:
* **Platform** - 次のいずれかの値を使用: APNS (iOS)、APNS\_SANDBOX (iOS)、GCM (Android)
* **Application Name** - メッセージを送信するアプリケーションの名前を入力します。
アプリケーション名は、大文字と小文字の ASCII 文字、数字、アンダースコア、ハイフン、ピリオドのみで構成される必要があり、1〜256 文字の長さでなければなりません。また *一意* でなければなりません。
* **PEM Certificate / API Key** - iOS (APNS または APNS\_SANDBOX) の場合、PEM ファイルの完全な内容を使用します。
JSON が生成されたら、それを使用して `SetupPushNotification` の呼び出しを実行します。応答は次の例のようになるはずです。
```json theme={null}
{
“code” : 200,
“status” : “OK”,
“data” :
{
“ARN” : “arn:*******/GCM/your_game_name”
}
}
```
おめでとうございます! これでタイトルの iOS メッセージング チャネルを構成しました。
## iOS クライアントをプッシュに登録する
iOS では、現時点で PlayFab は Unity 上のネイティブ実装を提供していないため、iOS がプッシュ通知を処理する既定の動作に依存する必要があります。
既定では、ゲームがバックグラウンドにある間に受信した通知は **Notification** エリアにルーティングされます。
一方、ゲームがアクティブなアプリの間に受信した通知はサイレントで受信され、**Notification** エリアに表示されません。
* サンプルの次のコードは `client Start()` で実行されます。
```csharp theme={null}
// must be called before trying to obtain the push token
// an asynchronous call with no callback into native iOS code that takes a moment or two before
// the token is available. (so spin and wait, or call this one early on)
// this will always return null if your app is not signed
UnityEngine.iOS.NotificationServices.RegisterForNotifications(UnityEngine.iOS.NotificationType.Alert | UnityEngine.iOS.NotificationType.Badge | UnityEngine.iOS.NotificationType.Sound, true);
```
* この時点で、ユーザーが通知にオプトインしていれば、PlayFab API [RegisterForIOSPushNotification](xref:titleid.playfabapi.com.client.platformspecificmethods.registerforiospushnotification) を呼び出すことができます。
```csharp theme={null}
byte[] token = UnityEngine.iOS.NotificationServices.deviceToken;
if(token != null)
{
RegisterForIOSPushNotificationRequest request = new RegisterForIOSPushNotificationRequest();
request.DeviceToken = System.BitConverter.ToString(token).Replace("-", "").ToLower();
PlayFabClientAPI.RegisterForIOSPushNotification(request, (RegisterForIOSPushNotificationResult result) =>
{
Debug.Log("Push Registration Successful");
}, OnPlayFabError);
}
else
{
Debug.Log("Push Token was null!");
}
```
* エラーが発生しなかった場合、おめでとうございます! iOS クライアントはタイトルの Apple 通知チャネルに正常にリンクされました。
## iOS のトラブルシューティング
* [有効な .pem ファイルを持っていることを確認します](https://docs.aws.amazon.com/sns/latest/dg/mobile-push-apns.html)。
* `SetupPushNotification` で使用したのと同じ証明書が、XCode でアプリの署名に使用されていることを確認します。
* XCode でビルドに対して Push Notification API が有効になっていることを確認します。
* 署名証明書が PlayFab プラットフォームと一致することを確認します。**[SetupPushNotification](xref:titleid.playfabapi.com.admin.title-widedatamanagement.setuppushnotification)** を実行するときは、`OverwriteOldARN = true` を使用して、チャネルを新しいプラットフォームに再バインドします。特定の時点で、1 つのタイトルにアクティブになれる iOS 環境 (APNS または APNS\_SANDBOX) は *1 つだけ* です。
## 追加のサポート
ヘルプ、バグの例、および関連する質問については、[フォーラム](https://community.playfab.com/index.html) までご連絡ください。
現在、当社はこのドキュメントで説明されている標準フローに対してのみサポートしています。他の一般的なプッシュ サービスやプラグインでさらなる機能が必要な場合はお知らせください! 開発者コミュニティからのフィードバックをいただくのが大好きです。
## Related topics
- [プッシュ通知クイックスタート](/ja-jp/services/playfab/live-service-management/game-configuration/title-communications/push-notifications/quickstart.md)
- [Android 用プッシュ通知](/ja-jp/services/playfab/live-service-management/game-configuration/title-communications/push-notifications/push-notifications-for-android.md)
- [プッシュ通知](/ja-jp/services/playfab/live-service-management/game-configuration/title-communications/push-notifications/index.md)
- [プッシュ通知テンプレート](/ja-jp/services/playfab/live-service-management/game-configuration/title-communications/push-notifications/push-notification-templates.md)
- [Android Studio とプッシュ通知の使い始め](/ja-jp/services/playfab/live-service-management/game-configuration/title-communications/push-notifications/getting-started-android-studio-push-notifications.md)