> ## Documentation Index
> Fetch the complete documentation index at: https://devdocs.xbox.com/llms.txt
> Use this file to discover all available pages before exploring further.
# Android Studio とプッシュ通知の使い始め
> Android Studio、Google Play Services、Firebase Cloud Messaging、PlayFab を連携させて、Android クライアント アプリケーションにプッシュ通知を送信します。
## 概要
このチュートリアルは、Android の PlayFab 統合とプッシュ通知を稼働させるのに役立つように設計されています。
プッシュ通知には複数のシステムでの構成が必要です。始める前に、インフラストラクチャの仕組みについて説明しましょう。プロセスには 4 つのエンティティが関与しています:
1. **Google Play Services**
2. **Firebase Cloud Messaging Service** (**FCM**、旧 **Google Cloud Messaging** の上に構築)
3. **PlayFab Services**
4. **Client Applications**
### 1. Google Play Services
Google Play Services は、パッケージ名を使用して Play マーケット上のページを識別します。
例: **com.bob.games.matchthree**。
Google Play に登録されると、パッケージ名は一意のアプリケーション ID となり、Play Store 経由のインストールから成りすまし防止まで、多くの目的に役立ちます。
### 2. Firebase Cloud Messaging (FCM)
Firebase Cloud Messaging サービスは、プッシュ通知を送信、ルーティング、配信するためのクラウド ベースのシステムを提供します。
また、FCM サーバー キーを使用して、他のサービス (PlayFab など) がユーザーに代わってプッシュ通知を送信することもできます。
### 3. PlayFab Services
PlayFab Services は、FCM サーバー キーを使用してクライアントにプッシュ通知を送信します。
### 4. Client Services
最後に、クライアント アプリケーションは通知を受信し、必要に応じて処理します。
### 4 方向の分割
その結果、*4 つの異なるシステム* をセットアップする必要があります。そのため、このチュートリアルは、それぞれの部分の構成を扱う 4 つの章に分割されています。
システムを構成する *順序* は重要です。
## 前提条件
* Google アカウントが必要です。
* PlayFab アカウントが必要です。
* Android Asset Studio [通知アイコン ジェネレーター](https://romannurik.github.io/AndroidAssetStudio/icons-notification.html) で生成した通知アイコン。
## シナリオ
このチュートリアルのセクションでは、Foo PlayFab App と呼ばれるアプリケーションを組み立てます。これは次の機能を持つ Android アプリです:
* Android デバイス ID を使用して PlayFab にサインインします。
* PlayFab からプッシュ通知を受信します。
パッケージ名は com.foo.playfab.app とします。
このチュートリアルに従うときは、ご自分のパッケージ名とタイトルを使用してください。
### 第 1 章: Firebase の構成
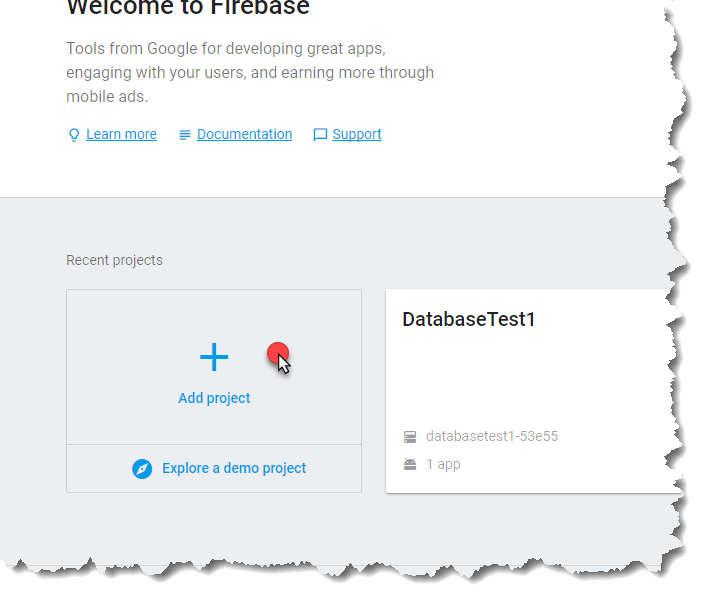
Firebase の構成は、[公式コンソール ページ](https://console.firebase.google.com/) を使用して開始します。新しいプロジェクトを追加できるページが表示されます。
* これを行うには、次の画像に示すように **Add project** エリアを選択します。
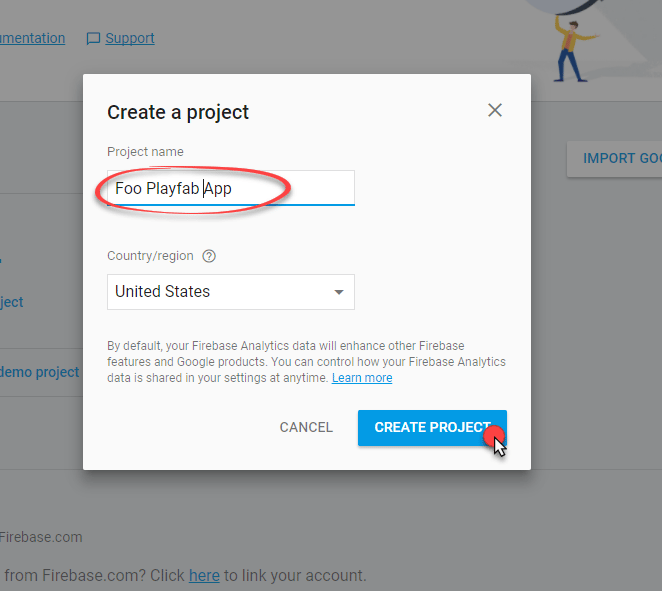
 * **Project Name** を入力するよう求められます (このチュートリアルでは **Foo PlayFab App** を使用しますが、このチュートリアルに従うときは *独自の* 名前を考えてください)。
* **Create Project** ボタンを選択して次のステップに進みます。
* **Project Name** を入力するよう求められます (このチュートリアルでは **Foo PlayFab App** を使用しますが、このチュートリアルに従うときは *独自の* 名前を考えてください)。
* **Create Project** ボタンを選択して次のステップに進みます。
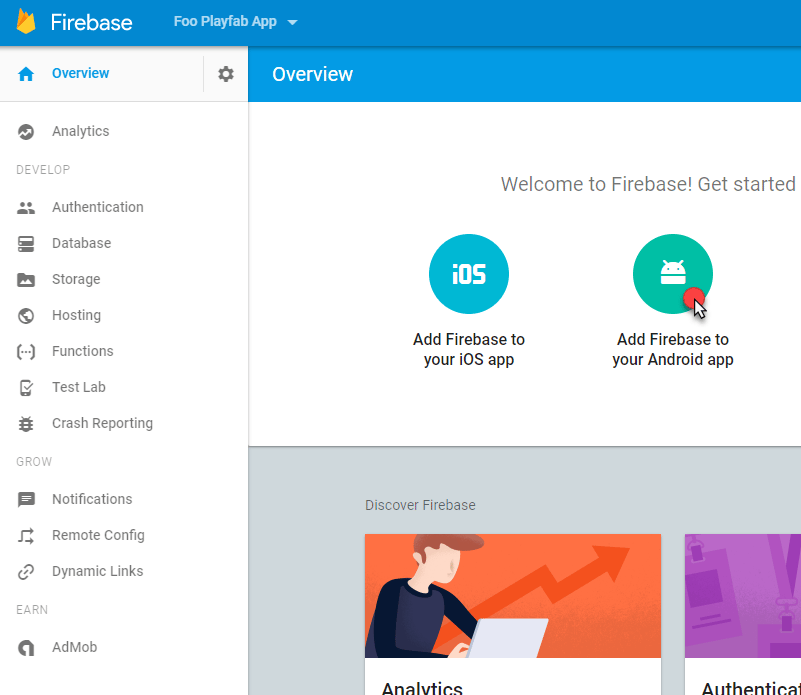
 **新しいプロジェクト ダッシュボード** にリダイレクトされます。
* 次の画像に示すエリアを選択して、プロジェクトに新しい **Android Application** を追加します。
**新しいプロジェクト ダッシュボード** にリダイレクトされます。
* 次の画像に示すエリアを選択して、プロジェクトに新しい **Android Application** を追加します。
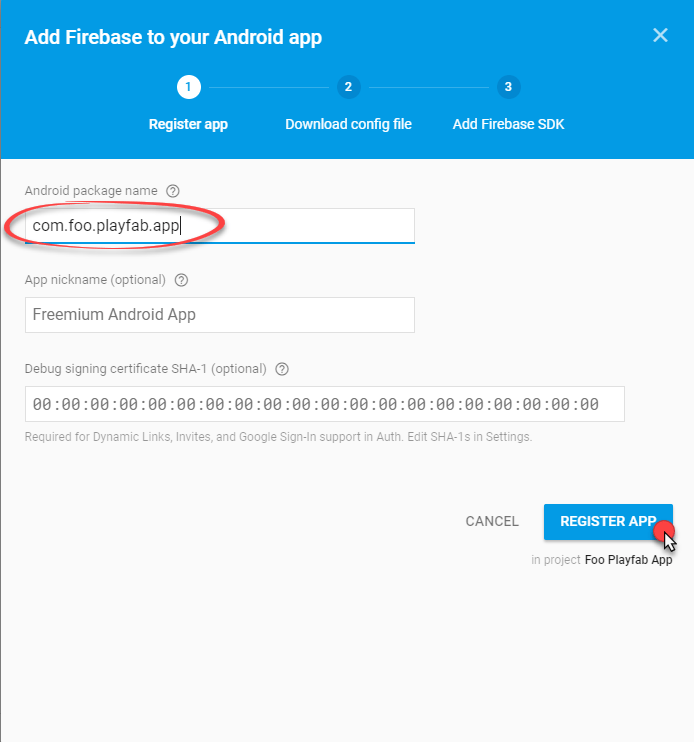
 新しい **Application** を追加するには 3 つの手順が必要です。
1. まず、**Android Package Name** を入力する必要があります。**com.foo.playfab.app** を使用していますが、このチュートリアルに従うときは *独自の* **Package Name** を考えてください。
2. **Register App** ボタンを選択して次のステップに進みます。
新しい **Application** を追加するには 3 つの手順が必要です。
1. まず、**Android Package Name** を入力する必要があります。**com.foo.playfab.app** を使用していますが、このチュートリアルに従うときは *独自の* **Package Name** を考えてください。
2. **Register App** ボタンを選択して次のステップに進みます。
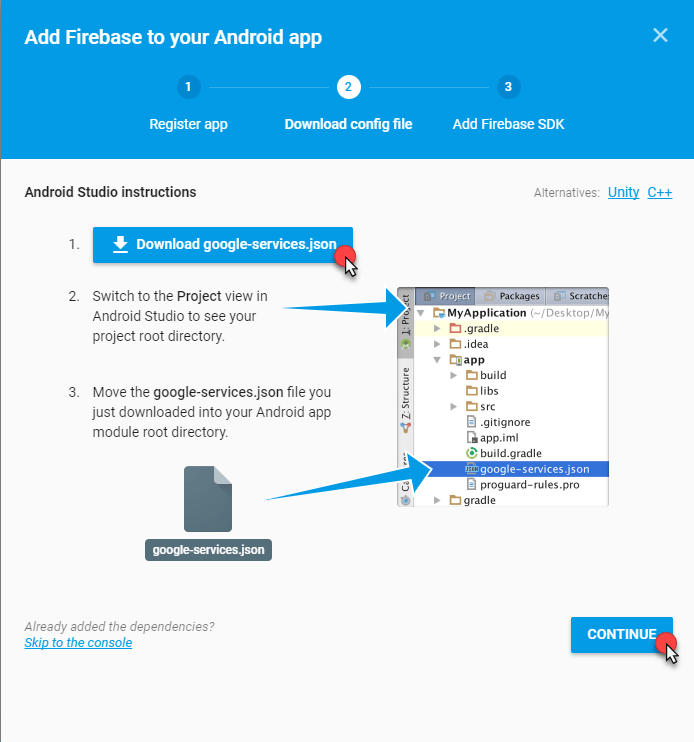
 ステップ 2 では、**google-services.json** と呼ばれる設定ファイルをダウンロードできます。これは、後で **App** で **Google** サービスを自動的に構成するために使用されます。
* ダウンロード後、**Continue** ボタンを選択して次のステップに進みます。
ステップ 2 では、**google-services.json** と呼ばれる設定ファイルをダウンロードできます。これは、後で **App** で **Google** サービスを自動的に構成するために使用されます。
* ダウンロード後、**Continue** ボタンを選択して次のステップに進みます。
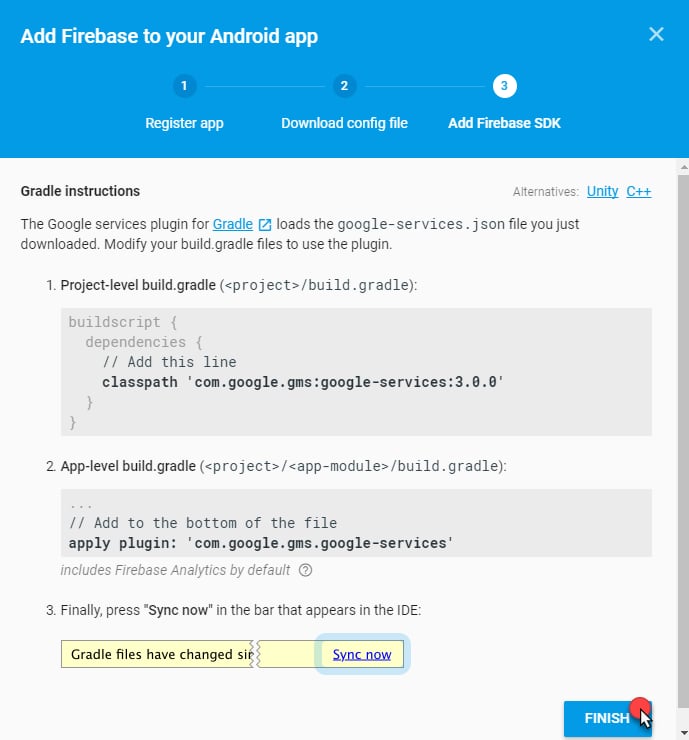
 3. 最終ステップでは、Firebase および Google Play SDK を連携させるためのビルド プロセスの設定方法についての情報が提供されます。
この設定を自動的に実行する Android Studio に組み込まれた自動化ツールを使用するため、この情報は無視してかまいません。
* **Finish** ボタンを選択して続行します。
3. 最終ステップでは、Firebase および Google Play SDK を連携させるためのビルド プロセスの設定方法についての情報が提供されます。
この設定を自動的に実行する Android Studio に組み込まれた自動化ツールを使用するため、この情報は無視してかまいません。
* **Finish** ボタンを選択して続行します。
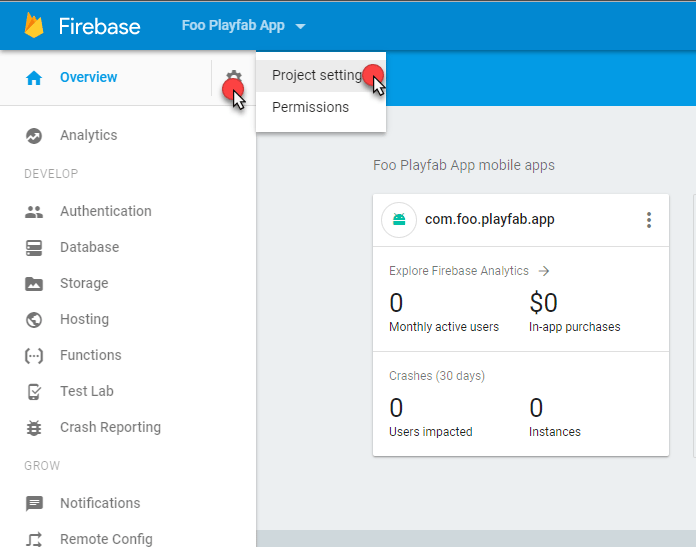
 * **Application** が追加されると、ダッシュボードに表示されます。
* この時点で構成は完了しており、FCM サーバー キー (PlayFab プッシュ通知の連携に使用します) を抽出する必要があります。
* 次の画像に示すように **Project settings** に移動します。
* **Application** が追加されると、ダッシュボードに表示されます。
* この時点で構成は完了しており、FCM サーバー キー (PlayFab プッシュ通知の連携に使用します) を抽出する必要があります。
* 次の画像に示すように **Project settings** に移動します。
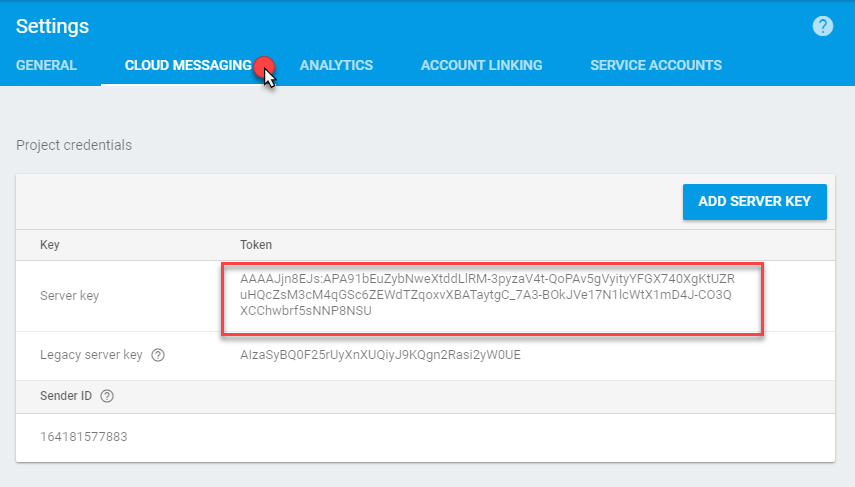
 * **Project settings** で **Cloud Messaging** タブに移動します。
* **Server Key** エリア (下の画像の赤いエリア) を見つけます。
* この **Key** をコピーして、安全でアクセスしやすい場所に保存します。
* **Project settings** で **Cloud Messaging** タブに移動します。
* **Server Key** エリア (下の画像の赤いエリア) を見つけます。
* この **Key** をコピーして、安全でアクセスしやすい場所に保存します。
 この時点で、プッシュ通知を有効にするために Firebase で必要なすべてを行いました。
### 第 2 章: Google Play コンソールの構成
アプリの準備ができたら、製品の Play Store ページを維持するために、Google Console プロジェクトを作成する可能性が高いです。GooglePlay プロジェクトを作成し、それを Firebase プロジェクトにリンクするプロセスを見ていきましょう。
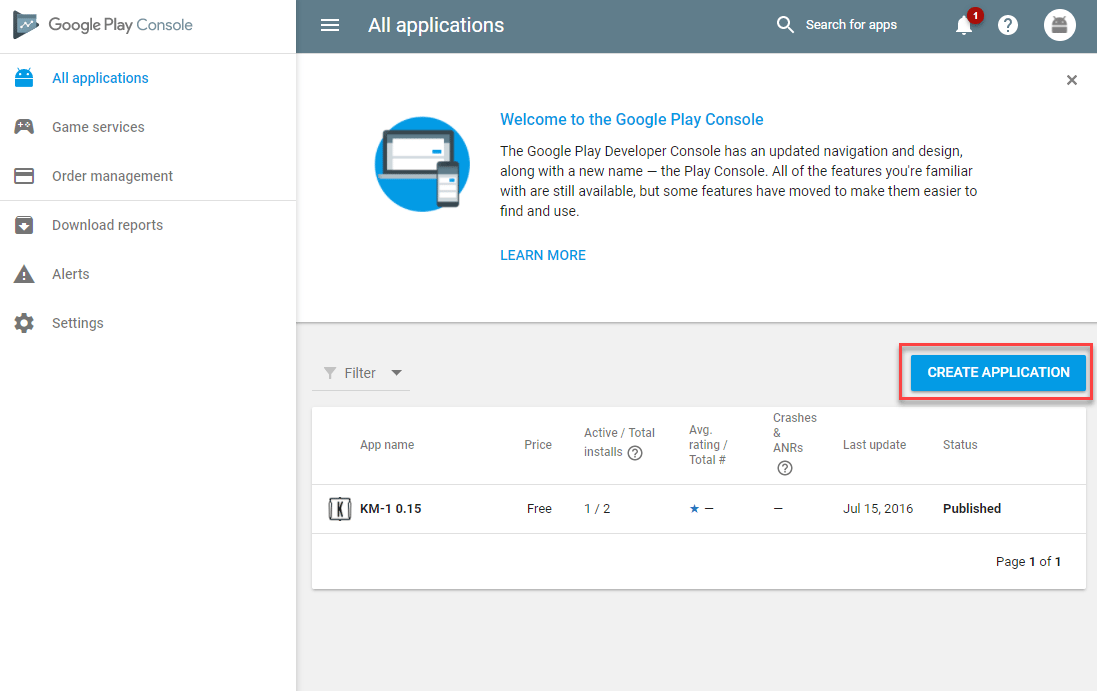
まず、[Google Play Console ページ](https://play.google.com/apps/publish) にアクセスし、次の画像に示すように新しいプロジェクトを作成します。
この時点で、プッシュ通知を有効にするために Firebase で必要なすべてを行いました。
### 第 2 章: Google Play コンソールの構成
アプリの準備ができたら、製品の Play Store ページを維持するために、Google Console プロジェクトを作成する可能性が高いです。GooglePlay プロジェクトを作成し、それを Firebase プロジェクトにリンクするプロセスを見ていきましょう。
まず、[Google Play Console ページ](https://play.google.com/apps/publish) にアクセスし、次の画像に示すように新しいプロジェクトを作成します。
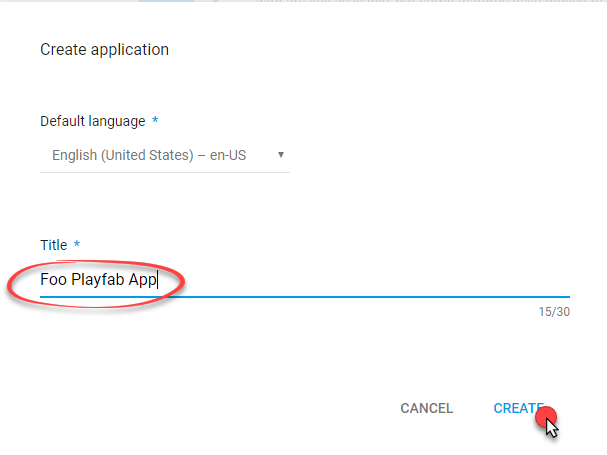
 * **Title** を割り当てます。
この例では **Foo PlayFab App** を使用します。このチュートリアルに従う際は、ご自分のタイトルとパッケージ名を考えてください。
* **Create** ボタンを選択して続行します。
* **Title** を割り当てます。
この例では **Foo PlayFab App** を使用します。このチュートリアルに従う際は、ご自分のタイトルとパッケージ名を考えてください。
* **Create** ボタンを選択して続行します。
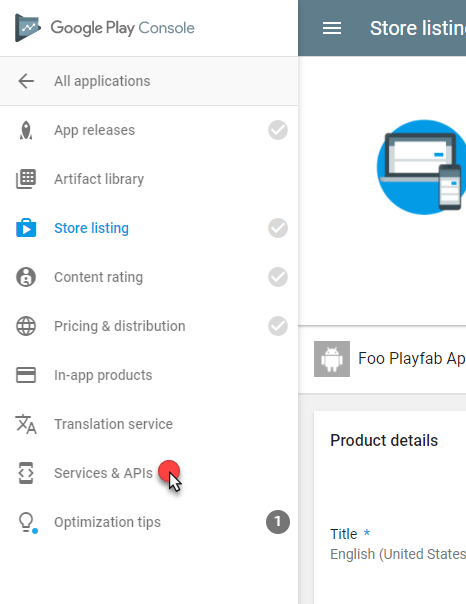
 * **Google Play Console Project** ページが開きます。
* サイド メニューで **Services & APIs** を選択します。
* **Google Play Console Project** ページが開きます。
* サイド メニューで **Services & APIs** を選択します。
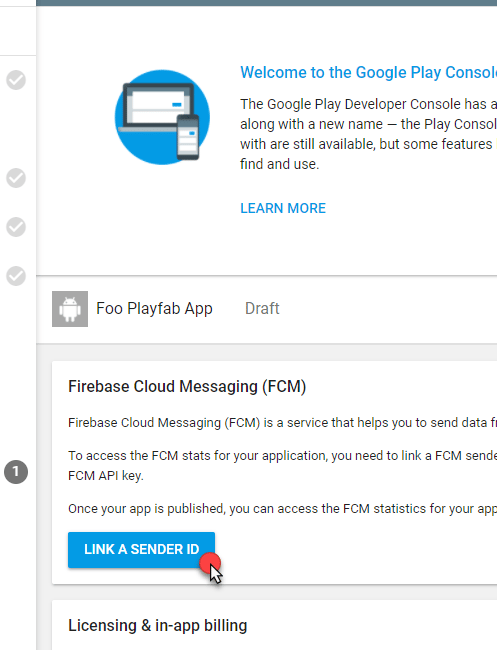
 * **Services configuration** ページが開きます。
* **Firebase Cloud Messaging** パネルを見つけます。
* 次の画像に示すように、**Link a Sender ID** ボタンを選択します。
* **Services configuration** ページが開きます。
* **Firebase Cloud Messaging** パネルを見つけます。
* 次の画像に示すように、**Link a Sender ID** ボタンを選択します。
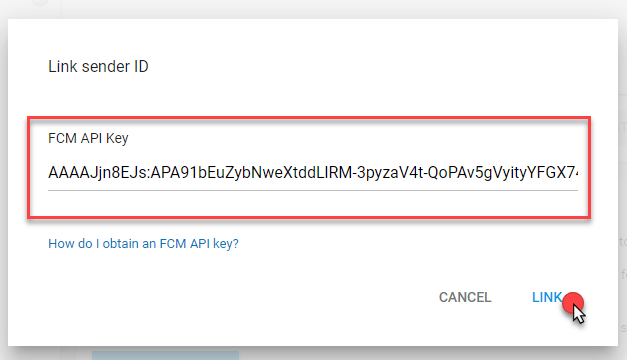
 **Sender ID** をリンクするには:
* 前の章で Firebase コンソールを使用しているときに受け取った (そして保存した) FCM サーバー キーを使用します。
* 完了したら、例に示すように **Link** ボタンを選択します。
**Sender ID** をリンクするには:
* 前の章で Firebase コンソールを使用しているときに受け取った (そして保存した) FCM サーバー キーを使用します。
* 完了したら、例に示すように **Link** ボタンを選択します。
 * 以下の例に示すように、**Google Play Console** に表示される **Sender ID** が **Firebase Console** のものと一致することを確認する時間を取ります。
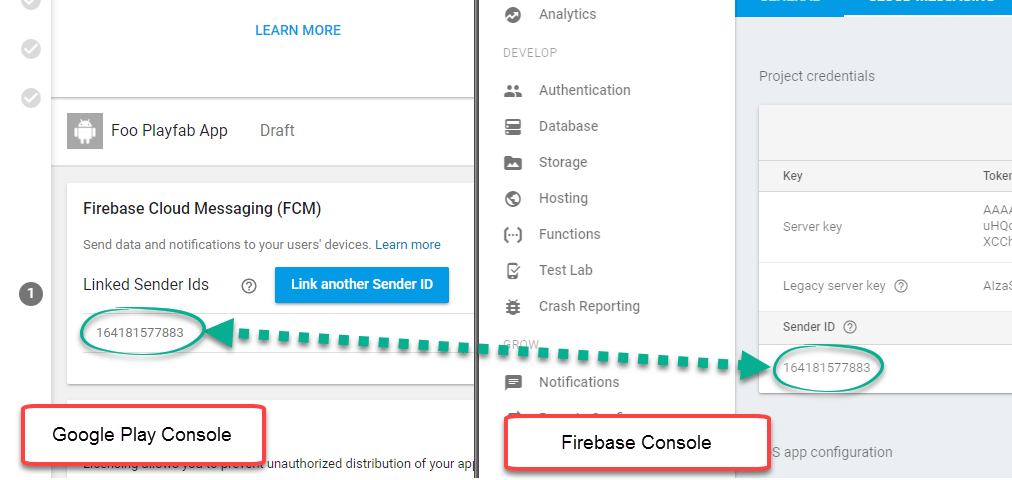 この時点で、**Google Play Console Project** は **Firebase Project** に正常にリンクされました。
### 第 3 章: PlayFab タイトルの構成
この章の目的は、PlayFab がユーザーに代わってプレイヤーにプッシュ通知を送信できるように、PlayFab Services を構成する方法を示すことです。
* まず、タイトルの Settings メニューで **Title settings** に移動する必要があります。
* **Push Notifications** タブを選択します。
* Android オプションで、**Settings** アイコンを選択します。
この時点で、**Google Play Console Project** は **Firebase Project** に正常にリンクされました。
### 第 3 章: PlayFab タイトルの構成
この章の目的は、PlayFab がユーザーに代わってプレイヤーにプッシュ通知を送信できるように、PlayFab Services を構成する方法を示すことです。
* まず、タイトルの Settings メニューで **Title settings** に移動する必要があります。
* **Push Notifications** タブを選択します。
* Android オプションで、**Settings** アイコンを選択します。
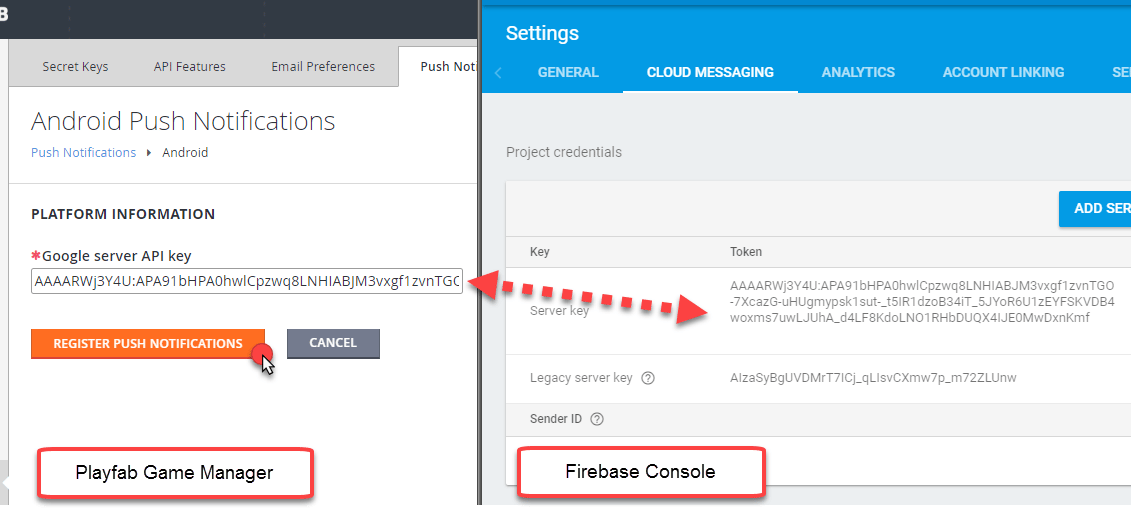
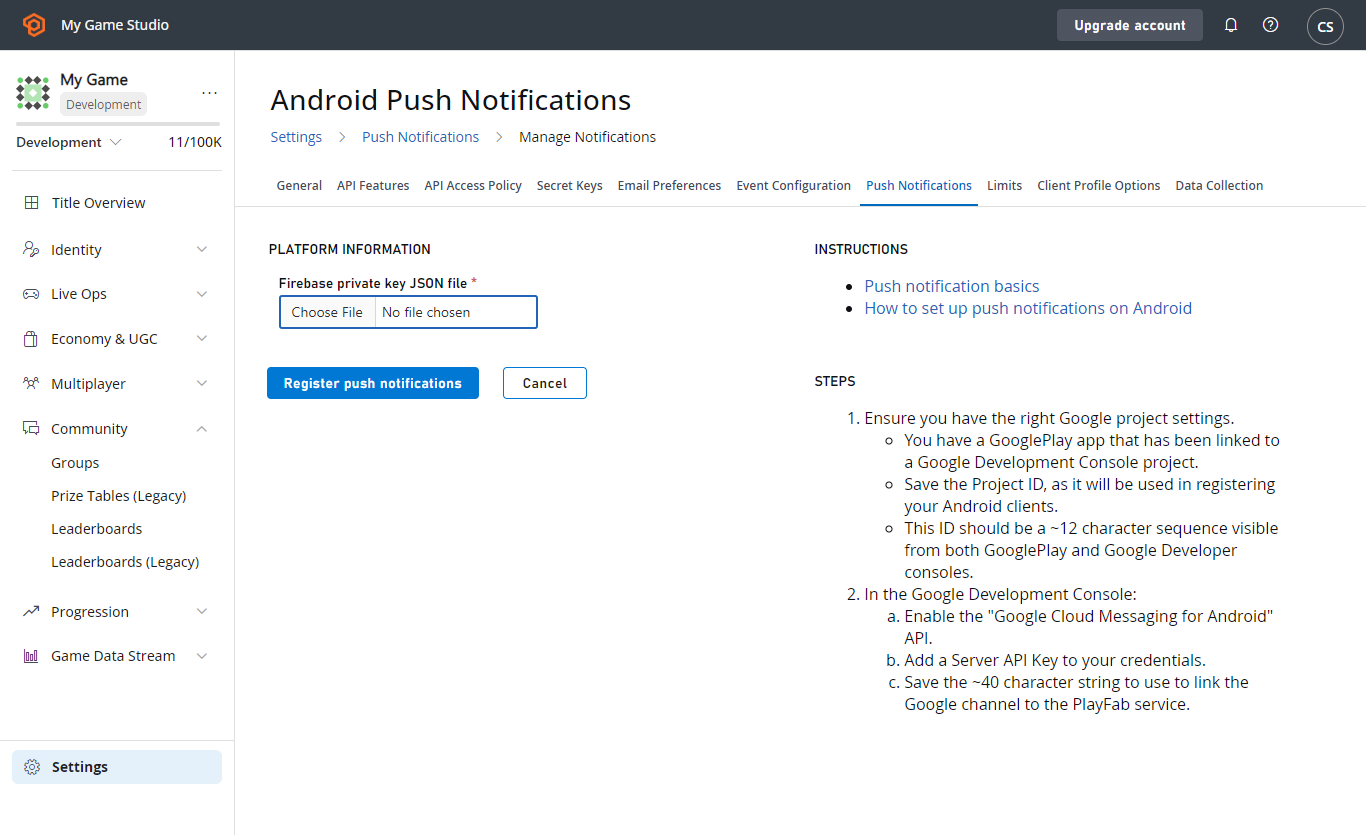 * **Google server API key** を求められます。
* 以下の例に示すように、Firebase コンソールで受け取ったものをコピーします。
* **Google server API key** を求められます。
* 以下の例に示すように、Firebase コンソールで受け取ったものをコピーします。
 * すべてが正しければ、**Push Notifications** が **Active** として表示されるページが表示されます。
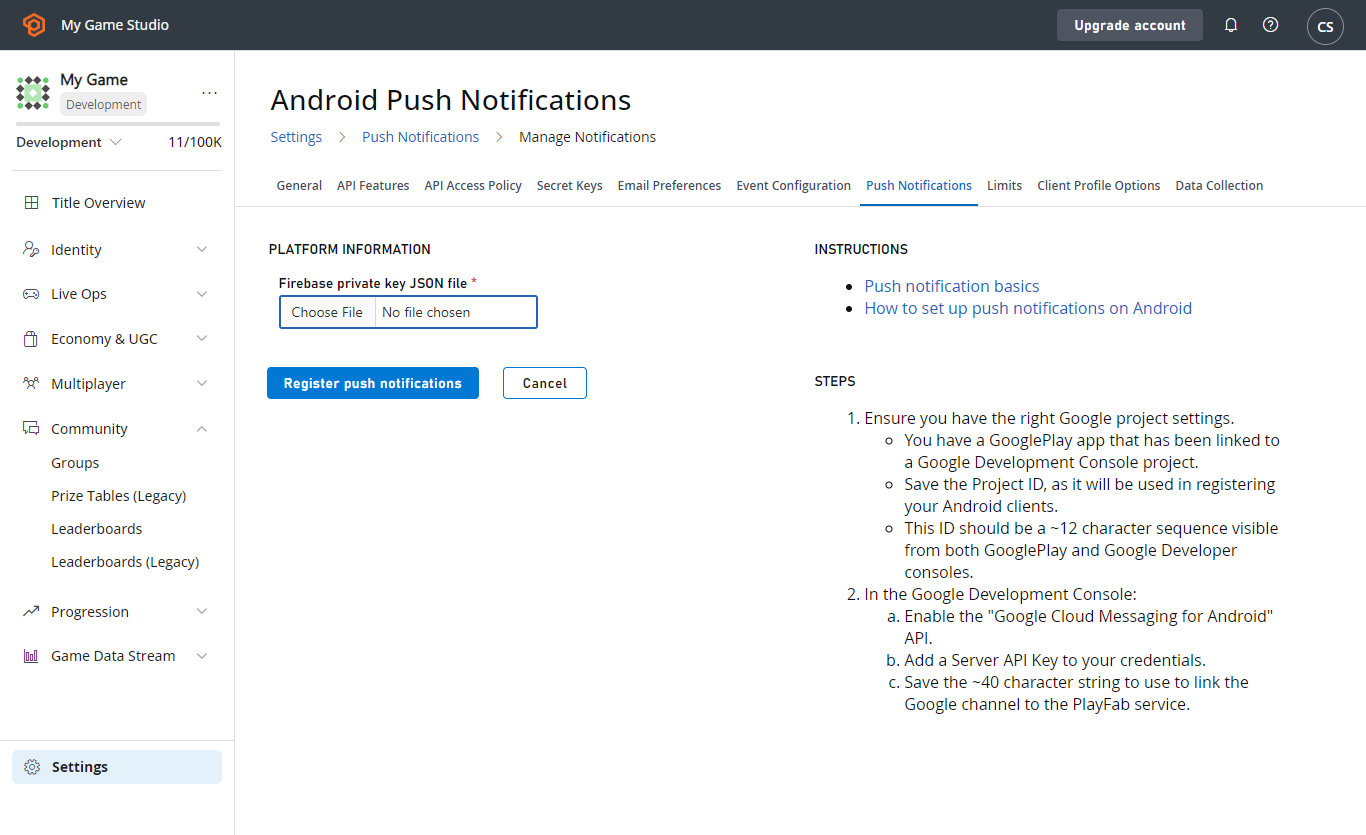 これで、PlayFab タイトルの構成は完了です。
### 第 4 章: Android Studio プロジェクトの構成
PlayFab JavaSDK を利用するには、PlayFab Client JavaSDK とその依存関係である Google GSON が必要です。
* PlayFab クライアント JavaSDK JAR ライブラリをここからダウンロードします。
* `client-sdk-*.jar` と、必要に応じて対応する Java Doc を探します。
* 最新の Google GSON をダウンロードします。
* `gson-*.jar` を探します。
* 上記の .jar ファイルを手近に用意します。
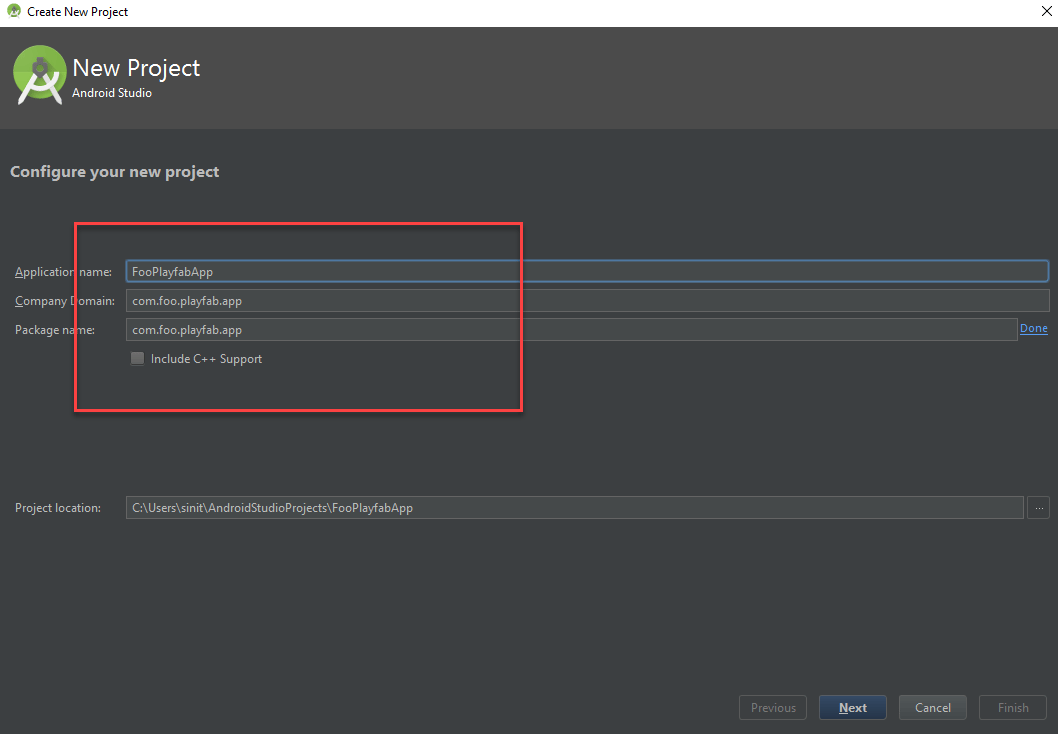
まず、通常の Android Studio プロジェクトを作成します。
* **Package name** がこのチュートリアル全体を通して使用したもの (たとえば Firebase 内) と一致することを確認します。
*この* 例では **com.foo.playfab.app** を使用していますが、このチュートリアルに従うときはご自分のパッケージ名とタイトルを考えてください。
これで、PlayFab タイトルの構成は完了です。
### 第 4 章: Android Studio プロジェクトの構成
PlayFab JavaSDK を利用するには、PlayFab Client JavaSDK とその依存関係である Google GSON が必要です。
* PlayFab クライアント JavaSDK JAR ライブラリをここからダウンロードします。
* `client-sdk-*.jar` と、必要に応じて対応する Java Doc を探します。
* 最新の Google GSON をダウンロードします。
* `gson-*.jar` を探します。
* 上記の .jar ファイルを手近に用意します。
まず、通常の Android Studio プロジェクトを作成します。
* **Package name** がこのチュートリアル全体を通して使用したもの (たとえば Firebase 内) と一致することを確認します。
*この* 例では **com.foo.playfab.app** を使用していますが、このチュートリアルに従うときはご自分のパッケージ名とタイトルを考えてください。
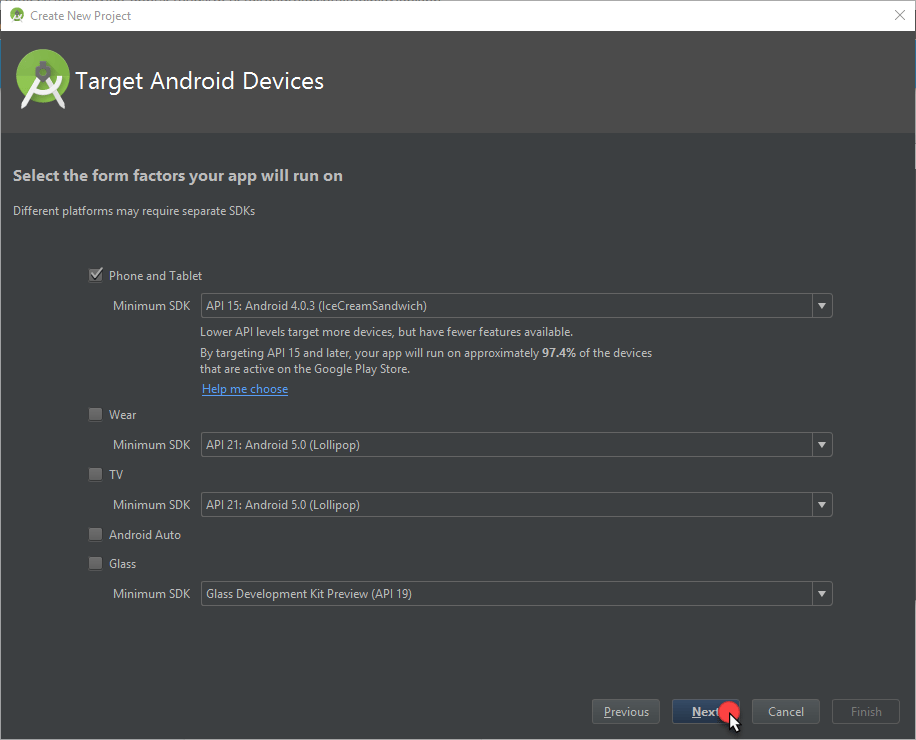
 * お好みの **Minimum SDK** を選択します。
* 次に **Next** ボタンを選択します。
* お好みの **Minimum SDK** を選択します。
* 次に **Next** ボタンを選択します。
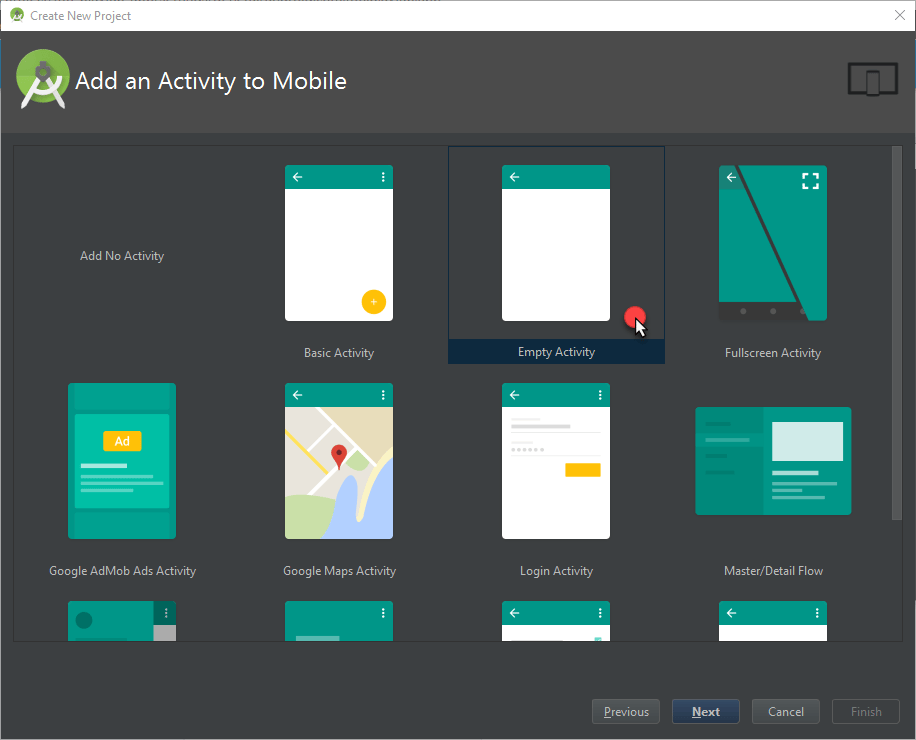
 このチュートリアルでは、まずは **Empty Activity** テンプレートを使用することをお勧めします。
* 使用したいテンプレートを選択します。
* 次に **Next** ボタンを選択します。
このチュートリアルでは、まずは **Empty Activity** テンプレートを使用することをお勧めします。
* 使用したいテンプレートを選択します。
* 次に **Next** ボタンを選択します。
 * お好みでテンプレートを構成します。
* **Finish** ボタンを選択します。
* お好みでテンプレートを構成します。
* **Finish** ボタンを選択します。
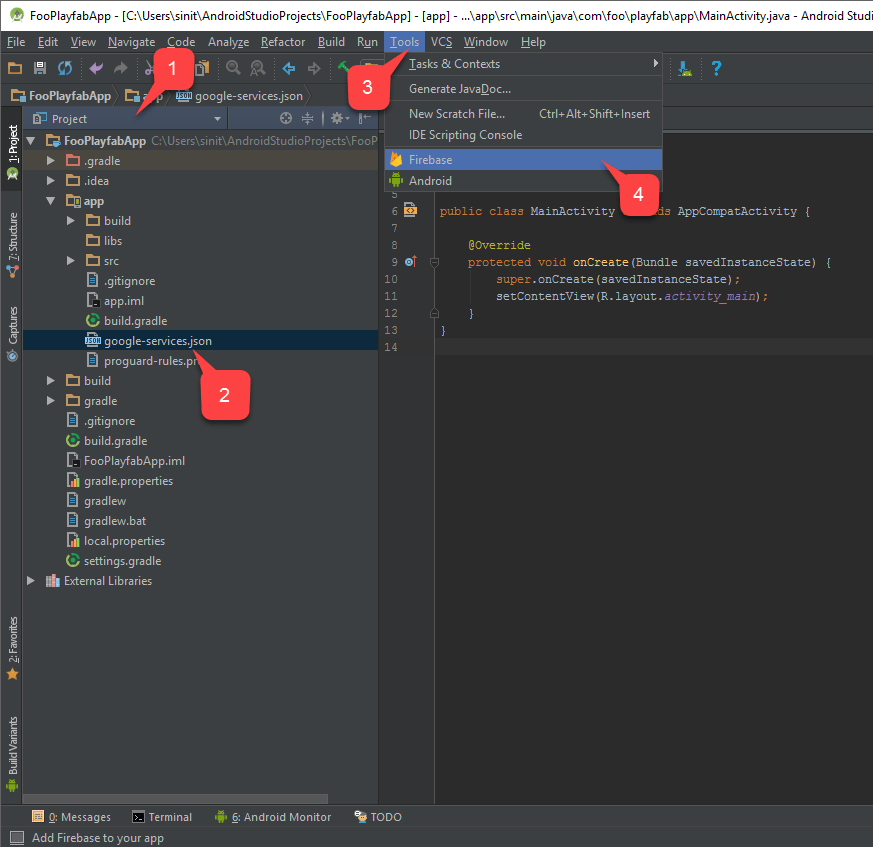
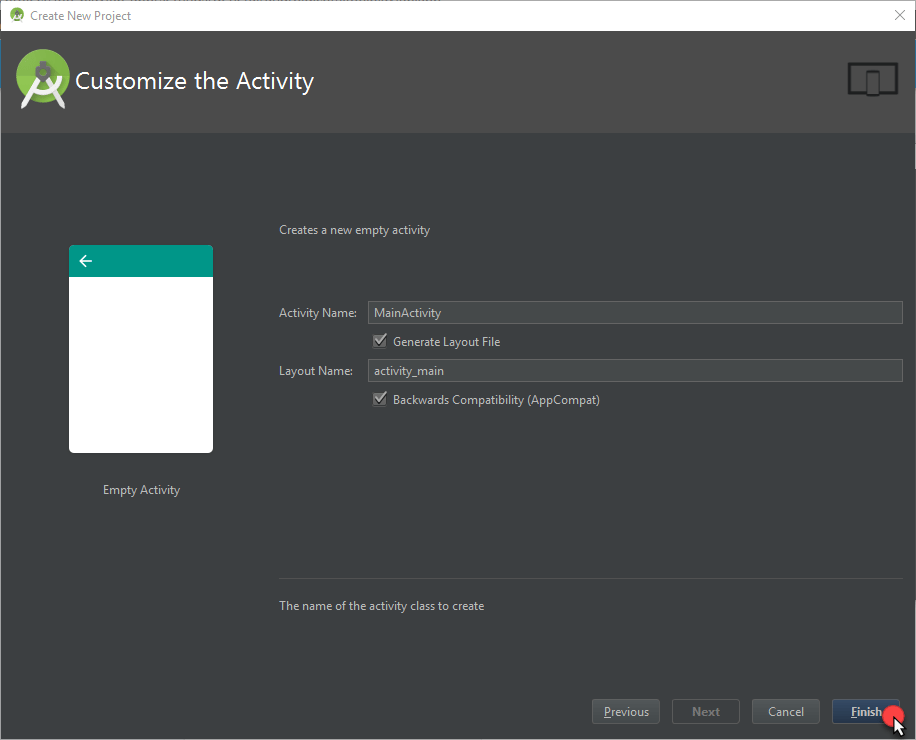 新しく作成したプロジェクトを開いたら:
* **Project** タブ **(1)** に切り替えます。
前の章で、Firebase コンソールから `google-services.json` 構成ファイルをダウンロードしました。次のステップでこれを使用します。
* このファイルが **App** フォルダー **(2)** の下に配置されていることを確認します。
* 次に、**Tools (3)** に移動します。
* 以下の例に示すように、**Firebase (4)** を選択します。
新しく作成したプロジェクトを開いたら:
* **Project** タブ **(1)** に切り替えます。
前の章で、Firebase コンソールから `google-services.json` 構成ファイルをダウンロードしました。次のステップでこれを使用します。
* このファイルが **App** フォルダー **(2)** の下に配置されていることを確認します。
* 次に、**Tools (3)** に移動します。
* 以下の例に示すように、**Firebase (4)** を選択します。
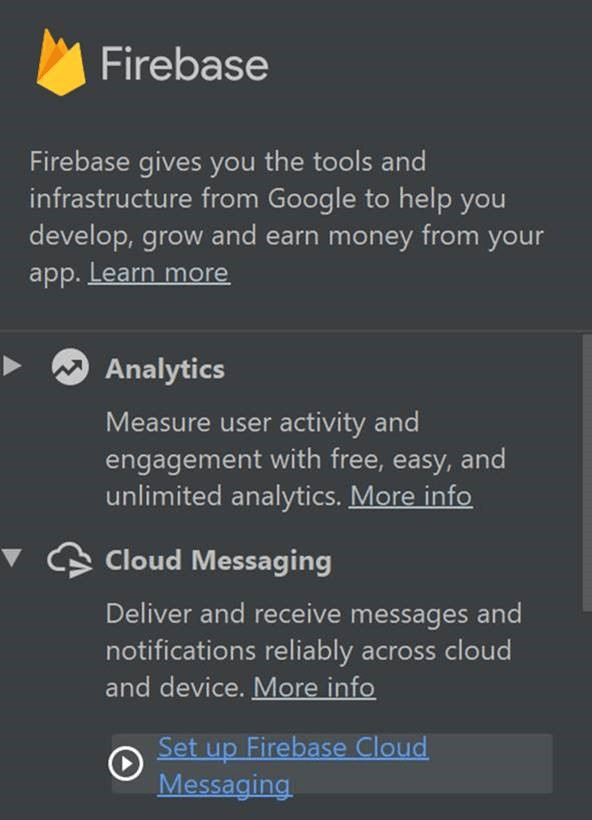
 **Firebase Assistant** がウィンドウの右側に開きます。
* **Cloud Messaging** フォルダーを見つけ、以下に示すように **Set up Firebase Cloud Messaging** を選択します。
**Firebase Assistant** がウィンドウの右側に開きます。
* **Cloud Messaging** フォルダーを見つけ、以下に示すように **Set up Firebase Cloud Messaging** を選択します。
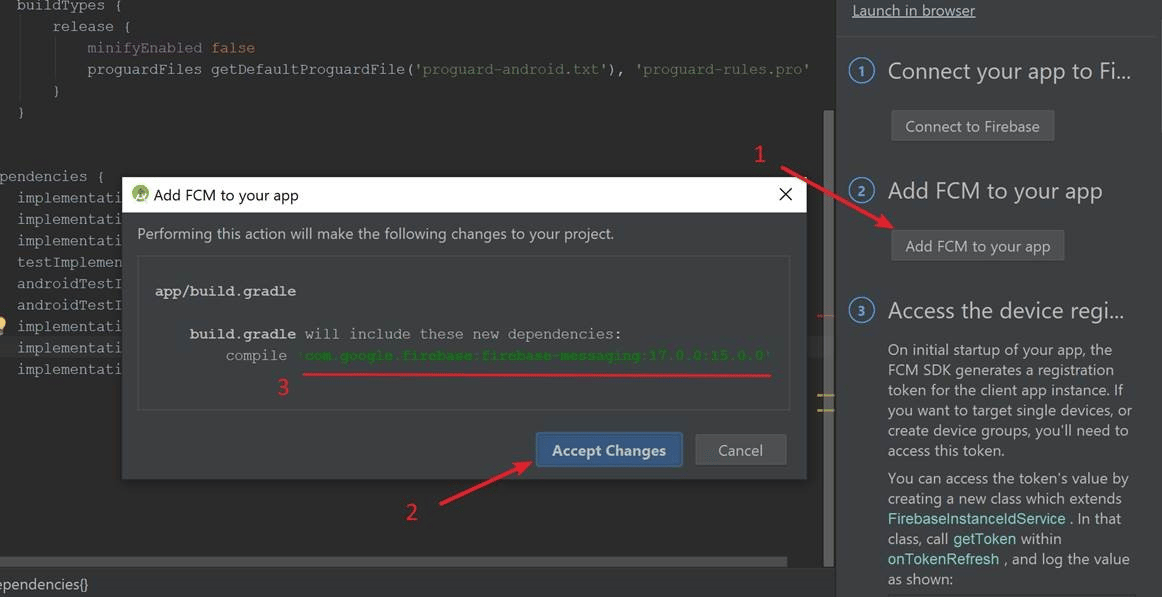
 * **Firebase Notifications Assistant** で、次の画像に示すように **Add FCM to your app (1)** ボタンを選択します。
* **Gradle** を介して新しい依存関係が追加されることを示すダイアログが開きます。
* **Accept Changes (2)** を選択して変更を承認します。
残念ながら、**Gradle** の同期プロセス (**3**) によって自動的に追加される依存関係は正しくなく、失敗が報告されます!
* 依存関係を正しく設定するには、自動追加された文を次の内容に置き換えます:
`implementation 'com.google.firebase:firebase-core:16.0.3`\
`implementation 'com.google.firebase:firebase-messaging:17.0.0`
* **Firebase Notifications Assistant** で、次の画像に示すように **Add FCM to your app (1)** ボタンを選択します。
* **Gradle** を介して新しい依存関係が追加されることを示すダイアログが開きます。
* **Accept Changes (2)** を選択して変更を承認します。
残念ながら、**Gradle** の同期プロセス (**3**) によって自動的に追加される依存関係は正しくなく、失敗が報告されます!
* 依存関係を正しく設定するには、自動追加された文を次の内容に置き換えます:
`implementation 'com.google.firebase:firebase-core:16.0.3`\
`implementation 'com.google.firebase:firebase-messaging:17.0.0`
 そのプロセスが完了したら:
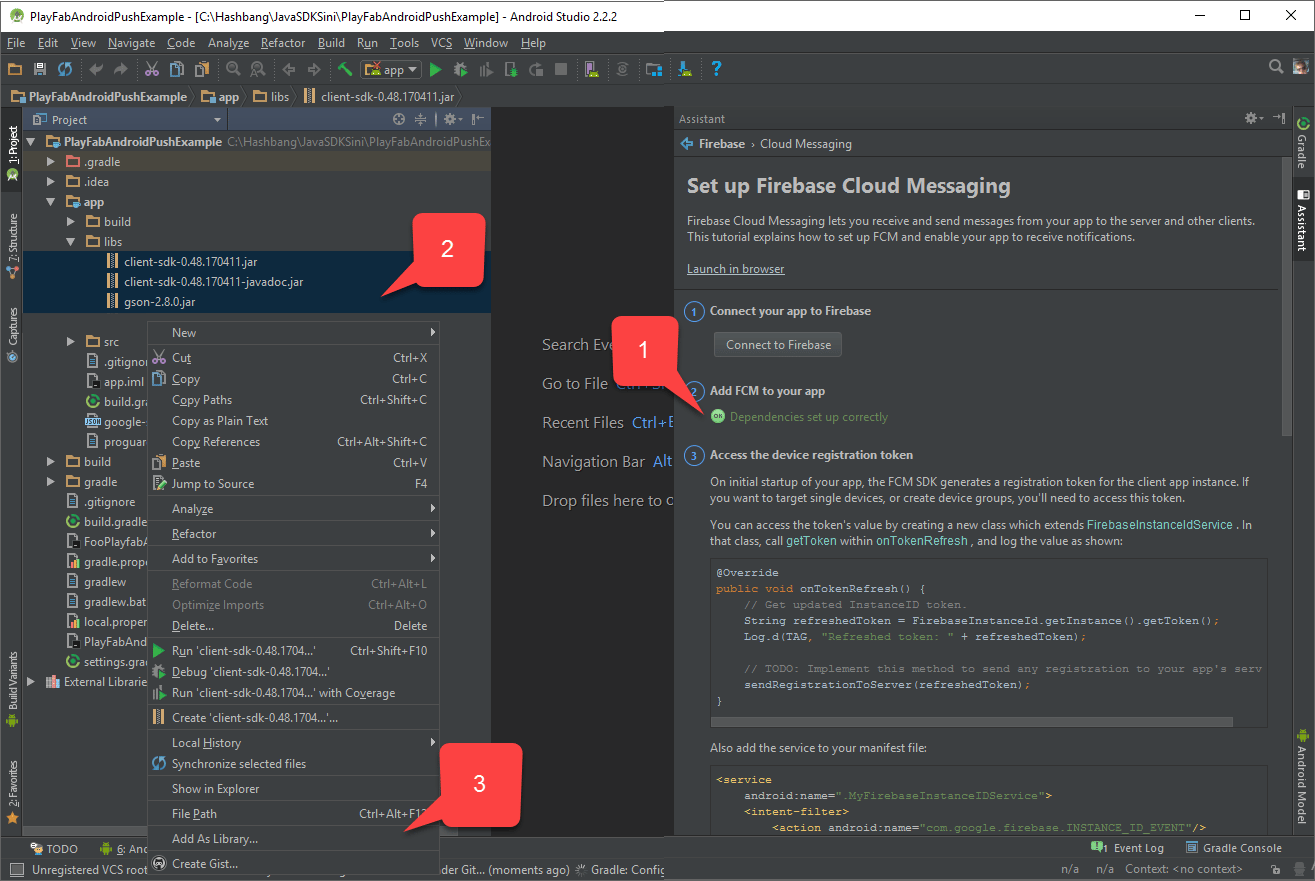
* **Firebase Notifications Assistant** が、依存関係が現在正しく設定されていることを示していることを確認します **(1)**。
この章の冒頭で、必要な JAR ファイルを取得しました。通常、ビルド ファイルはこれらのファイルを自動的にフェッチします。
* これらの JAR ファイルが **app/libs** フォルダー **(2)** の下にリストされていることを確認するには、すべてのファイルを選択して右クリックします。
* 次に、以下の例に示すように **Add as library... (3)** を選択します。
そのプロセスが完了したら:
* **Firebase Notifications Assistant** が、依存関係が現在正しく設定されていることを示していることを確認します **(1)**。
この章の冒頭で、必要な JAR ファイルを取得しました。通常、ビルド ファイルはこれらのファイルを自動的にフェッチします。
* これらの JAR ファイルが **app/libs** フォルダー **(2)** の下にリストされていることを確認するには、すべてのファイルを選択して右クリックします。
* 次に、以下の例に示すように **Add as library... (3)** を選択します。
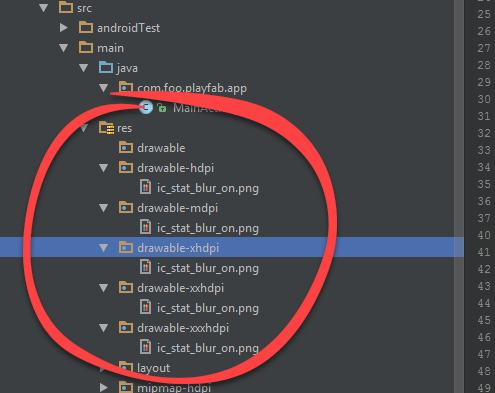
 * Android Asset Studio の [通知アイコン ジェネレーター](https://romannurik.github.io/AndroidAssetStudio/icons-notification.html) を使用して、アイコンを準備し、**app/src/main/res** の中に配置します。
* 以下の例では、アイコンは **ic\_stat\_blur\_on** と呼ばれます。
* Android Asset Studio の [通知アイコン ジェネレーター](https://romannurik.github.io/AndroidAssetStudio/icons-notification.html) を使用して、アイコンを準備し、**app/src/main/res** の中に配置します。
* 以下の例では、アイコンは **ic\_stat\_blur\_on** と呼ばれます。
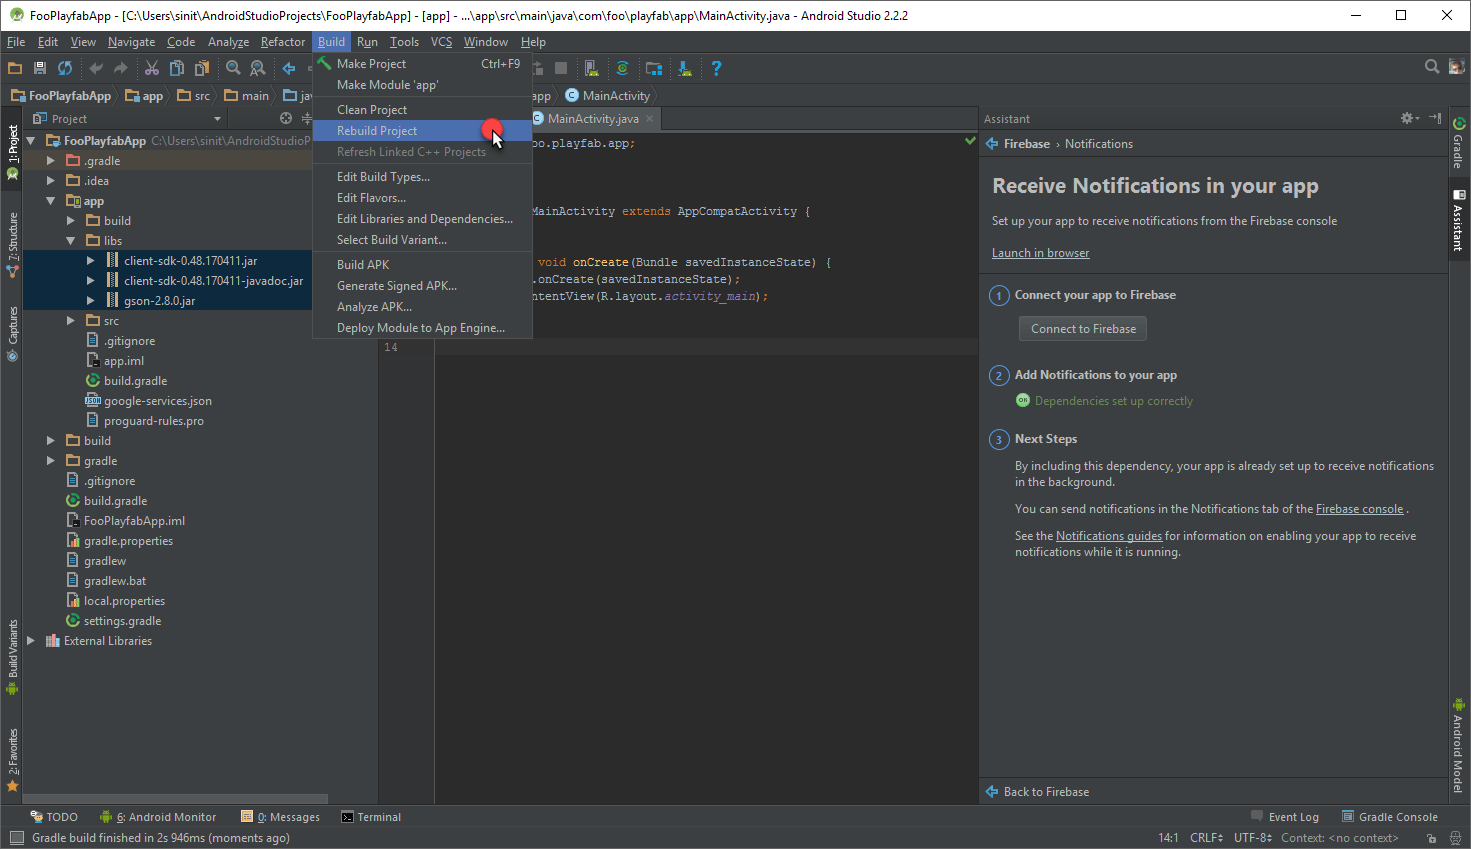
 * 最後に、**Rebuild Project** を選択します。
 これで通知の受信と処理のためのコードを実装し始めることができます。4 つのファイルを変更 (必要に応じて作成) します:
1. **app/src/main/AndroidManifest.xml**
2. **app/src/main/java/..packagePath../MainActivity.java**
3. **app/src/main/java/..packagePath../FooAppFirebaseInstanceIdService.java**
4. **app/src/main/java/..packagePath../FooAppFirebaseMessagingService.java**
現在の実装は、通知をすばやくテストするためだけに、可能な限り短くなるように作られています。品質の高いベスト プラクティスや、より複雑な実装例については、[FCM Guides](https://firebase.google.com/docs/cloud-messaging/concept-options) を検討してください。
#### AndroidManifest.xml
次のコードで、`MY_PACKAGE_IDENTIFIER` のプレースホルダーをすべて *ご自分の* パッケージ識別子に置き換えます。
```xml theme={null}
```
#### MainActivity.java
コード内の次のプレースホルダーは、シナリオに従って置き換える必要があります。
* `PLAYFAB_TITLE_ID`
* PlayFab Game Manager で受け取ったタイトルの ID を使用します。
* `PACKAGE_IDENTIFIER`
* セットアップに一致する Java パッケージ識別子を使用します。
```java theme={null}
package PACKAGE_IDENTIFIER;
import android.os.AsyncTask;
import android.support.v7.app.AppCompatActivity;
import android.os.Bundle;
import android.util.Log;
import com.playfab.PlayFabClientAPI;
import com.playfab.PlayFabClientModels.*;
import com.playfab.PlayFabErrors;
import com.playfab.PlayFabSettings;
import java.util.List;
import java.util.Map;
public class MainActivity extends AppCompatActivity {
// Invoked when activity is started
@Override
protected void onCreate(Bundle savedInstanceState) {
super.onCreate(savedInstanceState);
setContentView(R.layout.activity_main);
// Set PlayFab title
PlayFabSettings.TitleId = "PLAYFAB_TITLE_ID";
// Start login operation
AsyncTask.execute(new Runnable() {
@Override
public void run() {
if(login()) FooAppFirebaseInstanceIdService.setAllowRegisterForPush(true); // Ready to register for push notifications
}
});
}
public boolean login(){
LoginWithAndroidDeviceIDRequest request = new LoginWithAndroidDeviceIDRequest();
request.CreateAccount = true;
// There are several approaches on getting unique android device id.
// https://stackoverflow.com/questions/2785485/is-there-a-unique-android-device-id
request.AndroidDeviceId = "qwerty";
PlayFabErrors.PlayFabResult response = PlayFabClientAPI.LoginWithAndroidDeviceID(request);
if(response.Error != null){
Log.d("Foo PlayFab App",CompileErrorsFromResult(response.Error));
return false;
}
return true;
}
// Utility method to compose an error message out of PlayFab result.
private static String CompileErrorsFromResult(PlayFabErrors.PlayFabError error) {
if (error == null)
return null;
String errorMessage = "";
if (error.errorMessage != null)
errorMessage += error.errorMessage;
if (error.errorDetails != null)
for (Map.Entry> pair : error.errorDetails.entrySet())
for (String msg : pair.getValue())
errorMessage += "\n" + pair.getKey() + ": " + msg;
return errorMessage;
}
}
```
#### FooAppFirebaseInstanceIdService.java
以下に表示されるコード内のプレースホルダーは、シナリオに従って置き換える必要があります。
* `PACKAGE_IDENTIFIER`
* セットアップに一致する Java パッケージ識別子。
```java theme={null}
package PACKAGE_IDENTIFIER;
import android.text.TextUtils;
import android.util.Log;
import com.google.firebase.iid.FirebaseInstanceId;
import com.google.firebase.iid.FirebaseInstanceIdService;
import com.playfab.PlayFabClientAPI;
import com.playfab.PlayFabClientModels;
import com.playfab.PlayFabErrors;
import java.util.List;
import java.util.Map;
public class FooAppFirebaseInstanceIdService extends FirebaseInstanceIdService {
private static String _token;
private static boolean _allowRegistration;
// This is invoked from activity that performs authentication.
// Once login is complete this method is invoked.
// If we have a pending token, we use it to register for push notifications
public static void setAllowRegisterForPush(boolean isAllowed) {
_allowRegistration = isAllowed;
if (_allowRegistration && !TextUtils.isEmpty(_token)) {
registerForPush(_token);
}
}
// Invoked when firebase has fetched a token
// If we already have logged in, we use new token to register for push
@Override
public void onTokenRefresh() {
_token = FirebaseInstanceId.getInstance().getToken();
if (_allowRegistration && !TextUtils.isEmpty(_token)) {
registerForPush(_token);
}
}
private static void registerForPush(String token) {
PlayFabClientModels.AndroidDevicePushNotificationRegistrationRequest request = new PlayFabClientModels.AndroidDevicePushNotificationRegistrationRequest();
request.DeviceToken = token;
PlayFabErrors.PlayFabResult response = PlayFabClientAPI.AndroidDevicePushNotificationRegistration(request);
if (response.Error != null) {
Log.d("Foo PlayFab App", CompileErrorsFromResult(response.Error));
}
}
// Utility method to compose an error message out of PlayFab result.
private static String CompileErrorsFromResult(PlayFabErrors.PlayFabError error) {
if (error == null)
return null;
String errorMessage = "";
if (error.errorMessage != null)
errorMessage += error.errorMessage;
if (error.errorDetails != null)
for (Map.Entry> pair : error.errorDetails.entrySet())
for (String msg : pair.getValue())
errorMessage += "\n" + pair.getKey() + ": " + msg;
return errorMessage;
}
}
```
#### FooAppFirebaseMessagingService.java
以下に示されているコード内のプレースホルダーは、シナリオに従って置き換える必要があります。
* `PACKAGE_IDENTIFIER`
* セットアップに一致する Java パッケージ識別子。
```java theme={null}
package com.foo.playfab.app;
import android.util.Log;
import com.google.firebase.messaging.FirebaseMessagingService;
import com.google.firebase.messaging.RemoteMessage;
public class FooAppFirebaseMessagingService extends FirebaseMessagingService {
@Override
public void onMessageReceived(RemoteMessage message) {
// Intercept the message here
Log.d("Foo PlayFab App","Message received: "+message.getNotification().getBody());
}
}
```
## テスト
この時点で、アプリケーションをデバイスにデプロイできるはずです。
* アプリケーションを起動すると、自動的にログインしてプッシュ通知に登録します。
* デバイスの **Home** ボタンを選択して、アプリケーションを最小化します。*これは重要です*。システム トレイに届く通知をテストできるようにするためです。
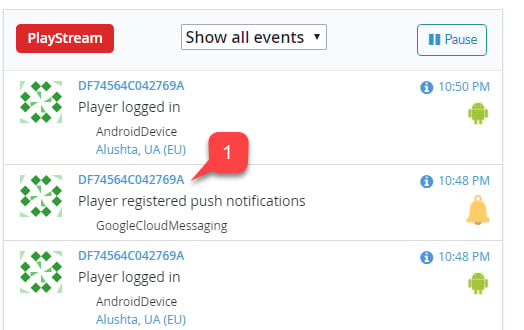
* 次に、PlayFab タイトルの Game Manager ページに移動し、ダッシュボードを使用して最新の **Push Registration** を見つけます。
* **Player ID (1)** を選択します。
これで通知の受信と処理のためのコードを実装し始めることができます。4 つのファイルを変更 (必要に応じて作成) します:
1. **app/src/main/AndroidManifest.xml**
2. **app/src/main/java/..packagePath../MainActivity.java**
3. **app/src/main/java/..packagePath../FooAppFirebaseInstanceIdService.java**
4. **app/src/main/java/..packagePath../FooAppFirebaseMessagingService.java**
現在の実装は、通知をすばやくテストするためだけに、可能な限り短くなるように作られています。品質の高いベスト プラクティスや、より複雑な実装例については、[FCM Guides](https://firebase.google.com/docs/cloud-messaging/concept-options) を検討してください。
#### AndroidManifest.xml
次のコードで、`MY_PACKAGE_IDENTIFIER` のプレースホルダーをすべて *ご自分の* パッケージ識別子に置き換えます。
```xml theme={null}
```
#### MainActivity.java
コード内の次のプレースホルダーは、シナリオに従って置き換える必要があります。
* `PLAYFAB_TITLE_ID`
* PlayFab Game Manager で受け取ったタイトルの ID を使用します。
* `PACKAGE_IDENTIFIER`
* セットアップに一致する Java パッケージ識別子を使用します。
```java theme={null}
package PACKAGE_IDENTIFIER;
import android.os.AsyncTask;
import android.support.v7.app.AppCompatActivity;
import android.os.Bundle;
import android.util.Log;
import com.playfab.PlayFabClientAPI;
import com.playfab.PlayFabClientModels.*;
import com.playfab.PlayFabErrors;
import com.playfab.PlayFabSettings;
import java.util.List;
import java.util.Map;
public class MainActivity extends AppCompatActivity {
// Invoked when activity is started
@Override
protected void onCreate(Bundle savedInstanceState) {
super.onCreate(savedInstanceState);
setContentView(R.layout.activity_main);
// Set PlayFab title
PlayFabSettings.TitleId = "PLAYFAB_TITLE_ID";
// Start login operation
AsyncTask.execute(new Runnable() {
@Override
public void run() {
if(login()) FooAppFirebaseInstanceIdService.setAllowRegisterForPush(true); // Ready to register for push notifications
}
});
}
public boolean login(){
LoginWithAndroidDeviceIDRequest request = new LoginWithAndroidDeviceIDRequest();
request.CreateAccount = true;
// There are several approaches on getting unique android device id.
// https://stackoverflow.com/questions/2785485/is-there-a-unique-android-device-id
request.AndroidDeviceId = "qwerty";
PlayFabErrors.PlayFabResult response = PlayFabClientAPI.LoginWithAndroidDeviceID(request);
if(response.Error != null){
Log.d("Foo PlayFab App",CompileErrorsFromResult(response.Error));
return false;
}
return true;
}
// Utility method to compose an error message out of PlayFab result.
private static String CompileErrorsFromResult(PlayFabErrors.PlayFabError error) {
if (error == null)
return null;
String errorMessage = "";
if (error.errorMessage != null)
errorMessage += error.errorMessage;
if (error.errorDetails != null)
for (Map.Entry> pair : error.errorDetails.entrySet())
for (String msg : pair.getValue())
errorMessage += "\n" + pair.getKey() + ": " + msg;
return errorMessage;
}
}
```
#### FooAppFirebaseInstanceIdService.java
以下に表示されるコード内のプレースホルダーは、シナリオに従って置き換える必要があります。
* `PACKAGE_IDENTIFIER`
* セットアップに一致する Java パッケージ識別子。
```java theme={null}
package PACKAGE_IDENTIFIER;
import android.text.TextUtils;
import android.util.Log;
import com.google.firebase.iid.FirebaseInstanceId;
import com.google.firebase.iid.FirebaseInstanceIdService;
import com.playfab.PlayFabClientAPI;
import com.playfab.PlayFabClientModels;
import com.playfab.PlayFabErrors;
import java.util.List;
import java.util.Map;
public class FooAppFirebaseInstanceIdService extends FirebaseInstanceIdService {
private static String _token;
private static boolean _allowRegistration;
// This is invoked from activity that performs authentication.
// Once login is complete this method is invoked.
// If we have a pending token, we use it to register for push notifications
public static void setAllowRegisterForPush(boolean isAllowed) {
_allowRegistration = isAllowed;
if (_allowRegistration && !TextUtils.isEmpty(_token)) {
registerForPush(_token);
}
}
// Invoked when firebase has fetched a token
// If we already have logged in, we use new token to register for push
@Override
public void onTokenRefresh() {
_token = FirebaseInstanceId.getInstance().getToken();
if (_allowRegistration && !TextUtils.isEmpty(_token)) {
registerForPush(_token);
}
}
private static void registerForPush(String token) {
PlayFabClientModels.AndroidDevicePushNotificationRegistrationRequest request = new PlayFabClientModels.AndroidDevicePushNotificationRegistrationRequest();
request.DeviceToken = token;
PlayFabErrors.PlayFabResult response = PlayFabClientAPI.AndroidDevicePushNotificationRegistration(request);
if (response.Error != null) {
Log.d("Foo PlayFab App", CompileErrorsFromResult(response.Error));
}
}
// Utility method to compose an error message out of PlayFab result.
private static String CompileErrorsFromResult(PlayFabErrors.PlayFabError error) {
if (error == null)
return null;
String errorMessage = "";
if (error.errorMessage != null)
errorMessage += error.errorMessage;
if (error.errorDetails != null)
for (Map.Entry> pair : error.errorDetails.entrySet())
for (String msg : pair.getValue())
errorMessage += "\n" + pair.getKey() + ": " + msg;
return errorMessage;
}
}
```
#### FooAppFirebaseMessagingService.java
以下に示されているコード内のプレースホルダーは、シナリオに従って置き換える必要があります。
* `PACKAGE_IDENTIFIER`
* セットアップに一致する Java パッケージ識別子。
```java theme={null}
package com.foo.playfab.app;
import android.util.Log;
import com.google.firebase.messaging.FirebaseMessagingService;
import com.google.firebase.messaging.RemoteMessage;
public class FooAppFirebaseMessagingService extends FirebaseMessagingService {
@Override
public void onMessageReceived(RemoteMessage message) {
// Intercept the message here
Log.d("Foo PlayFab App","Message received: "+message.getNotification().getBody());
}
}
```
## テスト
この時点で、アプリケーションをデバイスにデプロイできるはずです。
* アプリケーションを起動すると、自動的にログインしてプッシュ通知に登録します。
* デバイスの **Home** ボタンを選択して、アプリケーションを最小化します。*これは重要です*。システム トレイに届く通知をテストできるようにするためです。
* 次に、PlayFab タイトルの Game Manager ページに移動し、ダッシュボードを使用して最新の **Push Registration** を見つけます。
* **Player ID (1)** を選択します。
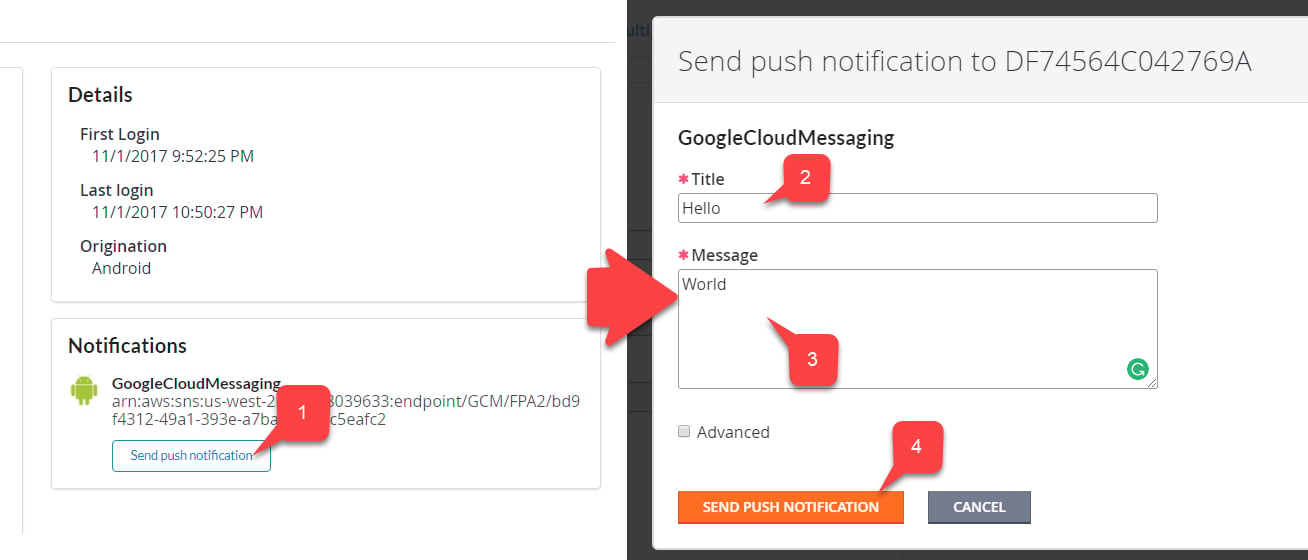
 これにより、そのプレイヤーの **Send Push Notification** ページが開きます。
* **Send Push Notification** ボタン **(1)** を選択します。
* **Title (2)** を入力します。
* メッセージの本文 **(3)** を入力します。
* **Send Push Notification** ボタン **(4)** を選択して変更をコミットします。
これにより、そのプレイヤーの **Send Push Notification** ページが開きます。
* **Send Push Notification** ボタン **(1)** を選択します。
* **Title (2)** を入力します。
* メッセージの本文 **(3)** を入力します。
* **Send Push Notification** ボタン **(4)** を選択して変更をコミットします。
 * メッセージがデバイスに届くことを確認します。
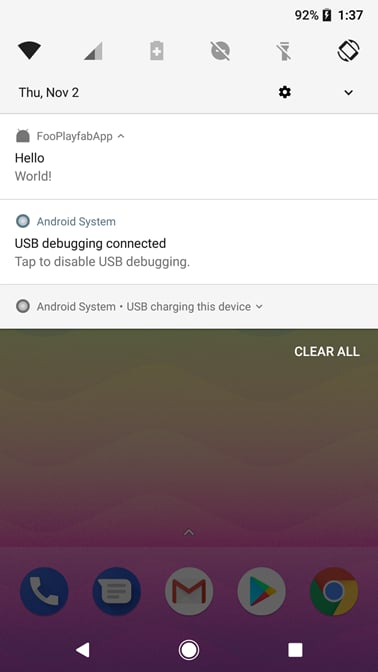 メッセージが届けば、メッセージがアプリケーションに正常に配信されています。
この時点で、統合が正常に完了しました。**FooAppFirebaseMessagingService** を使用して、アプリケーションが実際に実行されている間に受信メッセージを処理できます。
## Related topics
- [Android 用プッシュ通知](/ja-jp/services/playfab/live-service-management/game-configuration/title-communications/push-notifications/push-notifications-for-android.md)
- [プッシュ通知クイックスタート](/ja-jp/services/playfab/live-service-management/game-configuration/title-communications/push-notifications/quickstart.md)
- [プッシュ通知](/ja-jp/services/playfab/live-service-management/game-configuration/title-communications/push-notifications/index.md)
- [プッシュ通知テンプレート](/ja-jp/services/playfab/live-service-management/game-configuration/title-communications/push-notifications/push-notification-templates.md)
- [iOS 用プッシュ通知](/ja-jp/services/playfab/live-service-management/game-configuration/title-communications/push-notifications/push-notifications-for-ios.md)
メッセージが届けば、メッセージがアプリケーションに正常に配信されています。
この時点で、統合が正常に完了しました。**FooAppFirebaseMessagingService** を使用して、アプリケーションが実際に実行されている間に受信メッセージを処理できます。
## Related topics
- [Android 用プッシュ通知](/ja-jp/services/playfab/live-service-management/game-configuration/title-communications/push-notifications/push-notifications-for-android.md)
- [プッシュ通知クイックスタート](/ja-jp/services/playfab/live-service-management/game-configuration/title-communications/push-notifications/quickstart.md)
- [プッシュ通知](/ja-jp/services/playfab/live-service-management/game-configuration/title-communications/push-notifications/index.md)
- [プッシュ通知テンプレート](/ja-jp/services/playfab/live-service-management/game-configuration/title-communications/push-notifications/push-notification-templates.md)
- [iOS 用プッシュ通知](/ja-jp/services/playfab/live-service-management/game-configuration/title-communications/push-notifications/push-notifications-for-ios.md)