> ## Documentation Index
> Fetch the complete documentation index at: https://devdocs.xbox.com/llms.txt
> Use this file to discover all available pages before exploring further.

# Twitch と HTML5 を使用した PlayFab 認証のセットアップ

> Twitch アプリの登録と OAuth プレイヤー認証をカバーする、HTML5 と JavaScript を使用して PlayFab タイトルに Twitch ログインを追加する手順ガイド。

このチュートリアルは、Twitch と HTML5/JavaScript を使用した PlayFab 認証のプロセスをガイドするように設計されています。

## 要件

開始する前に、次のものが必要です:

* テスト用の [Twitch アカウント](https://www.twitch.tv/)。
* 登録済みの [PlayFab](https://developer.playfab.com/) タイトル。
* [ログインの基本とベスト プラクティス](/services/playfab/identity/player-identity/login/login-basics-best-practices) に精通していること。
* 少なくとも、静的 HTML ファイルを提供するための有効なドメイン名を持つサーバー。

<Note>
  有効なドメイン名でサーバーをセットアップする方法については、[テスト用の HTTP サーバーの実行](/services/playfab/identity/player-identity/platform-specific-authentication/running-an-http-server-for-testing) チュートリアルを参照してください。
</Note>

## サーバーとドメイン

このチュートリアルの手順に従うには、Web サーバーが必要です。登録済みのリモート Web サーバーがまだない場合は、[テスト用の HTTP サーバーの実行](/services/playfab/identity/player-identity/platform-specific-authentication/running-an-http-server-for-testing) チュートリアルに従って、ローカル Web サーバーを実行してください。

<Note>
  このチュートリアル全体を通じて、ドメインは `[http://localhost/](http://localhost/)` であると想定します。
</Note>

## Twitch アプリケーションを登録する

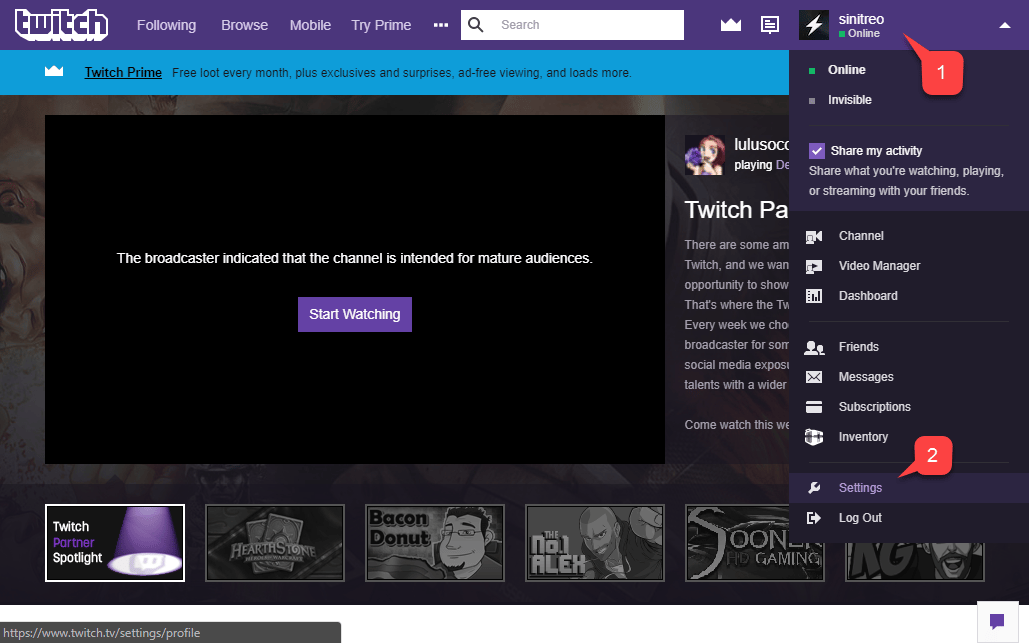
まず、[Twitch Web サイト](https://www.twitch.tv/) に移動し、ログインしていることを確認します。

1. **Account** ドロップダウンに移動します。
2. 提供されたメニューから **Settings** を選択します。

<img src="https://mintcdn.com/microsoft-4404708b/mLCHf0iQv3VidfBe/images/playfab/identity/player-identity/platform-specific-authentication/tutorials/twitch-html5/twitch-account-settings.png?fit=max&auto=format&n=mLCHf0iQv3VidfBe&q=85&s=16b0349a480883b4517f021b9f43b337" alt="Twitch アカウント設定" width="1029" height="643" data-path="images/playfab/identity/player-identity/platform-specific-authentication/tutorials/twitch-html5/twitch-account-settings.png" />

**Settings** ページで、以下のように **Connections (1)** を選択します。

<img src="https://mintcdn.com/microsoft-4404708b/3hg2JQs0m7qmDqay/images/playfab/identity/player-identity/platform-specific-authentication/tutorials/twitch-html5/twitch-settings-connections.png?fit=max&auto=format&n=3hg2JQs0m7qmDqay&q=85&s=4f6e6dc81498ffe1a7007c0ae060eab4" alt="Twitch 設定接続" width="1016" height="198" data-path="images/playfab/identity/player-identity/platform-specific-authentication/tutorials/twitch-html5/twitch-settings-connections.png" />

ページの一番下で、以下のように **Register your application (1)** ボタンを選択します。
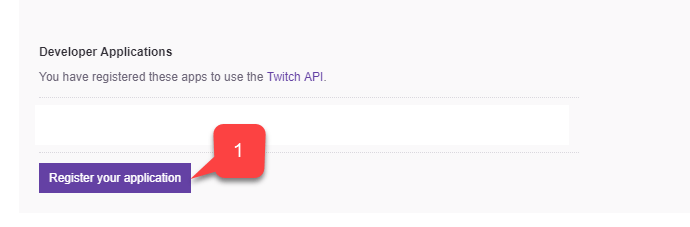
<img src="https://mintcdn.com/microsoft-4404708b/3hg2JQs0m7qmDqay/images/playfab/identity/player-identity/platform-specific-authentication/tutorials/twitch-html5/twitch-open-application-registration.png?fit=max&auto=format&n=3hg2JQs0m7qmDqay&q=85&s=d9b6a12d357e2364a422502ce3e943bd" alt="Twitch アプリケーション登録ページを開く" width="690" height="227" data-path="images/playfab/identity/player-identity/platform-specific-authentication/tutorials/twitch-html5/twitch-open-application-registration.png" />

新しいアプリを構成できるページが開きます。

1. **アプリケーション** の **Name** を入力します。
2. **Redirect URL** を入力します。
3. **Application Category** を入力します。
4. 次に、**Twitch** の利用規約に同意し、**Register** ボタンを選択します。
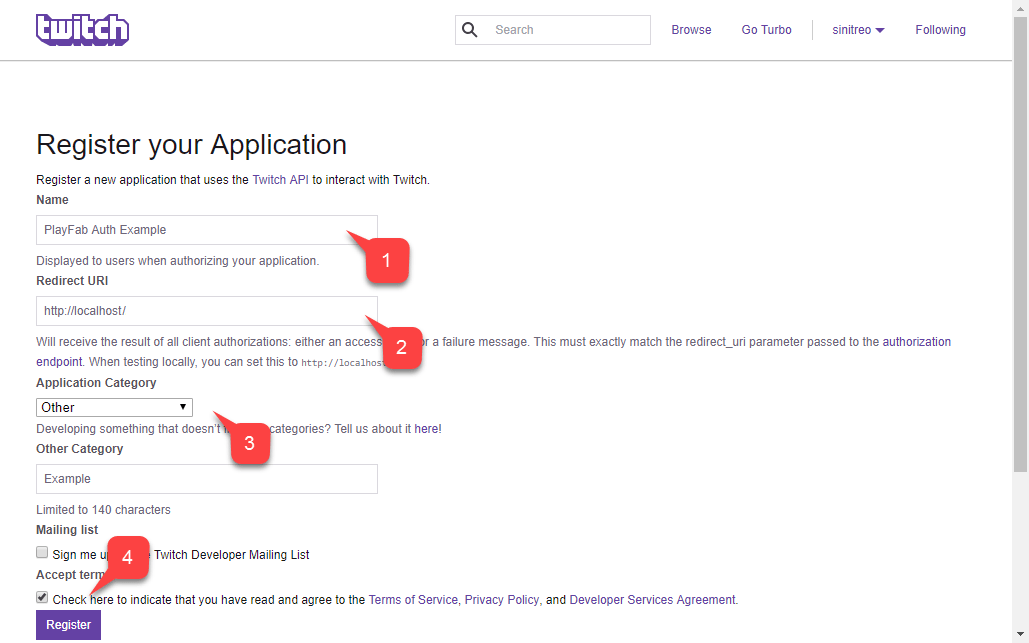
<img src="https://mintcdn.com/microsoft-4404708b/3hg2JQs0m7qmDqay/images/playfab/identity/player-identity/platform-specific-authentication/tutorials/twitch-html5/twitch-register-your-application.png?fit=max&auto=format&n=3hg2JQs0m7qmDqay&q=85&s=2f039af883eeeea4f5141f2b5f560cae" alt="Twitch アプリケーションを登録" width="1029" height="643" data-path="images/playfab/identity/player-identity/platform-specific-authentication/tutorials/twitch-html5/twitch-register-your-application.png" />

<Info>
  ローカル Web サーバーを使用してテストする場合、Twitch では `**<http://localhost>**` をリダイレクト URL として使用できます。先頭のスラッシュ **/** を必ず含めてください。先頭のスラッシュがないと、Twitch は localhost URL を認識できません。
</Info>

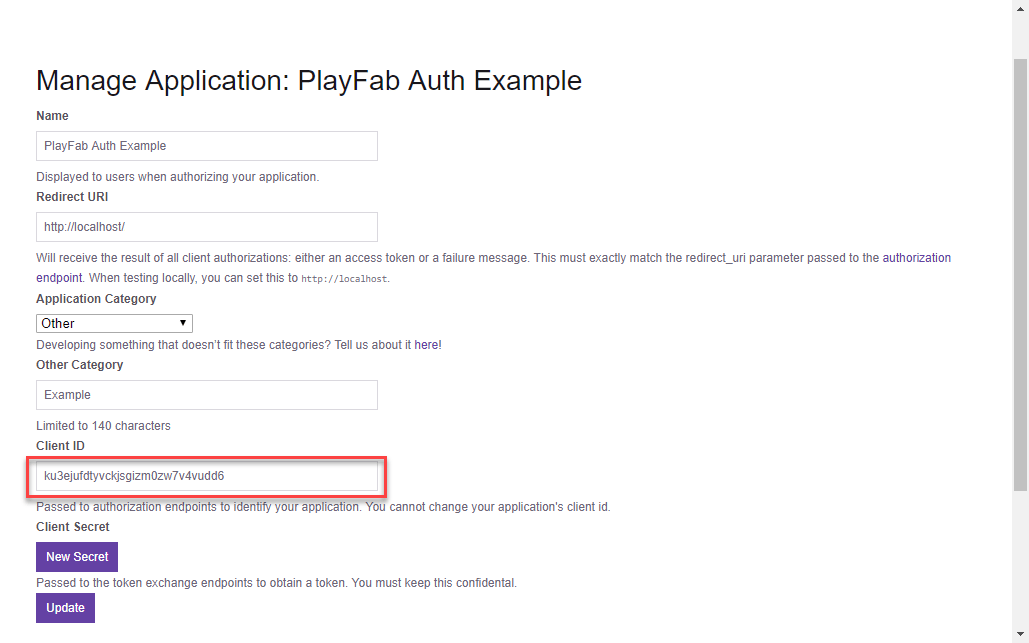
アプリケーションが登録されると、ページが更新され、アプリケーションの Client ID が表示されます。

<Note>
  この Client ID は、後で PlayFab タイトルを構成する際に使用するので、安全で簡単にアクセスできる場所に保管してください。
</Note>

<img src="https://mintcdn.com/microsoft-4404708b/mLCHf0iQv3VidfBe/images/playfab/identity/player-identity/platform-specific-authentication/tutorials/twitch-html5/twitch-manage-application.png?fit=max&auto=format&n=mLCHf0iQv3VidfBe&q=85&s=a540ab15379f0a9890594bb1f0b8b57a" alt="Twitch アプリケーションの管理" width="1029" height="643" data-path="images/playfab/identity/player-identity/platform-specific-authentication/tutorials/twitch-html5/twitch-manage-application.png" />

## PlayFab タイトルの構成

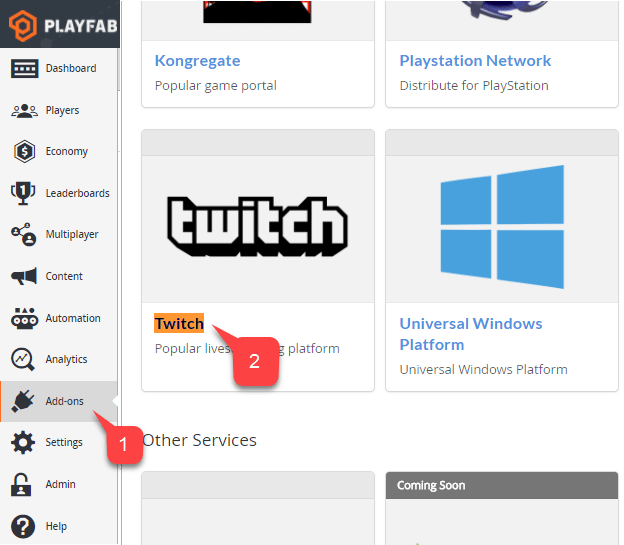
Twitch Client ID を取得したら、PlayFab タイトルの Twitch アドオンを有効にして構成できます。

1. **PlayFab タイトル** 画面で、メニューに移動し **Add-ons** 項目を選択します。
2. 次に **Twitch** アイコン リンクを選択します。
<img src="https://mintcdn.com/microsoft-4404708b/mLCHf0iQv3VidfBe/images/playfab/identity/player-identity/platform-specific-authentication/tutorials/twitch-html5/game-manager-addons-tab-twitch.png?fit=max&auto=format&n=mLCHf0iQv3VidfBe&q=85&s=50176ba6202f1f26b095ed278ce8c1ed" alt="Game Manager アドオン タブ" width="624" height="545" data-path="images/playfab/identity/player-identity/platform-specific-authentication/tutorials/twitch-html5/game-manager-addons-tab-twitch.png" />

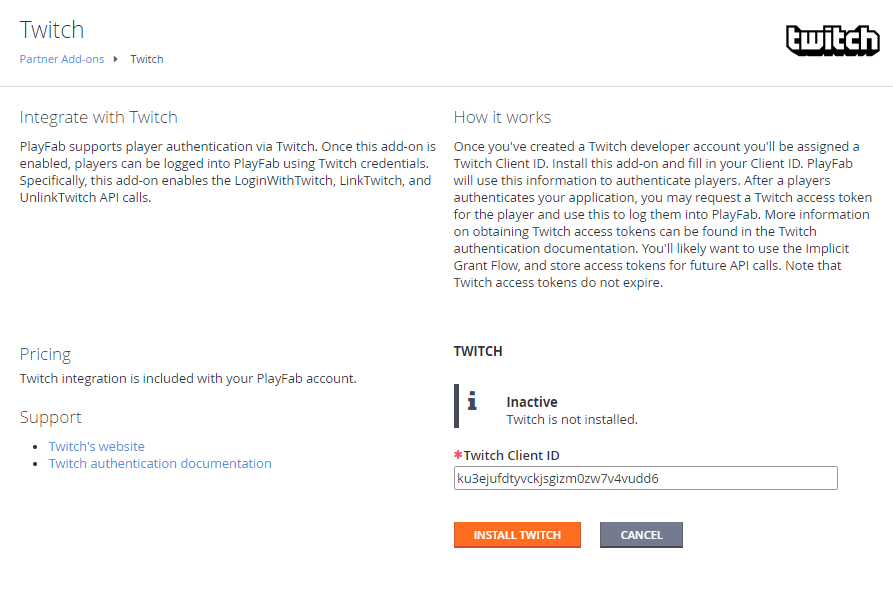
**Twitch** ページで:

* **Twitch アドオン** の **Settings** ページが開きます。
* **Twitch Client ID** を入力します。
* **Install Twitch** ボタンを選択します。
<img src="https://mintcdn.com/microsoft-4404708b/mLCHf0iQv3VidfBe/images/playfab/identity/player-identity/platform-specific-authentication/tutorials/twitch-html5/game-manager-twitch-addon-settings.png?fit=max&auto=format&n=mLCHf0iQv3VidfBe&q=85&s=ade8d576e742ccb6492da588c5f12cbc" alt="Game Manager Twitch アドオンの設定とインストール" width="893" height="599" data-path="images/playfab/identity/player-identity/platform-specific-authentication/tutorials/twitch-html5/game-manager-twitch-addon-settings.png" />

アドオンがインストールされ、エラーが発生していないことを確認するため、少し時間を取ってください。これで PlayFab タイトルの構成は完了です。

## テスト

以下の HTML ファイルを使用して、Twitch を使用した PlayFab 認証をテストします。

`TWITCH_CLIENT_ID_GOES_HERE` と `PLAYFAB_TITLE_ID_GOES_HERE` は必ずご自身の値に置き換えてください。

```html theme={null}
<!DOCTYPE html>
<html>
<head>
    <!-- Include JQuery - dependency of Twitch JS SDK -->
    <script src="//code.jquery.com/jquery.min.js"></script>
    <!-- Include Twitch SDK -->
    <script src="https://ttv-api.s3.amazonaws.com/twitch.min.js"></script>
    <!-- Include PlayFab SDK -->
    <script src="https://download.playfab.com/PlayFabClientApi.js"></script>
</head>
<body>
    <p>Twitch Auth Example</p>
    <button onclick="login()">Login With Twitch</button>
    <script>
        // Establish Twitch Auth Callback (invoked when logged in with Twitch)
        Twitch.events.addListener('auth.login', function() {
            logLine("Logged in with Twitch!");
            // Invoke login with PlayFab code and pass the token
            loginWithPlayFab(Twitch.getToken());
        });

        // Run Twitch SDK initialization
        Twitch.init({clientId: 'TWITCH_CLIENT_ID_GOES_HERE'}, function(error, status) {
            logLine("Twitch SDK Initialized");
        });

        // This method is invoked when you press the button

        function login() {
            logLine("Logging in via Twitch...");
            Twitch.login({
                scope: ['user_read', 'channel_read']
            });
        }

        function loginWithPlayFab(accessToken){
            logLine("Logging in via PlayFab...");

            // When given accessToken, make call to LoginWithTwitch API Call
            // Make sure to use your own PlayFab Title ID
            PlayFabClientSDK.LoginWithTwitch({
                AccessToken: accessToken,
                TitleId: "PLAYFAB_TITLE_ID_GOES_HERE",
                CreateAccount: true
            }, onPlayFabResponse);
        }

        // Handles response from playfab.
        function onPlayFabResponse(response, error) {
            if (response)
                logLine("Response: " + JSON.stringify(response));
            if (error)
                logLine("Error: " + JSON.stringify(error));
        }

        function logLine(message) {
        console.log(message);
            var textnode = document.createTextNode(message);
            document.body.appendChild(textnode);
            var br = document.createElement("br");
            document.body.appendChild(br);
        }
    </script>
</body>
</html>
```

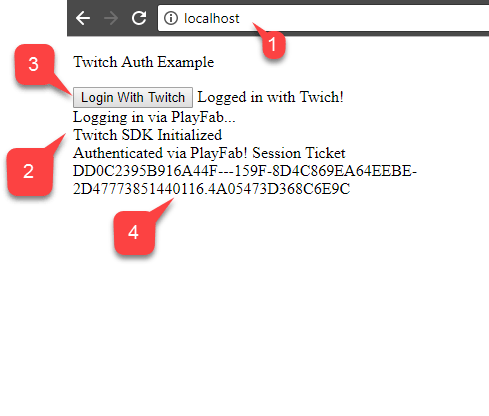
1. Twitch アプリケーションの構成時にセットアップしたドメイン (この場合は `<http://localhost>`) を使用して、サーバーから次のファイルを要求します。

2. ページが開いたら、**Twitch SDK** が初期化されたことを示すメッセージを待ちます。

3. 次に **Login with Twitch** ボタンを選択します。

4. ポップアップ ウィンドウの **Twitch** の指示に従い、出力を確認します。

<Info>
  ページに到達した時点で *すでに* Twitch 認証セッションが実行中の場合、コールバックが異なる予期しない順序で発火する可能性があります。このケースは以下のスクリーンショットに示されています。ただし、**Logged in with Twitch** の後に **Logging in via PlayFab** のみが続くことを確認する必要があります。これは、トークンが受信されたか、ローカル ストレージから復元されたことを示しており、PlayFab へのサインインを開始するために Twitch SDK を待つ必要はありません。
</Info>

<img src="https://mintcdn.com/microsoft-4404708b/mLCHf0iQv3VidfBe/images/playfab/identity/player-identity/platform-specific-authentication/tutorials/twitch-html5/twitch-auth-example.png?fit=max&auto=format&n=mLCHf0iQv3VidfBe&q=85&s=8e4934020a31d60a0c4eb5ee8c017558" alt="Twitch 認証の例" width="489" height="416" data-path="images/playfab/identity/player-identity/platform-specific-authentication/tutorials/twitch-html5/twitch-auth-example.png" />

PlayFab が `SessionTicket` を取得できた場合、Twitch 認証と PlayFab アプリの統合が正常に完了しています。


## Related topics

- [プラットフォーム固有の認証](/ja-jp/services/playfab/identity/player-identity/platform-specific-authentication/index.md)
- [テスト用の HTTP サーバーの実行](/ja-jp/services/playfab/identity/player-identity/platform-specific-authentication/running-an-http-server-for-testing.md)
- [Google と HTML5 を使用した PlayFab 認証のセットアップ](/ja-jp/services/playfab/identity/player-identity/platform-specific-authentication/google-html5.md)
- [Kongregate と HTML5 を使用した PlayFab 認証のセットアップ](/ja-jp/services/playfab/identity/player-identity/platform-specific-authentication/kongregate-html5.md)
- [Facebook と HTML5 を使用した PlayFab 認証のセットアップ](/ja-jp/services/playfab/identity/player-identity/platform-specific-authentication/facebook-html5.md)
