> ## Documentation Index
> Fetch the complete documentation index at: https://devdocs.xbox.com/llms.txt
> Use this file to discover all available pages before exploring further.
# Kongregate と Unity を使用した PlayFab 認証のセットアップ
> Kongregate アプリのアップロードとプレイヤー サインイン コードをカバーする、WebGL を使用して Unity の PlayFab タイトルに Kongregate 認証を追加する手順ガイド。
このチュートリアルでは、Kongregate と Unity を使用して PlayFab でプレイヤーを認証するために必要な最小限のセットアップを紹介します。
## 要件
* 登録済みの [Kongregate](https://www.kongregate.com/) アカウント。
* [Kongregate Developers Guide](https://www.kongregate.com/developer_center/docs/en/kongregate-api) に精通していること。
* 登録済みの PlayFab タイトル。
* タイトル用に PlayFab が構成された Unity プロジェクト。
* Unity WebGL サポートがインストールされていること。
* [ログインの基本とベスト プラクティス](/services/playfab/identity/player-identity/login/login-basics-best-practices) に精通していること。
## Kongregate アプリのセットアップ
Kongregate では、必要なアプリ情報にアクセスする前に、アプリのプレビュー バージョンをアップロードする必要があります。最初のステップは、以下の内容の **index.html** ファイルを準備することです。
```html theme={null}
Placeholder
```
[Kongregate Web サイト](https://www.kongregate.com/) に移動します。
1. **Games** タブを選択します。
2. 次に **Upload your game** ボタンを選択します。
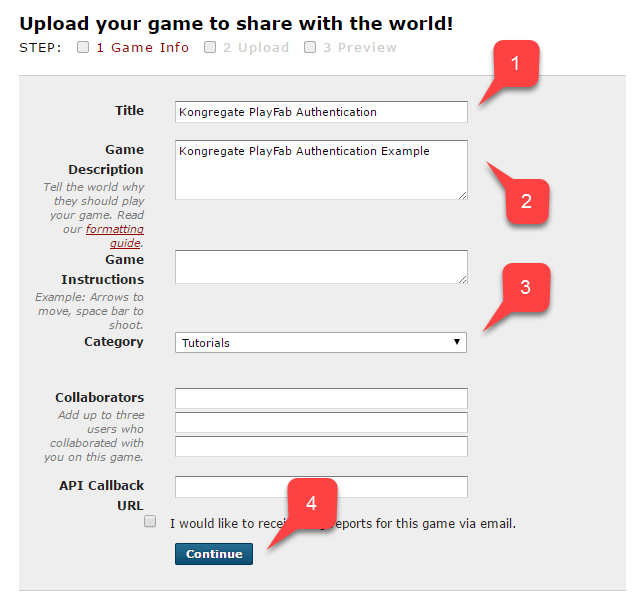
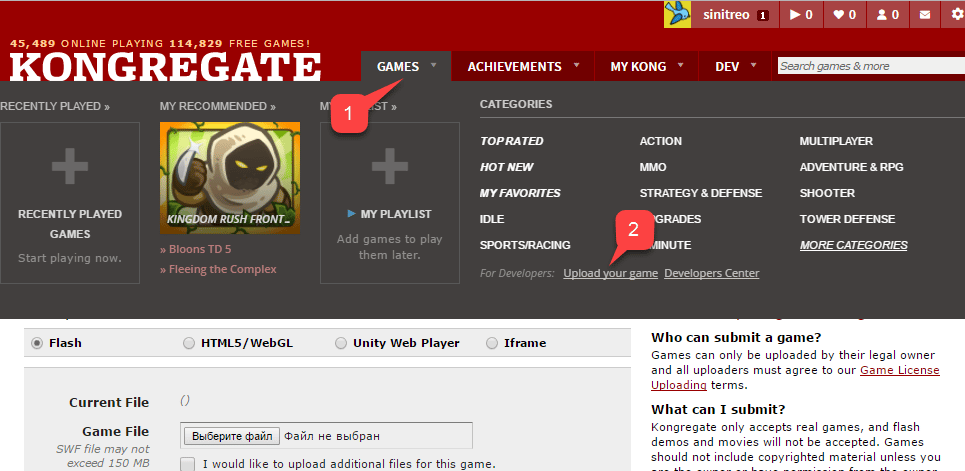 新しいアプリケーションをセットアップするためのページが開きます。
1. 必ず **アプリケーション名** を入力します。
2. **ゲームの説明** を入力します。
3. **カテゴリ** を選択します。
4. **Continue** ボタンを選択して新しいアプリを送信します。
新しいアプリケーションをセットアップするためのページが開きます。
1. 必ず **アプリケーション名** を入力します。
2. **ゲームの説明** を入力します。
3. **カテゴリ** を選択します。
4. **Continue** ボタンを選択して新しいアプリを送信します。
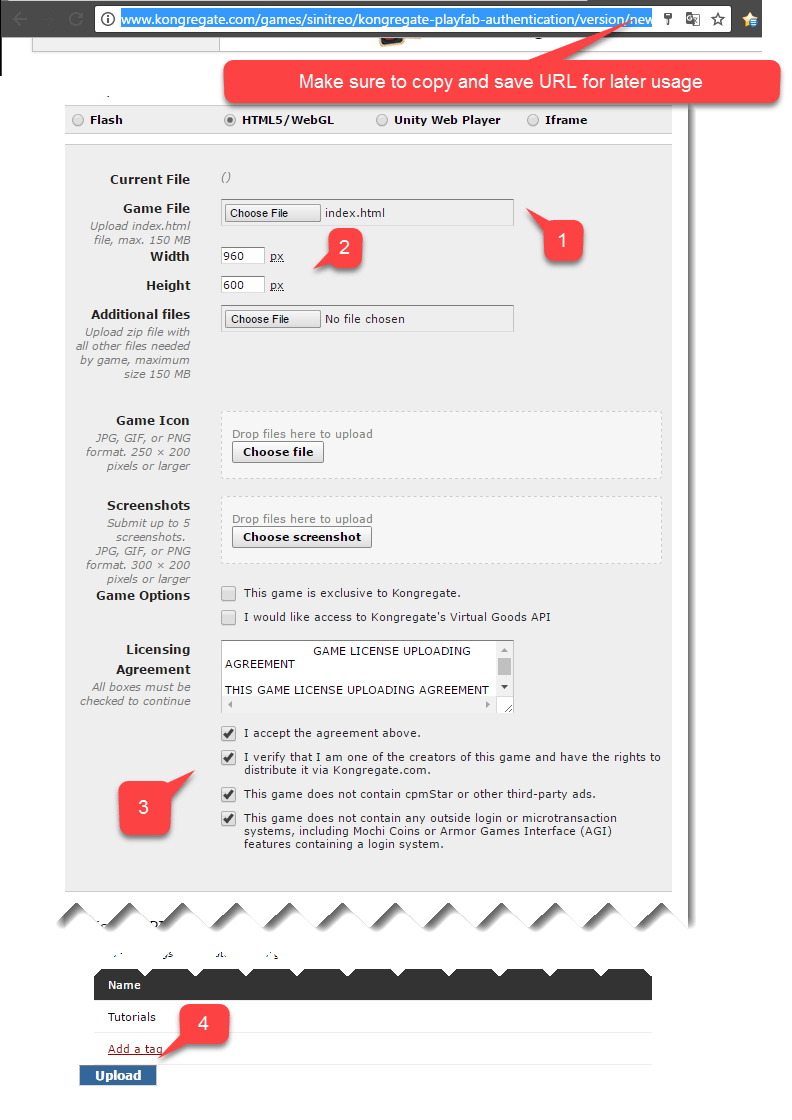
 **アプリケーション アップロード** ページに移動します。
まず — *そして最も重要なのは* — **Web アドレス バー** の URL を安全でアクセスしやすい場所に保存してください。*これにより、ページを閉じた後にアプリケーションへのアクセスを復元する時間を大幅に節約できます*。
1. 完了したら、準備した **index.html** ファイルを **ゲーム ファイル** として選択します。
2. 次に、画面サイズを設定します。
3. 必要なライセンスをすべて承諾してください。
4. 最後に、**Upload** ボタンを選択してアプリケーションをアップロードします。
**アプリケーション アップロード** ページに移動します。
まず — *そして最も重要なのは* — **Web アドレス バー** の URL を安全でアクセスしやすい場所に保存してください。*これにより、ページを閉じた後にアプリケーションへのアクセスを復元する時間を大幅に節約できます*。
1. 完了したら、準備した **index.html** ファイルを **ゲーム ファイル** として選択します。
2. 次に、画面サイズを設定します。
3. 必要なライセンスをすべて承諾してください。
4. 最後に、**Upload** ボタンを選択してアプリケーションをアップロードします。
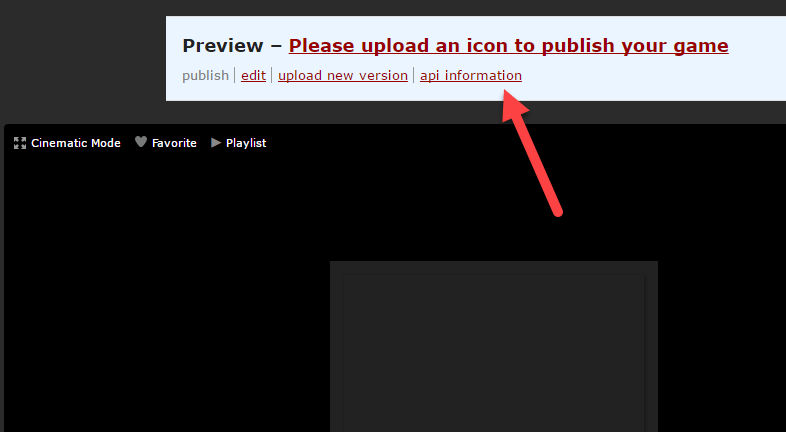
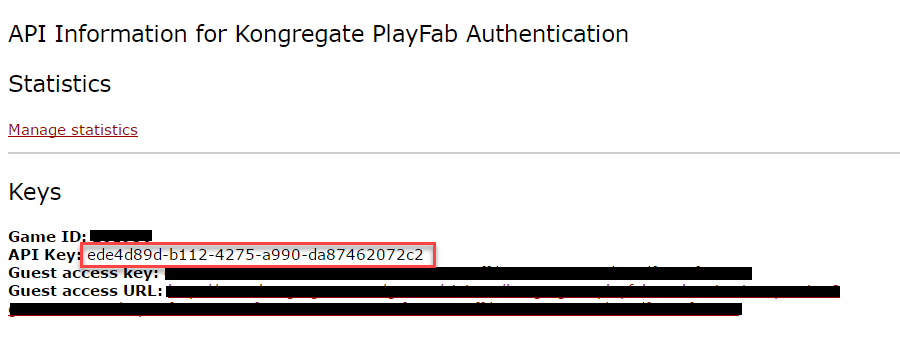
 プレビューが開いたら、内容は無視して **api information** リンクを開きます。
 **API 情報** ページが開いたら、**API Key** を見つけ、後で使用できるように簡単にアクセスできる安全な場所に保管してください。
 ## PlayFab タイトルの構成
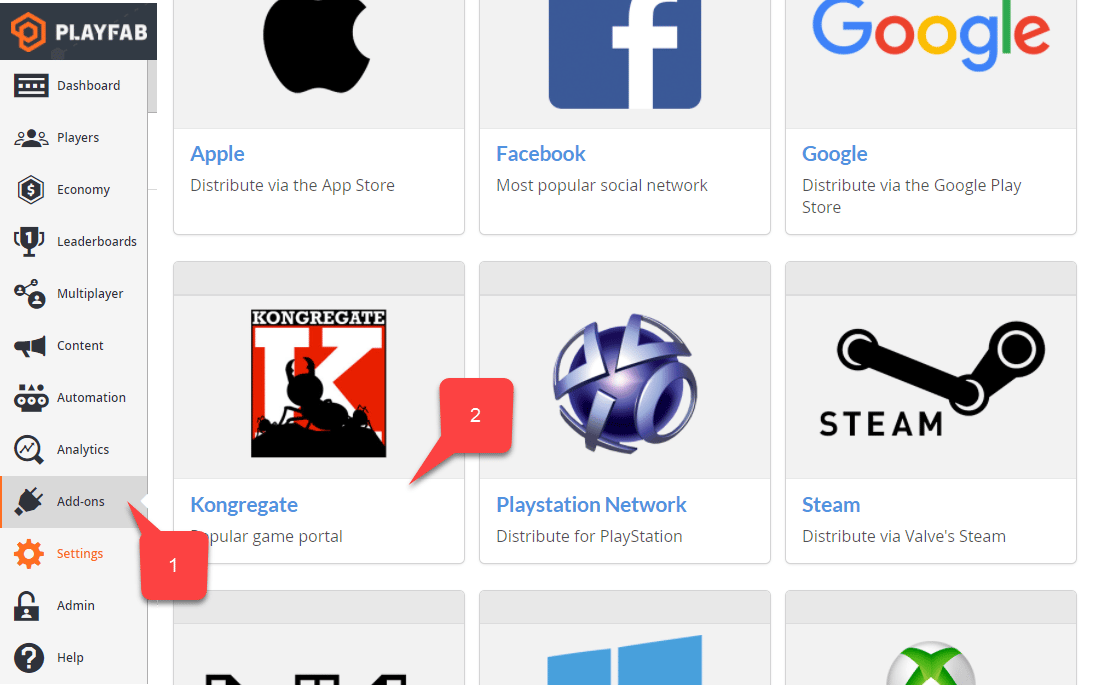
PlayFab タイトルの Game Manager で:
1. 左側のメニューから **Add-ons** を選択します。
2. **Kongregate** アイコンを見つけて選択します。
## PlayFab タイトルの構成
PlayFab タイトルの Game Manager で:
1. 左側のメニューから **Add-ons** を選択します。
2. **Kongregate** アイコンを見つけて選択します。
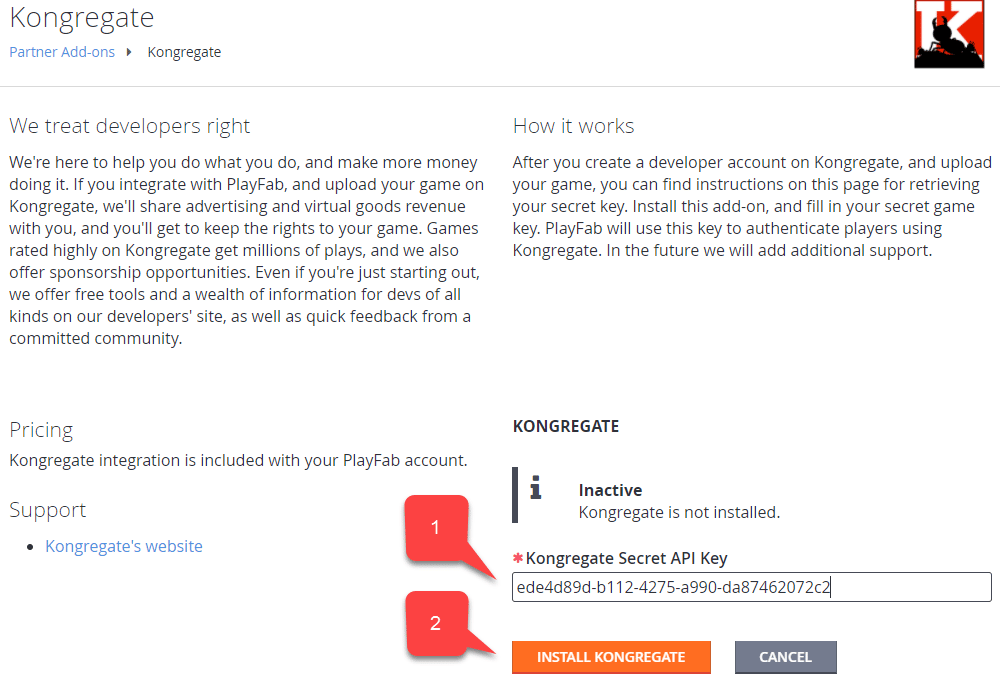
 新しいページが開き、**Kongregate** 統合をセットアップできます:
1. 前のセクションで取得した **API Key** を入力します。
2. **Install Kongregate** ボタンを選択します。
新しいページが開き、**Kongregate** 統合をセットアップできます:
1. 前のセクションで取得した **API Key** を入力します。
2. **Install Kongregate** ボタンを選択します。
 この時点でエラー メッセージが表示されなければ、Kongregate アプリケーションとの PlayFab タイトル統合が適切に構成されています。
## Unity プロジェクトのセットアップ
この Unity セットアップ チェックリストを使用してください:
* \[オプション] [PlayFab Editor Extensions](https://aka.ms/playfabunityextension) をインストールします。
* `PlayFabSharedSettings` Scriptable Object で `TitleId` をセットアップします。
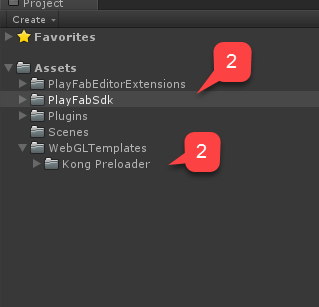
* Unity 5.6+ の場合、[Kongregate Preloader WebGL Template](https://github.com/kongregate/webgl-preloader) をダウンロードし、`Assets/WebGLTemplates` フォルダー **(2)** 内に配置します。
* Unity \< 5.6 の場合、[Kongregate Preloader WebGL Template 5.5 and below](https://github.com/kongregate/webgl-preloader/tree/unity-5.5-and-below) をダウンロードし、`Assets/WebGLTemplates` フォルダー **(2)** 内に配置します。
この時点でエラー メッセージが表示されなければ、Kongregate アプリケーションとの PlayFab タイトル統合が適切に構成されています。
## Unity プロジェクトのセットアップ
この Unity セットアップ チェックリストを使用してください:
* \[オプション] [PlayFab Editor Extensions](https://aka.ms/playfabunityextension) をインストールします。
* `PlayFabSharedSettings` Scriptable Object で `TitleId` をセットアップします。
* Unity 5.6+ の場合、[Kongregate Preloader WebGL Template](https://github.com/kongregate/webgl-preloader) をダウンロードし、`Assets/WebGLTemplates` フォルダー **(2)** 内に配置します。
* Unity \< 5.6 の場合、[Kongregate Preloader WebGL Template 5.5 and below](https://github.com/kongregate/webgl-preloader/tree/unity-5.5-and-below) をダウンロードし、`Assets/WebGLTemplates` フォルダー **(2)** 内に配置します。
 次に、作業シーンを作成しましょう。
1. テスト目的で、いくつかのテキスト ラベルを持つ画面スケーリング キャンバスを使用します。
デバッグ メッセージを表示するために *1 つの* テキスト ラベルのみが必要です。
2. 空の **GameObject** を作成し、名前を **Kongregate** に変更します。
次に、作業シーンを作成しましょう。
1. テスト目的で、いくつかのテキスト ラベルを持つ画面スケーリング キャンバスを使用します。
デバッグ メッセージを表示するために *1 つの* テキスト ラベルのみが必要です。
2. 空の **GameObject** を作成し、名前を **Kongregate** に変更します。
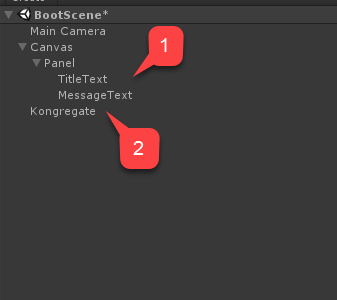 この `GameObject` には、デバッグ メッセージ用に配線されたテキスト ラベルを持つ `KongregateHandler` コンポーネントが含まれます。
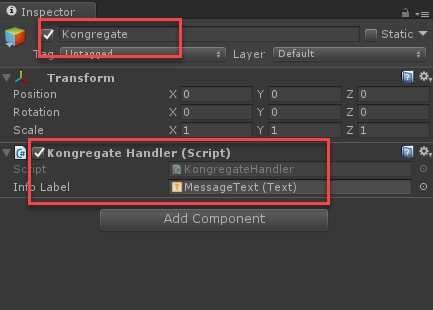 `KongregateHandler` コンポーネントのコードを以下に示します。
```csharp theme={null}
// We are specifically interested in importing PlayFab related namespaces
using PlayFab;
using PlayFab.ClientModels;
using UnityEngine;
using UnityEngine.UI;
public class KongregateHandler : MonoBehaviour
{
// Standard unity callback, executed once for the script to start
public void Start()
{
// Utility: show feedback
SetMessage("Loading kongregate api...");
/*
* Important: execute Javascript in the external context to initialize
* Kongregate API, Unity Support and set up callback GameObject and Method.
* In this case, callback is set to a GameObject called Kongregate and a
* method called OnKongregateAPILoaded, which we define later in this class.
* Once Kongregate API is initialized, Unity will locate this object by name
* ("Kongregate") and execute a method "OnKongregateAPILoaded" passing in user
* info string as an argument.
*/
Application.ExternalEval(
"if(typeof(kongregateUnitySupport) != 'undefined'){" +
" kongregateUnitySupport.initAPI('Kongregate', 'OnKongregateAPILoaded');" +
"} else {" +
" console.error('No unity support!');" +
"};"
);
}
/*
* Executed once Kongregate API is ready. This method is invoked by KongregateAPI
* and receives a structured text with multiple pieces of data you must parse manually.
* The userInfo string parameter has the following structure: 'user_identifier|user_name|auth_token'
*/
public void OnKongregateAPILoaded(string userInfo)
{
SetMessage("Received user info! Logging though playfab...");
// We split userInfo string using '|' character to acquire auth token and Kongregate ID.
var userInfoArray = userInfo.Split('|');
var authTicket = userInfoArray[2];
var kongregateId = userInfoArray[0];
LogToBrowser("Auth Token: " + authTicket);
LogToBrowser("Kongregate Id: " + kongregateId);
/*
* We then execute PlayFab API call called LoginWithKongregate.
* LoginWithKongregate requires KongregateID and AuthTicket.
* We also pass CreateAccount flag, to automatically create player account.
*/
PlayFabClientAPI.LoginWithKongregate(new LoginWithKongregateRequest
{
KongregateId = kongregateId,
AuthTicket = authTicket,
CreateAccount = true
}, OnLoggedIn, OnFailed);
}
/*
* The rest of the code serves as a utility to process results, log debug statements
* and display them using Text message label.
*/
private void OnLoggedIn(LoginResult obj)
{
SetMessage("Logged in through PlayFab!");
}
private void OnFailed(PlayFabError error)
{
SetMessage("Failed to login in with PlayFab: " + error.GenerateErrorReport());
}
private void SetMessage(string message)
{
InfoLabel.text = message;
}
private void LogToBrowser(string message)
{
Application.ExternalEval(string.Format("console.log('{0}')", message));
}
public Text InfoLabel;
}
```
## テスト
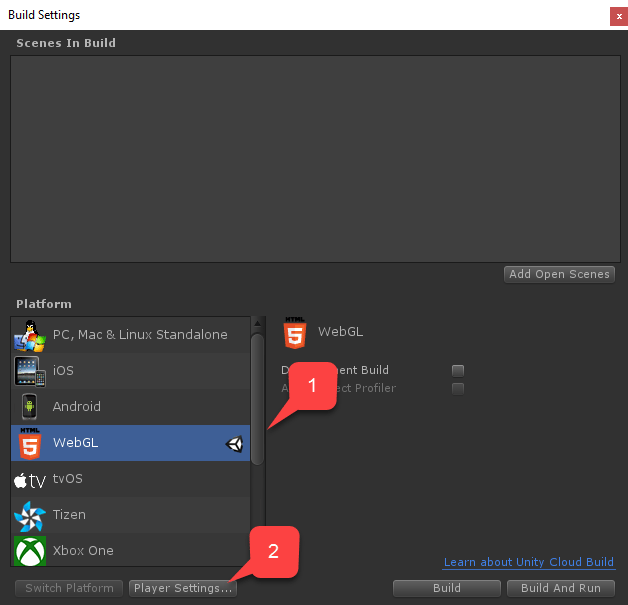
統合を真にテストできる唯一の方法は、プロトタイプを Kongregate にアップロードすることです。
1. **Build** ウィンドウを開き、メニューから **WebGL** が選択されていることを確認します。
2. 次に、ボタンを選択して **Player Settings** を開きます。
`KongregateHandler` コンポーネントのコードを以下に示します。
```csharp theme={null}
// We are specifically interested in importing PlayFab related namespaces
using PlayFab;
using PlayFab.ClientModels;
using UnityEngine;
using UnityEngine.UI;
public class KongregateHandler : MonoBehaviour
{
// Standard unity callback, executed once for the script to start
public void Start()
{
// Utility: show feedback
SetMessage("Loading kongregate api...");
/*
* Important: execute Javascript in the external context to initialize
* Kongregate API, Unity Support and set up callback GameObject and Method.
* In this case, callback is set to a GameObject called Kongregate and a
* method called OnKongregateAPILoaded, which we define later in this class.
* Once Kongregate API is initialized, Unity will locate this object by name
* ("Kongregate") and execute a method "OnKongregateAPILoaded" passing in user
* info string as an argument.
*/
Application.ExternalEval(
"if(typeof(kongregateUnitySupport) != 'undefined'){" +
" kongregateUnitySupport.initAPI('Kongregate', 'OnKongregateAPILoaded');" +
"} else {" +
" console.error('No unity support!');" +
"};"
);
}
/*
* Executed once Kongregate API is ready. This method is invoked by KongregateAPI
* and receives a structured text with multiple pieces of data you must parse manually.
* The userInfo string parameter has the following structure: 'user_identifier|user_name|auth_token'
*/
public void OnKongregateAPILoaded(string userInfo)
{
SetMessage("Received user info! Logging though playfab...");
// We split userInfo string using '|' character to acquire auth token and Kongregate ID.
var userInfoArray = userInfo.Split('|');
var authTicket = userInfoArray[2];
var kongregateId = userInfoArray[0];
LogToBrowser("Auth Token: " + authTicket);
LogToBrowser("Kongregate Id: " + kongregateId);
/*
* We then execute PlayFab API call called LoginWithKongregate.
* LoginWithKongregate requires KongregateID and AuthTicket.
* We also pass CreateAccount flag, to automatically create player account.
*/
PlayFabClientAPI.LoginWithKongregate(new LoginWithKongregateRequest
{
KongregateId = kongregateId,
AuthTicket = authTicket,
CreateAccount = true
}, OnLoggedIn, OnFailed);
}
/*
* The rest of the code serves as a utility to process results, log debug statements
* and display them using Text message label.
*/
private void OnLoggedIn(LoginResult obj)
{
SetMessage("Logged in through PlayFab!");
}
private void OnFailed(PlayFabError error)
{
SetMessage("Failed to login in with PlayFab: " + error.GenerateErrorReport());
}
private void SetMessage(string message)
{
InfoLabel.text = message;
}
private void LogToBrowser(string message)
{
Application.ExternalEval(string.Format("console.log('{0}')", message));
}
public Text InfoLabel;
}
```
## テスト
統合を真にテストできる唯一の方法は、プロトタイプを Kongregate にアップロードすることです。
1. **Build** ウィンドウを開き、メニューから **WebGL** が選択されていることを確認します。
2. 次に、ボタンを選択して **Player Settings** を開きます。
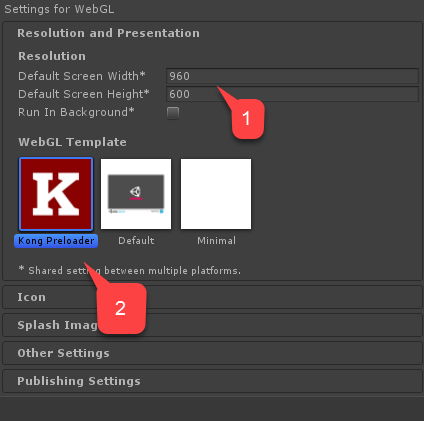
 **Player Settings** 画面内で、**Settings for WebGL** ビルドを見つけます:
1. サイズが正しく設定されていることを確認します。
2. 次に **Kongregate Preloader Template** を選択します。
**Player Settings** 画面内で、**Settings for WebGL** ビルドを見つけます:
1. サイズが正しく設定されていることを確認します。
2. 次に **Kongregate Preloader Template** を選択します。
 アプリケーションをビルドし、**Build** フォルダーを開きます。
* **index.html** と (Unity のバージョンによって) その他のファイルが多数存在します。
* 以下の例のように、**index.html** を除くすべてのファイルを zip アーカイブ内に配置します。
アプリケーションをビルドし、**Build** フォルダーを開きます。
* **index.html** と (Unity のバージョンによって) その他のファイルが多数存在します。
* 以下の例のように、**index.html** を除くすべてのファイルを zip アーカイブ内に配置します。
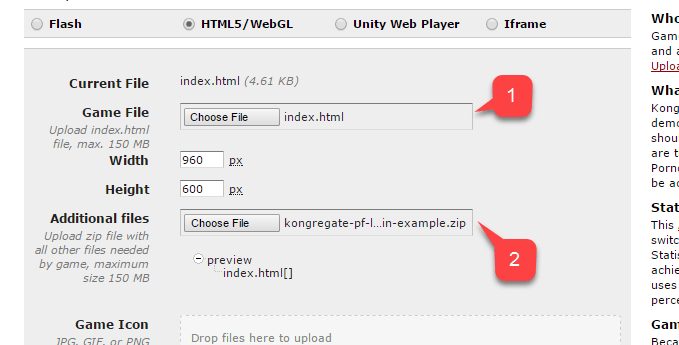
 以前保存した URL を使用して **アプリケーション アップロード** ページにアクセスします。
1. **index.html** を **ゲーム ファイル** として選択します。
2. 次に、zip アーカイブを **追加ファイル** として選択します。
* ライセンスを承諾してアップロードします。
以前保存した URL を使用して **アプリケーション アップロード** ページにアクセスします。
1. **index.html** を **ゲーム ファイル** として選択します。
2. 次に、zip アーカイブを **追加ファイル** として選択します。
* ライセンスを承諾してアップロードします。
 プレビューが開いたら、メッセージが変わるにつれてゲームがライブで表示されるはずです。
完了時に、PlayFab を通じてログインが成功したことがメッセージで示されるはずです。
この時点で、PlayFab と Kongregate を正常に統合できました。
## Related topics
- [プラットフォーム固有の認証](/ja-jp/services/playfab/identity/player-identity/platform-specific-authentication/index.md)
- [Kongregate と HTML5 を使用した PlayFab 認証のセットアップ](/ja-jp/services/playfab/identity/player-identity/platform-specific-authentication/kongregate-html5.md)
- [Steam と Unity を使用した PlayFab 認証のセットアップ](/ja-jp/services/playfab/identity/player-identity/platform-specific-authentication/steam-unity.md)
- [Facebook と Unity を使用した PlayFab 認証のセットアップ](/ja-jp/services/playfab/identity/player-identity/platform-specific-authentication/facebook-unity.md)
- [Google と HTML5 を使用した PlayFab 認証のセットアップ](/ja-jp/services/playfab/identity/player-identity/platform-specific-authentication/google-html5.md)
プレビューが開いたら、メッセージが変わるにつれてゲームがライブで表示されるはずです。
完了時に、PlayFab を通じてログインが成功したことがメッセージで示されるはずです。
この時点で、PlayFab と Kongregate を正常に統合できました。
## Related topics
- [プラットフォーム固有の認証](/ja-jp/services/playfab/identity/player-identity/platform-specific-authentication/index.md)
- [Kongregate と HTML5 を使用した PlayFab 認証のセットアップ](/ja-jp/services/playfab/identity/player-identity/platform-specific-authentication/kongregate-html5.md)
- [Steam と Unity を使用した PlayFab 認証のセットアップ](/ja-jp/services/playfab/identity/player-identity/platform-specific-authentication/steam-unity.md)
- [Facebook と Unity を使用した PlayFab 認証のセットアップ](/ja-jp/services/playfab/identity/player-identity/platform-specific-authentication/facebook-unity.md)
- [Google と HTML5 を使用した PlayFab 認証のセットアップ](/ja-jp/services/playfab/identity/player-identity/platform-specific-authentication/google-html5.md)