> ## Documentation Index
> Fetch the complete documentation index at: https://devdocs.xbox.com/llms.txt
> Use this file to discover all available pages before exploring further.
# Unity で Google Play Games サインインを使用した PlayFab 認証
> Play Console のセットアップとプレイヤー認証をカバーする、PlayFab SDK を使用して Unity プロジェクトに Google Play Games サインインを追加する手順ガイド。
# Unity で Google Play Games サインインを使用した PlayFab 認証のセットアップ
## 前提条件
* Unity ゲーム エンジンを使用して構築されたプロジェクト。
* Google 開発者アカウント。
* PlayFab のゲーム タイトルにアクセスできる PlayFab 開発者アカウント。
* [PlayFab Unity Editor Extensions と Unity SDK](/services/playfab/sdks/unity3d/quickstart)。
* [Google Play Games SDK](https://github.com/playgameservices/play-games-plugin-for-unity)。
* [ログインの基本とベスト プラクティス](/services/playfab/identity/player-identity/login/login-basics-best-practices) に精通していること。
## 開始する
まず、Google Play でいくつかの基本設定を行います。これらの作業を実行するための優れたガイドがいくつかあるため、車輪の再発明はしません。
1. **アプリケーション** を作成します — アプリケーションを作成していない場合は、[Google Play Developer Console](https://play.google.com/apps/publish) で作成する必要があります。
2. ゲームの AAB をビルドし、内部テスト用にアップロードします。[このガイド](https://support.google.com/googleplay/android-developer/answer/9859348?visit_id=638373214207471441-2235763004\&rd=1) に従って、アプリを **Internal testing** トラックにリリースする方法を確認できます。署名プロセスでは、この目的のためにアプリ バンドル用の独自のキーストアを使用する必要があることを考慮してください。キーストアの作成方法については、[このドキュメント](https://docs.unity3d.com/Manual/android-keystore-create.html) を参照してください。
3. このページの手順に従って Google Play Games サービスをセットアップします: [Google Play Games サービスのセットアップ](https://developers.google.com/games/services/console/enabling)。
4. [Google Play Games SDK](https://github.com/playgameservices/play-games-plugin-for-unity) をダウンロードしてインストールします。
5. PlayFab Unity SDK をインストールします (この作業を行う方法がわからない場合は、[Unity3D クイックスタート ガイド](/services/playfab/sdks/unity3d/quickstart) に従ってください)。
## Google Play Games の構成
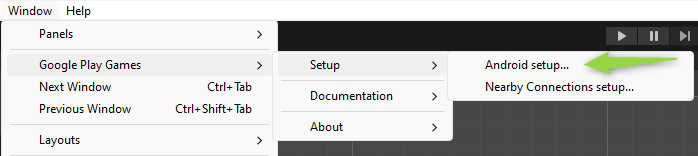
Google Play Games は、Google Play Games SDK と共にインストールされるツールセットから構成できます。これらのツールにアクセスするには:
* **Window** タブに移動します。
* **Google Play Games** を選択します。
* **Setup** に移動します。
* 次に **Android Setup** にアクセスします。
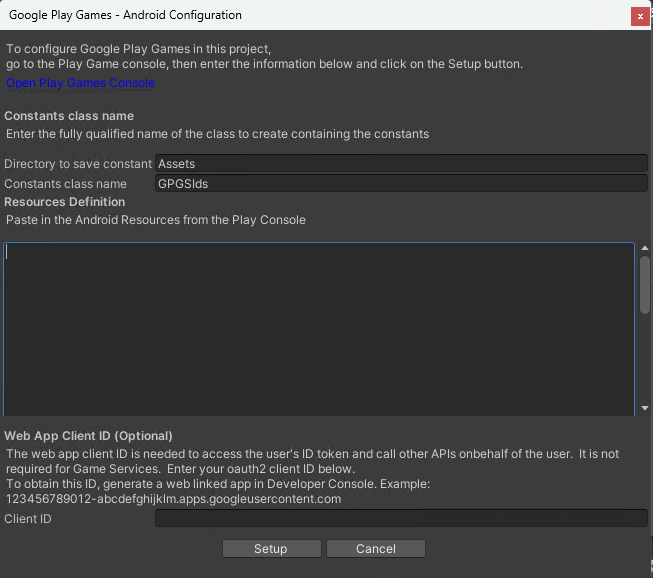
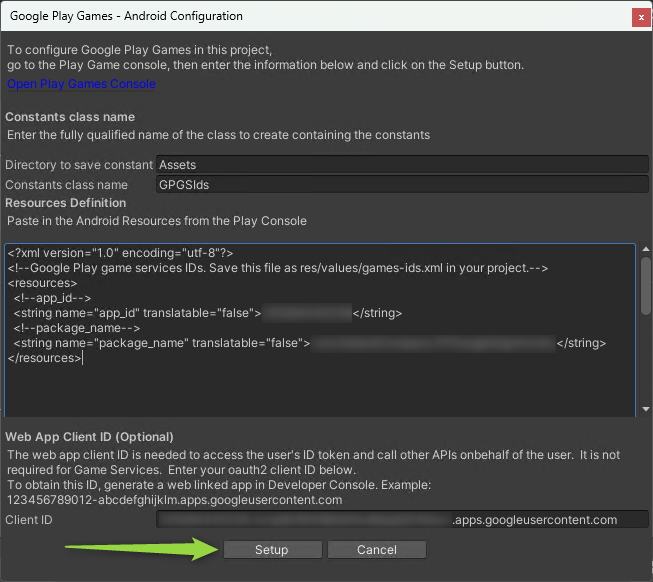
 * Android 構成ウィンドウが表示されます。この画面で Resources Definition と Web App Client ID を入力する必要があります。
 ### Resources Definition を取得する
* Android Resources 定義を取得するには、[こちら](https://developer.android.com/games/pgs/unity/unity-start#get-android-resources) の手順に従ってください。
### Web App Client ID を取得する
Google サインインを PlayFab で動作させるには、"Web application" タイプの OAuth Client ID 資格情報を作成することで取得できる Web Client ID を使用する必要があります。
OAuth Client ID を作成する前に、PlayFab **API Endpoint** を知っておく必要があります。これは、次の手順に従って確認できます:
* [Game Manager](https://developer.playfab.com/) にログインします。
* タイトルを選択します。
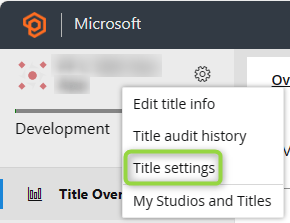
* タイトル名の横にある **歯車アイコン** をクリックし、**Title Settings** を選択して、タイトル設定に移動します。
### Resources Definition を取得する
* Android Resources 定義を取得するには、[こちら](https://developer.android.com/games/pgs/unity/unity-start#get-android-resources) の手順に従ってください。
### Web App Client ID を取得する
Google サインインを PlayFab で動作させるには、"Web application" タイプの OAuth Client ID 資格情報を作成することで取得できる Web Client ID を使用する必要があります。
OAuth Client ID を作成する前に、PlayFab **API Endpoint** を知っておく必要があります。これは、次の手順に従って確認できます:
* [Game Manager](https://developer.playfab.com/) にログインします。
* タイトルを選択します。
* タイトル名の横にある **歯車アイコン** をクリックし、**Title Settings** を選択して、タイトル設定に移動します。
 * **API Features** タブを選択します。
* **API endpoint** フィールドにコピーします。
* **API Features** タブを選択します。
* **API endpoint** フィールドにコピーします。
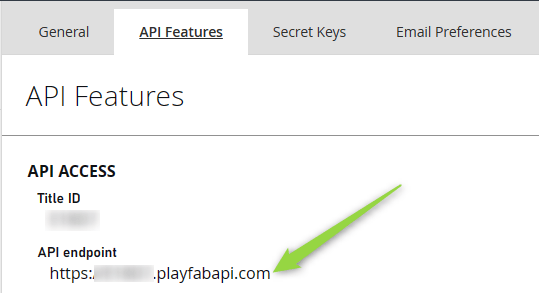 タイトルの API Endpoint がわかったので、[こちら](https://developers.google.com/workspace/guides/create-credentials#web-application) に記載されている手順に従って OAuth Client ID 資格情報を作成してください。
* Client ID を作成する際に、API エンドポイントを **Authorized JavaScript origin** として Client ID に追加する必要があります。
タイトルの API Endpoint がわかったので、[こちら](https://developers.google.com/workspace/guides/create-credentials#web-application) に記載されている手順に従って OAuth Client ID 資格情報を作成してください。
* Client ID を作成する際に、API エンドポイントを **Authorized JavaScript origin** として Client ID に追加する必要があります。
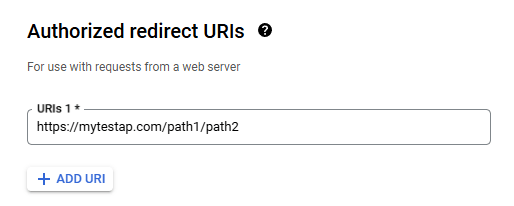
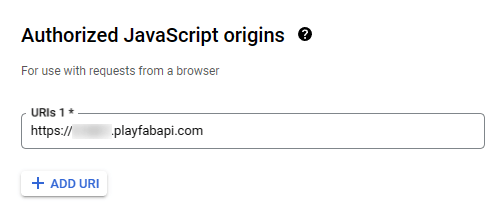 * また、独自のアプリケーション リダイレクト URI を **Authorized Redirect URI** として追加してください。この手順を行わないと、**redirect\_uri の不一致** エラーが発生します。
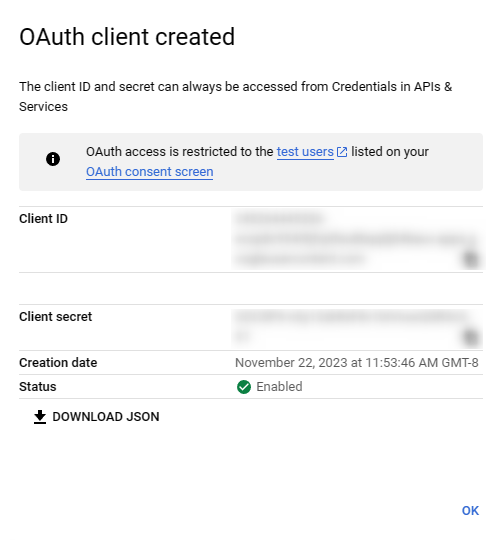
 Client ID を作成すると、次のような画面が表示され、生成された Client ID 文字列と Client Secret を取得できます。
 これで、Unity の Android Configuration ウィンドウに戻り、**Client ID** テキストボックスに Client ID を貼り付けることができます:
 両方の値が入力されたら、**Setup** を選択できます:
 ## PlayFab Google サインインのセットアップ
PlayFab には、Google サインインをセットアップするための独自のプロセスがあります。このセットアップは、PlayFab 開発者アカウントで行うことができます。持っていない場合は、[無料の開発者アカウントにサインアップ](https://developer.playfab.com) できます。
PlayFab で Google をセットアップするには:
* ダッシュボードの **Add-ons** セクションに移動します。
* **Google Add-On** に移動します。
* そこから **Install Google** ボタンを選択します。
このフォームに入力する必要があるいくつかの項目があります:
* **Google App Package ID** — このフィールドは Android パッケージの名前です。たとえば、サンプルでは `com.playfab.gpgexample` を使用しています。
* **Google App License Key** — このフィールドは必須ですが、Google サインインとは関係ありません。このフィールドは、**Receipt Validation API** を使用したレシート検証の設定に使用します。
この License Key は [Google Developer Console](https://play.google.com/apps/publish) から取得できます。アプリに移動し、**Monetize** セクションの下にある **Monetization Setup** というセクションを選択します。その中で、**Licensing** テキストボックスが見えるまで下にスクロールし、Base64 でエンコードされた RSA 公開キーをこのフィールドにコピーして貼り付けます。
* **Google OAuth Client ID** — Unity の **Google Play Games SDK** セットアップで使用した Web Client ID。
* **Google OAuth Client Secret** — OAuth Client ID を作成したときに取得したシークレット キー。
* **Service Account Key** — このフィールドはサービス アカウント キーの JSON 文字列を想定しています。[こちら](https://developers.google.com/workspace/guides/create-credentials#create_a_service_account) の手順に従ってサービス アカウント キーを作成する必要があります。次に、[こちら](https://developers.google.com/workspace/guides/create-credentials#create_credentials_for_a_service_account) の手順に従ってサービス アカウントの資格情報を作成します。資格情報 JSON ファイルを取得したら、JSON の内容全体をこのフィールドに貼り付けます。
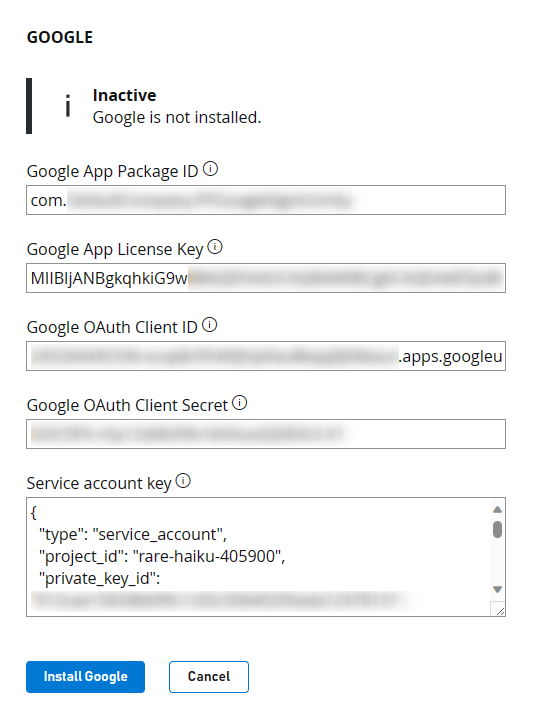
アドオン構成は、保存前に次のようになります:
## PlayFab Google サインインのセットアップ
PlayFab には、Google サインインをセットアップするための独自のプロセスがあります。このセットアップは、PlayFab 開発者アカウントで行うことができます。持っていない場合は、[無料の開発者アカウントにサインアップ](https://developer.playfab.com) できます。
PlayFab で Google をセットアップするには:
* ダッシュボードの **Add-ons** セクションに移動します。
* **Google Add-On** に移動します。
* そこから **Install Google** ボタンを選択します。
このフォームに入力する必要があるいくつかの項目があります:
* **Google App Package ID** — このフィールドは Android パッケージの名前です。たとえば、サンプルでは `com.playfab.gpgexample` を使用しています。
* **Google App License Key** — このフィールドは必須ですが、Google サインインとは関係ありません。このフィールドは、**Receipt Validation API** を使用したレシート検証の設定に使用します。
この License Key は [Google Developer Console](https://play.google.com/apps/publish) から取得できます。アプリに移動し、**Monetize** セクションの下にある **Monetization Setup** というセクションを選択します。その中で、**Licensing** テキストボックスが見えるまで下にスクロールし、Base64 でエンコードされた RSA 公開キーをこのフィールドにコピーして貼り付けます。
* **Google OAuth Client ID** — Unity の **Google Play Games SDK** セットアップで使用した Web Client ID。
* **Google OAuth Client Secret** — OAuth Client ID を作成したときに取得したシークレット キー。
* **Service Account Key** — このフィールドはサービス アカウント キーの JSON 文字列を想定しています。[こちら](https://developers.google.com/workspace/guides/create-credentials#create_a_service_account) の手順に従ってサービス アカウント キーを作成する必要があります。次に、[こちら](https://developers.google.com/workspace/guides/create-credentials#create_credentials_for_a_service_account) の手順に従ってサービス アカウントの資格情報を作成します。資格情報 JSON ファイルを取得したら、JSON の内容全体をこのフィールドに貼り付けます。
アドオン構成は、保存前に次のようになります:
 **Save Settings** を忘れずに実行してください!
## Unity ゲームに Google サインインを追加する
Google サインインを動作させるためのコードは非常にシンプルです。初期化コードは、Start (またはアプリを初期化または起動する任意の場所) に配置します。
このコードは、ゲームやアプリのアーキテクチャとフレームワークに応じて、さまざまな場所に配置できます。いずれの場合も、次のコードは Google Play Games を初期化します。
**using** ステートメントを忘れないようにして、Google Play Games SDK を使用できるようにしてください。
```csharp theme={null}
using GooglePlayGames;
using GooglePlayGames.BasicApi;
using PlayFab;
using PlayFab.ClientModels;
using UnityEngine;
public class PFGoogleSignInUnity : MonoBehaviour
{
void Start()
{
PlayGamesPlatform.Instance.Authenticate(ProcessAuthentication);
}
internal void ProcessAuthentication(SignInStatus status)
{
if (status == SignInStatus.Success)
{
PlayGamesPlatform.Instance.RequestServerSideAccess(false, ProcessServerAuthCode);
}
}
private void ProcessServerAuthCode(string serverAuthCode)
{
Debug.Log("Server Auth Code: " + serverAuthCode);
var request = new LoginWithGooglePlayGamesServicesRequest
{
ServerAuthCode = serverAuthCode,
CreateAccount = true,
TitleId = PlayFabSettings.TitleId
};
PlayFabClientAPI.LoginWithGooglePlayGamesServices(request, OnLoginWithGooglePlayGamesServicesSuccess, OnLoginWithGooglePlayGamesServicesFailure);
}
private void OnLoginWithGooglePlayGamesServicesSuccess(LoginResult result)
{
Debug.Log("PF Login Success LoginWithGooglePlayGamesServices");
}
private void OnLoginWithGooglePlayGamesServicesFailure(PlayFabError error)
{
Debug.Log("PF Login Failure LoginWithGooglePlayGamesServices: " + error.GenerateErrorReport());
}
}
```
何が起こっているかを正確に説明します:
* まず、`PlayGamesPlatform.Instance.Authenticate` でログインします — この関数は結果を処理するコールバック関数をパラメーターとして受け取り、受け取った *SignInStatus* に基づいてユーザーが正常にログインできたかどうかを知らせます。
* テスト アカウントをアプリに追加しないと、コールバック *SignInStatus* の結果は、テスト中は常に *Canceled* になります。この問題が発生した場合は、[このガイド](https://developers.google.com/games/services/console/testpub) の手順に従って、Google アプリケーションにテスターを追加してください。
`PlayGamesPlatform.Instance.Authenticate` の呼び出しにより、**Google Play Games** サインイン ダイアログがポップアップ表示されます。
* 次に、ログインに成功した場合、`PlayGamesPlatform.Instance.RequestServerSideAccess` を呼び出します。これは別のコールバックを受け取り、ServerAuthCode 文字列を返します。
* 次に、`PlayFabClientAPI.LoginWithGooglePlayGamesServices` を呼び出し、Google から取得した `AuthCode` を `ServerAuthCode` パラメーターとして渡します。
* 最後に、`LoginWithGooglePlayGamesServices` の呼び出しの結果に応じて、`OnLoginWithGooglePlayGamesServicesSuccess` または `OnLoginWithGooglePlayGamesServicesFailure` が呼び出されます。これらのコールバックは、PlayFab へのログイン操作結果を処理します。この時点で、ダッシュボードにログイン成功が表示されるはずです!
このガイドがお役に立てば幸いです。ただし、質問がある場合は、遠慮なく [コミュニティ フォーラム](https://community.playfab.com/) にお問い合わせください。
## Related topics
- [プラットフォーム固有の認証](/ja-jp/services/playfab/identity/player-identity/platform-specific-authentication/index.md)
- [Google マーケットプレイスでの引き換え](/ja-jp/services/playfab/economy-monetization/economy-v2/marketplace/marketplace-redemption/google.md)
- [Unity で Google サインインから Google Play Games に移行する](/ja-jp/services/playfab/identity/player-identity/platform-specific-authentication/google-play-games-sign-in-migration-details.md)
- [Google と HTML5 を使用した PlayFab 認証のセットアップ](/ja-jp/services/playfab/identity/player-identity/platform-specific-authentication/google-html5.md)
- [Steam と Unity を使用した PlayFab 認証のセットアップ](/ja-jp/services/playfab/identity/player-identity/platform-specific-authentication/steam-unity.md)
**Save Settings** を忘れずに実行してください!
## Unity ゲームに Google サインインを追加する
Google サインインを動作させるためのコードは非常にシンプルです。初期化コードは、Start (またはアプリを初期化または起動する任意の場所) に配置します。
このコードは、ゲームやアプリのアーキテクチャとフレームワークに応じて、さまざまな場所に配置できます。いずれの場合も、次のコードは Google Play Games を初期化します。
**using** ステートメントを忘れないようにして、Google Play Games SDK を使用できるようにしてください。
```csharp theme={null}
using GooglePlayGames;
using GooglePlayGames.BasicApi;
using PlayFab;
using PlayFab.ClientModels;
using UnityEngine;
public class PFGoogleSignInUnity : MonoBehaviour
{
void Start()
{
PlayGamesPlatform.Instance.Authenticate(ProcessAuthentication);
}
internal void ProcessAuthentication(SignInStatus status)
{
if (status == SignInStatus.Success)
{
PlayGamesPlatform.Instance.RequestServerSideAccess(false, ProcessServerAuthCode);
}
}
private void ProcessServerAuthCode(string serverAuthCode)
{
Debug.Log("Server Auth Code: " + serverAuthCode);
var request = new LoginWithGooglePlayGamesServicesRequest
{
ServerAuthCode = serverAuthCode,
CreateAccount = true,
TitleId = PlayFabSettings.TitleId
};
PlayFabClientAPI.LoginWithGooglePlayGamesServices(request, OnLoginWithGooglePlayGamesServicesSuccess, OnLoginWithGooglePlayGamesServicesFailure);
}
private void OnLoginWithGooglePlayGamesServicesSuccess(LoginResult result)
{
Debug.Log("PF Login Success LoginWithGooglePlayGamesServices");
}
private void OnLoginWithGooglePlayGamesServicesFailure(PlayFabError error)
{
Debug.Log("PF Login Failure LoginWithGooglePlayGamesServices: " + error.GenerateErrorReport());
}
}
```
何が起こっているかを正確に説明します:
* まず、`PlayGamesPlatform.Instance.Authenticate` でログインします — この関数は結果を処理するコールバック関数をパラメーターとして受け取り、受け取った *SignInStatus* に基づいてユーザーが正常にログインできたかどうかを知らせます。
* テスト アカウントをアプリに追加しないと、コールバック *SignInStatus* の結果は、テスト中は常に *Canceled* になります。この問題が発生した場合は、[このガイド](https://developers.google.com/games/services/console/testpub) の手順に従って、Google アプリケーションにテスターを追加してください。
`PlayGamesPlatform.Instance.Authenticate` の呼び出しにより、**Google Play Games** サインイン ダイアログがポップアップ表示されます。
* 次に、ログインに成功した場合、`PlayGamesPlatform.Instance.RequestServerSideAccess` を呼び出します。これは別のコールバックを受け取り、ServerAuthCode 文字列を返します。
* 次に、`PlayFabClientAPI.LoginWithGooglePlayGamesServices` を呼び出し、Google から取得した `AuthCode` を `ServerAuthCode` パラメーターとして渡します。
* 最後に、`LoginWithGooglePlayGamesServices` の呼び出しの結果に応じて、`OnLoginWithGooglePlayGamesServicesSuccess` または `OnLoginWithGooglePlayGamesServicesFailure` が呼び出されます。これらのコールバックは、PlayFab へのログイン操作結果を処理します。この時点で、ダッシュボードにログイン成功が表示されるはずです!
このガイドがお役に立てば幸いです。ただし、質問がある場合は、遠慮なく [コミュニティ フォーラム](https://community.playfab.com/) にお問い合わせください。
## Related topics
- [プラットフォーム固有の認証](/ja-jp/services/playfab/identity/player-identity/platform-specific-authentication/index.md)
- [Google マーケットプレイスでの引き換え](/ja-jp/services/playfab/economy-monetization/economy-v2/marketplace/marketplace-redemption/google.md)
- [Unity で Google サインインから Google Play Games に移行する](/ja-jp/services/playfab/identity/player-identity/platform-specific-authentication/google-play-games-sign-in-migration-details.md)
- [Google と HTML5 を使用した PlayFab 認証のセットアップ](/ja-jp/services/playfab/identity/player-identity/platform-specific-authentication/google-html5.md)
- [Steam と Unity を使用した PlayFab 認証のセットアップ](/ja-jp/services/playfab/identity/player-identity/platform-specific-authentication/steam-unity.md)