> ## Documentation Index
> Fetch the complete documentation index at: https://devdocs.xbox.com/llms.txt
> Use this file to discover all available pages before exploring further.

# Google と HTML5 を使用した PlayFab 認証のセットアップ

> Google API のセットアップと OAuth プレイヤー認証をカバーする、HTML5 と JavaScript を使用して PlayFab タイトルに Google サインインを追加する手順ガイド。

このチュートリアルでは、Google と HTML5/JavaScript を使用した PlayFab 認証のプロセスを説明します。

## 要件

必要なもの:

* テスト用の [Google アカウント](https://google.com/)。
* 登録済みの `[PlayFab](https://developer.playfab.com/)` タイトル。
* [ログインの基本とベスト プラクティス](/services/playfab/identity/player-identity/login/login-basics-best-practices) に精通していること。
* 少なくとも、静的 HTML ファイルとして機能する有効なドメイン名を持つサーバー。セットアップ方法については、[テスト用の HTTP サーバーの実行](/services/playfab/identity/player-identity/platform-specific-authentication/running-an-http-server-for-testing) チュートリアルを参照してください。

## サーバーとドメイン

このガイドに従うには、有効なドメインを持つサーバーが必要です。登録済みドメインとリモート Web サーバーがまだない場合は、[テスト用の HTTP サーバーの実行](/services/playfab/identity/player-identity/platform-specific-authentication/running-an-http-server-for-testing) チュートリアルに従って、有効なドメイン名でローカル Web サーバーを実行してください。

このガイド全体を通じて、ドメインは `[http://playfab.example](http://playfab.example)` であると想定します。

## Google API プロジェクトを登録する

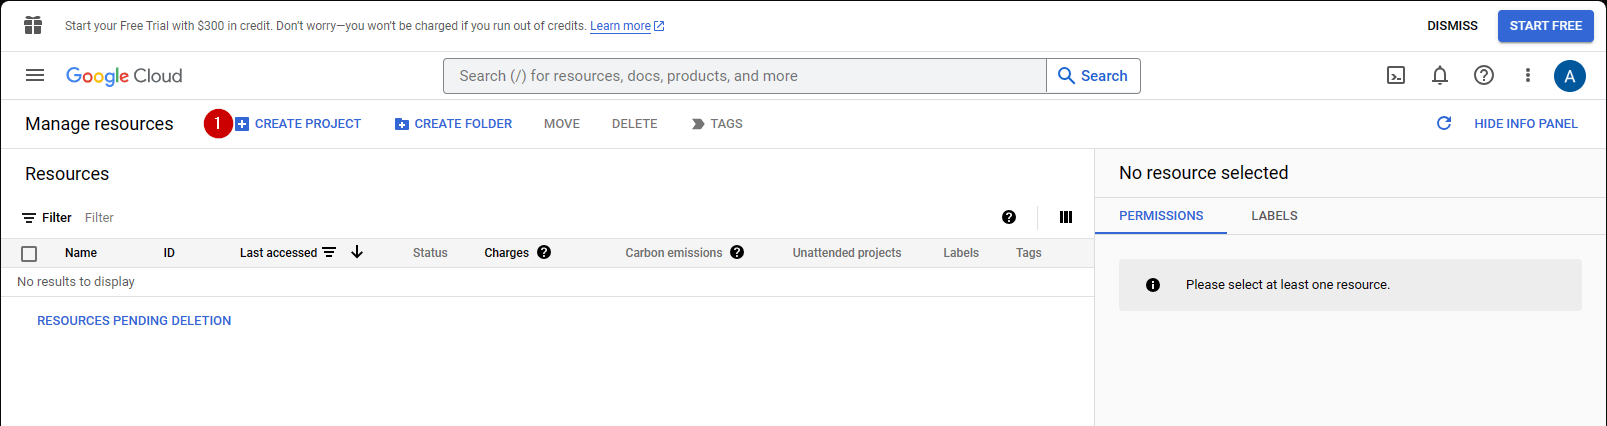
まず、[Google API Console](https://console.developers.google.com/) に移動します:

1. **CREATE PROJECT** に移動して選択します。

<img src="https://mintcdn.com/microsoft-4404708b/mLCHf0iQv3VidfBe/images/playfab/identity/player-identity/platform-specific-authentication/tutorials/google-html5/create-project.png?fit=max&auto=format&n=mLCHf0iQv3VidfBe&q=85&s=5b9ba00fd573b49ddbdc0a4b47d173a4" alt="Google API Manager 新しい資格情報の作成" width="1607" height="426" data-path="images/playfab/identity/player-identity/platform-specific-authentication/tutorials/google-html5/create-project.png" />

1. **Project Name** の下のフィールドに入力します。
2. **Create** ボタンを選択します。
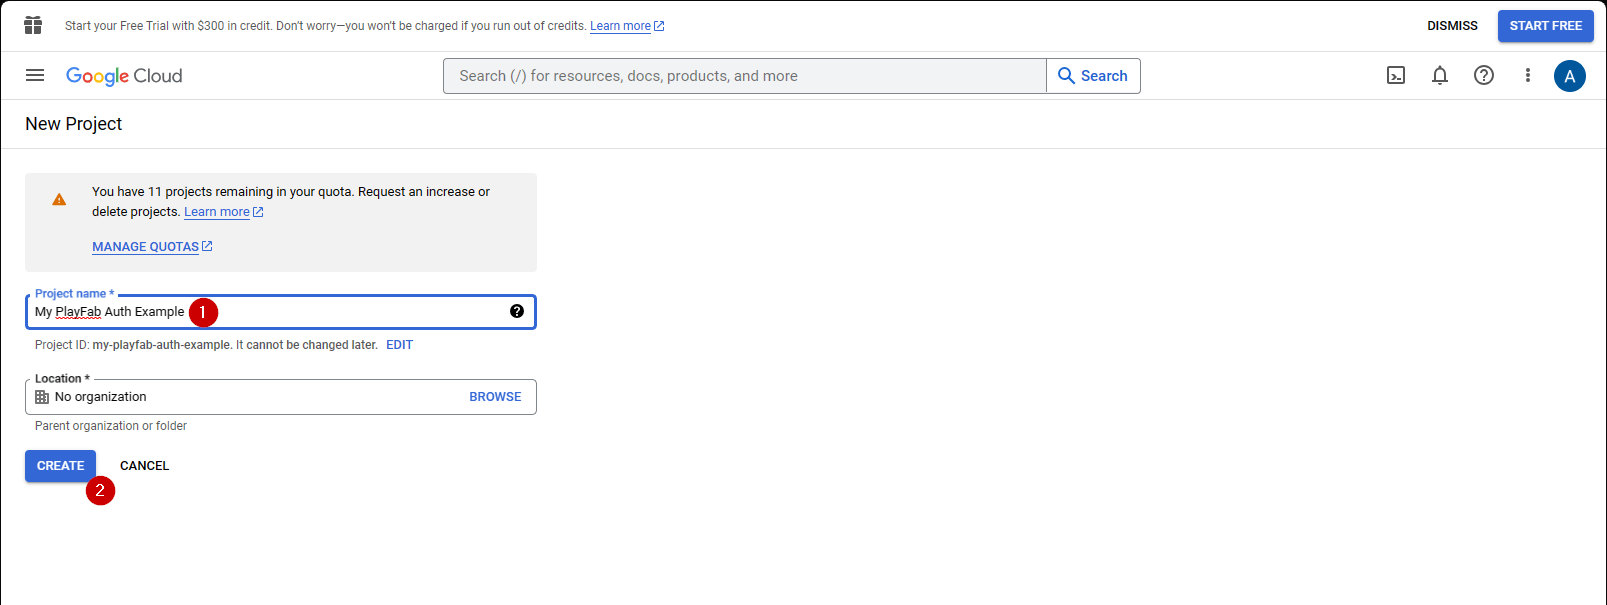
<img src="https://mintcdn.com/microsoft-4404708b/mLCHf0iQv3VidfBe/images/playfab/identity/player-identity/platform-specific-authentication/tutorials/google-html5/create-new-project.png?fit=max&auto=format&n=mLCHf0iQv3VidfBe&q=85&s=10b5bb3e56749cdc940cc756f0285d0d" alt="Google API Manager 新しいプロジェクト" width="1607" height="605" data-path="images/playfab/identity/player-identity/platform-specific-authentication/tutorials/google-html5/create-new-project.png" />

<Note>
  **API Manager** がプロジェクトを生成するのに 10 ～ 20 秒かかるのは正常です。
</Note>

プロジェクトが作成されたら:

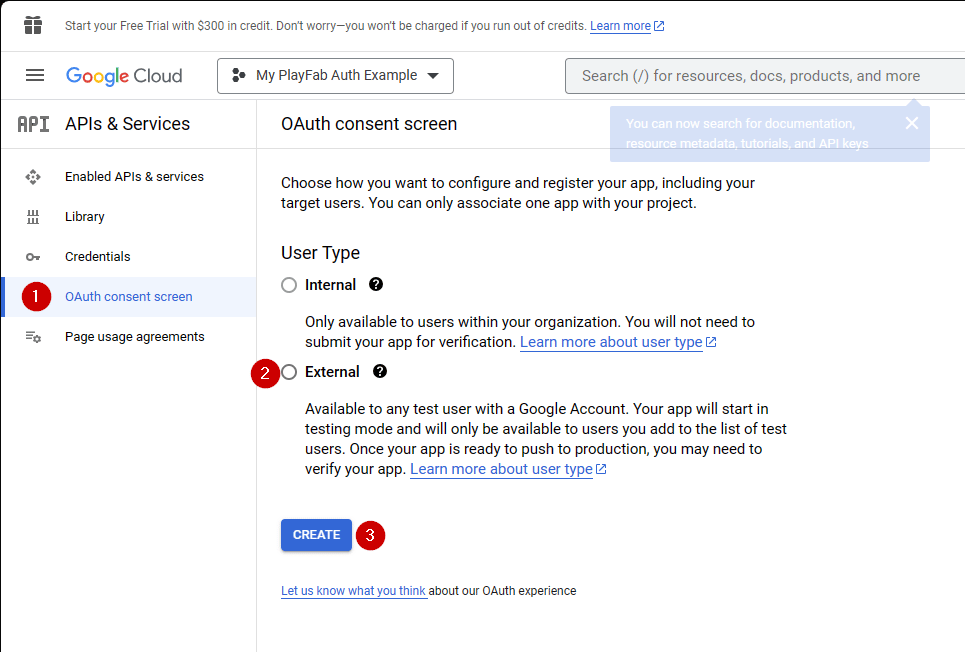
1. **OAuth consent screen** に移動します。
2. User Type の下で **External** を選択します
3. 次に **Create** を選択します。

<img src="https://mintcdn.com/microsoft-4404708b/mLCHf0iQv3VidfBe/images/playfab/identity/player-identity/platform-specific-authentication/tutorials/google-html5/oauth-consent-screen.png?fit=max&auto=format&n=mLCHf0iQv3VidfBe&q=85&s=f6889444d347b1f9d78f0309c2e75193" alt="Google API Manager OAuth 同意画面" width="965" height="652" data-path="images/playfab/identity/player-identity/platform-specific-authentication/tutorials/google-html5/oauth-consent-screen.png" />

1. App Name を入力します
2. **user support email** と **Developer Contact Email** のメール アドレスがあることを確認します
3. 次に **SAVE AND CONTINUE** を選択します
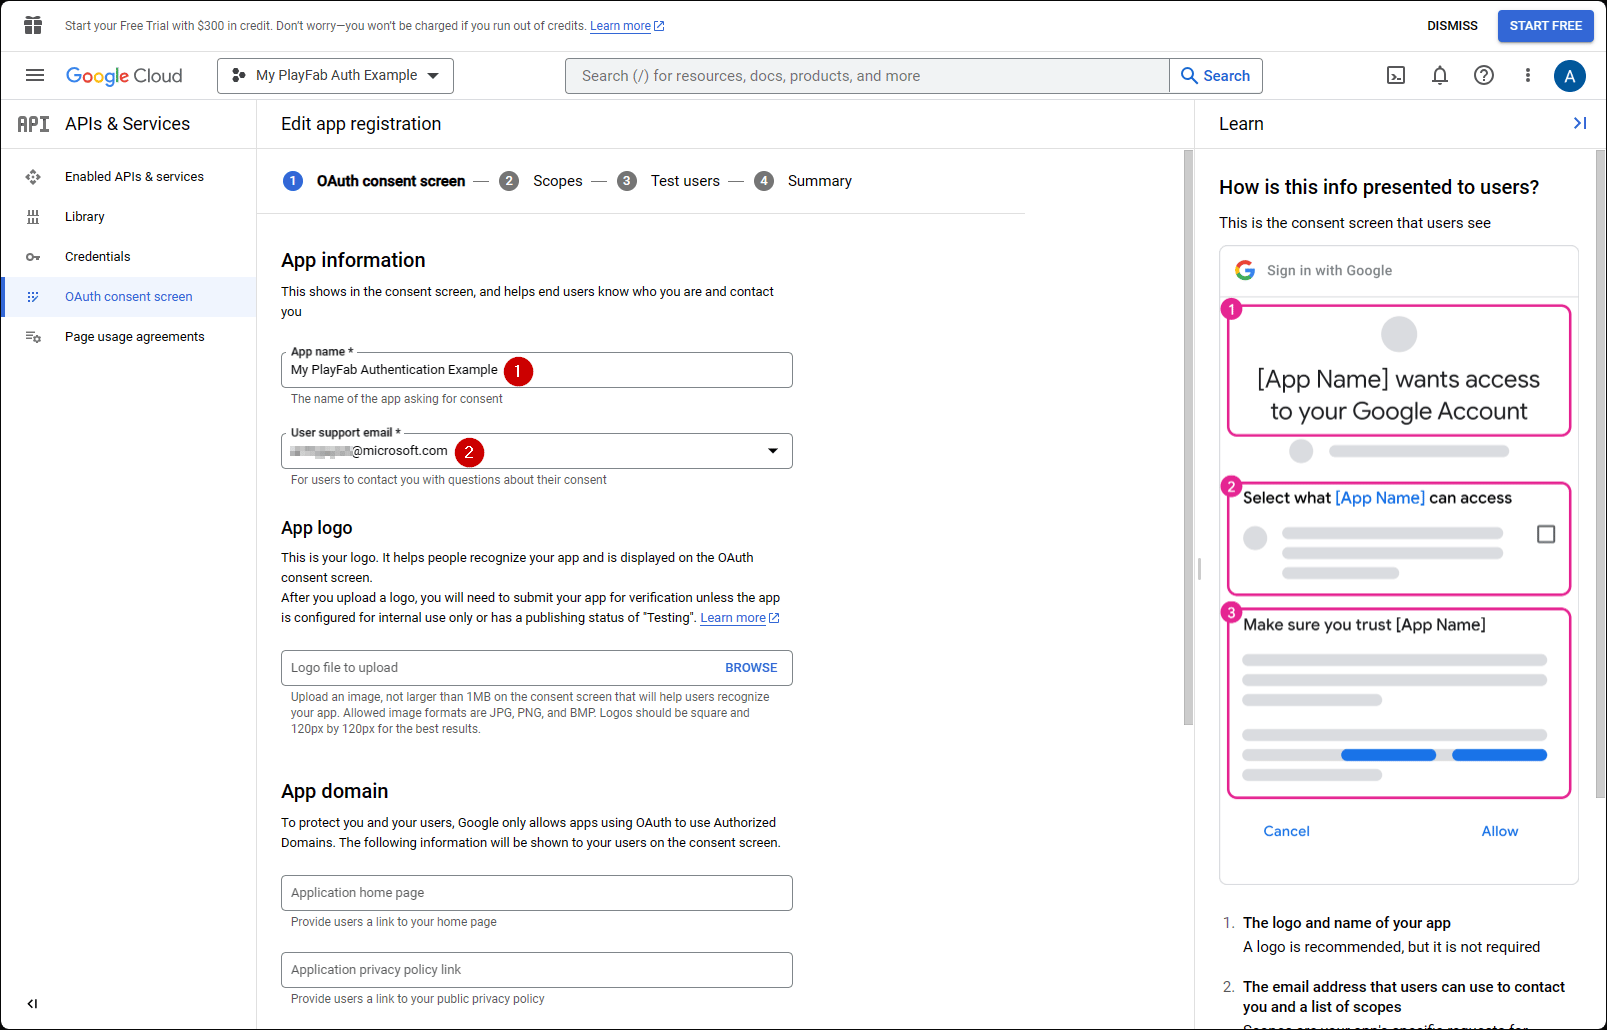
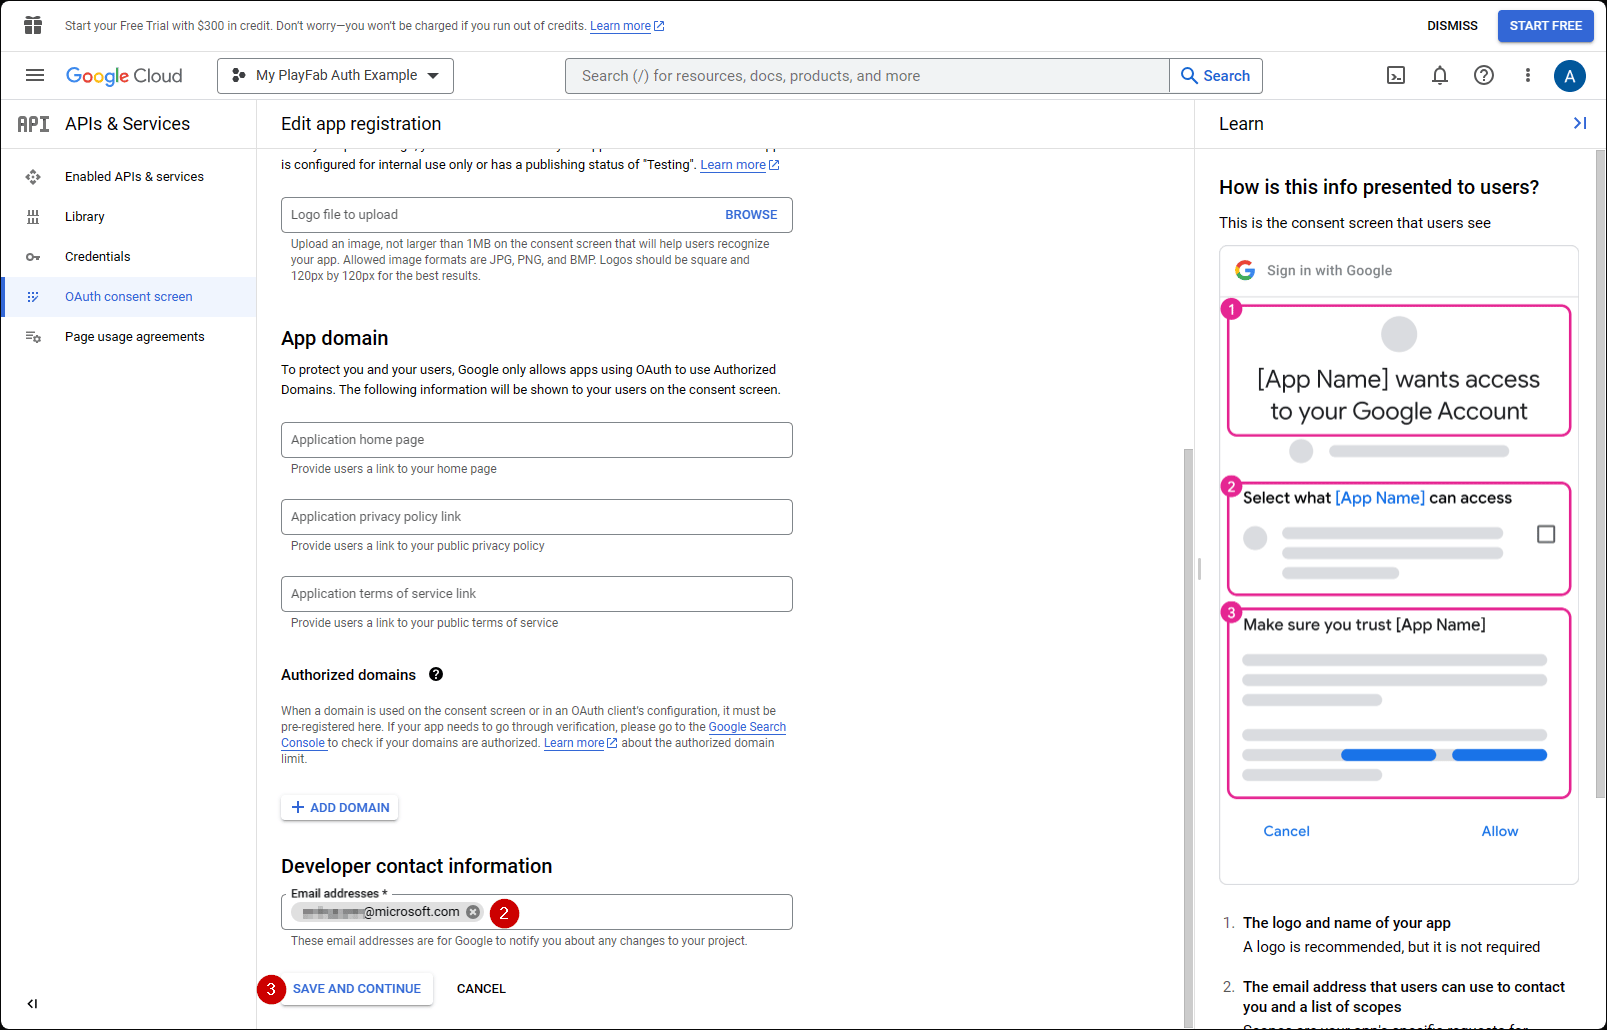
<img src="https://mintcdn.com/microsoft-4404708b/mLCHf0iQv3VidfBe/images/playfab/identity/player-identity/platform-specific-authentication/tutorials/google-html5/create-oauth-consent-screen-1.png?fit=max&auto=format&n=mLCHf0iQv3VidfBe&q=85&s=f3d7855e3f4b8ecd65cf3eb41f8f358c" alt="Google API Manager OAuth 同意画面の構成" width="1607" height="1030" data-path="images/playfab/identity/player-identity/platform-specific-authentication/tutorials/google-html5/create-oauth-consent-screen-1.png" />

<img src="https://mintcdn.com/microsoft-4404708b/mLCHf0iQv3VidfBe/images/playfab/identity/player-identity/platform-specific-authentication/tutorials/google-html5/create-oauth-consent-screen-2.png?fit=max&auto=format&n=mLCHf0iQv3VidfBe&q=85&s=d6013db1014b105eae236b04f61a92b9" alt="Google API Manager OAuth 同意画面の構成 2" width="1607" height="1030" data-path="images/playfab/identity/player-identity/platform-specific-authentication/tutorials/google-html5/create-oauth-consent-screen-2.png" />

1. 次に、**Credentials** に移動します。
2. **Create credentials** を選択します。
3. 次に **OAuth client ID** を選択します。
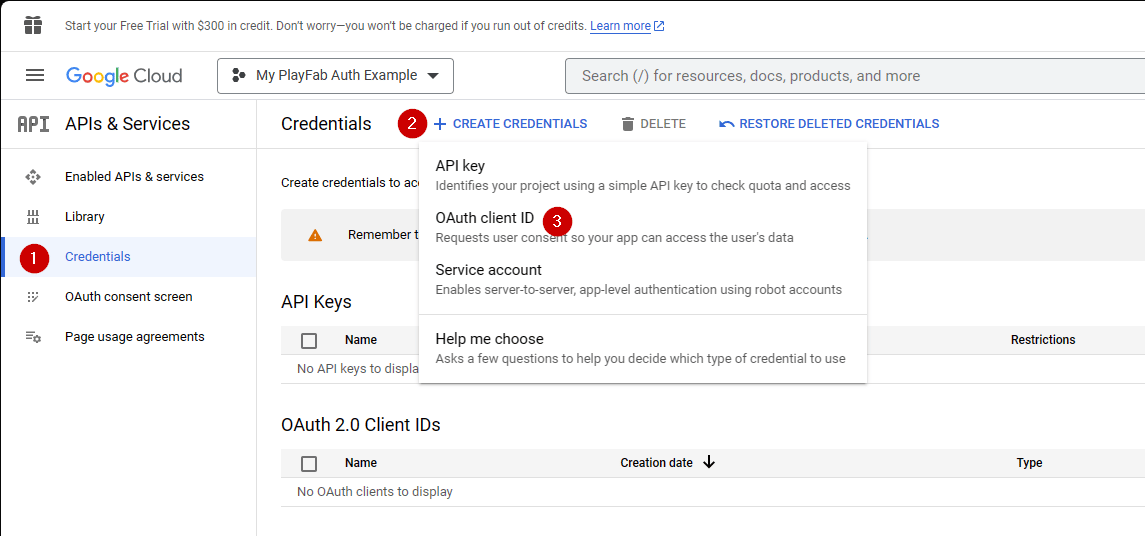
<img src="https://mintcdn.com/microsoft-4404708b/mLCHf0iQv3VidfBe/images/playfab/identity/player-identity/platform-specific-authentication/tutorials/google-html5/open-oauth-credentials.png?fit=max&auto=format&n=mLCHf0iQv3VidfBe&q=85&s=6d594083a2d96943f337a0c2489c40eb" alt="Google API Manager OAuth 資格情報を開く" width="1145" height="536" data-path="images/playfab/identity/player-identity/platform-specific-authentication/tutorials/google-html5/open-oauth-credentials.png" />

1. **Application type** として **Web Application** を選択します。
2. アプリケーションに **Name** を付けます。
3. **Authorized JavaScript origins** にドメインを追加します — この場合は `[PlayFab](http://playfab.example.com)` です。
4. 最後に、**Create** ボタンを選択して変更を確定します。
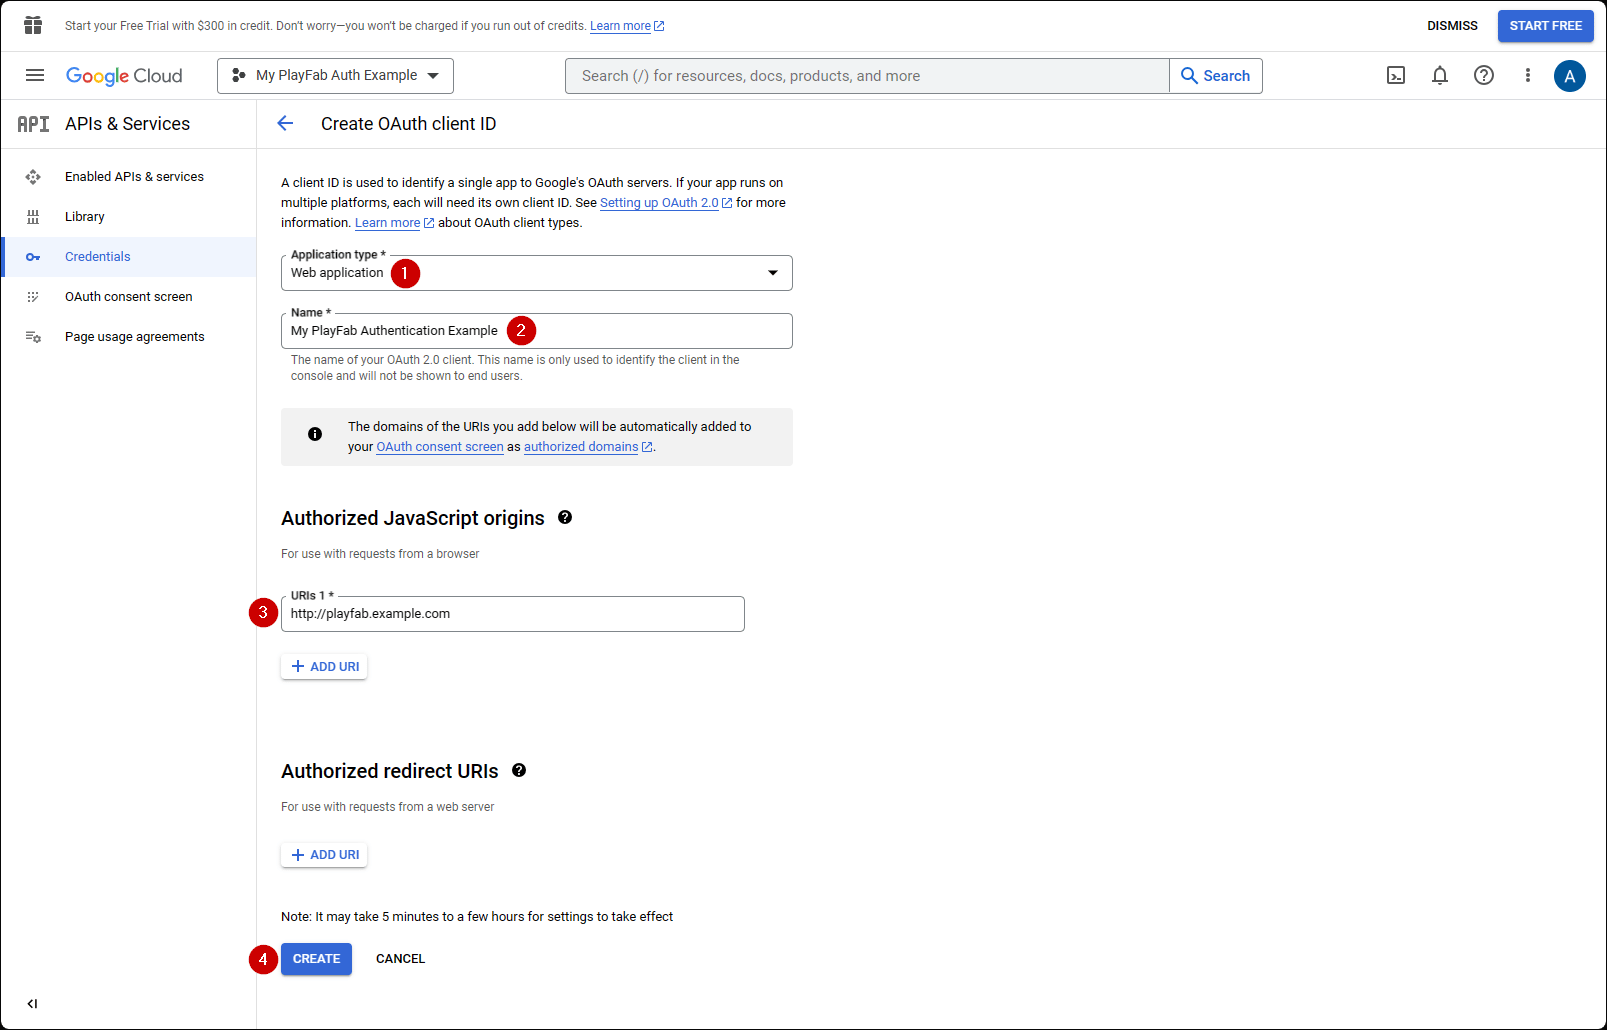
<img src="https://mintcdn.com/microsoft-4404708b/mLCHf0iQv3VidfBe/images/playfab/identity/player-identity/platform-specific-authentication/tutorials/google-html5/create-oauth-credentials.png?fit=max&auto=format&n=mLCHf0iQv3VidfBe&q=85&s=0cc913b14a6883d7f2286121ce8af563" alt="Google API Manager OAuth 資格情報の作成" width="1607" height="1030" data-path="images/playfab/identity/player-identity/platform-specific-authentication/tutorials/google-html5/create-oauth-credentials.png" />

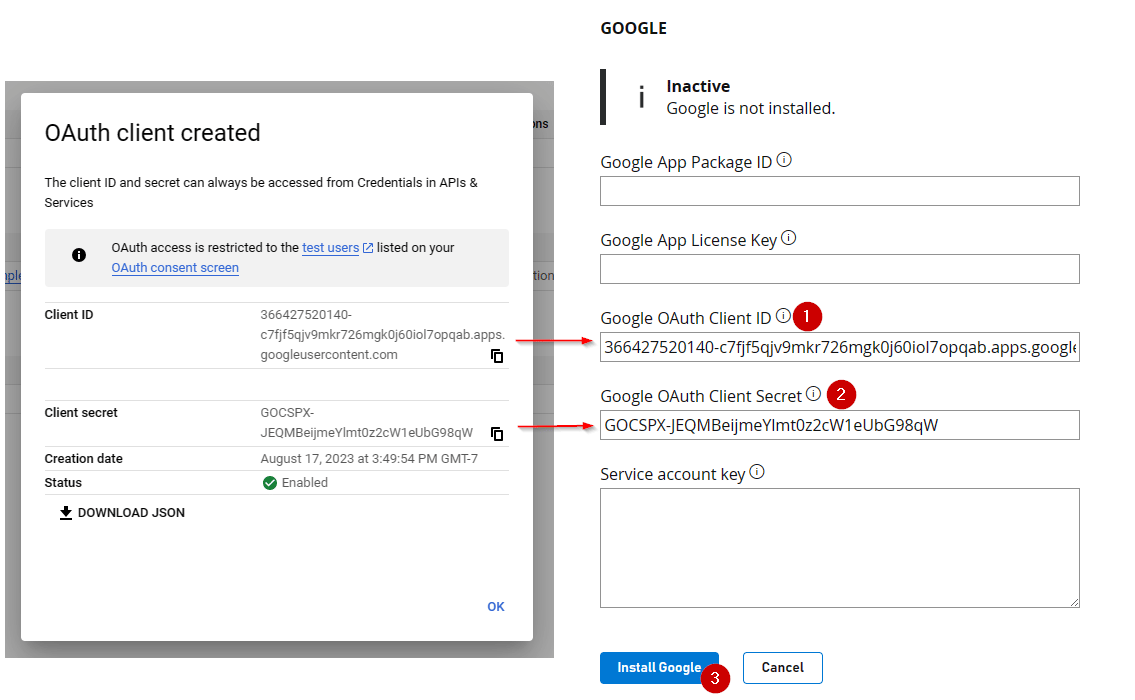
次の **OAuth client** 画面で、Google API Manager は 2 つの重要な情報を提供します:

1. **client ID**
2. **client secret**。
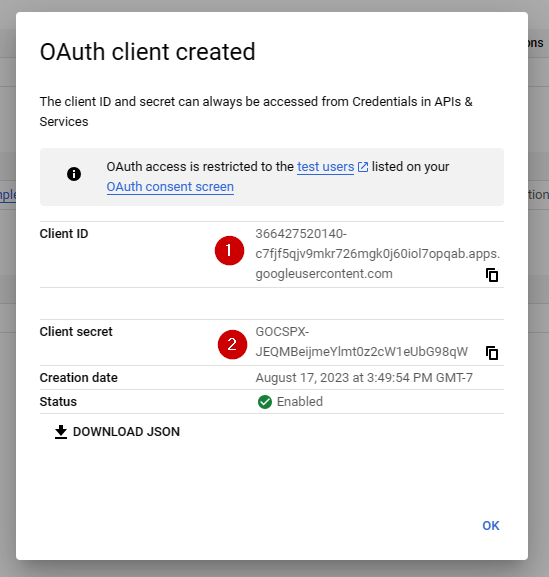
<Note>
  これらの値は、このチュートリアルの後半で示される認可プロセスで使用されるので、簡単にアクセスできる安全な場所にコピーして保存してください。
</Note>

<img src="https://mintcdn.com/microsoft-4404708b/mLCHf0iQv3VidfBe/images/playfab/identity/player-identity/platform-specific-authentication/tutorials/google-html5/oauth-client-credentials.png?fit=max&auto=format&n=mLCHf0iQv3VidfBe&q=85&s=33427703b3ddb679666f2d4c0632e0c8" alt="Google API Manager OAuth クライアント ID とシークレット" width="549" height="577" data-path="images/playfab/identity/player-identity/platform-specific-authentication/tutorials/google-html5/oauth-client-credentials.png" />

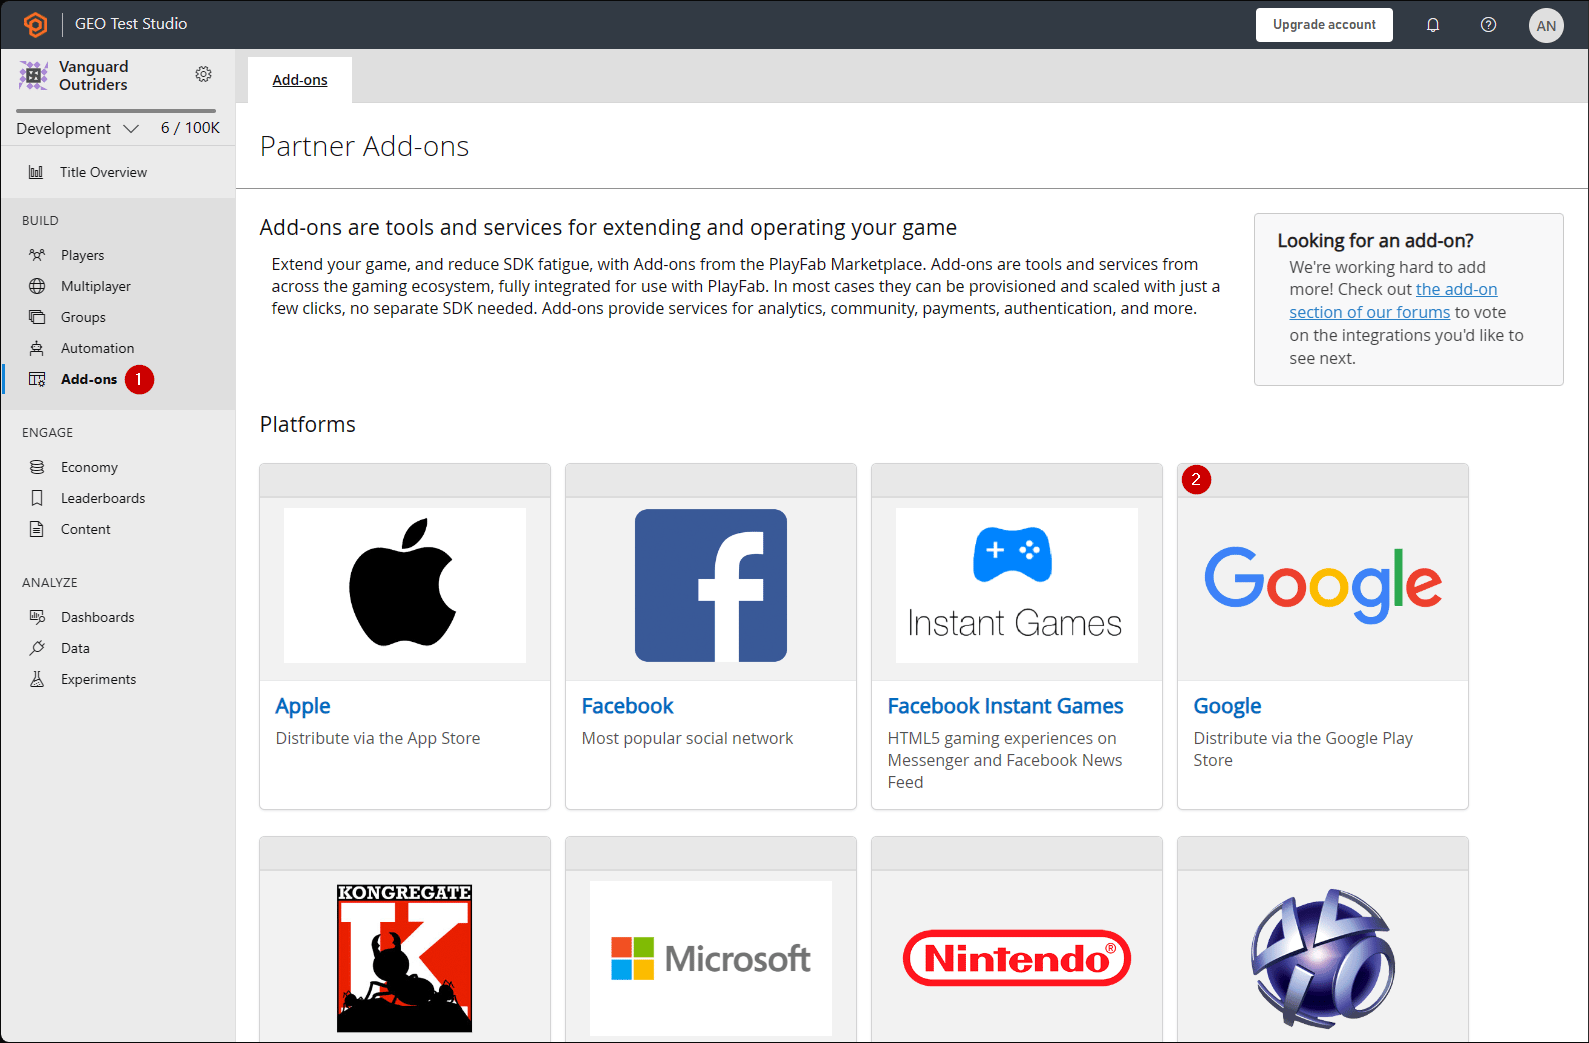
タイトルの PlayFab **Game Manager** ページに移動します。

1. メニューの **Add-ons** に移動します。
2. **Google アドオン** のアイコン/リンクを見つけて開きます。
<img src="https://mintcdn.com/microsoft-4404708b/mLCHf0iQv3VidfBe/images/playfab/identity/player-identity/platform-specific-authentication/tutorials/google-html5/open-google-add-on.png?fit=max&auto=format&n=mLCHf0iQv3VidfBe&q=85&s=1b0af874b0d7e46cf30337e322f0004a" alt="PlayFab Game Manager アドオン" width="1589" height="1043" data-path="images/playfab/identity/player-identity/platform-specific-authentication/tutorials/google-html5/open-google-add-on.png" />

1. **Client ID** を入力します。
2. **Client secret** を入力します。
3. 次に **Install Google** ボタンを選択します。
<img src="https://mintcdn.com/microsoft-4404708b/mLCHf0iQv3VidfBe/images/playfab/identity/player-identity/platform-specific-authentication/tutorials/google-html5/install-google-add-on.png?fit=max&auto=format&n=mLCHf0iQv3VidfBe&q=85&s=d84b1601417c536b97d909df1ae1f58c" alt="PlayFab Game Manager Google アドオンのインストール" width="1135" height="700" data-path="images/playfab/identity/player-identity/platform-specific-authentication/tutorials/google-html5/install-google-add-on.png" />

<Note>
  2017 年 7 月現在、**Google API Manager** には **Allowed JS** origin ドメインを適切にフックしないという問題があります。**"idpiframe\_initialization\_failed", details: "Not a valid origin for the client: somedomain.com..."** のようなエラーが表示された場合は、資格情報を削除して再作成してください。*プロジェクト全体を削除する必要はありません。資格情報のみで十分です。*
</Note>

## アクセス トークンを使用したテスト

この例では、従来のアクセス トークン方式を使用して LoginWithGoogleAccount API をテストする方法を示します。以下に提供されている HTML コードをテスト用に使用してください。

<Note>
  `YOUR_CLIENT_ID` と `YOUR_PLAYFAB_TITLE` は必ずご自身の値に置き換えてください。
</Note>

<Note>
  TypeScript の型定義ファイルの **LoginWithGoogleAccountRequest** オブジェクトには **AccessToken** パラメーターが含まれていません。Node SDK で TypeScript を使用している場合、カスタム型 `interface LoginRequest extends PlayFabClientModels.LoginWithGoogleAccountRequest { AccessToken: string; }` を作成し、API を使用するときに型をキャストできます: `PlayFabClient.LoginWithGoogleAccount( { AccessToken: accessToken, CreateAccount: true, } as LoginRequest, onPlayFabResponse);`
</Note>

```html theme={null}
<!DOCTYPE html>
<html>
  <head>
    <script src="https://accounts.google.com/gsi/client" onload="initClient()" async defer></script>
    <script src="https://download.playfab.com/PlayFabClientApi.js"></script>
  </head>
  <body>
    <script>
      var client;
      function initClient() {
          console.log("Initializing Google token client on page load");
          client = google.accounts.oauth2.initTokenClient({
              client_id: "YOUR_CLIENT_ID", // TODO: PUT YOUR GOOGLE CLIENT_ID HERE!
              callback: "onTokenResponse",
              scope: "https://www.googleapis.com/auth/userinfo.profile",
              callback: (tokenResponse) => {
                  access_token = tokenResponse.access_token;
                  onSignIn();
              }
          });
      }

      function getToken() {
        client.requestAccessToken();
      }

      // Invoked after user has signed in with Google
      function onSignIn() {
          // Execute LoginWithGoogleAccount API call using the Google access token. Please replace TitleId.
          logLine("Attempting PlayFab Sign-in using LoginWithGoogleAccount");
          PlayFabClientSDK.LoginWithGoogleAccount({
              AccessToken: access_token, // This access token is generated after a user has signed into Google
              CreateAccount: true,
              TitleId: "YOUR_PLAYFAB_TITLE", // TODO: PUT YOUR TITLE ID HERE!
          }, onPlayFabResponse);
      }

      // Handles response from PlayFab
      function onPlayFabResponse(response, error) {
          if (response)
              logLine("Response: " + JSON.stringify(response));
          if (error)
              logLine("Error: " + JSON.stringify(error));
      }

      function logLine(message) {
          var textnode = document.createTextNode(message);
          document.body.appendChild(textnode);
          var br = document.createElement("br");
          document.body.appendChild(br);
      }
    </script>
    <h1>Google Access Token Auth Example</h1>
    <!-- Clicking this button will prompt the user to sign into Google. Once they have signed into Google, LoginWithGoogleAccount is automatically called. -->
    <button onclick="getToken();">Sign into Google</button><br><br>
  </body>
</html>
```

**(非推奨) Google Sign-in Platform ライブラリを使用したテスト**

<Note>
  以下のサンプルは Google Sign-In プラットフォーム ライブラリを使用しています。**[Google Identity 公開ドキュメント サイト](https://developers.google.com/identity/gsi/web/guides/migration) によると、Web 用 Google Sign-In JavaScript プラットフォーム ライブラリは 2023 年 3 月 31 日に非推奨となります**。このサンプルは今後新しく作成される Google クライアントでは動作しません。より新しい Google Identity Services ライブラリを使用する前のコード サンプルを参照してください。
</Note>

```html theme={null}
<!DOCTYPE html>
<html>
<head>
    <!-- Special meta tag allows you to pass Google Client ID. Replace the content attribute value with your own Client Id -->
    <meta name="google-signin-client_id" content="YOUR_CLIENT_ID"><!-- // TODO: PUT YOUR GOOGLE CLIENT_ID HERE! -->
    <!-- Load Google platform SDK-->
    <script src="https://apis.google.com/js/platform.js" async defer></script>
    <!-- Load PlayFab Client JavaScript SDK -->
    <script src="https://download.playfab.com/PlayFabClientApi.js"></script>
</head>
<body>
    <p>Google Access Token Auth Example</p>
    <!-- Neat Google button gets styled automatically when Google platform SDK is loaded -->
    <div class="g-signin2" data-onsuccess="onSignIn"></div>
    <script>
        // Invoked when user has signed in with Google
        function onSignIn() {
            // Retrieve access token
            var accessToken = gapi.auth2.getAuthInstance().currentUser.get().getAuthResponse(true).access_token;
            // Execute LoginWithGoogleAccount API call using the access token. Please replace TitleID with your own.
            logLine("Attempting PlayFab Sign-in using LoginWithGoogleAccount");
            PlayFabClientSDK.LoginWithGoogleAccount({
                ServerAuthCode: accessToken,
                CreateAccount : true,
                TitleId: "YOUR_PLAYFAB_TITLE", // TODO: PUT YOUR TITLE ID HERE!
            }, onPlayFabResponse);
        }

        // Handles response from PlayFab
        function onPlayFabResponse(response, error) {
            if (response)
                logLine("Response: " + JSON.stringify(response));
            if (error)
                logLine("Error: " + JSON.stringify(error));
        }

        function logLine(message) {
            var textnode = document.createTextNode(message);
            document.body.appendChild(textnode);
            var br = document.createElement("br");
            document.body.appendChild(br);
        }
    </script>
</body>
</html>
```

Web サーバーを使用してこのページを開くことを忘れないでください。また、Google プロジェクトの構成中に指定した URL (この場合は `http://playfab.example`) を使用してこのページにアクセスするようにしてください。

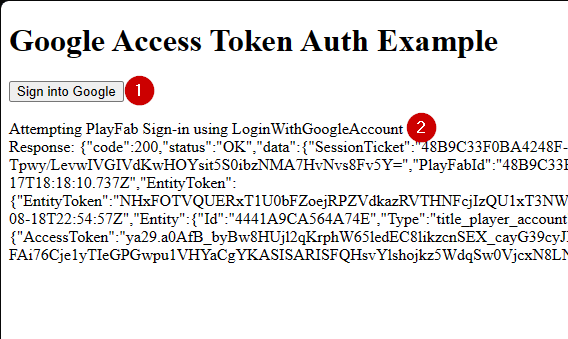
1. ページが開いたら、**G Signed In** を選択し、一般的な Google 認証フローに従います。
2. 完了すると、スクリプトが PlayFab 側で認証を試み、結果を出力します。
<img src="https://mintcdn.com/microsoft-4404708b/mLCHf0iQv3VidfBe/images/playfab/identity/player-identity/platform-specific-authentication/tutorials/google-html5/google-auth-example.png?fit=max&auto=format&n=mLCHf0iQv3VidfBe&q=85&s=b931669ffe5a96cb90404383ab650072" alt="Google 認証の例" width="568" height="339" data-path="images/playfab/identity/player-identity/platform-specific-authentication/tutorials/google-html5/google-auth-example.png" />

<Note>
  すでに Google 認証セッションが実行中の場合は、**G Signed In** を選択する必要はありません。すべてが自動的に行われます。
</Note>


## Related topics

- [プラットフォーム固有の認証](/ja-jp/services/playfab/identity/player-identity/platform-specific-authentication/index.md)
- [Kongregate と HTML5 を使用した PlayFab 認証のセットアップ](/ja-jp/services/playfab/identity/player-identity/platform-specific-authentication/kongregate-html5.md)
- [Facebook と HTML5 を使用した PlayFab 認証のセットアップ](/ja-jp/services/playfab/identity/player-identity/platform-specific-authentication/facebook-html5.md)
- [Twitch と HTML5 を使用した PlayFab 認証のセットアップ](/ja-jp/services/playfab/identity/player-identity/platform-specific-authentication/twitch-html5.md)
- [Steam と Unity を使用した PlayFab 認証のセットアップ](/ja-jp/services/playfab/identity/player-identity/platform-specific-authentication/steam-unity.md)