> ## Documentation Index
> Fetch the complete documentation index at: https://devdocs.xbox.com/llms.txt
> Use this file to discover all available pages before exploring further.
# Economy v2、Unity IAP、Android を使い始める
> Unity IAP と Android Billing API を PlayFab Economy v2 のバンドルに接続し、プレイヤーが実際のお金でアイテムを購入してインベントリに引き換えられるようにします。
# Economy v2、Unity、Android を使い始める
Economy v2 が一般提供 (GA) されました。サポートとフィードバックについては、[PlayFab フォーラム](https://community.playfab.com) を参照してください。
このチュートリアルでは、PlayFab、Unity + IAP サービス、Android Billing API を使用したアプリ内購入 (IAP) をセットアップする方法を説明します。
## 始める前に
Android Billing API と PlayFab は連携して、クライアントに IAP エクスペリエンスを提供します。
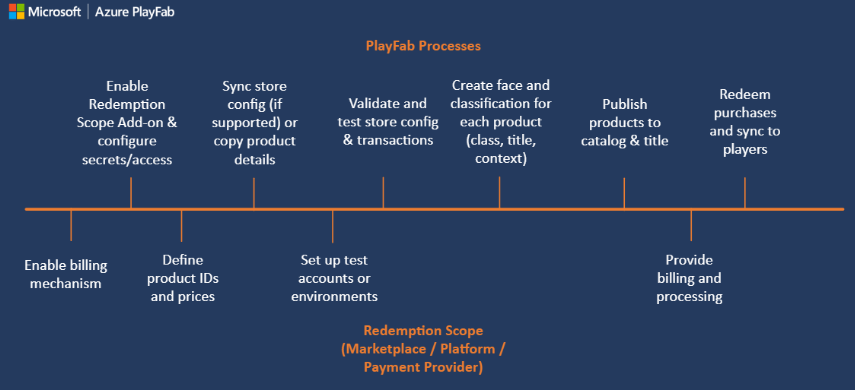 まず、PlayMarket を介して **Product ID** と **価格** を設定します。最初は、すべての製品は *無記名* です。プレイヤーが購入できるデジタル エンティティですが、PlayFab プレイヤーにとって意味を持ちません。
これらのエンティティを役立たせるには、PlayFab のアイテム カタログでミラーリングする必要があります。PlayFab は、無記名のエンティティをバンドル、コンテナ、および個々のアイテムに変えます。
それぞれに独自の顔があり、次を持ちます。
* **タイトル**
* **説明**
* **タグ**
* **タイプ**
* **画像**
* **動作**
すべてのアイテムは、ID を共有することによってマーケット製品にリンクされます。
購入可能な実際のお金のアイテムにアクセスする最良の方法は、[GetItems](https://learn.microsoft.com/en-us/rest/api/playfab/economy/catalog/get-items) を使用することです。
アイテムの ID は、PlayFab と任意の外部 IAP システムの間のリンクです。したがって、アイテム ID を IAP サービスに渡します。
この時点で購入プロセスが始まります。プレイヤーは IAP インターフェイスと対話し、購入が成功するとレシートを取得します。
PlayFab はレシートを検証し、購入を登録して、購入したアイテムを PlayFab プレイヤーに付与します。
## クライアント アプリケーションのセットアップ
このセクションでは、PlayFab、UnityIAP、Android Billing API を使用して IAP をテストするようにアプリケーションを構成する方法を説明します。
前提条件:
* Unity プロジェクト。
* [PlayFab Unity SDK](/services/playfab/sdks/unity3d) がインポートされ、タイトルで動作するように構成されている。
* [Visual Studio](https://learn.microsoft.com/en-us/visualstudio/gamedev/unity/get-started/getting-started-with-visual-studio-tools-for-unity) などのエディターがインストールされ、Unity プロジェクトで動作するように構成されている。
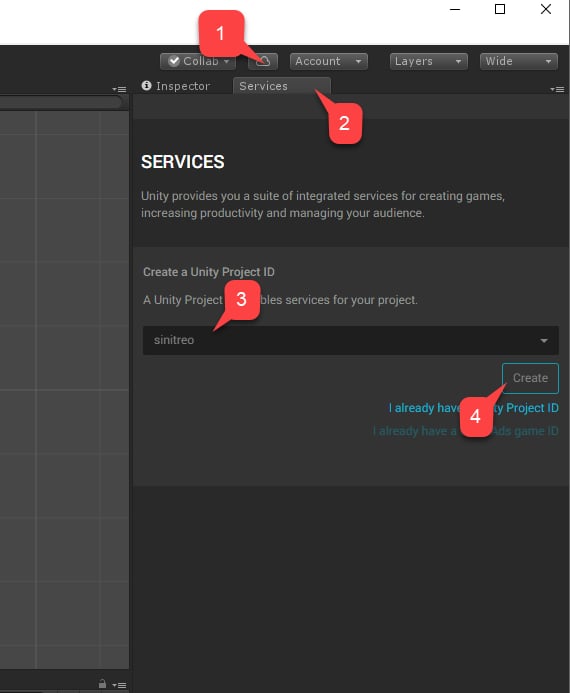
最初のステップは UnityIAP のセットアップです。
1. **Services** に移動します。
2. **Services** タブが選択されていることを確認します。
3. **Unity Services** プロファイルまたは組織を選択します。
4. **Create** ボタンを選択します。
まず、PlayMarket を介して **Product ID** と **価格** を設定します。最初は、すべての製品は *無記名* です。プレイヤーが購入できるデジタル エンティティですが、PlayFab プレイヤーにとって意味を持ちません。
これらのエンティティを役立たせるには、PlayFab のアイテム カタログでミラーリングする必要があります。PlayFab は、無記名のエンティティをバンドル、コンテナ、および個々のアイテムに変えます。
それぞれに独自の顔があり、次を持ちます。
* **タイトル**
* **説明**
* **タグ**
* **タイプ**
* **画像**
* **動作**
すべてのアイテムは、ID を共有することによってマーケット製品にリンクされます。
購入可能な実際のお金のアイテムにアクセスする最良の方法は、[GetItems](https://learn.microsoft.com/en-us/rest/api/playfab/economy/catalog/get-items) を使用することです。
アイテムの ID は、PlayFab と任意の外部 IAP システムの間のリンクです。したがって、アイテム ID を IAP サービスに渡します。
この時点で購入プロセスが始まります。プレイヤーは IAP インターフェイスと対話し、購入が成功するとレシートを取得します。
PlayFab はレシートを検証し、購入を登録して、購入したアイテムを PlayFab プレイヤーに付与します。
## クライアント アプリケーションのセットアップ
このセクションでは、PlayFab、UnityIAP、Android Billing API を使用して IAP をテストするようにアプリケーションを構成する方法を説明します。
前提条件:
* Unity プロジェクト。
* [PlayFab Unity SDK](/services/playfab/sdks/unity3d) がインポートされ、タイトルで動作するように構成されている。
* [Visual Studio](https://learn.microsoft.com/en-us/visualstudio/gamedev/unity/get-started/getting-started-with-visual-studio-tools-for-unity) などのエディターがインストールされ、Unity プロジェクトで動作するように構成されている。
最初のステップは UnityIAP のセットアップです。
1. **Services** に移動します。
2. **Services** タブが選択されていることを確認します。
3. **Unity Services** プロファイルまたは組織を選択します。
4. **Create** ボタンを選択します。
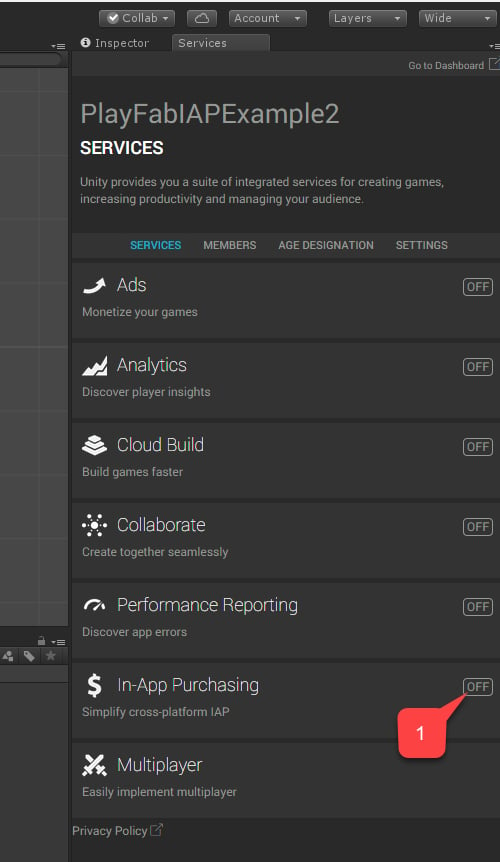
 1. 次に、**In-App Purchasing (IAP)** サービスに移動します。
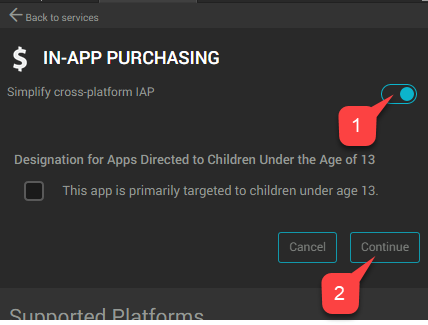
 1. **Simplify cross-platform IAP** トグルを設定して、**サービス** を有効にしていることを確認します。
2. 次に **Continue** ボタンを選択します。
1. **Simplify cross-platform IAP** トグルを設定して、**サービス** を有効にしていることを確認します。
2. 次に **Continue** ボタンを選択します。
 プラグインのリストが表示されるページが表示されます。
1. **Import** ボタンを選択します。
プラグインのリストが表示されるページが表示されます。
1. **Import** ボタンを選択します。
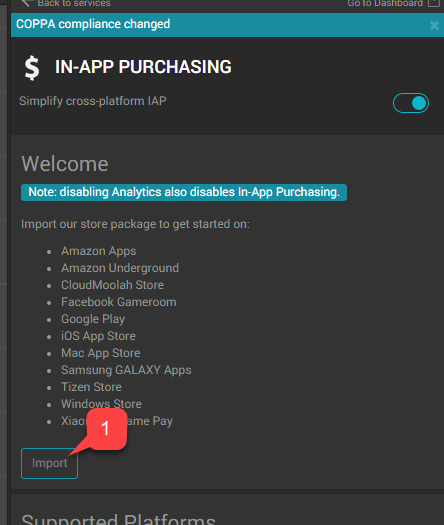 すべてのプラグインがインポートされる時点まで、Unity のインストールとインポート手順を続けます。
1. プラグインが所定の場所にあることを確認します。
2. 次に、**AndroidIAPExample.cs** という新しいスクリプトを作成します。
すべてのプラグインがインポートされる時点まで、Unity のインストールとインポート手順を続けます。
1. プラグインが所定の場所にあることを確認します。
2. 次に、**AndroidIAPExample.cs** という新しいスクリプトを作成します。
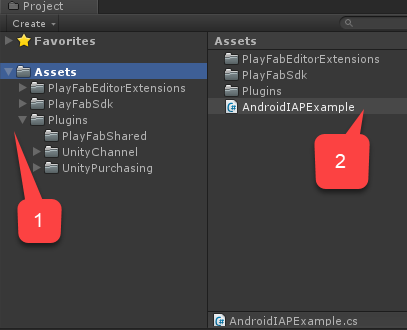 以下のコードを含む `AndroidIAPExample.cs` (詳細についてはコードのコメントを参照してください)。
```csharp theme={null}
using System;
using System.Collections.Generic;
using System.Linq;
using System.Threading.Tasks;
using UnityEngine;
using UnityEngine.Purchasing;
using UnityEngine.Purchasing.Extension;
using PlayFab;
using PlayFab.ClientModels;
using PlayFab.EconomyModels;
///
/// Unity IAP Store インターフェイスを実装する Unity ビヘイビア。
/// シーンにアセットとしてアタッチします。
///
public class AndroidIAPExample : MonoBehaviour, IDetailedStoreListener
{
// Google Play Store で販売されているバンドル。
private Dictionary _googlePlayCatalog;
// サンプル ベンダーで販売されているゲーム内アイテム。
private Dictionary _storefrontCatalog;
private string _purchaseIdempotencyId = null;
private PlayFabEconomyAPIAsyncResult _lastAPICallResult = null;
private static readonly PlayFabEconomyAPIAsync s_economyAPI = new();
private static IStoreController s_storeController;
// TODO: このコールバックは説明目的です。ニーズに合ったものを作成する必要があります
public delegate void PlayFabProcessPurchaseCallback(PurchaseProcessingResult result);
///
/// 購入が処理された際にトリガーされるイベント。
///
///
/// TODO: 購入結果を処理するために、ゲーム コードでこのイベントをサブスクライブします。
///
public event PlayFabProcessPurchaseCallback PlayFabProcessPurchaseEvent;
///
/// Store Controller、拡張、およびカタログが設定されている場合は true。
///
public bool IsInitialized => s_storeController != null
&& _googlePlayCatalog != null
&& _storefrontCatalog != null;
// Start は最初のフレーム更新の前に呼び出されます。
public void Start()
{
Login();
}
///
/// Android デバイス ID を使用してプレイヤーのログインを試みます。
///
private void Login()
{
// TODO: 最終的なゲーム コードでは、LoginWithGooglePlayGamesService または同様のプラットフォーム固有のログイン方法を使用することを推奨します。
// SystemInfo.deviceUniqueIdentifier は、新しいデバイスで権限を要求します。
// デバイス固有ではない GUID を使用してローカル ファイルに保存する方が
// 良いアプローチです。PlayFab では、複数の Android デバイス ID を
// 単一の PlayFab アカウントにリンクできます。
PlayFabClientAPI.LoginWithCustomID(new LoginWithCustomIDRequest()
{
CreateAccount = true,
CustomId = SystemInfo.deviceUniqueIdentifier
}, result => RefreshIAPItems(), PlayFabSampleUtil.OnPlayFabError);
}
///
/// PlayFab Economy Catalog V2 に更新されたリストをクエリし、
/// ローカル カタログ オブジェクトを埋めます。
///
private async void RefreshIAPItems()
{
_googlePlayCatalog = new Dictionary();
SearchItemsRequest googlePlayCatalogRequest = new()
{
Count = 50,
Filter = "AlternateIds/any(t: t/type eq 'GooglePlay')"
};
SearchItemsResponse googlePlayCatalogResponse;
do
{
googlePlayCatalogResponse = await s_economyAPI.SearchItemsAsync(googlePlayCatalogRequest);
Debug.Log("Search response: " + JsonUtility.ToJson(googlePlayCatalogResponse));
foreach (PlayFab.EconomyModels.CatalogItem item in googlePlayCatalogResponse.Items)
{
_googlePlayCatalog.Add(item.Id, item);
}
} while (!string.IsNullOrEmpty(googlePlayCatalogResponse.ContinuationToken));
Debug.Log($"Completed pulling from PlayFab Economy v2 googleplay Catalog: {_googlePlayCatalog.Count()} items retrieved");
_storefrontCatalog = new Dictionary();
GetItemRequest storeCatalogRequest = new()
{
AlternateId = new CatalogAlternateId()
{
Type = "FriendlyId",
Value = "villagerstore"
}
};
GetItemResponse storeCatalogResponse;
storeCatalogResponse = await s_economyAPI.GetItemAsync(storeCatalogRequest);
List itemIds = new();
foreach (CatalogItemReference item in storeCatalogResponse.Item.ItemReferences)
{
itemIds.Add(item.Id);
}
GetItemsRequest itemsCatalogRequest = new()
{
Ids = itemIds
};
GetItemsResponse itemsCatalogResponse = await s_economyAPI.GetItemsAsync(itemsCatalogRequest);
foreach (PlayFab.EconomyModels.CatalogItem item in itemsCatalogResponse.Items)
{
_storefrontCatalog.Add(item.Id, item);
}
Debug.Log($"Completed pulling from PlayFab Economy v2 villagerstore store: {_storefrontCatalog.Count()} items retrieved");
InitializePurchasing();
}
///
/// Google Play Store 向けに Unity IAP システムを初期化します。
///
private void InitializePurchasing()
{
if (IsInitialized) return;
var builder = ConfigurationBuilder.Instance(StandardPurchasingModule.Instance(AppStore.GooglePlay));
foreach (PlayFab.EconomyModels.CatalogItem item in _googlePlayCatalog.Values)
{
string googlePlayItemId = item.AlternateIds.FirstOrDefault(item => item.Type == "GooglePlay")?.Value;
if (!string.IsNullOrWhiteSpace(googlePlayItemId))
{
builder.AddProduct(googlePlayItemId, ProductType.Consumable);
}
}
UnityPurchasing.Initialize(this, builder);
}
///
/// テスト例のためのデバッグ IMGUI を描画します。
/// 本番ゲームのランタイム UI には、代わりに UI Toolkit を使用してください。
///
public void OnGUI()
{
// 高解像度デバイスをサポート。
GUI.matrix = Matrix4x4.TRS(new Vector3(0, 0, 0), Quaternion.identity, new Vector3(3, 3, 3));
if (!IsInitialized)
{
GUILayout.Label("Initializing IAP and logging in...");
return;
}
if (!string.IsNullOrEmpty(_purchaseIdempotencyId) && (!string.IsNullOrEmpty(_lastAPICallResult?.Message)
|| !string.IsNullOrEmpty(_lastAPICallResult?.Error)))
{
GUILayout.Label(_lastAPICallResult?.Message + _lastAPICallResult?.Error);
}
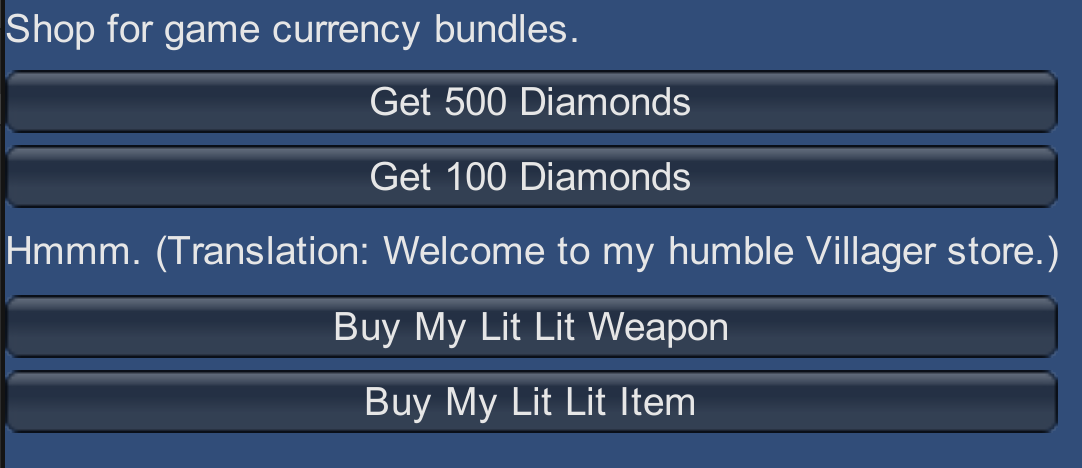
GUILayout.Label("Shop for game currency bundles.");
// 各カタログ アイテムの購入メニューを描画。
foreach (PlayFab.EconomyModels.CatalogItem item in _googlePlayCatalog.Values)
{
// ディクショナリを使用して適切な言語を選択。
if (GUILayout.Button("Get " + (item.Title.ContainsKey("en-US") ? item.Title["en-US"] : item.Title["NEUTRAL"])))
{
BuyProductById(item.AlternateIds.FirstOrDefault(item => item.Type == "GooglePlay").Value);
}
}
GUILayout.Label("Hmmm. (Translation: Welcome to my humble Villager store.)");
// 各カタログ アイテムの購入メニューを描画。
foreach (PlayFab.EconomyModels.CatalogItem item in _storefrontCatalog.Values)
{
// ディクショナリを使用して適切な言語を選択。
if (GUILayout.Button("Buy "
+ (item.Title.ContainsKey("en-US") ? item.Title["en-US"] : item.Title["NEUTRAL"]
+ ": "
+ item.PriceOptions.Prices.FirstOrDefault().Amounts.FirstOrDefault().Amount.ToString()
+ " Diamonds"
)))
{
Task.Run(() => PlayFabPurchaseItemById(item.Id));
}
}
}
///
/// Unity IAP API とゲーム購入を統合します。
///
public void BuyProductById(string productId)
{
if (!IsInitialized)
{
Debug.LogError("IAP Service is not initialized!");
return;
}
s_storeController.InitiatePurchase(productId);
}
///
/// ID で PlayFab インベントリ アイテムを購入します。
/// エラー処理と呼び出しパターンの詳細については、
/// クラスを参照してください。
///
async public Task PlayFabPurchaseItemById(string itemId)
{
if (!IsInitialized)
{
Debug.LogError("IAP Service is not initialized!");
return false;
}
_lastAPICallResult = new();
Debug.Log("Player buying product " + itemId);
if (string.IsNullOrEmpty(_purchaseIdempotencyId))
{
_purchaseIdempotencyId = Guid.NewGuid().ToString();
}
GetItemRequest getVillagerStoreRequest = new()
{
AlternateId = new CatalogAlternateId()
{
Type = "FriendlyId",
Value = "villagerstore"
}
};
GetItemResponse getStoreResponse = await s_economyAPI.GetItemAsync(getVillagerStoreRequest);
if (getStoreResponse == null || string.IsNullOrEmpty(getStoreResponse?.Item?.Id))
{
_lastAPICallResult.Error = "Unable to contact the store. Check your internet connection and try again in a few minutes.";
return false;
}
CatalogPriceAmount price = _storefrontCatalog.FirstOrDefault(item => item.Key == itemId).Value.PriceOptions.Prices.FirstOrDefault().Amounts.FirstOrDefault();
PurchaseInventoryItemsRequest purchaseInventoryItemsRequest = new()
{
Amount = 1,
Item = new InventoryItemReference()
{
Id = itemId
},
PriceAmounts = new List
{
new()
{
Amount = price.Amount,
ItemId = price.ItemId
}
},
IdempotencyId = _purchaseIdempotencyId,
StoreId = getStoreResponse.Item.Id
};
PurchaseInventoryItemsResponse purchaseInventoryItemsResponse = await s_economyAPI.PurchaseInventoryItemsAsync(purchaseInventoryItemsRequest);
if (purchaseInventoryItemsResponse == null || purchaseInventoryItemsResponse?.TransactionIds.Count < 1)
{
_lastAPICallResult.Error = "Unable to purchase. Try again in a few minutes.";
return false;
}
_purchaseIdempotencyId = "";
_lastAPICallResult.Message = "Purchasing!";
return true;
}
private void OnRegistration(LoginResult result)
{
PlayFabSettings.staticPlayer.ClientSessionTicket = result.SessionTicket;
}
public void OnInitialized(IStoreController controller, IExtensionProvider extensions)
{
s_storeController = controller;
extensions.GetExtension().RestoreTransactions((result, error) => {
if (result)
{
Debug.LogWarning("Restore transactions succeeded.");
}
else
{
Debug.LogWarning("Restore transactions failed.");
}
});
}
public void OnInitializeFailed(InitializationFailureReason error)
{
Debug.Log("OnInitializeFailed InitializationFailureReason:" + error);
}
public void OnInitializeFailed(InitializationFailureReason error, string message)
{
Debug.Log("OnInitializeFailed InitializationFailureReason:" + error + message);
}
public void OnPurchaseFailed(UnityEngine.Purchasing.Product product, PurchaseFailureReason failureReason)
{
Debug.Log($"OnPurchaseFailed: FAIL. Product: '{product.definition.storeSpecificId}', PurchaseFailureReason: {failureReason}");
}
public void OnPurchaseFailed(UnityEngine.Purchasing.Product product, PurchaseFailureDescription failureDescription)
{
Debug.Log($"OnPurchaseFailed: FAIL. Product: '{product.definition.storeSpecificId}', PurchaseFailureReason: {failureDescription}");
}
///
/// ストア購入のコールバック。最終的な PurchaseProcessingResult を処理するために PlayFabProcessPurchaseEvent をサブスクライブします。
///
///
///
/// このコードは、保留中でアプリケーション開始時に配信される購入を考慮していません。
/// 本番コードではこれらのケースを考慮する必要があります。
///
/// エラー時にはすぐに完了。PlayFab Economy が最終処理を処理している場合は保留中で、最終結果と共に PlayFabProcessPurchaseEvent をトリガーします。
public PurchaseProcessingResult ProcessPurchase(PurchaseEventArgs purchaseEvent)
{
if (!IsInitialized)
{
Debug.LogWarning("Not initialized. Ignoring.");
return PurchaseProcessingResult.Complete;
}
if (purchaseEvent.purchasedProduct == null)
{
Debug.LogWarning("Attempted to process purchase with unknown product. Ignoring.");
return PurchaseProcessingResult.Complete;
}
if (string.IsNullOrEmpty(purchaseEvent.purchasedProduct.receipt))
{
Debug.LogWarning("Attempted to process purchase with no receipt. Ignoring.");
return PurchaseProcessingResult.Complete;
}
Debug.Log("Attempting purchase with receipt " + purchaseEvent.purchasedProduct.receipt);
GooglePurchase purchasePayload = GooglePurchase.FromJson(purchaseEvent.purchasedProduct.receipt);
RedeemGooglePlayInventoryItemsRequest request = new()
{
Purchases = new List
{
new()
{
ProductId = purchasePayload.PayloadData?.JsonData?.productId,
Token = purchasePayload.PayloadData?.JsonData?.purchaseToken
}
}
};
PlayFabEconomyAPI.RedeemGooglePlayInventoryItems(request, result =>
{
Debug.Log("Processed receipt validation.");
if (result?.Failed.Count > 0)
{
Debug.Log($"Validation failed for {result.Failed.Count} receipts.");
Debug.Log(JsonUtility.ToJson(result.Failed));
PlayFabProcessPurchaseEvent?.Invoke(PurchaseProcessingResult.Pending);
}
else
{
Debug.Log("Validation succeeded!");
PlayFabProcessPurchaseEvent?.Invoke(PurchaseProcessingResult.Complete);
s_storeController.ConfirmPendingPurchase(purchaseEvent.purchasedProduct);
Debug.Log("Confirmed purchase with Google Marketplace.");
}
},
PlayFabSampleUtil.OnPlayFabError);
return PurchaseProcessingResult.Pending;
}
}
///
/// サンプル用のユーティリティ クラス。
///
public class PlayFabEconomyAPIAsyncResult
{
public string Error { get; set; } = null;
public string Message { get; set; } = null;
}
public static class PlayFabSampleUtil
{
public static void OnPlayFabError(PlayFabError error)
{
Debug.LogError(error.GenerateErrorReport());
}
}
///
/// PlayFab API のサンプル Async ラッパー。
///
/// これは説明目的のみの簡単なサンプルです。
///
/// ユーザー向けシナリオのエラーをログに記録および処理するために、独自のカスタム
/// Logger 実装を作成してください。タグを使用し、PlayFab のどのエラーが GUI やゲームプレイの
/// 更新のためにゲームで処理する必要があり、どれがクラッシュおよびエラー レポート サービスに
/// ログ記録すべきかをマッピングしてください。
///
public class PlayFabEconomyAPIAsync
{
///
///
///
public Task GetItemAsync(GetItemRequest request)
{
TaskCompletionSource getItemAsyncTaskSource = new();
PlayFabEconomyAPI.GetItem(request, (response) => getItemAsyncTaskSource.SetResult(response), error =>
{
PlayFabSampleUtil.OnPlayFabError(error);
getItemAsyncTaskSource.SetResult(default);
});
return getItemAsyncTaskSource.Task;
}
///
///
///
public Task GetItemsAsync(GetItemsRequest request)
{
TaskCompletionSource getItemsAsyncTaskSource = new();
PlayFabEconomyAPI.GetItems(request, (response) => getItemsAsyncTaskSource.SetResult(response), error =>
{
PlayFabSampleUtil.OnPlayFabError(error);
getItemsAsyncTaskSource.SetResult(default);
});
return getItemsAsyncTaskSource.Task;
}
///
///
///
public Task PurchaseInventoryItemsAsync(PurchaseInventoryItemsRequest request)
{
TaskCompletionSource purchaseInventoryItemsAsyncTaskSource = new();
PlayFabEconomyAPI.PurchaseInventoryItems(request, (response) => purchaseInventoryItemsAsyncTaskSource.SetResult(response), error =>
{
PlayFabSampleUtil.OnPlayFabError(error);
purchaseInventoryItemsAsyncTaskSource.SetResult(default);
});
return purchaseInventoryItemsAsyncTaskSource.Task;
}
///
///
///
public Task SearchItemsAsync(SearchItemsRequest request)
{
TaskCompletionSource searchItemsAsyncTaskSource = new();
PlayFabEconomyAPI.SearchItems(request, (response) => searchItemsAsyncTaskSource.SetResult(response), error =>
{
PlayFabSampleUtil.OnPlayFabError(error);
searchItemsAsyncTaskSource.SetResult(default);
});
return searchItemsAsyncTaskSource.Task;
}
}
[Serializable]
public class PurchaseJsonData
{
public string orderId;
public string packageName;
public string productId;
public string purchaseToken;
public long purchaseTime;
public int purchaseState;
}
[Serializable]
public class PurchasePayloadData
{
public PurchaseJsonData JsonData;
public string signature;
public string json;
public static PurchasePayloadData FromJson(string json)
{
var payload = JsonUtility.FromJson(json);
payload.JsonData = JsonUtility.FromJson(payload.json);
return payload;
}
}
[Serializable]
public class GooglePurchase
{
public PurchasePayloadData PayloadData;
public string Store;
public string TransactionID;
public string Payload;
public static GooglePurchase FromJson(string json)
{
var purchase = JsonUtility.FromJson(json);
// エディター プレイ時には偽のレシートのみ返されます。
if (Application.isEditor)
{
return purchase;
}
purchase.PayloadData = PurchasePayloadData.FromJson(purchase.Payload);
return purchase;
}
}
```
1. **Code** という新しい **GameObject** を作成します。
2. `AndroidIAPExample` コンポーネントを追加します (クリック アンド ドラッグ、または)。
3. シーンを **Save** することを確認してください。
以下のコードを含む `AndroidIAPExample.cs` (詳細についてはコードのコメントを参照してください)。
```csharp theme={null}
using System;
using System.Collections.Generic;
using System.Linq;
using System.Threading.Tasks;
using UnityEngine;
using UnityEngine.Purchasing;
using UnityEngine.Purchasing.Extension;
using PlayFab;
using PlayFab.ClientModels;
using PlayFab.EconomyModels;
///
/// Unity IAP Store インターフェイスを実装する Unity ビヘイビア。
/// シーンにアセットとしてアタッチします。
///
public class AndroidIAPExample : MonoBehaviour, IDetailedStoreListener
{
// Google Play Store で販売されているバンドル。
private Dictionary _googlePlayCatalog;
// サンプル ベンダーで販売されているゲーム内アイテム。
private Dictionary _storefrontCatalog;
private string _purchaseIdempotencyId = null;
private PlayFabEconomyAPIAsyncResult _lastAPICallResult = null;
private static readonly PlayFabEconomyAPIAsync s_economyAPI = new();
private static IStoreController s_storeController;
// TODO: このコールバックは説明目的です。ニーズに合ったものを作成する必要があります
public delegate void PlayFabProcessPurchaseCallback(PurchaseProcessingResult result);
///
/// 購入が処理された際にトリガーされるイベント。
///
///
/// TODO: 購入結果を処理するために、ゲーム コードでこのイベントをサブスクライブします。
///
public event PlayFabProcessPurchaseCallback PlayFabProcessPurchaseEvent;
///
/// Store Controller、拡張、およびカタログが設定されている場合は true。
///
public bool IsInitialized => s_storeController != null
&& _googlePlayCatalog != null
&& _storefrontCatalog != null;
// Start は最初のフレーム更新の前に呼び出されます。
public void Start()
{
Login();
}
///
/// Android デバイス ID を使用してプレイヤーのログインを試みます。
///
private void Login()
{
// TODO: 最終的なゲーム コードでは、LoginWithGooglePlayGamesService または同様のプラットフォーム固有のログイン方法を使用することを推奨します。
// SystemInfo.deviceUniqueIdentifier は、新しいデバイスで権限を要求します。
// デバイス固有ではない GUID を使用してローカル ファイルに保存する方が
// 良いアプローチです。PlayFab では、複数の Android デバイス ID を
// 単一の PlayFab アカウントにリンクできます。
PlayFabClientAPI.LoginWithCustomID(new LoginWithCustomIDRequest()
{
CreateAccount = true,
CustomId = SystemInfo.deviceUniqueIdentifier
}, result => RefreshIAPItems(), PlayFabSampleUtil.OnPlayFabError);
}
///
/// PlayFab Economy Catalog V2 に更新されたリストをクエリし、
/// ローカル カタログ オブジェクトを埋めます。
///
private async void RefreshIAPItems()
{
_googlePlayCatalog = new Dictionary();
SearchItemsRequest googlePlayCatalogRequest = new()
{
Count = 50,
Filter = "AlternateIds/any(t: t/type eq 'GooglePlay')"
};
SearchItemsResponse googlePlayCatalogResponse;
do
{
googlePlayCatalogResponse = await s_economyAPI.SearchItemsAsync(googlePlayCatalogRequest);
Debug.Log("Search response: " + JsonUtility.ToJson(googlePlayCatalogResponse));
foreach (PlayFab.EconomyModels.CatalogItem item in googlePlayCatalogResponse.Items)
{
_googlePlayCatalog.Add(item.Id, item);
}
} while (!string.IsNullOrEmpty(googlePlayCatalogResponse.ContinuationToken));
Debug.Log($"Completed pulling from PlayFab Economy v2 googleplay Catalog: {_googlePlayCatalog.Count()} items retrieved");
_storefrontCatalog = new Dictionary();
GetItemRequest storeCatalogRequest = new()
{
AlternateId = new CatalogAlternateId()
{
Type = "FriendlyId",
Value = "villagerstore"
}
};
GetItemResponse storeCatalogResponse;
storeCatalogResponse = await s_economyAPI.GetItemAsync(storeCatalogRequest);
List itemIds = new();
foreach (CatalogItemReference item in storeCatalogResponse.Item.ItemReferences)
{
itemIds.Add(item.Id);
}
GetItemsRequest itemsCatalogRequest = new()
{
Ids = itemIds
};
GetItemsResponse itemsCatalogResponse = await s_economyAPI.GetItemsAsync(itemsCatalogRequest);
foreach (PlayFab.EconomyModels.CatalogItem item in itemsCatalogResponse.Items)
{
_storefrontCatalog.Add(item.Id, item);
}
Debug.Log($"Completed pulling from PlayFab Economy v2 villagerstore store: {_storefrontCatalog.Count()} items retrieved");
InitializePurchasing();
}
///
/// Google Play Store 向けに Unity IAP システムを初期化します。
///
private void InitializePurchasing()
{
if (IsInitialized) return;
var builder = ConfigurationBuilder.Instance(StandardPurchasingModule.Instance(AppStore.GooglePlay));
foreach (PlayFab.EconomyModels.CatalogItem item in _googlePlayCatalog.Values)
{
string googlePlayItemId = item.AlternateIds.FirstOrDefault(item => item.Type == "GooglePlay")?.Value;
if (!string.IsNullOrWhiteSpace(googlePlayItemId))
{
builder.AddProduct(googlePlayItemId, ProductType.Consumable);
}
}
UnityPurchasing.Initialize(this, builder);
}
///
/// テスト例のためのデバッグ IMGUI を描画します。
/// 本番ゲームのランタイム UI には、代わりに UI Toolkit を使用してください。
///
public void OnGUI()
{
// 高解像度デバイスをサポート。
GUI.matrix = Matrix4x4.TRS(new Vector3(0, 0, 0), Quaternion.identity, new Vector3(3, 3, 3));
if (!IsInitialized)
{
GUILayout.Label("Initializing IAP and logging in...");
return;
}
if (!string.IsNullOrEmpty(_purchaseIdempotencyId) && (!string.IsNullOrEmpty(_lastAPICallResult?.Message)
|| !string.IsNullOrEmpty(_lastAPICallResult?.Error)))
{
GUILayout.Label(_lastAPICallResult?.Message + _lastAPICallResult?.Error);
}
GUILayout.Label("Shop for game currency bundles.");
// 各カタログ アイテムの購入メニューを描画。
foreach (PlayFab.EconomyModels.CatalogItem item in _googlePlayCatalog.Values)
{
// ディクショナリを使用して適切な言語を選択。
if (GUILayout.Button("Get " + (item.Title.ContainsKey("en-US") ? item.Title["en-US"] : item.Title["NEUTRAL"])))
{
BuyProductById(item.AlternateIds.FirstOrDefault(item => item.Type == "GooglePlay").Value);
}
}
GUILayout.Label("Hmmm. (Translation: Welcome to my humble Villager store.)");
// 各カタログ アイテムの購入メニューを描画。
foreach (PlayFab.EconomyModels.CatalogItem item in _storefrontCatalog.Values)
{
// ディクショナリを使用して適切な言語を選択。
if (GUILayout.Button("Buy "
+ (item.Title.ContainsKey("en-US") ? item.Title["en-US"] : item.Title["NEUTRAL"]
+ ": "
+ item.PriceOptions.Prices.FirstOrDefault().Amounts.FirstOrDefault().Amount.ToString()
+ " Diamonds"
)))
{
Task.Run(() => PlayFabPurchaseItemById(item.Id));
}
}
}
///
/// Unity IAP API とゲーム購入を統合します。
///
public void BuyProductById(string productId)
{
if (!IsInitialized)
{
Debug.LogError("IAP Service is not initialized!");
return;
}
s_storeController.InitiatePurchase(productId);
}
///
/// ID で PlayFab インベントリ アイテムを購入します。
/// エラー処理と呼び出しパターンの詳細については、
/// クラスを参照してください。
///
async public Task PlayFabPurchaseItemById(string itemId)
{
if (!IsInitialized)
{
Debug.LogError("IAP Service is not initialized!");
return false;
}
_lastAPICallResult = new();
Debug.Log("Player buying product " + itemId);
if (string.IsNullOrEmpty(_purchaseIdempotencyId))
{
_purchaseIdempotencyId = Guid.NewGuid().ToString();
}
GetItemRequest getVillagerStoreRequest = new()
{
AlternateId = new CatalogAlternateId()
{
Type = "FriendlyId",
Value = "villagerstore"
}
};
GetItemResponse getStoreResponse = await s_economyAPI.GetItemAsync(getVillagerStoreRequest);
if (getStoreResponse == null || string.IsNullOrEmpty(getStoreResponse?.Item?.Id))
{
_lastAPICallResult.Error = "Unable to contact the store. Check your internet connection and try again in a few minutes.";
return false;
}
CatalogPriceAmount price = _storefrontCatalog.FirstOrDefault(item => item.Key == itemId).Value.PriceOptions.Prices.FirstOrDefault().Amounts.FirstOrDefault();
PurchaseInventoryItemsRequest purchaseInventoryItemsRequest = new()
{
Amount = 1,
Item = new InventoryItemReference()
{
Id = itemId
},
PriceAmounts = new List
{
new()
{
Amount = price.Amount,
ItemId = price.ItemId
}
},
IdempotencyId = _purchaseIdempotencyId,
StoreId = getStoreResponse.Item.Id
};
PurchaseInventoryItemsResponse purchaseInventoryItemsResponse = await s_economyAPI.PurchaseInventoryItemsAsync(purchaseInventoryItemsRequest);
if (purchaseInventoryItemsResponse == null || purchaseInventoryItemsResponse?.TransactionIds.Count < 1)
{
_lastAPICallResult.Error = "Unable to purchase. Try again in a few minutes.";
return false;
}
_purchaseIdempotencyId = "";
_lastAPICallResult.Message = "Purchasing!";
return true;
}
private void OnRegistration(LoginResult result)
{
PlayFabSettings.staticPlayer.ClientSessionTicket = result.SessionTicket;
}
public void OnInitialized(IStoreController controller, IExtensionProvider extensions)
{
s_storeController = controller;
extensions.GetExtension().RestoreTransactions((result, error) => {
if (result)
{
Debug.LogWarning("Restore transactions succeeded.");
}
else
{
Debug.LogWarning("Restore transactions failed.");
}
});
}
public void OnInitializeFailed(InitializationFailureReason error)
{
Debug.Log("OnInitializeFailed InitializationFailureReason:" + error);
}
public void OnInitializeFailed(InitializationFailureReason error, string message)
{
Debug.Log("OnInitializeFailed InitializationFailureReason:" + error + message);
}
public void OnPurchaseFailed(UnityEngine.Purchasing.Product product, PurchaseFailureReason failureReason)
{
Debug.Log($"OnPurchaseFailed: FAIL. Product: '{product.definition.storeSpecificId}', PurchaseFailureReason: {failureReason}");
}
public void OnPurchaseFailed(UnityEngine.Purchasing.Product product, PurchaseFailureDescription failureDescription)
{
Debug.Log($"OnPurchaseFailed: FAIL. Product: '{product.definition.storeSpecificId}', PurchaseFailureReason: {failureDescription}");
}
///
/// ストア購入のコールバック。最終的な PurchaseProcessingResult を処理するために PlayFabProcessPurchaseEvent をサブスクライブします。
///
///
///
/// このコードは、保留中でアプリケーション開始時に配信される購入を考慮していません。
/// 本番コードではこれらのケースを考慮する必要があります。
///
/// エラー時にはすぐに完了。PlayFab Economy が最終処理を処理している場合は保留中で、最終結果と共に PlayFabProcessPurchaseEvent をトリガーします。
public PurchaseProcessingResult ProcessPurchase(PurchaseEventArgs purchaseEvent)
{
if (!IsInitialized)
{
Debug.LogWarning("Not initialized. Ignoring.");
return PurchaseProcessingResult.Complete;
}
if (purchaseEvent.purchasedProduct == null)
{
Debug.LogWarning("Attempted to process purchase with unknown product. Ignoring.");
return PurchaseProcessingResult.Complete;
}
if (string.IsNullOrEmpty(purchaseEvent.purchasedProduct.receipt))
{
Debug.LogWarning("Attempted to process purchase with no receipt. Ignoring.");
return PurchaseProcessingResult.Complete;
}
Debug.Log("Attempting purchase with receipt " + purchaseEvent.purchasedProduct.receipt);
GooglePurchase purchasePayload = GooglePurchase.FromJson(purchaseEvent.purchasedProduct.receipt);
RedeemGooglePlayInventoryItemsRequest request = new()
{
Purchases = new List
{
new()
{
ProductId = purchasePayload.PayloadData?.JsonData?.productId,
Token = purchasePayload.PayloadData?.JsonData?.purchaseToken
}
}
};
PlayFabEconomyAPI.RedeemGooglePlayInventoryItems(request, result =>
{
Debug.Log("Processed receipt validation.");
if (result?.Failed.Count > 0)
{
Debug.Log($"Validation failed for {result.Failed.Count} receipts.");
Debug.Log(JsonUtility.ToJson(result.Failed));
PlayFabProcessPurchaseEvent?.Invoke(PurchaseProcessingResult.Pending);
}
else
{
Debug.Log("Validation succeeded!");
PlayFabProcessPurchaseEvent?.Invoke(PurchaseProcessingResult.Complete);
s_storeController.ConfirmPendingPurchase(purchaseEvent.purchasedProduct);
Debug.Log("Confirmed purchase with Google Marketplace.");
}
},
PlayFabSampleUtil.OnPlayFabError);
return PurchaseProcessingResult.Pending;
}
}
///
/// サンプル用のユーティリティ クラス。
///
public class PlayFabEconomyAPIAsyncResult
{
public string Error { get; set; } = null;
public string Message { get; set; } = null;
}
public static class PlayFabSampleUtil
{
public static void OnPlayFabError(PlayFabError error)
{
Debug.LogError(error.GenerateErrorReport());
}
}
///
/// PlayFab API のサンプル Async ラッパー。
///
/// これは説明目的のみの簡単なサンプルです。
///
/// ユーザー向けシナリオのエラーをログに記録および処理するために、独自のカスタム
/// Logger 実装を作成してください。タグを使用し、PlayFab のどのエラーが GUI やゲームプレイの
/// 更新のためにゲームで処理する必要があり、どれがクラッシュおよびエラー レポート サービスに
/// ログ記録すべきかをマッピングしてください。
///
public class PlayFabEconomyAPIAsync
{
///
///
///
public Task GetItemAsync(GetItemRequest request)
{
TaskCompletionSource getItemAsyncTaskSource = new();
PlayFabEconomyAPI.GetItem(request, (response) => getItemAsyncTaskSource.SetResult(response), error =>
{
PlayFabSampleUtil.OnPlayFabError(error);
getItemAsyncTaskSource.SetResult(default);
});
return getItemAsyncTaskSource.Task;
}
///
///
///
public Task GetItemsAsync(GetItemsRequest request)
{
TaskCompletionSource getItemsAsyncTaskSource = new();
PlayFabEconomyAPI.GetItems(request, (response) => getItemsAsyncTaskSource.SetResult(response), error =>
{
PlayFabSampleUtil.OnPlayFabError(error);
getItemsAsyncTaskSource.SetResult(default);
});
return getItemsAsyncTaskSource.Task;
}
///
///
///
public Task PurchaseInventoryItemsAsync(PurchaseInventoryItemsRequest request)
{
TaskCompletionSource purchaseInventoryItemsAsyncTaskSource = new();
PlayFabEconomyAPI.PurchaseInventoryItems(request, (response) => purchaseInventoryItemsAsyncTaskSource.SetResult(response), error =>
{
PlayFabSampleUtil.OnPlayFabError(error);
purchaseInventoryItemsAsyncTaskSource.SetResult(default);
});
return purchaseInventoryItemsAsyncTaskSource.Task;
}
///
///
///
public Task SearchItemsAsync(SearchItemsRequest request)
{
TaskCompletionSource searchItemsAsyncTaskSource = new();
PlayFabEconomyAPI.SearchItems(request, (response) => searchItemsAsyncTaskSource.SetResult(response), error =>
{
PlayFabSampleUtil.OnPlayFabError(error);
searchItemsAsyncTaskSource.SetResult(default);
});
return searchItemsAsyncTaskSource.Task;
}
}
[Serializable]
public class PurchaseJsonData
{
public string orderId;
public string packageName;
public string productId;
public string purchaseToken;
public long purchaseTime;
public int purchaseState;
}
[Serializable]
public class PurchasePayloadData
{
public PurchaseJsonData JsonData;
public string signature;
public string json;
public static PurchasePayloadData FromJson(string json)
{
var payload = JsonUtility.FromJson(json);
payload.JsonData = JsonUtility.FromJson(payload.json);
return payload;
}
}
[Serializable]
public class GooglePurchase
{
public PurchasePayloadData PayloadData;
public string Store;
public string TransactionID;
public string Payload;
public static GooglePurchase FromJson(string json)
{
var purchase = JsonUtility.FromJson(json);
// エディター プレイ時には偽のレシートのみ返されます。
if (Application.isEditor)
{
return purchase;
}
purchase.PayloadData = PurchasePayloadData.FromJson(purchase.Payload);
return purchase;
}
}
```
1. **Code** という新しい **GameObject** を作成します。
2. `AndroidIAPExample` コンポーネントを追加します (クリック アンド ドラッグ、または)。
3. シーンを **Save** することを確認してください。
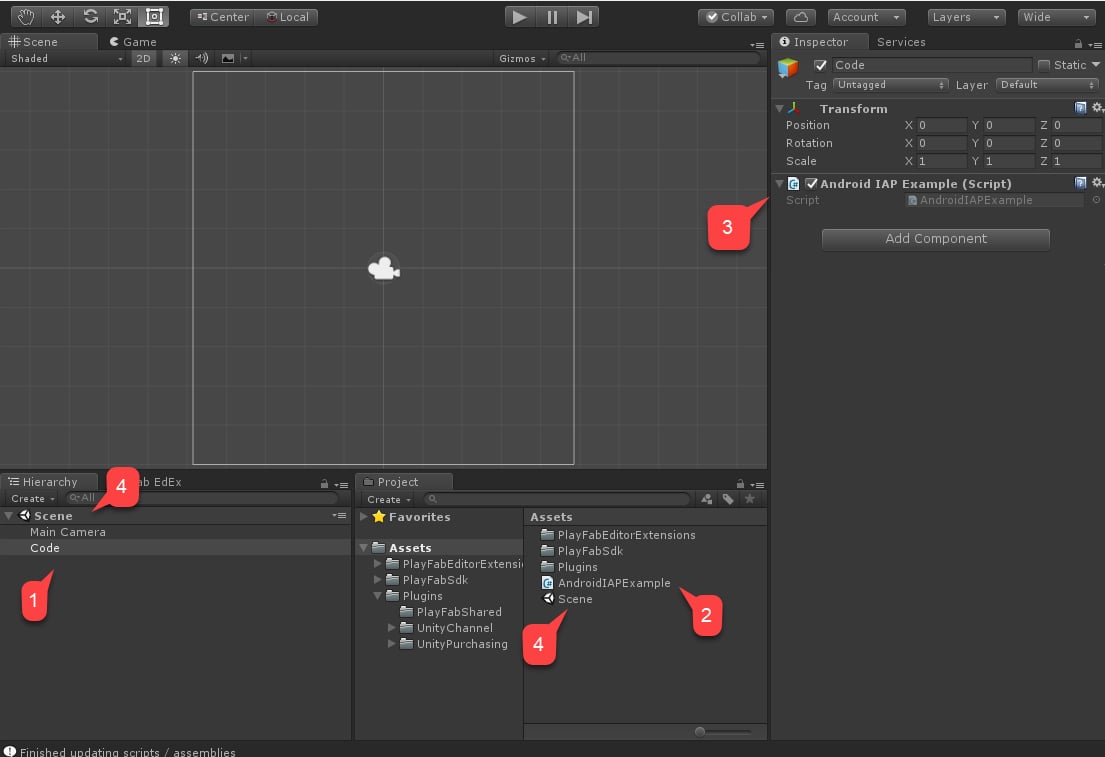 最後に、**Build Settings** に移動します。
1. **Scenes In Build** エリアにシーンが追加されていることを確認します。
2. **Android** プラットフォームが選択されていることを確認します。
3. **Player Settings** エリアに移動します。
4. **Package Name** を割り当てます。
**PlayMarket** の衝突を避けるために、必ず *独自の* パッケージ名を考えてください。
最後に、**Build Settings** に移動します。
1. **Scenes In Build** エリアにシーンが追加されていることを確認します。
2. **Android** プラットフォームが選択されていることを確認します。
3. **Player Settings** エリアに移動します。
4. **Package Name** を割り当てます。
**PlayMarket** の衝突を避けるために、必ず *独自の* パッケージ名を考えてください。
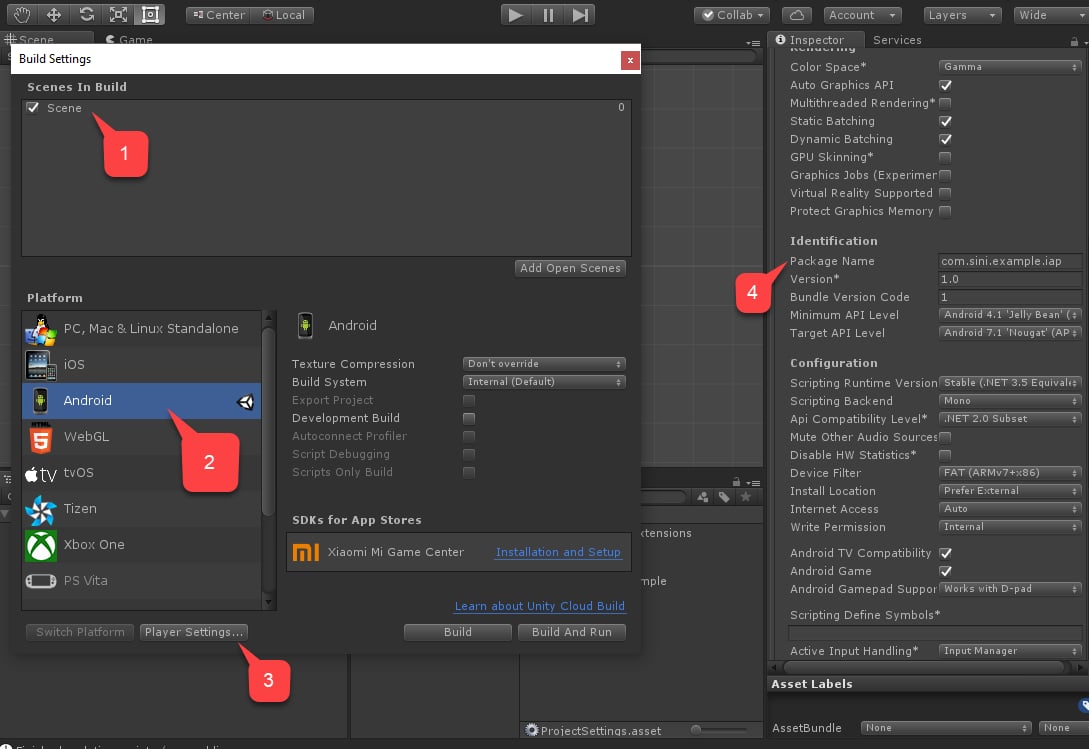 最後に、通常どおりアプリケーションをビルドし、APK があることを確認します。
テストするには、PlayMarket と PlayFab を構成する必要があります。
## IAP 用の PlayMarket アプリケーションのセットアップ
このセクションでは、PlayMarket アプリケーションで IAP を有効にする方法の詳細について説明します。
アプリケーション自体のセットアップはこのチュートリアルの範囲外です。すでにアプリケーションを持ち、少なくとも Alpha リリースを公開するように構成されていることを前提とします。
最後に、通常どおりアプリケーションをビルドし、APK があることを確認します。
テストするには、PlayMarket と PlayFab を構成する必要があります。
## IAP 用の PlayMarket アプリケーションのセットアップ
このセクションでは、PlayMarket アプリケーションで IAP を有効にする方法の詳細について説明します。
アプリケーション自体のセットアップはこのチュートリアルの範囲外です。すでにアプリケーションを持ち、少なくとも Alpha リリースを公開するように構成されていることを前提とします。
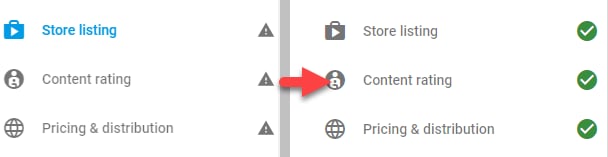 役立つ注意事項:
* そのポイントに到達するには、APK をアップロードする必要があります。前のセクションで構築した APK を使用します。
* IAP サンドボックスを有効にするには、APK を *Alpha* または *Beta* アプリケーションとしてアップロードします。
* **Content Rating** の構成には、アプリケーションで IAP がどのように有効になっているかについての質問が含まれます。
* PlayMarket は、パブリッシャーが IAP を使用またはテストすることを *許可しません*。テスト目的で *別の* Google アカウントを選び、Alpha/Beta ビルドのテスターとして追加してください。
1. アプリケーション ビルドを公開します。
2. メニューから **In-app products** を選択します。
* **Merchant Account** の入力を求められた場合は、リンクまたは作成します。
3. **Add New Product** ボタンを選択します。
役立つ注意事項:
* そのポイントに到達するには、APK をアップロードする必要があります。前のセクションで構築した APK を使用します。
* IAP サンドボックスを有効にするには、APK を *Alpha* または *Beta* アプリケーションとしてアップロードします。
* **Content Rating** の構成には、アプリケーションで IAP がどのように有効になっているかについての質問が含まれます。
* PlayMarket は、パブリッシャーが IAP を使用またはテストすることを *許可しません*。テスト目的で *別の* Google アカウントを選び、Alpha/Beta ビルドのテスターとして追加してください。
1. アプリケーション ビルドを公開します。
2. メニューから **In-app products** を選択します。
* **Merchant Account** の入力を求められた場合は、リンクまたは作成します。
3. **Add New Product** ボタンを選択します。 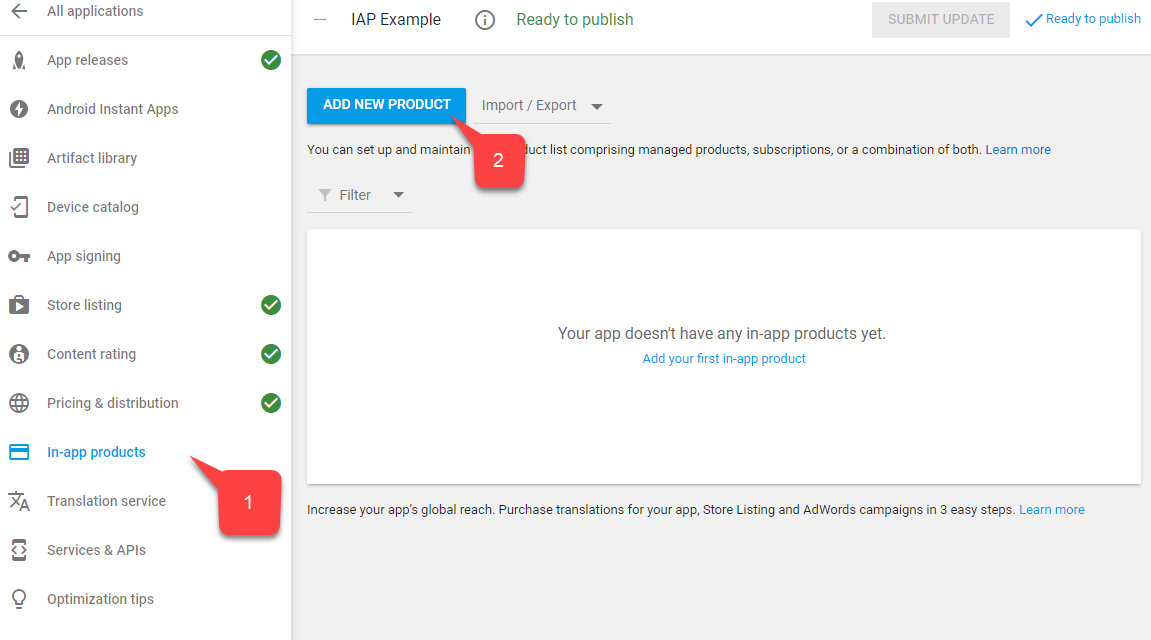 4. 新製品画面で **Managed Product** を選択します。
5. `100diamonds` のような説明的な *Product ID* を与えます。
6. **Continue** を選択します。
4. 新製品画面で **Managed Product** を選択します。
5. `100diamonds` のような説明的な *Product ID* を与えます。
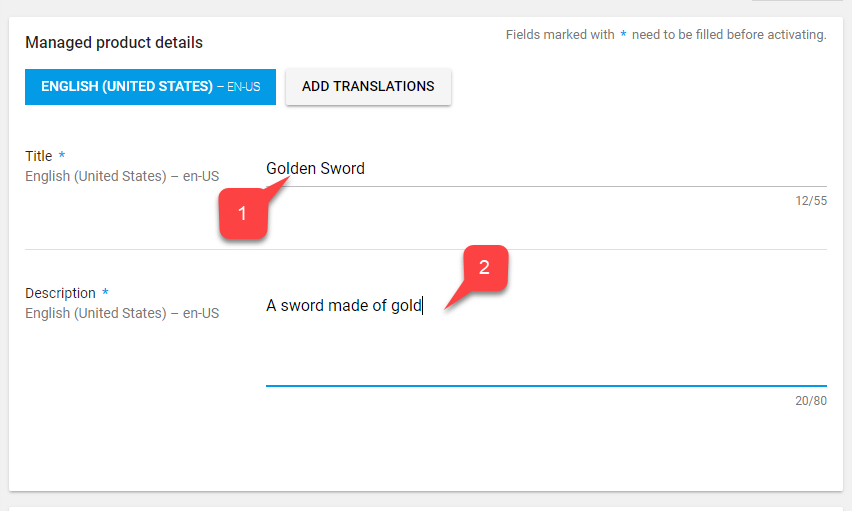
6. **Continue** を選択します。 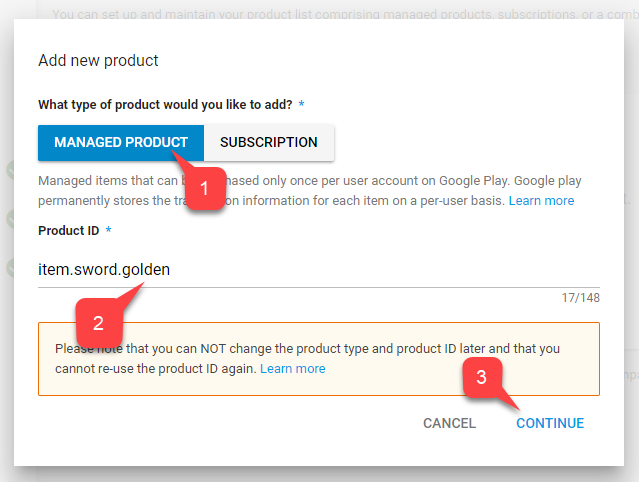 7. PlayMarket では、たとえば `100 Diamonds` や `A pack of 100 diamonds to spend in-game` のような **Title (1)** と **Description (2)** を入力する必要があります。**Data Item** のデータは PlayFab サービスからのみ取得され、ID が一致することのみが必要です。
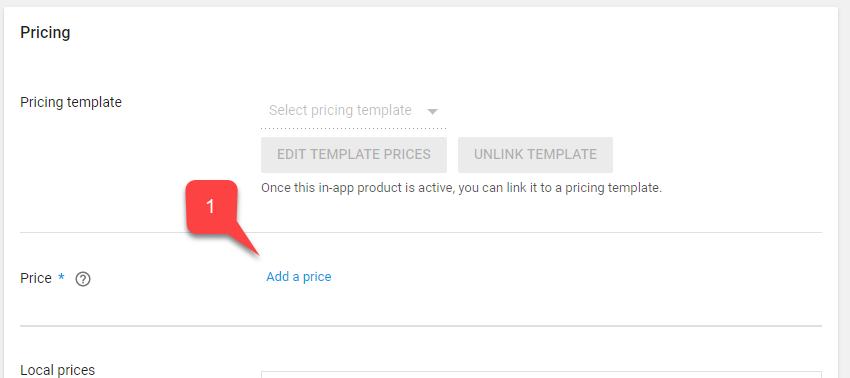
  8. さらにスクロールし、**Add a price** ボタンを選択します。
  9. "\$0.99" のような有効な価格を入力します (価格が国/地域ごとに個別に変換されることに注目してください)。
10. **Apply** ボタンを選択します。
9. "\$0.99" のような有効な価格を入力します (価格が国/地域ごとに個別に変換されることに注目してください)。
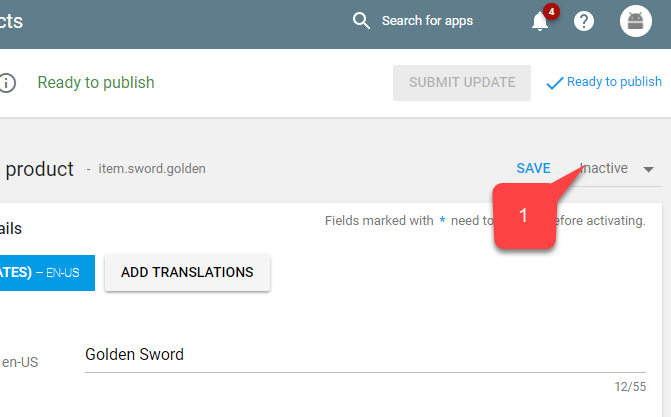
10. **Apply** ボタンを選択します。 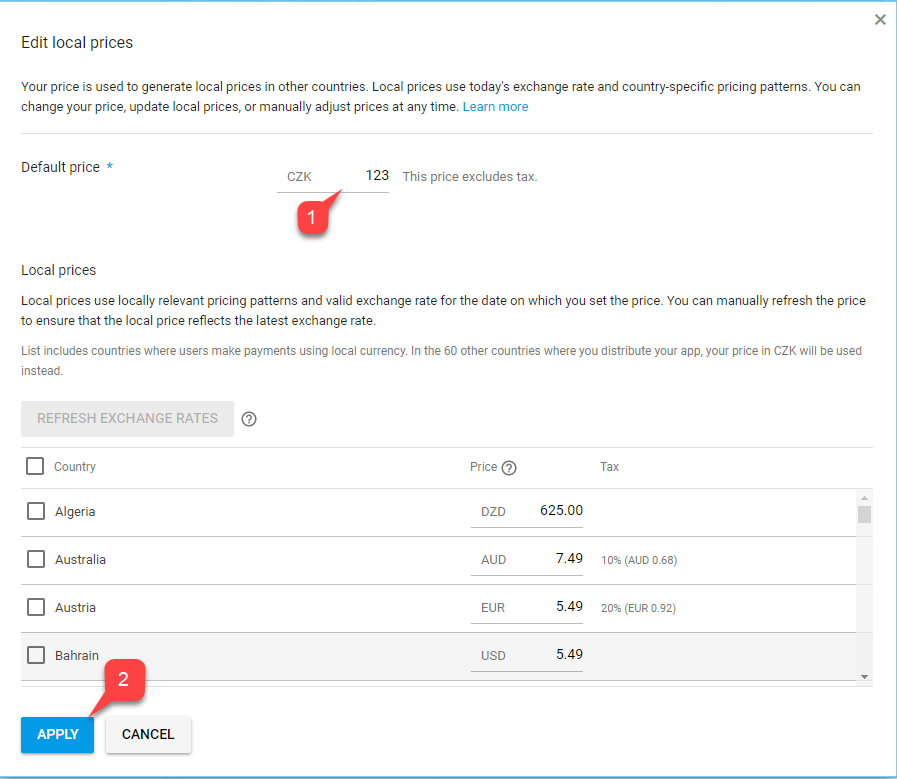 11. 最後に、画面の一番上まで戻り、アイテムのステータスを **Active** に変更します。
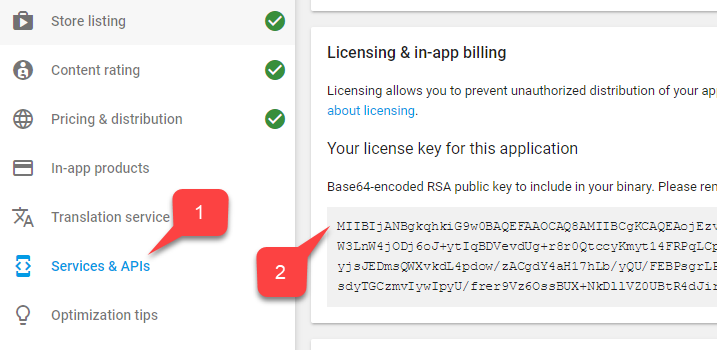
  12. PlayFab を PlayMarket とリンクするために **Licensing Key** を保存します。
13. メニューの **Services & APIs** に移動します。
14. 次に、**キー** の **Base64** バージョンを探して保存します。
12. PlayFab を PlayMarket とリンクするために **Licensing Key** を保存します。
13. メニューの **Services & APIs** に移動します。
14. 次に、**キー** の **Base64** バージョンを探して保存します。
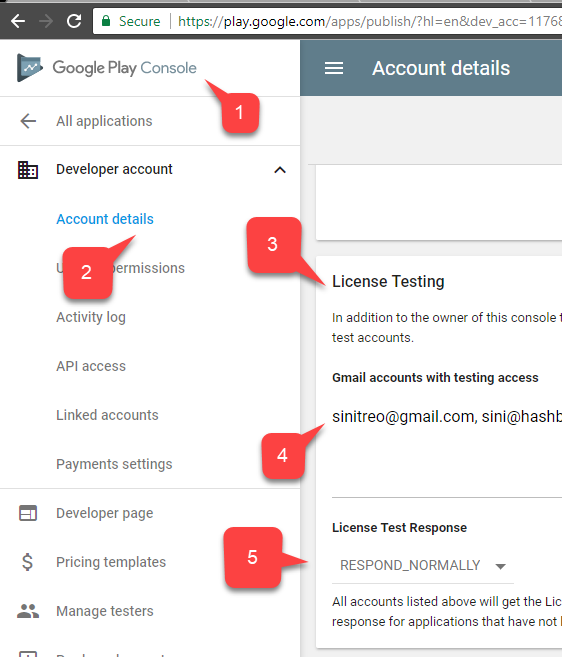
 次のステップは IAP テストの有効化です。Alpha および Beta ビルドではサンドボックスが自動的に有効になりますが、アプリのテストが認可されたアカウントをセットアップする必要があります。
1. **Home** に移動します。
2. 左側のメニューで **Account details** を見つけて選択します。
3. **License Testing** エリアを探します。
4. **Test Accounts** がリストにあることを確認します。
5. **License Test Response** が **RESPOND\_NORMALLY** に設定されていることを確認します。
設定の適用を忘れないでください。
次のステップは IAP テストの有効化です。Alpha および Beta ビルドではサンドボックスが自動的に有効になりますが、アプリのテストが認可されたアカウントをセットアップする必要があります。
1. **Home** に移動します。
2. 左側のメニューで **Account details** を見つけて選択します。
3. **License Testing** エリアを探します。
4. **Test Accounts** がリストにあることを確認します。
5. **License Test Response** が **RESPOND\_NORMALLY** に設定されていることを確認します。
設定の適用を忘れないでください。
 この時点で、統合の Play Market 側がセットアップされているはずです。
## PlayFab タイトルのセットアップ
最後のステップは、製品を反映し、Google Billing API と統合するように PlayFab タイトルを構成することです。
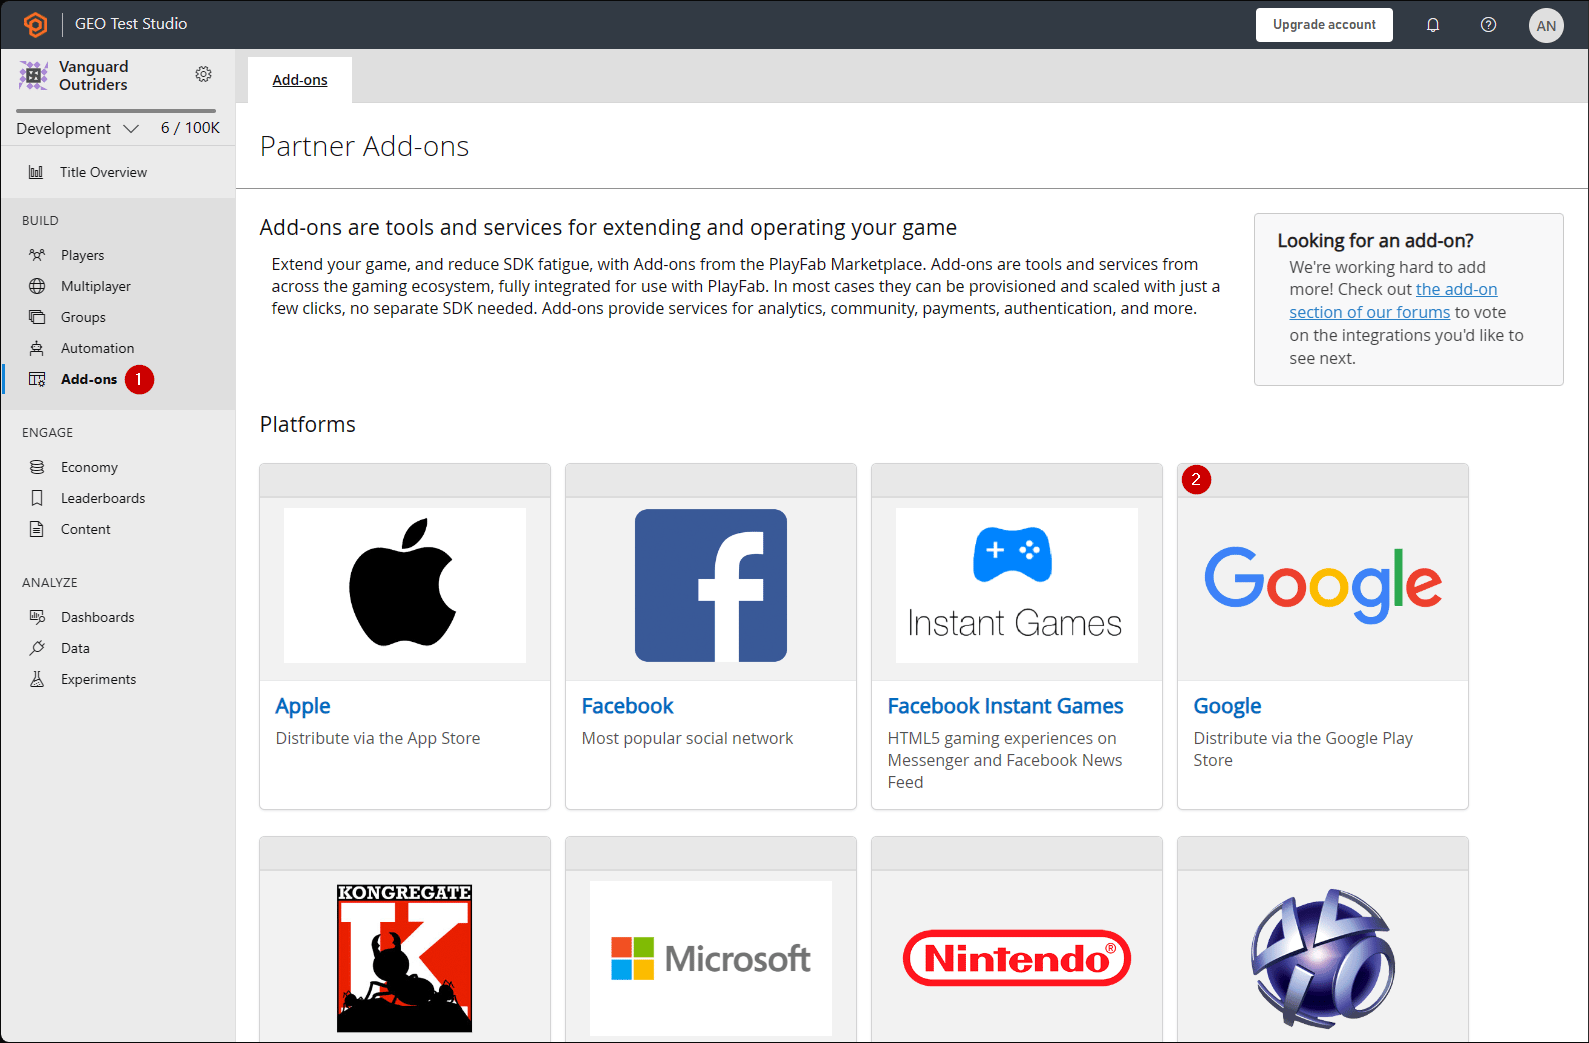
1. **Add-ons** を選択します。
2. 次に、**Google** アドオンを選択します。
この時点で、統合の Play Market 側がセットアップされているはずです。
## PlayFab タイトルのセットアップ
最後のステップは、製品を反映し、Google Billing API と統合するように PlayFab タイトルを構成することです。
1. **Add-ons** を選択します。
2. 次に、**Google** アドオンを選択します。
 1. **Package ID** を入力します。
2. 前のセクションで取得した **Google App License Key** を入力します。
3. **Install Google** ボタンを選択して変更をコミットします。
次のステップは、100 ダイヤモンド バンドルを PlayFab に反映することです。
### Game Manager
1. 新しい Economy Catalog (V2) の Currency を作成します。
2. **Title** を編集し、**Description** を追加します - たとえば `Diamonds`、`Our in-game currency of choice.`。
3. 通貨を見つけやすくするために **Friendly ID** を追加します: `diamonds`。
4. 変更を完了するために **Save and publish** を選択します。
5. **Currency** リストで通貨を確認します。
6. 次に、新しい Economy Catalog (V2) のバンドルを作成します。
7. **Title** を編集し、**Description** を追加します - たとえば `100 Diamonds Bundle`、`A pack of 100 diamonds to spend in-game.`。
```JSON theme={null}
{
"NEUTRAL": "100 Diamonds Bundle",
"en-US": "100 Diamonds Bundle",
"en-GB": "100 Diamonds Bundle",
"de-DE": "100 Diamantenbüschel"
}
```
このデータは **Play Market のアイテム タイトルと説明** とは *無関係* で、独立していることに注意してください。
1. Content type を使用してバンドルを整理できます - たとえば `appstorebundles`。Content type は ⚙️ > Title Settings > Economy (V2) で管理されます。
2. Display properties にローカライズされた価格を追加することで、実際の価格を追跡します。
```json theme={null}
{
"prices": [
"en-us": 0.99,
"en-gb": 0.85,
"de-de": 0.45
]
}
```
3. バンドルに新しいアイテムを追加します。フィルターで Currencies を選択し、前のセットで作成した通貨を選択します。このバンドルで販売する通貨の量に合わせて Quantity を設定します。
4. "GooglePlay" マーケットプレイス用に新しい Platform を追加します。まだ GooglePlay マーケットプレイスがない場合は、Economy Settings ページで作成できます。**Marketplace ID** を、前のセクションで作成した Google Play Console の Product ID と一致するように設定します。
5. 変更を完了するために **Save and publish** を選択します。
6. **Bundles** リストでバンドルを確認します。
### REST API
***
次に、ゲーム内 NPC ベンダーを表す PlayFab ストアで、プレイヤーが通貨を使えるゲーム内購入を設定できます。
### Game Manager
1. 新しい Economy Catalog (V2) の Item を作成します。
2. **Title** を編集し、**Description** を追加します - たとえば "Golden Sword"、"A sword made of gold."。
3. プレイヤーがストアでアイテムを見つけやすくするために、ローカライズされたキーワードを追加できます。API 経由での後の取得のためにアイテムを整理するために Tag と Content type を追加します。アーマー値、アート アセットへの相対パス、またはゲームで格納する必要のあるその他のデータを格納するために Display Properties を使用します。
4. 新しい価格を追加し、前のステップで作成した通貨を選択します。デフォルトで設定したい価格に Amount を設定します。後で作成する任意のストアで価格を上書きできます。
5. 変更を完了するために **Save and publish** を選択します。
6. **Items** リストでアイテムを確認します。
7. 最後に、新しい Economy Catalog (V2) の Store を作成します。
8. **Title** を編集し、**Description** を追加します - たとえば `Villager Store`、`A humble store run by a humble villager.`。
9. 取得を容易にするために **Friendly ID** を与えます。たとえば `villagerstore`。
10. 前のステップで作成したアイテムをストアに追加します。ストアには複数のアイテムを追加でき、必要に応じてデフォルト価格を上書きできます。
11. 変更を完了するために **Save and publish** を選択します。
12. **Stores** リストでストアを確認します。
### REST API
***
これで PlayFab タイトルのセットアップが完了しました。
## テスト
テスト目的のために、Alpha/Beta リリースを使用してアプリをダウンロードします。
* テスト アカウントと実際の Android デバイスを必ず使用してください。
* アプリを起動すると、IAP が初期化され、アイテムを表す *1 つのボタン* が表示されるはずです。
* そのボタンを選択します。
1. **Package ID** を入力します。
2. 前のセクションで取得した **Google App License Key** を入力します。
3. **Install Google** ボタンを選択して変更をコミットします。
次のステップは、100 ダイヤモンド バンドルを PlayFab に反映することです。
### Game Manager
1. 新しい Economy Catalog (V2) の Currency を作成します。
2. **Title** を編集し、**Description** を追加します - たとえば `Diamonds`、`Our in-game currency of choice.`。
3. 通貨を見つけやすくするために **Friendly ID** を追加します: `diamonds`。
4. 変更を完了するために **Save and publish** を選択します。
5. **Currency** リストで通貨を確認します。
6. 次に、新しい Economy Catalog (V2) のバンドルを作成します。
7. **Title** を編集し、**Description** を追加します - たとえば `100 Diamonds Bundle`、`A pack of 100 diamonds to spend in-game.`。
```JSON theme={null}
{
"NEUTRAL": "100 Diamonds Bundle",
"en-US": "100 Diamonds Bundle",
"en-GB": "100 Diamonds Bundle",
"de-DE": "100 Diamantenbüschel"
}
```
このデータは **Play Market のアイテム タイトルと説明** とは *無関係* で、独立していることに注意してください。
1. Content type を使用してバンドルを整理できます - たとえば `appstorebundles`。Content type は ⚙️ > Title Settings > Economy (V2) で管理されます。
2. Display properties にローカライズされた価格を追加することで、実際の価格を追跡します。
```json theme={null}
{
"prices": [
"en-us": 0.99,
"en-gb": 0.85,
"de-de": 0.45
]
}
```
3. バンドルに新しいアイテムを追加します。フィルターで Currencies を選択し、前のセットで作成した通貨を選択します。このバンドルで販売する通貨の量に合わせて Quantity を設定します。
4. "GooglePlay" マーケットプレイス用に新しい Platform を追加します。まだ GooglePlay マーケットプレイスがない場合は、Economy Settings ページで作成できます。**Marketplace ID** を、前のセクションで作成した Google Play Console の Product ID と一致するように設定します。
5. 変更を完了するために **Save and publish** を選択します。
6. **Bundles** リストでバンドルを確認します。
### REST API
***
次に、ゲーム内 NPC ベンダーを表す PlayFab ストアで、プレイヤーが通貨を使えるゲーム内購入を設定できます。
### Game Manager
1. 新しい Economy Catalog (V2) の Item を作成します。
2. **Title** を編集し、**Description** を追加します - たとえば "Golden Sword"、"A sword made of gold."。
3. プレイヤーがストアでアイテムを見つけやすくするために、ローカライズされたキーワードを追加できます。API 経由での後の取得のためにアイテムを整理するために Tag と Content type を追加します。アーマー値、アート アセットへの相対パス、またはゲームで格納する必要のあるその他のデータを格納するために Display Properties を使用します。
4. 新しい価格を追加し、前のステップで作成した通貨を選択します。デフォルトで設定したい価格に Amount を設定します。後で作成する任意のストアで価格を上書きできます。
5. 変更を完了するために **Save and publish** を選択します。
6. **Items** リストでアイテムを確認します。
7. 最後に、新しい Economy Catalog (V2) の Store を作成します。
8. **Title** を編集し、**Description** を追加します - たとえば `Villager Store`、`A humble store run by a humble villager.`。
9. 取得を容易にするために **Friendly ID** を与えます。たとえば `villagerstore`。
10. 前のステップで作成したアイテムをストアに追加します。ストアには複数のアイテムを追加でき、必要に応じてデフォルト価格を上書きできます。
11. 変更を完了するために **Save and publish** を選択します。
12. **Stores** リストでストアを確認します。
### REST API
***
これで PlayFab タイトルのセットアップが完了しました。
## テスト
テスト目的のために、Alpha/Beta リリースを使用してアプリをダウンロードします。
* テスト アカウントと実際の Android デバイスを必ず使用してください。
* アプリを起動すると、IAP が初期化され、アイテムを表す *1 つのボタン* が表示されるはずです。
* そのボタンを選択します。
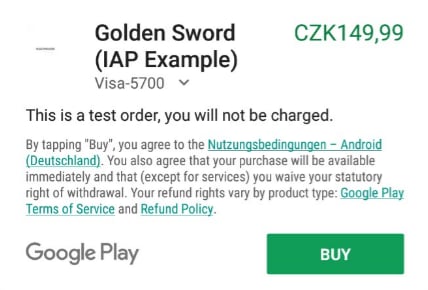
 IAP 購入が開始されます。購入が成功する時点まで Google Play の指示に従います。
 最後に、PlayFab の **Game Manager** ダッシュボードでタイトルに移動し、**New Events** を見つけます。
購入が提供、検証され、PlayFab エコシステムにパイプされたことを確認します。
UnityIAP と Android Billing API を PlayFab アプリケーションに正常に統合しました。
## 次のステップ
1. デモの IMGUI ディスプレイを置き換えるための購入用の Unity UI Toolkit インターフェイスを構築します。
2. PlayFab エラーを処理してユーザーに表示するためのカスタム Unity Logger を作成します。
3. Unity UI で表示するために、PlayFab の Items Images フィールドにアイコン画像を追加します。
## Related topics
- [PlayFab Economy Legacy、Unity IAP、Android を使い始める](/ja-jp/services/playfab/economy-monetization/economy/tutorials/getting-started-with-unity-iap-android.md)
- [Google マーケットプレイスでの引き換え](/ja-jp/services/playfab/economy-monetization/economy-v2/marketplace/marketplace-redemption/google.md)
- [リワード広告を使い始める](/ja-jp/services/playfab/economy-monetization/rewarded-ads/quickstart.md)
- [PlayFab for Unity (v2 Unified)](/ja-jp/services/playfab/sdks/unified-unity/overview.md)
- [Android Studio とプッシュ通知の使い始め](/ja-jp/services/playfab/live-service-management/game-configuration/title-communications/push-notifications/getting-started-android-studio-push-notifications.md)
最後に、PlayFab の **Game Manager** ダッシュボードでタイトルに移動し、**New Events** を見つけます。
購入が提供、検証され、PlayFab エコシステムにパイプされたことを確認します。
UnityIAP と Android Billing API を PlayFab アプリケーションに正常に統合しました。
## 次のステップ
1. デモの IMGUI ディスプレイを置き換えるための購入用の Unity UI Toolkit インターフェイスを構築します。
2. PlayFab エラーを処理してユーザーに表示するためのカスタム Unity Logger を作成します。
3. Unity UI で表示するために、PlayFab の Items Images フィールドにアイコン画像を追加します。
## Related topics
- [PlayFab Economy Legacy、Unity IAP、Android を使い始める](/ja-jp/services/playfab/economy-monetization/economy/tutorials/getting-started-with-unity-iap-android.md)
- [Google マーケットプレイスでの引き換え](/ja-jp/services/playfab/economy-monetization/economy-v2/marketplace/marketplace-redemption/google.md)
- [リワード広告を使い始める](/ja-jp/services/playfab/economy-monetization/rewarded-ads/quickstart.md)
- [PlayFab for Unity (v2 Unified)](/ja-jp/services/playfab/sdks/unified-unity/overview.md)
- [Android Studio とプッシュ通知の使い始め](/ja-jp/services/playfab/live-service-management/game-configuration/title-communications/push-notifications/getting-started-android-studio-push-notifications.md)