> ## Documentation Index
> Fetch the complete documentation index at: https://devdocs.xbox.com/llms.txt
> Use this file to discover all available pages before exploring further.
# Démarrage rapide de Photon
> Connectez le multijoueur Photon Realtime et PUN à PlayFab pour authentifier les joueurs et recevoir les événements de salle via des rappels CloudScript dans un projet Unity.
Cette section fournit des informations sur l'utilisation de PlayFab avec les services multijoueurs Photon, tels que Photon RealTime et Photon Unity Networking (PUN).
Actuellement, nous proposons les intégrations Photon suivantes :
* Authentification des joueurs Photon avec PlayFab.
* Écoute des événements de salle à l'aide des rappels CloudScript de PlayFab.
## Démarrage rapide de Photon
Ce démarrage rapide montre comment configurer Photon Multiplayer pour qu'il fonctionne avec PlayFab. Actuellement, PlayFab propose les intégrations Photon suivantes :
* Authentification des joueurs Photon avec PlayFab.
* Écoute des événements de salle à l'aide des rappels CloudScript de PlayFab.
Dans ce démarrage rapide, nous illustrons le fonctionnement de ces deux fonctionnalités à l'aide du dernier [exemple de projet Photon Unity](https://assetstore.unity.com/packages/tools/network/photon-unity-networking-classic-free-1786).
Pour une expérience multijoueur et de chat PlayFab entièrement prise en charge sur Unity, consultez le [plug-in Unity PlayFab Party](/fr/services/playfab/multiplayer/networking/party-unity-overview) pour plus d'informations.
## Prérequis
1. Un projet [Unity](/fr/services/playfab/sdks/unity3d/quickstart) dans lequel le SDK PlayFab est importé, avec un titre configuré.
2. Le titre PlayFab inscrit.
Ce guide omet les paramètres de l'application de chat. Pour intégrer votre application de chat, créez une nouvelle application Photon Chat et entrez l'App ID dans les zones correspondantes d'Unity et de la page du module complémentaire Photon de PlayFab Game Manager.
## Configuration d'une application Photon
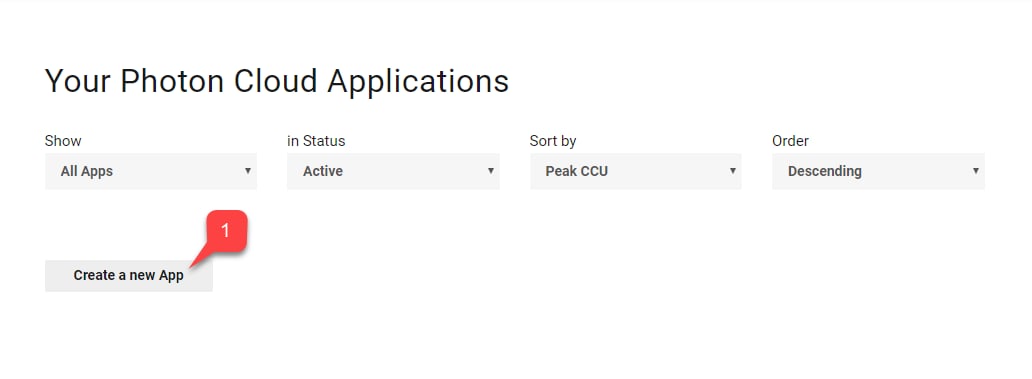
1. Une fois inscrit et connecté au tableau de bord Photon, sélectionnez **Create a new App**.
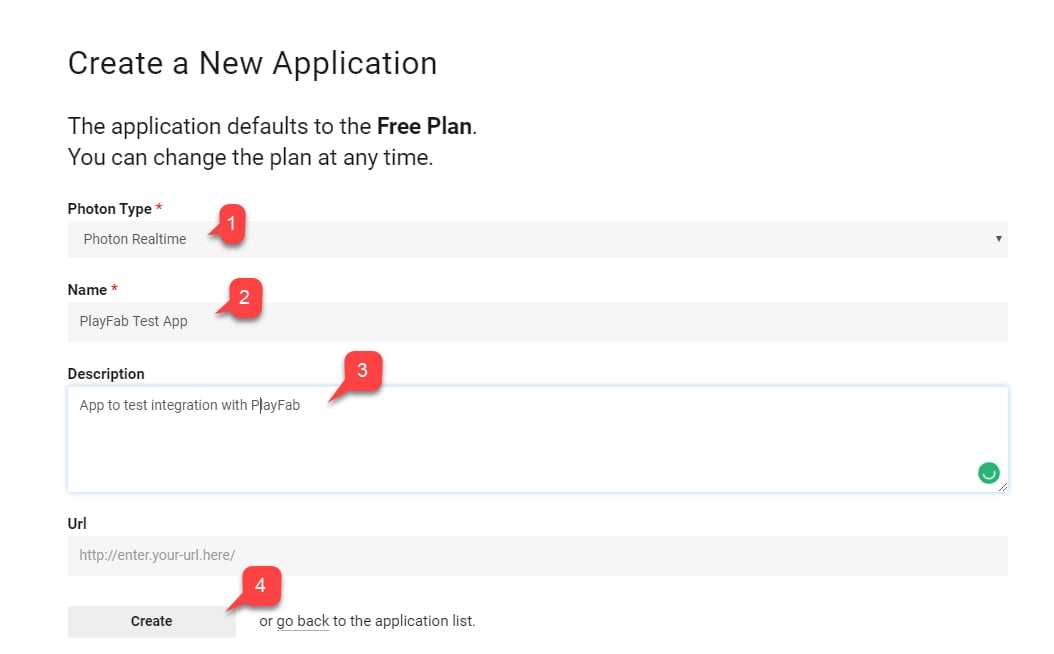
 2. Sélectionnez le **Photon Type**.
3. Choisissez un **Name**.
4. Rédigez une **Description**.
5. Validez en sélectionnant **Create**.
2. Sélectionnez le **Photon Type**.
3. Choisissez un **Name**.
4. Rédigez une **Description**.
5. Validez en sélectionnant **Create**.
 ## Configuration de l'authentification
1. Trouvez l'application nouvellement créée dans la liste et sélectionnez **Manage**.
## Configuration de l'authentification
1. Trouvez l'application nouvellement créée dans la liste et sélectionnez **Manage**.
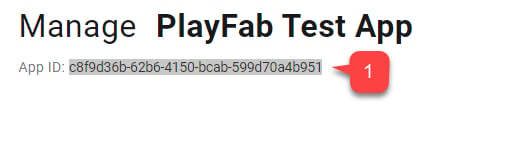
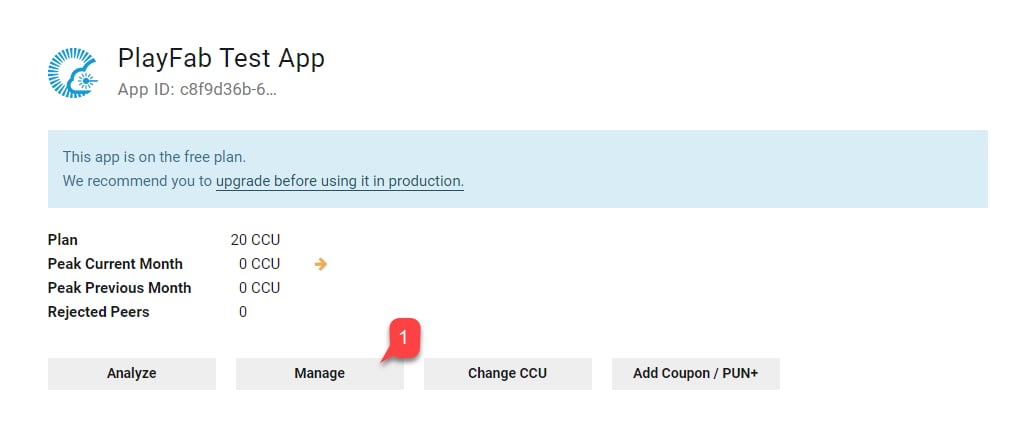 2. Dans le tableau de bord de l'**Application**, trouvez et enregistrez l'**App ID** situé sous le **Title** de la page.
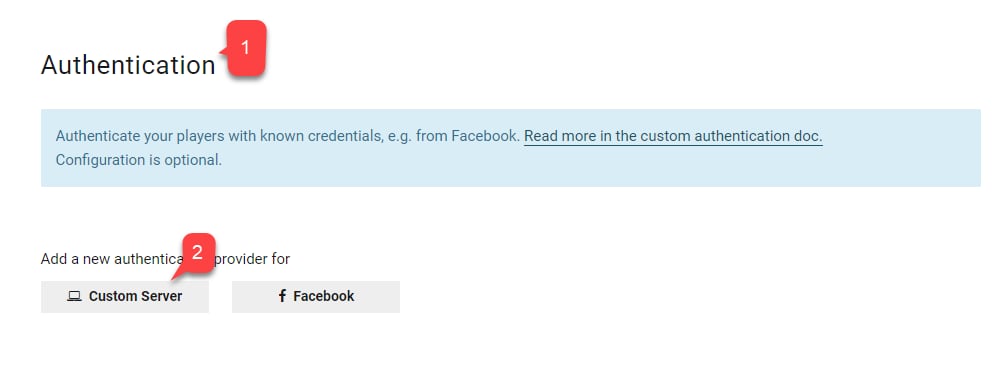
 3. Repérez la section **Authentication**.
4. Sélectionnez **Custom Server**.
3. Repérez la section **Authentication**.
4. Sélectionnez **Custom Server**.
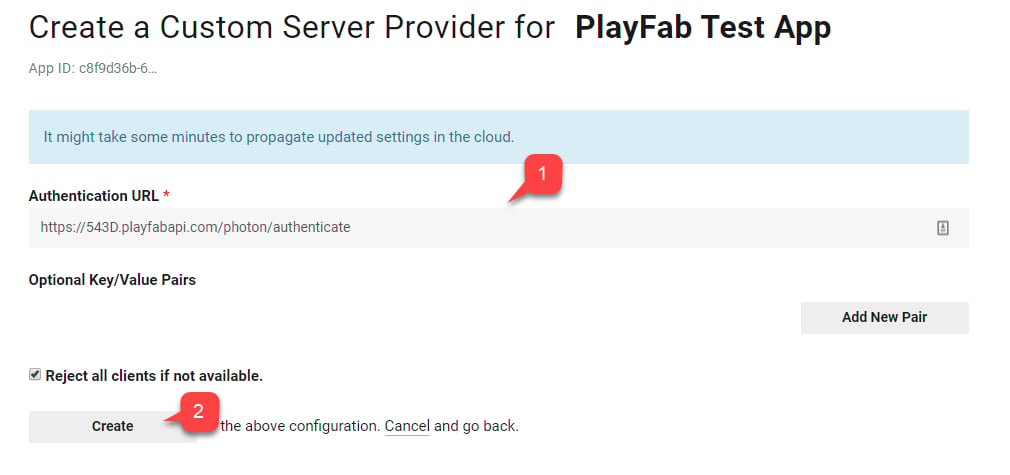
 La page suivante vous permet de configurer l'URL d'authentification pour Photon.
```html theme={null}
https://{PlayFabTitleId}.playfabapi.com/photon/authenticate
```
Remplacez l'espace réservé `PlayFabTitleId` par votre propre Title Id.
```html theme={null}
{PlayFabTitleId}
```
5. Entrez l'**URL**.
6. Validez en sélectionnant le bouton **Create**.
La page suivante vous permet de configurer l'URL d'authentification pour Photon.
```html theme={null}
https://{PlayFabTitleId}.playfabapi.com/photon/authenticate
```
Remplacez l'espace réservé `PlayFabTitleId` par votre propre Title Id.
```html theme={null}
{PlayFabTitleId}
```
5. Entrez l'**URL**.
6. Validez en sélectionnant le bouton **Create**.
 ## Configuration d'un titre PlayFab pour Photon
Accédez à la page **Game Manager** de votre titre, puis :
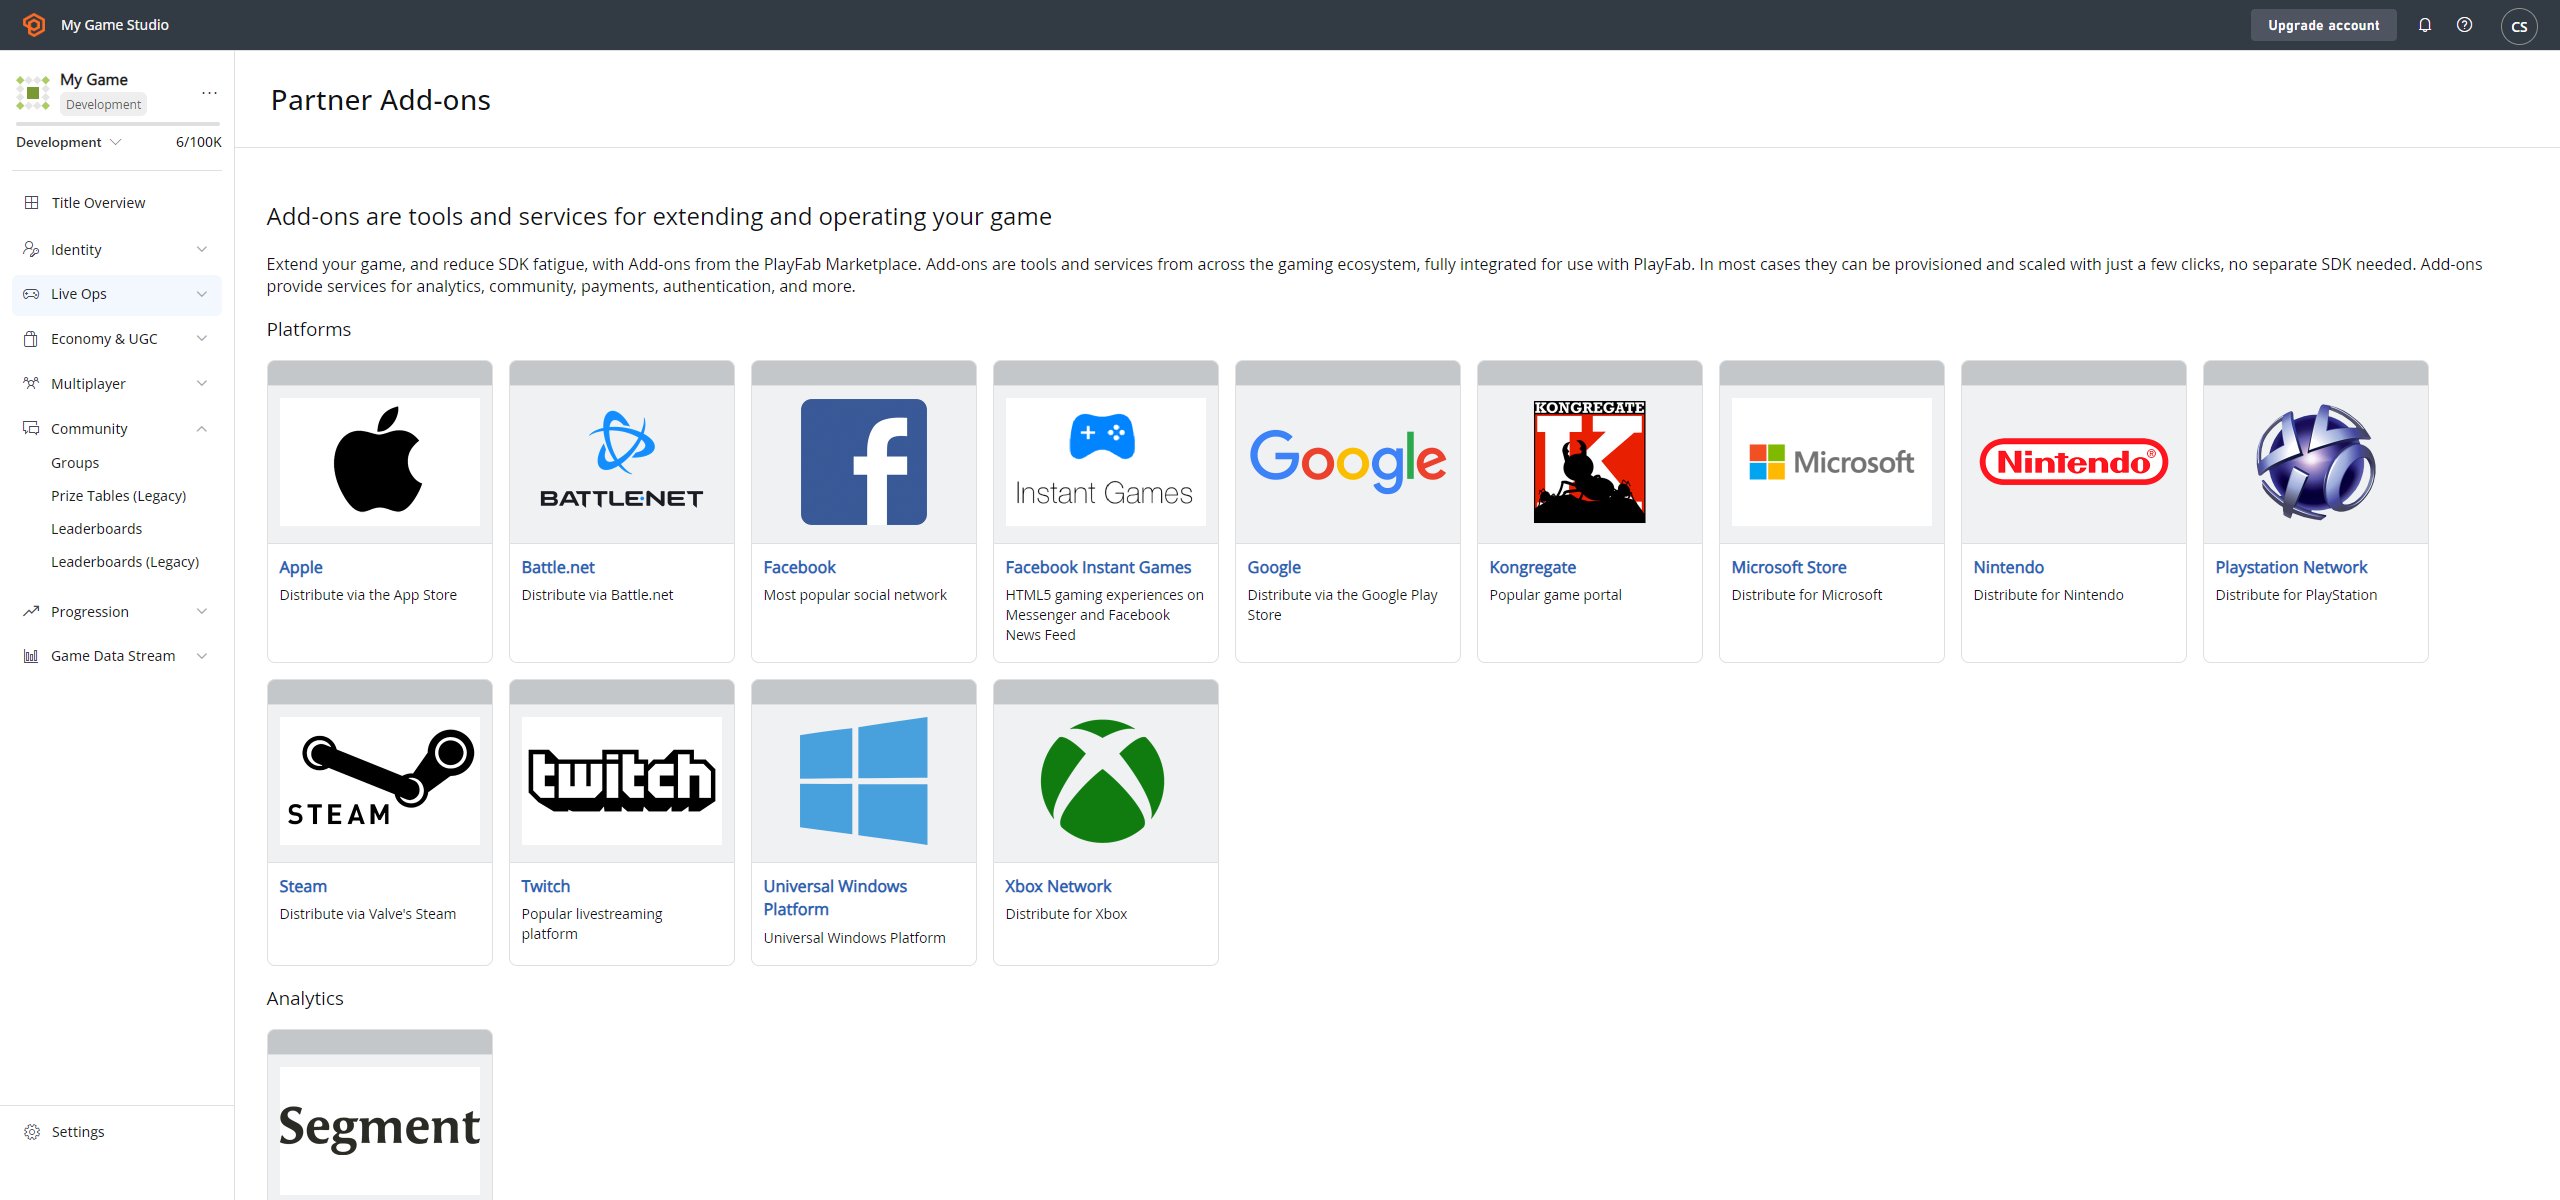
1. Accédez à l'onglet **Add-ons**.
2. Dans la liste des **Add-ons**, trouvez et sélectionnez **Photon**.
## Configuration d'un titre PlayFab pour Photon
Accédez à la page **Game Manager** de votre titre, puis :
1. Accédez à l'onglet **Add-ons**.
2. Dans la liste des **Add-ons**, trouvez et sélectionnez **Photon**.
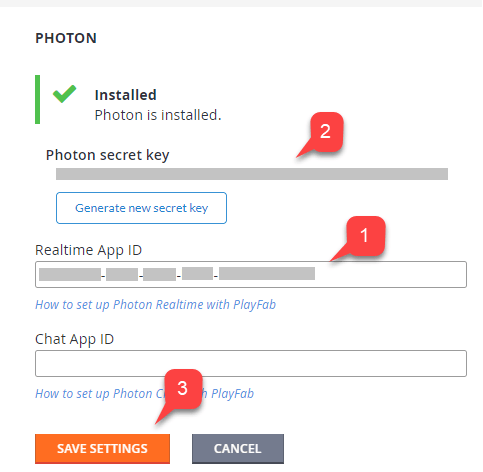
 3. La page **Photon Add-on** vous permet d'installer Photon en spécifiant votre **Photon Realtime Application ID**.
* Vous pouvez éventuellement spécifier le **Chat App ID**.
* Une fois le **module complémentaire (3)** installé, une **Photon secret Key** est générée **(2)**.
* Enregistrez-la pour une utilisation ultérieure lors de la configuration des webhooks.
N'oubliez pas d'enregistrer votre clé secrète Photon en lieu sûr, à un endroit facilement accessible. Elle vous sera utile lors de la configuration des webhooks.
3. La page **Photon Add-on** vous permet d'installer Photon en spécifiant votre **Photon Realtime Application ID**.
* Vous pouvez éventuellement spécifier le **Chat App ID**.
* Une fois le **module complémentaire (3)** installé, une **Photon secret Key** est générée **(2)**.
* Enregistrez-la pour une utilisation ultérieure lors de la configuration des webhooks.
N'oubliez pas d'enregistrer votre clé secrète Photon en lieu sûr, à un endroit facilement accessible. Elle vous sera utile lors de la configuration des webhooks.
 ## Configuration des webhooks Photon
Dans le cadre d'une intégration facultative, Photon peut transmettre certains événements à votre CloudScript PlayFab. Cela se fait à l'aide de webhooks :
* Vous spécifiez une URL de base.
* Vous spécifiez ensuite un chemin pour chacun des événements disponibles.
* Un chemin correspond en fait au nom d'un gestionnaire implémenté dans votre CloudScript.
L'URL de base a le format suivant :
```html theme={null}
https://{PlayFabTitleId}.playfablogic.com/webhook/1/prod/{PhotonSecretKey}
```
Veillez à remplacer l'espace réservé `Title Id` par votre propre Title Id.
```html theme={null}
{PlayFabTitleId}
```
Veillez à remplacer le jeton `PhotonSecretKey` par la clé secrète que vous avez générée sur la page **Photon Add-on**.
```html theme={null}
{PhotonSecretKey}
```
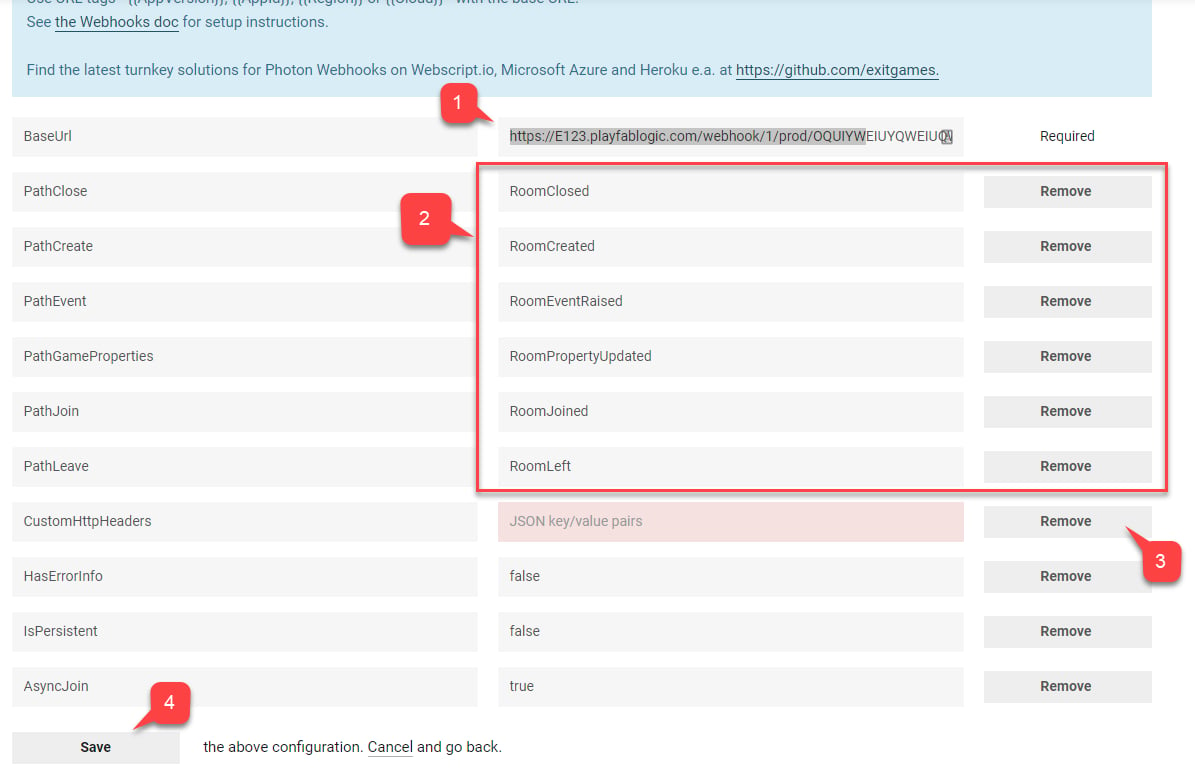
1. Renseignez la **Base URL**.
2. Attribuez un **Name** de gestionnaire **CloudScript** à chacun des **Events** disponibles.
3. Supprimez les éventuels **CustomHttpHeaders**.
4. Validez en sélectionnant le bouton **Save**.
## Configuration des webhooks Photon
Dans le cadre d'une intégration facultative, Photon peut transmettre certains événements à votre CloudScript PlayFab. Cela se fait à l'aide de webhooks :
* Vous spécifiez une URL de base.
* Vous spécifiez ensuite un chemin pour chacun des événements disponibles.
* Un chemin correspond en fait au nom d'un gestionnaire implémenté dans votre CloudScript.
L'URL de base a le format suivant :
```html theme={null}
https://{PlayFabTitleId}.playfablogic.com/webhook/1/prod/{PhotonSecretKey}
```
Veillez à remplacer l'espace réservé `Title Id` par votre propre Title Id.
```html theme={null}
{PlayFabTitleId}
```
Veillez à remplacer le jeton `PhotonSecretKey` par la clé secrète que vous avez générée sur la page **Photon Add-on**.
```html theme={null}
{PhotonSecretKey}
```
1. Renseignez la **Base URL**.
2. Attribuez un **Name** de gestionnaire **CloudScript** à chacun des **Events** disponibles.
3. Supprimez les éventuels **CustomHttpHeaders**.
4. Validez en sélectionnant le bouton **Save**.
 ## Configuration d'un projet Unity
Ce guide suppose que le SDK PlayFab est déjà importé et configuré, et que les paramètres du titre sont configurés.
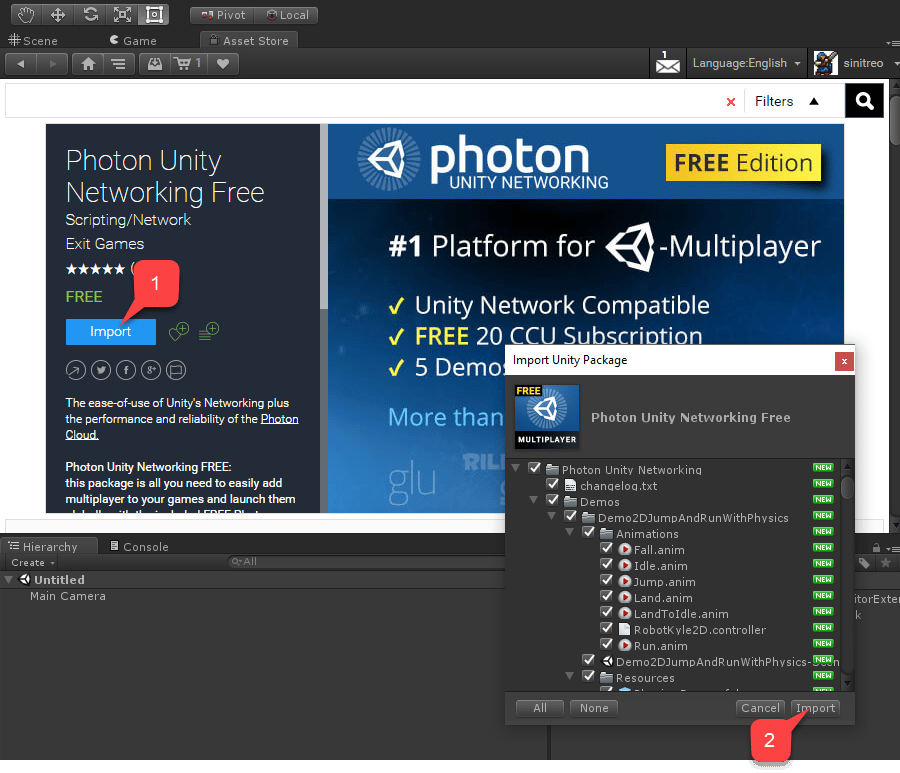
* Commencez par accéder à l'**Asset Store**.
* Repérez le [package Photon Unity Networking Free](https://assetstore.unity.com/packages/tools/network/photon-unity-networking-classic-free-1786).
* Sélectionnez **Import (1)**.
* Vous pouvez examiner les fichiers importés.
* Sélectionnez ensuite **Import (2)**.
## Configuration d'un projet Unity
Ce guide suppose que le SDK PlayFab est déjà importé et configuré, et que les paramètres du titre sont configurés.
* Commencez par accéder à l'**Asset Store**.
* Repérez le [package Photon Unity Networking Free](https://assetstore.unity.com/packages/tools/network/photon-unity-networking-classic-free-1786).
* Sélectionnez **Import (1)**.
* Vous pouvez examiner les fichiers importés.
* Sélectionnez ensuite **Import (2)**.
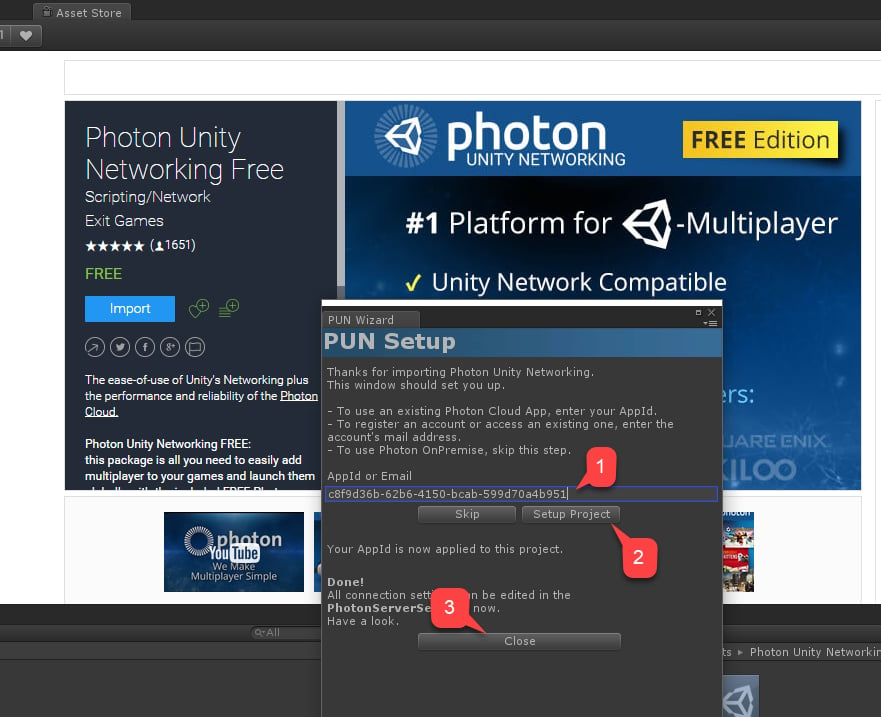
 Juste après la fin du processus d'importation, la fenêtre **PUN Setup** s'ouvre.
* Entrez votre **Realtime Application ID (1)**, disponible dans le **Photon Application Dashboard** pour la **Photon App** que vous avez créée.
* Sélectionnez **Setup Project (2)**.
* Une fois la configuration terminée, sélectionnez **Close (3)**.
Juste après la fin du processus d'importation, la fenêtre **PUN Setup** s'ouvre.
* Entrez votre **Realtime Application ID (1)**, disponible dans le **Photon Application Dashboard** pour la **Photon App** que vous avez créée.
* Sélectionnez **Setup Project (2)**.
* Une fois la configuration terminée, sélectionnez **Close (3)**.
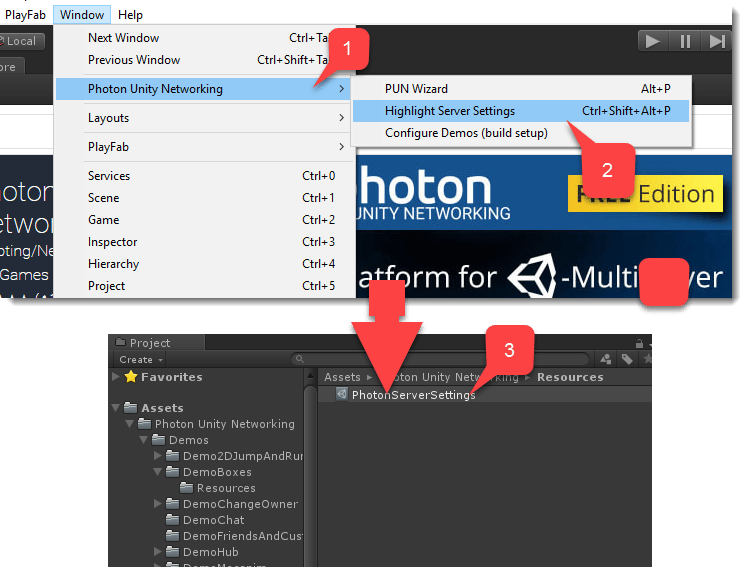
 Si l'**AppId** a été accepté, l'objet **Photon Server Settings** est sélectionné et visible dans la fenêtre **Unity Inspector**. Pour accéder manuellement à l'objet **Server Settings** :
* Accédez au panneau supérieur de la fenêtre.
* Sélectionnez **Window**.
* Sélectionnez ensuite **Photon Unity Networking (1)**.
* Enfin, sélectionnez **Highlight Server Settings (2)**.
* La fenêtre de projet **Standard Unity** affiche l'objet **PhotonServerSettings (3)**.
* Sélectionnez l'objet pour afficher ses paramètres dans la fenêtre **Unity Inspector**.
Si l'**AppId** a été accepté, l'objet **Photon Server Settings** est sélectionné et visible dans la fenêtre **Unity Inspector**. Pour accéder manuellement à l'objet **Server Settings** :
* Accédez au panneau supérieur de la fenêtre.
* Sélectionnez **Window**.
* Sélectionnez ensuite **Photon Unity Networking (1)**.
* Enfin, sélectionnez **Highlight Server Settings (2)**.
* La fenêtre de projet **Standard Unity** affiche l'objet **PhotonServerSettings (3)**.
* Sélectionnez l'objet pour afficher ses paramètres dans la fenêtre **Unity Inspector**.
 Dans **PhotonServerSettings**, vous avez la possibilité d'attribuer le **Chat Application ID**.
À ce stade, le projet est configuré.
## Implémentation de l'authentification de PlayFab vers Photon
Lorsque vous activez le **Photon Add-on** pour votre titre dans PlayFab Game Manager et que vous configurez l'authentification dans le tableau de bord de la **Photon Application**, PlayFab vous permet d'authentifier les joueurs PlayFab existants dans l'environnement Photon.
Cela signifie que vous pouvez éviter complètement d'implémenter une gestion des utilisateurs pour Photon.
1. Accédez à la scène **DemoHub-Scene-V2** du package **Photon Unity Networking Free**, version **Classic**.
* Cette scène est un hub pour tous les exemples du package.
* Comme il s'agit de la *première* scène chargée, ajoutons un petit script pour permettre l'authentification de PlayFab avec Photon.
2. Créez un **GameObject** vide nommé **PlayFabAuthenticator**.
3. Ensuite, dans la fenêtre **Unity Inspector**, ajoutez un composant portant le même nom à ce **GameObject**.
Dans **PhotonServerSettings**, vous avez la possibilité d'attribuer le **Chat Application ID**.
À ce stade, le projet est configuré.
## Implémentation de l'authentification de PlayFab vers Photon
Lorsque vous activez le **Photon Add-on** pour votre titre dans PlayFab Game Manager et que vous configurez l'authentification dans le tableau de bord de la **Photon Application**, PlayFab vous permet d'authentifier les joueurs PlayFab existants dans l'environnement Photon.
Cela signifie que vous pouvez éviter complètement d'implémenter une gestion des utilisateurs pour Photon.
1. Accédez à la scène **DemoHub-Scene-V2** du package **Photon Unity Networking Free**, version **Classic**.
* Cette scène est un hub pour tous les exemples du package.
* Comme il s'agit de la *première* scène chargée, ajoutons un petit script pour permettre l'authentification de PlayFab avec Photon.
2. Créez un **GameObject** vide nommé **PlayFabAuthenticator**.
3. Ensuite, dans la fenêtre **Unity Inspector**, ajoutez un composant portant le même nom à ce **GameObject**.
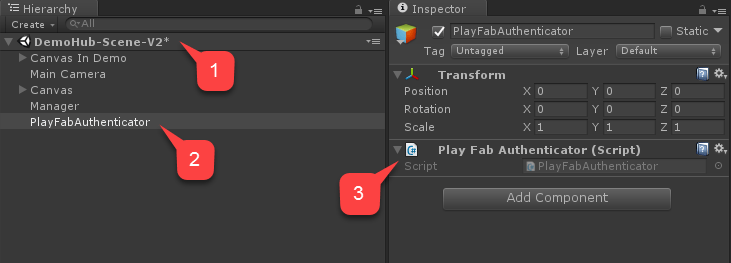 Sélectionnez l'icône d'engrenage, puis choisissez de modifier le script dans le menu déroulant. Copiez et collez le code du composant `PlayFabAuthenticator`, puis enregistrez et fermez le fichier.
```csharp theme={null}
using PlayFab;
using PlayFab.ClientModels;
using UnityEngine;
public class PlayFabAuthenticator : MonoBehaviour {
private string _playFabPlayerIdCache;
//Run the entire thing on awake
public void Awake() {
AuthenticateWithPlayFab();
}
/*
* Step 1
* We authenticate a current PlayFab user normally.
* In this case we use the LoginWithCustomID API call for simplicity.
* You can absolutely use any Login method you want.
* We use PlayFabSettings.DeviceUniqueIdentifier as our custom ID.
* We pass RequestPhotonToken as a callback to be our next step, if
* authentication was successful.
*/
private void AuthenticateWithPlayFab(){
LogMessage("PlayFab authenticating using Custom ID...");
PlayFabClientAPI.LoginWithCustomID(new LoginWithCustomIDRequest()
{
CreateAccount = true,
CustomId = PlayFabSettings.DeviceUniqueIdentifier
}, RequestPhotonToken, OnPlayFabError);
}
/*
* Step 2
* We request a Photon authentication token from PlayFab.
* This is a crucial step, because Photon uses different authentication tokens
* than PlayFab. Thus, you cannot directly use PlayFab SessionTicket and
* you need to explicitly request a token. This API call requires you to
* pass a Photon App ID. The App ID may be hard coded, but in this example,
* we are accessing it using convenient static field on PhotonNetwork class.
* We pass in AuthenticateWithPhoton as a callback to be our next step, if
* we have acquired the token successfully.
*/
private void RequestPhotonToken(LoginResult obj) {
LogMessage("PlayFab authenticated. Requesting photon token...");
//We can player PlayFabId. This will come in handy during next step
_playFabPlayerIdCache = obj.PlayFabId;
PlayFabClientAPI.GetPhotonAuthenticationToken(new GetPhotonAuthenticationTokenRequest()
{
PhotonApplicationId = PhotonNetwork.PhotonServerSettings.AppSettings.AppIdRealtime
}, AuthenticateWithPhoton, OnPlayFabError);
}
/*
* Step 3
* This is the final and the simplest step. We create a new AuthenticationValues instance.
* This class describes how to authenticate a player inside the Photon environment.
*/
private void AuthenticateWithPhoton(GetPhotonAuthenticationTokenResult obj) {
LogMessage("Photon token acquired: " + obj.PhotonCustomAuthenticationToken + " Authentication complete.");
//We set AuthType to custom, meaning we bring our own, PlayFab authentication procedure.
var customAuth = new Photon.Realtime.AuthenticationValues { AuthType = CustomAuthenticationType.Custom };
//We add "username" parameter. Do not let it confuse you: PlayFab is expecting this parameter to contain player PlayFab ID (!) and not username.
customAuth.AddAuthParameter("username", _playFabPlayerIdCache); // expected by PlayFab custom auth service
//We add "token" parameter. PlayFab expects it to contain Photon Authentication Token issues to your during previous step.
customAuth.AddAuthParameter("token", obj.PhotonCustomAuthenticationToken);
//We finally tell Photon to use this authentication parameters throughout the entire application.
PhotonNetwork.AuthValues = customAuth;
}
private void OnPlayFabError(PlayFabError obj) {
LogMessage(obj.GenerateErrorReport());
}
public void LogMessage(string message) {
Debug.Log("PlayFab + Photon Example: " + message);
}
}
```
## Test de l'authentification de PlayFab vers Photon
1. Démarrez la scène.
2. Examinez le flux des messages de la console.
Vérifiez que :
3. L'authentification auprès de PlayFab elle-même a réussi.
4. Le jeton Photon a été obtenu.
L'image suivante illustre le flux correct.
Sélectionnez l'icône d'engrenage, puis choisissez de modifier le script dans le menu déroulant. Copiez et collez le code du composant `PlayFabAuthenticator`, puis enregistrez et fermez le fichier.
```csharp theme={null}
using PlayFab;
using PlayFab.ClientModels;
using UnityEngine;
public class PlayFabAuthenticator : MonoBehaviour {
private string _playFabPlayerIdCache;
//Run the entire thing on awake
public void Awake() {
AuthenticateWithPlayFab();
}
/*
* Step 1
* We authenticate a current PlayFab user normally.
* In this case we use the LoginWithCustomID API call for simplicity.
* You can absolutely use any Login method you want.
* We use PlayFabSettings.DeviceUniqueIdentifier as our custom ID.
* We pass RequestPhotonToken as a callback to be our next step, if
* authentication was successful.
*/
private void AuthenticateWithPlayFab(){
LogMessage("PlayFab authenticating using Custom ID...");
PlayFabClientAPI.LoginWithCustomID(new LoginWithCustomIDRequest()
{
CreateAccount = true,
CustomId = PlayFabSettings.DeviceUniqueIdentifier
}, RequestPhotonToken, OnPlayFabError);
}
/*
* Step 2
* We request a Photon authentication token from PlayFab.
* This is a crucial step, because Photon uses different authentication tokens
* than PlayFab. Thus, you cannot directly use PlayFab SessionTicket and
* you need to explicitly request a token. This API call requires you to
* pass a Photon App ID. The App ID may be hard coded, but in this example,
* we are accessing it using convenient static field on PhotonNetwork class.
* We pass in AuthenticateWithPhoton as a callback to be our next step, if
* we have acquired the token successfully.
*/
private void RequestPhotonToken(LoginResult obj) {
LogMessage("PlayFab authenticated. Requesting photon token...");
//We can player PlayFabId. This will come in handy during next step
_playFabPlayerIdCache = obj.PlayFabId;
PlayFabClientAPI.GetPhotonAuthenticationToken(new GetPhotonAuthenticationTokenRequest()
{
PhotonApplicationId = PhotonNetwork.PhotonServerSettings.AppSettings.AppIdRealtime
}, AuthenticateWithPhoton, OnPlayFabError);
}
/*
* Step 3
* This is the final and the simplest step. We create a new AuthenticationValues instance.
* This class describes how to authenticate a player inside the Photon environment.
*/
private void AuthenticateWithPhoton(GetPhotonAuthenticationTokenResult obj) {
LogMessage("Photon token acquired: " + obj.PhotonCustomAuthenticationToken + " Authentication complete.");
//We set AuthType to custom, meaning we bring our own, PlayFab authentication procedure.
var customAuth = new Photon.Realtime.AuthenticationValues { AuthType = CustomAuthenticationType.Custom };
//We add "username" parameter. Do not let it confuse you: PlayFab is expecting this parameter to contain player PlayFab ID (!) and not username.
customAuth.AddAuthParameter("username", _playFabPlayerIdCache); // expected by PlayFab custom auth service
//We add "token" parameter. PlayFab expects it to contain Photon Authentication Token issues to your during previous step.
customAuth.AddAuthParameter("token", obj.PhotonCustomAuthenticationToken);
//We finally tell Photon to use this authentication parameters throughout the entire application.
PhotonNetwork.AuthValues = customAuth;
}
private void OnPlayFabError(PlayFabError obj) {
LogMessage(obj.GenerateErrorReport());
}
public void LogMessage(string message) {
Debug.Log("PlayFab + Photon Example: " + message);
}
}
```
## Test de l'authentification de PlayFab vers Photon
1. Démarrez la scène.
2. Examinez le flux des messages de la console.
Vérifiez que :
3. L'authentification auprès de PlayFab elle-même a réussi.
4. Le jeton Photon a été obtenu.
L'image suivante illustre le flux correct.
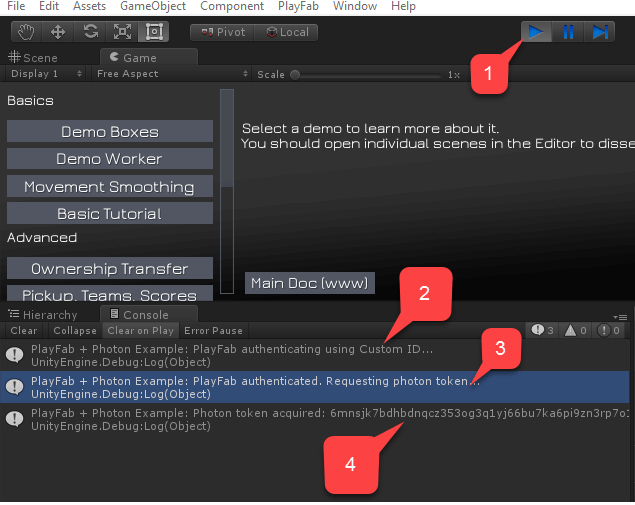 Une fois le jeton Photon obtenu et l'authentification terminée, nous pouvons essayer les démos Photon.
Par exemple, lancez une démo appelée **Demo Boxes**.
5. Pour vous assurer que l'authentification PlayFab est terminée, sélectionnez **Demo Boxes**.
6. Sélectionnez ensuite **Load Demo**, comme illustré dans l'image suivante.
Une fois le jeton Photon obtenu et l'authentification terminée, nous pouvons essayer les démos Photon.
Par exemple, lancez une démo appelée **Demo Boxes**.
5. Pour vous assurer que l'authentification PlayFab est terminée, sélectionnez **Demo Boxes**.
6. Sélectionnez ensuite **Load Demo**, comme illustré dans l'image suivante.
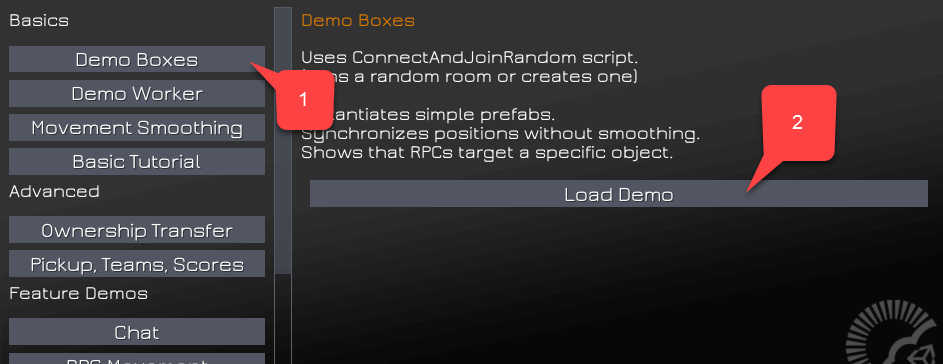 Photon commence à afficher des messages de débogage. En surveillant votre console, vous pouvez facilement repérer d'éventuels problèmes d'authentification.
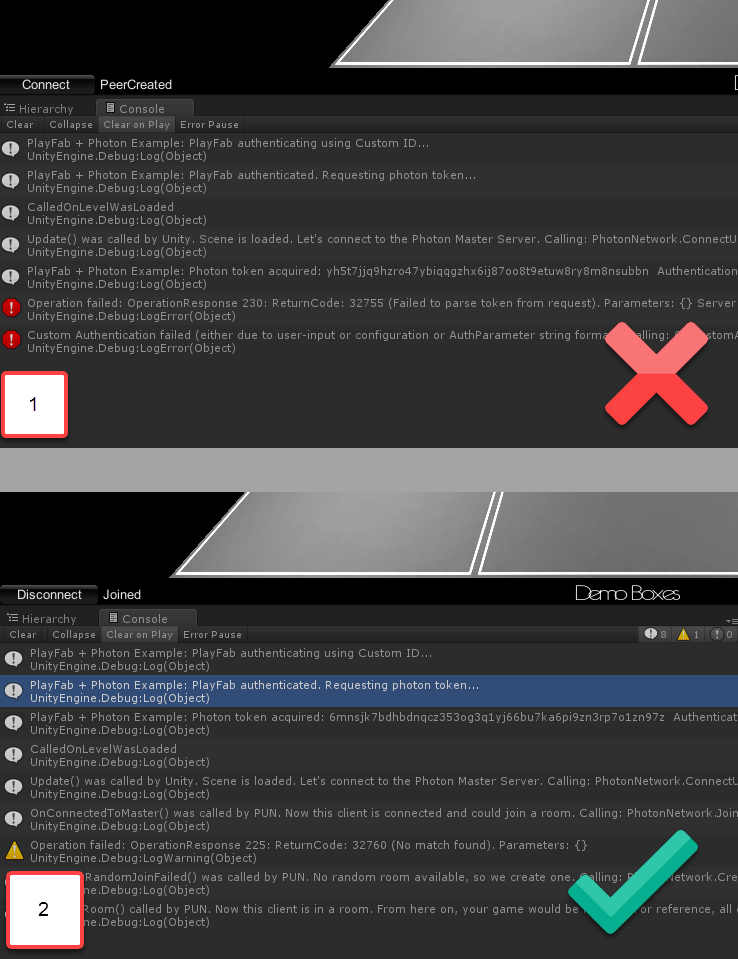 Assurez-vous qu'aucune erreur **Authentication Denied** n'apparaît dans la console. À ce stade, vous avez mis en place une intégration minimale de PlayFab et Photon.
## Événements de salle Photon + CloudScript
Le système de matchmaking de Photon repose sur le concept de *salle* (Room). Si vous ne connaissez pas ce concept, consultez le [guide de matchmaking Photon](https://doc.photonengine.com/realtime/current/lobby-and-matchmaking/matchmaking-and-lobby).
PlayFab vous permet d'intercepter divers événements de salle. Les événements de salle suivants ne nécessitent que CloudScript pour être interceptés :
* `RoomCreated`
* `RoomJoined`
* `RoomLeft`
* `RoomClosed`
Les événements suivants nécessitent un contrôle supplémentaire sur le code Unity pour être interceptés (les détails sont fournis plus loin dans ce document) :
* `RoomPropertyUpdated`
* `RoomEventRaised`
Dès que vous introduisez un gestionnaire pour un événement de salle, il devient un élément essentiel du flux de traitement des événements. Les erreurs produites lors de l'exécution de votre CloudScript peuvent donc causer des problèmes pour l'*ensemble* du système. Par exemple, si le gestionnaire `RoomCreated` lève une erreur, vos clients lèveront également une erreur et ne pourront pas se connecter correctement.
Construisons un CloudScript PlayFab en définissant un gestionnaire pour chaque type d'événement individuellement.
### Gestionnaire Room Created
Le gestionnaire `RoomCreated` est appelé chaque fois qu'une salle Photon est créée. Le gestionnaire CloudScript suivant intercepte ces événements.
```javascript theme={null}
// Triggered automatically when a Photon room is first created
handlers.RoomCreated = function (args) {
return { ResultCode : 0, Message: 'Success' };
};
```
Vous pouvez obtenir davantage de données sur l'événement à l'aide de l'argument "args".
```json theme={null}
{
"ActorNr": 1,
"AppVersion": "1.2_1.85",
"AppId": "bfd5f98b-c6a4-4763-80d9-824d20db842b",
// Options with which the room was created.
"CreateOptions": {
"MaxPlayers": 4,
"LobbyId": null,
"LobbyType": 0,
"CustomProperties": {
},
"EmptyRoomTTL": 0,
"PlayerTTL": 0,
"CheckUserOnJoin": false,
"DeleteCacheOnLeave": true,
"SuppressRoomEvents": false,
"PublishUserId": false,
"ExpectedUsers": null
},
// Unique game identifier
"GameId": "8b8322de-096d-4481-a2b2-8db8bb45cfef",
"Region": "EU",
"Type": "Create",
// User that caused the room to be created
"UserId": "834D5AA5BAB1DFB6",
"Username": ""
}
```
### Gestionnaire Room Joined
Le gestionnaire `RoomJoined` est appelé chaque fois qu'un joueur rejoint la salle. Le gestionnaire CloudScript suivant intercepte ce type d'événement.
```javascript theme={null}
// Triggered automatically when a player joins a Photon room
handlers.RoomJoined = function (args) {
return { ResultCode : 0, Message: 'Success' };
};
```
Ce rappel n'est pas appelé pour le premier utilisateur qui entre dans la salle. Utilisez `RoomCreated` pour intercepter le premier joueur qui la rejoint. Vous pouvez obtenir davantage de données sur l'événement à l'aide de l'argument "args".
```json theme={null}
{
"ActorNr": 2,
"AppVersion": "1.2_1.85",
"AppId": "bfd5f98b-c6a4-4763-80d9-824d20db842b",
// Unique Game Identifier
"GameId": "b0f55a2e-431d-402a-9809-b0240443267e",
"Region": "EU",
"Type": "Join",
// Id of the player that has joined
"UserId": "AAC7634BF46289DF",
"Username": ""
}
```
### Room left
Le gestionnaire `RoomLeft` est appelé chaque fois qu'un joueur quitte la salle. Le gestionnaire CloudScript suivant intercepte ce type d'événement.
```javascript theme={null}
// Triggered automatically when a player leaves a Photon room
handlers.RoomLeft = function (args) {
return { ResultCode : 0, Message: 'Success' };
};
```
Vous pouvez obtenir davantage de données sur l'événement à l'aide de l'argument "args".
```json theme={null}
{
"ActorNr": 2,
"AppVersion": "1.2_1.85",
"AppId": "bfd5f98b-c6a4-4763-80d9-824d20db842b",
// Unique Game Identifier
"GameId": "b0f55a2e-431d-402a-9809-b0240443267e",
"IsInactive": false,
"Reason": "0",
"Region": "EU",
"Type": "ClientDisconnect",
// Id of the user that has left the room
"UserId": "AAC7634BF46289DF",
"Username": ""
}
```
### Gestionnaire Room Closed
Le gestionnaire `RoomClosed` est appelé chaque fois que le dernier joueur quitte la salle et qu'il ne reste plus aucun joueur. Le gestionnaire CloudScript suivant intercepte ce type d'événement.
```javascript theme={null}
// Triggered automatically when a Photon room closes
// Note: currentPlayerId is undefined in this function
handlers.RoomClosed = function (args) {
return { ResultCode : 0, Message: 'Success' };
};
```
Vous pouvez obtenir davantage de données sur l'événement à l'aide de l'argument "args".
```json theme={null}
"ActorCount": 0,
"ActorNr": 1,
"AppVersion": "1.2_1.85",
"AppId": "bfd5f98b-c6a4-4763-80d9-824d20db842b",
// Unique game identifier
"GameId": "b0f55a2e-431d-402a-9809-b0240443267e",
"Region": "EU",
"State2": {
"ActorList": [
]
},
"Type": "Close"
}
```
### Room Property Updated
Le gestionnaire `RoomPropertyUpdated` est appelé chaque fois qu'une propriété de la salle est modifiée. Le gestionnaire CloudScript suivant intercepte ce type d'événement.
```javascript theme={null}
// Triggered automatically when a Photon room game property is updated.
// Note: currentPlayerId is undefined in this function
handlers.RoomPropertyUpdated = function (args) {
return { ResultCode : 0, Message: 'Success' };
};
```
`currentPlayerId` n'est pas défini dans ce gestionnaire. Si la propriété de la salle a été modifiée depuis le client, vous pouvez utiliser l'argument "args" et vous reporter au UserId pour obtenir le joueur responsable.
Vous pouvez obtenir davantage de données sur l'événement à l'aide de l'argument "args".
```json theme={null}
{
"ActorNr": 1,
"AppVersion": "1.2_1.85",
"AppId": "bfd5f98b-c6a4-4763-80d9-824d20db842b",
// Custom Room Properties
"Properties": {
"CustomProperty": "It's Value"
},
"GameId": "8b8322de-096d-4481-a2b2-8db8bb45cfef",
"Region": "EU",
"State": {
"ActorCounter": 1,
"ActorList": [
{
"ActorNr": 1,
"UserId": "834D5AA5BAB1DFB6",
"Username": "",
"IsActive": true,
"Binary": "RGIAAAEBRAAAAAFi\/3MAAA==",
"DEBUG_BINARY": {
"1": {
"255": ""
}
}
}
],
"Binary": {
"18": "RAAAAANi+nkAAHNzAA1QbGF5ZXJJbmRleGVzRGlpAAEAAAABAAAAAHMADkN1c3RvbVByb3BlcnR5cwAKSXQncyBWYWx1ZQ=="
},
"CheckUserOnJoin": false,
"CustomProperties": {
},
"DeleteCacheOnLeave": true,
"EmptyRoomTTL": 0,
"IsOpen": true,
"IsVisible": true,
"LobbyType": 0,
"LobbyProperties": [
],
"MaxPlayers": 4,
"PlayerTTL": 0,
"SuppressRoomEvents": false,
"Slice": 0,
"DebugInfo": {
"DEBUG_PROPERTIES_18": {
"250": [
],
"PlayerIndexes": {
"1": 0
},
"CustomProperty": "It's Value"
}
},
"ExcludedActors": [
],
"PublishUserId": false,
"ExpectedUsers": [
]
},
"Type": "Game",
"UserId": "834D5AA5BAB1DFB6",
"Username": ""
}
```
Lorsque vous modifiez des propriétés de salle personnalisées à l'aide du client Unity Photon, *il est important de marquer l'appel* afin qu'il transmette l'événement au webhook (PlayFab dans ce cas).
```csharp theme={null}
// Properties updates ( this hashtable contains the properties to be changed. Properties not mentioned here will stay as is
var properties = new ExitGames.Client.Photon.Hashtable() { { "CustomProperty" , "It's Value" } };
// Control set. Empty in this case, because our property has not existed before.
// Otherwise you would include previous value of the property.
var expectedProperties = new ExitGames.Client.Photon.Hashtable();
// Set Custom Properties call. Notice the last argument set to "true"
// This tells Photon to forward event to the webhook.
PhotonNetwork.room.SetCustomProperties(properties, expectedProperties, true);
```
### Room Event Raised
**Room Event Raised** est appelé chaque fois qu'un événement de salle personnalisé est déclenché. Le gestionnaire **CloudScript** suivant intercepte ce type d'événement.
```javascript theme={null}
// Triggered by calling "OpRaiseEvent" on the Photon client. The "args.Data" property is
// set to the value of the "customEventContent" HashTable parameter, so you can use
// it to pass in arbitrary data.
handlers.RoomEventRaised= function (args) {
return { ResultCode : 0, Message: 'Success' };
};
```
Vous pouvez obtenir davantage de données sur l'événement à l'aide de l'argument "args".
```json theme={null}
{
"ActorNr": 1,
"AppVersion": "1.2_1.85",
"AppId": "bfd5f98b-c6a4-4763-80d9-824d20db842b",
// Custom event data
"Data": {
"Hello": "World"
},
"GameId": "8b8322de-096d-4481-a2b2-8db8bb45cfef",
"Region": "EU",
"State": {
"ActorCounter": 1,
"ActorList": [
{
"ActorNr": 1,
"UserId": "834D5AA5BAB1DFB6",
"Username": "",
"IsActive": true,
"Binary": "RGIAAAEBRAAAAAFi\/3MAAA==",
"DEBUG_BINARY": {
"1": {
"255": ""
}
}
}
],
"Binary": {
"18": "RAAAAAJi+nkAAHNzAA1QbGF5ZXJJbmRleGVzRGlpAAEAAAABAAAAAA=="
},
"CheckUserOnJoin": false,
"CustomProperties": {
},
"DeleteCacheOnLeave": true,
"EmptyRoomTTL": 0,
"IsOpen": true,
"IsVisible": true,
"LobbyType": 0,
"LobbyProperties": [
],
"MaxPlayers": 4,
"PlayerTTL": 0,
"SuppressRoomEvents": false,
"Slice": 0,
"DebugInfo": {
"DEBUG_PROPERTIES_18": {
"250": [
],
"PlayerIndexes": {
"1": 0
}
}
},
"ExcludedActors": [
],
"PublishUserId": false,
"ExpectedUsers": [
]
},
"Type": "Event",
// PlayFab User Id if he/she was the source of the event
"UserId": "834D5AA5BAB1DFB6",
"Username": "",
// Event code
"EvCode": 15
}
```
Lorsque vous déclenchez des événements de salle personnalisés à l'aide du client Unity Photon, il est important de marquer l'appel afin qu'il transmette l'événement aux webhooks (PlayFab dans ce cas).
```csharp theme={null}
var data = new Dictionary() {
{ "Hello" , "World" }
};
// Raise custom room event
// Replace 15 with any custom event code of your choice [0..299]
PhotonNetwork.RaiseEvent(15, data, true, new RaiseEventOptions() {
ForwardToWebhook = true, // Mark call to pass event to Webhook (PlayFab in this case)
});
```
## Test des gestionnaires d'événements de salle
Cet exemple prolonge l'exemple précédent (authentification PlayFab + Photon).
Chargez le CloudScript suivant pour votre titre.
```javascript theme={null}
handlers.RoomCreated = function (args) {
server.WriteTitleEvent({
EventName : "room_created"
});
return { ResultCode : 0, Message: 'Success' };
};
handlers.RoomJoined = function (args) {
server.WriteTitleEvent({
EventName : "room_joined"
});
return { ResultCode : 0, Message: 'Success' };
};
handlers.RoomLeft = function (args) {
server.WriteTitleEvent({
EventName : "room_left"
});
return { ResultCode : 0, Message: 'Success' };
};
handlers.RoomClosed = function (args) {
server.WriteTitleEvent({
EventName : "room_closed"
});
return { ResultCode : 0, Message: 'Success' };
};
handlers.RoomPropertyUpdated = function (args) {
server.WriteTitleEvent({
EventName : "room_property_changed"
});
return { ResultCode : 0, Message: 'Success' };
};
handlers.RoomEventRaised = function (args) {
server.WriteTitleEvent({
EventName : "room_event_raised"
});
return { ResultCode : 0, Message: 'Success' };
};
```
Le code se contente de publier un nouvel événement de titre chaque fois qu'un rappel Photon est appelé. Sans utilité en production, cet exemple nous permet de voir clairement comment les rappels sont appelés.
Étendez le script `PlayFabAuthenticator` en y incluant un nouvel exemple de code qui déclenche un événement personnalisé et définit une propriété de salle personnalisée. La version étendue utilise également une méthode `Awake` afin de ne pas détruire l'objet entre les chargements de scène.
```csharp theme={null}
using System.Collections.Generic;
using PlayFab;
using PlayFab.ClientModels;
using UnityEngine;
public class PlayFabAuthenticator : MonoBehaviour {
private string _playFabPlayerIdCache;
//Run the entire thing on awake
public void Awake() {
AuthenticateWithPlayFab();
DontDestroyOnLoad(gameObject);
}
/*
* Step 1
* We authenticate a current PlayFab user normally.
* In this case we use the LoginWithCustomID API call for simplicity.
* You can absolutely use any Login method you want.
* We use PlayFabSettings.DeviceUniqueIdentifier as our custom ID.
* We pass RequestPhotonToken as a callback to be our next step, if
* authentication was successful.
*/
private void AuthenticateWithPlayFab() {
LogMessage("PlayFab authenticating using Custom ID...");
PlayFabClientAPI.LoginWithCustomID(new LoginWithCustomIDRequest()
{
CreateAccount = true,
CustomId = PlayFabSettings.DeviceUniqueIdentifier+"EDITOR"
}, RequestPhotonToken, OnPlayFabError);
}
/*
* Step 2
* We request a Photon authentication token from PlayFab.
* This is a crucial step, because Photon uses different authentication tokens
* than PlayFab. Thus, you cannot directly use PlayFab SessionTicket and
* you need to explicitly request a token. This API call requires you to
* pass a Photon App ID. The App ID may be hard coded, but in this example,
* we are accessing it using convenient static field on PhotonNetwork class.
* We pass in AuthenticateWithPhoton as a callback to be our next step, if
* we have acquired the token successfully.
*/
private void RequestPhotonToken(LoginResult obj) {
LogMessage("PlayFab authenticated. Requesting photon token...");
//We can player PlayFabId. This will come in handy during next step
_playFabPlayerIdCache = obj.PlayFabId;
PlayFabClientAPI.GetPhotonAuthenticationToken(new GetPhotonAuthenticationTokenRequest()
{
PhotonApplicationId = PhotonNetwork.PhotonServerSettings.AppSettings.AppIdRealtime
}, AuthenticateWithPhoton, OnPlayFabError);
}
/*
* Step 3
* This is the final and the simplest step. We create a new AuthenticationValues instance.
* This class describes how to authenticate a player inside the Photon environment.
*/
private void AuthenticateWithPhoton(GetPhotonAuthenticationTokenResult obj) {
LogMessage("Photon token acquired: " + obj.PhotonCustomAuthenticationToken + " Authentication complete.");
//We set AuthType to custom, meaning we bring our own, PlayFab authentication procedure.
var customAuth = new Photon.Realtime.AuthenticationValues { AuthType = CustomAuthenticationType.Custom };
//We add "username" parameter. Do not let it confuse you: PlayFab is expecting this parameter to contain player PlayFab ID (!) and not username.
customAuth.AddAuthParameter("username", _playFabPlayerIdCache); // expected by PlayFab custom auth service
//We add "token" parameter. PlayFab expects it to contain Photon Authentication Token issues to your during previous step.
customAuth.AddAuthParameter("token", obj.PhotonCustomAuthenticationToken);
//We finally tell Photon to use this authentication parameters throughout the entire application.
PhotonNetwork.AuthValues = customAuth;
}
private void OnPlayFabError(PlayFabError obj) {
LogMessage(obj.ErrorMessage);
}
public void LogMessage(string message) {
Debug.Log("PlayFab + Photon Example: " + message);
}
// Add small button to launch our example code
public void OnGUI() {
if (GUILayout.Button("Execute Example ")) ExecuteExample();
}
// Example code which raises custom room event, then sets custom room property
private void ExecuteExample() {
// Raise custom room event
var data = new Dictionary() { {"Hello","World"} };
var result = PhotonNetwork.RaiseEvent(15, data, true, new RaiseEventOptions()
{
ForwardToWebhook = true,
});
LogMessage("New Room Event Post: "+result);
// Set custom room property
var properties = new ExitGames.Client.Photon.Hashtable() { { "CustomProperty", "It's Value" } };
var expectedProperties = new ExitGames.Client.Photon.Hashtable();
PhotonNetwork.room.SetCustomProperties(properties, expectedProperties, true);
LogMessage("New Room Properties Set");
}
}
```
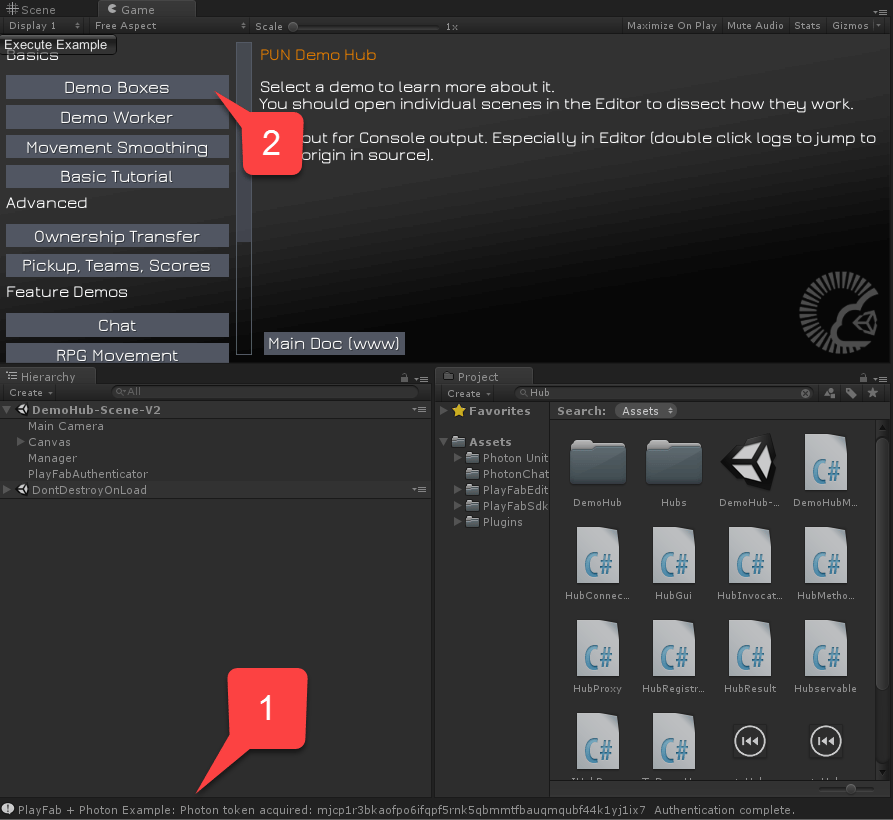
* Exécutez la scène hub et attendez la fin de l'authentification PlayFab **(1)**.
* Chargez ensuite la scène **Boxes Demo** **(2)**.
Assurez-vous qu'aucune erreur **Authentication Denied** n'apparaît dans la console. À ce stade, vous avez mis en place une intégration minimale de PlayFab et Photon.
## Événements de salle Photon + CloudScript
Le système de matchmaking de Photon repose sur le concept de *salle* (Room). Si vous ne connaissez pas ce concept, consultez le [guide de matchmaking Photon](https://doc.photonengine.com/realtime/current/lobby-and-matchmaking/matchmaking-and-lobby).
PlayFab vous permet d'intercepter divers événements de salle. Les événements de salle suivants ne nécessitent que CloudScript pour être interceptés :
* `RoomCreated`
* `RoomJoined`
* `RoomLeft`
* `RoomClosed`
Les événements suivants nécessitent un contrôle supplémentaire sur le code Unity pour être interceptés (les détails sont fournis plus loin dans ce document) :
* `RoomPropertyUpdated`
* `RoomEventRaised`
Dès que vous introduisez un gestionnaire pour un événement de salle, il devient un élément essentiel du flux de traitement des événements. Les erreurs produites lors de l'exécution de votre CloudScript peuvent donc causer des problèmes pour l'*ensemble* du système. Par exemple, si le gestionnaire `RoomCreated` lève une erreur, vos clients lèveront également une erreur et ne pourront pas se connecter correctement.
Construisons un CloudScript PlayFab en définissant un gestionnaire pour chaque type d'événement individuellement.
### Gestionnaire Room Created
Le gestionnaire `RoomCreated` est appelé chaque fois qu'une salle Photon est créée. Le gestionnaire CloudScript suivant intercepte ces événements.
```javascript theme={null}
// Triggered automatically when a Photon room is first created
handlers.RoomCreated = function (args) {
return { ResultCode : 0, Message: 'Success' };
};
```
Vous pouvez obtenir davantage de données sur l'événement à l'aide de l'argument "args".
```json theme={null}
{
"ActorNr": 1,
"AppVersion": "1.2_1.85",
"AppId": "bfd5f98b-c6a4-4763-80d9-824d20db842b",
// Options with which the room was created.
"CreateOptions": {
"MaxPlayers": 4,
"LobbyId": null,
"LobbyType": 0,
"CustomProperties": {
},
"EmptyRoomTTL": 0,
"PlayerTTL": 0,
"CheckUserOnJoin": false,
"DeleteCacheOnLeave": true,
"SuppressRoomEvents": false,
"PublishUserId": false,
"ExpectedUsers": null
},
// Unique game identifier
"GameId": "8b8322de-096d-4481-a2b2-8db8bb45cfef",
"Region": "EU",
"Type": "Create",
// User that caused the room to be created
"UserId": "834D5AA5BAB1DFB6",
"Username": ""
}
```
### Gestionnaire Room Joined
Le gestionnaire `RoomJoined` est appelé chaque fois qu'un joueur rejoint la salle. Le gestionnaire CloudScript suivant intercepte ce type d'événement.
```javascript theme={null}
// Triggered automatically when a player joins a Photon room
handlers.RoomJoined = function (args) {
return { ResultCode : 0, Message: 'Success' };
};
```
Ce rappel n'est pas appelé pour le premier utilisateur qui entre dans la salle. Utilisez `RoomCreated` pour intercepter le premier joueur qui la rejoint. Vous pouvez obtenir davantage de données sur l'événement à l'aide de l'argument "args".
```json theme={null}
{
"ActorNr": 2,
"AppVersion": "1.2_1.85",
"AppId": "bfd5f98b-c6a4-4763-80d9-824d20db842b",
// Unique Game Identifier
"GameId": "b0f55a2e-431d-402a-9809-b0240443267e",
"Region": "EU",
"Type": "Join",
// Id of the player that has joined
"UserId": "AAC7634BF46289DF",
"Username": ""
}
```
### Room left
Le gestionnaire `RoomLeft` est appelé chaque fois qu'un joueur quitte la salle. Le gestionnaire CloudScript suivant intercepte ce type d'événement.
```javascript theme={null}
// Triggered automatically when a player leaves a Photon room
handlers.RoomLeft = function (args) {
return { ResultCode : 0, Message: 'Success' };
};
```
Vous pouvez obtenir davantage de données sur l'événement à l'aide de l'argument "args".
```json theme={null}
{
"ActorNr": 2,
"AppVersion": "1.2_1.85",
"AppId": "bfd5f98b-c6a4-4763-80d9-824d20db842b",
// Unique Game Identifier
"GameId": "b0f55a2e-431d-402a-9809-b0240443267e",
"IsInactive": false,
"Reason": "0",
"Region": "EU",
"Type": "ClientDisconnect",
// Id of the user that has left the room
"UserId": "AAC7634BF46289DF",
"Username": ""
}
```
### Gestionnaire Room Closed
Le gestionnaire `RoomClosed` est appelé chaque fois que le dernier joueur quitte la salle et qu'il ne reste plus aucun joueur. Le gestionnaire CloudScript suivant intercepte ce type d'événement.
```javascript theme={null}
// Triggered automatically when a Photon room closes
// Note: currentPlayerId is undefined in this function
handlers.RoomClosed = function (args) {
return { ResultCode : 0, Message: 'Success' };
};
```
Vous pouvez obtenir davantage de données sur l'événement à l'aide de l'argument "args".
```json theme={null}
"ActorCount": 0,
"ActorNr": 1,
"AppVersion": "1.2_1.85",
"AppId": "bfd5f98b-c6a4-4763-80d9-824d20db842b",
// Unique game identifier
"GameId": "b0f55a2e-431d-402a-9809-b0240443267e",
"Region": "EU",
"State2": {
"ActorList": [
]
},
"Type": "Close"
}
```
### Room Property Updated
Le gestionnaire `RoomPropertyUpdated` est appelé chaque fois qu'une propriété de la salle est modifiée. Le gestionnaire CloudScript suivant intercepte ce type d'événement.
```javascript theme={null}
// Triggered automatically when a Photon room game property is updated.
// Note: currentPlayerId is undefined in this function
handlers.RoomPropertyUpdated = function (args) {
return { ResultCode : 0, Message: 'Success' };
};
```
`currentPlayerId` n'est pas défini dans ce gestionnaire. Si la propriété de la salle a été modifiée depuis le client, vous pouvez utiliser l'argument "args" et vous reporter au UserId pour obtenir le joueur responsable.
Vous pouvez obtenir davantage de données sur l'événement à l'aide de l'argument "args".
```json theme={null}
{
"ActorNr": 1,
"AppVersion": "1.2_1.85",
"AppId": "bfd5f98b-c6a4-4763-80d9-824d20db842b",
// Custom Room Properties
"Properties": {
"CustomProperty": "It's Value"
},
"GameId": "8b8322de-096d-4481-a2b2-8db8bb45cfef",
"Region": "EU",
"State": {
"ActorCounter": 1,
"ActorList": [
{
"ActorNr": 1,
"UserId": "834D5AA5BAB1DFB6",
"Username": "",
"IsActive": true,
"Binary": "RGIAAAEBRAAAAAFi\/3MAAA==",
"DEBUG_BINARY": {
"1": {
"255": ""
}
}
}
],
"Binary": {
"18": "RAAAAANi+nkAAHNzAA1QbGF5ZXJJbmRleGVzRGlpAAEAAAABAAAAAHMADkN1c3RvbVByb3BlcnR5cwAKSXQncyBWYWx1ZQ=="
},
"CheckUserOnJoin": false,
"CustomProperties": {
},
"DeleteCacheOnLeave": true,
"EmptyRoomTTL": 0,
"IsOpen": true,
"IsVisible": true,
"LobbyType": 0,
"LobbyProperties": [
],
"MaxPlayers": 4,
"PlayerTTL": 0,
"SuppressRoomEvents": false,
"Slice": 0,
"DebugInfo": {
"DEBUG_PROPERTIES_18": {
"250": [
],
"PlayerIndexes": {
"1": 0
},
"CustomProperty": "It's Value"
}
},
"ExcludedActors": [
],
"PublishUserId": false,
"ExpectedUsers": [
]
},
"Type": "Game",
"UserId": "834D5AA5BAB1DFB6",
"Username": ""
}
```
Lorsque vous modifiez des propriétés de salle personnalisées à l'aide du client Unity Photon, *il est important de marquer l'appel* afin qu'il transmette l'événement au webhook (PlayFab dans ce cas).
```csharp theme={null}
// Properties updates ( this hashtable contains the properties to be changed. Properties not mentioned here will stay as is
var properties = new ExitGames.Client.Photon.Hashtable() { { "CustomProperty" , "It's Value" } };
// Control set. Empty in this case, because our property has not existed before.
// Otherwise you would include previous value of the property.
var expectedProperties = new ExitGames.Client.Photon.Hashtable();
// Set Custom Properties call. Notice the last argument set to "true"
// This tells Photon to forward event to the webhook.
PhotonNetwork.room.SetCustomProperties(properties, expectedProperties, true);
```
### Room Event Raised
**Room Event Raised** est appelé chaque fois qu'un événement de salle personnalisé est déclenché. Le gestionnaire **CloudScript** suivant intercepte ce type d'événement.
```javascript theme={null}
// Triggered by calling "OpRaiseEvent" on the Photon client. The "args.Data" property is
// set to the value of the "customEventContent" HashTable parameter, so you can use
// it to pass in arbitrary data.
handlers.RoomEventRaised= function (args) {
return { ResultCode : 0, Message: 'Success' };
};
```
Vous pouvez obtenir davantage de données sur l'événement à l'aide de l'argument "args".
```json theme={null}
{
"ActorNr": 1,
"AppVersion": "1.2_1.85",
"AppId": "bfd5f98b-c6a4-4763-80d9-824d20db842b",
// Custom event data
"Data": {
"Hello": "World"
},
"GameId": "8b8322de-096d-4481-a2b2-8db8bb45cfef",
"Region": "EU",
"State": {
"ActorCounter": 1,
"ActorList": [
{
"ActorNr": 1,
"UserId": "834D5AA5BAB1DFB6",
"Username": "",
"IsActive": true,
"Binary": "RGIAAAEBRAAAAAFi\/3MAAA==",
"DEBUG_BINARY": {
"1": {
"255": ""
}
}
}
],
"Binary": {
"18": "RAAAAAJi+nkAAHNzAA1QbGF5ZXJJbmRleGVzRGlpAAEAAAABAAAAAA=="
},
"CheckUserOnJoin": false,
"CustomProperties": {
},
"DeleteCacheOnLeave": true,
"EmptyRoomTTL": 0,
"IsOpen": true,
"IsVisible": true,
"LobbyType": 0,
"LobbyProperties": [
],
"MaxPlayers": 4,
"PlayerTTL": 0,
"SuppressRoomEvents": false,
"Slice": 0,
"DebugInfo": {
"DEBUG_PROPERTIES_18": {
"250": [
],
"PlayerIndexes": {
"1": 0
}
}
},
"ExcludedActors": [
],
"PublishUserId": false,
"ExpectedUsers": [
]
},
"Type": "Event",
// PlayFab User Id if he/she was the source of the event
"UserId": "834D5AA5BAB1DFB6",
"Username": "",
// Event code
"EvCode": 15
}
```
Lorsque vous déclenchez des événements de salle personnalisés à l'aide du client Unity Photon, il est important de marquer l'appel afin qu'il transmette l'événement aux webhooks (PlayFab dans ce cas).
```csharp theme={null}
var data = new Dictionary() {
{ "Hello" , "World" }
};
// Raise custom room event
// Replace 15 with any custom event code of your choice [0..299]
PhotonNetwork.RaiseEvent(15, data, true, new RaiseEventOptions() {
ForwardToWebhook = true, // Mark call to pass event to Webhook (PlayFab in this case)
});
```
## Test des gestionnaires d'événements de salle
Cet exemple prolonge l'exemple précédent (authentification PlayFab + Photon).
Chargez le CloudScript suivant pour votre titre.
```javascript theme={null}
handlers.RoomCreated = function (args) {
server.WriteTitleEvent({
EventName : "room_created"
});
return { ResultCode : 0, Message: 'Success' };
};
handlers.RoomJoined = function (args) {
server.WriteTitleEvent({
EventName : "room_joined"
});
return { ResultCode : 0, Message: 'Success' };
};
handlers.RoomLeft = function (args) {
server.WriteTitleEvent({
EventName : "room_left"
});
return { ResultCode : 0, Message: 'Success' };
};
handlers.RoomClosed = function (args) {
server.WriteTitleEvent({
EventName : "room_closed"
});
return { ResultCode : 0, Message: 'Success' };
};
handlers.RoomPropertyUpdated = function (args) {
server.WriteTitleEvent({
EventName : "room_property_changed"
});
return { ResultCode : 0, Message: 'Success' };
};
handlers.RoomEventRaised = function (args) {
server.WriteTitleEvent({
EventName : "room_event_raised"
});
return { ResultCode : 0, Message: 'Success' };
};
```
Le code se contente de publier un nouvel événement de titre chaque fois qu'un rappel Photon est appelé. Sans utilité en production, cet exemple nous permet de voir clairement comment les rappels sont appelés.
Étendez le script `PlayFabAuthenticator` en y incluant un nouvel exemple de code qui déclenche un événement personnalisé et définit une propriété de salle personnalisée. La version étendue utilise également une méthode `Awake` afin de ne pas détruire l'objet entre les chargements de scène.
```csharp theme={null}
using System.Collections.Generic;
using PlayFab;
using PlayFab.ClientModels;
using UnityEngine;
public class PlayFabAuthenticator : MonoBehaviour {
private string _playFabPlayerIdCache;
//Run the entire thing on awake
public void Awake() {
AuthenticateWithPlayFab();
DontDestroyOnLoad(gameObject);
}
/*
* Step 1
* We authenticate a current PlayFab user normally.
* In this case we use the LoginWithCustomID API call for simplicity.
* You can absolutely use any Login method you want.
* We use PlayFabSettings.DeviceUniqueIdentifier as our custom ID.
* We pass RequestPhotonToken as a callback to be our next step, if
* authentication was successful.
*/
private void AuthenticateWithPlayFab() {
LogMessage("PlayFab authenticating using Custom ID...");
PlayFabClientAPI.LoginWithCustomID(new LoginWithCustomIDRequest()
{
CreateAccount = true,
CustomId = PlayFabSettings.DeviceUniqueIdentifier+"EDITOR"
}, RequestPhotonToken, OnPlayFabError);
}
/*
* Step 2
* We request a Photon authentication token from PlayFab.
* This is a crucial step, because Photon uses different authentication tokens
* than PlayFab. Thus, you cannot directly use PlayFab SessionTicket and
* you need to explicitly request a token. This API call requires you to
* pass a Photon App ID. The App ID may be hard coded, but in this example,
* we are accessing it using convenient static field on PhotonNetwork class.
* We pass in AuthenticateWithPhoton as a callback to be our next step, if
* we have acquired the token successfully.
*/
private void RequestPhotonToken(LoginResult obj) {
LogMessage("PlayFab authenticated. Requesting photon token...");
//We can player PlayFabId. This will come in handy during next step
_playFabPlayerIdCache = obj.PlayFabId;
PlayFabClientAPI.GetPhotonAuthenticationToken(new GetPhotonAuthenticationTokenRequest()
{
PhotonApplicationId = PhotonNetwork.PhotonServerSettings.AppSettings.AppIdRealtime
}, AuthenticateWithPhoton, OnPlayFabError);
}
/*
* Step 3
* This is the final and the simplest step. We create a new AuthenticationValues instance.
* This class describes how to authenticate a player inside the Photon environment.
*/
private void AuthenticateWithPhoton(GetPhotonAuthenticationTokenResult obj) {
LogMessage("Photon token acquired: " + obj.PhotonCustomAuthenticationToken + " Authentication complete.");
//We set AuthType to custom, meaning we bring our own, PlayFab authentication procedure.
var customAuth = new Photon.Realtime.AuthenticationValues { AuthType = CustomAuthenticationType.Custom };
//We add "username" parameter. Do not let it confuse you: PlayFab is expecting this parameter to contain player PlayFab ID (!) and not username.
customAuth.AddAuthParameter("username", _playFabPlayerIdCache); // expected by PlayFab custom auth service
//We add "token" parameter. PlayFab expects it to contain Photon Authentication Token issues to your during previous step.
customAuth.AddAuthParameter("token", obj.PhotonCustomAuthenticationToken);
//We finally tell Photon to use this authentication parameters throughout the entire application.
PhotonNetwork.AuthValues = customAuth;
}
private void OnPlayFabError(PlayFabError obj) {
LogMessage(obj.ErrorMessage);
}
public void LogMessage(string message) {
Debug.Log("PlayFab + Photon Example: " + message);
}
// Add small button to launch our example code
public void OnGUI() {
if (GUILayout.Button("Execute Example ")) ExecuteExample();
}
// Example code which raises custom room event, then sets custom room property
private void ExecuteExample() {
// Raise custom room event
var data = new Dictionary() { {"Hello","World"} };
var result = PhotonNetwork.RaiseEvent(15, data, true, new RaiseEventOptions()
{
ForwardToWebhook = true,
});
LogMessage("New Room Event Post: "+result);
// Set custom room property
var properties = new ExitGames.Client.Photon.Hashtable() { { "CustomProperty", "It's Value" } };
var expectedProperties = new ExitGames.Client.Photon.Hashtable();
PhotonNetwork.room.SetCustomProperties(properties, expectedProperties, true);
LogMessage("New Room Properties Set");
}
}
```
* Exécutez la scène hub et attendez la fin de l'authentification PlayFab **(1)**.
* Chargez ensuite la scène **Boxes Demo** **(2)**.
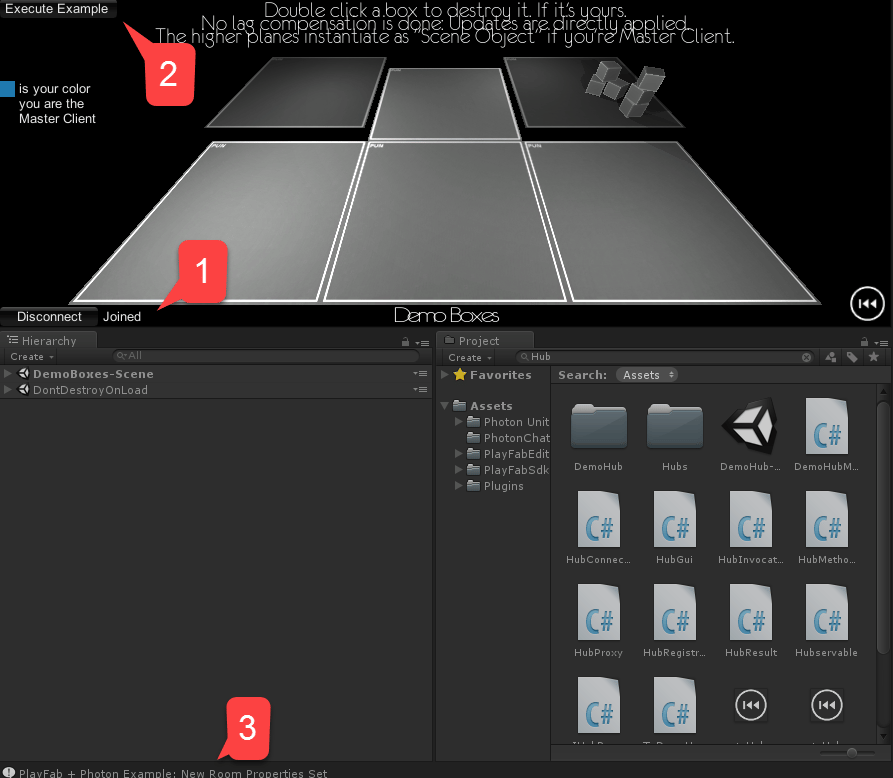
 * Une fois la scène chargée, attendez que le pair se connecte à la salle nouvellement créée **(1)**.
* Sélectionnez ensuite **Execute Example** dans le coin supérieur gauche **(2)**.
* Observez la sortie de la console **(3)**.
* Assurez-vous qu'aucune erreur ne s'est produite.
* Une fois la scène chargée, attendez que le pair se connecte à la salle nouvellement créée **(1)**.
* Sélectionnez ensuite **Execute Example** dans le coin supérieur gauche **(2)**.
* Observez la sortie de la console **(3)**.
* Assurez-vous qu'aucune erreur ne s'est produite.
 N'oubliez pas d'arrêter la lecture dans Unity. Cela permet de nous assurer que nous recevons également les événements **RoomLeft** et **RoomClosed**.
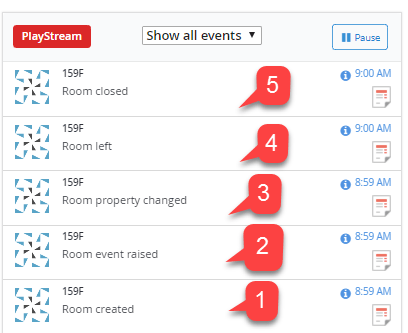
Accédez à la page Game Manager du titre et observez le panneau **PlayStream**. Vous devriez voir les événements générés par notre code CloudScript lors du traitement des événements Photon.
1. Au départ, notre instance Photon n'avait aucune salle ouverte. Lorsque nous avons lancé l'exemple, Photon a créé la salle pour la démo Boxes.
2. Le premier joueur à rejoindre la salle est celui qui l'a demandée. Aucun **RoomJoined Event** n'a donc été enregistré. Nous avons ensuite exécuté notre exemple de code :
* Nous avons d'abord déclenché un **Room Event** personnalisé.
* Nous avons ensuite défini une **Room Property** personnalisée.
* Puis nous avons arrêté le mode lecture d'Unity, ce qui a entraîné le départ de notre client de la salle.
3. Comme notre client déconnecté était le dernier, il n'y a plus de clients et Photon ferme la salle.
Tous les événements doivent être consignés dans le flux d'événements PlayStream, comme illustré dans l'image suivante.
N'oubliez pas d'arrêter la lecture dans Unity. Cela permet de nous assurer que nous recevons également les événements **RoomLeft** et **RoomClosed**.
Accédez à la page Game Manager du titre et observez le panneau **PlayStream**. Vous devriez voir les événements générés par notre code CloudScript lors du traitement des événements Photon.
1. Au départ, notre instance Photon n'avait aucune salle ouverte. Lorsque nous avons lancé l'exemple, Photon a créé la salle pour la démo Boxes.
2. Le premier joueur à rejoindre la salle est celui qui l'a demandée. Aucun **RoomJoined Event** n'a donc été enregistré. Nous avons ensuite exécuté notre exemple de code :
* Nous avons d'abord déclenché un **Room Event** personnalisé.
* Nous avons ensuite défini une **Room Property** personnalisée.
* Puis nous avons arrêté le mode lecture d'Unity, ce qui a entraîné le départ de notre client de la salle.
3. Comme notre client déconnecté était le dernier, il n'y a plus de clients et Photon ferme la salle.
Tous les événements doivent être consignés dans le flux d'événements PlayStream, comme illustré dans l'image suivante.
 À ce stade, vous avez entièrement intégré la prise en charge des événements Photon à votre titre PlayFab.
## Related topics
- [Démarrage rapide](/fr/services/playfab/economy-monetization/economy-v2/quickstart.md)
- [Démarrage rapide de Party](/fr/services/playfab/multiplayer/networking/quickstart.md)
- [Démarrage rapide du matchmaking](/fr/services/playfab/multiplayer/matchmaking/quickstart.md)
- [Démarrage rapide Win32](/fr/services/playfab/sdks/c/quickstart-win32.md)
- [Démarrage rapide Linux](/fr/services/playfab/sdks/c/quickstart-linux.md)
À ce stade, vous avez entièrement intégré la prise en charge des événements Photon à votre titre PlayFab.
## Related topics
- [Démarrage rapide](/fr/services/playfab/economy-monetization/economy-v2/quickstart.md)
- [Démarrage rapide de Party](/fr/services/playfab/multiplayer/networking/quickstart.md)
- [Démarrage rapide du matchmaking](/fr/services/playfab/multiplayer/matchmaking/quickstart.md)
- [Démarrage rapide Win32](/fr/services/playfab/sdks/c/quickstart-win32.md)
- [Démarrage rapide Linux](/fr/services/playfab/sdks/c/quickstart-linux.md)