> ## Documentation Index
> Fetch the complete documentation index at: https://devdocs.xbox.com/llms.txt
> Use this file to discover all available pages before exploring further.
# Configurer l'authentification PlayFab avec des applications UWP
> Tutoriel pas à pas pour ajouter l'authentification PlayFab à une application de plateforme Windows universelle à l'aide de Windows Hello pour la création de compte et la connexion des joueurs.
Ce tutoriel vous guide à travers la procédure d'authentification PlayFab avec la plateforme Windows universelle (UWP).
Cette procédure constitue une introduction de base sur la façon d'obtenir toutes les entités et d'effectuer l'authentification via Windows Hello et PlayFab. Pour un exemple plus élaboré d'authentification Windows Hello et PlayFab, consultez notre `[UWPExample project](https://github.com/PlayFab/UWPExample)`.
## Configuration requise
* Suivez le [guide MSDN « Get Set Up »](https://learn.microsoft.com/en-us/windows/apps/windows-app-sdk/set-up-your-development-environment) pour préparer Windows et Visual Studio au développement UWP.
* Disposer d'un titre [PlayFab](https://developer.playfab.com/) inscrit.
* Avoir une bonne connaissance des [principes de base et bonnes pratiques de connexion](/fr/services/playfab/identity/player-identity/login/login-basics-best-practices).
Il est *très* important d'utiliser le système d'exploitation Windows 10, d'être connecté avec un compte Microsoft vérifié et d'avoir configuré une interface d'accès telle qu'un code PIN. Si ces conditions ne sont pas\* remplies, l'application échouera sans aucune explication utile.
## Préparation d'un projet Visual Studio
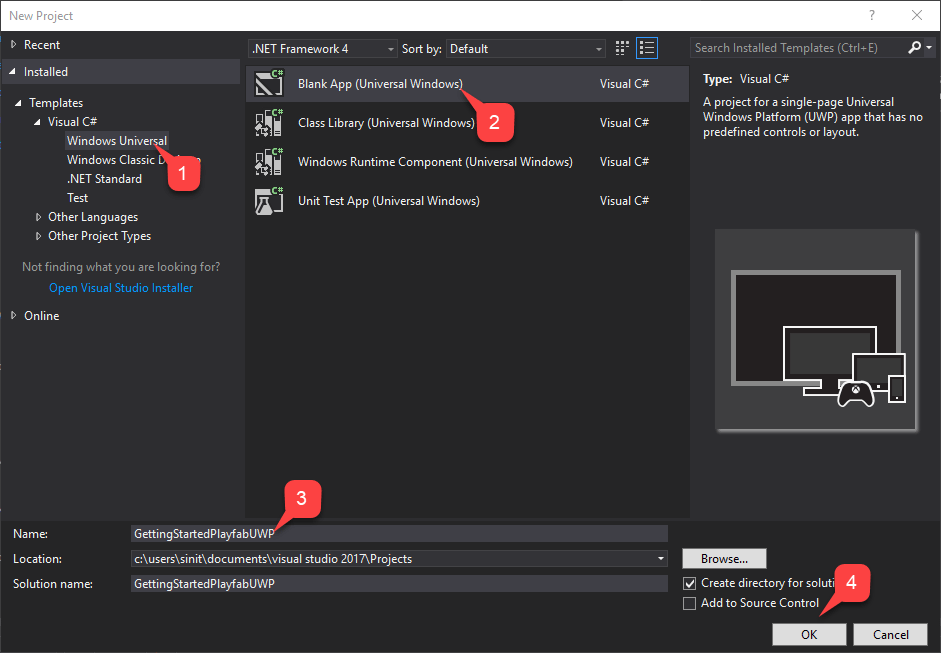
Démarrez Visual Studio et créez un nouveau projet.
1. Sous **Templates**, sélectionnez **Windows Universal**.
2. Sélectionnez ensuite le type **Blank App (Universal Windows)**.
3. Nommez-le **GettingStartedPlayfabUWP**.
4. Sélectionnez le bouton **OK** pour valider.
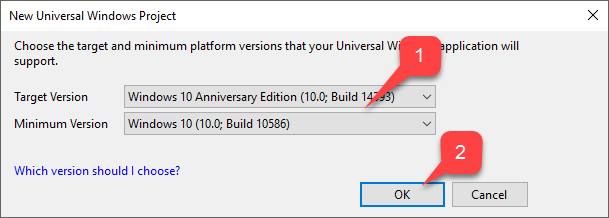
1. Sélectionnez la **Target Version** et la **Minimum Version** correspondant à votre **Project**.
2. Sélectionnez le bouton **OK**.
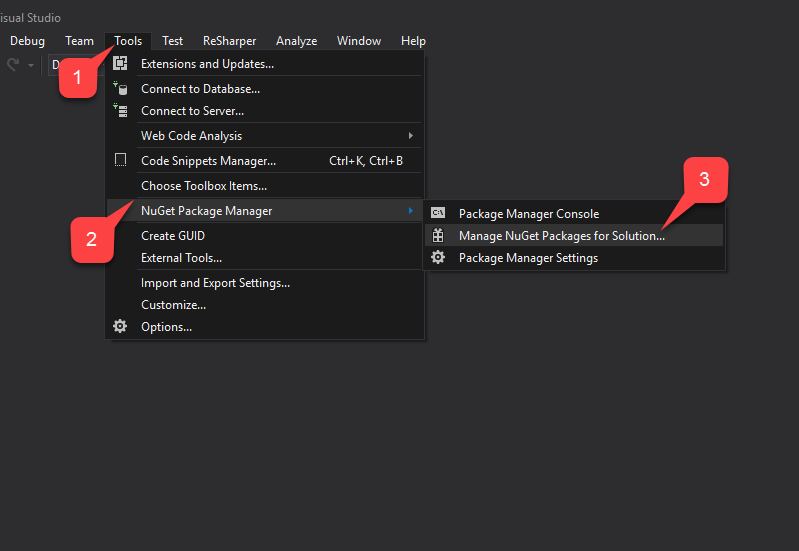
Une fois le **Project** créé, ajoutez le **PlayFab SDK** à l'aide du **NuGet Package Manager**.
1. Sélectionnez d'abord l'onglet **Tools**.
2. Dans le menu déroulant, sélectionnez **NuGet Package Manager**.
3. Sélectionnez ensuite **Manage NuGet Packages for Solution**.
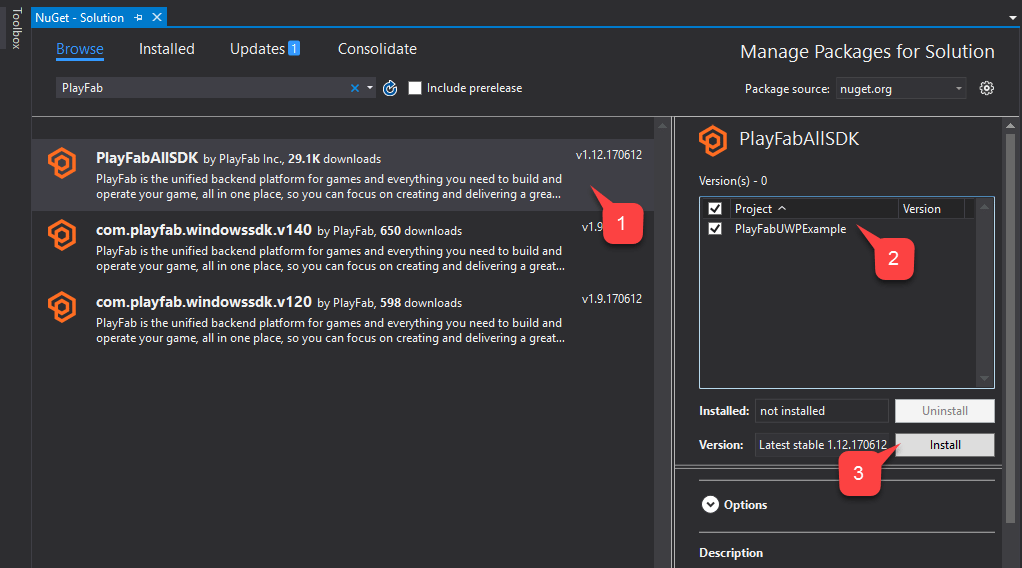
Dans la fenêtre **NuGet Manager** :
1. Sélectionnez **Browse** et recherchez le package **PlayFabAllSDK**.
2. Sélectionnez votre **Project** cible.
3. Sélectionnez ensuite le bouton **Install**.
Une fois cette opération terminée, la configuration de base de votre projet est achevée. Dans la section suivante, nous allons modifier deux classes qui doivent être générées automatiquement lors de la création du projet :
1. **App**
2. **MainPage**
## Implémentation
### App.xaml.cs
Cette classe se contente de configurer notre SDK PlayFab en définissant un ID de titre approprié. N'oubliez pas de remplacer l'ID de titre par le vôtre.
```csharp theme={null}
using System;
using Windows.ApplicationModel;
using Windows.ApplicationModel.Activation;
using Windows.UI.Xaml;
using Windows.UI.Xaml.Controls;
using Windows.UI.Xaml.Navigation;
namespace GettingStartedPlayfabUWP
{
// This class is generated upon project creation.
// While template on it's own contains a lot of xml comments, we are only interested in lines 17 and 27
sealed partial class App : Application
{
// Replace PLAYFAB_TITLE_ID with your own
public const string PlayfabTitleId = "PLAYFAB_TITLE_ID";
///
/// Initializes the singleton application object. This is the first line of authored code
/// executed, and as such is the logical equivalent of main() or WinMain().
///
public App()
{
// This is the only line of functional code we need to add to this class.
PlayFab.PlayFabSettings.TitleId = PlayfabTitleId;
this.InitializeComponent();
this.Suspending += OnSuspending;
}
///
/// Invoked when the application is launched normally by the end user. Other entry points
/// will be used such as when the application is launched to open a specific file.
///
/// Details about the launch request and process.
protected override void OnLaunched(LaunchActivatedEventArgs e)
{
Frame rootFrame = Window.Current.Content as Frame;
// Do not repeat app initialization when the Window already has content,
// just ensure that the window is active
if (rootFrame == null)
{
// Create a Frame to act as the navigation context and navigate to the first page
rootFrame = new Frame();
rootFrame.NavigationFailed += OnNavigationFailed;
if (e.PreviousExecutionState == ApplicationExecutionState.Terminated)
{
//TODO: Load state from previously suspended application
}
// Place the frame in the current Window
Window.Current.Content = rootFrame;
}
if (e.PrelaunchActivated == false)
{
if (rootFrame.Content == null)
{
// When the navigation stack isn't restored navigate to the first page,
// configuring the new page by passing required information as a navigation
// parameter
rootFrame.Navigate(typeof(MainPage), e.Arguments);
}
// Ensure the current window is active
Window.Current.Activate();
}
}
///
/// Invoked when Navigation to a certain page fails
///
/// The Frame which failed navigation
/// Details about the navigation failure
void OnNavigationFailed(object sender, NavigationFailedEventArgs e)
{
throw new Exception("Failed to load Page " + e.SourcePageType.FullName);
}
///
/// Invoked when application execution is being suspended. Application state is saved
/// without knowing whether the application will be terminated or resumed with the contents
/// of memory still intact.
///
/// The source of the suspend request.
/// Details about the suspend request.
private void OnSuspending(object sender, SuspendingEventArgs e)
{
var deferral = e.SuspendingOperation.GetDeferral();
//TODO: Save application state and stop any background activity
deferral.Complete();
}
}
}
```
### MainPage.xaml
Ce fichier contient la disposition de notre page principale. Il s'agit d'une disposition *très simple* composée de deux boutons et d'un champ de saisie de texte regroupés dans une grille orientée verticalement.
Les boutons sont liés à des méthodes spécifiques, et la zone de texte est accessible par son nom `UsernameInput`.
```xaml theme={null}
```
### MainPage.xaml.cs
Il s'agit de la classe fonctionnelle de la page principale, qui constitue le cœur de l'exemple. Reportez-vous aux commentaires du code et examinez les différentes méthodes conçues pour vous guider dans l'inscription et la connexion PlayFab+Hello.
La façon la plus simple de commencer à comprendre le code est d'examiner les méthodes déclenchées par les boutons correspondants :
* **RegisterRequest**
* **LogInRequest**.
```csharp theme={null}
using System;
using System.Linq;
using System.Threading.Tasks;
using Windows.Foundation;
using Windows.Networking.Connectivity;
using Windows.Security.Credentials;
using Windows.Security.Cryptography;
using Windows.Security.Cryptography.Core;
using Windows.Storage.Streams;
using Windows.UI.Popups;
using Windows.UI.Xaml;
using Windows.UI.Xaml.Controls;
using PlayFab;
using PlayFab.ClientModels;
namespace GettingStartedPlayfabUWP
{
public sealed partial class MainPage : Page
{
// Shortcut to get current value of UsernameInput
public string Username => UsernameInput.Text;
public MainPage()
{
this.InitializeComponent();
}
///
/// This method is invoked when you select the Register button
/// This method illustrates the flow for Registration process.
/// We operate on 2 entities:
/// - User Credentials of type KeyCredential
/// - Public Key of type String
/// We first check if user with this id already has Credentials. If so, we redirect to login procedure.
/// Then we create new User Credentials. Check CreateKeyCredential for implementation details
/// Then we get Base64 encoded Public Key using the new User Credentials. Check GetPublicKeyBase64 for implementation details
/// Then we execute RegisterWithHello api call call. Check CallPlayFabRegisterWithHello for implementation details
///
private async void RegisterRequest(object sender, RoutedEventArgs e)
{
// Check if the user already exists and if so log them in.
KeyCredentialRetrievalResult retrieveResult = await KeyCredentialManager.OpenAsync(Username);
if (retrieveResult.Status == KeyCredentialStatus.Success)
{
// Redirect to login procedure
LogInRequest(sender, e);
return;
}
// Create a new KeyCredential for the user on the device.
var credential = await CreateKeyCredential(Username);
if (credential == null) return;
var publicKey = await GetPublicKeyBase64(credential);
if (string.IsNullOrEmpty(publicKey)) return;
// Include the name of the current device for the benefit of the user.
// The server could support a Web interface that shows the user all the devices they
// have signed in from and revoke access from devices they have lost.
var registerResponse = await CallPlayFabRegisterWithHello(publicKey, Username);
await ShowMessage("Registered and signed in with Session Ticket " + registerResponse.Result.SessionTicket);
}
//
///
/// This method is invoked when you select the Log In button
/// This method shows entities flow during the sign in process.
/// We have 4 different entities:
/// - User Credentials of type KeyCredential
/// - Public Key Hint of type String
/// - Challenge of type String
/// - SignedChallenge of type String
///
/// We first acquire the User Credentials. We do it based on Username. Check GetUserCredentials method for implementation details
/// Next, we get Public Key Hint based on those credentials. Check GetPublicKeyHint for implementation details.
/// Next we request a Challenge from PlayFab. Check GetPlayFabHelloChallenge for implementation details
/// Next we sign the Challenge using User Credentials, so we obtain Signed Challenge. Check GetPlayFabHelloChallenge for implementation details
/// Finally we use Signed Challenge and Public Key Hint to log into PlayFab. Check CallPlayFabLoginWithHello for implementation details
///
private async void LogInRequest(object sender, RoutedEventArgs e)
{
// Get credentials based on current Username.
var credentials = await GetUserCredentials(Username);
if (credentials == null) return;
// Credentials will give us Public Key. We use it to construct Public Key Hint, which is first important entity for PlayFab+UWP authentication.
var publicKeyHint = GetPublicKeyHintBase64(credentials);
if (string.IsNullOrEmpty(publicKeyHint)) return;
// Get PlayFab Challenge to sign for Windows Hello.
var challenge = await GetPlayFabHelloChallenge(publicKeyHint);
if (string.IsNullOrEmpty(challenge)) return;
// Request user to sign the challenge.
var signedChallenge = await RequestUserSignChallenge(credentials, challenge);
if (string.IsNullOrEmpty(signedChallenge)) return;
// Send the signature back to the server to confirm our identity.
// The publicKeyHint tells the server which public key to use to verify the signature.
var result = await CallPlayFabLoginWithHello(publicKeyHint, signedChallenge);
if (result == null) return;
// Report the result.
await ShowMessage("Signed in with Session Ticket " + result.Result.SessionTicket);
}
public async Task GetPublicKeyBase64(KeyCredential userCredential)
{
IBuffer publicKey = userCredential.RetrievePublicKey();
if (publicKey == null)
{
await ShowMessage("Failed to get public key for credential");
return null;
}
return CryptographicBuffer.EncodeToBase64String(publicKey);
}
public string GetPublicKeyHintBase64(KeyCredential userCredential)
{
HashAlgorithmProvider hashProvider = HashAlgorithmProvider.OpenAlgorithm(HashAlgorithmNames.Sha256);
var publicKey = userCredential.RetrievePublicKey();
IBuffer publicKeyHash = hashProvider.HashData(publicKey);
return CryptographicBuffer.EncodeToBase64String(publicKeyHash);
}
public async Task GetUserCredentials(string userId)
{
// Open credential based on our Username and make sure it is successful
KeyCredentialRetrievalResult retrieveResult = await KeyCredentialManager.OpenAsync(userId);
if (retrieveResult.Status != KeyCredentialStatus.Success)
{
await ShowMessage("Error: Unable to open credentials! " + retrieveResult.Status);
return null;
}
return retrieveResult.Credential;
}
public async Task GetPlayFabHelloChallenge(string publicKeyHint)
{
// Request challenge from PlayFab and make sure response has no errors
var challengeResponse = await PlayFab.PlayFabClientAPI.GetWindowsHelloChallengeAsync(new GetWindowsHelloChallengeRequest
{
PublicKeyHint = publicKeyHint,
TitleId = PlayFab.PlayFabSettings.TitleId
});
if (challengeResponse.Error != null)
{
await ShowMessage($"Error during getting challenge: {challengeResponse.Error.Error}");
return null;
}
return challengeResponse.Result.Challenge;
}
public async Task RequestUserSignChallenge(KeyCredential credentials, string challenge)
{
IBuffer challengeBuffer = CryptographicBuffer.DecodeFromBase64String(challenge);
KeyCredentialOperationResult opResult = await credentials.RequestSignAsync(challengeBuffer);
if (opResult.Status != KeyCredentialStatus.Success)
{
await ShowMessage("Failed sign the challenge string: " + opResult.Status);
return null;
}
return CryptographicBuffer.EncodeToBase64String(opResult.Result);
}
public async Task> CallPlayFabLoginWithHello(string publicKeyHint, string signedChallenge)
{
var loginResponse = await PlayFab.PlayFabClientAPI.LoginWithWindowsHelloAsync(new LoginWithWindowsHelloRequest
{
ChallengeSignature = signedChallenge,
PublicKeyHint = publicKeyHint
});
if (loginResponse.Error != null)
{
await ShowMessage($"Failed to log in: {loginResponse.Error.Error}");
return null;
}
return loginResponse;
}
public IAsyncOperation ShowMessage(string messageString)
{
MessageDialog message = new MessageDialog($"{messageString}");
return message.ShowAsync();
}
public async Task> CallPlayFabRegisterWithHello(string publicKey, string username)
{
var hostNames = NetworkInformation.GetHostNames();
var localName = hostNames.FirstOrDefault(name => name.DisplayName.Contains(".local"));
string computerName = localName.DisplayName.Replace(".local", "");
var registerResult = await PlayFab.PlayFabClientAPI.RegisterWithWindowsHelloAsync(new RegisterWithWindowsHelloRequest
{
DeviceName = computerName,
PublicKey = publicKey,
UserName = username
});
if (registerResult.Error != null)
{
await ShowMessage(registerResult.Error.GenerateErrorReport());
return null;
}
return registerResult;
}
public async Task CreateKeyCredential(string username)
{
KeyCredentialRetrievalResult keyCreationResult = await KeyCredentialManager.RequestCreateAsync(username, KeyCredentialCreationOption.ReplaceExisting);
if (keyCreationResult.Status != KeyCredentialStatus.Success)
{
// User has authenticated with Windows Hello and the key credential is created.
await ShowMessage("Failed to create key credential: " + keyCreationResult.Status);
return null;
}
return keyCreationResult.Credential;
}
}
}
```
## Test
Pour exécuter l'application :
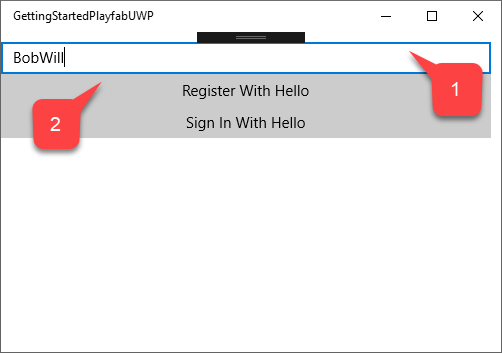
1. Entrez votre nom d'utilisateur.
2. Sélectionnez le bouton **Register With Hello**.
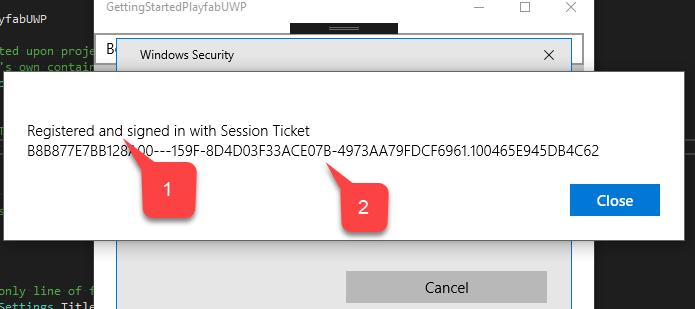
Suivez les instructions d'authentification proposées par **Windows**.
1. Une fois votre identité confirmée, un message de confirmation indique que le compte a été **Registered and signed in**.
2. Avec un **Session Ticket**.
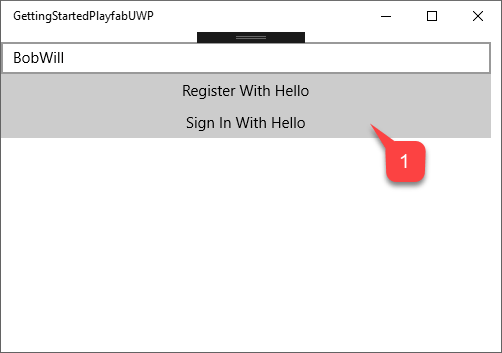
1. Sélectionnez le bouton **Sign in With Hello**.
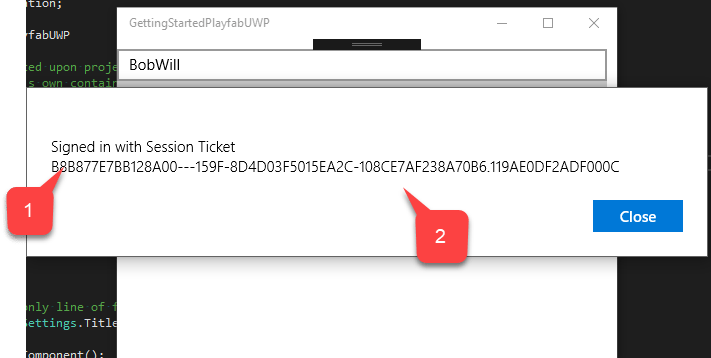
Suivez les instructions d'authentification proposées par Windows.
1. Une fois votre identité confirmée, un message de confirmation indique que le compte est **Signed in**.
2. Avec un **Session Ticket**.
À ce stade, vous avez correctement intégré PlayFab à votre application UWP.
## Related topics
- [Configurer la connexion avec Battle.net pour PlayFab](/fr/services/playfab/identity/player-identity/platform-specific-authentication/battlenet-login.md)
- [Configuration de l'authentification PlayFab avec Facebook et Unity](/fr/services/playfab/identity/player-identity/platform-specific-authentication/facebook-unity.md)
- [Configuration de l'authentification PlayFab avec Twitch et HTML5](/fr/services/playfab/identity/player-identity/platform-specific-authentication/twitch-html5.md)
- [Configuration de l'authentification PlayFab avec Facebook et HTML5](/fr/services/playfab/identity/player-identity/platform-specific-authentication/facebook-html5.md)
- [Configuration de l'authentification PlayFab avec Kongregate et Unity](/fr/services/playfab/identity/player-identity/platform-specific-authentication/kongregate-unity.md)
 1. Sélectionnez la **Target Version** et la **Minimum Version** correspondant à votre **Project**.
2. Sélectionnez le bouton **OK**.
1. Sélectionnez la **Target Version** et la **Minimum Version** correspondant à votre **Project**.
2. Sélectionnez le bouton **OK**.
 Une fois le **Project** créé, ajoutez le **PlayFab SDK** à l'aide du **NuGet Package Manager**.
1. Sélectionnez d'abord l'onglet **Tools**.
2. Dans le menu déroulant, sélectionnez **NuGet Package Manager**.
3. Sélectionnez ensuite **Manage NuGet Packages for Solution**.
Une fois le **Project** créé, ajoutez le **PlayFab SDK** à l'aide du **NuGet Package Manager**.
1. Sélectionnez d'abord l'onglet **Tools**.
2. Dans le menu déroulant, sélectionnez **NuGet Package Manager**.
3. Sélectionnez ensuite **Manage NuGet Packages for Solution**.
 Dans la fenêtre **NuGet Manager** :
1. Sélectionnez **Browse** et recherchez le package **PlayFabAllSDK**.
2. Sélectionnez votre **Project** cible.
3. Sélectionnez ensuite le bouton **Install**.
Dans la fenêtre **NuGet Manager** :
1. Sélectionnez **Browse** et recherchez le package **PlayFabAllSDK**.
2. Sélectionnez votre **Project** cible.
3. Sélectionnez ensuite le bouton **Install**.
 Une fois cette opération terminée, la configuration de base de votre projet est achevée. Dans la section suivante, nous allons modifier deux classes qui doivent être générées automatiquement lors de la création du projet :
1. **App**
2. **MainPage**
## Implémentation
### App.xaml.cs
Cette classe se contente de configurer notre SDK PlayFab en définissant un ID de titre approprié. N'oubliez pas de remplacer l'ID de titre par le vôtre.
```csharp theme={null}
using System;
using Windows.ApplicationModel;
using Windows.ApplicationModel.Activation;
using Windows.UI.Xaml;
using Windows.UI.Xaml.Controls;
using Windows.UI.Xaml.Navigation;
namespace GettingStartedPlayfabUWP
{
// This class is generated upon project creation.
// While template on it's own contains a lot of xml comments, we are only interested in lines 17 and 27
sealed partial class App : Application
{
// Replace PLAYFAB_TITLE_ID with your own
public const string PlayfabTitleId = "PLAYFAB_TITLE_ID";
///
Une fois cette opération terminée, la configuration de base de votre projet est achevée. Dans la section suivante, nous allons modifier deux classes qui doivent être générées automatiquement lors de la création du projet :
1. **App**
2. **MainPage**
## Implémentation
### App.xaml.cs
Cette classe se contente de configurer notre SDK PlayFab en définissant un ID de titre approprié. N'oubliez pas de remplacer l'ID de titre par le vôtre.
```csharp theme={null}
using System;
using Windows.ApplicationModel;
using Windows.ApplicationModel.Activation;
using Windows.UI.Xaml;
using Windows.UI.Xaml.Controls;
using Windows.UI.Xaml.Navigation;
namespace GettingStartedPlayfabUWP
{
// This class is generated upon project creation.
// While template on it's own contains a lot of xml comments, we are only interested in lines 17 and 27
sealed partial class App : Application
{
// Replace PLAYFAB_TITLE_ID with your own
public const string PlayfabTitleId = "PLAYFAB_TITLE_ID";
///  Suivez les instructions d'authentification proposées par **Windows**.
1. Une fois votre identité confirmée, un message de confirmation indique que le compte a été **Registered and signed in**.
2. Avec un **Session Ticket**.
Suivez les instructions d'authentification proposées par **Windows**.
1. Une fois votre identité confirmée, un message de confirmation indique que le compte a été **Registered and signed in**.
2. Avec un **Session Ticket**.
 1. Sélectionnez le bouton **Sign in With Hello**.
 Suivez les instructions d'authentification proposées par Windows.
1. Une fois votre identité confirmée, un message de confirmation indique que le compte est **Signed in**.
2. Avec un **Session Ticket**.
Suivez les instructions d'authentification proposées par Windows.
1. Une fois votre identité confirmée, un message de confirmation indique que le compte est **Signed in**.
2. Avec un **Session Ticket**.
 À ce stade, vous avez correctement intégré PlayFab à votre application UWP.
## Related topics
- [Configurer la connexion avec Battle.net pour PlayFab](/fr/services/playfab/identity/player-identity/platform-specific-authentication/battlenet-login.md)
- [Configuration de l'authentification PlayFab avec Facebook et Unity](/fr/services/playfab/identity/player-identity/platform-specific-authentication/facebook-unity.md)
- [Configuration de l'authentification PlayFab avec Twitch et HTML5](/fr/services/playfab/identity/player-identity/platform-specific-authentication/twitch-html5.md)
- [Configuration de l'authentification PlayFab avec Facebook et HTML5](/fr/services/playfab/identity/player-identity/platform-specific-authentication/facebook-html5.md)
- [Configuration de l'authentification PlayFab avec Kongregate et Unity](/fr/services/playfab/identity/player-identity/platform-specific-authentication/kongregate-unity.md)
À ce stade, vous avez correctement intégré PlayFab à votre application UWP.
## Related topics
- [Configurer la connexion avec Battle.net pour PlayFab](/fr/services/playfab/identity/player-identity/platform-specific-authentication/battlenet-login.md)
- [Configuration de l'authentification PlayFab avec Facebook et Unity](/fr/services/playfab/identity/player-identity/platform-specific-authentication/facebook-unity.md)
- [Configuration de l'authentification PlayFab avec Twitch et HTML5](/fr/services/playfab/identity/player-identity/platform-specific-authentication/twitch-html5.md)
- [Configuration de l'authentification PlayFab avec Facebook et HTML5](/fr/services/playfab/identity/player-identity/platform-specific-authentication/facebook-html5.md)
- [Configuration de l'authentification PlayFab avec Kongregate et Unity](/fr/services/playfab/identity/player-identity/platform-specific-authentication/kongregate-unity.md)