> ## Documentation Index
> Fetch the complete documentation index at: https://devdocs.xbox.com/llms.txt
> Use this file to discover all available pages before exploring further.
# Configuration de l'authentification PlayFab avec Google et HTML5
> Tutoriel pas à pas pour ajouter la connexion Google à un titre PlayFab avec HTML5 et JavaScript, couvrant la configuration de l'API Google et l'authentification OAuth des joueurs.
Ce tutoriel vous guide tout au long du processus d'authentification PlayFab avec Google et HTML5/JavaScript.
## Configuration requise
Vous aurez besoin des éléments suivants :
* Un [compte Google](https://google.com/) pour les tests.
* Un titre `[PlayFab](https://developer.playfab.com/)` inscrit.
* Une bonne connaissance des [principes de base et bonnes pratiques de connexion](/fr/services/playfab/identity/player-identity/login/login-basics-best-practices).
* Au minimum, un serveur avec un nom de domaine valide pour servir un fichier HTML statique. Consultez le tutoriel [Exécution d'un serveur HTTP pour les tests](/fr/services/playfab/identity/player-identity/platform-specific-authentication/running-an-http-server-for-testing) pour savoir comment en configurer un.
## Serveur et domaine
Pour suivre ce guide, vous avez besoin d'un serveur avec un domaine valide. Si vous n'avez pas encore de domaine inscrit ni de serveur web distant, suivez notre tutoriel [Exécution d'un serveur HTTP pour les tests](/fr/services/playfab/identity/player-identity/platform-specific-authentication/running-an-http-server-for-testing) pour savoir comment exécuter un serveur web local avec un nom de domaine valide.
Tout au long de ce guide, nous supposerons que votre domaine est `[http://playfab.example](http://playfab.example)`.
## Inscription d'un projet d'API Google
Commencez par accéder à la [console des API Google](https://console.developers.google.com/) :
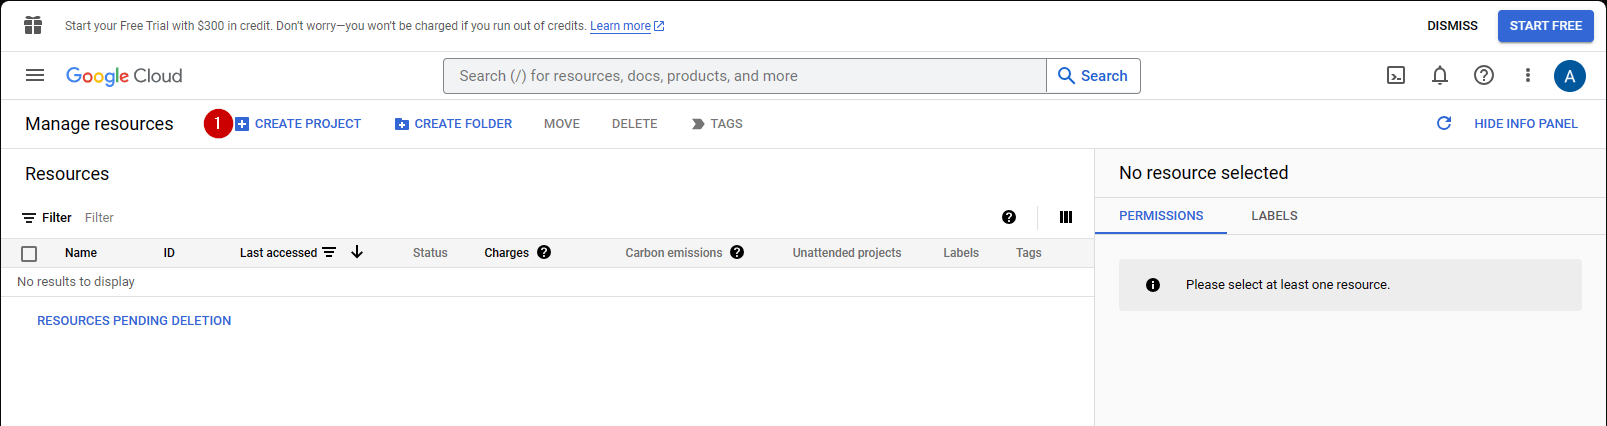
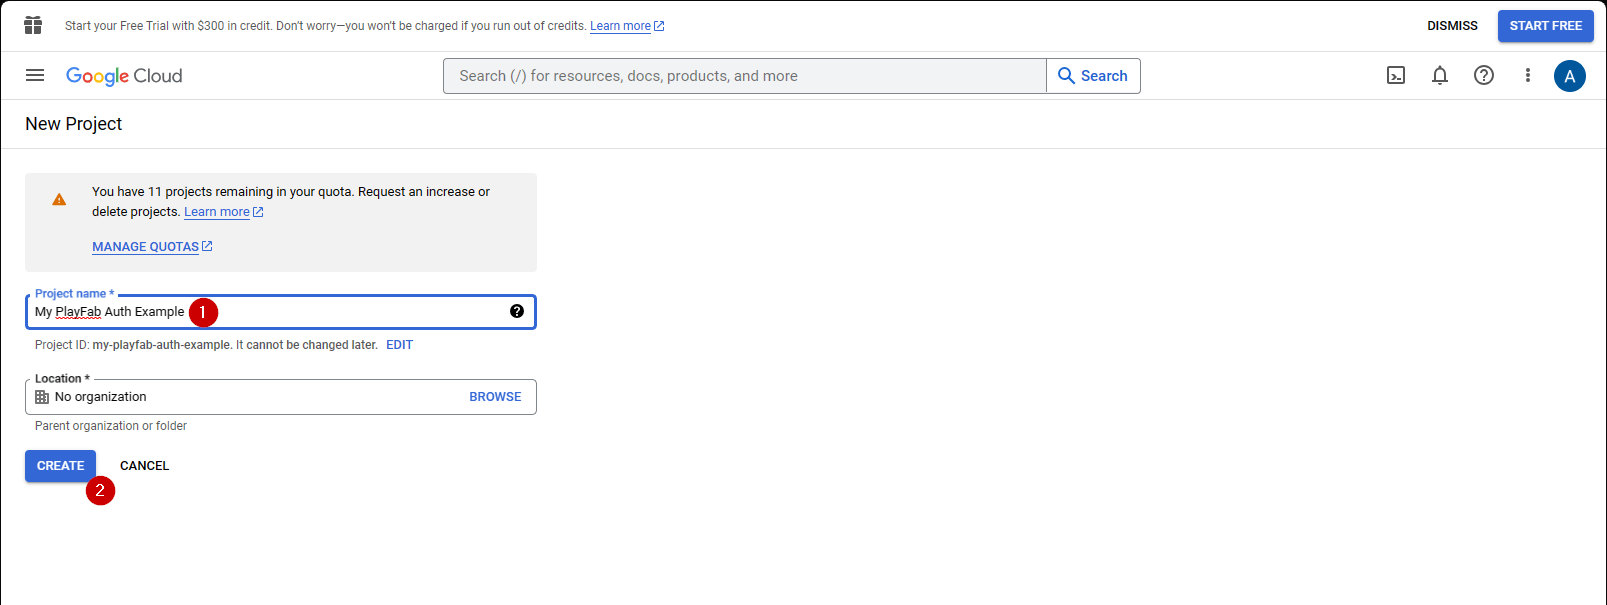
1. Accédez à **CREATE PROJECT** et sélectionnez-le.
1. Renseignez le champ sous **Project Name**.
2. Sélectionnez le bouton **Create**.
Il est normal que l'**API Manager** mette 10 à 20 secondes pour générer le projet.
Une fois le projet créé :
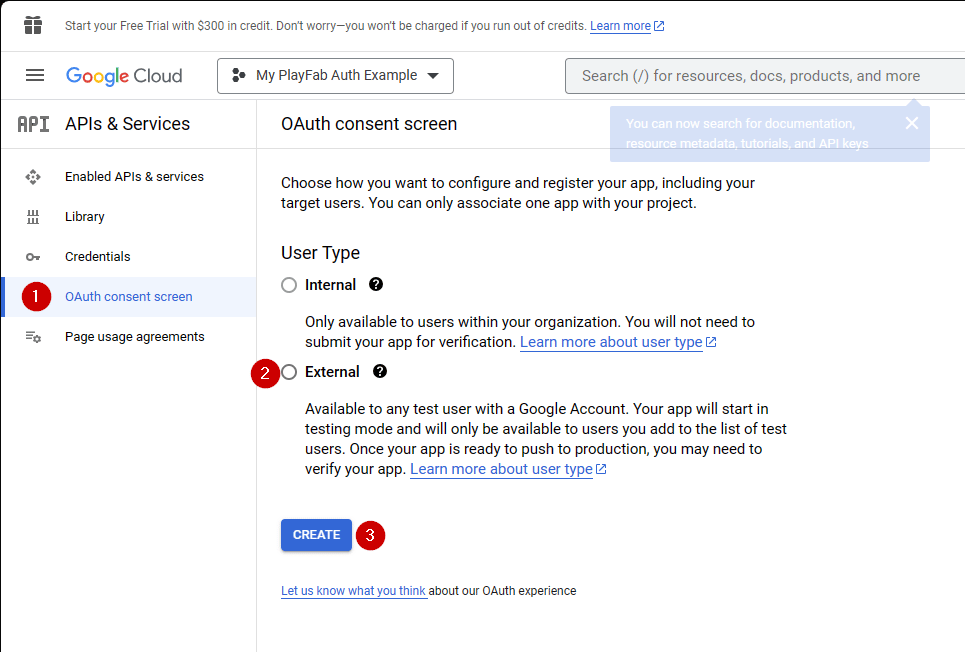
1. Accédez à **OAuth consent screen**.
2. Sélectionnez **External** sous User Type
3. Sélectionnez ensuite **Create**.
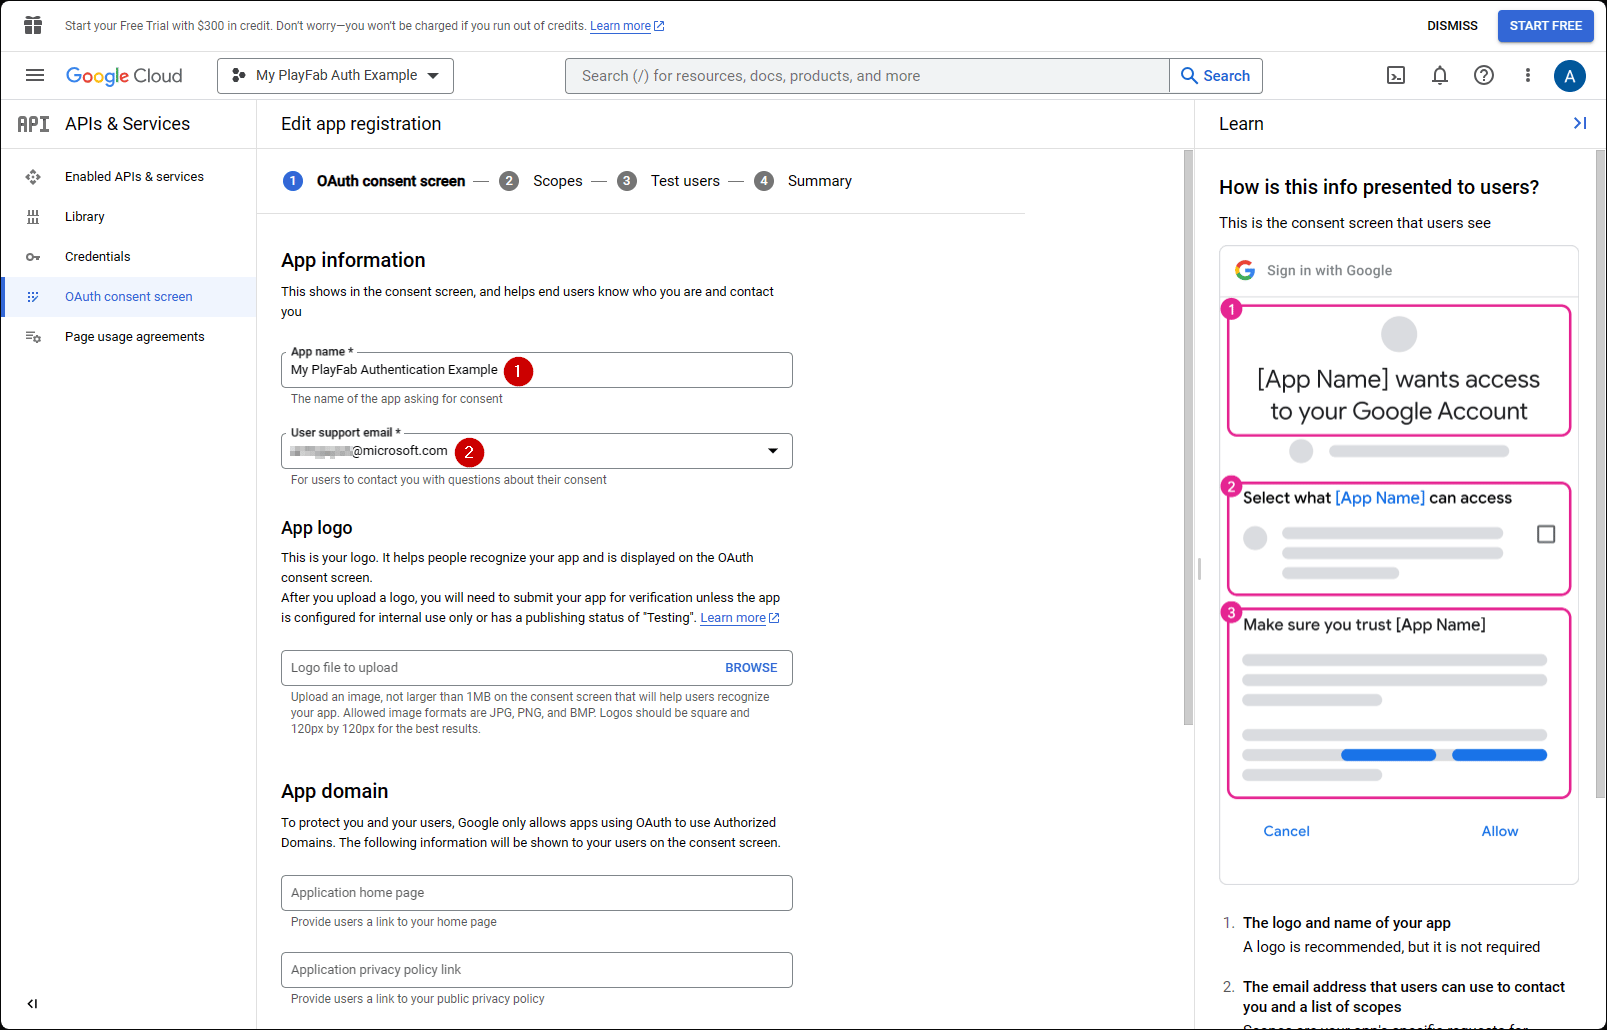
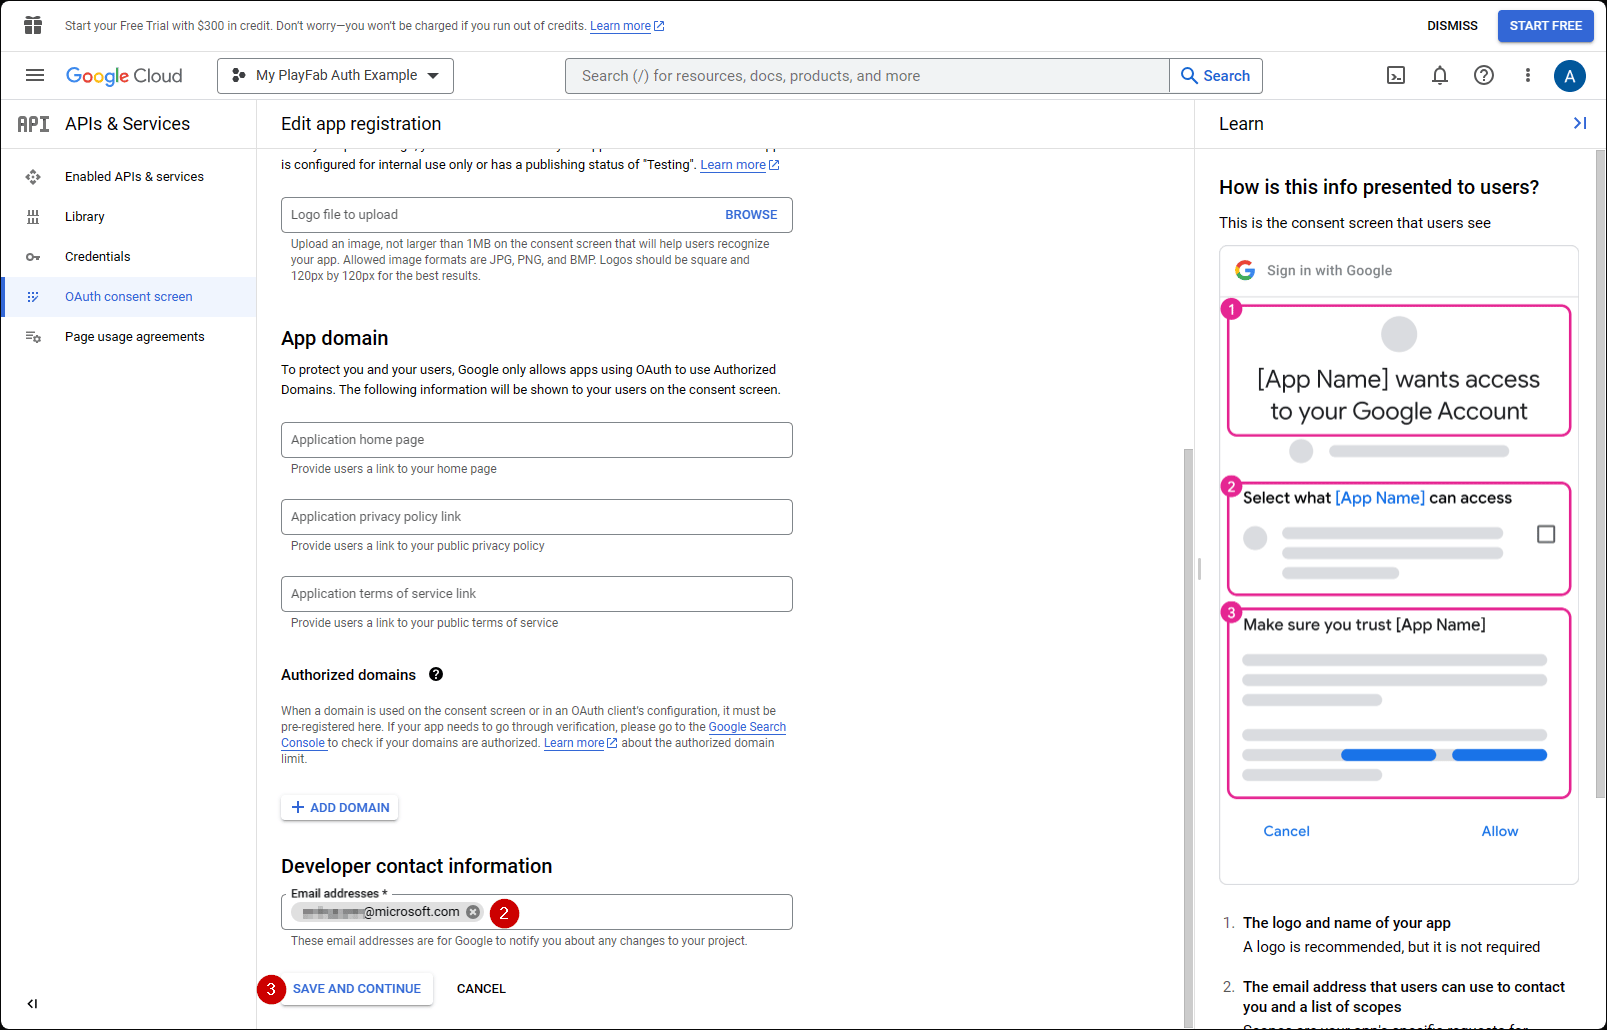
1. Renseignez un nom d'application (App Name)
2. Assurez-vous que des adresses e-mail sont indiquées pour **user support email** et **Developer Contact Email**
3. Sélectionnez ensuite **SAVE AND CONTINUE**
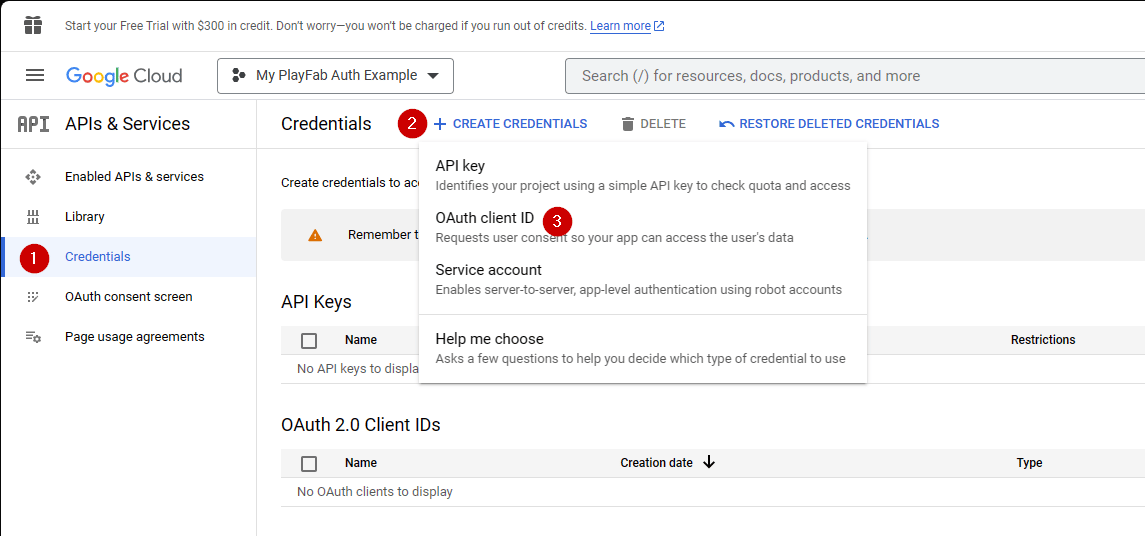
1. Accédez ensuite à **Credentials**.
2. Sélectionnez **Create credentials**.
3. Sélectionnez ensuite **OAuth client ID**.
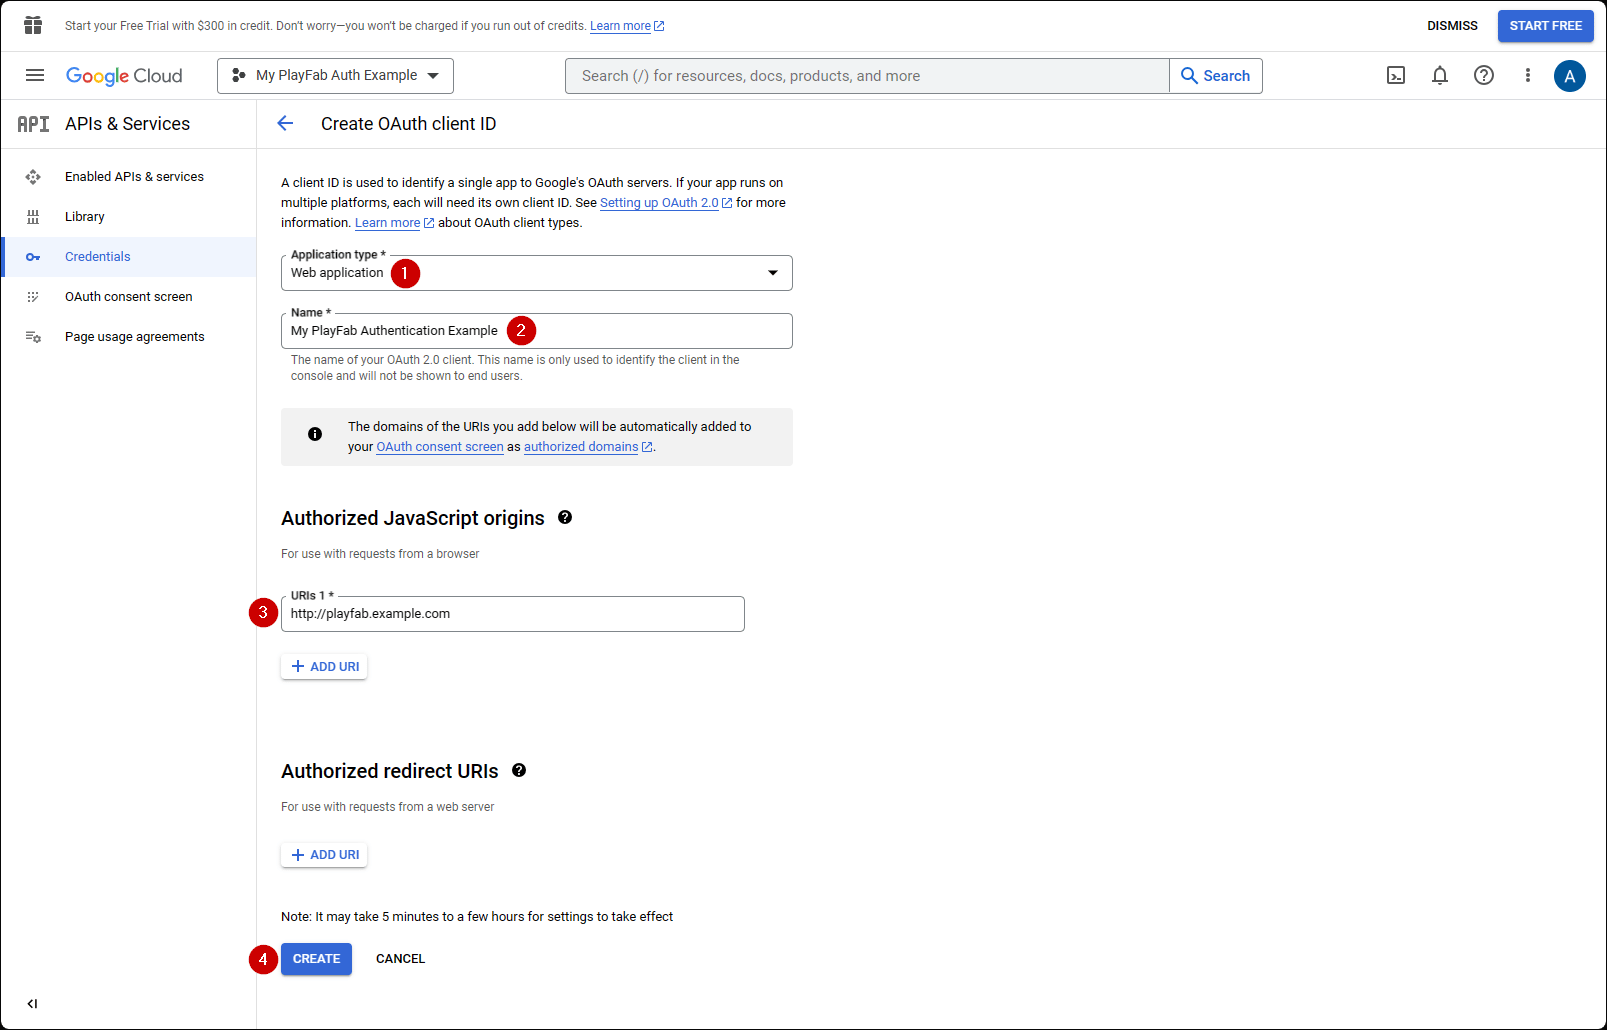
1. Sélectionnez **Web Application** comme **Application type**.
2. Donnez un **Name** à votre application.
3. Ajoutez votre domaine à **Authorized JavaScript origins** - `[PlayFab](http://playfab.example.com)` dans notre cas.
4. Enfin, sélectionnez le bouton **Create** pour valider vos modifications.
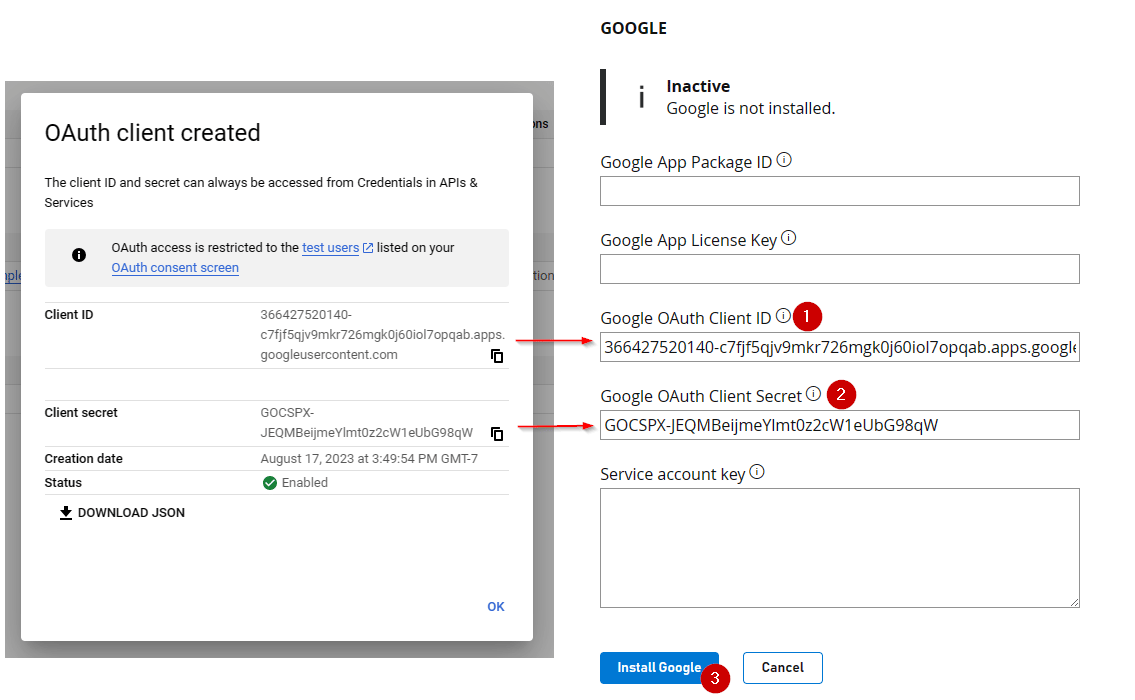
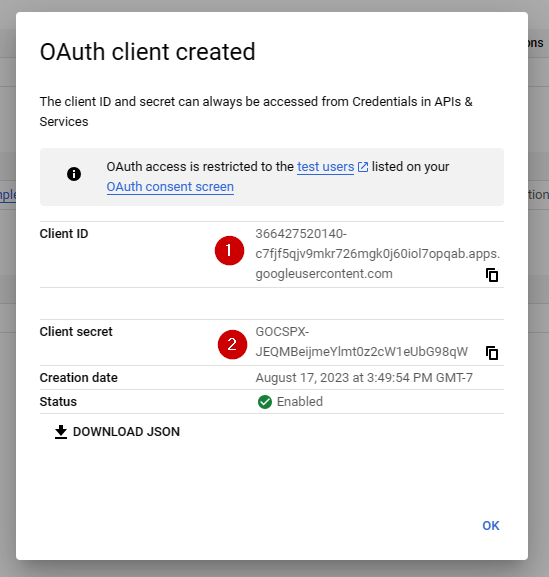
Dans l'écran **OAuth client** illustré ci-dessous, le Google API Manager affiche deux informations importantes :
1. Le **client ID**
2. Le **client secret**.
Veillez à copier et enregistrer ces valeurs en lieu sûr, à un endroit facilement accessible, car elles seront utilisées dans le processus d'autorisation présenté plus loin dans ce tutoriel.
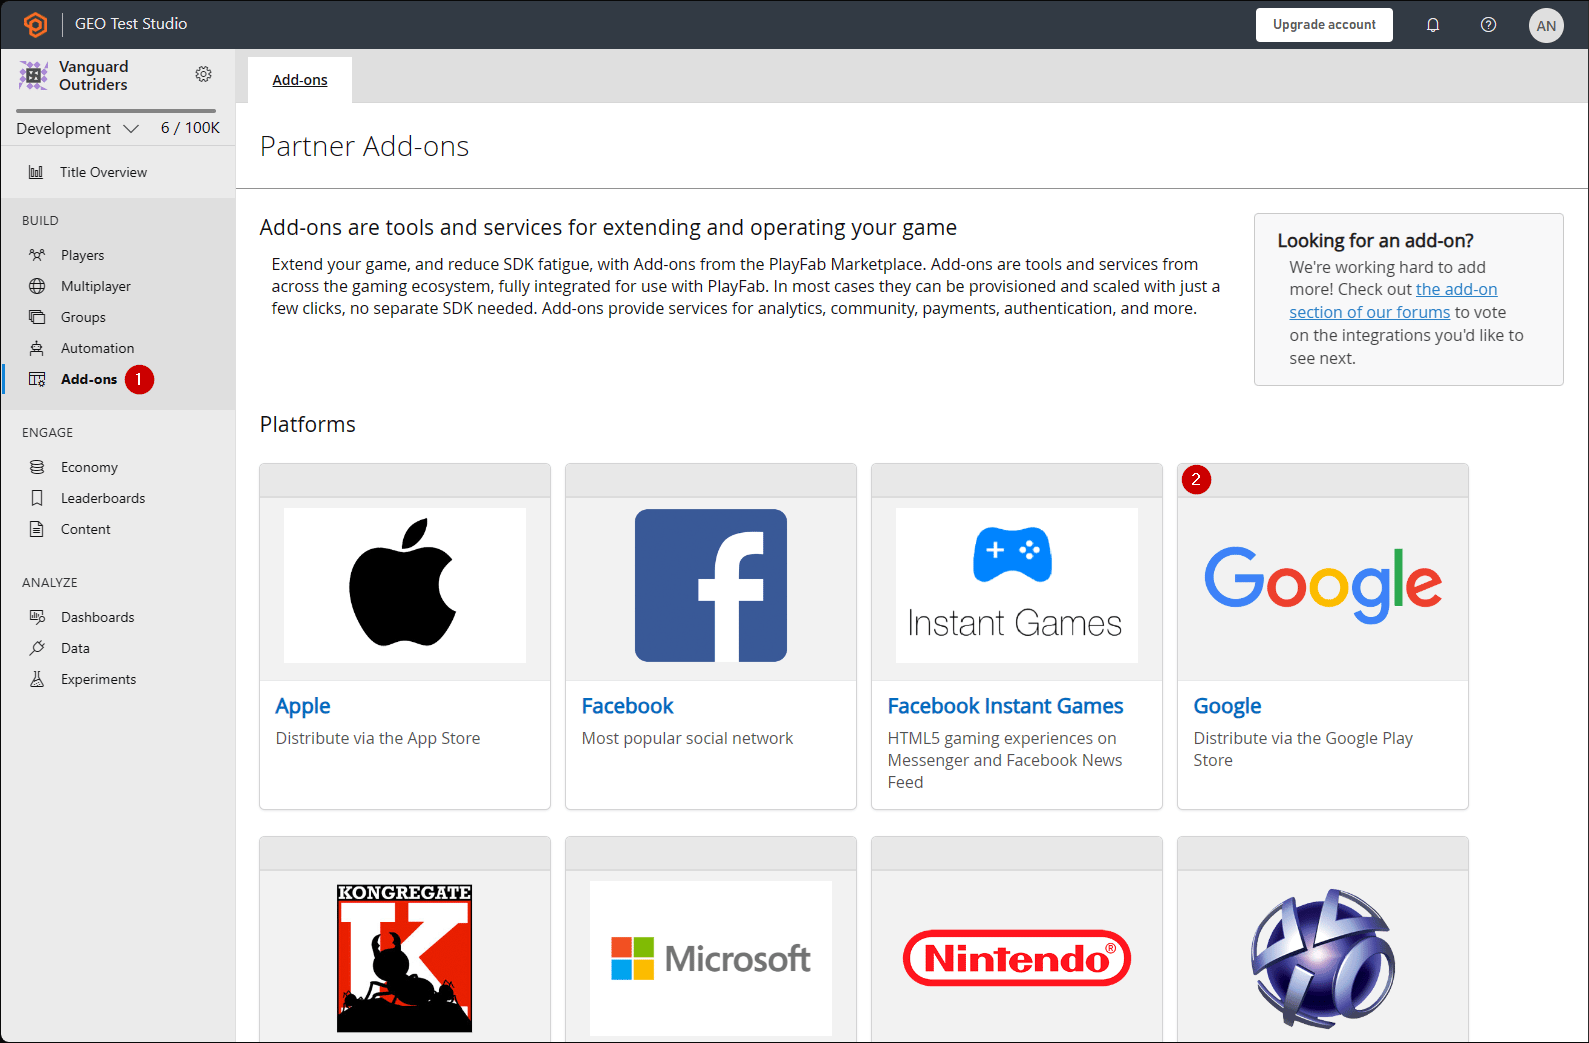
Accédez à la page PlayFab **Game Manager** de votre titre.
1. Accédez à **Add-ons** dans le menu.
2. Repérez et ouvrez l'icône/le lien **Google Add-on**.
1. Renseignez le **Client ID**.
2. Renseignez le **Client secret**.
3. Sélectionnez ensuite le bouton **Install Google**.
Depuis juillet 2017, le **Google API Manager** a la fâcheuse habitude de *ne pas* associer correctement le domaine d'origine **Allowed JS**. Si vous recevez l'erreur suivante : **"idpiframe\_initialization\_failed", details: "Not a valid origin for the client: somedomain.com..."** Supprimez les informations d'identification et recréez-les. *Il n'est pas nécessaire de supprimer l'ensemble du projet, seulement les informations d'identification.*
## Test à l'aide d'un jeton d'accès
Dans cet exemple, nous montrons comment tester l'API LoginWithGoogleAccount à l'aide de l'approche classique par jeton d'accès. Utilisez le code HTML fourni ci-dessous pour vos tests.
Veillez\* à remplacer `YOUR_CLIENT_ID` et `YOUR_PLAYFAB_TITLE` par vos propres valeurs.
le paramètre **AccessToken** est absent de l'objet **LoginWithGoogleAccountRequest** dans les fichiers de typages TypeScript. Si vous utilisez TypeScript avec le SDK Node, vous pouvez créer un type personnalisé `interface LoginRequest extends PlayFabClientModels.LoginWithGoogleAccountRequest { AccessToken: string; }` et effectuer un cast du type lors de l'utilisation de l'API `PlayFabClient.LoginWithGoogleAccount( { AccessToken: accessToken, CreateAccount: true, } as LoginRequest, onPlayFabResponse);`
```html theme={null}
Google Access Token Auth Example
```
**Test à l'aide de la bibliothèque Google Sign-in Platform (dépréciée)**
L'exemple ci-dessous utilise la bibliothèque de plateforme Google Sign-In. **Selon le [site de documentation publique Google Identity](https://developers.google.com/identity/gsi/web/guides/migration), la bibliothèque de plateforme JavaScript Google Sign-In pour le web sera dépréciée le 31 mars 2023**. Cet exemple ne fonctionnera pas pour les clients Google nouvellement créés : reportez-vous à l'exemple de code précédent, qui utilise la bibliothèque plus récente Google Identity Services !
```html theme={null}
Google Access Token Auth Example
```
N'oubliez pas d'ouvrir cette page à l'aide de votre serveur web et veillez à y accéder via l'URL que vous avez spécifiée lors de la configuration du projet Google (`http://playfab.example` dans notre cas).
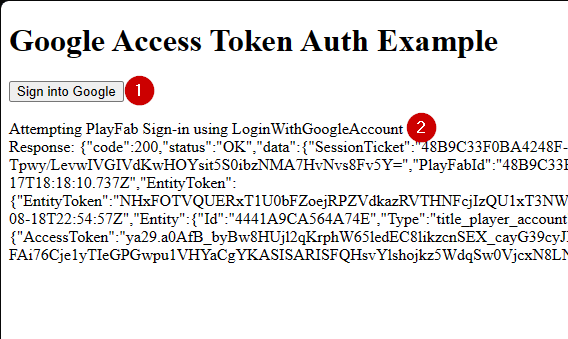
1. Une fois la page ouverte, sélectionnez **G Signed In** et suivez le flux d'authentification Google habituel.
2. Une fois cette opération terminée, le script tente de s'authentifier côté PlayFab et affiche le résultat.
Si une session d'authentification Google est *déjà* en cours, vous n'aurez pas à sélectionner **G Signed In**. Tout se fera automatiquement.
## Related topics
- [Authentification spécifique à la plateforme](/fr/services/playfab/identity/player-identity/platform-specific-authentication/index.md)
- [Configuration de l'authentification PlayFab avec Kongregate et HTML5](/fr/services/playfab/identity/player-identity/platform-specific-authentication/kongregate-html5.md)
- [Configuration de l'authentification PlayFab avec Facebook et HTML5](/fr/services/playfab/identity/player-identity/platform-specific-authentication/facebook-html5.md)
- [Configuration de l'authentification PlayFab avec Twitch et HTML5](/fr/services/playfab/identity/player-identity/platform-specific-authentication/twitch-html5.md)
- [Authentification par connexion anonyme côté serveur](/fr/services/playfab/identity/player-identity/platform-specific-authentication/anonymous-login.md)
 1. Renseignez le champ sous **Project Name**.
2. Sélectionnez le bouton **Create**.
1. Renseignez le champ sous **Project Name**.
2. Sélectionnez le bouton **Create**.
 1. Renseignez un nom d'application (App Name)
2. Assurez-vous que des adresses e-mail sont indiquées pour **user support email** et **Developer Contact Email**
3. Sélectionnez ensuite **SAVE AND CONTINUE**
1. Renseignez un nom d'application (App Name)
2. Assurez-vous que des adresses e-mail sont indiquées pour **user support email** et **Developer Contact Email**
3. Sélectionnez ensuite **SAVE AND CONTINUE**
 1. Accédez ensuite à **Credentials**.
2. Sélectionnez **Create credentials**.
3. Sélectionnez ensuite **OAuth client ID**.
1. Accédez ensuite à **Credentials**.
2. Sélectionnez **Create credentials**.
3. Sélectionnez ensuite **OAuth client ID**.
 1. Sélectionnez **Web Application** comme **Application type**.
2. Donnez un **Name** à votre application.
3. Ajoutez votre domaine à **Authorized JavaScript origins** - `[PlayFab](http://playfab.example.com)` dans notre cas.
4. Enfin, sélectionnez le bouton **Create** pour valider vos modifications.
1. Sélectionnez **Web Application** comme **Application type**.
2. Donnez un **Name** à votre application.
3. Ajoutez votre domaine à **Authorized JavaScript origins** - `[PlayFab](http://playfab.example.com)` dans notre cas.
4. Enfin, sélectionnez le bouton **Create** pour valider vos modifications.
 Dans l'écran **OAuth client** illustré ci-dessous, le Google API Manager affiche deux informations importantes :
1. Le **client ID**
2. Le **client secret**.
Dans l'écran **OAuth client** illustré ci-dessous, le Google API Manager affiche deux informations importantes :
1. Le **client ID**
2. Le **client secret**.
 Accédez à la page PlayFab **Game Manager** de votre titre.
1. Accédez à **Add-ons** dans le menu.
2. Repérez et ouvrez l'icône/le lien **Google Add-on**.
Accédez à la page PlayFab **Game Manager** de votre titre.
1. Accédez à **Add-ons** dans le menu.
2. Repérez et ouvrez l'icône/le lien **Google Add-on**.
 1. Renseignez le **Client ID**.
2. Renseignez le **Client secret**.
3. Sélectionnez ensuite le bouton **Install Google**.
1. Renseignez le **Client ID**.
2. Renseignez le **Client secret**.
3. Sélectionnez ensuite le bouton **Install Google**.