> ## Documentation Index
> Fetch the complete documentation index at: https://devdocs.xbox.com/llms.txt
> Use this file to discover all available pages before exploring further.

# Configuration de l'authentification PlayFab avec Facebook et HTML5

> Tutoriel pas à pas pour ajouter la connexion Facebook à un titre PlayFab avec HTML5 et JavaScript, couvrant l'inscription de l'application Facebook et l'authentification des joueurs.

Ce tutoriel a pour but de vous guider dans l'authentification PlayFab avec Facebook et HTML5/JavaScript.

## Configuration requise

* Un [compte Facebook](https://www.facebook.com/) pour les tests.
* Un titre [PlayFab](https://developer.playfab.com/) inscrit.
* Une bonne connaissance des [principes de base et bonnes pratiques de connexion](/fr/services/playfab/identity/player-identity/login/login-basics-best-practices).
* Un serveur minimal, avec un nom de domaine valide pour servir un fichier HTML statique.

<Note>
  Si vous n'êtes pas sûr de disposer de la configuration requise pour cette activité, consultez le tutoriel [Exécution d'un serveur HTTP pour les tests](/fr/services/playfab/identity/player-identity/platform-specific-authentication/running-an-http-server-for-testing).
</Note>

## Serveur et domaine

Parmi les conditions requises pour configurer votre authentification PlayFab,  vous devez disposer d'un serveur avec un domaine valide. Si vous n'avez pas encore de domaine inscrit ni de serveur web distant, suivez notre tutoriel [Exécution d'un serveur HTTP pour les tests](/fr/services/playfab/identity/player-identity/platform-specific-authentication/running-an-http-server-for-testing) pour exécuter un serveur web local avec un nom de domaine valide.

Tout au long de ce guide, nous supposerons que votre domaine est `['http://playfab.example'](http://playfab.example)`.

## Inscription d'une application Facebook

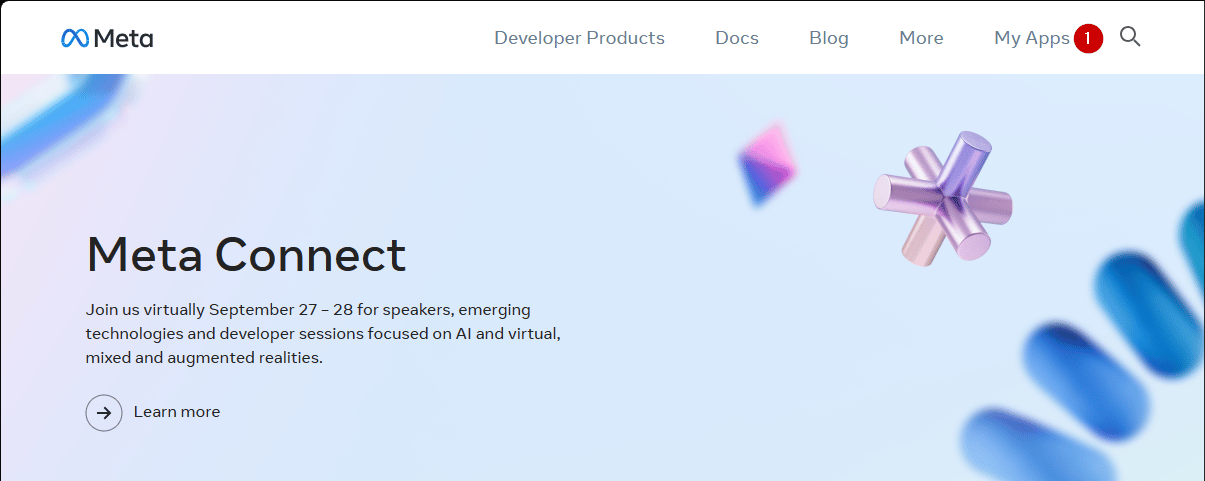
Commencez par accéder au [portail des développeurs Facebook](https://developers.facebook.com/).

1. Sélectionnez le bouton **My Apps**.

<img src="https://mintcdn.com/microsoft-4404708b/mLCHf0iQv3VidfBe/images/playfab/identity/player-identity/platform-specific-authentication/tutorials/facebook-html5/my-apps.png?fit=max&auto=format&n=mLCHf0iQv3VidfBe&q=85&s=c533fd072cd7b47233fd2c7eb8c431a6" alt="Facebook : ajouter une nouvelle application" width="1205" height="481" data-path="images/playfab/identity/player-identity/platform-specific-authentication/tutorials/facebook-html5/my-apps.png" />

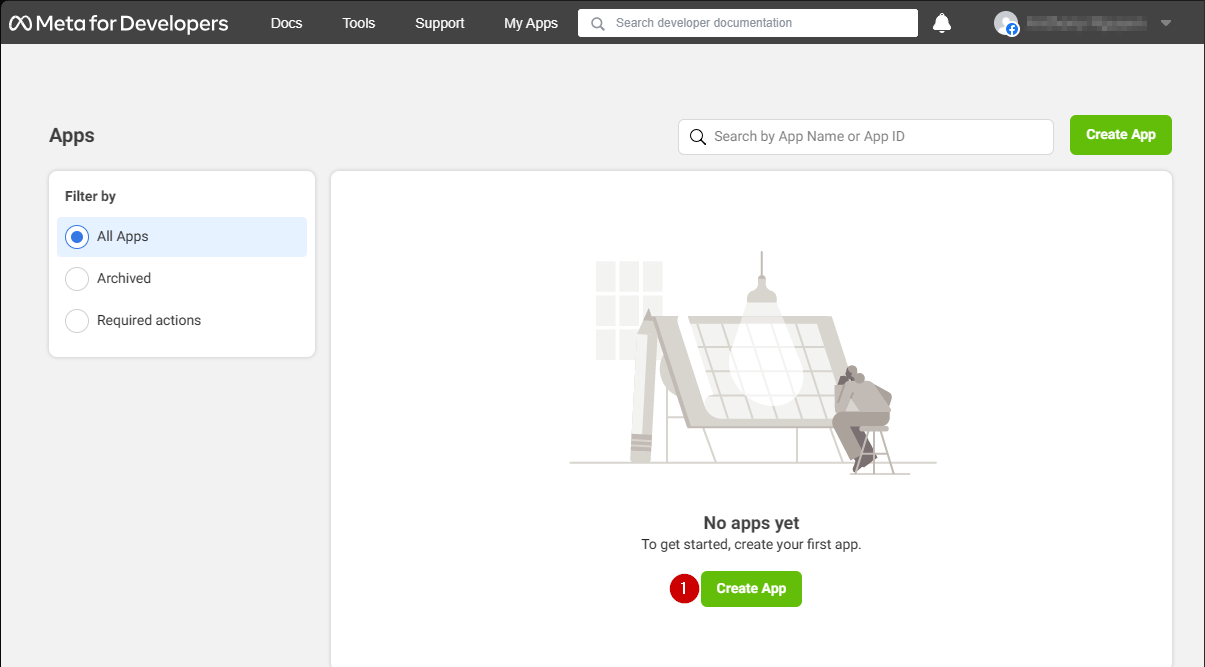
1. Sélectionnez **Create App** pour créer une nouvelle application.
<img src="https://mintcdn.com/microsoft-4404708b/mLCHf0iQv3VidfBe/images/playfab/identity/player-identity/platform-specific-authentication/tutorials/facebook-html5/facebook-add-a-new-app.png?fit=max&auto=format&n=mLCHf0iQv3VidfBe&q=85&s=ab8793987c97a532fa9e970436afe2a3" alt="Facebook : créer une nouvelle application" width="1205" height="667" data-path="images/playfab/identity/player-identity/platform-specific-authentication/tutorials/facebook-html5/facebook-add-a-new-app.png" />

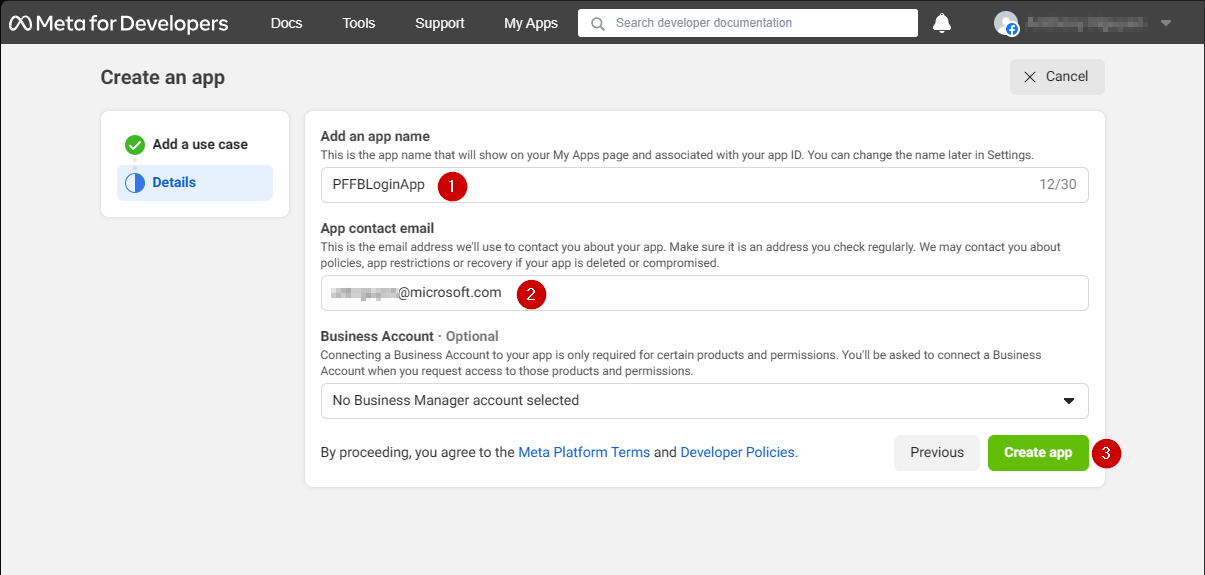
Une nouvelle fenêtre contextuelle **Application** s'ouvre.

1. Entrez un nom pour votre **Application** dans le champ sous **Add an app name**.
2. Entrez une adresse e-mail de contact dans le champ sous **App contact email**.
3. Sélectionnez le bouton **Create app** pour enregistrer.
<Note>
  Veillez à choisir votre propre nom d'application unique et votre propre adresse e-mail, comme illustré dans l'exemple ci-dessous.
</Note>

<img src="https://mintcdn.com/microsoft-4404708b/mLCHf0iQv3VidfBe/images/playfab/identity/player-identity/platform-specific-authentication/tutorials/facebook-html5/facebook-new-app-id.png?fit=max&auto=format&n=mLCHf0iQv3VidfBe&q=85&s=43a15fe0906efcfb030b98c375ef610f" alt="Facebook : nouvel ID d'application" width="1205" height="575" data-path="images/playfab/identity/player-identity/platform-specific-authentication/tutorials/facebook-html5/facebook-new-app-id.png" />

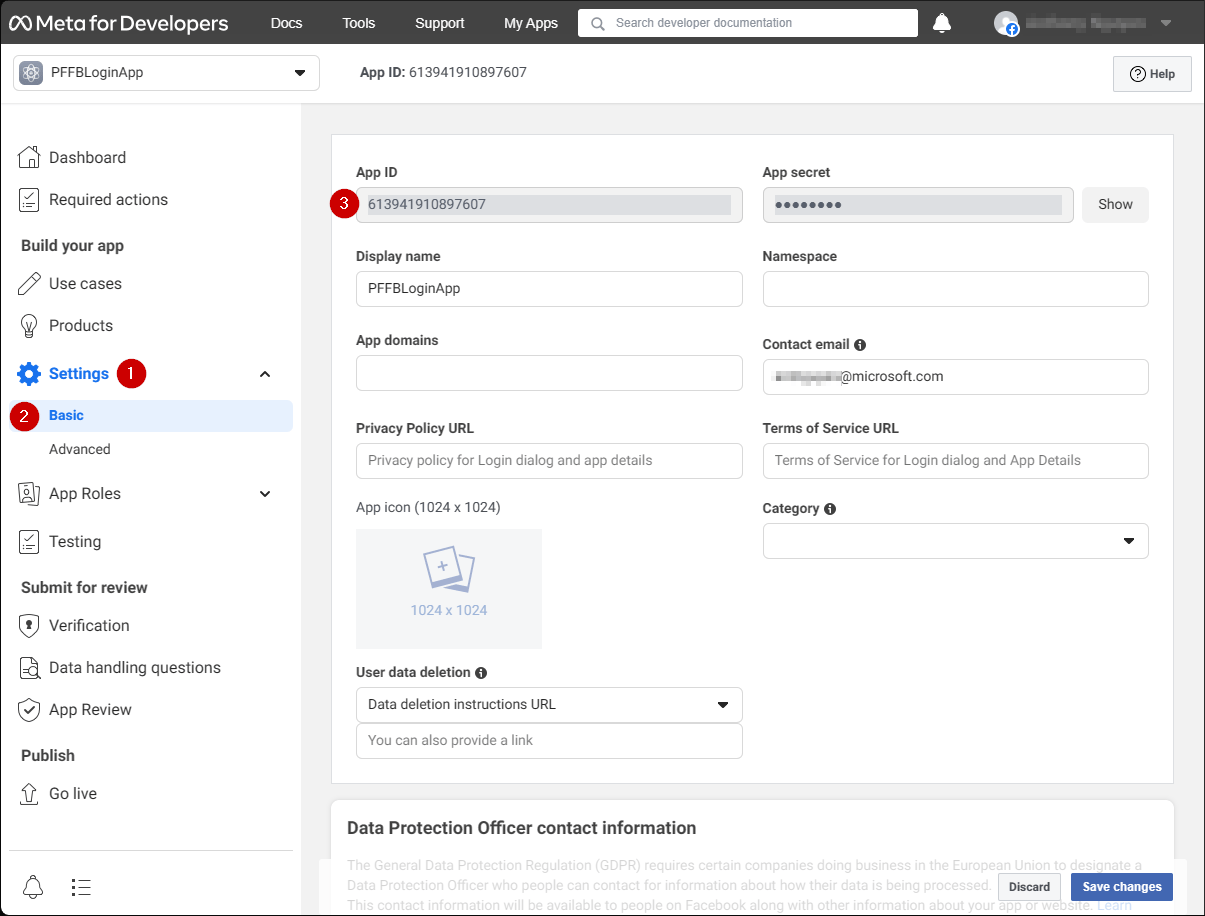
1. Accédez à l'onglet **Settings**.
2. Sélectionnez le sous-onglet **Basic**.
3. Repérez votre **App ID**.
<Note>
  Copiez votre **App ID** en lieu sûr ; nous l'utiliserons plus tard pour configurer le **Facebook SDK**.
</Note>

<img src="https://mintcdn.com/microsoft-4404708b/mLCHf0iQv3VidfBe/images/playfab/identity/player-identity/platform-specific-authentication/tutorials/facebook-html5/facebook-save-app-id.png?fit=max&auto=format&n=mLCHf0iQv3VidfBe&q=85&s=724d5c403c24e3077b1fe09f59791f46" alt="Facebook : enregistrer l'ID d'application" width="1205" height="916" data-path="images/playfab/identity/player-identity/platform-specific-authentication/tutorials/facebook-html5/facebook-save-app-id.png" />

1. Accédez au menu situé à gauche de votre écran et sélectionnez l'élément **Products**.
2. Repérez **Configure** dans la zone **Facebook Login** et sélectionnez **Settings** dans le menu déroulant.
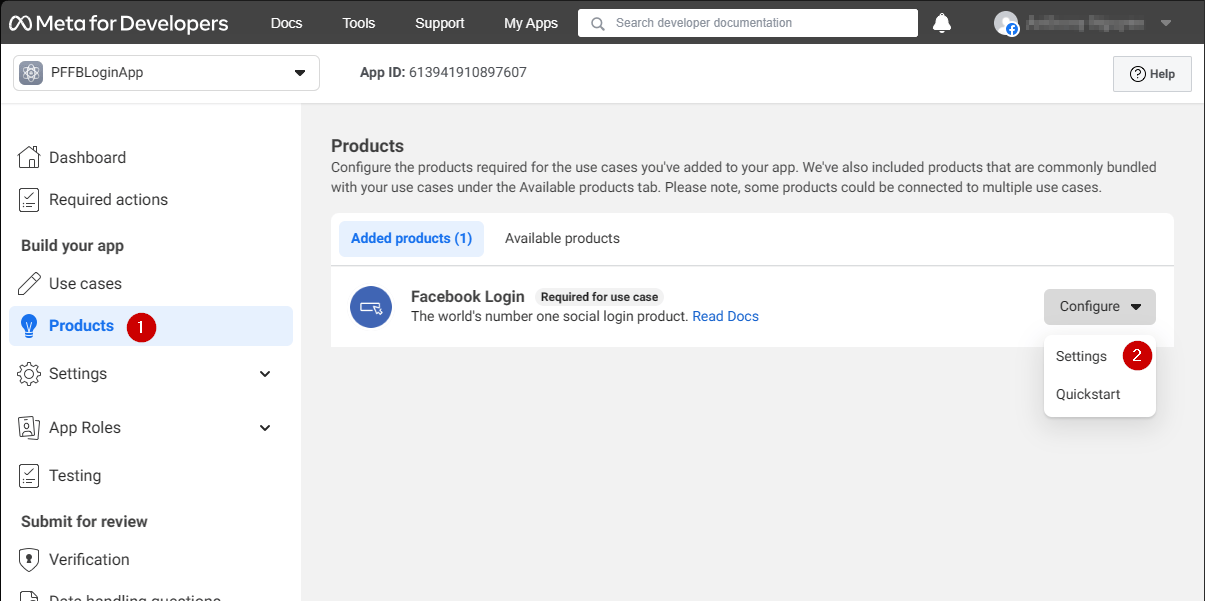
<img src="https://mintcdn.com/microsoft-4404708b/mLCHf0iQv3VidfBe/images/playfab/identity/player-identity/platform-specific-authentication/tutorials/facebook-html5/login-get-started.png?fit=max&auto=format&n=mLCHf0iQv3VidfBe&q=85&s=bd346c82af2a1914bd8dfca79653f5c6" alt="Facebook Login : prise en main" width="1205" height="601" data-path="images/playfab/identity/player-identity/platform-specific-authentication/tutorials/facebook-html5/login-get-started.png" />

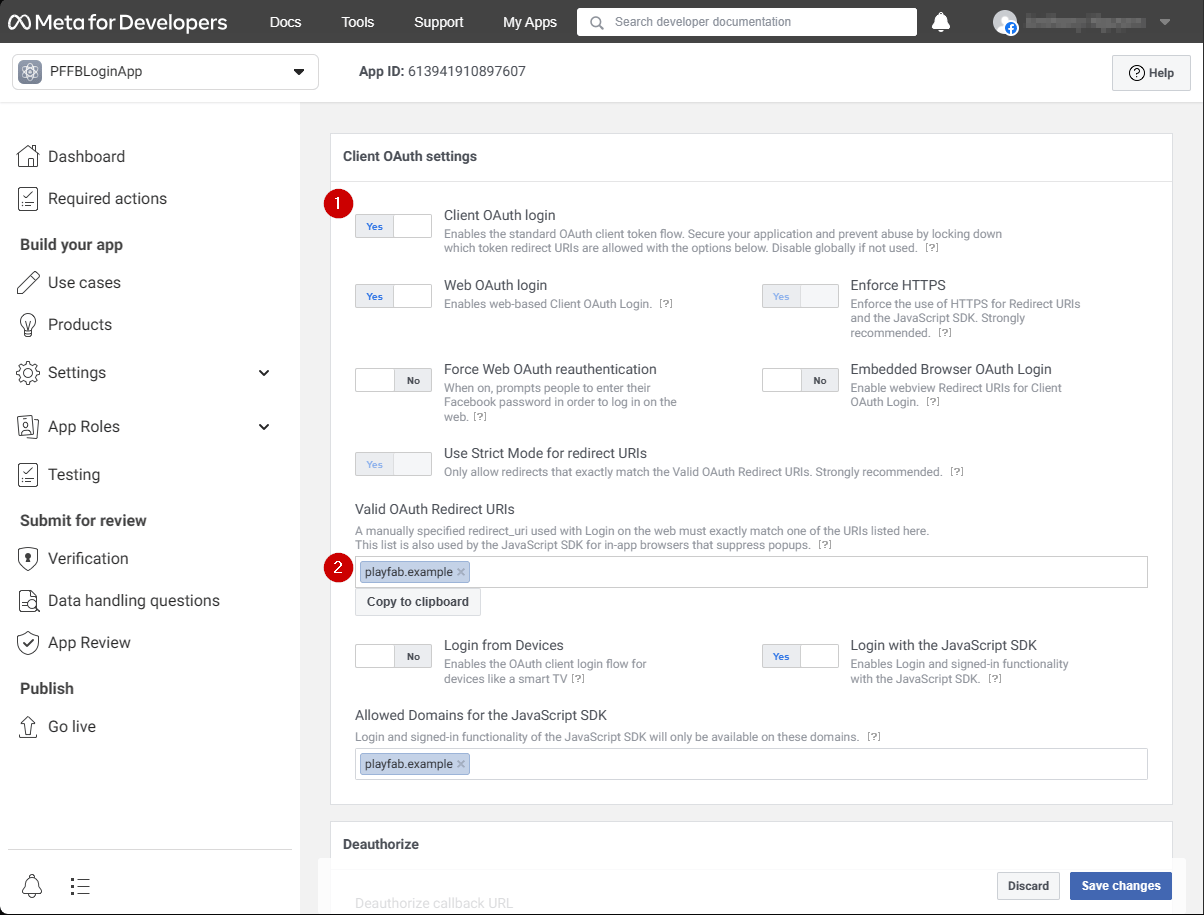
La page doit s'ouvrir et afficher l'exemple illustré ci-dessous.

1. Vérifiez que **Client OAuth** et **Web OAuth** sont tous deux activés (marqués **Yes**).
2. Définissez **Valid OAuth redirect URIs** sur l'**URI** de votre propre page d'authentification.
<Note>
  Dans votre cas, il s'agit de `playfab.example`.
</Note>

<img src="https://mintcdn.com/microsoft-4404708b/mLCHf0iQv3VidfBe/images/playfab/identity/player-identity/platform-specific-authentication/tutorials/facebook-html5/login-product-settings.png?fit=max&auto=format&n=mLCHf0iQv3VidfBe&q=85&s=493c1ca8600489493ca47ced5c579204" alt="Paramètres du produit Facebook Login" width="1204" height="915" data-path="images/playfab/identity/player-identity/platform-specific-authentication/tutorials/facebook-html5/login-product-settings.png" />

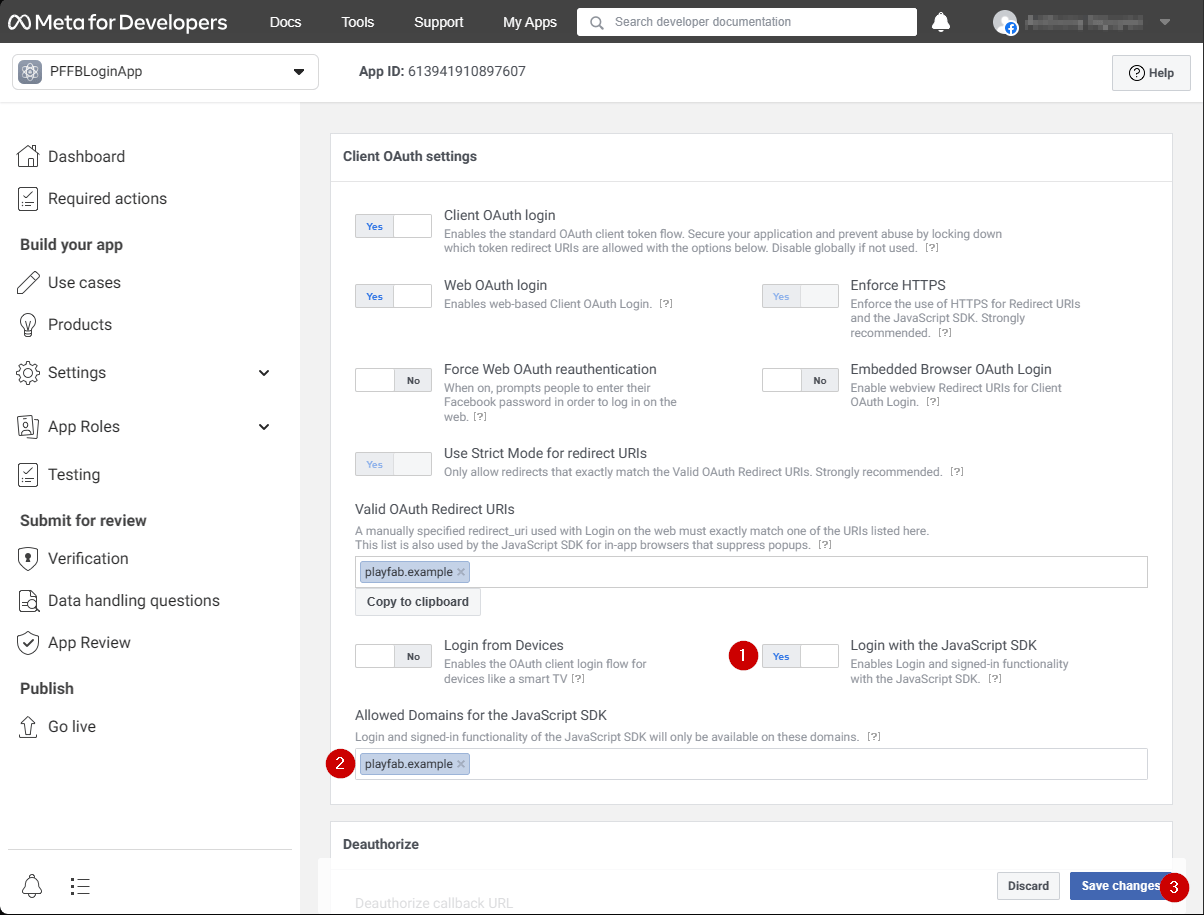
Dans l'écran **Client OAuth Settings** :

1. Vérifiez que **Login with the JavaScript SDK** est activé (marqué **Yes**)
2. Définissez **Valid OAuth redirect URIs** sur l'**URI** de votre propre page d'authentification.
<Note>
  Dans votre cas, il s'agit de `playfab.example`.
</Note>

3. Sélectionnez **Save Changes** pour valider.

<img src="https://mintcdn.com/microsoft-4404708b/mLCHf0iQv3VidfBe/images/playfab/identity/player-identity/platform-specific-authentication/tutorials/facebook-html5/set-oauth-redirect.png?fit=max&auto=format&n=mLCHf0iQv3VidfBe&q=85&s=1d900349086b3efc854d19e7e394bbfa" alt="Facebook : définir l'URI de redirection OAuth" width="1204" height="915" data-path="images/playfab/identity/player-identity/platform-specific-authentication/tutorials/facebook-html5/set-oauth-redirect.png" />

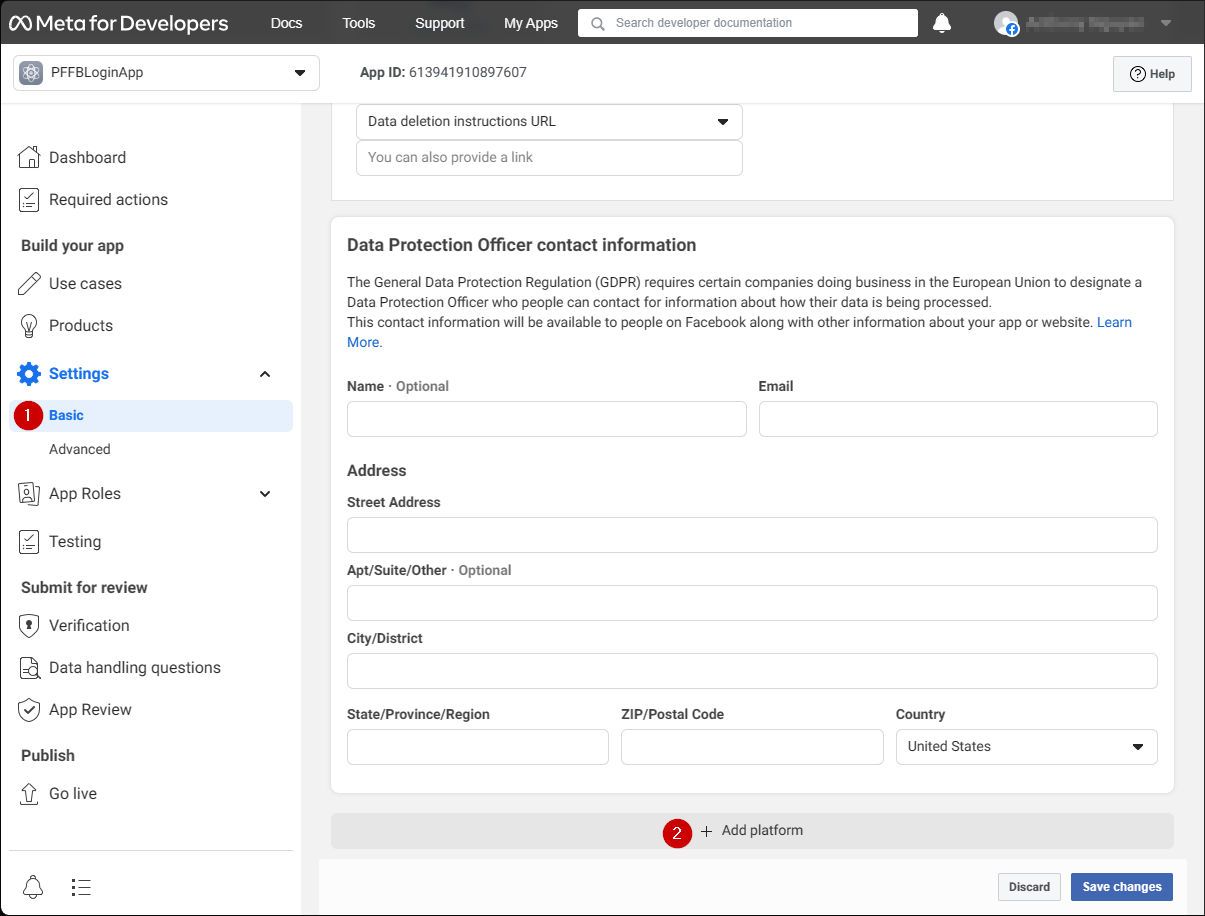
Dans la page **Application Manager** :

* Ouvrez **Settings/Basic (1)** dans votre menu.
* Sélectionnez le bouton **Add Platform (2)**.
<img src="https://mintcdn.com/microsoft-4404708b/mLCHf0iQv3VidfBe/images/playfab/identity/player-identity/platform-specific-authentication/tutorials/facebook-html5/add-platform.png?fit=max&auto=format&n=mLCHf0iQv3VidfBe&q=85&s=d715322d7bdb36fdb0cca082e6394fd7" alt="Facebook Application Manager : ajouter une plateforme" width="1205" height="916" data-path="images/playfab/identity/player-identity/platform-specific-authentication/tutorials/facebook-html5/add-platform.png" />

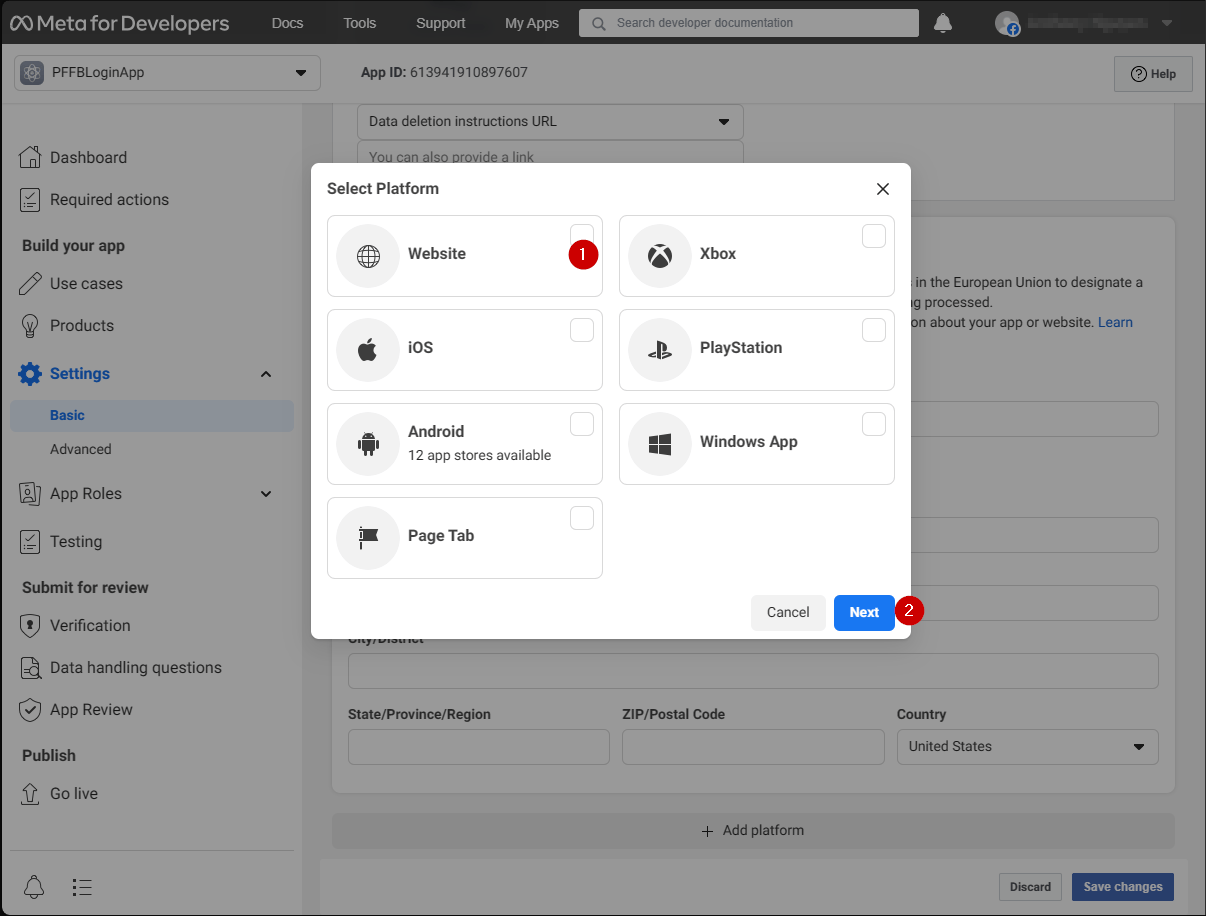
Une fenêtre contextuelle apparaît à l'écran :

1. Sélectionnez l'**icône Website**.
2. Sélectionnez ensuite **Next**.
<img src="https://mintcdn.com/microsoft-4404708b/mLCHf0iQv3VidfBe/images/playfab/identity/player-identity/platform-specific-authentication/tutorials/facebook-html5/website-options.png?fit=max&auto=format&n=mLCHf0iQv3VidfBe&q=85&s=96645e531316bffa3730f606c1b799ce" alt="Facebook : options de la plateforme Website" width="1206" height="916" data-path="images/playfab/identity/player-identity/platform-specific-authentication/tutorials/facebook-html5/website-options.png" />

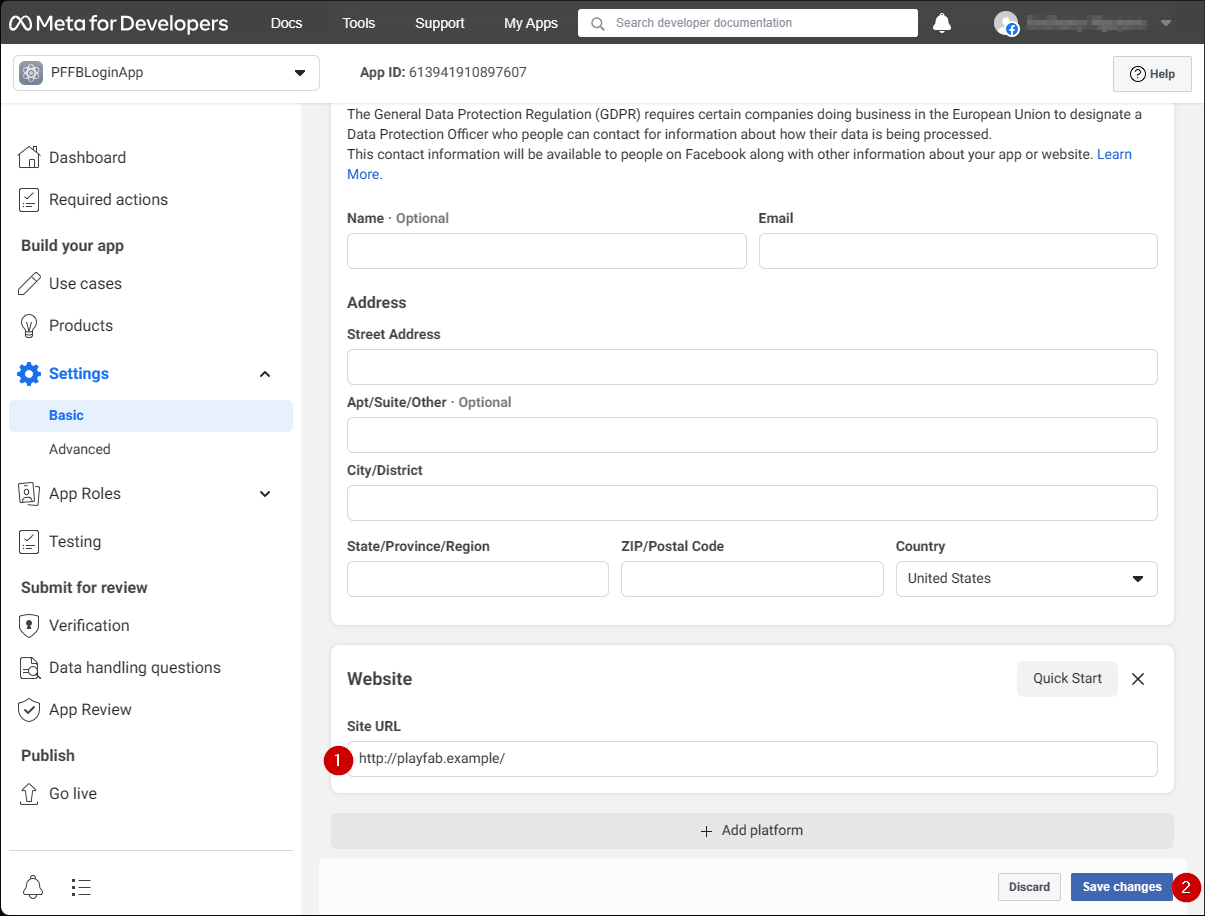
Le panneau de configuration **Website** doit maintenant apparaître.

1. Dans le champ **Site URL**, entrez l'**URL** de votre page d'authentification (dans votre cas, `playfab.example`).
2. Sélectionnez **Save changes** pour valider.
<img src="https://mintcdn.com/microsoft-4404708b/mLCHf0iQv3VidfBe/images/playfab/identity/player-identity/platform-specific-authentication/tutorials/facebook-html5/website-configuration.png?fit=max&auto=format&n=mLCHf0iQv3VidfBe&q=85&s=ef19a6ad2bf003e8e58802abeea329c5" alt="Panneau de configuration du site web Facebook" width="1205" height="916" data-path="images/playfab/identity/player-identity/platform-specific-authentication/tutorials/facebook-html5/website-configuration.png" />

## Test

Utilisez le fichier HTML suivant pour tester votre authentification PlayFab avec Facebook.

<Note>
  Veillez à remplacer **YOUR-APPLICATION-ID** et **YOUR-PLAYFAB-TITLE** par vos propres valeurs.
</Note>

```html theme={null}
<!DOCTYPE html>
<html>
<head>
   <script>
        // This function will be called when Facebook SDK is loaded
        window.fbAsyncInit = function() {

            // Make sure to use your own App ID for the configuration
            FB.init({
                appId      : 'YOUR-APPLICATION-ID',
                xfbml      : true,
                version    : 'v2.9'
            });

            // Record PageView event for analytics
            FB.AppEvents.logPageView();
        };

        // Facebook SDK loader. Creates a script entry to load the SDK
        (function(d, s, id){
            var js, fjs = d.getElementsByTagName(s)[0];
            if (d.getElementById(id)) {return;}
            js = d.createElement(s); js.id = id;
            js.src = "//connect.facebook.net/en_US/sdk.js";
            fjs.parentNode.insertBefore(js, fjs);
        }(document, 'script', 'facebook-jssdk'));
    </script>
    <script src="https://download.playfab.com/PlayFabClientApi.js"></script>
</head>
<body>
    <p>Facebook Auth Example</p>
    <button onclick="loginWithFacebook()">Log In with Facebook</button>
    <script>
        // This method is invoked when you press the button
        function loginWithFacebook() {
            logLine("Logging in via Facebook...");

            // Standard practice: make call to FB.login.
            // This will show Facebook popup window. To prevent browsers from locking it,
            // always make sure to call it from Button click event
            FB.login(function(response){
                if(!response.authResponse){
                    logLine("Problem authenticating via Facebook!");
                } else {
                    loginWithPlayfab(response.authResponse.accessToken);
                }
            });
        }

        function loginWithPlayfab(accessToken){

            logLine("Logging in via PlayFab...");

            // When given accessToken, make call to LoginWithFacebook API Call
            // Make sure to use your own PlayFab Title ID
            PlayFabClientSDK.LoginWithFacebook({
                AccessToken: accessToken,
                TitleId: "YOUR-PLAYFAB-TITLE",
                CreateAccount: true
            }, onPlayFabResponse);
        }

        // Handles response from playfab.
        function onPlayFabResponse(response, error) {
            if (response)
                logLine("Response: " + JSON.stringify(response));
            if (error)
                logLine("Error: " + JSON.stringify(error));
        }

        function logLine(message) {
            var textnode = document.createTextNode(message);
            document.body.appendChild(textnode);
            var br = document.createElement("br");
            document.body.appendChild(br);
        }
    </script>
</body>
</html>
```

Demandez ce fichier à votre serveur en utilisant le domaine que vous avez configuré lors de la configuration de l'**application Facebook** (`playfab.example` dans notre cas).

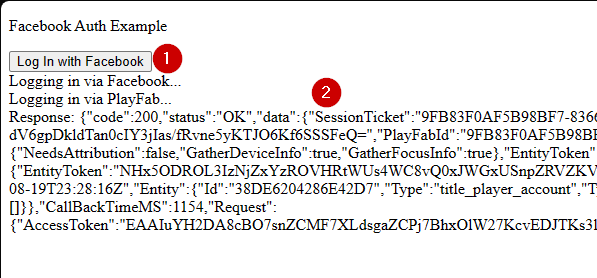
1. Une fois la page **Facebook Auth Example** ouverte, sélectionnez le bouton **Log In with Facebook**.
2. Suivez les instructions de Facebook dans la fenêtre contextuelle.

Observez la sortie.
<img src="https://mintcdn.com/microsoft-4404708b/mLCHf0iQv3VidfBe/images/playfab/identity/player-identity/platform-specific-authentication/tutorials/facebook-html5/facebook-auth-example.png?fit=max&auto=format&n=mLCHf0iQv3VidfBe&q=85&s=e6f77a4ce2fae3bfd5dfcc97acd2e88b" alt="Exemple d'authentification Facebook" width="597" height="278" data-path="images/playfab/identity/player-identity/platform-specific-authentication/tutorials/facebook-html5/facebook-auth-example.png" />

Vous obtiendrez un ticket de session PlayFab. À ce stade, vous avez correctement configuré l'authentification PlayFab et Facebook avec HTML5 et JavaScript.


## Related topics

- [Authentification spécifique à la plateforme](/fr/services/playfab/identity/player-identity/platform-specific-authentication/index.md)
- [Exécution d'un serveur HTTP pour les tests](/fr/services/playfab/identity/player-identity/platform-specific-authentication/running-an-http-server-for-testing.md)
- [Configuration de l'authentification PlayFab avec Google et HTML5](/fr/services/playfab/identity/player-identity/platform-specific-authentication/google-html5.md)
- [Configuration de l'authentification PlayFab avec Kongregate et HTML5](/fr/services/playfab/identity/player-identity/platform-specific-authentication/kongregate-html5.md)
- [Configuration de l'authentification PlayFab avec Twitch et HTML5](/fr/services/playfab/identity/player-identity/platform-specific-authentication/twitch-html5.md)
