> ## Documentation Index
> Fetch the complete documentation index at: https://devdocs.xbox.com/llms.txt
> Use this file to discover all available pages before exploring further.
# Configuration de l'authentification PlayFab avec Twitch et HTML5
> Tutoriel pas à pas pour ajouter la connexion Twitch à un titre PlayFab avec HTML5 et JavaScript, couvrant l'inscription de l'application Twitch et l'authentification OAuth des joueurs.
Ce tutoriel a été conçu pour vous guider à travers le processus d'authentification PlayFab avec Twitch et HTML5/JavaScript.
## Configuration requise
Avant de commencer, vous devez disposer des éléments suivants :
* Un [compte Twitch](https://www.twitch.tv/) pour les tests.
* Un titre [PlayFab](https://developer.playfab.com/) inscrit.
* Une bonne connaissance des [principes de base et pratiques exemplaires de connexion](/fr-CA/services/playfab/identity/player-identity/login/login-basics-best-practices).
* Au minimum, un serveur doté d'un nom de domaine valide pour servir des fichiers HTML statiques.
Consultez le tutoriel [Exécution d'un serveur HTTP pour les tests](/fr-CA/services/playfab/identity/player-identity/platform-specific-authentication/running-an-http-server-for-testing) pour savoir comment configurer un serveur doté d'un nom de domaine valide.
## Serveur et domaine
Ce tutoriel nécessite un serveur web pour suivre les instructions. Si vous n'avez pas encore de serveur web distant inscrit, suivez notre tutoriel [Exécution d'un serveur HTTP pour les tests](/fr-CA/services/playfab/identity/player-identity/platform-specific-authentication/running-an-http-server-for-testing) pour savoir comment exécuter un serveur web local.
Tout au long de ce tutoriel, nous supposerons que votre domaine est `[http://localhost/](http://localhost/)`.
## Inscription d'une application Twitch
Commencez par accéder au [site web de Twitch](https://www.twitch.tv/) et vérifiez que vous êtes connecté.
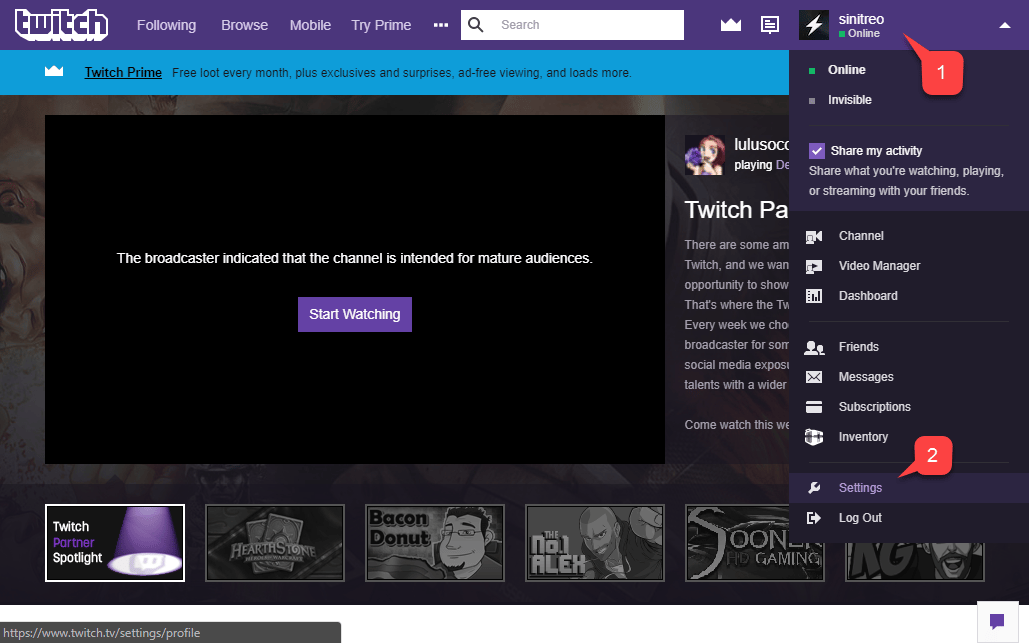
1. Accédez à la liste déroulante **Account**.
2. Sélectionnez **Settings** dans le menu proposé.
Sur la page **Settings**, sélectionnez **Connections (1)**, comme illustré ci-dessous.
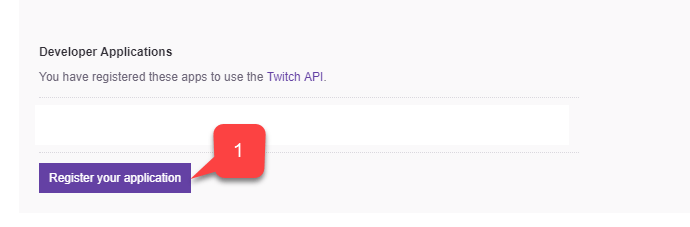
En bas de la page, sélectionnez le bouton **Register your application (1)**, comme illustré ci-dessous.
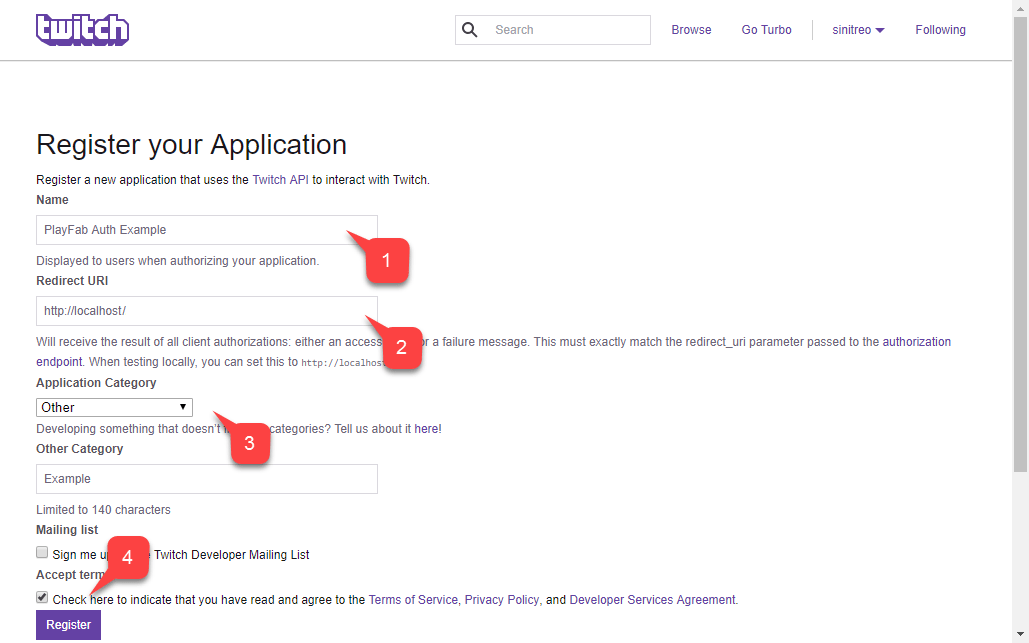
Une page s'ouvre pour vous permettre de configurer une nouvelle application.
1. Renseignez le **Name** de l'**Application**.
2. Entrez la **Redirect URL**.
3. Entrez l'**Application Category**.
4. Acceptez ensuite les conditions de **Twitch**, puis sélectionnez le bouton **Register**.
Lors de tests avec un serveur web local, Twitch vous permet d'utiliser `****` comme URL de redirection. Veillez à inclure la barre oblique **/**. Sans barre oblique, Twitch ne reconnaîtra pas l'URL localhost.
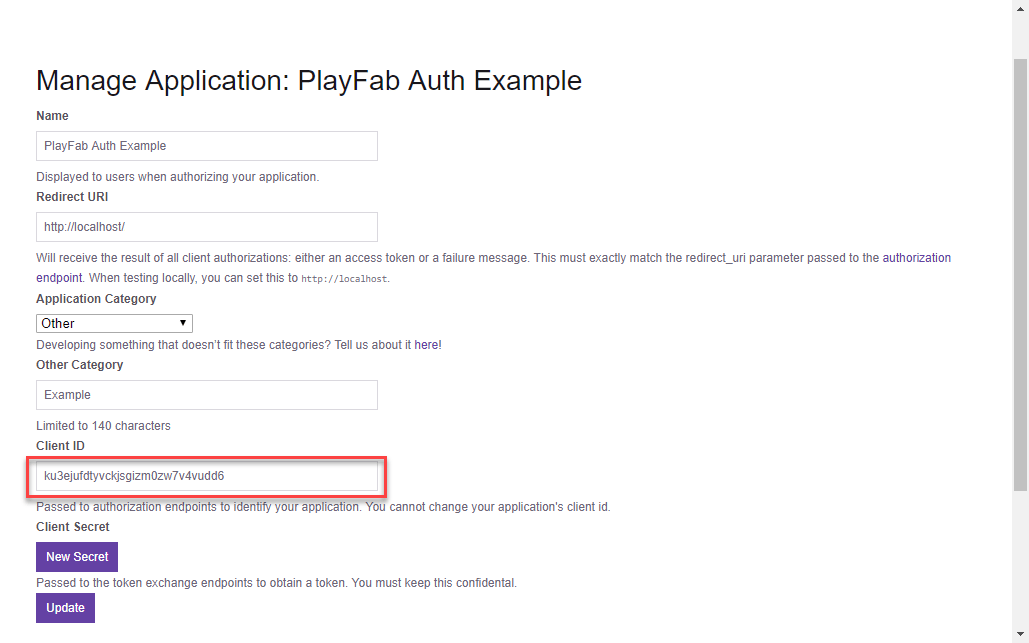
Une fois l'application inscrite, la page est mise à jour et affiche le Client ID de votre application.
Conservez ce Client ID en lieu sûr, à un endroit facilement accessible, car vous l'utiliserez plus tard pour configurer votre titre PlayFab.
## Configuration d'un titre PlayFab
Une fois votre Client ID Twitch obtenu, vous pouvez activer et configurer un module complémentaire Twitch pour votre titre PlayFab.
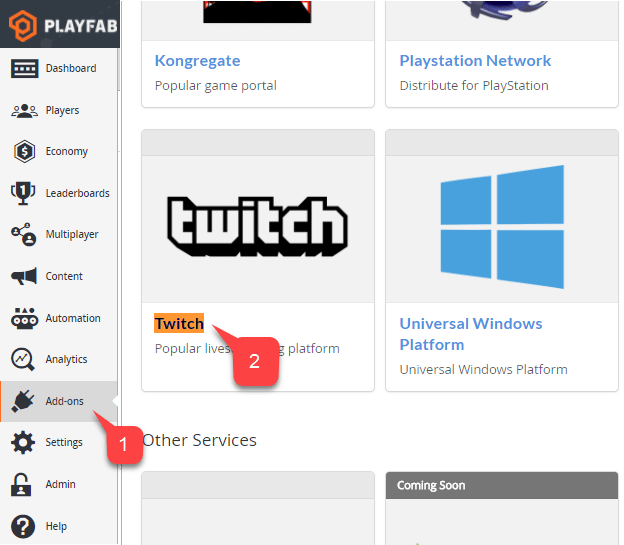
1. Sur l'écran de votre **PlayFab Title**, accédez au menu et sélectionnez l'élément **Add-ons**.
2. Sélectionnez ensuite le lien de l'icône **Twitch**.
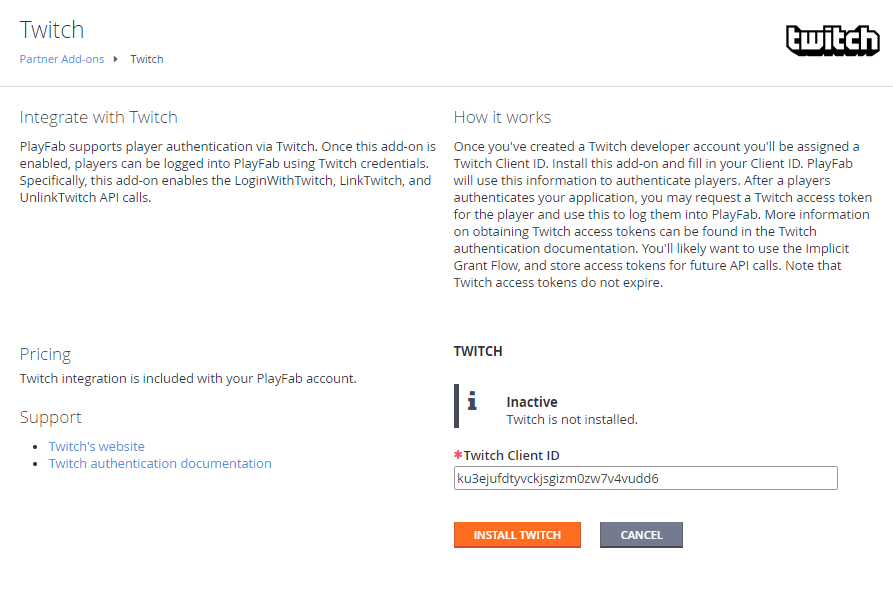
Sur la page **Twitch** :
* Une page **Settings** s'ouvre pour le **Twitch Add-on**.
* Entrez votre **Twitch Client ID**.
* Sélectionnez le bouton **Install Twitch**.
Prenez un moment pour vérifier que le module complémentaire a été installé et qu'aucune erreur ne s'est produite. La configuration du titre PlayFab est terminée.
## Test
Utilisez le fichier HTML suivant pour tester l'authentification PlayFab avec Twitch.
Veillez à remplacer `TWITCH_CLIENT_ID_GOES_HERE` et `PLAYFAB_TITLE_ID_GOES_HERE` par vos propres valeurs.
```html theme={null}
Twitch Auth Example
```
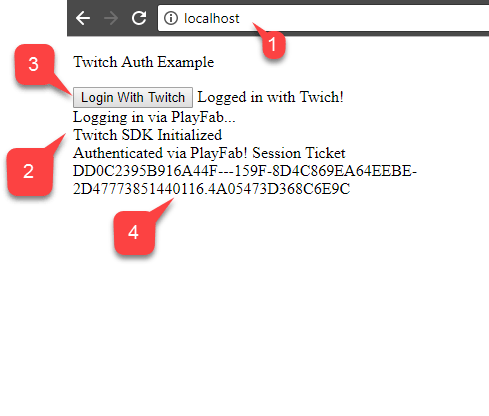
1. Demandez ce fichier à votre serveur, en utilisant le domaine que vous avez configuré lors de la configuration de l'application Twitch, `` dans notre cas.
2. Une fois la page ouverte, attendez le message indiquant que le **Twitch SDK** a été initialisé.
3. Sélectionnez ensuite le bouton **Login with Twitch**.
4. Suivez les éventuelles instructions de **Twitch** dans la fenêtre contextuelle et observez la sortie.
Si vous avez *déjà* une session d'authentification Twitch en cours en arrivant sur la page, les rappels peuvent se déclencher dans un ordre différent et inattendu. Ce cas est illustré dans la capture d'écran ci-dessous. Vous devez toutefois vous assurer que seul **Logging in via PlayFab** suit **Logged in with Twitch**. Cela indique que le jeton a été reçu ou restauré depuis le stockage local et qu'il n'est pas nécessaire d'attendre le Twitch SDK pour commencer à se connecter à PlayFab.
Si PlayFab parvient à obtenir un `SessionTicket`, vous avez correctement intégré l'authentification Twitch à votre application PlayFab.
## Related topics
- [Authentification propre à la plateforme](/fr-CA/services/playfab/identity/player-identity/platform-specific-authentication/index.md)
- [Configuration de l'authentification PlayFab avec Kongregate et HTML5](/fr-CA/services/playfab/identity/player-identity/platform-specific-authentication/kongregate-html5.md)
- [Configuration de l'authentification PlayFab avec Facebook et HTML5](/fr-CA/services/playfab/identity/player-identity/platform-specific-authentication/facebook-html5.md)
- [Configuration de l'authentification PlayFab avec Google et HTML5](/fr-CA/services/playfab/identity/player-identity/platform-specific-authentication/google-html5.md)
- [Authentification par connexion anonyme côté serveur](/fr-CA/services/playfab/identity/player-identity/platform-specific-authentication/anonymous-login.md)
 Sur la page **Settings**, sélectionnez **Connections (1)**, comme illustré ci-dessous.
 En bas de la page, sélectionnez le bouton **Register your application (1)**, comme illustré ci-dessous.
 Une page s'ouvre pour vous permettre de configurer une nouvelle application.
1. Renseignez le **Name** de l'**Application**.
2. Entrez la **Redirect URL**.
3. Entrez l'**Application Category**.
4. Acceptez ensuite les conditions de **Twitch**, puis sélectionnez le bouton **Register**.
Une page s'ouvre pour vous permettre de configurer une nouvelle application.
1. Renseignez le **Name** de l'**Application**.
2. Entrez la **Redirect URL**.
3. Entrez l'**Application Category**.
4. Acceptez ensuite les conditions de **Twitch**, puis sélectionnez le bouton **Register**.
 ## Configuration d'un titre PlayFab
Une fois votre Client ID Twitch obtenu, vous pouvez activer et configurer un module complémentaire Twitch pour votre titre PlayFab.
1. Sur l'écran de votre **PlayFab Title**, accédez au menu et sélectionnez l'élément **Add-ons**.
2. Sélectionnez ensuite le lien de l'icône **Twitch**.
## Configuration d'un titre PlayFab
Une fois votre Client ID Twitch obtenu, vous pouvez activer et configurer un module complémentaire Twitch pour votre titre PlayFab.
1. Sur l'écran de votre **PlayFab Title**, accédez au menu et sélectionnez l'élément **Add-ons**.
2. Sélectionnez ensuite le lien de l'icône **Twitch**.
 Sur la page **Twitch** :
* Une page **Settings** s'ouvre pour le **Twitch Add-on**.
* Entrez votre **Twitch Client ID**.
* Sélectionnez le bouton **Install Twitch**.
Sur la page **Twitch** :
* Une page **Settings** s'ouvre pour le **Twitch Add-on**.
* Entrez votre **Twitch Client ID**.
* Sélectionnez le bouton **Install Twitch**.
 Prenez un moment pour vérifier que le module complémentaire a été installé et qu'aucune erreur ne s'est produite. La configuration du titre PlayFab est terminée.
## Test
Utilisez le fichier HTML suivant pour tester l'authentification PlayFab avec Twitch.
Veillez à remplacer `TWITCH_CLIENT_ID_GOES_HERE` et `PLAYFAB_TITLE_ID_GOES_HERE` par vos propres valeurs.
```html theme={null}
Prenez un moment pour vérifier que le module complémentaire a été installé et qu'aucune erreur ne s'est produite. La configuration du titre PlayFab est terminée.
## Test
Utilisez le fichier HTML suivant pour tester l'authentification PlayFab avec Twitch.
Veillez à remplacer `TWITCH_CLIENT_ID_GOES_HERE` et `PLAYFAB_TITLE_ID_GOES_HERE` par vos propres valeurs.
```html theme={null}
 Si PlayFab parvient à obtenir un `SessionTicket`, vous avez correctement intégré l'authentification Twitch à votre application PlayFab.
## Related topics
- [Authentification propre à la plateforme](/fr-CA/services/playfab/identity/player-identity/platform-specific-authentication/index.md)
- [Configuration de l'authentification PlayFab avec Kongregate et HTML5](/fr-CA/services/playfab/identity/player-identity/platform-specific-authentication/kongregate-html5.md)
- [Configuration de l'authentification PlayFab avec Facebook et HTML5](/fr-CA/services/playfab/identity/player-identity/platform-specific-authentication/facebook-html5.md)
- [Configuration de l'authentification PlayFab avec Google et HTML5](/fr-CA/services/playfab/identity/player-identity/platform-specific-authentication/google-html5.md)
- [Authentification par connexion anonyme côté serveur](/fr-CA/services/playfab/identity/player-identity/platform-specific-authentication/anonymous-login.md)
Si PlayFab parvient à obtenir un `SessionTicket`, vous avez correctement intégré l'authentification Twitch à votre application PlayFab.
## Related topics
- [Authentification propre à la plateforme](/fr-CA/services/playfab/identity/player-identity/platform-specific-authentication/index.md)
- [Configuration de l'authentification PlayFab avec Kongregate et HTML5](/fr-CA/services/playfab/identity/player-identity/platform-specific-authentication/kongregate-html5.md)
- [Configuration de l'authentification PlayFab avec Facebook et HTML5](/fr-CA/services/playfab/identity/player-identity/platform-specific-authentication/facebook-html5.md)
- [Configuration de l'authentification PlayFab avec Google et HTML5](/fr-CA/services/playfab/identity/player-identity/platform-specific-authentication/google-html5.md)
- [Authentification par connexion anonyme côté serveur](/fr-CA/services/playfab/identity/player-identity/platform-specific-authentication/anonymous-login.md)